571287
283
Zoom out
Zoom in
Previous page
1/299
Next page
4
Inserte la tarjeta en los carriles de guía en el interior del
MOTIF unos dos tercios, con el lado del conector hacia arri-
ba y hacia usted.
5
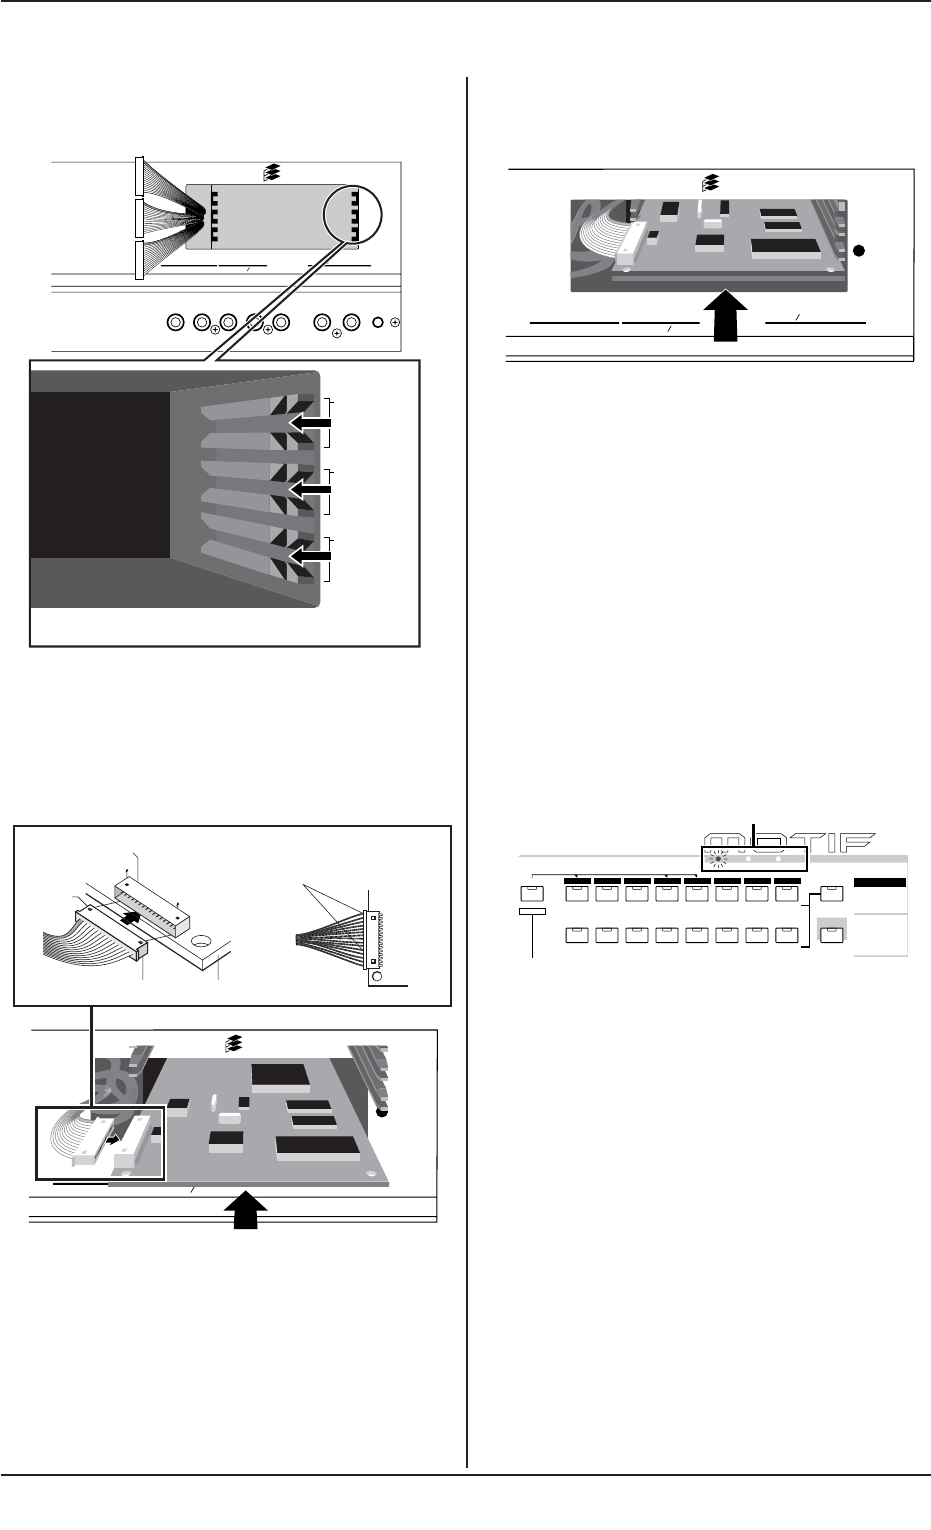
Con la tarjeta sobresaliendo ligeramente de la bahía, saque
el cable y conéctelo a la tarjeta. Asegúrese de que conecta
el cable correcto fijándose en el color para insertarlo en la
ranura adecuada. También, procure no tirar del cable con
demasiada fuerza al conectarlo a la tarjeta.
n La tarjeta de armonía vocal (PLG100-VH) puede instalarse
sólo en la ranura 1.
n La tarjeta Multi part (PLG100-XG) puede instalarse sólo en la
ranura 3.
6
Introduzca el resto de la tarjeta Plug-in en la bahía. Meta
con cuidado el cable plano dentro del MOTIF y asegúrese
de que no sobresale nada de cable.
7
Vuelva a colocar la tapa con el tornillo que retiró en el paso
2 anterior. La tarjeta quedará sujeta en su sitio al colocar la
tapa.
8
Compruebe que la tarjeta Plug-in instalada funciona correc-
tamente. Encienda el instrumento.
Un mensaje indicará que se está probando la tarjeta Plug-in insta-
lada. Aparecerá la pantalla principal y se iluminará el indicador de
ranura correspondiente en el ángulo superior derecho del panel
frontal. Esto indica que la instalación de la tarjeta se ha llevado a
cabo con éxito.
Si aparece un mensaje de error, el MOTIF se bloqueará al cabo
de un tiempo para indicar que la instalación no se ha completado.
Si esto sucede, apague el instrumento y repita paso por paso el
procedimiento de instalación.
MOTIF ( Apéndice)
283
Instalación de hardware opcional
OUTPUT
ASSIGNABLE
OUTPUT
L MONO
PHONES
A
DINPUT
GAIN
RL
R
R
L
GREEN
YELLOW
ORANGE
3
2
1
Plug-in SLOT
Slot 3
Slot 2
Slot 1
Securely insert the board into the appropriate slot,
taking care that the board isn't jammed between slots.
Ranura 3
Ranura 2
Ranura 1
Inserte con firmeza la tarjeta en la ranura apropiada y procure
que la tarjeta no se enganche entre las ranuras.
OUTPUT
ASSIGNABLE
OUTPUT
L MONO
PHONES
A
D
INPUT
GAIN
RL
R
R
L
GREEN
YELLOW
ORANGE
3
2
1
Plug-in SLOT
Notch
Connector from MOTIF
Plug-in Connector
Press the connectors together
until the two notches lock into
the sockets.
Plug-in board
Conector Plug-in
Muesca
Conector del MOTIF
Tarjeta Plug-in
Presione los conectores uno contra
otro hasta que las muescas queden
perfectamente encajadas.
OUTPUT
ASSIGNABLE
OUTPUT
L MONO
PHONES
A
D
INPUT
GAIN
RL
R
R
L
GREEN
YELLOW
ORANGE
3
2
1
Plug-in SLOT
PLG 2
A
B
C
D
E
F
G
H
CATEGORY
SEARCH
MUSIC
PRODUCTION
SYNTHESIZER
Integrated
Sampling
Sequencer
Real-time External Control
Surface
Modular
Synthesis
Plug-in
System
DRUM KITS
FAVORITES
SLOT 1 SLOT 2 SLOT 3
PRE 1
PRE 2
PRE 3
GM
USER PLG 1
PLG 3
A. PIANO
KEYBOARD
ORGAN
GUITAR /
PLUCKED
BASS
STRINGS
BRASS
REED/PIPE
SYN LEAD SYN PAD/
CHOIR
SYN COMP CHROMATIC
PERCUSSION
DRUM /
PERCUSSION
SE
MUSICAL FX COMBI
SECTION
BANK
GROUP
COMMON
Slot indicator lamps
In this example, a Plug-in board has been installed to slot 1.
En este ejemplo, se ha instalado una tarjeta Plug-in en la ranura 1.
Indicadores luminosos de indicación de ranura
283


Need help? Post your question in this forum.

Forumrules


Report abuse

Libble takes abuse of its services very seriously. We're committed to dealing with such abuse according to the laws in your country of residence. When you submit a report, we'll investigate it and take the appropriate action. We'll get back to you only if we require additional details or have more information to share.

Product:

For example, Anti-Semitic content, racist content, or material that could result in a violent physical act.

For example, a credit card number, a personal identification number, or an unlisted home address. Note that email addresses and full names are not considered private information.

Forumrules

To achieve meaningful questions, we apply the following rules:

Register

Register getting emails for Yamaha MOTIF6 at:


You will receive an email to register for one or both of the options.


Get your user manual by e-mail

Enter your email address to receive the manual of Yamaha MOTIF6 in the language / languages: Spanish as an attachment in your email.

The manual is 10,31 mb in size.


You will receive the manual in your email within minutes. If you have not received an email, then probably have entered the wrong email address or your mailbox is too full. In addition, it may be that your ISP may have a maximum size for emails to receive.

Others manual(s) of Yamaha MOTIF6

Yamaha MOTIF6 Additional guide - English - 2 pages

Yamaha MOTIF6 Installation Guide - English - 44 pages

Yamaha MOTIF6 User Manual - English - 300 pages

Yamaha MOTIF6 User Manual - German - 33 pages

Yamaha MOTIF6 Additional guide - German - 2 pages

Yamaha MOTIF6 Installation Guide - German - 44 pages

Yamaha MOTIF6 User Manual - German - 300 pages

Yamaha MOTIF6 User Manual - Dutch - 300 pages

Yamaha MOTIF6 User Manual - French - 300 pages

Yamaha MOTIF6 User Manual - French - 33 pages

Yamaha MOTIF6 Additional guide - French - 2 pages

Yamaha MOTIF6 Installation Guide - French - 44 pages

Yamaha MOTIF6 User Manual - Italian - 300 pages


The manual is sent by email. Check your email

If you have not received an email with the manual within fifteen minutes, it may be that you have a entered a wrong email address or that your ISP has set a maximum size to receive email that is smaller than the size of the manual.

The email address you have provided is not correct.

Please check the email address and correct it.

Your question is posted on this page

Would you like to receive an email when new answers and questions are posted? Please enter your email address.


Info