04: Normalize Play EffectThis Job rewrites the data in the selected track so that it incorporates the current Grid Groove settings.
After specifying a track (TR 01-16) to which this Job is applied, press the [ENTER] button to execute this Job.
05: Divide Drum TrackSeparates the note events in a drum performance assigned to a specified track, and places the notes
corresponding to different drum instruments in separate tracks (tracks 1 through 8).
After specifying a track (TR 01-16) to which this Job is applied, press the [ENTER] button to execute this Job.
nIn order to use this Job, tracks 1 - 8 must be empty. If there aren’t enough empty tracks, an error message appears. If this
happens, use the Clear Track Job (page 246) to delete tracks 1 - 8, then try the Job again.
06: Put Track To ArpThis Job copies data in the specified measures of a section/track for creating Arpeggio data. For details, refer to
page 130 in the Quick Guide section.
[F6] PATTERN (Pattern Job)
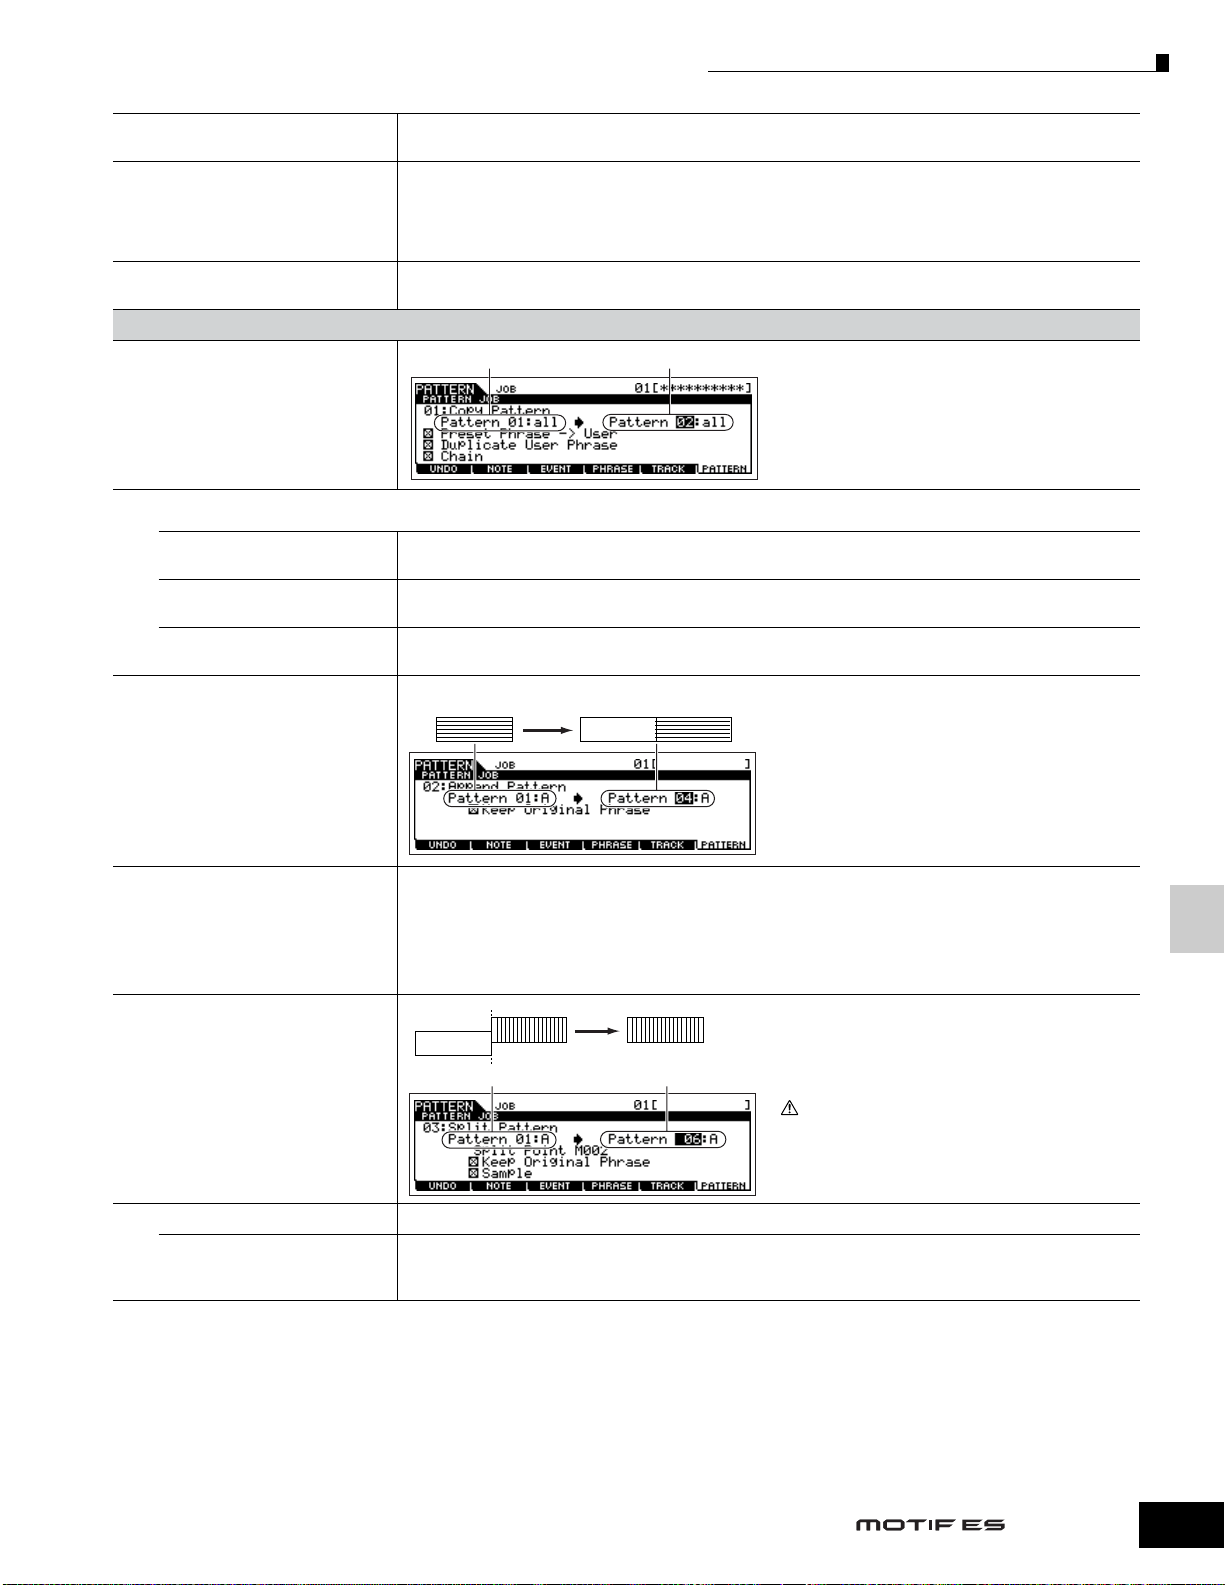
01: Copy PatternThis Job copies all data from a selected source Pattern
to a selected destination Pattern.
After specifying the source Pattern/section, and the
destination Pattern/section, as well as setting the
checkboxes as necessary, press the [ENTER] button to
execute this Job.
nIf you set the source section to “all,” the destination section is also set to “all” automatically. With this status, execute this Job to copy the entire source Pattern data to the
destination.
Preset Phrase → UserWhen this box is checkmarked, Preset Phrases (if included in the source Pattern) are copied to the User Phrase,
which will be assigned to the destination Pattern.
Duplicate User PhraseWhen this box is checkmarked, User Phrases (if included in the source Pattern) are copied to another User Phrase,
which will be assigned to the destination Pattern.
ChainWhen this box is checkmarked, Pattern chain data (if included in the source Pattern) is copied to the destination
Pattern.
02: Append PatternAppends one Pattern to the end of another to create
one longer Pattern with all 16 tracks.
nIf this job is applied to Patterns which use Sample Voices,
the Sample Voices will not be appended.
nIf the Pattern length becomes greater than 256 measures
as a result of the Append Pattern Job, an error message
will be displayed and the Job will be aborted.
Keep Original PhraseWhen this box is checkmarked, the original destination Pattern data is retained in memory, along with the new
appended Pattern data. If the box is not checkmarked, the original destination Pattern is erased and replaced with
the newly created data.
nWhen the KEEP ORIGINAL PHRASE checkbox is checked, this Job requires twice the number of empty user phrases as the
number of tracks containing data in which to store the appended phrase data. If the required space is unavailable, an alert
message will appear and the Job will be aborted. If this occurs use the Clear Phrase Job (page 246) to delete unused phrases
Libble takes abuse of its services very seriously. We're committed to dealing with such abuse according to the laws in your country of residence. When you submit a report, we'll investigate it and take the appropriate action. We'll get back to you only if we require additional details or have more information to share.
Product:
Forumrules
To achieve meaningful questions, we apply the following rules:
First, read the manual;
Check if your question has been asked previously;
Try to ask your question as clearly as possible;
Did you already try to solve the problem? Please mention this;
Is your problem solved by a visitor then let him/her know in this forum;
To give a response to a question or answer, do not use this form but click on the button 'reply to this question';
Your question will be posted here and emailed to our subscribers. Therefore, avoid filling in personal details.
Register
Register getting emails for Yamaha MOTIF ES7 at:
new questions and answers
new manuals
You will receive an email to register for one or both of the options.
Get your user manual by e-mail
Enter your email address to receive the manual of Yamaha MOTIF ES7 in the language / languages: English as an attachment in your email.
The manual is 8,4 mb in size.
You will receive the manual in your email within minutes. If you have not received an email, then probably have entered the wrong email address or your mailbox is too full. In addition, it may be that your ISP may have a maximum size for emails to receive.
If you have not received an email with the manual within fifteen minutes, it may be that you have a entered a wrong email address or that your ISP has set a maximum size to receive email that is smaller than the size of the manual.
The email address you have provided is not correct.
Please check the email address and correct it.
Your question is posted on this page
Would you like to receive an email when new answers and questions are posted? Please enter your email address.