48732
179
Zoom out
Zoom in
Previous page
1/192
Next page
179
Rimozione della scheda Plug-in dalla tastiera
1Togliete il cavo dal laccio a forma di gancio.
2Premete verso il basso i ganci 2 nella direzione mostrata
nell’illustrazione ed estraete la scheda dai ganci 2 tirando
verso l’alto da un lato solo.
3Estraete l’altro lato della scheda dai ganci 1.
4Estraete il connettore del cavo da quello della scheda Plug-
in.
5Fissate il cavo del connettore al laccio a forma di gancio.
Installazione del CS6R
nPer le informazioni riguardanti l’installazione del CS6x, tornate a
pagina 177.
1Spegnete il CS6R e scollegate il cavo di alimentazione.
Inoltre, se il CS6R è collegato con altri dispositivi esterni,
scollegateli.
2Spostatevi in una posizione di fronte al pannello frontale
del dispositivo, e togliete le viti (sei viti a testa piatta) dal
coperchio della scheda Plug-in sul pannello superiore,
utilizzando una moneta o un cacciavite.
nConservate le sei viti rimosse in un luogo sicuro, poiché verranno
riusate quando dovete risistemare il coperchio della scheda Plug-in.
3Togliete il coperchio della scheda Plug-in.
Appare la piastra della scheda Plug-in. Possono essere
sistemate due schede: PLG1 a destra e PLG2 a sinistra.
Lo slot disponibile (PLG1, PLG2) differisce secondo il tipo di
scheda Plug-in. Vedere a pagina 177 ulteriori informazioni.
Quando si installa la scheda Plug-in opzionale (dalla
rimozione del coperchio a quella della sua risistemazione)
tutte le operazioni devono essere effettuate con il cavo della
corrente scollegato.
4Togliete il nastro che viene usato per bloccare il cavo alla
piastra.
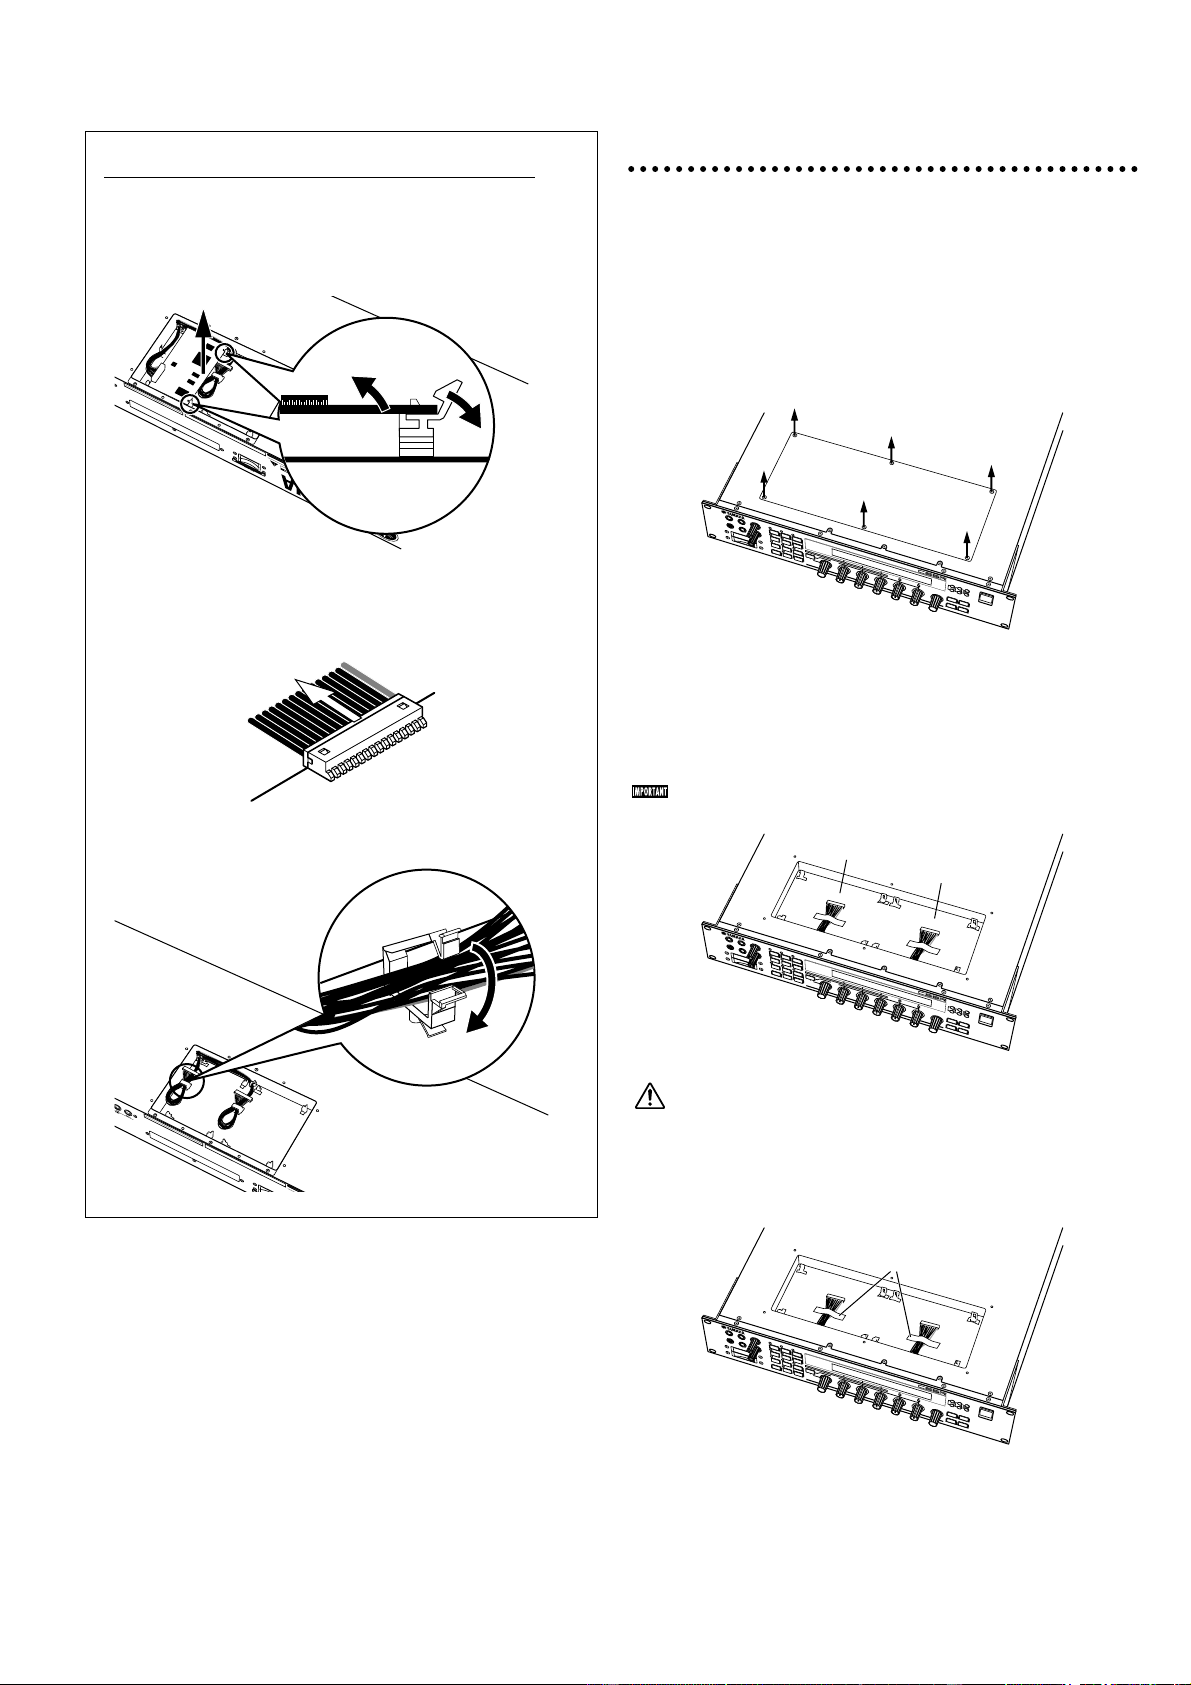
tape
PLG2PLG1
PLG2
PLG1
PLG2PLG1
179


Need help? Post your question in this forum.

Forumrules


Report abuse

Libble takes abuse of its services very seriously. We're committed to dealing with such abuse according to the laws in your country of residence. When you submit a report, we'll investigate it and take the appropriate action. We'll get back to you only if we require additional details or have more information to share.

Product:

For example, Anti-Semitic content, racist content, or material that could result in a violent physical act.

For example, a credit card number, a personal identification number, or an unlisted home address. Note that email addresses and full names are not considered private information.

Forumrules

To achieve meaningful questions, we apply the following rules:

Register

Register getting emails for Yamaha CS6X at:


You will receive an email to register for one or both of the options.


Get your user manual by e-mail

Enter your email address to receive the manual of Yamaha CS6X in the language / languages: Italian as an attachment in your email.

The manual is 6,82 mb in size.


You will receive the manual in your email within minutes. If you have not received an email, then probably have entered the wrong email address or your mailbox is too full. In addition, it may be that your ISP may have a maximum size for emails to receive.

Others manual(s) of Yamaha CS6X

Yamaha CS6X Installation Guide - English - 24 pages

Yamaha CS6X User Manual - English - 196 pages

Yamaha CS6X Installation Guide - German - 24 pages

Yamaha CS6X User Manual - German - 196 pages

Yamaha CS6X User Manual - Dutch - 192 pages

Yamaha CS6X User Manual - French - 196 pages

Yamaha CS6X Installation Guide - French - 24 pages

Yamaha CS6X Installation Guide - Italian - 12 pages

Yamaha CS6X User Manual - Portuguese - 284 pages

Yamaha CS6X User Manual - Spanish - 192 pages


The manual is sent by email. Check your email

If you have not received an email with the manual within fifteen minutes, it may be that you have a entered a wrong email address or that your ISP has set a maximum size to receive email that is smaller than the size of the manual.

The email address you have provided is not correct.

Please check the email address and correct it.

Your question is posted on this page

Would you like to receive an email when new answers and questions are posted? Please enter your email address.


Info