48732
150
Zoom out
Zoom in
Previous page
1/196
Next page
150
Variation Settings
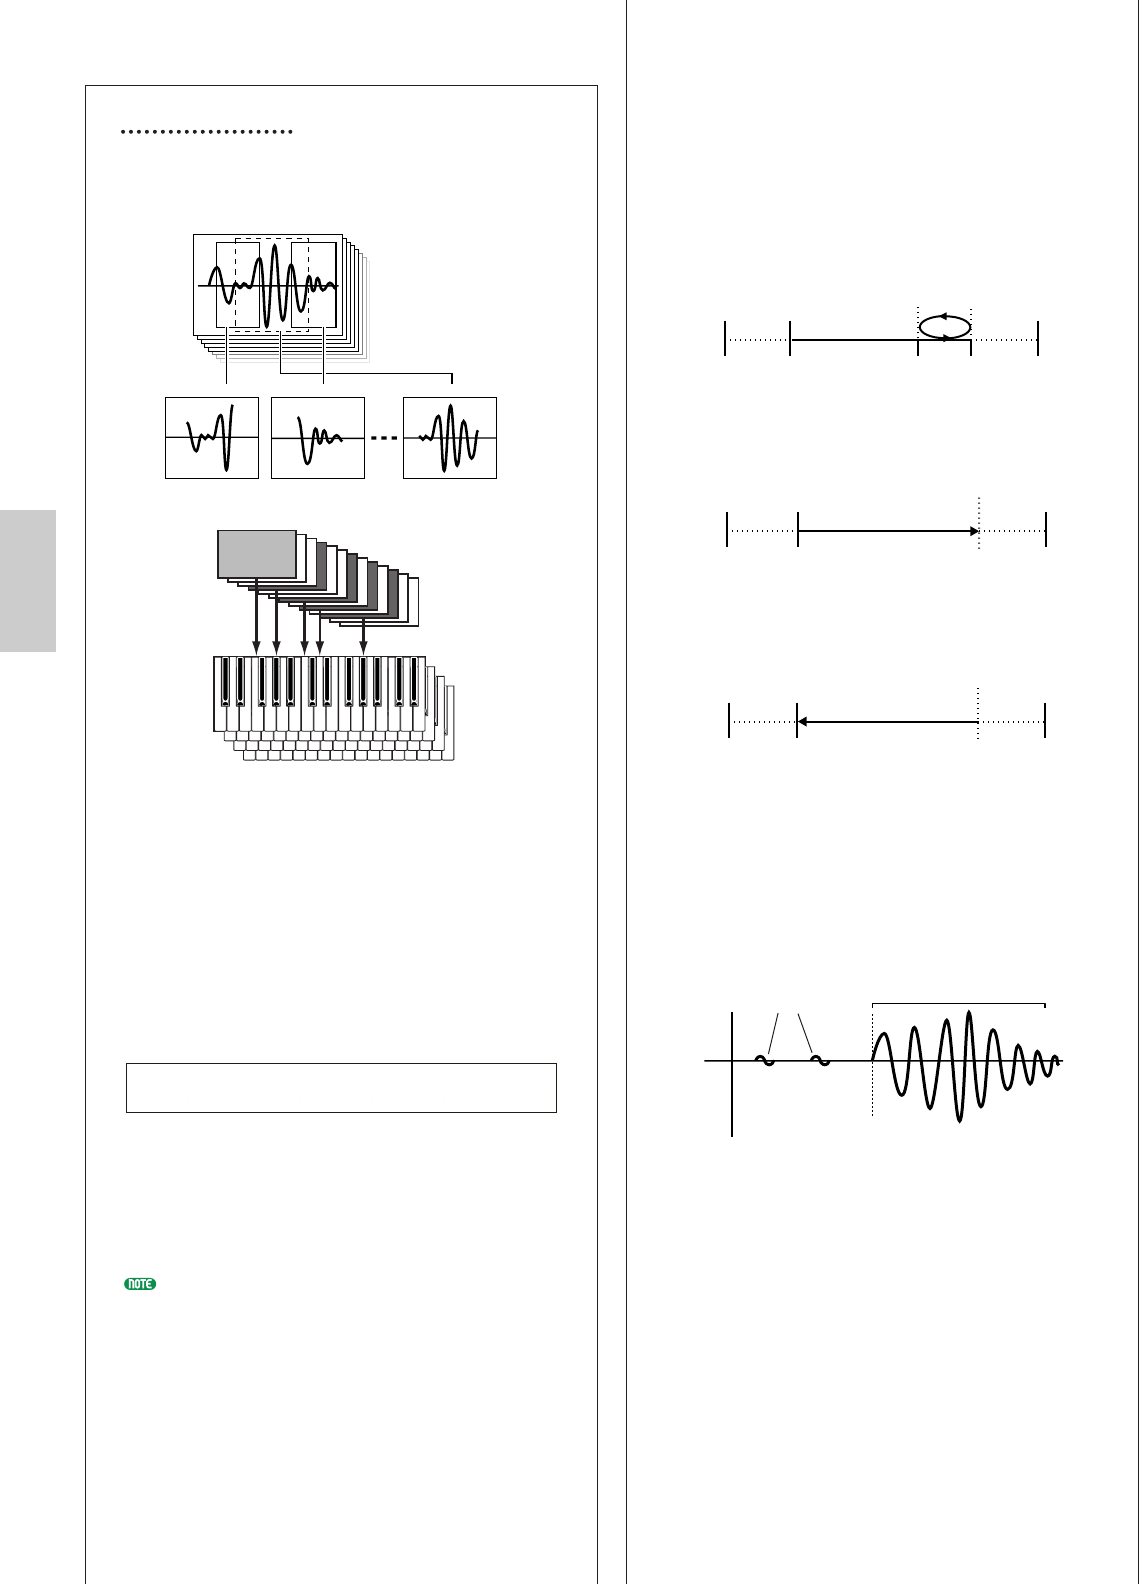
You can play back a Phrase Clip in up to eight
different ways (Variations). They are related to the
Clip Kit as shown in the illustration.
Select the Phrase Clip at the OSC Asgn (Oscillator
Assign) screen, then press the [ENTER] key. You
will see the Variation Edit screen.
• PCLP Var (Phrase Clip Variation)
You can edit the settings of each Variation in the
currently selected Phrase Clip.
Select the Variation (1 to 8), set each of its
parameters, then press the [EXIT] key. The settings
will be applied and you will be returned to the OSC
Asgn (Oscillator Assign) screen.
Var (Variation Number)
Select the Variation. Its settings will be reflected in
each parameter.
Settings: 1 ~ 8
If you change the Variation Number with this
parameter, it will automatically change one that is
set in the OSC Asgn (Oscillator Assign) screen.
PCLP Var) Play Start Loop End
(C 3)=1: oneshot 2097150 2097150 2097150
Clip 1~256
Variation 1~8
Clip kit 1~4
Clip1~256
Variation 1 Variation 8Variation 2
Play (Play Mode)
Select the Phrase Clip playback method. There are
three modes.
Settings:
loop:
When you press a note on the keyboard, the Phrase Clip is
played completely from its Start Point. Then its looped
section is played back repetitively until you release the note.
oneshot:
When you press a note on the keyboard, the Phrase Clip is
played just once from its Start Point to its End Point (not
looped).
reverse:
When you press a note on the keyboard, the Phrase Clip is
played in reverse, just once, from its End Point to its Start
Point (not looped).
Start (Start Point)
Set the Start Point from which the Phrase Clip will
be played back (as shown in the illustration below).
In this case, you can avoid playback of the noise
before the Start Point. Note that this setting does
not eliminate the noise in the original Clip.
Settings: Depends on the length of the Phrase Clip
Loop (Loop Point)
Set the starting point of the looped section. With a
violin sound, for example, the Loop Point should be
set after the distinctive attack portion and at the start
of the sustained section of the sound. When playing
back this loop, the distinctive attack portion of the
violin sound is played back, followed by the looped
section corresponding with the sustained section of
the violin sound (between the Loop Point and the
End Point.) On the other hand, if the sound does not
have a distinctive attack portion, the Loop Point can
be set to the same position as the Start Point.
Start Point
Record Start
Necessary portion
Noise
End
Point
Data
End
Data Top Start Point
End
Point
Data
End
Data Top Start Point
End
Point
Loop
Point
Looped Section
Data EndData Top Start Point
150


Need help? Post your question in this forum.

Forumrules


Report abuse

Libble takes abuse of its services very seriously. We're committed to dealing with such abuse according to the laws in your country of residence. When you submit a report, we'll investigate it and take the appropriate action. We'll get back to you only if we require additional details or have more information to share.

Product:

For example, Anti-Semitic content, racist content, or material that could result in a violent physical act.

For example, a credit card number, a personal identification number, or an unlisted home address. Note that email addresses and full names are not considered private information.

Forumrules

To achieve meaningful questions, we apply the following rules:

Register

Register getting emails for Yamaha CS6X at:


You will receive an email to register for one or both of the options.


Get your user manual by e-mail

Enter your email address to receive the manual of Yamaha CS6X in the language / languages: English as an attachment in your email.

The manual is 8 mb in size.


You will receive the manual in your email within minutes. If you have not received an email, then probably have entered the wrong email address or your mailbox is too full. In addition, it may be that your ISP may have a maximum size for emails to receive.

Others manual(s) of Yamaha CS6X

Yamaha CS6X Installation Guide - English - 24 pages

Yamaha CS6X Installation Guide - German - 24 pages

Yamaha CS6X User Manual - German - 196 pages

Yamaha CS6X User Manual - Dutch - 192 pages

Yamaha CS6X User Manual - French - 196 pages

Yamaha CS6X Installation Guide - French - 24 pages

Yamaha CS6X User Manual - Italian - 192 pages

Yamaha CS6X Installation Guide - Italian - 12 pages

Yamaha CS6X User Manual - Portuguese - 284 pages

Yamaha CS6X User Manual - Spanish - 192 pages


The manual is sent by email. Check your email

If you have not received an email with the manual within fifteen minutes, it may be that you have a entered a wrong email address or that your ISP has set a maximum size to receive email that is smaller than the size of the manual.

The email address you have provided is not correct.

Please check the email address and correct it.

Your question is posted on this page

Would you like to receive an email when new answers and questions are posted? Please enter your email address.


Info