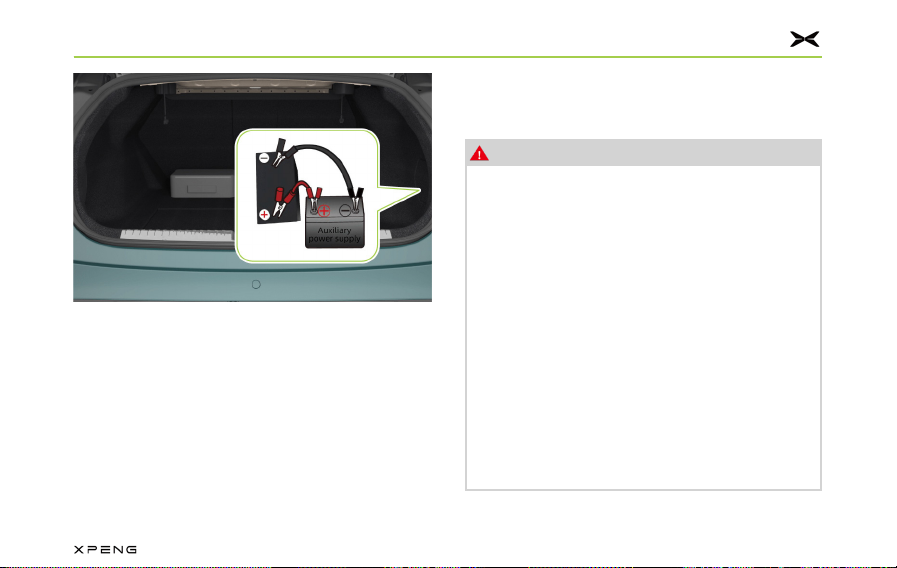
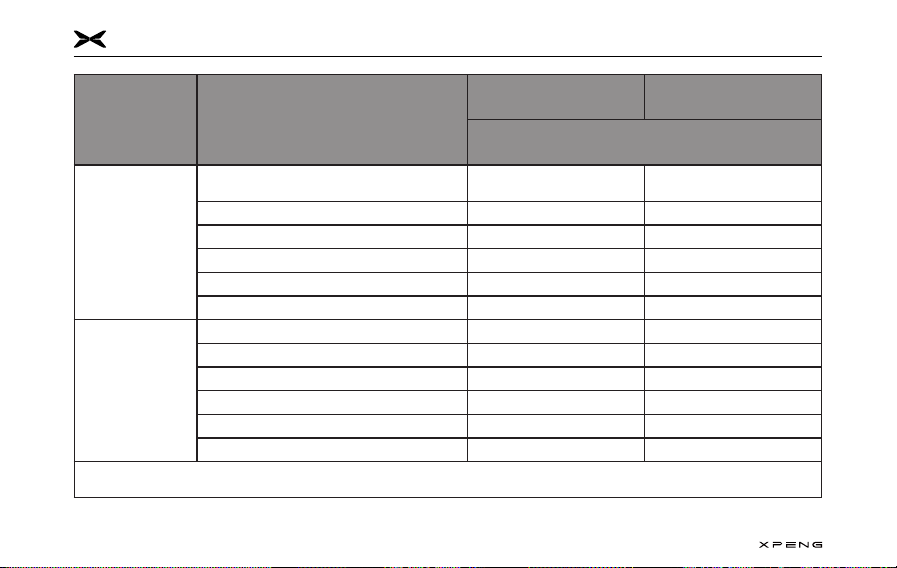
Some indicator lights will come on when the vehicle is powered on and go off after system self-Some indicator lights will come on when the vehicle is powered on and go off after system self-
inspection. Some indicator lights are on to indicate the current status of the vehicle system functions, inspection. Some indicator lights are on to indicate the current status of the vehicle system functions,
not for system faults.not for system faults.
If you are unsure what happen or what to do with your car when the indicator light is on during daily If you are unsure what happen or what to do with your car when the indicator light is on during daily
driving, contact XPENG Service Center or Customer Service Center for consultation.driving, contact XPENG Service Center or Customer Service Center for consultation.
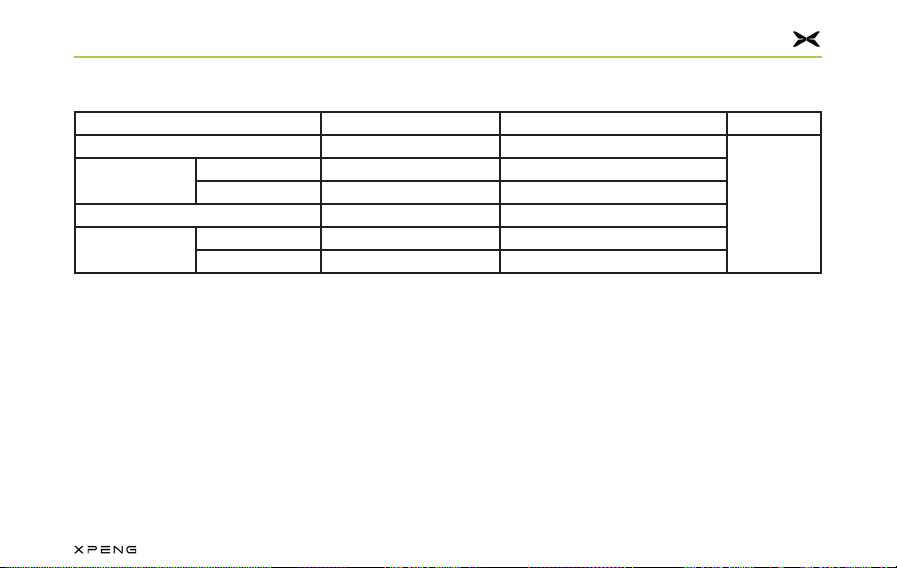
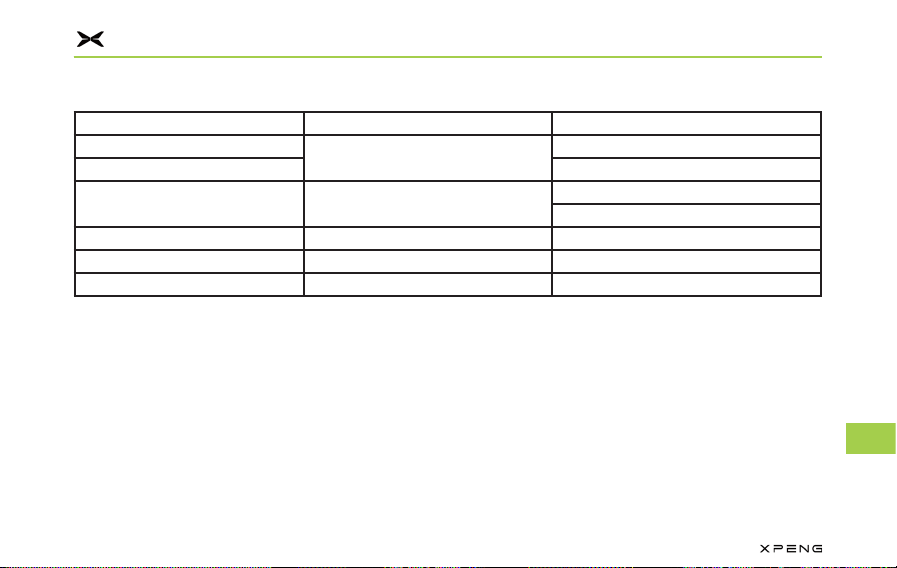
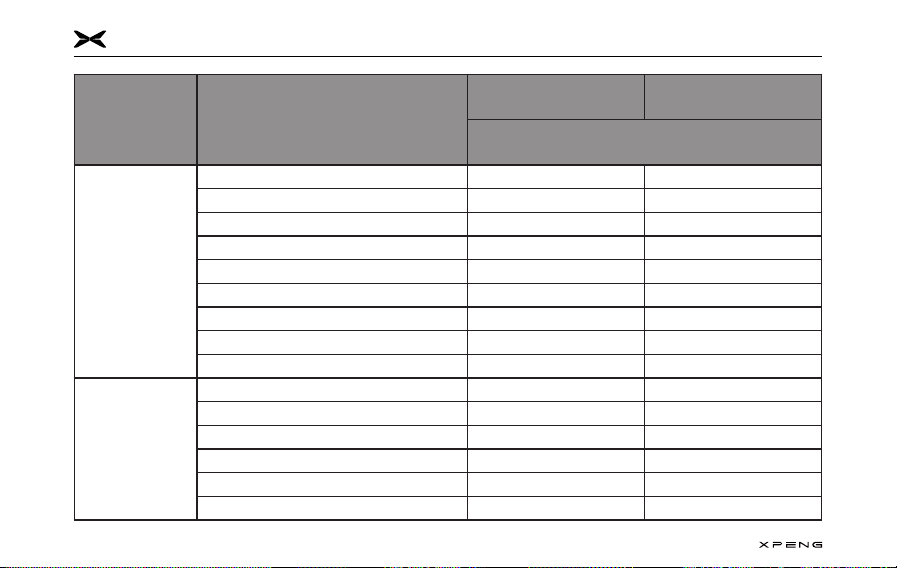
Door open indicator Left turn signal and hazard warning indica-
tor
READY indicator Right turn signal and hazard warning indi-
cator
Rear fog light indicator Airbag fault indicator
Position light indicator Unfastened driver's seat belt warning indi-
cator
High beam indicatorUnfastened front passenger's seat belt
warning indicator
Low beam indicator Unfastened rear left seat belt warning indi-
cator
Preparations Before Driving
91
2
3
4
5
6
7
8
9
10
11
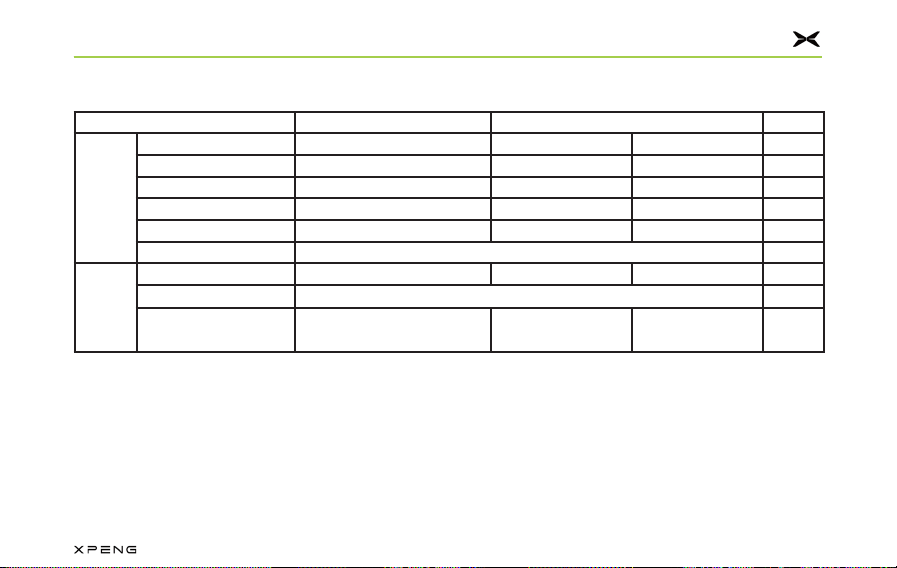
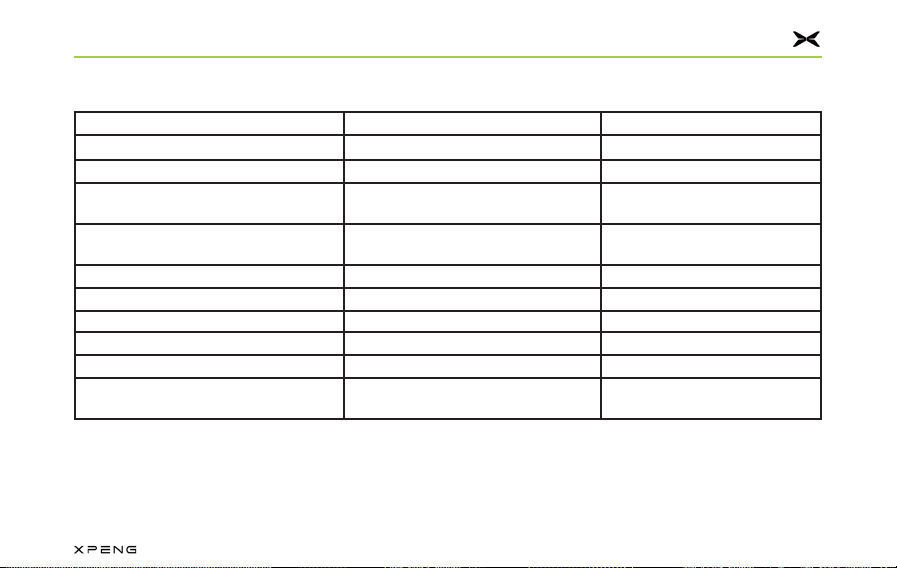
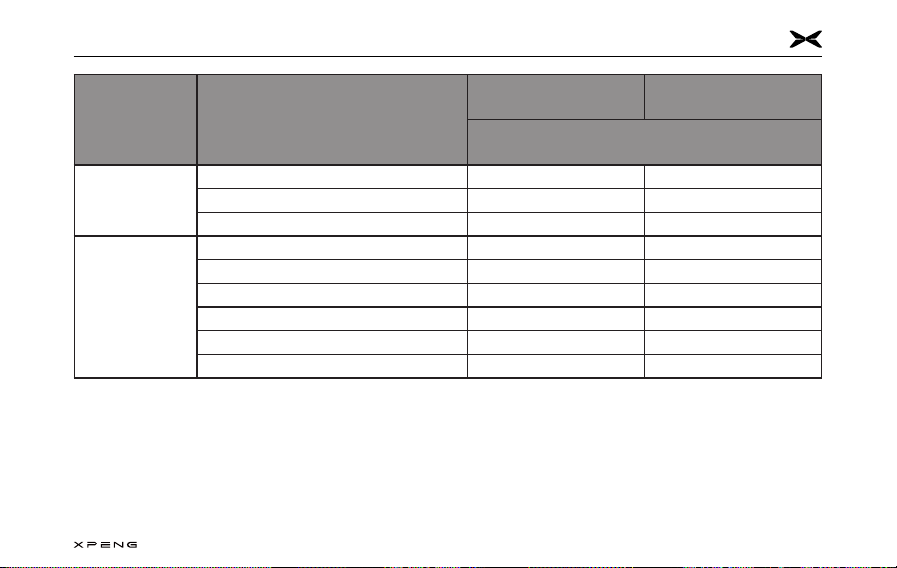
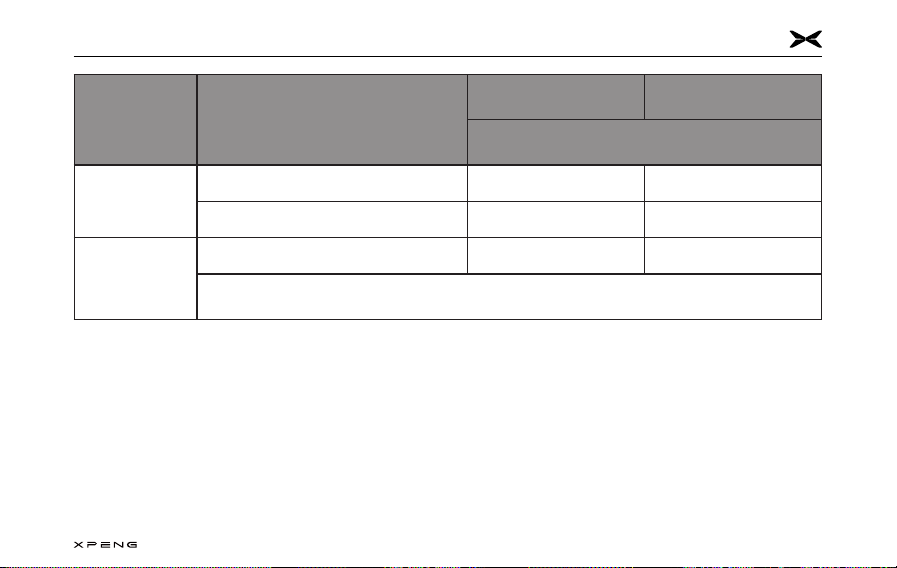
Schedule charge indicator lightUnfastened rear middle seat belt warning
indicator light
EPB fault indicator lightUnfastened rear right seat belt warning
indicator light
AUTO HOLD turn on the indicatorEPB status indicator light
AUTO HOLD fault indicatorElectric Power Steering (EPS) indicator
light
Braking system fault indicator light12V battery charging system indicator light
ESP indicatorCharging gun plugged indicator light
ESP OFF indicator lightElectric system fault indicator light
ABS indicator lightMotor and IPU overheat indicator light
Preparations Before Driving
92
IBooster fault indicatorTraction battery high temperature indicator
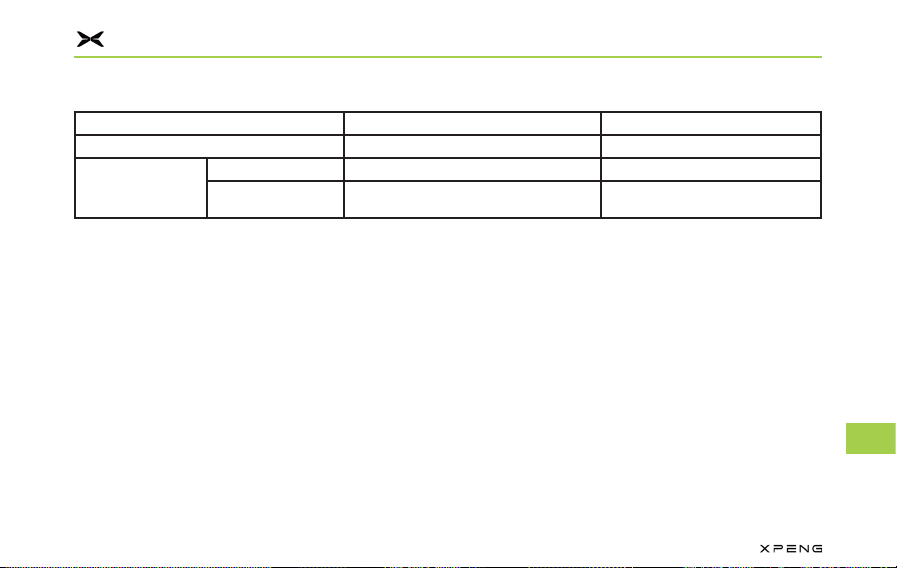
In the initial position, the adjustment parameters of the seat are as follows:In the initial position, the adjustment parameters of the seat are as follows:
ItemParameter
Driver seat
Front and back adjustmentTotal stroke 235 mm, forward 190 mm, backward
45 mm
Up and down adjustmentTotal stroke 59.7 mm, up 27 mm,
2. 2. Tap"Tap"Settings Settings "" on the CID to enter on the CID to enter
the interface, then slide down and tap the the interface, then slide down and tap the
front passenger airbag switch.front passenger airbag switch.
Safe Driving
143
4
5
6
7
8
9
10
11
Warning
●Do not place a rear-facing child seat on
the seat with an active frontal airbag.
Death or serious injury to the child in the
seat can occur.
●Be sure to select an appropriate child
safety seat for the child based on his/her
age, height and weight.
●One child seat is for only one child. Never
constrain multiple children into one child
seat with the seat belt.
●Under no circumstances should a child or
infant be carried in the occupant's arms
during driving.
●Never leave a child unattended in the
child seat.
Warning
●Never leave children unprotected in
a vehicle. Always keep children in the
correct seating position during driving.
Never stand in the vehicle or kneel on the
seat. If an accident occurs under these
circumstances, it could be fatal to children
and others.
●Any child seat that has been applied
forces in an accident must be replaced.
Safe Driving
144
Recommended types of child seats
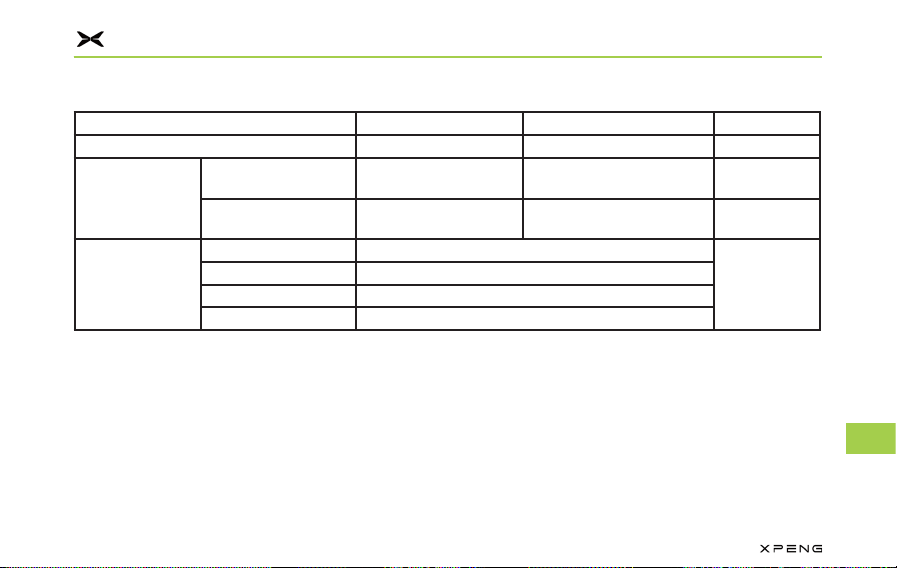
Both ECE-R44 and ECE-R129 standards apply to child seats in the country where the user is located.Both ECE-R44 and ECE-R129 standards apply to child seats in the country where the user is located.
ECE-R129 classification is based on a child heightECE-R129 classification is based on a child height
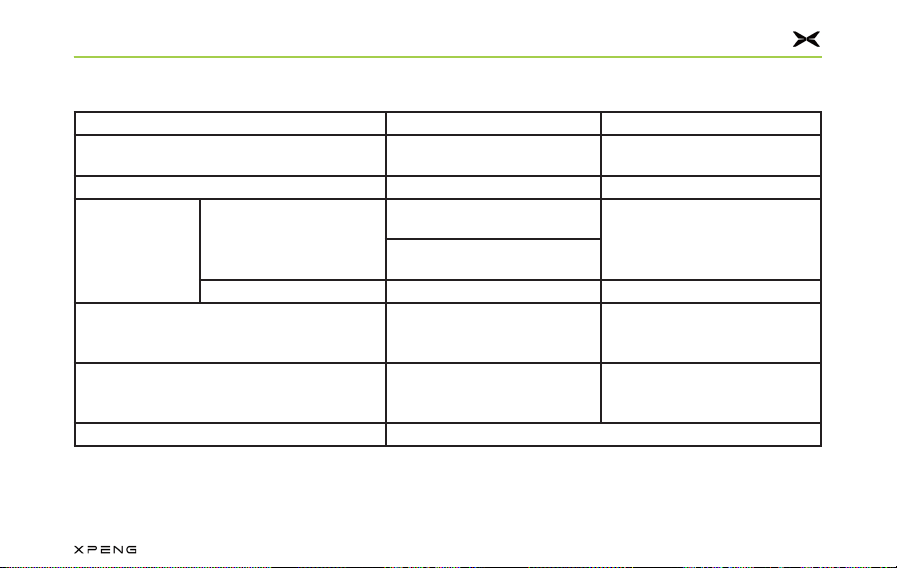
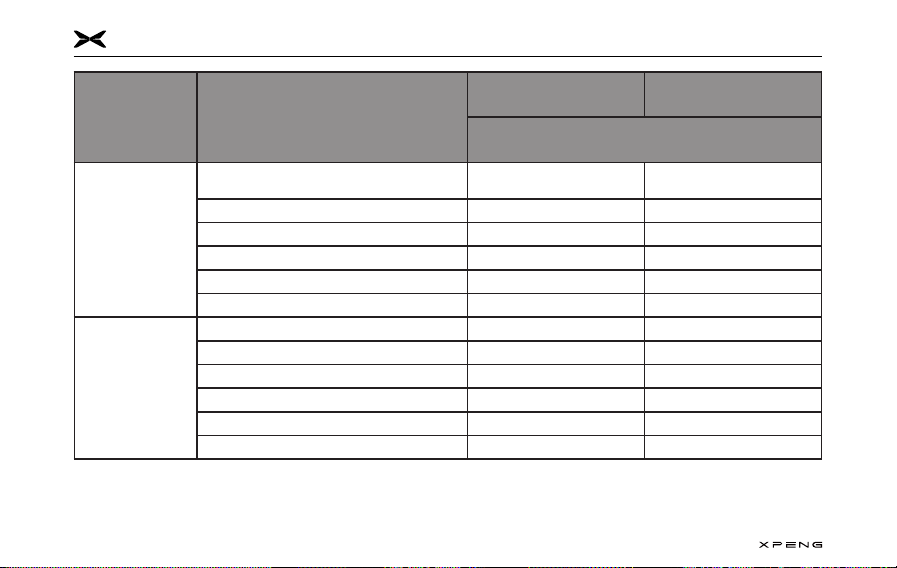
Child statureManufacturerTypeAccessory
40cm-105cmDorel EuropeMaxi-Cosi Pearl 360
& FamilyFix 360 baseISOFIX + Support Leg
61cm-105cmHTS BeSafeiZi Kid X3 i-SizeISOFIX + Support Leg
100cm-150cmBritax RomerKidfix i-Size*ISOFIX + Belt
*. For the best protection, it is recommended to use this child restraint system with the included
backrest and be sure to attach the seat belt through Secure Guard and XP-pad.
ECE-R44 classification is based on a child weight.
Child weightManufacturerTypeAccessory
22 kg- 36 kgGracoBooster BasicBelt
Only a child seat that is compliant might be used in the vehicle.
Safe Driving
145
4
5
6
7
8
9
10
11
Seating position
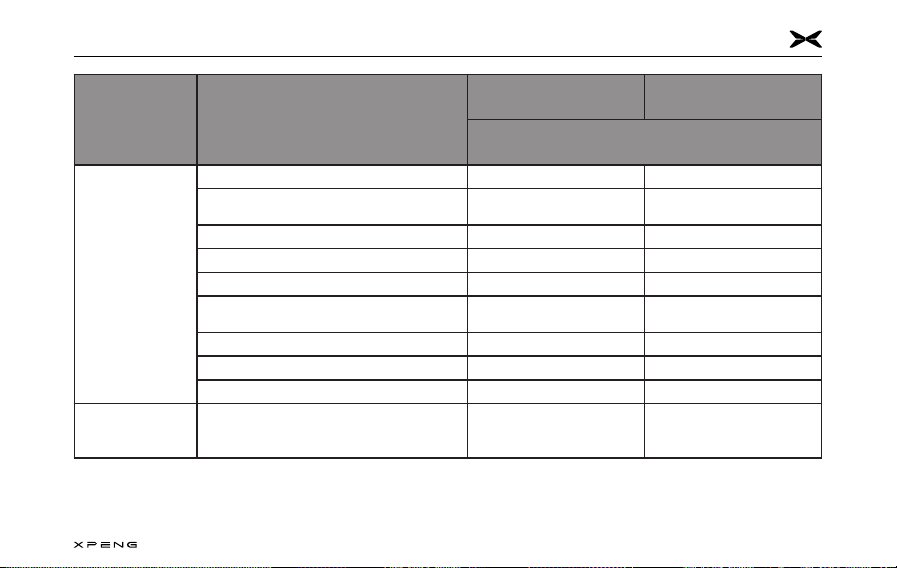
seating positionfront
left
front
centre
front right2nd row
left
2nd row
centre
2nd row
right
with front passenger
airbag activated
with front passenger
airbag deactivated
Seating position suitable for
universal belted(yes/no)NoNoYes
Forward facing onlyYesYesYesYes
I-Size seating position(yes/no)NoNoNoNoYesNoYes
Seating position suitable for
lateral fixture(L1/L2)NoNoNoNoNoNoNo
Largest suitable rearward
facing fixture(R1/R2x/R2/R3)NoNoNoNoR1/R2x/
R2/R3No
R1/
R2x/
R2/R3
Largest suitable forward facing
fixture(F1/F2x/F2/F3) NoNoNoNoF1/F2x/
F2/F3NoF1/F2x/
F2/F3
Largest suitable booster fixture
(B2/B3)NoNo(B2/B3)*(B2/B3)*B2/B3(B2/
B3)*B2/B3
●*Only applicable for installation with seat belt.
●During the installation of the CRS, the backrest angle of the front passenger seat should be adjusted
reasonably to ensure that the CRS remains stable.
●During the installation of the CRS, the height of the headrest should be adjusted reasonably or the headrest
should be removed to avoid interference with the CRS. Do not remove the head restraint when using a booster
cushion with no backrest.
●When installing a CRS on the front passenger seat, adjust the front passenger seat as high as possible to
securely install the CRS.
Safe Driving
146
For Tall ChildrenFor Tall Children
If a child is too tall to use a child safety seat, If a child is too tall to use a child safety seat,
but too short to safely use a standard seat belt, but too short to safely use a standard seat belt,
purchase and properly use a child's booster purchase and properly use a child's booster
cushion that meets the relevant regulations cushion that meets the relevant regulations
or standards. Use a child's booster cushion to or standards. Use a child's booster cushion to
increase the child sitting height, so that the increase the child sitting height, so that the
shoulder belt stays right in the middle of the shoulder belt stays right in the middle of the
child's shoulder and the lap belt is lowered to the child's shoulder and the lap belt is lowered to the
Drive Motor Model and CodeDrive Motor Model and Code
Front Drive Motor *Front Drive Motor *
─The front drive motor model and code are
presented on the drive motor housing and
the drive motor label.
Rear Drive MotorRear Drive Motor
─The rear drive motor model and code are
presented on the drive motor housing and
the drive motor label.
Vehicle Specifications
261
3
4
5
6
7
10
11
LabelsLabels
Label positionsLabel positions
1. 1. Cooling fan labelCooling fan label
2. 2. A/C system labelA/C system label
3. 3. Airbag labelAirbag label
4. 4. Tire pressure labelTire pressure label
5. 5. Side airbag labelSide airbag label
6. 6. Coolant labelCoolant label
Label InformationLabel Information
1. 1. Tire pressure label.Tire pressure label.
Vehicle Specifications
262
2. 2. Side airbag label.Side airbag label.
3. 3. Cooling fan labelCooling fan label
4. 4. Coolant label.Coolant label.
Vehicle Specifications
263
3
4
5
6
7
10
11
5. 5. Air conditioning system label.Air conditioning system label.
6. 6. Airbag label.Airbag label.
Vehicle Specifications
264
Vehicle ParametersVehicle Parameters
Exterior DimensionsExterior Dimensions
Vehicle Specifications
265
3
4
5
6
7
10
11
ItemP7Unit
Exterior Dimensions
Length4888
mm
Width1896
Height1450
TrackFront Track1615
Rear Track1621
Wheelbase2998
Front Overhang853
Rear Suspension1037
Number of Occupants5Persons
Approach Angle (Full Load)≥ 13°
Departure Angle (Full Load)≥ 14
Exterior rear-view mirrors (one for the left side and one for the right side) are not included in exterior Exterior rear-view mirrors (one for the left side and one for the right side) are not included in exterior
width and the tolerance range of vehicle size parameters ± 1%.width and the tolerance range of vehicle size parameters ± 1%.
Vehicle Specifications
266
WeightWeight
ItemType IType IIUnit
Vehicle Curb Mass20202140/2180
kg
Kerb WeightFront axle9111029/1052
Rear axle11091111/1128
Maximum Total Mass24502570/2600
Maximum
total mass
Front axle10261146/1172
Rear axle14241424/1428
Tolerance ranges ± 3% for mass, excluding maximum total mass.Tolerance ranges ± 3% for mass, excluding maximum total mass.
Vehicle Specifications
267
3
4
5
6
7
10
11
Overview ParametersOverview Parameters
ItemP7Unit
Minimum Turning Diameter≤ 11.7m
Maximum Speed≥ 200km/h
Maximum Gradient≥ 30%
Vehicle Specifications
268
Types and Parameters of the PowerchainTypes and Parameters of the Powerchain
Type of DriveRear Engine, Rear DriveFour Wheel DriveUnit
Drive
motor
Rated Power80Front: 20Rear: 80kW
Rated Torque175Front: 40Rear: 175N·m
Rated Speed4400Front: 4775Rear: 4400rpm
Peak Power203Front: 145Rear: 203kW
Peak Torque440Front: 317Rear: 440N·m
Peak Speed14,000rpm
Final
Drive
Model1eDT400CFront: 1eDT300ARear: 1eDT400C/
TypeIntermediate reducer/
Final Reduction
Drive Ratio8.782Front: 8.604Rear: 8.782/
Vehicle Specifications
269
3
4
5
6
7
10
11
Steering GearSteering Gear
ItemParameterUnit
TypeElectric power assisted/
Maximum
Steering Angle of
Front Wheels
Interior40.4°
Exterior33.4°
Vehicle Specifications
270
Braking SystemBraking System
ItemParameterUnit
TypeHydraulic diagonal
arrangement/
Type of AssistElectric power assisted/
Brake PedalTravel
113 (power-on with assisted
power)mm
40 (power-off without
assisted power)
Free travel≤ 2mm
Wear limit of brake pad for the front wheel
(excluding the backing plate for brake
pad)
2.0mm
Wear limit of brake pad for rear
wheel (excluding the backing plate
for brake pad)
2.0mm
Brake Fluid Replacement Period24 months or 40,000 km (whichever is earlier)
Vehicle Specifications
271
3
4
5
6
7
10
11
Main Parameters of Traction BatteryMain Parameters of Traction Battery
ItemP7Unit
Cell
TypeNCM/
Rated Voltage3.68V
Rated Capacity122.00Ah
Traction Battery
Rated voltage353.28V
Rated capacity244.00Ah
Rated Energy86.20kWh
Mass (with Underbody
Guard)545.00kg
Vehicle Specifications
272
SuspensionSuspension
ItemP7
Front Suspension TypeDouble-wishbone independent suspension
The kingpin inclination is not subject to tolerance requirements due to the large measurement deviation The kingpin inclination is not subject to tolerance requirements due to the large measurement deviation
and the strong correlation with the wheel camber angle, so it is only for reference.and the strong correlation with the wheel camber angle, so it is only for reference.
Vehicle Specifications
275
3
4
5
6
7
10
11
TireTire
Tire245/50 ZR18245/45 R19Unit
Rims18 × 8J19 × 8J/
Pressure
Front wheel (empty
half load/full load)250/250250/290kPa
Rear wheel (empty
half load/full load)270/270270/290kPa
Wheel Balancing
(After Applying
Balancing
Blocks)
Front tires interior≤ 8
g
Front tires exterior≤ 8
Rear tires interior≤ 8
Rear tires exterior≤ 8
Vehicle Specifications
276
Microwave WindowMicrowave Window
The microwave window is on the front windshield, The microwave window is on the front windshield,
as shown in the illustration. Please keep the front as shown in the illustration. Please keep the front
windshield clean so as to ensure the best results windshield clean so as to ensure the best results
and minimize interference with the driving view.and minimize interference with the driving view.
Warning
The location of the microwave window
shall not be shielded.
The necessary markings required by trac
regulations shall be pasted around the
microwave window.
Event Data Recorder (EDR)Event Data Recorder (EDR)
This vehicle is equipped with an event data This vehicle is equipped with an event data
recorder (EDR).recorder (EDR).
The EDR can automatically record vehicle The EDR can automatically record vehicle
operation and vehicle safety system status operation and vehicle safety system status
information for a period of time before and after information for a period of time before and after
a vehicle event, for example:a vehicle event, for example:
●Vehicle speed.
●Braking status when driving, it's on or off.
●Driver's seat belt status.
●The opening percentage of the accelerator
pedal.
Vehicle Specifications
277
3
4
5
6
7
10
11
●The power-on cycle (from the latest start
time) during an event.
●Readout the power-on cycle information.
●The overall of Event data records.
●The time interval between this event and the
last event.
●Longitudinal acceleration.
Collecting and analyzing the vehicle data Collecting and analyzing the vehicle data
recorded by the EDR can help to understand the recorded by the EDR can help to understand the
situation before and after the event.situation before and after the event.
The data recorded by EDR needs to be The data recorded by EDR needs to be
extracted using dedicated diagnostic equipment extracted using dedicated diagnostic equipment
connected to the OBD interface of the vehicle. connected to the OBD interface of the vehicle.
If necessary, please contact the XPENG Service If necessary, please contact the XPENG Service
Center to obtain the equipment.Center to obtain the equipment.
Data Use StatementData Use Statement
The EDR data may be used by XPENG for The EDR data may be used by XPENG for
troubleshooting, product development, and troubleshooting, product development, and
quality improvement. XPENG will not disclose quality improvement. XPENG will not disclose
EDR data to third parties except for the following:EDR data to third parties except for the following:
●Obtain consent from the owner or lessee of
the vehicle.
●Use in a lawsuit in compliance with the ocial
requirements of the police, court, or other
government departments.
278
Contact XPENGContact XPENG
IntroductionIntroduction
If you have any questions during the use of If you have any questions during the use of
the vehicle, please contact the XPENG Service the vehicle, please contact the XPENG Service
Center or call the Customer Service Center.Center or call the Customer Service Center.
Customer Service Center Tel:Customer Service Center Tel:
Libble takes abuse of its services very seriously. We're committed to dealing with such abuse according to the laws in your country of residence. When you submit a report, we'll investigate it and take the appropriate action. We'll get back to you only if we require additional details or have more information to share.
Product:
Forumrules
To achieve meaningful questions, we apply the following rules:
First, read the manual;
Check if your question has been asked previously;
Try to ask your question as clearly as possible;
Did you already try to solve the problem? Please mention this;
Is your problem solved by a visitor then let him/her know in this forum;
To give a response to a question or answer, do not use this form but click on the button 'reply to this question';
Your question will be posted here and emailed to our subscribers. Therefore, avoid filling in personal details.
Register
Register getting emails for Xpeng P7 at:
new questions and answers
new manuals
You will receive an email to register for one or both of the options.
Get your user manual by e-mail
Enter your email address to receive the manual of Xpeng P7 in the language / languages: English as an attachment in your email.
The manual is 38.13 mb in size.
You will receive the manual in your email within minutes. If you have not received an email, then probably have entered the wrong email address or your mailbox is too full. In addition, it may be that your ISP may have a maximum size for emails to receive.
If you have not received an email with the manual within fifteen minutes, it may be that you have a entered a wrong email address or that your ISP has set a maximum size to receive email that is smaller than the size of the manual.
The email address you have provided is not correct.
Please check the email address and correct it.
Your question is posted on this page
Would you like to receive an email when new answers and questions are posted? Please enter your email address.