General Guidelines...................................................................................................................................................12
Power Cord..................................................................................................................................................................13
Environmental, Health, and Safety Contact Information...............................................................................18
2 Features19
Parts of the Printer...........................................................................................................................................................20
Front View....................................................................................................................................................................20
Control Panel..............................................................................................................................................................25
Information Pages...........................................................................................................................................................27
Printing the Information Pages..........................................................................................................................27
Power Saver Mode............................................................................................................................................................
28
Po
wer Saver Levels...................................................................................................................................................28
Exiting Power Saver Mode....................................................................................................................................28
Accessing CentreWare Internet Services........................................................................................................29
Finding the IP Address of the Printer...............................................................................................................30
Automatic Data Collection...................................................................................................................................30
More Information.............................................................................................................................................................31
3 Installation and Setup33
Installation and Setup Overview................................................................................................................................34
Selecting a Location for the Printer..........................................................................................................................35
Configuring the Printer at Setup................................................................................................................................36
Connecting the Printer....................................................................................................................................................38
Contents
4 Xerox
®
WorkCentre
®
4265 Multifunction Printer
User Guide
Selecting a Connection Method.........................................................................................................................38
Physically Connecting the Printer to the Network......................................................................................39
Connecting to a Computer Using USB............................................................................................................39
Connecting to a Telephone Line........................................................................................................................39
Turning the Printer On and Off...........................................................................................................................40
About TCP/IP and IP Addresses.........................................................................................................................41
Enabling the Printer for Scanning..............................................................................................................................42
Installing the Software...................................................................................................................................................43
Installing Drivers and Utilities for Windows..................................................................................................43
Installing Print Drivers for Macintosh OS X Version 10.7 and Later...................................................44
Installing Scan Drivers for Macintosh..............................................................................................................45
Installing the Print Drivers for UNIX and Linux...........................................................................................46
Other Drivers...............................................................................................................................................................46
Installing the Printer as a Web Service on Devices............................................................................................47
General Paper Loading Guidelines....................................................................................................................50
Paper That Can Damage Your Printer.............................................................................................................51
Paper Storage Guidelines......................................................................................................................................51
Supported Paper Types and Weights...............................................................................................................52
Supported Standard Paper Sizes........................................................................................................................53
Supported Custom Paper Sizes...........................................................................................................................53
Supported Paper Types and Weights for Automatic 2-Side
d Printing..............................................54
Supported Standard Paper Sizes for Automatic 2-Sided Printing........................................................54
Supported Custom Paper Sizes for Automatic 2-Sided Printing...........................................................54
Supported Paper for Automatic Stapling.......................................................................................................54
Loading Paper in the Bypass Tray.....................................................................................................................56
Loading Paper in a 520-Sheet Feeder (Trays 1-4)......................................................................................58
Loading Paper in the 2100-Sheet High-Capacity Feeder........................................................................60
Printing on Special Paper...............................................................................................................................................63
Windows Printing Options....................................................................................................................................72
Macintosh Printing Options..................................................................................................................................73
Linux Printing Options............................................................................................................................................74
Special Job Types..............................................................................................................................................................81
Personal Print Job.....................................................................................................................................................81
Printing from Saved Jobs.......................................................................................................................................83
Held Print Jobs...................................................................................................................................................................84
Releasing Held Print Jobs......................................................................................................................................84
Printing from a USB Flash Drive................................................................................................................................. 85
ID Card Copying........................................................................................................................................................98
Setting the Output Color.....................................................................................................................................104
Setting the Scan Resolution...............................................................................................................................104
Setting the File Format........................................................................................................................................105
Lightening or Darkening the Image...............................................................................................................105
Specifying the Original Size................................................................................................................................106
Building a Scan Job................................................................................................................................................107
Sending a Scanned Image to a Destination.......................................................................................................109
Scanning to a Shared Folder on a Network Computer...................................................................................110
Sharing a Folder on a Windows Computer..................................................................................................110
Sharing a Folder Using Macintosh OS X Version 10.7 and Later.......................................................111
Scanning to a Folder on a Network Computer...........................................................................................111
Scanning to Your Home Directory...........................................................................................................................112
Scanning to an Email Address...................................................................................................................................113
Scanning to a USB Flash Drive..................................................................................................................................114
Scanning to a Computer..............................................................................................................................................115
Scanning to a Computer......................................................................................................................................115
Specifying the Size of the Original..................................................................................................................
120
Sen
ding a Delayed Fax........................................................................................................................................120
To Lighten or Darken an Image.......................................................................................................................121
Building a Fax Job..................................................................................................................................................122
Storing a Fax in a Local Mailbox..............................................................................................................................123
Printing Local Mailbox Documents.........................................................................................................................124
Sending a Fax to a Remote Mailbox......................................................................................................................125
Storing a Fax for Local or Remote Polling............................................................................................................126
Polling a Remote Fax....................................................................................................................................................127
Printing or Deleting Stored Faxes............................................................................................................................128
Using the Address Book...............................................................................................................................................129
Adding an Individual Entry to the Device Address Book.......................................................................129
Editing an Individual Address Book Entry....................................................................................................129
9 Maintenance131
Cleaning the Printer.......................................................................................................................................................132
General Precautions...............................................................................................................................................132
Cleaning the Exterior.............................................................................................................................................133
Contents
Xerox
®
WorkCentre
®
4265 Multifunction Printer7
User Guide
Cleaning the Scanner............................................................................................................................................133
Cleaning the Interior.............................................................................................................................................135
When toOrder Supplies.......................................................................................................................................137
Managing the Printer....................................................................................................................................................140
Moving the Printer..................................................................................................................................................140
Billing and Usage Information.........................................................................................................................141
10Troubleshooting 143
General Troubleshooting.............................................................................................................................................144
General Precautions...............................................................................................................................................144
Restarting the Printer............................................................................................................................................145
Printer Fails to Power On.....................................................................................................................................146
Printer Resets or Turns Off Frequently...........................................................................................................146
Document Prints from Wrong Tray.................................................................................................................146
Paper Tray Fails to Close.....................................................................................................................................147
Printing Takes Too Long......................................................................................................................................147
Printer Fails to Print...............................................................................................................................................148
Printer is Making Unusual Noises....................................................................................................................148
Condensation Has Formed Inside the Printer............................................................................................
149
Paper Jams........................................................................................................................................................................150
Minimizing Paper Jams........................................................................................................................................150
Locating Paper Jams.............................................................................................................................................151
Clearing Paper Jams..............................................................................................................................................152
Troubleshooting Paper Jams.............................................................................................................................164
Copy and Scan Problems.............................................................................................................................................170
Control Panel Messages.......................................................................................................................................173
Online Support Assistant.....................................................................................................................................174
Using the Integrated Troubleshooting Tools.............................................................................................175
A Specifications177
Printer Configurations and Options........................................................................................................................178
Standard Configurations.....................................................................................................................................178
Contents
8 Xerox
®
WorkCentre
®
4265 Multifunction Printer
User Guide
Standard Features..................................................................................................................................................178
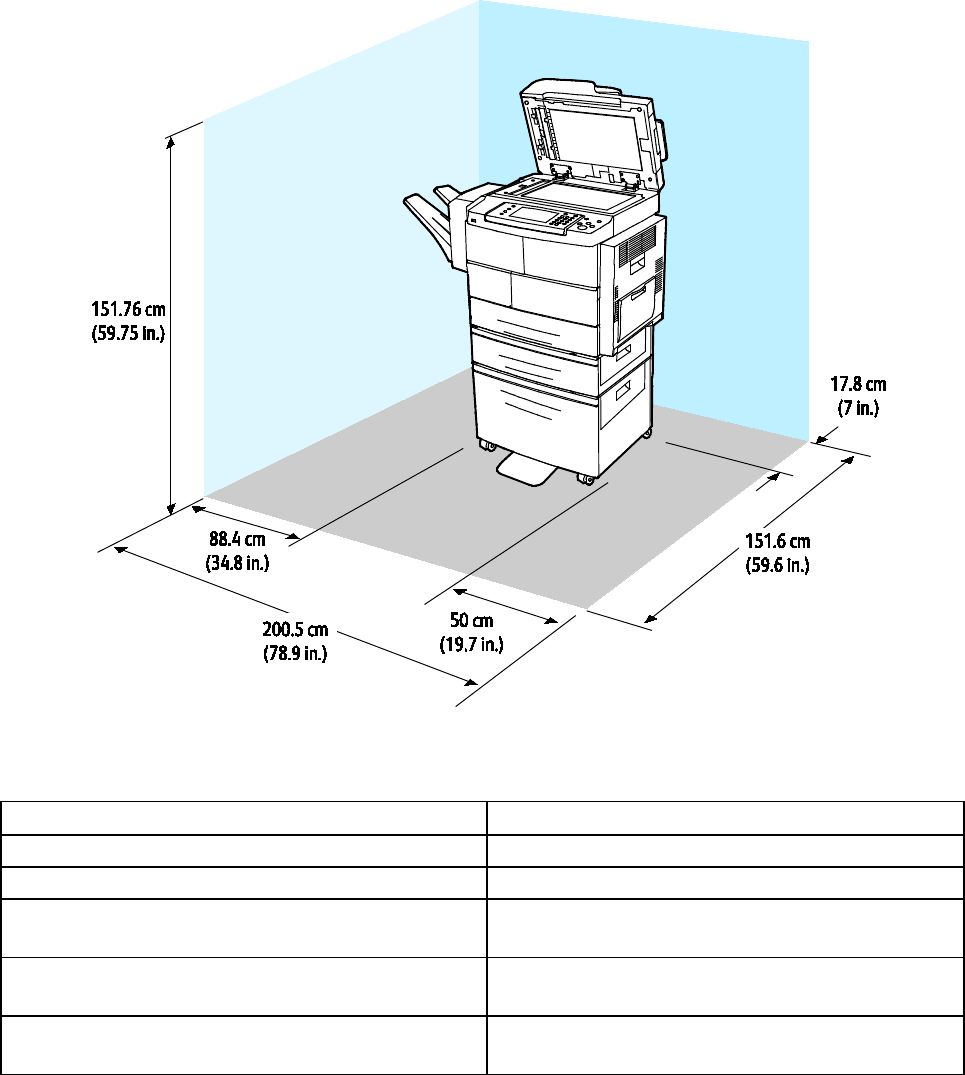
Clearance Requirements for Standard Configuration............................................................................180
Clearance Requirements for Standard Configuration with Optional Finisher..............................181
Clearance Requirements for Standard Configuration with Optional Feeders..............................182
Clearance Requirements for Standard Configuration with Optional Finisher and Feeders...183
Weights and Dimensions.....................................................................................................................................183
Power Supply Voltage and Frequency...........................................................................................................185
Power Consumption..............................................................................................................................................185
ENERGY STAR Qualified Product.....................................................................................................................185
United States FCC Regulations.........................................................................................................................188
European Union......................................................................................................................................................189
European Union Lot 4 Imaging Equipment Agreement Environmental Information..............189
United States............................................................................................................................................................193
Other Countries.......................................................................................................................................................195
United States............................................................................................................................................................196
European Union......................................................................................................................................................198
South Africa..............................................................................................................................................................198
New Zealand.............................................................................................................................................................199
Material Safety Data Sheets......................................................................................................................................200
C Recycling and Disposal201
All Countries......................................................................................................................................................................202
North America..................................................................................................................................................................203
European Union...............................................................................................................................................................204
Collection and Disposal of Equipment and Batteries..............................................................................205
Battery Symbol Note.............................................................................................................................................205
Other Countries................................................................................................................................................................206
•Environmental, Health, and Safety Contact Information..................................................................................18
Your printer and the recommended supplies have been designed and tested to meet strict safety
requirements. Attention to the following information ensures the continued safe operation of your Xerox
printer.
1
Safety
Safety
12Xerox
®
WorkCentre
®
4265 Multifunction Printer
User Guide
Electrical Safety
General Guidelines
WARNINGS:
•Do not push objects into slots or openings on the printer. Touching a voltage point or shorting
out a part could result in fire or electric shock.
•Do not remove the covers or guards that are fastened with screws unless you are installing
optional equipment and are instructed to do so. Turn off the printer when performing these
installations. Disconnect the power cord when removing covers and guards for installing optional
equipment. Except for user-installable options, there are no parts that you can maintain or
service behind these covers.
The following are hazards to your safety:
•The power cord is damaged or frayed.
•Liquid is spilled into the printer.
•The printer isexposed to water.
•The printer emits smoke, or the surface is unusually hot.
•The printer emits unusual noise or odors.
•The printer causes a circuit breaker, fuse, or other safety device to activate.
If any of these conditions occur, do the following:
1.Turn off the printer immediately.
2.Disconnect the power cord from the electrical outlet.
3.Call an authorized service representative.
Safety
Xerox
®
WorkCentre
®
4265 Multifunction Printer13
User Guide
Power Cord
•Use the power cord supplied with your printer.
•Plug the power cord directly into a properly grounded electrical outlet. Ensure that each end of the
cord is connected securely. If you do not know if an outlet is grounded, ask an electrician to check
the outlet.
•Do not use a ground adapter plug to connect the printer to an electrical outlet that does not have a
ground connection terminal.
WARNING: Avoid the potential of electrical shock by ensuring that the printeris grounded properly.
Electrical products can be hazardous if misused.
•Verify that the printer is plugged into an outlet that is providing the correct voltage and power.
Review the electrical specification of the printer with an electrician if necessary.
•Do not place the printer in an area where people can step on the power cord.
•Do not place objects on the power cord.
•If the power cord becomes frayed or worn, replace it.
•Do not plug or unplug the power cord while the power switch is in the On position.
•To avoid electrical shock and damage to the cord, grasp the plug when unplugging the power cord.
•Ensure that the electrical outlet is near the printer and is easily accessible.
The power cord is attached to the printer as a plug-in device on the back of the printer. If it is necessary
to disconnect all electrical power from the printer, disconnect the power cord from the electrical outlet.
Emergency Turn Off
If any of the following conditions occur, turn off the printer immediately and disconnect the powercord
from the electrical outlet. Contact an authorized Xerox service representative to correct the problem if:
•The equipment emits unusual odors or makes unusual noises.
•The power cable is damaged or frayed.
•A wall panel circuit breaker, fuse, or other safety device has been tripped.
•Liquid is spilled into the printer.
•The printer is exposed to water.
•Any part of the printer is damaged.
Laser Safety
This printer complies with laser product performance standards set by governmental, national, and
international agencies and is certified as a Class 1 Laser Product. The printer does not emit hazardous
light because the beam is totally enclosed during all modes of customer operation and maintenance.
WARNING: Use of controls, adjustments, or performance of procedures other than those specified in
this manual can result in hazardous radiation exposure.
Safety
14Xerox
®
WorkCentre
®
4265 Multifunction Printer
User Guide
Operational Safety
Your printer and supplies were designed and tested to meet strict safety requirements. These include
safety agency examination, approval, and compliance with established environmental standards.
Your attention to the following safety guidelines helps to ensure the continued, safe operation of your
printer.
Operational Guidelines
•Do not remove the paper source tray that you selected in either the print driver or control panel
while the printer is printing.
•Do not open the doors when theprinter is printing.
•Do not move the printer while is printing.
•Keep hands, hair, neckties, and so on away from the exit and feed rollers.
•Covers, which require tools for removal, protect the hazard areas within the printer. Do not remove
the protective covers.
Ozone Release
This printer produces ozone during normal operation. The amount of ozone produced is dependent on
copy volume. Ozone is heavier than air and is not produced in amounts large enough to harm anyone.
Install the printer in a well-ventilated room.
For more information in the United States and Canada, go to www.xerox.com/environment. In other
markets, please contact your local Xerox representative or go to www.xerox.com/environment_europe.
Printer Location
•Place the printer on a level, solid, non-vibrating surface with adequate strength to hold its weight.
To find the weight for your printer configuration, see Physical Specifications on page 180.
•Do not block or cover the slots or openings on the printer. These openings are provided for
ventilation and to prevent overheating of the printer.
•Place the printer in an area where there is adequate space for operation andservicing.
•Place the printer in a dust-free area.
•Do not store or operate the printer in an extremely hot, cold, or humid environment.
•Do not place the printer near a heat source.
•Do not place the printer in direct sunlight to avoid exposure to light-sensitive components.
•Do not place the printer where it is directly exposed to the cold air flow from an air conditioning
system.
•Do not place the printer in locations susceptible to vibrations.
•For optimum performance, use the printer at the elevations specified in Elevationon page 184.
Safety
Xerox
®
WorkCentre
®
4265 Multifunction Printer15
User Guide
Printer Supplies
•Use the supplies designed for your printer. The use of unsuitable materials can cause poor
performance and a possible safety hazard.
•Follow all warnings and instructions marked on, or supplied with, the product, options, and supplies.
•Store all consumables in accordance with the instructions given on the package or container.
•Keep all consumable supplies away from the reach of children.
•Never throw toner, print/drum cartridges, or tonercontainers into an open flame.
•When handling cartridges, for example toner cartridges, avoid skin or eye contact. Eye contact can
cause irritation and inflammation.Do not attempt to disassemble the cartridge, which can increase
the risk of skin or eye contact.
CAUTION: Use of non-Xerox supplies is not recommended. The Xerox Warranty, Service Agreement,
and Total Satisfaction Guarantee do not cover damage, malfunction, or degradation of performance
caused by use of non-Xerox supplies, or the use of Xerox supplies not specified for this printer. The
Total Satisfaction Guarantee is available in the United States and Canada. Coverage could vary
outside these areas. Please contact your Xerox representative for details.
Safety
16Xerox
®
WorkCentre
®
4265 Multifunction Printer
User Guide
Maintenance Safety
•Do not attempt any maintenance procedure that is not described in the documentation supplied
with your printer.
•Do not use aerosol cleaners. Clean with a dry lint-free cloth only.
•Do not burn any consumables or routine maintenance items.
•For information on Xerox
®
supplies recycling programs, go to www.xerox.com/gwa.
WARNING: Do not use aerosol cleaners. Aerosol cleaners can cause explosions or fires when used on
electromechanical equipment.
Safety
Xerox
®
WorkCentre
®
4265 Multifunction Printer17
User Guide
Printer Symbols
SymbolDescription
Warning:
Indicates a hazard which, if not avoided, could result in death or serious injury.
Caution:
Indicates a mandatory action to take in order to avoid damage to the property.
Hot surface on or in the printer. Use caution to avoid personal injury.
Do not burn the item.
Do not expose the imaging unit to light for more than 10 minutes.
Do not expose theimaging unit to direct sunlight.
Do not touch the part or area of the printer.
Warning:
Wait for the printer to cool for the specified time before touching the fuser.
This item can be recycled. For details, see Recycling and Disposalon page 201.
Safety
18Xerox
®
WorkCentre
®
4265 Multifunction Printer
User Guide
Environmental, Health, and Safety Contact
Information
For more information on Environment, Health, and Safety in relation to this Xerox product and supplies,
contact the following customer help lines:
United States and Canada:1-800-ASK-XEROX (1-800-275-9376)
Europe:
+44 1707 353 434
For product safety information in the United States and Canada, go to www.xerox.com/environment.
For product safety information in Europe, go to www.xerox.com/environment_europe.
Xerox
®
WorkCentre
®
4265 Multifunction Printer19
User Guide
This chapter includes:
•Parts of the Printer...............................................................................................................................................................20
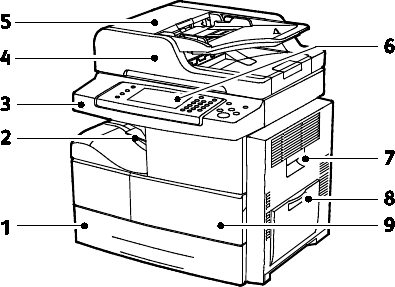
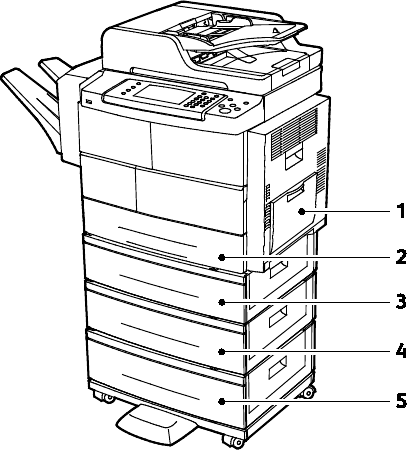
Optional Finisher, Tray 2, and High-Capacity Feeder
1.Optional 500-Sheet Finisher
2.Finisher Front Door
3.USB Port
4.Document Feeder with 100-Sheet Capacity
5.Document Feeder Top Cover
6.Control Panel
7.Side Door
8.Bypass tray with 100-sheet capacity
9.Front Door
10.Tray 1 with 520-sheet capacity
11.Feeder Tray Outside Cover
12.Feeder Tray Inside Cover
13.Optional Feeder Tray 2 with 520-Sheet
Capacity
14.High-Capacity Feeder Outside Cover
15.High-Capacity Feeder Inside Cover
16.
Optional 2100-Sheet High-Capacity Feeder
Features
22Xerox
®
WorkCentre
®
4265 Multifunction Printer
User Guide
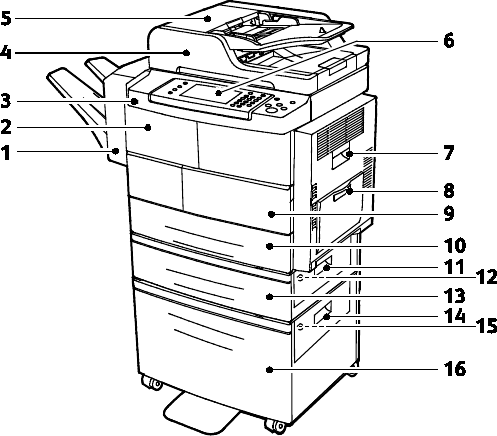
Alternate Configuration with Trays 1-4
1.Bypass tray with 100-sheet capacity
2.Tray 1 with 520-sheet capacity
3.Optional Feeder Tray 2 with 520-Sheet Capacity
4.Optional 520-Sheet Feeder Tray 3
5.Optional 520-Sheet Feeder Tray 4
Features
Xerox
®
WorkCentre
®
4265 MultifunctionPrinter23
User Guide
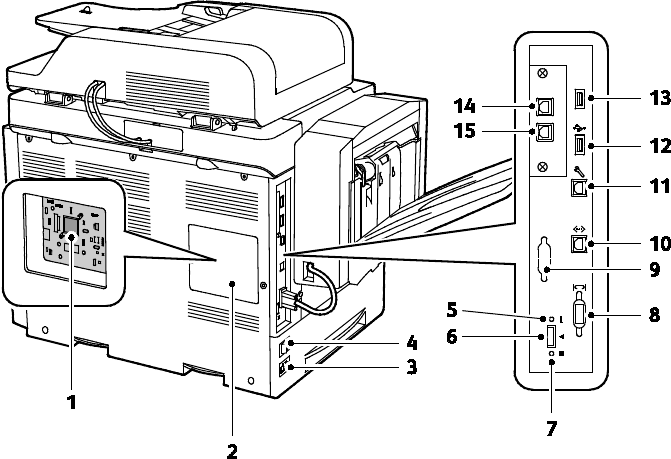
Rear View
1.Control Board
2.Control Board Cover
3.Power Connector
4.Power Switch
5.Red LED
6.Card Reader Slot
7.Green LED
8.Finisher Interface
9.Optional Foreign Device Interface
10.Ethernet Connection
11.USB Port for Service Only
12.Direct Connect Port for USB Printing
13.Direct Connect Port for USB Printing
14.Handset Extension Connector for Optional Fax Kit
15.Fax Line In for Optional Fax Kit
Features
24Xerox
®
WorkCentre
®
4265 Multifunction Printer
User Guide
Internal Components
1.Toner Cartridge
2.Drum Cartridge
3.Smart Kit Drum Cartridge
4.Document Glass
5.Document Feeder
6.Fuser
7.Transfer Roller
Optional 500-Sheet Finisher
1.Finisher Connector Cable
2.Finisher Front Door
3.Staple Cartridge
Features
Xerox
®
WorkCentre
®
4265 MultifunctionPrinter25
User Guide
Control Panel
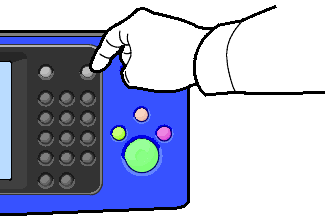
The control panel consists of a touch screen and buttonsyou press to control the functions available on
the printer. The control panel:
•Displays the current operating status of the printer.
•Provides access to print features.
•Provides access to reference materials.
•Provides access to Tools and Setup menus.
•Provides access to Troubleshooting menus and videos.
•Prompts you to load paper, replace supplies, and clear jams.
•Displays errors and warnings.
Item
NameDescription
1
Touch Screen
Display
The screen displaysinformation and provides access to printer functions.
2
Services Home
Button
This button provides access to printer features such as copy, scan, and fax on the touch
screen.
3 Services Button
This button returns to the active service from the Job Statusor Machine Status screens,
or to a preset service.
4 Job Status ButtonThis button displays lists of all active, secure, or completed jobs on the touch screen.
5
Machine Status
Button
This button displays the status of the printer on the touch screen.
6
Alphanumeric
Keypad
The keypad enters alphanumeric information.
7 Dial Pause ButtonThis button inserts a pause in a telephone number when it transmits a fax.
8 C (clear) ButtonThis button deletes numeric values or the last digit entered using the alphanumeric keys.
9 Interrupt ButtonThis button pauses the current job to run a more urgent print, copy, or fax job.
10Start ButtonThis button starts the selected copy, scan, fax, or Print From job, such as Print from USB.
11Stop Button
This button stops the current job temporarily. To cancel or resume your job, follow the
onscreen instructions.
Features
26Xerox
®
WorkCentre
®
4265 Multifunction Printer
User Guide
Item
NameDescription
12Clear All Button
This button clears previous and changed settings for the current selection. To reset all
features to their default settings and clear existing scans, press this button twice.
13Language ButtonThis button changes the touch screen language and keyboard settings.
14Power Saver buttonThis button enters and exits the low-power mode.
15Help ButtonThis button displays information about the current selection on the touch screen.
16Log In/Out ButtonThis button provides access to password-protected features.
Features
Xerox
®
WorkCentre
®
4265 MultifunctionPrinter27
User Guide
Information Pages
Your printer has a printable set of information pages. These include configuration and font information,
demonstration pages, and more.
Printing the Information Pages
1.At the printer control panel, press the Machine Statusbutton.
2.On the Machine Information tab, touch Self Help.
3.To print an information page, select an option, then touch Print.
Note: To scroll throughthe list of available items, touch and drag your finger up or down on the
menu.
4.Touch Close.
Features
28Xerox
®
WorkCentre
®
4265 Multifunction Printer
User Guide
Power Saver Mode
Power Saver mode reduces power consumption when the printer is left idle for a specified period of time.
Power Saver Levels
There are two levels of Power Saver mode.
•Power Saver Mode 1: After a specified period of inactivity, the touch screen is dims and the printer
operates on reduced power consumption.
•Power Saver Mode 2: After a specified period of inactivity, the touch screen turns off and the
printer enters standby mode.
Exiting Power Saver Mode
The printer exits Power Saver mode automatically when any of the following events occur.
•You press a button on the control panel.
•The printer receives data from a connected device.
•You open any door or cover on the printer.
•You load media in the document feeder or bypass tray.
•You insert a thumb drive or an access card into a port.
Features
Xerox
®
WorkCentre
®
4265 Multifunction Printer29
User Guide
Administration Features
This section includes:
•CentreWare Internet Services.........................................................................................................................................29
•Accessing CentreWare Internet Services...................................................................................................................29
•Finding the IP Address of the Printer..........................................................................................................................30
•Automatic Data Collection..............................................................................................................................................30
•Billing and Usage Information.......................................................................................................................................30
For details, see the System Administrator Guide at www.xerox.com/office/WC4265docs.
CentreWare Internet Services
CentreWare Internet Services is the administration and configuration software installed on the
embedded Web server in the printer. Itallows you to configure and administer the printer from a Web
browser.
CentreWare Internet Services requires:
•A TCP/IP connection between the printer and the network in Windows, Macintosh, UNIX, or Linux
environments.
•TCP/IP and HTTP enabled in the printer.
•A network-connected computer with a Web browser that supports JavaScript.
For details, see the Help in CentreWare Internet Services or the System Administrator Guide.
Accessing CentreWare Internet Services
At your computer, open a Web browser, in the address field, type the IP address of the printer, then press
Enteror Return.
Features
30Xerox
®
WorkCentre
®
4265 Multifunction Printer
User Guide
Finding the IP Address of the Printer
To install the print drivers for a network-connected printer, you need the IP address of your printer. You
also need the IP address to access the settings of your printer through CentreWare Internet Services.
You can view the IP address of your printer on the control panel or on the Configuration Report.
To view the IP address of the printer on the control panel:
1.At the printer control panel,press the Machine Statusbutton.
2.Touch the Machine Informationtab.
−If the system administrator has set the Display Network Settings to show the IP address, it
appears in the center panel.
−If the IP address is not displayed, print the Configuration Reportor contact your system
administrator.
To print a configuration report:
1.At the printer control panel, press the Machine Statusbutton.
2.On the Machine Information tab, touch Self Help> System Configuration> Print.
3.Touch Close.
Note: After the printer has been on for two minutes, print the Configuration Report. The TCP/IP
address appears in the Network section of the page. If the IP address listed on the page is 0.0.0.0,
the printer needs more time to acquire an IP address from the DHCP server. Wait two minutes, then
print the Configuration Report again.
Automatic Data Collection
This printer automatically collects data and transmits it to a secure offsite location.Xerox or a
designated servicer uses this data to support and service the printer, or for billing, supplies
replenishment, or product improvement.Automatically transmitted data can include product
registration, meter read, supply level, printer configuration and settings, software version, and problem
or fault code data.Xerox cannot read, view, or download the content of your documents residing on or
passing through your printer or any of your information management systems.
To turn off automatic data collection:
On the Welcome page in CentreWare Internet Services, click the link in the note regarding automated
services.
Billing and Usage Information
Billing and printer usage information appears on the Billing Meters information screen. The impression
counts shown are used for billing. For details on viewing this information, see Billing and Usage
Informationon page 141.
Features
Xerox
®
WorkCentre
®
4265 Multifunction Printer31
User Guide
More Information
You can obtain more information about your printer from these sources:
ResourceLocation
Installation Guide
Packaged with the printer.
Other documentation for your printerwww.xerox.com/office/WC4265docs
Technical support information for your printer;
including online technical support, Online Support
Assistant, and driver downloads.
www.xerox.com/office/WC4265support
Information about menus or error messages
Press the control panel Help (?) button.
Information PagesPrint from the control panel, or from CentreWare
Internet Services, click Status> Information Pages.
CentreWare Internet Services documentation
In CentreWare Internet Services, click Help.
Order supplies for your printerwww.xerox.com/office/WC4265supplies
Local sales and support centerwww.xerox.com/office/worldcontacts
Printer registrationwww.xerox.com/office/register
Xerox
®
Direct online storewww.direct.xerox.com/
Xerox
®
WorkCentre
®
4265 Multifunction Printer33
User Guide
This chapter includes:
•Installation and Setup Overview...................................................................................................................................34
•Selecting a Location for the Printer..............................................................................................................................35
•Configuring the Printer at Setup...................................................................................................................................36
•Connecting the Printer.......................................................................................................................................................38
•Enabling the Printer for Scanning................................................................................................................................. 42
•Installing the Software......................................................................................................................................................43
•Installing the Printer as a Web Service on Devices................................................................................................47
See also:
Installation Guidepackaged with your printer.
System Administrator Guideat www.xerox.com/office/WC4265docs.
3
Installation and Setup
Installation and Setup
34Xerox
®
WorkCentre
®
4265 Multifunction Printer
User Guide
Installation and Setup Overview
Before printing, your computer and the printer must be plugged in, turned on, and connected. Configure
the initial settings of the printer, then install the driver software and utilities on your computer.
You can connect to your printer directly from your computer using USB, or connect over a network using
an Ethernet cable or wireless connection. Hardware and cabling requirements vary for the different
connection methods. Routers, network hubs, network switches, modems, Ethernet cables, and USB cables
are not included with your printer and must be purchased separately. Xerox recommends an Ethernet
connection because it is typically faster than a USB connection, and itprovides access to CentreWare
Internet Services.
Note: If the Software and Documentation discis not available, you can download the latest drivers
from www.xerox.com/office/WC4265drivers.
See also:
Selecting a Location for the Printeron page 35
Choosing a Connection Methodon page 38
Connecting the Printeron page 38
Configuring Network Settingson page 41
Installing the Softwareon page 43
Installation and Setup
Xerox
®
WorkCentre
®
4265 Multifunction Printer35
User Guide
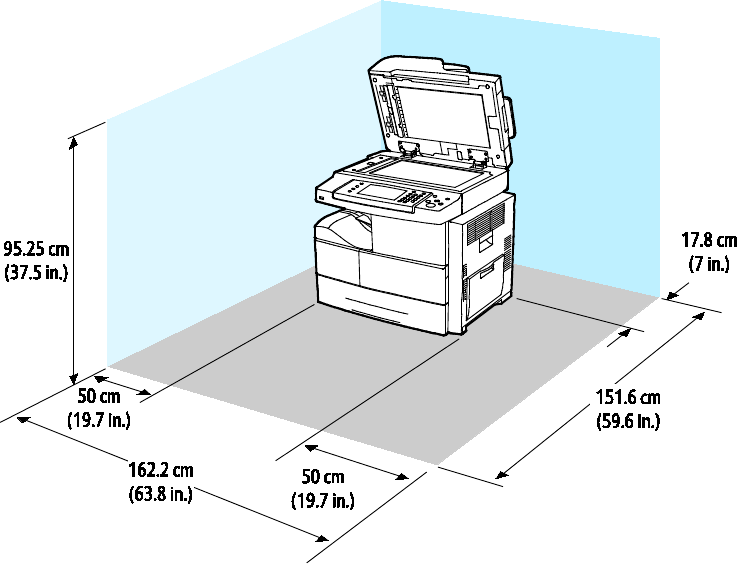
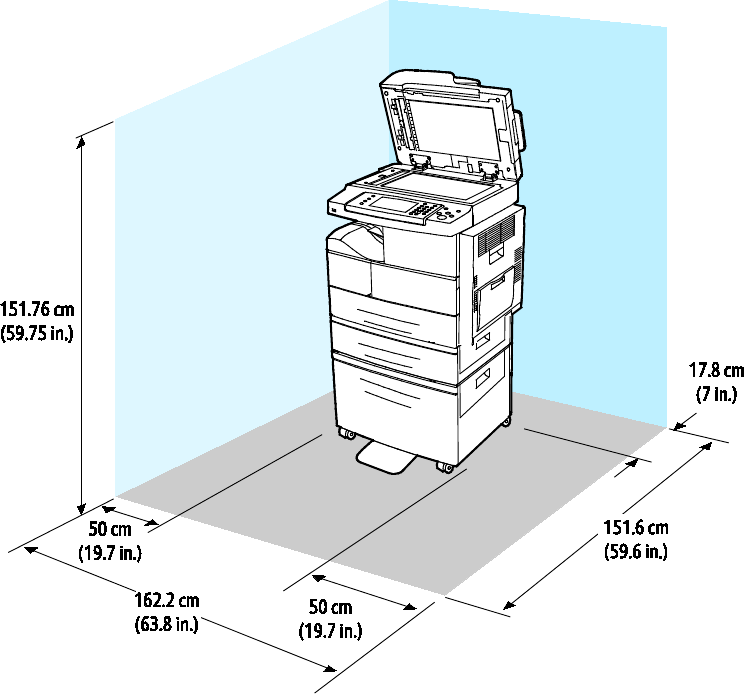
Selecting a Location for the Printer
•Select a dust-free area with temperatures from 10–30°C (50–90°F), and relative humidity 20–80%.
Note: Sudden temperature fluctuations can affect print quality. Rapid heating of a cold room can
cause condensation inside the printer, directly interfering with image transfer.
•Place the printer ona level, solid, non-vibrating surface with adequate strength for the weight of the
printer. The printer must be horizontal with all four feet in solid contact with the surface. To find the
weight for your printer configuration, see Physical Specificationson page 180.
•Select a location with adequate clearance to access supplies and to provide proper ventilation. To
find the clearance requirements for your printer, see Clearance Requirementson page 180.
•After positioning the printer, you are ready to connect it to the power source and computer or
network.
Installation and Setup
36Xerox
®
WorkCentre
®
4265 Multifunction Printer
User Guide
Configuring the Printer at Setup
Once the printer is assembled, to complete the configuration process, use the Product Enablement Key.
The Product Enablement Keysets the billing mode.
Note: The Product Enablement Key is packaged in a plastic tube contained inside the box with the
printer.
To configure the printer using the Product Enablement Key:
1.Remove the plastic card that contains the Product Enablement Key from the tube.
2.To remove the Product Enablement Key from the plastic card, carefully press it out.
3.Attach the power cord to the printer, plug the cord into an electrical outlet, then turn on the printer.
The Installation wizard starts on the control panel the first time that you turn on the printer.
Installation and Setup
Xerox
®
WorkCentre
®
4265 Multifunction Printer37
User Guide
4.In the Installation Wizard, to begin, select your chosen language and keyboard layout, then touch
Next.
5.On the Product Enablement Settingsscreen, follow the directions.
6.At step 2 of the Installation Wizard, insert the Product Enablement Key into the card reader slot at
the back of the printer.
7.When the green LED light stops blinking and remains illuminated for approximately 10 seconds,
remove the Product Enablement Key fromthe card reader slot.
8.Touch Continue.
9.Configure settings as needed, then to restart the printer and save your settings, touch Restart. To
adjust your settings, touch Back.
10.When the Services screen appears, the printer is ready for use.
If the printer prompts you for Supplies Plan Activation during setup, enter your activation code.
Installation and Setup
38Xerox
®
WorkCentre
®
4265 Multifunction Printer
User Guide
Connecting the Printer
This section includes:
•Selecting a Connection Method....................................................................................................................................38
•Physically Connectingthe Printer to the Network................................................................................................. 39
•Connecting to a Computer Using USB.......................................................................................................................39
•Connecting to a Telephone Line....................................................................................................................................39
•Turning the Printer On and Off......................................................................................................................................40
Selecting a Connection Method
The printer can be connected to your computer using a USB cable or an Ethernet cable. The method you
select depends on how your computer is connected to the network. A USB connection is a direct
connection and is the easiest to set up. An Ethernet connection is used for networking. If you are using a
network connection, it is important to understand how your computer is connected to the network. For
details, see About TCP/IP and IP Addresseson page 41.
Notes:
•Not all options listed are supported on all printers. Some options apply only to a specific printer
model, configuration, operating system, or driver type.
•Hardware and cabling requirements vary for the different connection methods. Routers,
network hubs, network switches, modems, Ethernet cables, and USB cables are not included
with your printer and must be purchased separately.
•Network: If your computer is connected to an office network or home network, use an Ethernet
cable to connect the printer to a network port. Ethernet networks can support many computers,
printers, and devices simultaneously. In most cases, Ethernet connection is faster than USB and
provides direct access to printer settings using CentreWare Internet Services.
•Wireless Network: If your computer includes a wireless router or wireless access point, you can
connect the printer to the network with a wireless connection. A wireless network connection
provides the same access and services as a wired connection provides. A wireless network
connection is typically faster than USB and allows direct access to the setting of the printer using
CentreWare Internet Services.
•USB: If you connect the printer to one computer and do not have a network, use a USB connection.
A USB connection offers fast data speeds, but typically not as fast as an Ethernet connection. In
addition, a USB connection does not provide access to CentreWare Internet Services.
•Telephone: To send and receive faxes, the multifunction printer must be connected to a dedicated
telephone line.
Installation and Setup
Xerox
®
WorkCentre
®
4265 Multifunction Printer39
User Guide
Physically Connecting the Printer to the Network
Use a Category 5 or better Ethernet cable to connect the printer to the network. An Ethernet network is
used for one or more computers andsupports many printers and systems simultaneously. An Ethernet
connection provides direct access to printer settings using CentreWare Internet Services.
To connect the printer:
1.Connect the power cord to the printer, and plug the cord into an electrical outlet.
2.Connect one end of a Category 5 or better Ethernet cable to the Ethernet port on the printer.
Connect the other end of the Ethernet cable to a correctly configured network port on a hub or
router.
3.Turn on the printer.
Note: For details on configuring wireless network settings, see the System Administrator Guideat
www.xerox.com/office/WC4265docs.
Connecting to a Computer Using USB
To connect using USB, you need Windows XP SP3, Windows 7, Windows 8 or later, Windows Server 2003
or later, or Macintosh OS X version 10.5 or later.
To connect the printer to the computer using a USB cable:
1.Connect the B end of a standard A/B USB 2.0 cable to the USB Port on the left side of the printer.
2.Connect the A end of the USB cable to the USB port on the computer.
3.If the Windows Found New Hardware Wizard appears, cancel it.
4.Install the print drivers. For details, see Installing the Softwareon page 43.
Connecting to a Telephone Line
Note: Not all options listed are supported on all printers. Some options apply only to a specific
printer model, configuration, operating system, or driver type.
1.Connect a standard RJ11 cable, No. 26 American Wire Gauge (AWG) or larger, to the Line port on
the back of the printer.
2.Connect the other end of the RJ11 cable to an operating telephone line.
3.Enable and configure the Fax functions.
For details, see the System Administrator Guide at www.xerox.com/office/WC4265docs.
Installation and Setup
40Xerox
®
WorkCentre
®
4265 Multifunction Printer
User Guide
Turning the Printer On and Off
The printer has a Power Down button on the touch screen and a power switch on the left side. ThePower
Down button on the touch screen initiates an orderly shutdown of the printer electronic components The
power switch on the side of the printer controls the main power to the printer.
To turn on the printer:
1.Turn on the power switch.
•If the power switch is on, but the printer is powered off, the printer was turned off using the control
panel. To turn on the printer, flip the power switch first to the Offposition and then to the On
position.
To turn off the printer:
1.At the printer control panel, press the Power Saverbutton.
Touch Power Down.
CAUTIONS:
•To prevent a printer malfunction, perform the control panel shutdown first.
•Do not plug or unplug the power cord while the printer is powered on.
Note: When all of the control panel lights are off, the printer power off sequence is complete.
Turning the power switch off is optional.
Installation and Setup
Xerox
®
WorkCentre
®
4265 Multifunction Printer41
User Guide
Configuring Network Settings
This section includes:
•About TCP/IP and IP Addresses.....................................................................................................................................41
About TCP/IP and IP Addresses
Computers and printers primarily use TCP/IP protocols to communicate over an Ethernet network.
Generally, Macintosh computers use either TCP/IP or the Bonjour protocol to communicate with a
network printer. For Macintosh OS X systems, TCP/IP is preferred. Unlike TCP/IP, however, Bonjour does
not require printers or computers to have IP addresses.
With TCP/IP protocols, each printer and computer must have a unique IP address. Many networks and
cable and DSL routers have a Dynamic Host Configuration Protocol (DHCP) server. A DHCP server
automatically assigns an IP address to every computer and printer on the network that is configured to
use DHCP.
If you use a Cable or DSL router, see thedocumentation for your router for information on IP addressing.
Installation and Setup
42Xerox
®
WorkCentre
®
4265 Multifunction Printer
User Guide
Enabling the Printer for Scanning
If the printer is connected to a network, you can scan to any of the following locations.
•FTP
•SMB
•HTTP
•HTTPS
•SFTP
•An email address
•A shared folder on your computer
For details, see CentreWare Internet Serviceson page 29.
Note: If your printer is connected using the USB cable, you cannot scan to an email address or a
network location, such as a shared folder on your computer.
For details,see the System Administrator Guide at www.xerox.com/office/WC4265docs.
Installation and Setup
Xerox
®
WorkCentre
®
4265 Multifunction Printer43
User Guide
Installing the Software
This section includes:
•Operating System Requirements..................................................................................................................................43
•Installing Drivers and Utilities for Windows.............................................................................................................43
•Installing Print Drivers for Macintosh OS X Version 10.7 and Later...............................................................44
•Installing Scan Drivers for Macintosh.........................................................................................................................45
•Installing the Print Drivers for UNIX and Linux......................................................................................................46
•Printing on Special Paper..................................................................................................................................................63
•General Paper Loading Guidelines................................................................................................................................50
•Paper That Can Damage Your Printer........................................................................................................................51
•Supported Paper Types and Weights..........................................................................................................................52
•Supported Standard Paper Sizes...................................................................................................................................53
•Supported Custom Paper Sizes......................................................................................................................................53
•Supported Paper Types and Weights for Automatic 2-Sided Printing..........................................................54
•Supported Standard Paper Sizes for Automatic 2-Sided Printing...................................................................54
•Supported Custom Paper Sizes for Automatic 2-Sided Printing ......................................................................54
•Supported Paper for Automatic Stapling..................................................................................................................54
Your printer is designed to use various paper and other media types. To ensure the best print quality and
to avoid jams, follow the guidelines in this section.
For best results, use Xerox paper and media recommended for your printer.
Ordering Paper
To order paper or other media, contact your local reseller or visit www.xerox.com/office/WC4265supplies.
General Paper Loading Guidelines
•Do not overfill the paper trays. Do not load paper above the maximum fill line in the tray.
•Adjust the paper guides to fit the paper size.
•Fan paper before loading it in the paper tray.
•If excessive jams occur, use paper or other approved media from a new package.
•Use only recommended Xerox
®
transparencies. Print quality could vary with other transparencies.
•Do not print on label media once a label has been removed from a sheet.
•Use only paper envelopes. Print envelopes 1-sided only.
Paper and Media
Xerox
®
WorkCentre
®
4265 Multifunction Printer51
User Guide
Paper That Can Damage Your Printer
Some paper and other media types can cause poor output quality, increased paper jams, or damage
your printer. Do not use the following:
•Rough or porous paper
•Plastic media other than supported transparencies
•Paper that has been folded or wrinkled
•Paper with cutouts or perforations
•Stapled paper
•Envelopes with windows, metal clasps, side seams, or adhesives with release strips
•Padded envelopes
•Plastic media
•Iron on transfer paper
CAUTION: The Xerox
®
Warranty, Service Agreement, or Xerox
®
Total Satisfaction Guarantee does
not cover damage caused by using unsupported paper or special media. The Xerox
®
Total
Satisfaction Guarantee is available in the United States and Canada. Coverage could vary outside
these areas. Contact your Xerox representative for details.
Paper Storage Guidelines
Storing your paper and other media properly contributes to optimum print quality.
•Store paper in dark, cool, relatively dry locations. Most paper is susceptible to damage from
ultraviolet and visible light. Ultraviolet light, from the sun and fluorescent bulbs, is particularly
damaging to paper.
•Reduce the exposure of paper to strong lights for long periods of time.
•Maintain constant temperatures and relative humidity.
•Avoid storing paper in attics, kitchens, garages, or basements. These spaces are more likely to collect
moisture.
•Store paper flat, either on pallets, cartons, shelves, or in cabinets.
•Avoid food or drinks in the area where paper is stored or handled.
•Do not open sealed packages of paper until you are ready to load them into the printer. Leave
stored paper in the original packaging. The paper wrapper protects the paper from moisture loss or
gain.
•Some special media is packaged inside resealable plastic bags. Store the media inside the bag until
you are ready to use it. Keep unused media in the bag and reseal it for protection.
Paper and Media
52Xerox
®
WorkCentre
®
4265 Multifunction Printer
User Guide
Supported Paper Types and Weights
Paper TrayPaper TypesWeight
Bypass Tray
Tray 1 with 520-sheet capacity
Optional Trays 2-4 with 520-sheet capacities
Plain
Lightweight
Bond
Hole Punched
Pre-Printed
Recycled
Envelope
Transparency
Labels
Cardstock
Cotton Letterhead
70–90 g/m²
60–69 g/m²
105–120 g/m²
60–90 g/m²
75–85 g/m²
60–85 g/m²
75–90 g/m²
138–146 g/m²
120–150 g/m²
90–163 g/m²
90 g/m²
Optional 2100-Sheet High-Capacity Feeder Plain
Lightweight
Bond
Hole Punched
Pre-Printed
Recycled
Cardstock
Cotton Letterhead
70–90 g/m²
60–69 g/m²
105–120 g/m²
60–90 g/m²
75–85 g/m²
60–85 g/m²
90–163 g/m²
90 g/m²
Paper and Media
Xerox
®
WorkCentre
®
4265 Multifunction Printer53
User Guide
Supported Standard Paper Sizes
TrayEuropean Standard SizesNorth American Standard Sizes
Tray 1 and
optional Trays
2-4
A4 (210x297 mm, 8.3x11.7in.)
A5 (148x210 mm, 5.8x8.3in.)
JIS B5 (182x257 mm, 7.2x10.1in.)
ISO B5 (176 x 250 mm, 6.9 x 9.8 in.)
A6 (105x148 mm, 4.1x5.8in.)
C5 envelope (162x229mm, 6.4x9in.)
C6 envelope (114x162mm, 4.5x6.38in.)
DL envelope (110x220mm, 4.33x8.66in.)
Letter (216x279mm, 8.5x11 in.)
Legal (216x356mm, 8.5x14 in.)
Oficio (216x343 mm, 8.5x13.5in.)
Folio (216 x 330 mm, 8.5 x 13 in.)
Executive (184x267mm, 7.25x10.5 in.)
Statement (140x216mm, 5.5x8.5 in.)
Postcard (102 x 152mm, 4 x 6in.)
No. 10 envelope (241x105mm, 4.1x9.5in.)
Monarch envelope (98x190mm, 3.9x7.5in.)
Optional
2100-Sheet
High-Capacity
Feeder
A5 (148x210 mm, 5.8x8.3in.)
ISO B5 (176 x 250 mm, 6.9 x 9.8 in.)
JIS B5 (182x257 mm, 7.2x10.1in.)
A4 (210x297 mm, 8.3x11.7in.)
Statement (140x216mm, 5.5x8.5 in.)
Executive (184x267mm, 7.25x10.5 in.)
Letter (216x279mm, 8.5x11 in.)
Folio (216 x 330 mm, 8.5 x 13 in.)
Oficio (216x343 mm, 8.5x13.5in.)
Legal (216
x
356
mm, 8.5
x
14 in.)
Bypass Tray
A4 (210x297 mm, 8.3x11.7in.)
A5 (148x210 mm, 5.8x8.3in.)
JIS B5 (182x257 mm, 7.2x10.1in.)
ISO B5 (176 x 250 mm, 6.9 x 9.8 in.)
A6 (105x148 mm, 4.1x5.8in.)
C5 envelope (162x229mm, 6.4x9in.)
C6 envelope (114x162mm, 4.5x6.38in.)
DL envelope (110x220mm, 4.33x8.66in.)
Postcard (100 x 148 mm, 3.9 x 5.8in.)
Letter (216x279mm, 8.5x11 in.)
Legal (216x356mm, 8.5x14 in.)
Oficio (216x343 mm, 8.5x13.5in.)
Folio (216 x 330 mm, 8.5 x 13 in.)
Executive (184x267mm, 7.25x10.5 in.)
Statement (140x216mm, 5.5x8.5 in.)
Postcard (102 x 152mm, 4 x 6in.)
No. 10 envelope (241x105mm, 4.1x9.5in.)
Monarch envelope (98x190mm, 3.9x7.5in.)
Postcard (102 x 152
mm, 4 x 6
in.)
Supported Custom Paper Sizes
TrayWidth Length
Trays 1-4 and Bypass Tray Only98–216 mm (3.9–8.5 in.) 148–356 mm (5.8–14 in.)
All Trays182–216 mm (7.2–8.5 in.)152.4–356 mm (6–14 in.)
Paper and Media
54Xerox
®
WorkCentre
®
4265 Multifunction Printer
User Guide
Supported Paper Types and Weights for Automatic 2-Sided Printing
Paper TypeWeight
Lightweight60–70 g/m²
Recycled60–85 g/m²
Plain
Letterhead
Hole Punched
70–90 g/m²
Pre-Printed75–85 g/m²
Supported Standard Paper Sizes for Automatic 2-Sided Printing
European Standard SizesNorth American Standard Sizes
A4 (210x297 mm, 8.3x11.7in.)
JIS B5 (182x257 mm, 7.2x10.1in.)
ISO B5 (176 x 250 mm, 6.9 x 9.8 in.)
A5 (148x210 mm, 5.8x8.3in.)
Legal (216x356mm, 8.5x14 in.)
Oficio (216x343 mm, 8.5x13.5in.)
Folio (216 x 330 mm, 8.5 x 13 in.)
Letter (216x279mm, 8.5x11 in.)
Executive (184x267mm, 7.25x10.5 in.)
Statement (140
x
216
mm, 5.5
x
8.5 in.)
Supported Custom Paper Sizes for Automatic 2-Sided Printing
TrayWidth Length
Trays 1-4 and Bypass Tray Only98–216 mm (3.9–8.5 in.)148–356 mm (5.8–14 in.)
All Trays98–216 mm (3.9–8.5 in.)152.4–356 mm (6–14 in.)
Supported Paper for Automatic Stapling
The following standard paper types are supported for automatic stapling.
Paper TypeWeight
Lightweight60–70 g/m²
Recycled60–85 g/m²
Plain
Letterhead
Hole Punched
Custom
70–90 g/m²
Pre-Printed75–85 g/m²
Bond 105–120 g/m²
LightweightCardstock
106–163 g/m²
Paper and Media
Xerox
®
WorkCentre
®
4265 Multifunction Printer55
User Guide
The following standard paper sizes are supported for automatic stapling.
European Standard SizesNorth American Standard Sizes
A4 (210x297 mm, 8.3x11.7in.)
JIS B5 (182x257 mm, 7.2x10.1in.)
Legal (216x356mm, 8.5x14 in.)
Oficio (216x343 mm, 8.5x13.5in.)
Folio (216 x 330 mm, 8.5 x 13 in.)
Letter (216x279mm, 8.5x11 in.)
Executive (184
x
267
mm, 7.25
x
10.5 in.)
Custom paper sizes within the following ranges are supported for automatic stapling.
TrayWidth Length
Tray 1 and Bypass Tray182–216 mm (7.2–8.5 in.)148–356 mm (5.8–14 in.)
Trays 1 and 2182–216 mm (7.2–8.5 in.)152.4–356 mm (6–14 in.)
Paper and Media
56Xerox
®
WorkCentre
®
4265 Multifunction Printer
User Guide
Loading Paper
This section includes:
•Loading Paper in the Bypass Tray................................................................................................................................56
•Loading Paper in a 520-Sheet Feeder (Trays 1-4)................................................................................................. 58
•Loading Paper in the 2100-Sheet High-Capacity Feeder...................................................................................60
Loading Paper in the Bypass Tray
To load paper in the bypass tray:
1.Open the bypass tray.
2.If the bypass tray is loaded with paper already, remove any paper that is a different size or type.
3.Move the width guides to the edges of the tray.
Paper and Media
Xerox
®
WorkCentre
®
4265 Multifunction Printer57
User Guide
4.Flex the sheets back and forth and fan them, then align the edges of the stack on a level surface.
This procedure separates any sheets that are stuck together and reduces the possibility of jams.
Note: To avoid jams and misfeeds, do not remove paper from its packaging until you are ready to
use it.
5.Load the paper in the tray.
6.Load hole punched paper with the holes towardthe rear of the printer.
7.For 1-sided and 2-sided printing, to load letterhead or pre-printed paper, place letterhead face down
with the top edge going into the printer.
Note: Do not load paper above the maximum fill line. Overfilling the tray can cause the printer to
jam.
8.Adjust the width guides until they touch the edges of the paper.
9.If the control panel prompts you, verify the paper size, type, and color in the Paper Settings screen.
10.When finished, touch Confirm.
Paper and Media
58Xerox
®
WorkCentre
®
4265 Multifunction Printer
User Guide
Loading Paper in a 520-Sheet Feeder (Trays 1-4)
To load paper in a 520-sheet feeder:
1.Pull out the tray until it stops.
2.Move the length and width guides out:
a.Pinch the guide lever on each guide.
b.Slide the guides outward until they stop.
c.Release the levers.
3.Flex the sheets back and forth and fan them, then align the edges of the stack on a level surface.
This procedure separates any sheets that are stuck together and reduces the possibility of jams.
Paper and Media
Xerox
®
WorkCentre
®
4265 Multifunction Printer59
User Guide
4.Load the paper with the short edge against the right side of the tray.
Notes:
•Load paper into the tray with the print side face up.
•Load hole punched paper with the holes toward the rear of the printer.
•Do not load paper above the maximum fill line. Overfilling can cause paper jams.
5.Adjust the paper guides in the tray to match the size of the paper.
6.Close the tray.
7.If the control panel prompts you, verify the paper size, type, and color in the Paper Settings screen.
8.Touch Confirm.
Paper and Media
60Xerox
®
WorkCentre
®
4265 Multifunction Printer
User Guide
Loading Paper in the 2100-Sheet High-Capacity Feeder
To load paper in the high-capacity feeder:
1.Pull out the tray until it stops.
2.To unlock the paper guides, lift, turn, then remove the locking pinsfrom the side paper guides.
Paper and Media
Xerox
®
WorkCentre
®
4265 Multifunction Printer61
User Guide
3.To adjust the size, slide the paper guides until the arrow aligns to the required paper size. In this
example, the guide is locked to fit JIS B5 paper.
4.To lock the paper guides in place, insert the locking pins into the desired slot, then turn pins to the
left until they fit snugly.
CAUTION: If you force the pin into place, it can result in breakage.
5.Flex the sheets back and forth and fan them, then align the edges of the stack on a level surface.
This procedure separates any sheets that are stuck together and reduces the possibility of jams.
Paper and Media
62Xerox
®
WorkCentre
®
4265 Multifunction Printer
User Guide
6.Load the paper with the short edge against the right side of the tray.
Notes:
•Load paper into the tray with the print side face down.
•Load hole punched paper with the holes toward the rear of the printer.
•Do not load paper above the maximum fill line. Overfilling the tray can cause the printer to
jam.
7.Close the tray.
8.If the control panel prompts you, verify the paper size, type, and color in the Paper Settings screen.
•Guidelines for Printing Envelopes................................................................................................................................. 63
•Loading Envelopes in a 520-Sheet Feeder (Trays 1-4)........................................................................................64
•Loading Envelopes in the Bypass Tray........................................................................................................................65
•Printing from a USB Flash Drive....................................................................................................................................85
5
Printing
Printing
70Xerox
®
WorkCentre
®
4265 Multifunction Printer
User Guide
Printing Overview
Before printing, your computer and the printer must be plugged in, turned on, and connected to an
active network. Make sure that you have the correct print driver software installed on your computer. For
details, see Installing the Softwareon page 43.
1.Select the appropriate paper.
2.Load paper in the appropriate tray.
3.At the printer control panel, specify the size and type.
4.In your software application, access the print settings. For most software applications, press CTRL+P
for Windows or CMD+Pfor Macintosh.
5.Select your printer.
6.To access the print driver settings for Windows, select Propertiesor Preferences. For Macintosh
•Managing Jobs at the Control Panel...........................................................................................................................76
•Managing Secure and Held Print Jobs........................................................................................................................77
•Managing Jobs in CentreWare Internet Services...................................................................................................77
Managing Jobs at the Control Panel
From the control panel Job Status, you can view lists of active jobs, secure jobs, or completed jobs. You
can pause, delete, print, or view job progress or job details for a selected job. For details, see Printing
Special Job Typeson page 81.
To pause and restart printing:
1.To pause printing, at the control panel, press the Interrupt Printingbutton.
2.To resume printing, press the Interrupt Printingbutton.
To pause the print job with the option to delete it:
1.At the control panel, press the Stopbutton.
2.To resume the print job, touch Resume.
3.To delete the print job, touch Cancel.
To view active, secure, or completed jobs:
1.At the control panel, press the Job Statusbutton.
2.To see a list of specific job types, touch a tab.
−To view jobs that are in process or waiting to process, touch the Active Jobstab.
−To view Secure Print jobs, touch the Personal & Secure Jobstab. Touch the folder, enter the
passcode number, then touch OK.
−To view completed jobs, touch the Completed Jobstab.
3.To see details about a job, touch the job.
To delete a job:
1.At the control panel, press the Job Statusbutton.
2.From any of the job type tabs, touch the job.
3.Touch Delete.
Notes:
•The system administrator can restrict users from deleting jobs. If a system administrator has
restricted job deletion, you can view the jobs, but not delete them.
•Only the user that sent the job or the system administrator can delete a secure print job.
Printing
Xerox
®
WorkCentre
®
4265 Multifunction Printer77
User Guide
From the Print From menu, you can view lists of saved jobs, jobs stored on a USB Flash drive, or jobs
stored in printer folders. You can select and print jobs from any of the lists. To print the job, see Printing
Special Job Typeson page 81.
To reprint saved jobs:
At the control panel, press the Servicesbutton, then touch Reprint Saved Jobs.
Managing Secure and Held Print Jobs
When you send a secure print job, the job is held until you release it by typing a passcode at the control
panel.
To view a list of secure print jobs:
1.At the printer control panel, press the Job Statusbutton.
2.Touch Personal & Secure Print Jobs.
Note: Only the user that sent the job or the system administrator can delete a secure print job.
If the system administrator has configured the Hold All Jobs feature, any job sent to the printer is held
until you release it. For details, see Releasing Held Print Jobson page 84.
Unidentified jobs are jobs that are not associated with a user name. Unidentified jobs originate from a
computer that does not require a user to log in. Examples are a job sent from a DOS or UNIX window
using LPR, Port 9100, or from the Jobs tab in CentreWare Internet Services.
To view a list of the unidentified jobs andrelease them:
1.Touch the Unidentified Jobstab.
2.To release a held job, touch the job, then touch Release.
3.To release all held jobs, touch Release All Jobs.
If the printer is unable to complete a print job, it holds the job. Once the condition resolves, theprinter
resumes printing automatically.
Managing Jobs in CentreWare Internet Services
You can view a list of active jobs and delete print jobs from the Active Jobs list in CentreWare Internet
Services. You can also print, copy, move, or delete saved jobs. For details, see the Help in CentreWare
Internet Services.
Printing
78Xerox
®
WorkCentre
®
4265 Multifunction Printer
User Guide
Printing Features
This section includes:
•Printing on Both Sides of the Paper.............................................................................................................................78
•Selecting Paper Options for Printing............................................................................................................................79
•Printing Multiple Pages to a Single Sheet..................................................................................................................79
t Feeder................................................................................................................................................................89
•Documen
t Feeder Guidelines..........................................................................................................................................89
You can adjust numerous options for your copy jobs, specify characteristics of the original documents,
and customize the output. For details, see Basic Copyingon page 91.
You can also modify the default settings for many options. For details, see Selecting Default Copy
Settingson page 94.
Copying
Xerox
®
WorkCentre
®
4265 Multifunction Printer91
User Guide
Basic Settings
This section includes:
•Selecting a Paper Tray.......................................................................................................................................................91
•Making the Image Lighter or Darker...........................................................................................................................91
1.At the printer control panel, press the Services Homebutton.
2.Touch Copy.
3.Touch the Copytab.
4.For Paper Supply, touch the desired tray.
5.Touch OK.
Making the Image Lighter or Darker
1.At the printer control panel, press the Services Homebutton.
2.Touch Copy.
3.Touch More Features> Lighten/Darken.
4.Adjust the sliders up or down as needed.
5.Touch OK.
Setting 2-Sided Copying
1.At the printer control panel, press the Services Homebutton.
2.Touch Copy.
3.Under the Copy tab, touch 2-Sided Copying.
4.Touch an option.
5.Touch OK.
Copying
92Xerox
®
WorkCentre
®
4265 Multifunction Printer
User Guide
Image-Quality Settings
This section includes:
•Specifying the Original Type...........................................................................................................................................92
•Output Format Settings....................................................................................................................................................96
You can reduce the image to as little as 25% of its original size or enlarge it as much as 400%.
To reduce or enlarge the image:
1.Press the Services Homebutton, then touch Copy.
2.Touch More Features> Reduce/Enlarge.
3.Touch an option.
−To reduce or enlarge the percentage incrementally, touch Plus (+)or Minus (-).
−To reduce or enlarge the percentage incrementally, touch the arrows.
−To reduce or enlarge the percentage using the alphanumeric keypad, touch the current
displayed value.
4.Touch OK.
Specifying the Size of the Original
To scan the correct area of the original, specify the original size.
1.Press the Services Homebutton, then touch Copy.
2.Touch More Features> Original Size.
3.Touch an option.
−Auto Detect: The printer detects the size of the original document.
−Preset Scan Area: You can specify the area to scan when it matches a standard paper size.
−Custom Scan Area: You can specify the height and width of the area to scan.
−Mixed Size Originals: You can scan standard-size originals of varying sizes.
4.Touch OK.
Copying
Xerox
®
WorkCentre
®
4265 Multifunction Printer95
User Guide
Erasing the Edges of Copies
You can erase content from the edges of your copies by specifying the amount to erase on the right, left,
top, and bottom edges.
To erase edges on copies:
1.Press the Services Homebutton, then touch Copy.
2.Touch More Features> Edge Erase.
3.Select an option.
4.Touch OK.
Page Layout
You can use Page Layout to place a defined number of pages on one or both sides of the paper.
Note: Page Layout is disabled unless a preset Original Size is selected.
To specify the page layout:
1.Press the Services Homebutton, then touch Copy.
2.Touch More Features> Page Layout.
3.Select an option.
4.For Paper Supply, touch the desired tray.
5.Touch OK.
Shifting the Image
You can change the placement of an image on the copy page. For Image Shift to function correctly,
position originals as follows.
•For the Document Feeder, position originals face up, short edge entering the feeder first.
•For Document Glass, position originals face down in the back-left corner of the document glass with
the short edge to the left.
To change the placement of the image:
1.Press the Services Homebutton, then touch Copy.
2.Touch More Features> Image Shift.
3.Select an option.
4.Touch OK.
Copying
96Xerox
®
WorkCentre
®
4265 Multifunction Printer
User Guide
Output Format Settings
This section includes:
•Selecting Book Copying.....................................................................................................................................................96
•Creating a Booklet...............................................................................................................................................................96
When copying a book, magazine, or other bound document, you can copy either the left or right page
onto a single sheet of paper. You can copy both the left and right pages onto two sheets of paper, or as
a single image on one sheet of paper.
Note: Book Copying is disabled unless a preset Original Size is selected.
To set up book copying:
1.Press the Services Homebutton, then touch Copy.
2.Touch More Features> Book Copying.
3.Touch an option, then touch OK.
Creating a Booklet
You can print copies in booklet format. The booklet feature reduces the original page images to fit two
images on each side of the printed page.
Note: In this mode, the printer scans all of the originals before printing the copies.
To create a booklet:
1.Press the Services Homebutton, then touch Copy.
2.Touch More Features> Booklet Creation.
3.Touch On.
4.Make selections as needed.
5.Touch OK.
Copying
Xerox
®
WorkCentre
®
4265 Multifunction Printer97
User Guide
Including Covers
You can print the first and last pages of your copy job on different paper, such as colored or heavyweight
paper. The printer selects the paper from a different tray. The covers can be blank or printed.
Notes:
•Ensure that the paper used for the covers is the same as the paper used for the rest of the
document.
•If Booklet Creation is turned off or the paper supply is set to Auto Select, Covers Options are
unavailable.
To select the type of covers and the tray to use for the cover paper:
1.Press the Services Homebutton, then touch Copy.
2.Under Paper Supply, touch the tray containing the paper for the body pages of the job.
3.Touch OK.
4.Touch MoreFeatures> Covers.
5.Touch an option, then touch OK.
Adding Transparency Separators
You can add blank sheets of paper between each printed transparency. Ensure that the size and
orientation of the separators is the same as the transparencies.
Note: If the paper supply is set to Auto Select, you cannot add transparency separators.
To add transparency separators:
1.Press the Services Homebutton, then touch Copy.
2.Touch More Features> Transparency Separators.
3.Select an option.
−Off: This option does not insert a page between the transparencies.
−Blank: This option inserts a blank page between the transparencies.
−Printed:This option inserts a printed sheet of paper betweenthe transparencies.
4.Under Paper Supply, touch the desired tray.
5.Touch OK.
Copying
98Xerox
®
WorkCentre
®
4265 Multifunction Printer
User Guide
ID Card Copying
You can copy both sides of an ID card or small document onto one side of paper. Each side is copied
using the same location on the document glass. The printer stores both sides and prints them side by
side on the paper.
To copy an ID card:
1.Press the Services Homebutton, then touch ID Card Copy.
2.To change the options for paper supply, to lighten or darken an image or to turn on auto
suppression, in the ID Card Copy screen, touch Edit.
3.Lift the document cover.
4.Place the ID card, or a document smaller than half the selected paper supply size, in the upper left
corner of the document glass.
5.To enter the number of copies, use the alphanumeric keypad on the touch screen orthe control
panel.
6.Press the green Startbutton.
7.Lift the document cover.
8.Turn over the document and position it in the upper left corner of the document glass.
9.Press the green Startbutton.
10.Lift the document cover and remove the ID card or document.
Copying
Xerox
®
WorkCentre
®
4265 Multifunction Printer99
User Guide
Advanced Copying
This section includes:
•Building a Copy Job.............................................................................................................................................................99
Building a Copy Job
Use this feature to produce complex copy jobs that include a variety of originals requiring different copy
settings. Each segment of the job can have different copy settings. Once all the segments are
programmed, scanned, and temporarily stored in the printer, the copy job prints.
The Build Job screen displays information about the job such as the Segment #, Pages, and Quantity for
Final Job.
To build a copy job with multiple segments:
1.Press the Services Homebutton, then touch Copy.
2.Touch More Features> Build Job.
3.Touch On.
4.Touch Options.
a.Select or clear the Display Summary window between segmentscheck box.
b.Select or clear the Turn Build Job Off after Job is Submittedcheck box.
5.Touch OK.
6.Program and copy the first segment.
a.Load the originals for the first segment.
b.Press the green Startbutton.
7.If a password is required, contact the system administrator.
8.Program and copy additional segments.
a.Load the originals for the next segment.
b.When the Build Job screen appears, touch Program Next Segment.
c.Press the green Startbutton.
9.Repeat the previous step for each remaining segment.
10.At any time, you can touch Delete All Segmentsto modify the job.
11.When all of the segments have been programmed and copied, touch Submit the Job.
If necessary, touch Delete> Delete Jobto cancel the job.
ing a Scanned Image to a Destination ..........................................................................................................109
•Sca
nning to a Shared Folder on a Network Computer......................................................................................110
•Sca
nning to Your Home Directory..............................................................................................................................112
•Sca
nning to an Email Address......................................................................................................................................113
•Sca
nning to a USB Flash Drive.....................................................................................................................................114
•Scanning to a Computer.................................................................................................................................................115
The system administrator must set up this feature before you can use it. For details, see the System
Administrator Guide at www.xerox.com/office/WC4265docs.
If the system administrator enables Remote Start in CentreWare Internet Services, you can scan images
directly from the scanner to a PC. Using Microsoft Clip Organizer, you can scan, import, and store images
from the printer. You canalso scan directly from the printer to a computer using most TWAIN-compliant
scanning applications.
7
Scanning
Scanning
102Xerox
®
WorkCentre
®
4265 Multifunction Printer
User Guide
Basic Scanning
The Scanning feature provides several methods for scanning and storing an original document. The
scanning procedure using your printer differs from that of desktop scanners. The printer is connected
typically to a network rather than a single computer, so you select a destination for the scanned image
at the printer. For details, see Adjusting Scanning Settingson page 104.
The printer supports the following scanning functions:
•Scan documents and store images on the printer hard drive.
•Scan original documents to a document repository on a network server.
•Scan original documents to an email address.
•Scan original documentsto your home directory.
•Scan original documents to a USB Flash drive.
•Import scanned images into applications using TWAIN and WIA.
Notes:
•The printer must be connected to a network to retrieve a scan file remotely.
•Print, copy, and fax jobs can print while you are scanning original documents or downloading
files from the printer hard drive.
•For details, see the Help in CentreWare Internet Services.
To scan an image:
1.Load your original documents:
−Use the document glass for single pages or paper that cannot be fed using the document
feeder. Place the first page of the document face down, in the top left corner of the document
glass.
−Use the document feeder for multiple or single pages. Remove any staples and paper clips from
the pages and place them face up in the document feeder.
2.At the printer control panel, press Clear All, then press Services Home.
3.Touch Workflow Scanning.
4.Select a template from the list.
5.To change the scan setting, touch an option.
6.For more options, touch the More Featurestab.
7.Press the green Startbutton.
Scanning
Xerox
®
WorkCentre
®
4265 Multifunction Printer103
User Guide
Document Glass
• Lift the document feeder cover and place the
first page face down in the upper left corner
of the document glass.
• Align the originals to the matching paper size
printed on the edge of the glass.
• The document glass accommodates original
sizes up to 216 x 356 mm (8.5 x 14 in.).
• The document glass automatically detects
Legal or Letter/A4 and smaller paper sizes.
Document Feeder
• Insert originals face up, with pageone on top.
• Adjust the paper guides so they fit against the
originals.
•The document feeder accepts paper
weights from 50–105 g/m² (12.5–28 lb.)
for 2-sided pages.
• The document feeder accepts paper sizes from
145 x 145mm (5.7 x 5.7in.) through 216 x
356mm (8.5 x 14in.) for 1-sided pages, and
176 x 250 (6.93 x 9.84 in.) through 216 x
356mm (8.5 x 14in.) for 2-sided pages.
• The maximum feeder capacity is
approximately 100 sheets of 75g/m² paper.
• The document feeder automatically detects
Legal or Letter/A4 size paper.
Document Feeder Guidelines
When loading originals into the duplex automatic document feeder, follow these guidelines:
•Insert originals face up with the top of the page entering the feeder first.
•Only place loose sheets of paper in the duplex automatic document feeder.
•Adjust the paper guides so that they fit against the originals.
•Only Insert paper in theduplex automatic document feeder when ink on the paper is dry.
•Do not load originals above the MAX fill line.
Scanning
104Xerox
®
WorkCentre
®
4265 Multifunction Printer
User Guide
Adjusting Scanning Settings
This section includes:
•Setting the Output Color.................................................................................................................................................104
•Setting the Scan Resolution..........................................................................................................................................104
•Setting the File Format....................................................................................................................................................105
•Lightening or Darkening the Image..........................................................................................................................105
•Specifying the Original Size...........................................................................................................................................106
•Building a Scan Job...........................................................................................................................................................107
Setting the Output Color
If the original image contains color, you can scan the image in color or in black and white. Selecting
black and white significantly reduces the file size of the scanned images.
To set the output color:
1.At the printer control panel, press Clear All, then press Services Home.
2.Touch Scan To, then select an option.
3.Touch the More Featurestab.
4.Touch Output Color.
5.Selecta color mode.
6.Touch OK.
Setting the Scan Resolution
The scan resolution depends on how you plan to use the scanned image. Scan resolution affects both
the size and image quality of the scanned image file. Higher scan resolution produces better image
quality and a larger file size.
To set the scan resolution:
1.At the printer control panel, press Clear All, then press Services Home.
2.Touch Scan To, then select an option.
3.Touch More Features> Resolution.
4.Select an option.
5.Touch OK.
Scanning
Xerox
®
WorkCentre
®
4265 Multifunction Printer105
User Guide
Selecting 2-Sided Scanning
2-Sided Scanning scans both sides of the original image.
To set 2-sided scanning:
1.At the printer control panel, press Clear All, then press Services Home.
2.Touch Scan To, then select an option.
3.Touch 2-Sided Scanning.
4.Touch 2-Sided.
5.To rotate the image on side 2 by 180 degrees, touch 2-Sided, then touch Rotate Side 2.
6.Touch OK.
Setting the File Format
1.At the printer control panel, press Clear All, then press Services Home.
2.Touch Scan To, then select an option.
3.Touch File.
4.Type a file extension, or select one from the menu.
5.Touch OK.
Lightening or Darkening the Image
1.At the printer control panel, press Clear All, then press Services Home.
2.Touch Scan To, then select an option.
3.Touch More Features> Lighten/Darken.
4.To lighten or darken the image, move the slider up or down.
5.Touch OK.
Automatically Suppressing Background Variation
When scanning originals printed on thin paper, text or images printed on one side of the paper can be
seen on the other side. Use the Auto Suppression setting to reduce the sensitivity of the printer to
variations in light background colors.
To select Auto Suppression:
1.At the printer control panel, press Clear All, then press Services Home.
2.Touch Scan To, then select an option.
3.Touch MoreFeatures> Background Suppression.
4.Touch AutoSuppression.
5.Touch OK.
Scanning
106Xerox
®
WorkCentre
®
4265 Multifunction Printer
User Guide
Specifying the Original Size
1.At the printer control panel, press Clear All, then press Services Home.
2.Touch Scan To, then select an option.
3.Touch Original Size, then select an option.
4.Touch OK.
Erasing Edges
To use Edge Erase:
1.At the printer control panel, press Clear All, then press Services Home.
2.Touch Scan To, then select an option.
3.Touch More Features> Scan to Edge.
4.To change the Edge Erase settings, select an option.
5.Touch OK.
Scanning
Xerox
®
WorkCentre
®
4265 Multifunction Printer107
User Guide
Building a Scan Job
Use this feature to combine an assorted group of originals for assembly into a single scan job.
When you build a scan job, each individual segment is scanned as a single job. At any time, you can
touch Delete All Segmentsto modify the job.
To build a scan job:
1.At the printer controlpanel, press Clear All, then press Services Home.
2.Touch Workflow Scanning, then touch an option.
3.Touch More Features> Build Job.
4.Touch On.
5.Touch Options.
a.Select or clear the Display Summary window between segmentscheck box.
b.Select or clear the Turn Build Job Off after Job is Submittedcheck box.
6.Touch OK.
7.Program and scan the first segment:
a.Load the originals for the first segment.
b.Press the green Startbutton on the control panel.
8.If a password is required, contact the system administrator.
9.Program and scan additional segments:
a.Load the originals for the next segment.
b.When the Build Job screen appears, touch Program Next Segment.
c.Press the green Startbutton to scan the originals for that segment.
10.Repeat the previous step for each remaining segment.
11.At any time, you can touch Delete All Segmentsto modify the job.
12.When all of the segments have been programmed and scanned, touch Submit the Job.
If necessary, touch Delete> Delete Jobto cancel the job.
Scanning
108Xerox
®
WorkCentre
®
4265 Multifunction Printer
User Guide
Selecting Filing Options
Filing Options provide additional settings for naming images, selecting image formats, and selecting
behavior when a file name exists.
Document Management and Add File Destinations can be modified only after scanning to network file
repositories or scanning to home are set up. For details, see the System Administrator Guide at
www.xerox.com/office/WC4265docs.
To select filing options:
1.At the printer control panel, press Clear All, then press Services Home.
2.Touch Workflow Scanning> File.
To select a file format:
1.Type a file extension, or select one from the menu.
2.Touch OK.
To select the action to take if a file already exists:
1.Touch the More Featurestab.
2.Touch If File Already Exists.
3.Select an option.
4.Touch OK.
To define additional network locations as destinations for scanned documents:
1.Touch the More Featurestab.
2.Touch Add File Destinations.
3.Select an option.
4.Touch OK.
Scanning
Xerox
®
WorkCentre
®
4265 Multifunction Printer109
User Guide
Sending a Scanned Image to a Destination
Before scanning to a destination, configure the destination folders on the server or share the folder on a
personal computer. In addition, you must have at least one Scan To Destination in the address book.If
Scan To Destination properties are not properly configured, the Scan To icon appears grayed out on the
touch screen.
To scan an image and send it to a destination:
1.Load the original on the document glass or in the document feeder.
2.At the printer control panel, press Clear All, then press Services Home.
3.Touch Scan To> Scan Contacts.
4.Select an option.
5.Select the desired name from the list, then touch OK.
6.Change scan settings as needed.
7.Press the green Startbutton.
For details, see Adjusting Scanning Settingson page 104.
Scanning
110Xerox
®
WorkCentre
®
4265 Multifunction Printer
User Guide
Scanning to a Shared Folder on a Network
Computer
This section includes:
•Sharing a Folder on a Windows Computer.............................................................................................................110
•Sharing a Folder UsingMacintosh OS X Version 10.7 and Later...................................................................111
•Scanning to a Folder on a Network Computer......................................................................................................111
Before using the printer as a scanner on a network, you must:
1.Create a shared folder on your computer hard drive.
2.Create an address using CentreWare Internet Services or the Address Book Editor pointing the
scanner to the computer.
Note: For more information, see Connecting the Printeron page 38.
Sharing a Folder on a Windows Computer
Before you begin:
•Verify that your computer security software allows for file sharing.
•Verify that File and Printer Sharing For Microsoft Networks is enabled for each of your connections.
Note: For assistance, contact your system administrator.
To turn on sharing:
1.Open Windows Explorer.
2.Right-click the folder you want to share, then select Properties.
3.Click the Sharingtab, then click Advanced Sharing.
4.Select Share this folder.
5.Click Permissions.
6.Select the Everyonegroup, and verify that allpermissions are enabled.
7.Click OK.
Note: Remember the Share name for later use.
8.Click OKagain.
9.Click Close.
Scanning
Xerox
®
WorkCentre
®
4265 Multifunction Printer111
User Guide
Sharing a Folder Using Macintosh OS X Version 10.7 and Later
1.From the Apple menu, select System Preferences.
2.Select Sharing.
3.From the Service menu, select File Sharing.
4.Under Shared Folders, click the plus icon (+).
5.Browse to the folder that you want to share on the network, then click Add.
6.To modify access rights for your folder, select it. The groups activate.
7.From the Users list, click Everyone, then use the arrows to select Read & Write.
8.Click Options.
9.To share the folder with Windows computers, select Share files and folders using SMB.
10.To share the folder with specific users, next to the user name, select On.
11.Click Done.
12.Close the System Preferences window.
Note: When you open a shared folder, a Shared Folder banner appears in the Finder for the folder
and subfolders.
Scanning to a Folder on a Network Computer
1.Load the original on the document glass or in the duplex automatic document feeder.
2.Press the Services Homebutton, then touch Workflow Scanning.
3.Select a template from the list.
4.Change scan settings as needed. For details, see Adjusting Scanning Settingson page 104.
5.To begin the scan, press Start.
Scanning
112Xerox
®
WorkCentre
®
4265 Multifunction Printer
User Guide
Scanning to Your Home Directory
The Scan to Home feature allows you to scan an image to your home directory.
Note: To use the Scan to Home function, you must log in with a valid user name and passcode.
To scan an image to your home directory:
1.Load the original on the document glass or in the document feeder.
2.At the printer control panel, press Clear All, then press Services Home.
3.Touch Workflow Scanning.
4.Select the template that the system administrator created.
5.Change scan settings as needed.
6.Press the green Startbutton.
Scanning
Xerox
®
WorkCentre
®
4265 Multifunction Printer 113
User Guide
Scanning to an Email Address
When using this feature, the images you scan are sent as email attachments.
Before scanning to email, configure the email SMTP and From Field properties. You must have at least
one email address in the address book. If email properties are not properly configured, the Email icon
appears grayed out on the touch screen.
To scan an image and send it to an email address:
1.Load the original on the document glass or in the document feeder.
2.Press the Services Homebutton, then touch Email.
3.To enter an email address, do the following.
a.Touch Enter Recipient.
b.Touch the down arrow, then from the menu, select To:or Cc:or Bcc:.
c.Type the email address.
d.Touch OK.
4.To enter an email address from the network address book, do the following.
a.TouchDevice Address Book.
b.Select the desired name from the list, then touch OK.
5.To add a subject line, do the following.
a.Touch Subject, then type the desired text.
b.To modify the default subject, touch Xto delete it, or type over the existing text.
c.Touch OK.
6.To change any of the scan settings, use options on the More Featurestab.
7.Press the green Startbutton.
Scanning
114Xerox
®
WorkCentre
®
4265 Multifunction Printer
User Guide
Scanning to a USB Flash Drive
You can scan a document and store the scanned file on a USB Flash drive. The Scan to USB function
produces scans in .jpg, .pdf, and .tifffile formats.
To scan to a USB Flash drive:
1.Load the original on the document glass or in the duplex automatic document feeder.
2.Insert your USB Flash drive into the USB port on the side of the printer.
3.Touch USB> Scan to USB.
4.Change scan settings as needed. For details, see Adjusting Scanning Settingson page 104.
5.To begin the scan, press Start.
WARNING: Do not remove the USB Flash drive until prompted. If you remove the Flash drive before
the transfer is complete, the file can become unusable and other files on the drive can be damaged.
Scanning
Xerox
®
WorkCentre
®
4265 Multifunction Printer 115
User Guide
Scanning to a Computer
If the system administrator enables Remote Start in CentreWare Internet Services, you can scan images
directly from the scanner to a PC. Using Microsoft Clip Organizer, you can scan, import, and store images
from the printer. You can also scan directly from the printer to a computer using most TWAIN-compliant
scanning applications.
Scanning to a Computer
1.At the printer, load the original on the document glass or in the automatic document feeder.
2.At your computer, click Start> Programs> Microsoft Office> Microsoft Office Tools> Microsoft
Clip Organizer.
3.Click File> Add Clips to Organizer> From Scanner or Camera.
4.Click Device> Xerox TWAIN Driver.
5.Click Custom Insert.
6.If multiple scanners are installed on your computer, click Select Scan Device, select the scanner,
then click Select.
7.To select a size for the scanned image, click Scan Sizeand select an option.
8.To select the sides to scan from the original, click Side to Scanand select an option:
−1-Sided Scan: This setting scans only one side of the original document or image and produces
1-sided output files.
−2-Sided Scan: This setting scans both sides of the original document or image.
−2-Sided Scan, Short Edgescans both sides of the original image on the short edge.
9.To select the resolution to scan the image, click Resolution, then select an option.
10.To adjust the scan color, click Image Colorand select an option:
−Autodetects the color content in the original image. If the original image is color, the printer
scans in full color. If the original is a black and white document, the printer scans in black and
white only.
−Color: Scans in full color.
−Grayscale: Detects and scans various shades of gray.
−Black and White: This setting scans in black and white only.
ring a Fax in a Local Mailbox ................................................................................................................................. 123
•Pri
nting Local Mailbox Documents.............................................................................................................................124
•Send
ing a Fax to a Remote Mailbox..........................................................................................................................125
•Stor
ing a Fax for Local or Remote Polling...............................................................................................................126
•Poll
ing a Remote Fax........................................................................................................................................................127
•Pri
nting or Deleting Stored Faxes...............................................................................................................................128
•Using the Address Book...................................................................................................................................................129
The system administrator must set up this feature before you can use it. For details, see the System
−Use the document glass for single pages or paper that cannot be fed using the document
feeder. Placethe first page of the document face down, in the top left corner of the document
glass.
−Use the document feeder for multiple or single pages. Remove any staples and paper clips from
the pages and place them face up in the document feeder.
2.Press the Services Homebutton, then touch Fax.
3.Address the fax using one or more of the available options:
−Enter Recipient: This option allows you to enter a fax number manually.
−Manual Dial Mode: This option allows you to insert characters, such as Dial Pause, in a fax
number.
−Device Address Book: This option allows you to access the printer address book.
4.Adjust additional fax options as needed. For details, see Selecting Fax Optionson page 120.
5.Press the green Startbutton. The printer scans the pages and transmits the document when all
pages have been scanned.
Document Glass
• Lift the document feeder cover and place the
first page face down in the upper left corner
of the document glass.
• Align the originals to the matching paper size
printed on the edge of the glass.
• The document glass accommodates original
sizes up to 216 x 356 mm (8.5 x 14 in.).
• The document glass automatically detects
Legal or Letter/A4 and smaller paper sizes.
Faxing
Xerox
®
WorkCentre
®
4265 Multifunction Printer119
User Guide
Document Feeder
• Insert originals face up, with pageone on top.
• Adjust the paper guides so they fit against the
originals.
•The document feeder accepts paper
weights from 50–105 g/m² (12.5–28 lb.)
for 2-sided pages.
• The document feeder accepts paper sizes from
145 x 145mm (5.7 x 5.7in.) through 216 x
356mm (8.5 x 14in.) for 1-sided pages, and
176 x 250 (6.93 x 9.84 in.) through 216 x
356mm (8.5 x 14in.) for 2-sided pages.
• The maximum feeder capacity is
approximately 100 sheets of 75g/m² paper.
• The document feeder automatically detects
Legal or Letter/A4 size paper.
Duplex Automatic Document Feeder Guidelines
When loading originals into the duplex automatic document feeder, follow these guidelines:
•Insert originals face up with the top of the page entering the feeder first.
•Only place loose sheets of paper in the duplex automatic document feeder.
•Adjust the paper guides so that they fit against the originals.
•Only Insert paper in the duplex automatic document feeder when ink on the paper is dry.
•Do not load originals above the MAX fill line.
Faxing
120Xerox
®
WorkCentre
®
4265 Multifunction Printer
User Guide
Selecting Fax Options
This section includes:
•Specifying the Size of the Original.............................................................................................................................120
•Sending a Delayed Fax....................................................................................................................................................120
•To Lighten or Darken an Image..................................................................................................................................121
•Building a Fax Job..............................................................................................................................................................122
Specifying the Size of the Original
To ensure that you are scanning the correct area of the documents, specify the original size.
To specify the original size:
1.At the printer control panel, press Clear All, then press Services Home.
2.Touch Fax, then touch an option.
3.Touch More Features> Original Size.
4.Touch an option, then touch OK.
Sending a Delayed Fax
You can scan and save a fax on the printer, then send it at a later time.
1.At the printer control panel, press Clear All, then press Services Home.
2.Touch Fax, then touch an option.
3.Touch More Features> Delay Send.
4.Touch the Hourfield, then touch the arrows to set a number.
5.Touch the Minutefield, then touch the arrows to set a number.
6.If your printer is set to display the 12-hour clock, touch AMor PM.
7.Touch OK.
Faxing
Xerox
®
WorkCentre
®
4265 Multifunction Printer121
User Guide
Automatically Suppressing Background Variation
When scanning originals printed on thin paper, text or images printed on one side of the paper can be
seen on the other side. Use the Auto Suppression setting to reduce the sensitivity of the printer to
variations in light background colors.
To select Auto Suppression:
1.At the printer control panel, press Clear All, then press Services Home.
2.Touch Fax, then touch an option.
3.Touch MoreFeatures> Background Suppression.
4.Touch Auto Suppression.
5.Touch OK.
Sending Header Text
The system administrator must set up this feature before you can use it. For details, see the System
Administrator Guide at www.xerox.com/office/WC4265docs.
To include the fax header text:
1.At the printer control panel, press Clear All, then press Services Home.
2.Touch Fax, then touch an option.
3.Touch More Features> Send Header Text.
4.Touch On, then touch OK.
To Lighten or Darken an Image
1.At the printer control panel, press Clear All, then press Services Home.
2.Touch Fax, then touch an option.
3.Touch More Features> Lighten/Darken.
4.Touch OK.
Faxing
122Xerox
®
WorkCentre
®
4265 Multifunction Printer
User Guide
Building a Fax Job
Use this feature to fax an assorted group of originals, each with different settings. Each segment is
programmed and scanned, and the images are stored temporarily in the printer. Once all segments have
been stored, the individual segments are faxed as a single job.
To build a fax job:
1.At the printer control panel, press Clear All, then press Services Home.
2.Touch Fax, then touch an option.
3.Touch More Features> Build Job.
4.Touch On.
5.Touch Options.
−Select or clear the Display Summary window between segmentscheck box.
−Select or clear the Turn Build Job Off after Job is Submittedcheck box.
6.Program and scan the first segment:
a.Load the originals for the first segment.
b.Select the required settings, such as layout adjustments, image quality, and options.
c.Press the green Startbutton.
7.Program and scan additional segments:
a.Load the originals for the next segment.
b.When theBuild Job screen appears, touch Program Next Segment.
c.Using the appropriate tabs, select the required settings.
d.Press the green Startbutton to scan the originals for that segment.
8.Repeat the previous step for each remaining segment.
9.When all of the segments have been programmed and scanned, touch Submit the Job.
10.On the Job Progress screen, touch Job Detailsto view a summary of the job.
Faxing
Xerox
®
WorkCentre
®
4265 Multifunction Printer123
User Guide
Storing a Fax in a Local Mailbox
The system administrator must create a mailbox before you can use this feature. For details, see the
System Administrator Guide at www.xerox.com/office/WC4265docs.
To store a fax in a local mailbox:
1.At the printer control panel, press Clear All, then press Services Home.
2.Touch Fax> Mailboxes.
3.Touch Store To Mailbox> Local Mailbox.
4.Touch an option, then touch OK.
Faxing
124Xerox
®
WorkCentre
®
4265 Multifunction Printer
User Guide
Printing Local Mailbox Documents
To use this feature, you must have documents stored in a mailbox. For details, see Storing a Fax in a
Local Mailboxon page 123.
To print local mailbox documents:
1.At the printer control panel, press Clear All, then press Services Home.
2.Touch Fax> Mailboxes.
3.Touch Print From Mailbox.
4.Touch an option.
5.Touch Print.
Faxing
Xerox
®
WorkCentre
®
4265 Multifunction Printer125
User Guide
Sending a Fax to a Remote Mailbox
1.At the printer control panel, press Clear All, then press Services Home.
2.Touch Fax> Mailboxes.
3.Touch Store To Mailbox> Remote Mailbox.
4.Touch an option, then touch OK.
Faxing
126Xerox
®
WorkCentre
®
4265 Multifunction Printer
User Guide
Storing a Fax for Local or Remote Polling
Turn on Secure or Non-Secure Local Polling to make fax documents stored on one printer available for
remote polling by other printers. When Secure Local Polling is on, you create a list of fax numbers that
are allowed to access the stored faxes on the printer.
To store a fax:
1.At the printer control panel, press Clear All, then press Services Home.
2.Touch Fax> Polling.
3.Touch Store Locally for Remote Polling.
4.Touch an option.
5.Touch Save.
Faxing
Xerox
®
WorkCentre
®
4265 Multifunction Printer127
User Guide
Polling a Remote Fax
If remote polling is turned on, you can retrieve documents that were stored using local polling on
another fax machine.
Note: If Local Polling is turned on, Remote Polling is not available. To turn off Local Polling, touch
Local Polling> Off> Save.
To poll a remote fax:
1.At the printer control panel, press Clear All, then press Services Home.
2.Touch Fax> Polling.
3.Touch Retrieve/Print Remote Files.
4.Type the fax number.
5.Touch Print.
Faxing
128Xerox
®
WorkCentre
®
4265 Multifunction Printer
User Guide
Printing or Deleting Stored Faxes
1.At the printer control panel, press Clear All, then press Services Home.
2.Touch Fax> Polling.
3.Touch Local File Management, then select an option.
Faxing
Xerox
®
WorkCentre
®
4265 Multifunction Printer129
User Guide
Using the Address Book
This section includes:
•Adding an Individual Entry to the Device Address Book...................................................................................129
•Editing an Individual Address Book Entry...............................................................................................................129
Adding an Individual Entry to the Device Address Book
The Device Address Book stores a maximum of 2000 contacts. If the Add button is unavailable, the
address book has reached its limit.
Before you can use this feature, the system administrator must enable Create/Edit Contact from Touch
Screen for All Users.
To add a recipient to the Device Address Book:
1.At the printer control panel, press Clear All, then press Services Home.
2.Touch Fax> Device Address Book.
3.Touch Create New Contact.
4.To enter a name, fax number, or optional email address, touch each field, then enter the details.
5.To add a company name, touch the iicon.
6.To mark any entered contact information as a favorite, touch the star icon.
7.Touch OK.
Editing an Individual Address Book Entry
1.At the printer control panel, press Clear All, then press Services Home.
2.Touch Fax> Device Address Book.
3.Touch the address book entry.
4.Touch OK.
5.Touch the contact name.
6.To edit the fields, touch Details.
7.To delete the contact, touch Remove.
Xerox
®
WorkCentre
®
4265 Multifunction Printer131
User Guide
This chapter includes:
•Cleaning the Printer..........................................................................................................................................................132
•Managing the Printer.......................................................................................................................................................140
•Cleaning the Exterior........................................................................................................................................................133
•Cleaning the Scanner.......................................................................................................................................................133
•Cleaning the Interior........................................................................................................................................................135
General Precautions
CAUTION: Do not expose the drum cartridge to direct sunlight or strong indoor fluorescent lighting.
Do not touch or scratch the surface of the drum.
CAUTION: When cleaning your printer do not use organic or strong chemical solvents or aerosol
cleaners. Do not pour fluids directly into any area. Use supplies and cleaning materials only as
directed in this documentation.
WARNING: Keep all cleaning materials out of the reach of children.
WARNING: Do not use pressurized spray cleaning aids on or in the printer. Some pressurized sprays
contain explosive mixtures and are not suitable for use in electrical applications. Use of pressurized
spray cleaners increases the risk of fire and explosion.
WARNING: Do not remove the covers or guards that arefastened with screws. You cannot maintain
or service any parts that are behind these covers and guards. Do not attempt any maintenance
procedure that is not described in the documentation supplied with your printer.
WARNING: Internal parts of the printer can be hot. Use caution when doors and covers are open.
•Do not place anything on top of the printer.
•Do not leave the covers and doors open for any length of time, especially in well-lit places. Light
exposure can damage the drum cartridge.
•Do not open covers and doors during printing.
•Do not tilt the printer while it is in use.
•Do not touch the electrical contacts or gears. Doing so could damage the printer and cause the print
quality to deteriorate.
•Ensure any parts removed during cleaning are replaced before you plug in the printer.
Maintenance
Xerox
®
WorkCentre
®
4265 Multifunction Printer133
User Guide
Cleaning the Exterior
Clean the exterior of the printer once a month.
•Wipe the paper tray, output tray, control panel, and other parts with a damp, soft cloth.
•After cleaning, wipe with a dry, soft cloth.
•For stubborn stains, apply a small amount of mild detergent to the cloth and gently wipe the stain
off.
CAUTION: Do not spray detergent directly on the printer. Liquid detergent could enter the printer
through a gap and cause problems. Never use cleaning agents other than water or mild detergent.
Cleaning the Scanner
Clean the scanner about once a month, when anything is spilled on it, or when debris or dust collect on
any of the surfaces. Keep the feed rollers clean to ensure the best possible copies and scans.
Cleaning the Document Cover
1.Slightly dampen a soft, lint-free cloth with water.
2.Remove any paper from the document feeder.
3.Open the document cover.
Maintenance
134Xerox
®
WorkCentre
®
4265 Multifunction Printer
User Guide
4.Wipe the surface of the document glass until it is clean and dry.
Note: For best results, to remove marks and streaks, use a standard glass cleaner.
5.Wipethe white underside of the document cover until it is clean and dry.
6.Close the document cover.
Cleaning the Feed Rollers, Separation Pad, and Scanner Components
Debris and toner stains on the document feeder feed rollers, separation pads, and scanner components
can cause stains or unwanted marks on printed documents. To remove stains, use a soft lint-free cloth
dampened with a neutral detergent or water.
You can view a video on the control panel that shows how to clean the feed rollers, separation pads, and
scanner components.
To view the video:
1.At the printer control panel, press the Machine Statusbutton.
2.On the Machine Information tab, touch Self Help.
3.For Videos, select Clean Feeder to Improve Quality.
4.To view the video, touch Play Video.
Maintenance
Xerox
®
WorkCentre
®
4265 Multifunction Printer135
User Guide
Cleaning the Interior
To prevent stains inside the printer that can deteriorate print quality, clean the interior of the printer
regularly. Clean the printer interior whenever you replace the drum cartridge.
After clearing paper jams or replacing a toner cartridge, inspect the inside of the printer before closing
the printer covers and doors.
•Remove any remaining pieces of paper or debris. For details, see Clearing Paper Jamson page 152.
•Remove any dust or stains with a dry, clean cloth.
WARNING: To avoid injury, never touch a labeled area on or near the heat roller in the fuser. If a
sheet of paper is wrapped around the heat roller, do not try to remove it immediately. Switch off the
printer immediately and wait 30 minutes for the fuser to cool. After the printer cools, try to remove
the jammed paper. If the error persists, contact your Xerox representative.
When to Order Supplies ................................................................................................................................................... 137
Viewing Printer Supply Status ...................................................................................................................................... 137
•Replacing a Toner Cartridge..........................................................................................................................................139
General Precautions
WARNINGS:
•When replacing a toner cartridge, be careful not to spill the toner. If any toner spills, avoid
contact with clothes, skin, eyes, and mouth. Do not inhale the toner dust.
•Keep toner cartridges out of the reach of children. If a child accidentally swallows toner, have the
child spit out the toner, and rinse out their mouth with water. Consult a physician immediately.
•Use a damp cloth to wipe off spilled toner. Never use a vacuum cleaner to remove spills. Electric
sparks inside the vacuum cleaner can cause a fire or explosion. If you spill a large volume of
toner, contact your local Xerox representative.
•Never throw a toner cartridge into an open flame. Remaining toner in the cartridge can catch
fire and cause burn injuries or an explosion.
WARNING: Do not remove the covers or guards that are fastened with screws. You cannot maintain
or service any parts that are behind these covers and guards. Do not attempt any maintenance
procedure that is not described in the documentation supplied with your printer.
•Do not open covers and doors during printing.
•Do not leave the covers and doors open for any length of time, especially in well-lit places. Light
exposure can damage the drum cartridge.
•Do not place anything on top of the printer.
•Do not tilt the printer while it is inuse.
•Do not touch the electrical contacts or gears. Doing so could damage the printer and cause the print
quality to deteriorate.
•Ensure any parts removed during cleaning are replaced before you plug in the printer.
Maintenance
Xerox
®
WorkCentre
®
4265 Multifunction Printer139
User Guide
Replacing a Toner Cartridge
When a toner cartridge approaches the end of its usable life span, the control panel displays a toner low
message. When a toner cartridge is empty, the printer stops and displays a message on the control
panel.
Note: Each toner cartridge includes installation instructions.
Printer Status MessageCause and Solution
Low Toner Status. Ensure that a new Toner Cartridge
is available.
The toner cartridge is low. Order a new toner cartridge.
Replace Toner CartridgeThe toner cartridge is empty. Open the side door and then
the front door, then replace the toner cartridge.
Recycling Supplies
For more information on the Xerox
®
supplies recycling program, go to: www.xerox.com/gwa.
Maintenance
140Xerox
®
WorkCentre
®
4265 Multifunction Printer
User Guide
Managing the Printer
This section includes:
•Moving the Printer.............................................................................................................................................................140
•Billing and Usage Information.....................................................................................................................................141
Moving the Printer
WARNINGS:
•To prevent electric shock, never touch the power plug with wet hands. When removing the power
cord, ensure that you pull the plug and not the cord. Pulling the cord can damage it, which can
lead to fire or electric shock.
•When moving the printer, do not tilt it more than 10 degrees to the front, back, left, or right.
Tilting the printer more than 10 degrees can cause toner spillage.
Follow these instructions when moving the printer:
1.Turn off the printer and disconnect the power cord and other cables from the back of the printer.
For details,see Turning the Printer On and Offon page 40.
2.Remove any paper or other media from the output tray.
3.For ease of transport, remove the finisher.
Maintenance
Xerox
®
WorkCentre
®
4265 Multifunction Printer141
User Guide
4.When moving the printer from one location to another, use caution to ensure that the printer does
not topple.
5.When lifting the printer, grasp the areas as shown.
Notes:
•To prevent dropping or tipping the printer, hold the printer between two people, with each
person using one hand underneath tohold the printer and the other hand on top to stabilize it.
•Repack the printer and its options using the original packing material and boxes or a Xerox
Repackaging Kit. For a repacking kit and instructions, go to
www.xerox.com/office/WC4265support.
CAUTION: Failure to repackage the printer properly for shipment can result in damage not covered
by the Xerox
®
Warranty, Service Agreement, or Total Satisfaction Guarantee. The Xerox
®
Warranty,
Service Agreement, or Total Satisfaction Guarantee do not cover damage to the printer caused by
improper moving.
After moving the printer:
1.Reinstall any parts you removed.
2.Reconnect the printer to the cables and power cord.
3.Plug in and turn on the printer.
Billing and Usage Information
Billing and printer usage information appears on the Billing Meters information screen. The impression
counts shown are used for billing.
To view Billing and Usage information:
1.At the printer control panel, press the Machine Statusbutton.
2.To view basic impression counts, touch the Billing Informationtab:
•Copy and Scan Problems................................................................................................................................................170
•Restarting the Printer.......................................................................................................................................................145
•Printer Fails to Power On.................................................................................................................................................146
•Printer Resets or Turns Off Frequently......................................................................................................................146
•Document Prints fromWrong Tray............................................................................................................................146
•Paper Tray Fails to Close.................................................................................................................................................147
•Printing Takes Too Long..................................................................................................................................................147
•Printer Fails to Print...........................................................................................................................................................148
•Printer is Making Unusual Noises................................................................................................................................148
•Condensation Has Formed Inside the Printer........................................................................................................149
This section contains procedures to help you locate and resolve problems. Resolve some problems by
simply restarting the printer.
General Precautions
To maintain and operate your printer safely, follow each of the precautions mentioned in this section.
Avoiding Damage to the Printer
•Do not place anything on top of the printer.
•Do not leave the covers and doors open for any length of time.
•Do not open covers and doors during printing.
•Do not tilt the printer while it is in use.
•Do not touch the electrical contacts or gears. Doing so could damage the printer and cause the print
quality to deteriorate.
•Ensure any parts removed during cleaning are replaced before you plug in the printer.
Avoiding Hot Printer Parts
WARNINGS:
•Internal parts of the printer can be hot. Use caution when doors and covers are open.
•To avoidpersonal injury or printer damage, wait 30 minutes for the fuser to cool.
Troubleshooting
Xerox
®
WorkCentre
®
4265 Multifunction Printer145
User Guide
Caution When Cleaning
CAUTIONS:
•When cleaning your printer, do not use organic or strong chemical solvents or aerosol cleaners.
•Do not pour fluids directly into any area of the printer.
•Use supplies and cleaning materials only as directed in the Maintenance section of this manual.
•Do not spray detergent directly on the printer. Liquid detergent could enter the printer through a
gap and cause problems. Never use cleaning agents other than water or mild detergent.
WARNING: Keep all cleaning materials out of the reach of children.
Maintenance Restrictions
WARNING: Do not remove the covers or guards that are fastened with screws. You cannot maintain
or service any parts that are behind these covers and guards. Do not attempt any maintenance
procedure that is not described in the documentation supplied with your printer.
Restarting the Printer
To restart the printer:
1.Press Power Saver.
2.Touch Power Down.
3.To restart the printer, turn on the power switch.
Note: If restarting the printer does not resolve the problem, see the table in this chapter that best
describes the problem.
Troubleshooting
146Xerox
®
WorkCentre
®
4265 Multifunction Printer
User Guide
Printer Fails to Power On
Probable CausesSolutions
The power switch is not turned on.Turn on the power switch. For details, see Turning the Printer On
and Offon page 40.
The power cord is not correctly plugged into
the outlet.
Turn off the printer power switch, and plug the powercord securely
into the outlet.
Something is wrong with the outlet
connectedto the printer.
•Plug another electrical appliance into the outlet and see if it
operates properly.
•Try a different outlet.
The printer is connected to an outlet with a
voltage or frequency that does not match the
printer specifications.
Use a power source within the specifications for the printer.
CAUTION: Plug the three-wire cord with groundingprong directly into a grounded AC outlet.
See also:
•Turning the Printer On and Offon page 40
•Electrical Specificationson page 185
Printer Resets or Turns Off Frequently
Probable CausesSolutions
The powercord is not plugged into the outlet
correctly.
Turn off the printer, confirm that the power cord is plugged in
correctly to the printer and the outlet, then turn on the printer.
A system error occurred.
Turn off the printer, then turn it on again. Print the Error History
report from the Information Pages menu. If the error persists,
contact your Xerox representative.
The printer is connected to an uninterruptible
power supply.
Turn off the printer, then connect the power cord to a suitable
outlet.
The printer is connected to a power strip
shared with other high-power devices.
Plug the printer directly into the outlet or into a power strip that is
not shared with other high-power devices.
Document Prints from Wrong Tray
Probable CausesSolutions
Application and print driver have conflicting
tray selections.
1.Check the tray selected in the print driver.
2.Go to the page setup or printer settings of the application from
which you are printing.
3.Set the paper source to match the tray selected in the print
driver or set the paper source to Automatically Select.
Troubleshooting
Xerox
®
WorkCentre
®
4265 Multifunction Printer147
User Guide
Automatic 2-Sided Printing Problems
Probable CausesSolutions
Unsupported or incorrect paper.Ensure that you are using a supported paper size and weight for
2-sided printing. Envelopes and labelscannot be used for 2-sided
printing. For details, see Supported Standard Types and Weights for
Automatic 2-Sided Printingon page 54and Supported Standard
Paper Sizes for Automatic 2-Sided Printingon page 54.
Incorrect setting.
In the print driver Properties, select 2-Sided Printon the
Paper/Output tab.
Paper Tray Fails to Close
Probable CauseSolution
The paper tray does not close fully.Some debris or an object is blocking the tray.
Printing Takes Too Long
Probable CausesSolutions
The printer is set to a slower printing mode.
For example, the printer could be set to print
on Heavyweight paper.
It takes more time to print on certain types of special paper. Ensure
that the paper type is set properly in the driver and at the printer
control panel. For details, see Print Speedon page 186.
The printer is in Power Saver mode.It takes time for printing to start when the printer is coming out of
Power Saver mode.
The way the printer was installed on the
network could be an issue.
Determine if a print spooler or a computer sharing the printer is
buffering all print jobs and then spooling them to the printer.
Spooling can slow print speeds. To test the speed of the printer,
print some information pages such as the Office Demo Page. If the
page prints at the rated speed of the printer, you could have a
network or printer installation issue. For additional help, contact the
system administrator.
The job is complex.Wait. No action needed.
The print-quality mode in the driver is set to
Enhanced.
Change the print-quality mode in the print driver to Standard.
Troubleshooting
148Xerox
®
WorkCentre
®
4265 Multifunction Printer
User Guide
Printer Fails to Print
Probable CausesSolutions
The printer has an error.
•To clear the error, follow the onscreen prompts.
•If the error persists, contact your Xerox representative.
The printer is out of paper.
Load paper into the tray.
A toner cartridge is empty.Replace the empty toner cartridge.
The front door is open.
•Ensure that the toner cartridge and Smart Kit drum cartridge are
installed and fully seated.
•Ensure that the front and side doors are closed.
Note: For the doors to lock properly, close the front door
first, then close the side door.
•Turn off the printer, then turn it on again. If the error persists,
contact your Xerox representative.
The power cord is not correctly plugged into
the outlet.
Turn off the printer, confirm that the power cord is plugged in
correctly to the printer and the outlet, then turn on the printer. For
details, see Turning the Printer On and Offon page 40. If the error
persists, contact your Xerox representative.
The printer is busy.
•A previous print job could be the problem. On your computer,
you can use the printer properties to delete all print jobs in the
print queue.
•Load the paper in the tray.
•At the printer control panel, press the Job Statusbutton. If the
print job does not appear check the Ethernet connection
between the printer and the computer.
•At the printer control panel, press the Job Statusbutton. Ifthe
print job does not appear, check the USB connection between
the printer and the computer. Turn off the printer, then turn it on
again.
The printer cable is disconnected.
•At the printer control panel, press the Job Statusbutton. If the
print job doesnot appear check the Ethernet connection
between the printer and the computer.
•At the printer control panel, press the Job Statusbutton. If the
print job does not appear, check the USB connection between
the printer and the computer. Turn off the printer, then turn it on
again.
Printer is Making Unusual Noises
Probable CausesSolutions
There is an obstruction or debris inside the
printer.
Turn off the printer and remove the obstruction or debris. If you
cannot remove it, contact your Xerox representative.
Troubleshooting
Xerox
®
WorkCentre
®
4265 Multifunction Printer149
User Guide
Condensation Has Formed Inside the Printer
Moisture can condense inside a printer where the humidity is above 85% or when a cold printer is
located in a warm room. Condensation can form in a printer after it has been sitting in a cold room that
is heated quickly.
Probable CausesSolutions
The printer has been sitting in a cold room.
•Allow the printer to acclimate for several hours before operation.
•Allow the printer to operate for several hours at room
temperature.
The relative humidity of the room is too high.
•Reduce the humidity in the room.
•Move the printer to a location where the temperature and
relative humidity are within the operating specifications.
Troubleshooting
150Xerox
®
WorkCentre
®
4265 Multifunction Printer
User Guide
Paper Jams
This section includes:
•Minimizing Paper Jams....................................................................................................................................................150
•Locating Paper Jams.........................................................................................................................................................151
•Clearing Paper Jams......................................................................................................................................................... 152
•Troubleshooting Paper Jams.........................................................................................................................................164
Minimizing Paper Jams
The printer is designed to function with minimal paper jams using Xeroxsupported paper. Other paper
types can cause jams. If supported paper is jamming frequently in one area, clean that area of the paper
path.
The following can cause paper jams:
•Selecting the incorrect paper type in the print driver.
•Using damaged paper.
•Using unsupported paper.
•Loading paper incorrectly.
•Overfilling the tray.
•Adjusting the paper guides improperly.
Most jams can be prevented by following a simple set of rules:
•Use only supported paper. For details, see Supported Paperon page 50.
•Follow proper paper handling and loading techniques.
•Always use clean, undamaged paper.
•Avoid paper that is curled, torn, moist, creased, or folded.
•To separatethe sheets before loading into the tray, fan the paper.
•Observe the paper tray fill line; never overfill the tray.
•Adjust the paper guides in all trays after inserting the paper. A guide that is not properly adjusted
can cause poor print quality, misfeeds, skewed prints, and printer damage.
•After loading the trays, select the correct paper type and size on the control panel.
•When printing, select the correct type and size in the print driver.
•Store paper in a dry location.
•Use only Xerox paper and transparencies designed for the printer.
Troubleshooting
Xerox
®
WorkCentre
®
4265 Multifunction Printer151
User Guide
Avoid the following:
•Polyester coated paper that is specially designed for inkjet printers.
•Paper that is folded, wrinkled, or excessively curled.
•Loading more than one type, size, or weight of paper in a tray at the same time.
•Overfilling the trays.
•Allowing the output tray to overfill.
For a detailed list of supported paper, go to www.xerox.com/paper.
Locating Paper Jams
WARNING: To avoid injury, never touch a labeled area on or near the heat roller in the fuser. If a
sheet of paper is wrapped around the heat roller, do not try to remove it immediately. Switch off the
printer immediately and wait 30 minutes for the fuser to cool. After the printer cools, try to remove
the jammed paper. If the error persists, contact your Xerox representative.
The following illustration shows where paper jams can occur along the paper path:
1.Feeder Trays
2.Output Tray/Finisher
3.Document Feeder Top Cover
4.Document Feeder Paper Path
5.Fuser Area
6.Duplex Area
7.Bypass Tray
Troubleshooting
152Xerox
®
WorkCentre
®
4265 Multifunction Printer
User Guide
Clearing Paper Jams
This section includes:
•Clearing Paper Jams from Tray 1................................................................................................................................152
•Clearing Paper Jams from Trays 2-4 ..........................................................................................................................154
•Clearing Paper Jams from the 2100-Sheet High-Capacity Feeder...............................................................155
•Clearing Jams in the Optional Finisher.....................................................................................................................157
•Clearing Paper Jams from the Document Feeder................................................................................................158
•Clearing Paper Jams from the Fuser Area...............................................................................................................161
•Clearing Paper Jams from the Duplex Area............................................................................................................162
•Clearing Paper Jams at the Bypass Tray..................................................................................................................163
Clearing Paper Jams from Tray 1
To resolve the error displayed on the control panel you must clear all paper from the paper path.
1.Remove Tray 1 from the printer.
2.Remove any crumpled paper from the tray and any remaining paper jammed in the printer.
Troubleshooting
Xerox
®
WorkCentre
®
4265 Multifunction Printer153
User Guide
3.Insert tray 1 into the printer, then push it in all the way.
4.If the control panel prompts you, verify the paper size, type, and color in the Paper Settings screen.
5.Touch Confirm.
Troubleshooting
154Xerox
®
WorkCentre
®
4265 Multifunction Printer
User Guide
Clearing Paper Jams from Trays 2-4
To resolve the error displayed on the control panel you must clear all paper from the paper path.
1.Remove tray 2 from the printer.
2.Remove any crumpled paper from the tray and any remaining paper jammed in the printer.
3.Insert tray 2 into the printer, then push it all the way in.
Troubleshooting
Xerox
®
WorkCentre
®
4265 Multifunction Printer155
User Guide
4.If the control panel prompts you, open the outside and inside covers, then remove the jammed
paper.
5.Close the inside and outside covers.
6.If the control panel prompts you, verify the paper size, type, and color in the Paper Settings screen.
7.Touch Confirm.
Clearing Paper Jams from the 2100-Sheet High-Capacity Feeder
1.Before removing the paper tray from the printer, lookat the jam message on the control panel. If
another jam is shown, clear that jam first.
2.Open the high-capacity feeder tray then remove any damaged paper.
Troubleshooting
156Xerox
®
WorkCentre
®
4265 Multifunction Printer
User Guide
3.If the control panel prompts you, open the outside and inside covers, then remove the jammed
paper.
Note: If the paper does not move easily, to remove it, reach behind the high-capacity feeder tray
and grasp the paper, then pull gently.
4.If the paper is torn, remove all torn pieces from the printer.
5.Push the tray back into the printer completely, then close the inside and outside covers.
6.If the control panel prompts you, verify the paper size, type, and color in the Paper Settings screen.
7.Touch Confirm.
Troubleshooting
Xerox
®
WorkCentre
®
4265 Multifunction Printer157
User Guide
Clearing Jams in the Optional Finisher
1.Open the finisher front door.
2.To access the finisher, release lever 1c, then slide the finisher unit to the left.
CAUTION: To avoid dropping the finisher, do not slide the finisher too far to the left
1
a
3.Remove any jammed paper from inside the finisher area.
Troubleshooting
158Xerox
®
WorkCentre
®
4265 Multifunction Printer
User Guide
4.If the paper is torn, remove all torn pieces from the finisher.
5.Close the finisher front door.
6.To return the finisher to its original position, lift slightly and push to the right until the finisher clicks
into place.
Clearing Paper Jams from the Document Feeder
1.Removeany paper from the document feeder.
2.Open the document feeder top cover.
Troubleshooting
Xerox
®
WorkCentre
®
4265 Multifunction Printer159
User Guide
3.If paper is jammed in the exit of the document feeder, pull it out as illustrated.
4.Toaccess the document feeder to remove jammed paper, lift the document feeder cover.
5.To open the document feeder inside cover, gently pull the green lever.
6.Remove any paper or debris from the paper path.
Troubleshooting
160Xerox
®
WorkCentre
®
4265 Multifunction Printer
User Guide
7.Press the document feeder inside cover into its original position, then ensure that the lever is locked
in place.
Note: Ensure that the magnetic edge of the whiteplastic strip rests securely against the metal strip.
8.Close the document feeder cover.
Troubleshooting
Xerox
®
WorkCentre
®
4265 Multifunction Printer161
User Guide
Clearing Paper Jams from the Fuser Area
To resolve the error displayed on the control panel you must clear all paper from the paper path.
1.To access jammed paper in the fuser area, open the right side door.
2.Gently remove any paper from the fuser area.
WARNING: The area around the fuser can be hot. Use caution to avoid injury.
3.Close the right side door.
Troubleshooting
162Xerox
®
WorkCentre
®
4265 Multifunction Printer
User Guide
Clearing Paper Jams from the Duplex Area
1.To access paper jams in the duplex area, open the right side door.
2.Gently remove any paper from the duplex area.
3.Close the right side door.
Troubleshooting
Xerox
®
WorkCentre
®
4265 Multifunction Printer163
User Guide
Clearing Paper Jams at the Bypass Tray
1.Remove any paper from the bypass tray. Where the tray connects to the printer, clear any paper
that is jammed.
2.If the paper is torn, check inside the printer for pieces of paper, then gently remove them. If you
cannot remove the paper fragments easily, contact your Xerox representative.
WARNING: The area around the fuser can be hot. Use caution to avoid injury.
3.When you reload the bypass tray, fan the paper and ensure that all four corners align neatly.
4.If the control panel prompts you, verify the size and type on the screen.
•Label and Envelope Misfeeds.......................................................................................................................................165
•Paper Jam Message Stays On.......................................................................................................................................165
•Jams During Automatic 2-Sided Printing ................................................................................................................165
Multiple Sheets Pulled Together
Probable CausesSolutions
The paper tray is too full.Remove some of the paper. Do not load paper past fill line.
The edges of the paper are not even.Remove the paper, align the edges, and then reload it.
The paper is moist from humidity.Remove the paper from the tray, and replace it with new dry paper.
Too much static electricity is present.
•Try a new ream of paper.
•Do not fan transparencies before loading in tray.
Using unsupported paper.
Use only Xerox approved paper. For details, see Supported Paperon
page 50.
Humidity is too high for coated paper.Feed paper one sheet at a time.
Paper Misfeeds
Probable CausesSolutions
The paper is not correctly positioned in the
tray.
•Remove the misfed paper and reposition it properly in the tray.
•Adjust the paper guides in the tray to match the size of the
paper.
The paper tray is too full.Remove some of the paper. Do not load paper past the fill line.
The paper guides are not correctly adjusted
to the paper size.
Adjust the paper guides in the tray to match the size of the paper.
The tray contains warped or wrinkled paper.Remove the paper, smooth it out, and reload it. If it still misfeeds,
do not use that paper.
The paper is moist from humidity.
Remove the moist paper and replace it with new, dry paper.
Using paper of the wrong size, thickness, or
type.
Use only Xerox approved paper. For details, see Supported Paperon
page 50.
Troubleshooting
Xerox
®
WorkCentre
®
4265 Multifunction Printer165
User Guide
Label and Envelope Misfeeds
Probable CausesSolutions
The label sheet is facing the wrong way in the
tray.
•Load label sheets according to the instructions from the
manufacturer.
•Load labels face down in the bypass tray.
•Load labels face up in trays 1–4.
•Do not load labels in the high-capacity feeder.
Envelopes are loaded incorrectly in trays 1–4.Load envelopes in trays 1–4 with the flaps closed, flap-side down,
and the short edge leading into the printer.
Envelopes are loaded incorrectly in the
bypass tray.
•Load envelopes in the bypass tray with the print side down, flaps
closed, and the short edge leading into the printer.
•Ensure that the width guides rest loosely against the edge of the
envelopes without restricting their movement.
Paper Jam Message Stays On
Probable CausesSolutions
Some paper remains jammed in the printer.Recheck the media path and make sure that you have removed all
of the jammed paper.
One of the printer doors is open.Check the doors on the printer. Close any door that is open.
Note: Check for, and remove, torn pieces of paper in the paper path.
Jams During Automatic 2-Sided Printing
Probable CausesSolutions
Using paper of the wrong size, thickness, or
type.
•Use only Xerox approved paper. For details, see Supported Paper
Sizes and Weights for Automatic 2-Sided Printingon page 54.
•For automatic 2-sided printing, do not use transparencies,
envelopes, labels, reloaded paper, or paper heavier than 105
g/m².
Paper is loaded in the wrong tray.
The paper must be loaded in the correct tray. For details, see
Supported Paperon page 50.
Tray is loaded with mixed paper.Load the tray with only one type and size of paper.
Troubleshooting
166Xerox
®
WorkCentre
®
4265 Multifunction Printer
User Guide
Print-Quality Problems
Your printer is designed to produce consistently high-quality prints. If you observe print-quality problems,
use the information in this section to troubleshoot the problem. For more information, go to
www.xerox.com/office/WC4265support.
CAUTION: The Xerox Warranty, Service Agreement, or Xerox Total Satisfaction Guarantee does not
cover damage caused by using unsupported paper or specialty media. The Xerox Total Satisfaction
Guarantee is available in the United States and Canada. Coverage could vary outside these areas.
Please contact your local representative for details.
Note: To ensure consistent print quality, the toner cartridges and imaging units for many models of
equipment are designed to cease functioning at a predetermined point.
Controlling Print Quality
Various factors can affect the quality of the output of your printer. For consistent and optimum print
quality, use paper designed for your printer and set the paper type correctly. Follow the guidelines in this
section to maintain optimum print quality from your printer.
Temperature and humidity affect the quality of the printed output. The guaranteed range for optimal
print quality is 10–30°C (50–90°F) and 20–80% relative humidity.
Solving Print-Quality Problems
When the print quality is poor, select the closest symptom from the following table and see the
corresponding solution to correct the problem. You can also print a Demo Page to more precisely
determine the print-quality problem.
If the print quality does not improve after carrying out the appropriate action, contact your Xerox
representative.
Note: To maintain print quality, the toner cartridge is designed to provide a warning message when
the toner level is low. When the toner cartridge reaches this level, a warning message appears. Once
the toner cartridge is empty, another message prompts you to replace the toner cartridge. The
printer stops printing until you install a new toner cartridge.
Troubleshooting
Xerox
®
WorkCentre
®
4265 Multifunction Printer167
User Guide
Symptom Solutions
The output is too light.
•To check the toner level, check the control panel, use the print driver, or
CentreWare Internet Services. If the toner cartridge is near empty,
replace it.
•Verify that the toner cartridge is approved for use in this printer, and
replace it as needed. For best results, use a genuine Xerox toner cartridge.
•Ensure that the print quality mode is not set to Toner Saver. Toner Saver
us useful for draft quality output.
•Replace the paper with a recommended size and type, and confirm that
your printer and print driver settings are correct.
•Verify that the paper is dry and that supported paper is used. If not,
change the paper.
•Change the Paper Type settings in the print driver.
In the Printing Preferences of the printdriver, on the Paper/Output tab,
change the Paper Type setting.
•If printer is located in a high altitude environment, adjust the altitude
setting of the printer. For details, see the System Administrator Guide at
www.xerox.com/office/WC4265docs.
Toner smears or print comes off.
The output has stains on the back
side.
•Change the Paper Type settings in the print driver. For example, change
Plain to Lightweight Cardstock.
In the Printing Preferences of the print driver, on the Paper/Output tab,
change the Paper Type setting.
•Verify that the paper is the correct size, type, and weight. If not, change
the paper settings.
•Verify that the printer is plugged into an outlet that is providing the
correct voltage and power. Review the electrical specification of the
printer with an electrician if necessary.
•For details, see Electrical Specificationson page 185.
Random spots on the output, or the
image is blurry.
•Ensure that the toner cartridge is installed correctly.
•If you used a non-genuine brand toner cartridge, install a genuine Xerox
toner cartridge.
•Use the Heavyweight or Cardstock paper type setting, or use paper type
with a smoother surface.
•Ensure that the humidity in the room is within specifications. For details,
see Relative Humidityon page 184.
•For details, see Selecting a Location for the Printeron page 35.
Troubleshooting
168Xerox
®
WorkCentre
®
4265 Multifunction Printer
User Guide
Symptom Solutions
The output is blank.
•Turn off the printer, then turn it on again.
•If the error persists, contact your Xerox representative.
Streaks appear in the output.
•Replace the Smart Kit Drum Cartridge.
•Contact your Xerox representative.
The output has a mottled
appearance.
•Verify that the paper is the correct size, type, and weight. If not, change
the paper settings.
•Ensure that the humidity is within specifications. For details, see Selecting
a Location for the Printeron page 35.
Ghosting appears in the printed
output.
•Verify that the paper is the correct size, type, and weight. If not, change
the paper settings.
•Change the Paper Type settings in the print driver.
In the Printing Preferences of the print driver, on the Paper/Output tab,
change the Paper Type setting.
•Replace the Smart Kit Drum Cartridge.
Troubleshooting
Xerox
®
WorkCentre
®
4265 Multifunction Printer169
User Guide
Symptom Solutions
Auger marks appear on the printed
output.
•To check the toner level, check the control panel, use the print driver, or
CentreWare Internet Services. If the toner cartridge is near empty,
replace it.
•Verify that the toner cartridge is approved for use in this printer, and
replace it as needed. For best results, use a genuine Xerox toner cartridge.
•Replace the Smart Kit Drum Cartridge.
The output print is wrinkled or
stained.
•Verify that the paper is the correct size, type, and weight for the printer
and that it is loaded properly. If not, change the paper.
•Try a new ream of paper.
•Change the Paper Type settings in the print driver.
In the Printing Preferences of the print driver, on the Paper/Output tab,
change the Paper Type setting.
Envelopes are wrinkled or creased
when printed.
•Ensure that envelopes are loaded properly in the bypass tray or in trays
1–4.
•Follow the guidelines for printing on envelopes. For details, see Guidelines
for Printing Envelopes.on page 63
The top margin is incorrect.
•Ensure that the paper is loaded properly.
•Ensure that the margins are set correctly in the application you are using.
The printed surface of the paper is
bumpy.
1.Print a solid image over the entire surface of one sheet of paper.
2.Load the printed sheet into the tray with the printed side face down.
3.Print five blank pages to remove debris from the fuser rollers.
Troubleshooting
170Xerox
®
WorkCentre
®
4265 Multifunction Printer
User Guide
Copy and Scan Problems
If the copy or scan quality is poor, refer to the following table.
SymptomsSolutions
Lines or streaks present in copies only made
from the document feeder.
There is debris on the document glass. When scanning, the paper
from the document feeder passes over the debris creating lines or
streaks. Clean all glass surfaces with a lint-free cloth.
Spots present in copies taken from the
document glass.
There is debris on the document glass. When scanning, the debris
creates a spot on the image. Clean all glass surfaces with a lint-free
cloth.
The reverse side of the original is showing on
the copy or scan.
Turn on Background Suppression.
Image is too light or too dark.
To lighten, darken, or adjust contrast, touch the More Featurestab.
If the problem persists, for online support information, go to www.xerox.com/office/WC4265support.
Troubleshooting
Xerox
®
WorkCentre
®
4265 Multifunction Printer171
User Guide
Fax Problems
Note: If you cannot send and receive faxes, ensure that you are connected to an approved analog
or digital telephone line.
To troubleshoot fax connection issues:
Problems Sending Faxes
SymptomsCausesSolutions
The document is not scanned
using the document feeder.
The document is too thick, too thin, or
too small.
Use the document glass to send the
fax.
The document is scanned at an
angle.
The document feeder guides are not
adjusted to the width of the document.
Adjust the document feeder guides to
fit the width of the document.
The fax received by the recipient
is blurry.
The document is incorrectly positioned.Position the document correctly.
The document glass is dirty.Clean the document glass.
The text in the document is too light.Adjust the resolution. Adjust the
contrast.
There is a problem with the telephone
connection.
Verify that the telephone line is
working, then send the fax again.
There is a problem with the fax
machine of the caller.
Make a copy to verify that your printer
is operating correctly. If the copy was
printed correctly, have the recipient
verify the condition of their fax
machine.
The fax received by the recipient
is blank.
The document was loaded incorrectly.
•Document feeder: Place the original
document face up.
•Document glass: Place the original
document face down.
Fax was not transmitted.The fax number is wrong.Verify the fax number.
The telephone lineis incorrectly
connected.
Verify the telephone line connection. If
it is disconnected, connect it.
There is a problem with the fax
machine of the recipient.
Contact the recipient.
The fax is not installed or is not
enabled.
Verify that the fax is installed and
enabled.
Server Fax is enabled.Make sure that Server Fax is disabled.
If the problem persists, for online support information, go to www.xerox.com/office/WC4265support.
Troubleshooting
172Xerox
®
WorkCentre
®
4265 Multifunction Printer
User Guide
Problems Receiving Faxes
SymptomsCausesSolutions
The received fax is blank.There is a problem with the telephone
connection or with the fax machine of
the caller.
Verify that the printer can make clean
copies. If it can, have the caller send
the fax again.
The sender loaded the pages
incorrectly.
Contact the sender.
The printer answers the call, but
does not accept incoming data.
Not enough memory.
If the job contains several graphics, the
printer could not have enough memory.
The printer does not answer when
memory is low. Delete stored
documents and jobs then wait for the
existing job to complete. This increases
available memory.
The received fax size is reduced.The paper supply in the printer does
not match the document size sent.
Confirm the original size of the
documents. Documents could be
reduced based on the available paper
supply in the printer.
Faxes cannot be received
automatically.
The printer is set to receive faxes
manually.
Set the printer to automatic reception.
The memory is full.Load paper if it is empty, and then
print the faxes stored in the memory.
The telephone line is incorrectly
connected.
Verify the telephone line connection. If
it is disconnected, connect it.
There is a problem with the fax
machine of the sender.
Make a copy to verify that your printer
is operating correctly. If the copy prints
correctly, have the recipient verify their
fax machine is operating correctly.
If the problem persists, for online support information, go to www.xerox.com/office/WC4265support.
•Online Support Assistant................................................................................................................................................174
•Using the Integrated Troubleshooting Tools.........................................................................................................175
Xerox provides several automatic diagnostic utilities to help you maintain productivity and print quality.
Control Panel Messages
The printer control panel provides information and troubleshooting help. When a fault or warning
condition occurs, the control panel displays a message informing you of the problem. In many cases, the
control panel also displays an animated graphic showing the location of the problem, such as the
location of a paper jam. For many status and warning messages, the control panel Help provides
additional information.
Control Panel Help
To view more information about error or status messages on the control panel, touch the Helpbutton.
The control panel menu items also have associated help text that describes the menu item.
Viewing Warning Messages on the Control Panel
When a warning condition occurs, a message appears on the control panel to inform you of the problem.
Warning messages inform you about printer conditions, such as low supplies or open doors, that require
your attention. If more than one warning condition occurs, only one appears on the control panel.
Troubleshooting
174Xerox
®
WorkCentre
®
4265 Multifunction Printer
User Guide
Viewing Fault and Alert Messages on the Control Panel
When afault condition occurs, a message appears on the control panel to inform you of the problem.
Fault messages warn you about printer conditions that prevent the printer from printing or degrade
printing performance. If more than one fault occurs, only one is displayed on the control panel.
To view a list of the current faults on the control panel:
1.Press Machine Status, then touch the Active Messagestab.
2.Touch the Faults and Alertsmenu, then choose an option.
−Faults: This menu shows the fault messages that affect the operation of the printer and their
corresponding fault codes.
−Alerts: This menu shows alert messages regarding the current job status of the printer and the
corresponding alert codes.
Viewing Job Status on the Control Panel
To view current or saved jobs on the control panel:
1.At the control panel, press the Job Statusbutton.
2.To view a list of active jobs, touch Active Jobs.
3.To view a list of personal and secure jobs, touch Personal & Secure Jobs.
4.To view a list of completed jobs, touch CompletedJobs.
Online Support Assistant
The Online Support Assistant is a knowledge base that provides instructions and troubleshooting help to
solve your printer problems. You can find solutions for print-quality problems, paper jams, software
installation issues, and more.
To access the Online Support Assistant, go to www.xerox.com/office/WC4265support.
Troubleshooting
Xerox
®
WorkCentre
®
4265 Multifunction Printer175
User Guide
Using the Integrated Troubleshooting Tools
To troubleshoot print-quality problems and paper jams, you can use several integrated tools such as
Information pages and CentreWare Internet Services.
Available Information Pages
Information pages provide important details to help you troubleshoot issues or analyze printer use. You
can print information pages from the printer control panel.
Information PageDescription
Configuration ReportThe Configuration Report provides product information including, installed
options, network settings, port setup, tray information, and more.
Customer Assistance ReportThe Customer Assistance Report provides a summary of relevant information
that you can provide to a Xerox support representative when you call for
assistance.
Demo PageThe Demo page provides a demonstration of the current print quality.
Email Sent ReportThe Email Sent Report provides a record of emails sent, including From, To, Date
& Time, Subject, and Result.
Error Message ReportThe Error Message Report provides a record of errors, including fault and alert
codes and date and time of the error.
Fax Broadcast ReportThe Fax Broadcast Report provides a record of broadcast faxes, including total
Local sales and support centerwww.xerox.com/office/worldcontacts
Printer registrationwww.xerox.com/office/register
Xerox
®
Direct online storewww.direct.xerox.com/
Xerox
®
WorkCentre
®
4265 Multifunction Printer177
User Guide
This appendix includes:
•Printer Configurations and Options...........................................................................................................................178
•Material Safety Data Sheets.........................................................................................................................................200
B
Regulatory Information
Regulatory Information
188Xerox
®
WorkCentre
®
4265 Multifunction Printer
User Guide
Basic Regulations
Xerox has tested this printer to electromagnetic emission and immunity standards. These standards are
designed to mitigate interference caused or received by this printer in a typical office environment.
United States FCC Regulations
This equipment has been tested and found to comply with the limits for a Class A digital device,
pursuant to Part 15 of the FCC Rules. These limits are designed to provide reasonable protection against
harmful interference when the equipment is operated in a commercial environment. This equipment
generates, uses, and can radiate radio frequency energy. If it is not installed and used in accordance
with these instructions, itmay cause harmful interference to radio communications. Operation of this
equipment in a residential area is likely to cause harmful interference in which case the user will be
required to correct the interference at his/her own expense.
If this equipmentdoes cause harmful interference to radio or television reception, which can be
determined by turning the equipment off and on, the user is encouraged to try to correct the
interference by one or more of the following measures:
•Reorient or relocate the receiving antenna.
•Increase the separation between the equipment and receiver.
•Connect the equipment into an outlet on a circuit different from that to which the receiver is
connected.
•Consult the dealer or an experienced radio/TV technician for help.
Changesor modifications to this equipment not approved by Xerox can void the authority of the user to
operate this equipment.
Note: To ensure compliance with Part 15 of the FCC rules, use shielded interface cables.
Canada
This Class A digital apparatus complies with Canadian ICES-003.
Cet appareil numérique de la classe A est conforme à la norme NMB-003 du Canada.
Regulatory Information
Xerox
®
WorkCentre
®
4265 Multifunction Printer189
User Guide
European Union
The CE mark applied to this product symbolizes a declaration of conformity by Xerox with
the following applicable Directives of the European Union as of the dates indicated:
•December 12, 2006: Low Voltage Directive 2006/95/EC
Libble takes abuse of its services very seriously. We're committed to dealing with such abuse according to the laws in your country of residence. When you submit a report, we'll investigate it and take the appropriate action. We'll get back to you only if we require additional details or have more information to share.
Product:
Forumrules
To achieve meaningful questions, we apply the following rules:
First, read the manual;
Check if your question has been asked previously;
Try to ask your question as clearly as possible;
Did you already try to solve the problem? Please mention this;
Is your problem solved by a visitor then let him/her know in this forum;
To give a response to a question or answer, do not use this form but click on the button 'reply to this question';
Your question will be posted here and emailed to our subscribers. Therefore, avoid filling in personal details.
Register
Register getting emails for Xerox WorkCentre 4265 at:
new questions and answers
new manuals
You will receive an email to register for one or both of the options.
Get your user manual by e-mail
Enter your email address to receive the manual of Xerox WorkCentre 4265 in the language / languages: English as an attachment in your email.
The manual is 4,37 mb in size.
You will receive the manual in your email within minutes. If you have not received an email, then probably have entered the wrong email address or your mailbox is too full. In addition, it may be that your ISP may have a maximum size for emails to receive.
If you have not received an email with the manual within fifteen minutes, it may be that you have a entered a wrong email address or that your ISP has set a maximum size to receive email that is smaller than the size of the manual.
The email address you have provided is not correct.
Please check the email address and correct it.
Your question is posted on this page
Would you like to receive an email when new answers and questions are posted? Please enter your email address.