657822
10
Zoom out
Zoom in
Previous page
1/77
Next page
October 2016
05-0857-200
Design © 2016 Xerox Corporation. All rights reserved. Xerox
®
, Xerox and Design
®
and DocuMate
®
are registered
trademarks of Xerox Corporation in the United States and/or other countries. BR19347
Content © 2016 Visioneer, Inc. All rights reserved. The Visioneer brand name and OneTouch
®
logo are registered
trademarks of Visioneer, Inc.
Copyright protection claimed includes all forms of matters of copyrightable materials and information now allowed by
statutory or judicial law or hereinafter granted, including without limitation, material generated from the software
programs which are displayed on the screen such as styles, templates, icons, screen displays, looks, etc.
Reproduction, adaptation, or translation without prior written permission is prohibited, except as allowed under the
copyright laws.
The PaperPort
®
and OmniPage
®
brand name and logo are registered trademarks of Nuance Communications, Inc.
ISIS® is a registered trademark of EMC
2
® Corporation in the United States and/or other countries.
Adobe
®
, Adobe
®
Acrobat
®
, Adobe
®
Reader
®
, and the Adobe
®
PDF logo are registered trademarks of Adobe Systems
Incorporated in the United States and/or other countries. The Adobe PDF logo will appear in this product’s software, and
full access to Adobe software features is only available if an Adobe product is installed on your computer.
Post-It
®
is a registered trademark of 3M in the United States and/or other countries.
Microsoft is a U.S. registered trademark of Microsoft Corporation. Windows™ is a trademark and SharePoint
®
is a
registered trademark of Microsoft Corporation.
ZyINDEX is a registered trademark of ZyLAB International, Inc. ZyINDEX toolkit portions, Copyright © 1990-1998, ZyLAB
International, Inc. All Rights Reserved. All other products mentioned herein may be trademarks of their respective
companies and are hereby acknowledged.
Document Version: 05-0857-200 (October 2016)
Information is subject to change without notice and does not represent a commitment on the part of Visioneer. The
software described is furnished under a licensing agreement. The software may be used or copied only in accordance
with the terms of such an agreement. It is against the law to copy the software on any medium except as specifically
allowed in the licensing agreement. No part of this document may be reproduced or transmitted in any form or by any
means, electronic or mechanical, including photocopying, recording, or information storage and retrieval systems, or
translated to another language, for any purpose other than the licensee's personal use and as specifically allowed in the
licensing agreement, without the express written permission of Visioneer.
Restricted Rights Legend
Use, duplication, or disclosure is subject to restrictions as set forth in contract subdivision (c)(1)(ii) of the Rights in
Technical Data and Computer Software Clause 52.227-FAR14. Material scanned by this product may be protected by
governmental laws and other regulations, such as copyright laws. The customer is solely responsible for complying with
all such laws and regulations.
Changes are periodically made to this document. Changes, technical inaccuracies, and typographic errors will be
corrected in subsequent editions.
User Guide iii
Table of Contents
Safety ................................................................................................................................v
Safety Introduction ................................................................................................................................v
Operational Safety Information.......................................................................................................v
Electrical Information.......................................................................................................................... vi
Warning - Electrical Safety Information......................................................................... vi
Electrical Supply........................................................................................................................ vii
Disconnect Device ................................................................................................................... vii
Emergency Power Off.........................................................................................................................vii
Maintenance Information................................................................................................................ vii
Product Safety Certification ...........................................................................................................viii
Environmental Health and Safety Contacts............................................................................viii
Welcome .........................................................................................................................1
What’s in the Box....................................................................................................................................1
System Requirements...........................................................................................................................1
Documentation .......................................................................................................................................2
The Xerox
®
DocuMate
®
5445 / 5460 Scanner Features.......................................................4
Scanner Setup............................................................................................................... 7
Unpack the scanner...............................................................................................................................7
Attach the Input Tray...........................................................................................................................8
Connect the Scanner Power Cord....................................................................................................9
Installation...................................................................................................................11
Install the Software and Connect the Scanner...................................................................... 11
Installing the Scanner Driver.............................................................................................. 14
Connect the USB Cable and Turn on the Power........................................................ 15
User Utility Installation ........................................................................................................17
Installing the ISIS Driver......................................................................................................18
Installing Visioneer OneTouch..........................................................................................18
Installing Additional Applications................................................................................................ 19
View the User Guides......................................................................................................................... 20
Register Your Scanner........................................................................................................................ 21
Loading Documents to Scan................................................................................23
Supported Document Types...........................................................................................................23
Documents to Avoid Scanning...................................................................................................... 24
Unsupported Document Types..................................................................................................... 25
Xerox
®
DocuMate
®
5445 / 5460 Table of Contents
iv User Guide
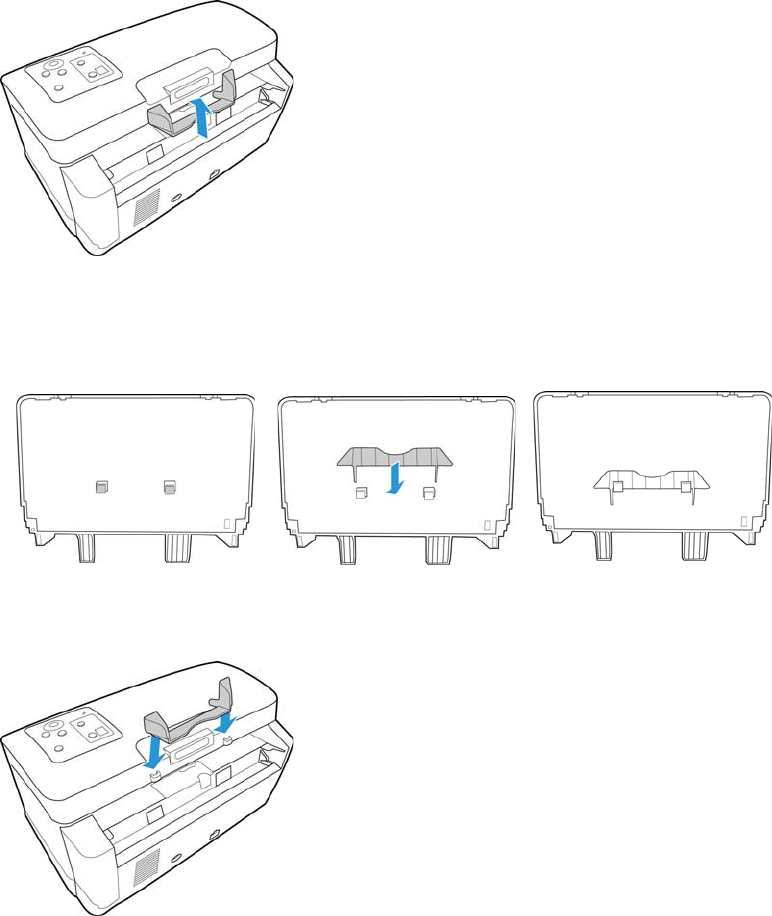
Using the Mixed Batch Card Guide ............................................................................................. 25
Detach or Attach the Mixed Batch Card Guide ......................................................... 26
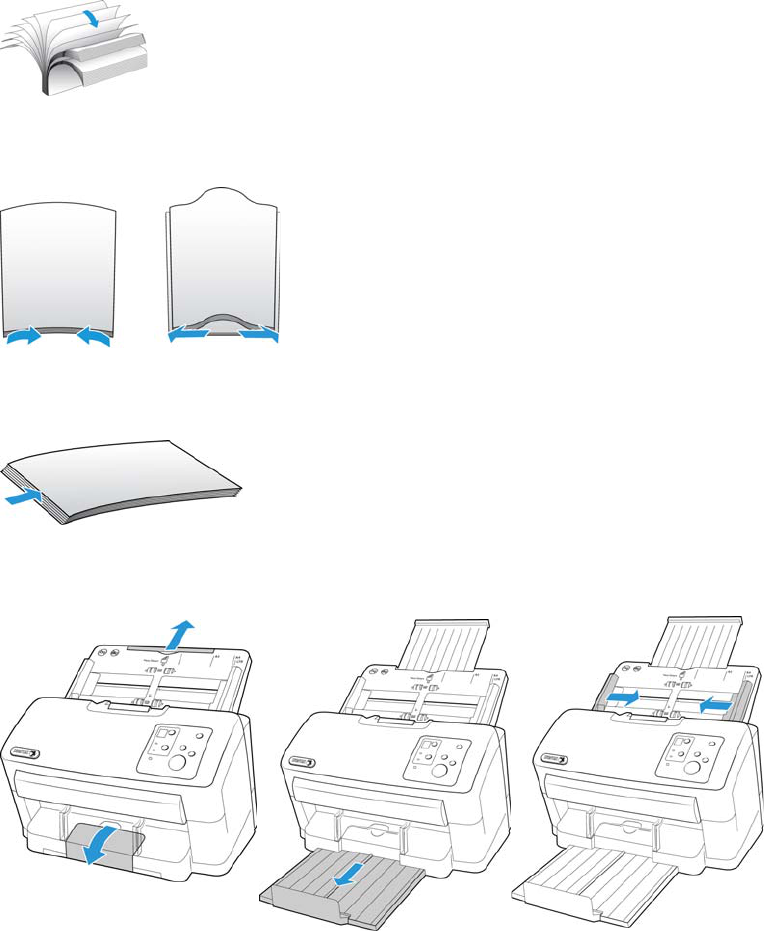
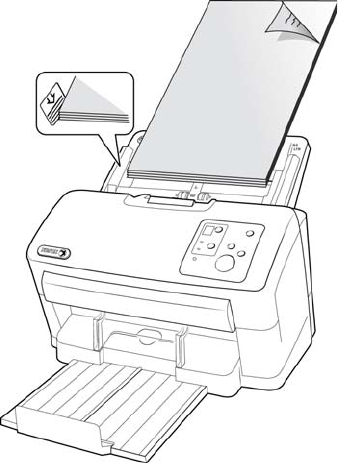
Scanning from the Automatic Document Feeder (ADF) ...................................................27
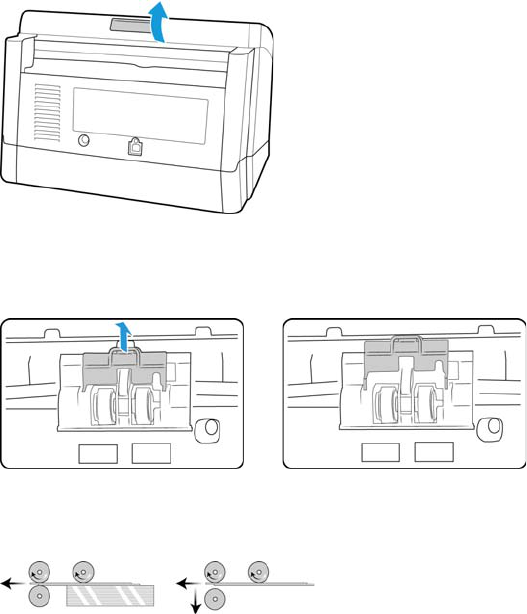
Scanning Thick Pages or Bound Documents........................................................................... 28
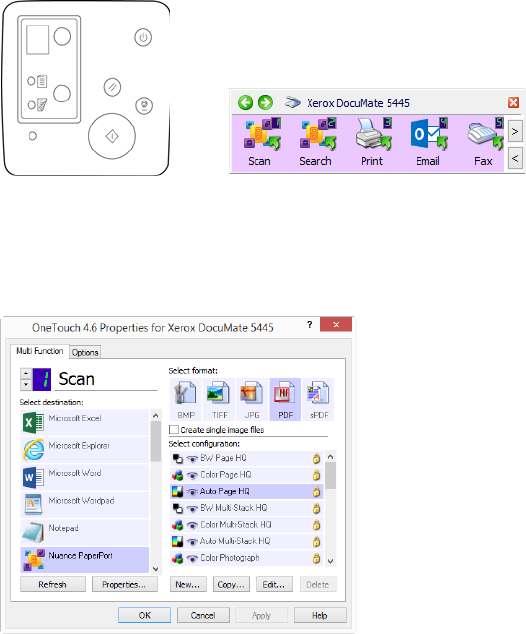
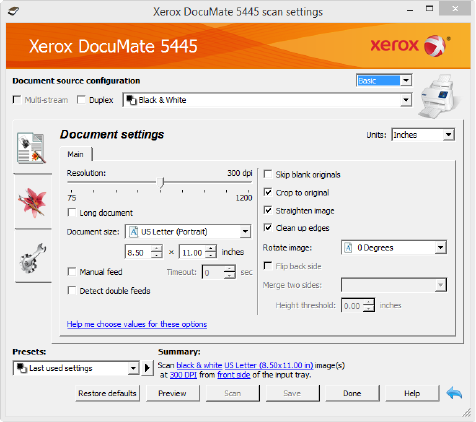
Scanning Interfaces ........................................................................................................................... 30
Maintenance...............................................................................................................33
Safety Precautions .............................................................................................................................. 33
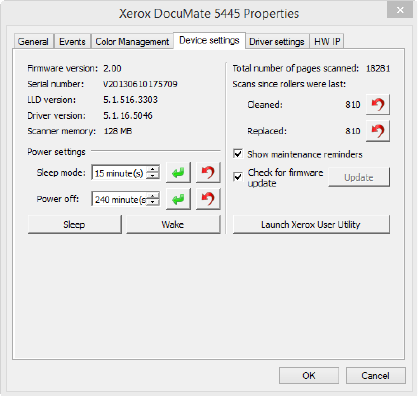
Hardware Properties........................................................................................................................... 34
Device Settings......................................................................................................................... 34
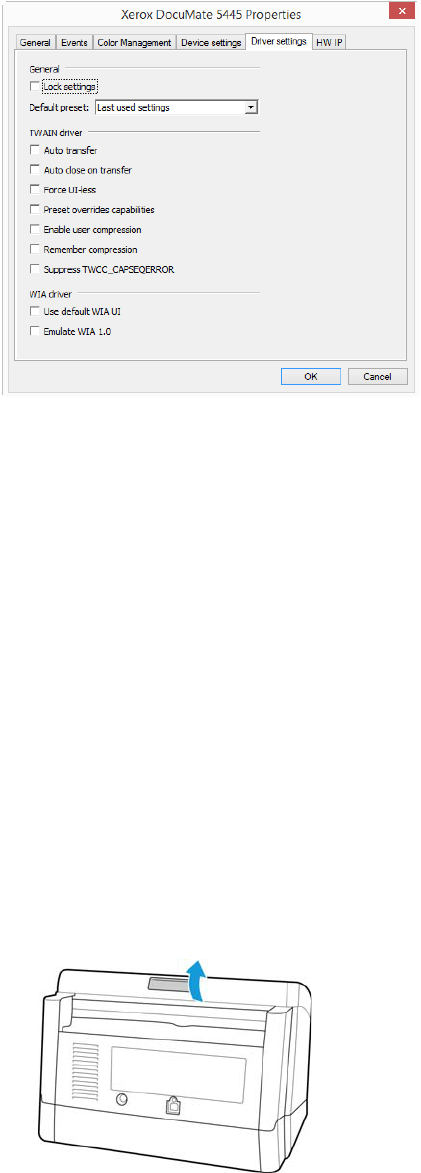
Driver Settings .......................................................................................................................... 36
Clearing Paper Jams........................................................................................................................... 36
Cleaning the Scanner......................................................................................................................... 39
Cleaning the Outside of the Scanner ............................................................................. 39
Cleaning the Inside of the Scanner ................................................................................ 40
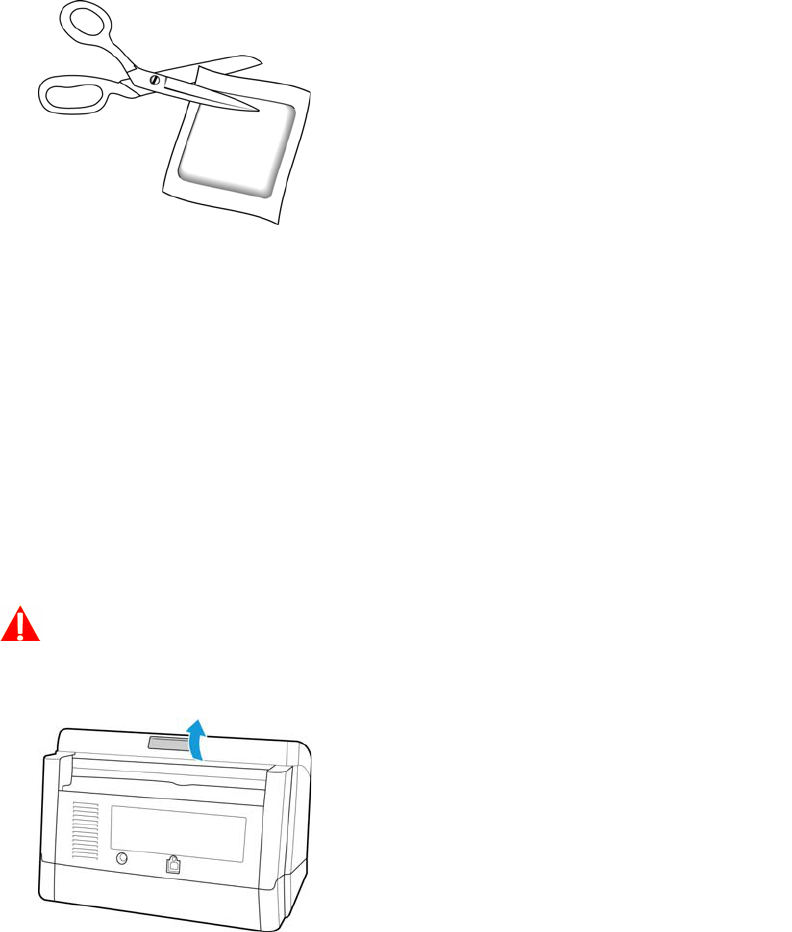
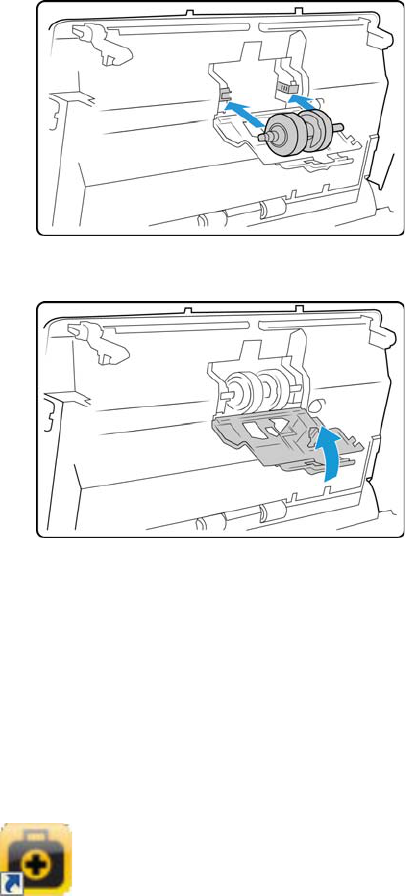
Replacing the Rollers.......................................................................................................................... 44
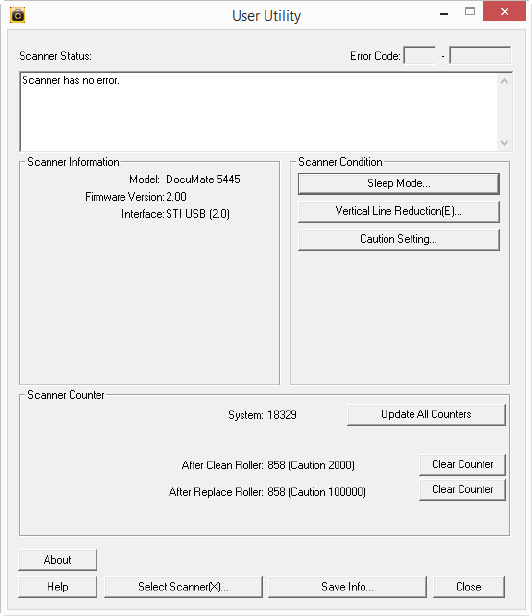
User Utility..............................................................................................................................................47
Main Screen Options .............................................................................................................48
Scanner Error Codes............................................................................................................... 49
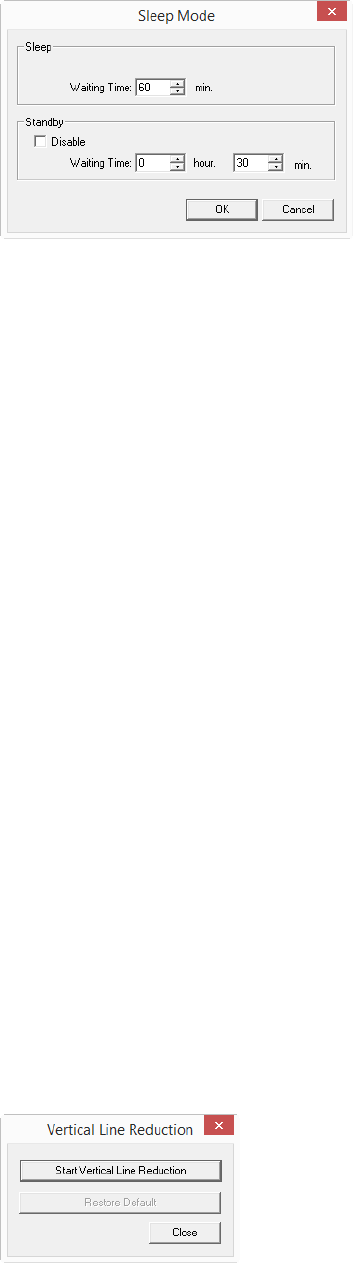
Setting Sleep Mode................................................................................................................ 51
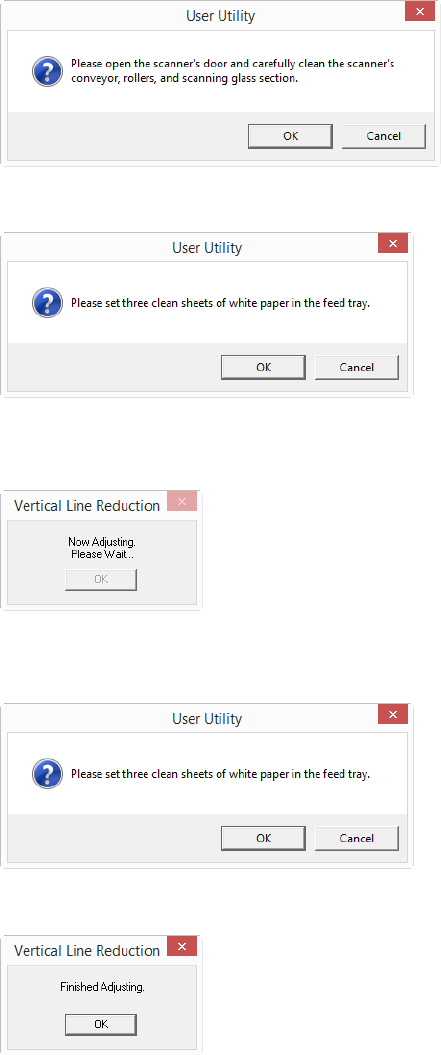
Vertical Line Reduction.........................................................................................................52
Uninstalling Your Scanner ...............................................................................................................54
Troubleshooting................................................................................................................................... 55
Xerox
®
DocuMate
®
5445 / 5460 Specifications.................................................................... 57
Xerox
®
DocuMate
®
5445 / 5460 Parts List .............................................................................. 60
Regulatory Information .........................................................................................61
Basic Regulations................................................................................................................................. 61
United States (FCC Regulations)...................................................................................... 61
European Union.......................................................................................................................61
Turkey (RoHS Regulation) ................................................................................................... 62
Copy Regulations................................................................................................................................. 62
United States ............................................................................................................................ 62
Canada ........................................................................................................................................ 64
Other Countries........................................................................................................................ 64
Compliance Information .......................................................................................67
Product Recycling & Disposal......................................................................................................... 67
USA & Canada.......................................................................................................................... 67
European Union....................................................................................................................... 67
ENERGY STAR for the USA............................................................................................................... 68
User Guide v
Safety
Safety Introduction
Notices and Safety
Please read the following instructions carefully before operating the machine and refer to them as
needed to ensure the continued safe operation of your machine.
Your Xerox
®
product and supplies have been designed and tested to meet strict safety
requirements. These include safety agency evaluation and certification, and compliance with
electromagnetic regulations and established environmental standards.
WARNING:
The safety and environment testing and performance of this product have been verified using
Xerox
®
materials only. Unauthorized alterations, which may include the addition of new
functions or connection of external devices, may impact the product certification. Please
contact your Xerox representative for more information.
Operational Safety Information
Your Xerox
®
equipment and supplies have been designed and tested to meet strict safety
requirements. These include safety agency examination, approval, and compliance with
established environmental standards.
To ensure the continued safe operation of your Xerox
®
equipment, follow these safety guidelines
at all times:
Do these:
Always follow all warnings and instructions that are marked on or supplied with the
equipment.
Always use materials specifically designated for this product, the use of other materials may
result in poor performance and create a hazardous situation. Do not use aerosol cleaners,
they may be explosive and flammable under certain conditions.
Always exercise care when moving or relocating equipment.
Always locate the machine on a solid support surface that has adequate strength to support
the weight of the machine.
Always locate the machine in an area that has adequate ventilation and room for servicing.
Always unplug this equipment from the electrical outlet before cleaning.
Xerox
®
DocuMate
®
5445 / 5460 Safety
vi User Guide
Note: Your Xerox
®
machine is equipped with an energy saving device to conserve power when the
machine is not in use. The machine may be left on continuously.
Do not do these:
Never use a ground adapter plug to connect the equipment to a power outlet that lacks a
ground connection terminal.
Never attempt any maintenance function that is not specifically described in this
documentation.
Never remove covers or guards that are fastened with screws. There are no operator
serviceable areas within these covers.
Never locate the machine near a radiator or any other heat source.
Never override or “cheat” any of the electrical or mechanical interlock devices.
Never place this equipment where people might step on or trip on the power cord.
Caution: This device is not intended for use in the direct field of view at visual display
workplaces
To avoid incommoding reflections at visual display workplaces this device must not be placed in
the direct field of view.
Electrical Information
Warning - Electrical Safety Information
1. The power receptacle for the machine must meet the requirements stated on the data plate
on the rear of the machine. If you are not sure that your electrical supply meets the
requirements, please consult your local power company or an electrician for advice.
2. The socket outlet shall be installed near the equipment and shall be easily accessible.
3. Use the power cable that is supplied with your machine. Do not use an extension cord or
remove or modify the power cord plug.
4. Plug the power cable directly into a correctly grounded electrical outlet. If you are not sure
whether or not an outlet is correctly grounded, consult an electrician.
5. Do not use an adapter to connect any Xerox
®
equipment to an electrical outlet that lacks a
ground connection terminal.
6. Do not place this equipment where people might step or trip on the power cable.
7. Do not place objects on the power cable.
8. Do not override or disable electrical or mechanical interlock devices.
9. Do not push objects into slots or openings on the machine. Electrical shock or fire may result.
Safety Xerox
®
DocuMate
®
5445 / 5460
User Guide vii
Electrical Supply
This product shall be operated from the type of electrical supply indicted on the product’s
data plate label. If you are not sure that your electrical supply meets the requirements, please
consult your local power company for advice.
Always connect equipment to a correctly grounded power outlet. If in doubt, have the outlet
checked by a qualified electrician.
WARNING: This equipment must be connected to a protective earth circuit
This equipment is supplied with a plug that has a protective earth pin. This plug will only fit into
an earthed electrical outlet. This is a safety feature. If you are unable to insert the plug into the
outlet, contact your electrician to replace the outlet.
Disconnect Device
The power cable is the disconnect device for this equipment. It is attached to the back of the
machine as a plug-in device. To remove all electrical power from the equipment, disconnect the
power cable from the electrical outlet.
Emergency Power Off
If any of the following conditions occur, turn off the machine immediately and disconnect the
power cable(s) from the electrical outlet(s).
The equipment emits unusual odors or makes unusual noises.
The power cable is damaged or frayed.
A wall panel circuit breaker, fuse, or other safety device has been tripped.
Liquid is spilled into the machine.
The machine is exposed to water.
Any part of the machine is damaged.
Maintenance Information
1. Any operator product maintenance procedures will be described in the user documentation
supplied with the product.
2. Do not carry out any maintenance on this product which is not described in the customer
documentation.
Xerox
®
DocuMate
®
5445 / 5460 Safety
viii User Guide
3. Do not use aerosol cleaners. The use of cleaners that are not approved may cause poor
performance of the equipment, and could cause a dangerous condition.
4. Use supplies and cleaning materials only as directed in this manual.
5. Do not remove covers or guards that are fastened with screws. There are no parts behind
these covers that you can maintain or service.
6. Do not perform any maintenance procedures unless you have been trained to do them by an
authorized local dealer or unless a procedure is specifically described in the user manuals.
Product Safety Certification
This product is certified by the following Agency using the Safety standards listed:
Environmental Health and Safety
Contacts
Contact Information
For more information on Environment, Health, and Safety in relation to this Xerox
®
product and
supplies, please contact the following customer help lines:
Standard
UL60950-1 (USA)
CSA 22.2 No. 60950-1 (Canada)
IEC 60950-1
USA & Canada: 1-800-828-6571
Europe: +44 1707 353 434
User Guide 1
Welcome
Your new Xerox
®
scanner can quickly scan stacks of single-sided or double-sided pages and place
their electronic images on your computer.
What’s in the Box
Before proceeding, check the contents of the box. If items are missing or damaged, contact the
dealer where you purchased the scanner.
System Requirements
Intel Pentium 4 or equivalent processor
Xerox® DocuMate® 5445
or
Xerox® DocuMate® 5460
Quick Install Guide Input Tray
USB Cable Power Supply Power Cord
Technical Support Card Warranty Card Installation Disc
Xerox
®
DocuMate
®
5445 / 5460 Welcome
2 User Guide
DVD-ROM drive capable of reading Dual Layer DVDs
Universal Serial Bus (USB) port
•Microsoft
®
Windows
®
operating system:
32-bit Windows XP (Service Pack 3)
32-bit or 64-bit Windows Vista (Service Pack 2)
32-bit or 64-bit Windows 7 (Service Pack 1)
32-bit or 64-bit Windows 8 / 8.1
32-bit or 64-bit Windows 10
2 gigabyte (GB) internal memory (RAM)
Minimum available hard disk space:
350 MB for the scanner driver
750 MB for Visioneer OneTouch
1 to 2 GB for each additional application
Please refer page 19 for a list of the applications provided with your scanner.
Monitor (recommended settings):
Color quality of 16-bit or 32-bit
Resolution set to at least 800 x 600 pixels
Refer to your Windows documentation for instructions on setting the color quality and
resolution for the monitor.
Documentation
The following printed documentation is provided in the box:
Installation guide—abbreviated scanner setup and installation instructions.
Technical support card—contact information for technical support and customer service,
and a brief overview of our standard product warranty.
Warranty card—the warranty card is provided for users in Russia and should be filled in as
described on the card. For all other users, please dispose of this card in paper recycling.
The following soft-copy documentation is available on the installation disc:
Scanner user guide—instructions for scanner setup, installation, operation, maintenance,
safety, and warranty
OneTouch scanning guide—instructions for configuring and scanning using OneTouch
TWAIN scanning guide—instructions for accessing and scanning using the TWAIN interface
Welcome Xerox
®
DocuMate
®
5445 / 5460
User Guide 3
Control sheets—automatically adjust the scan settings when scanning using the TWAIN
interface. The file contains layouts for various ISO and U.S. paper sizes. The TWAIN
scanning chapter contains instructions on using these sheets while scanning.
Make sure you print the page size that matches the size of the pages in your document stack.
Also, make sure the application you are using is not set to automatically scale the page to fit
on the paper in your printer.
File separation sheets—automatically separate a stack of paper into two or more separate
files, when scanning using the TWAIN interface.
Make sure you print the page size that matches the size of the pages in your document stack.
Also, make sure the application you are using is not set to automatically scale the page to fit
on the paper in your printer.
Patch code sheets—use with an application that supports detection of patch code data
when using the TWAIN interface. The patch code page layouts have been specifically
designed for your scanner. The file contains Patch 2, 3 and T layouts for A4 and U.S. Letter
size pages.
Make sure you print the correct page size for the paper in your printer. Also, make sure the
application you are using is not set to automatically scale the page to fit on the paper in your
printer.
Nuance PaperPort user’s guide—contains detailed information using the application and
managing your scanned documents.
Nuance OmniPage user’s guide—contains detailed instructions on using the software,
including information on using Optical Character Recognition to create editable text files
from the scanned documents.
Xerox
®
DocuMate
®
5445 / 5460 Welcome
4 User Guide
The Xerox
®
DocuMate
®
5445 / 5460
Scanner Features
1. Input Tray—Holds the documents in the Automatic Document Feeder for scanning.
Paper Guides—Slide to adjust to document width.
2. ADF Cover Release—Press to open the Automatic Document Feeder.
3. Automatic Document Feeder—Feeds documents through the scanner during scanning.
4. Output Tray—Holds documents after being scanned.
Exit tray extension—extends to support various document lengths.
Exit stopper—holds documents in the exit tray
Exit Guides—helps to keep paper stacked nearly in the exit tray.
5. Mixed batch card guide—allows for scanning a mixed batch of paper and cards.
6. Paper thickness switch—separates the rollers to allow for scanning thick items.
7. Power Jack—Connect the power cord to the scanner.
8. Universal Serial Bus (USB) Port—Connect the scanner to the computer via the USB 2.0
cable.
1
2
3
4
5
6
7
8
Welcome Xerox
®
DocuMate
®
5445 / 5460
User Guide 5
Control Panel
1. LED number—shows the OneTouch function that will be used for scanning. You can view the
scan settings for that function in the OneTouch Properties window. When there is a hardware
error, the LED number indicates what the hardware error code is.
2. LED function button—tap the button to cycle through the 9 OneTouch scanning options.
3. Scan type function button—tap the button to change the scan type between Simplex (one-
sided) and Duplex (two-sided) scanning. The option you select here overrides the selected
option in the OneTouch Properties window when you scan by pressing the green start button.
4. Power button—turns the scanner power on or off. Press the button to turn the scanner on.
Press and hold down the button for a couple of seconds to turn the scanner off. This is the
clear button on the control panel.
5. Reset button—returns the scan settings in TWAIN to the default settings. This is the yellow
button on the control panel.
6. Stop button—stops the scanner when scanning. This is the red button on the control panel.
7. Start button—starts scanning. This is the green button on the control panel.
8. Error light—this light will start flashing if the scanner experiences a hardware error.
2
3
4
5
6
7
8
1
Xerox
®
DocuMate
®
5445 / 5460 Welcome
6 User Guide
User Guide 7
Scanner Setup
Unpack the scanner
Remove any tape from the scanner body. Use care while removing the tape, the tape holds fragile
parts in place for shipping.
Note: we recommend you remove the tape from the scanner in the order indicated in the
illustrations below. Also remove any protective foam from the inside of the scanner while you are
removing the packaging tape.
Press the ADF cover release button and open the scanner.
2
1
3
Xerox
®
DocuMate
®
5445 / 5460 Scanner Setup
8 User Guide
Place the scanner on a level surface near the computer.
Keep clear space on every side of the scanner for the input and exit tray extensions,
performing maintenance, and to have sufficient air flow for ventilation.
Attach the Input Tray
1. Align the tabs on the input tray with the holes in the scanner body.
2. Slide the input tray into position.
Scanner Setup Xerox
®
DocuMate
®
5445 / 5460
User Guide 9
3. Push firmly on the input tray until you hear it lock in place.
Connect the Scanner Power Cord
Note: Only use the power supply (PNLV6507Y) included with your scanner. Connecting any other
type of power supply may damage your scanner, and will void its warranty.
1. Plug the power supply into the power port on the scanner.
2. Plug the power cord into the power supply and into a wall outlet.
Xerox
®
DocuMate
®
5445 / 5460 Scanner Setup
10 User Guide
User Guide 11
Installation
Please make sure of the following before you begin installation:
If you are prompted to reboot during installation, please select “No”. Finish installing the rest
of the software, then close all open windows and reboot your computer.
The information in this guide may cover software not provided with the scanner you
purchased. Please disregard any information about the software not applicable to your
scanner.
If your computer has AntiVirus or AntiSpyware software running, you may encounter alerts or
messages during installation asking you to allow the installation to proceed. Although the
messages will differ based on the software your computer is running, in each case you should
allow the installation to proceed if that option is available. Alternatively, you can turn off the
AntiVirus or AntiSpyware software before installing your scanner, but if you do, make sure to
turn it back on again when installation is finished.
If your computer is running Windows Vista or later, you may see the Windows User Account
Control screen asking you to confirm system changes. Click the Yes button to allow the
installation to proceed.
Install the Software and Connect the
Scanner
1. Start Microsoft Windows and make sure that no other applications are running.
Xerox
®
DocuMate
®
5445 / 5460 Installation
12 User Guide
2. Insert the installation disc into your computer’s DVD-ROM drive.
The disc automatically starts.
3. The Select Language window opens. Click the drop-down menu arrow and select the
language to use. Click OK.
The disc’s Main menu window opens.
Note: If the disc does not start, check the following:
Make sure the disc drives door is completely shut.
Make sure the disc was inserted in the drive in the proper direction (label side up).
To l a un c h t h e di sc m anu all y:
Open the Windows options for your computer’s disc drives.
Double-click the icon for your DVD-ROM drive.
The Installation menu for the disc should now open.
If the menu does not open:
From the list of files on the disc, double-click the file named setup.exe.
Installation Xerox
®
DocuMate
®
5445 / 5460
User Guide 13
4. On the Main menu, select Install software.
5. Make sure the boxes for Scanner Driver and Visioneer OneTouch are selected, as well as any
other applications you want to install.
Note: The software provided with your scanner may differ slightly from the list shown in the
window.
6. Click Install now.
Xerox
®
DocuMate
®
5445 / 5460 Installation
14 User Guide
Installing the Scanner Driver
The scanner driver installation will start first.
1. The Welcome screen for the scanner driver Setup Wizard opens. Click Next.
Note: there may be an option in the installation window to remove any current scanning
profiles. You will see this prompt if you already have a previous version of the scanner driver
installed. Select the option in the installation window only if you want the existing profiles
removed.
2. On the Xerox License Agreement window, read the license agreement. If you accept the
terms, select I Agree then click Next.
If you choose not to accept the license agreement, click Cancel. Click Close on the
Installation Interrupted window.
3. The software will now be installed.
Installation Xerox
®
DocuMate
®
5445 / 5460
User Guide 15
4. Stop when you see the “Complete the installation by connecting your hardware” window. Do
not click OK yet. Leave the window open and proceed to the next section.
Note: If you do not see this on-screen diagram for connecting the scanner, stop and follow the
instructions below.
Connect the USB Cable and Turn on the Power
1. Remove any tape from the USB cable.
2. Plug the USB cable into the USB port on the scanner then into a USB port on the computer.
Check your computer’s manual for USB port locations.
If the plug does not attach easily, make sure that you are plugging it in correctly. Do not force
the plug into either connection.
Xerox
®
DocuMate
®
5445 / 5460 Installation
16 User Guide
3. Turn on the scanner power.
The status light comes on and flashes indicating that the scanner is receiving power.
Your computer recognizes that a scanner has been plugged into the USB port and
automatically loads the appropriate software to run the scanner.
4. When you’re certain that the software has completely loaded, return to the “Complete the
installation by connecting your hardware” window.
5. Click OK to complete the installation process.
Installation Xerox
®
DocuMate
®
5445 / 5460
User Guide 17
6. Click Close on the Installation Complete window to close and exit the driver installer.
User Utility Installation
The User Utility installation will automatically start after you close the TWAIN installation. The
User Utility is a software diagnostic and maintenance software that you can use for monitoring
your scanner hardware.
1. On the Xerox User Utility License Agreement window, read the license agreement. If you
accept the terms, select
Yes to accept the agreement and continue with the installation.
If you choose not to accept the license agreement, the installation will terminate and the
User Utility will not be installed.
2. The next screen lets you choose where the installation files are going to be on your computer.
Click on Browse... to change the location where the files are installed.
We recommend that you keep the default options on this window and just click on Next to
proceed with the installation.
3. The next screen lets you change the Program Files folder name and where the program
appears in your Windows Start Programs list.
The default options on this window will put the shortcut icon in your Windows All Programs list
in the Xerox folder. We recommend that you keep the default options on this window and just
click on Next to proceed with the installation.
4. Click on Finish on the Installation Complete window to close the installation window.
5. A shortcut icon for the User Utility will be on your Windows desktop and in the Windows Start
All Programs menu.
Xerox
®
DocuMate
®
5445 / 5460 Installation
18 User Guide
Installing the ISIS Driver
1. You will first be prompted to select a language for the ISIS driver. The language selection on
this screen only applies to the ISIS scanning interface.
Select the language you want to use then click on Next.
2. Click on Next in the ISIS Installation Welcome window.
3. Click on Install to begin the ISIS driver installation.
4. Click on Finish to close the ISIS installation complete window.
Installing Visioneer OneTouch
The Visioneer OneTouch software installation will start automatically after you click Close on the
driver Installation Complete window.
1. Click Next on the Welcome to the OneTouch Setup Wizard.
Note: there may be an option in the installation window to remove any current scanning
profiles. You will see this prompt if you already have a previous version of OneTouch installed.
Select the option in the installation window only if you want the existing profiles removed.
2. On the Visioneer License Agreement window, read the license agreement. If you accept the
terms, select I Agree then click Next.
If you choose not to accept the license agreement, the installation will terminate and
OneTouch will not be installed.
3. Click Close on the Installation Complete window to close and exit the software installer.
Note: If you selected other software to install from the DVD the installation for that software will
automatically start after you click Close on the Installation Complete window. Follow the
instructions on-screen to install each application you selected.
Installation Xerox
®
DocuMate
®
5445 / 5460
User Guide 19
Installing Additional Applications
Your scanner includes free, additional applications as described in the table below.
1. Return to the disc’s Main menu and click Install software.
2. Select the additional applications you want to install, then click Install now.
3. Follow the instructions on the screen to install each of the additional applications.
Software About the Software
Nuance PaperPort
®
PaperPort is a document management software application. The PaperPort
scanning features allow you to insert new pages into an existing file and name
your file immediately after scanning. From within the PaperPort desktop you
can sort your documents and move them between folders as you would
through the Windows My Documents folder. You can reorder the pages in a PDF
file, and unstack a document so all the pages are re-saved as individual files.
PaperPort also has some basic image editing options in the PaperPort
PageView, such as; adding notes to image files, modifying image colors, and
touch up the image using the erase and/or auto-correct options.
You can see more information about this application at www.nuance.com
Nuance OmniPage
®
OmniPage Pro provides precision OCR analysis, advanced layout detection, and
Logical Form Recognition™ (LFR) technology. Advanced security features quickly
turn office documents and forms into over 30 different PC applications for
editing, searching and sharing. Custom workflows handle large volumes of
documents, and you can use its tools to print to PDF.
Nuance Power PDF Power PDF features 100% industry-standard PDF creation and editing plus the
world’s most accurate PDF conversion to editable Microsoft
®
Office
®
formats
available. It also offers one-click scanning to PDF, the most advanced PDF
search capabilities, excellent graphics management, document flattening and
auto-removal of sensitive information. Combining unparalleled functionality,
built-in intelligence and ease of use, Power PDF enables users to create, convert,
edit, assemble and securely share PDF files like never before for enhanced
professionalism, productivity and collaboration.
Xerox
®
DocuMate
®
5445 / 5460 Installation
20 User Guide
View the User Guides
1. Return to the disc’s Main menu and click on View user guides.
2. Click on View scanner documentation to access the scanner user guide and scanning guides
for OneTouch and TWAIN.
Scanner user guide—Instructions for scanner setup, installation, operation,
maintenance, safety, and warranty
OneTouch scanning guide—Instructions for configuring and scanning using OneTouch
TWAIN scanning guide—Instructions for accessing and scanning using the TWAIN
interface
Click on View software documentation to access the user guides for the software
applications provided with the scanner.
From either of these user guide windows, click on the User guide menu button to return to
the main user guide window, then select the other documentation section to view the user
guides.
3. Click the links of the guides you want to view.
4. When you’re finished, click Main menu to return to the Main menu window and click Exit.
5. Remove the installation disc and store it in a safe place.
Installation Xerox
®
DocuMate
®
5445 / 5460
User Guide 21
Register Your Scanner
Registering your scanner is important as it provides you with access to our free telephone support
service. Registration also gives you free access to software updates for your scanner.
You will need an active network connection to register your scanner. If you do not have network
access you can contact our customer service department to register the scanner. Please refer to
the Technical Support Card, that you received with the scanner, for our customer service contact
information.
1. Open an Internet Explorer window, or any other Internet browser you have installed on your
computer.
2. In the web address field type www.xeroxscanners.com
.
3. Press Enter on your computer’s keyboard or click the option on screen to go to the web
address.
4. When the Xerox
®
scanners web page loads click on Register Your Product.
5. Fill in the registration form, all required fields have an asterisk (*).
A valid email address is required for registration.
6. You will be asked to enter the serial number for the scanner, it is located on the back or
underside of the scanner.
7. After filling in the form, click on Submit Your Registration to complete the registration.
Xerox
®
DocuMate
®
5445 / 5460 Installation
22 User Guide
User Guide 23
Loading Documents to
Scan
Always remove any staples or paper clips from documents before inserting them into the scanner.
Staples and paper clips can jam the feed mechanism and scratch the internal components. Also
remove any labels, stickers, or Post-It™ notes that may come off during the scanning process and
get stuck in the scanner. Misuse as described here will void your scanner’s warranty. Please go to
www.xeroxscanners.com
, select your product, and then click the “Warranty Program” link to view
the warranty terms and conditions for your scanner.
Supported Document Types
You can scan the following types of documents and cards with this scanner.
Acceptable Paper Documents
The maximum amount of paper in the input tray should not exceed the maximum stack
thickness indicated on the paper guides.
Maximum amount of paper in the input tray
Approximately 75 pages of 20 lb (75–80 g/m
2
) new printer paper
•Document size
Minimum size (width x length) – 1.9 x 2.9 inches (48 x 71 mm).
The minimum supported paper length is 71 mm except when scanning the acceptable
card size stated below.
Maximum size (width x length) – Please refer to the Xerox
®
DocuMate
®
5445 / 5460
Specifications section for this information.
We recommend scanning one page at a time when the documents you are scanning are
longer than 14 inches (356 mm).
•Mixed document stacks
Scanner minimum to maximum without long document enabled
Arrange the documents so that all items are centered in the stack. The document sensor,
paper separation, and feed rollers are located in the middle of the paper path. If smaller
items are offset from the center they will not be detected. This will cause feeding issues
and paper jams.
Paper thickness between 5 lbs to 55 lbs (19-206 g/m
2
)
Xerox
®
DocuMate
®
5445 / 5460 Loading Documents to Scan
24 User Guide
We recommend changing the Document handling speed to Delicate in the TWAIN
interface when scanning thin paper of approximately 11 lbs (40 g/m
2
) or thinner.
Additionally, we recommend using the slow paper feeding speed if you are scanning
fragile documents.
Note: The minimum custom item size is 1.9 x 2.13 inches (48 x 54 mm). This means that you
cannot scan business cards size 3.5 x 2 inches in the landscape orientation. You can place them
with the short edge leading into the scanner (portrait orientation) and scan from the TWAIN
interface. Select one of the rotate image options in the TWAIN interface to have the business
cards rotated to the correct orientation in the final scan.
Note that if you attempt to scan business cards in the landscape orientation you will probably
receive a paper jam error.
Acceptable Card Type
Card size: 3.4 x 2.13 inches (86 x 54 mm)
•Standard ID cards
Card size: 3.4 x 2.13 inches (86 x 54 mm)
Card thickness: 0.03 inches (0.76 mm)
•Embossed cards
A maximum of 3 cards can be loaded in the input tray.
The maximum height of the 3 cards stacked in the input tray should not exceed 0.2
inches (5 mm).
Scan the cards in the landscape (horizontal) orientation.
Use the mixed batch card guide when scanning mixed media (cards and paper) at the same time.
Please refer to Using the Mixed Batch Card Guide for instructions.
Documents to Avoid Scanning
The documents in this list can be scanned, but please note that scanning documents of this type
will reduce the life of the scanner. Maintenance will be required more often and replaceable parts
will wear faster. These types of documents will jam more frequently and damage to the original
documents may occur. If you do choose to scan these document types, do not scan large batches.
This type of use is not covered under the scanner warranty and alters replacement parts life
expectancy.
We recommend you limit the amount or completely avoid scanning documents that are in this list.
Curled, wrinkled or folded documents may cause paper jams or multiple pages being fed
through the scanner at one time.
Perforated or punched paper that could tear when the separation roller engages.
Coated paper or photographs where the coating can flake off during scanning and leave
residue in the scanner.
Loading Documents to Scan Xerox
®
DocuMate
®
5445 / 5460
User Guide 25
Extremely smooth, shiny, or highly textured paper may cause the paper feed rollers to slip
across the page and cause the scanner to report a paper jam.
Carbonless copy paper may tear while being fed through the scanner and the pressure of the
rollers may leave streaks on the page. The chemical coating on this paper will rub off on the
rollers during the scan process, increasing the frequency of miss-feeds and paper jams.
Partially transparent paper such as tracing paper as any images from the opposite side of the
page or black background will appear in the scanned images.
Unsupported Document Types
Do not scan the following types of documents as they may cause damage to the scanner.
Items outside of the specified supported sizes, thickness, and weight defined in this
document.
Non-rectangular or irregularly shaped paper will cause the scanner to detect and report
document skew errors or paper jams.
Carbon paper that will leave residue in the scanner and on the rollers that will transfer to the
next set of documents scanned.
Documents with hard items attached such as paper clips, binder clips, and staples.
Documents with wet ink or white-out.
Thermal or photosensitive paper.
Overhead projector sheets, plastic film, camera film, and any other type of transparent or
partially transparent plastic item.
Documents that have been glued together.
Cloth or metallic sheets.
Using the Mixed Batch Card Guide
You can use the card guide to scan most ID and credit cards without having to adjust the paper
guides to fit the width of the card. The card guide helps to prevent the card from skewing while
scanning a mixed batch containing both regular paper and cards.
Please note and follow these guidelines when using the mixed batch card guide:
The input tray paper guides cannot be adjusted to less than A5 size in width.
The total thickness of the paper stack you place in the input tray should not exceed 0.08
inches (2 mm). This is roughly equivalent to 20 pages of 20 lb (75 - 80 g/m
2
) printer paper.
Place only one card at a time in the card guide.
Xerox
®
DocuMate
®
5445 / 5460 Loading Documents to Scan
26 User Guide
Detach or Attach the Mixed Batch Card Guide
The card guide is pre-installed in the scanner. After removing the shipping tape lift up on the card
guide to remove it from the scanner.
After you remove the card guide from the scanner you can attach it to the back of the input tray.
Slide the paper guide into the tabs on the back of the input tray as indicated in the illustration
below.
When you want to use the card guide you can attach it by sliding the tabs on the card guide into
the niches on the scanner.
Loading Documents to Scan Xerox
®
DocuMate
®
5445 / 5460
User Guide 27
Scanning from the Automatic Document
Feeder (ADF)
Preparing Documents for Scanning
Fan the documents to make sure all pages in the stack are separated.
Bend and then flatten the document stack to make sure the horizontal edges are aligned to
help prevent paper from skewing while being pulled through the scanner.
Pinch the ends to align the leading edges slantwise to help prevent multiple pages from being
fed through at a single time.
Adjust the paper guide for the width of paper, and make sure the input and output trays are
fully extended.
Xerox
®
DocuMate
®
5445 / 5460 Loading Documents to Scan
28 User Guide
•Place the documents face down in the input tray. Set the leading edge of the documents as
shown in the illustration below.
Important: the paper capacity for the input tray is 75 pages of standard 20 lb printer paper.
You cannot place a full stack of pages in the scanner if the card guide is installed in the
scanner. Please refer to page 26 for instructions on removing and storing the card guide.
You can now scan the documents using the scanner buttons, OneTouch, or one of the other
scanning interfaces.
Scanning Thick Pages or Bound
Documents
With this scanner you can scan thick paper and bound documents up to a maximum of 1 mm
thick.
To scan thick items:
The double feed prevention roller has to be moved away from the feed roller before you can scan
thick items. The double feed prevention roller separates the pages as the feed roller grabs and
feeds the pages through the scanner. Because the double feed prevention roller has to be
disengaged, you can scan only one page at a time.
Loading Documents to Scan Xerox
®
DocuMate
®
5445 / 5460
User Guide 29
1. Open the scanner.
2. Locate the paper thickness switch in the underside of the ADF door.
3. Pull the paper thickness switch up as indicated in the illustration below.
When you pull the paper thickness switch the double feed prevention roller disengages and
sits back into the scanner.
4. Close the ADF door.
When you close the ADF door the double feed prevention roller will no longer touch the feed
roller.
5. Place a single item in the input tray and scan.
When you are scanning thick items you cannot use the Double Feed Detection option in the
scanning interface. If you leave that option enabled the scanner will report a double feed error for
each page you scan.
When you are done scanning, do not forget to move the paper thickness switch back into its
original position so that you can proceed with normal document scanning.
Xerox
®
DocuMate
®
5445 / 5460 Loading Documents to Scan
30 User Guide
Scanning Interfaces
OneTouch Control Panel—When you press the Start button on the scanner, the scanner
starts scanning using the settings for the current LED number. The scanned image is then sent
to a destination on your computer or network drive.
OneTouch Button Panel—Use this scan option when you want to scan from the computer
screen. Scanning from the on-screen OneTouch Button Panel is the same as selecting a
scanning option on the scanner, except you click an icon that represents the function.
Please see the OneTouch Scanning Guide on the installation disc for instructions. You can also
click the Help button in the OneTouch Properties window to open the instructions in an
Internet browser.
Scanner Control Panel
OneTouch Button Panel
Loading Documents to Scan Xerox
®
DocuMate
®
5445 / 5460
User Guide 31
TWAIN and WIA Interface—This option uses your scanner’s TWAIN interface to scan.
Select scanning options before scanning, put the document in the scanner, then click the
Scan button in the TWAIN interface window.
Please see the TWAIN Scanning Guide on the installation disc for instructions. You can also
click the Help button in the TWAIN interface to open the instructions in an Internet browser.
ISIS Interface—This option uses the ISIS interface for scanning. Please refer the user
manual for your ISIS scanning application for instructions on scanning with the ISIS interface.
Xerox
®
DocuMate
®
5445 / 5460 Loading Documents to Scan
32 User Guide
User Guide 33
Maintenance
This section contains information about maintenance, troubleshooting, uninstalling, scanner
specifications, and spare parts.
Safety Precautions
When servicing the scanner you should take the following precautions to ensure your safety and
prevent damage to the scanner.
Do These
Wear protective gloves when cleaning the scanner with Isopropyl rubbing alcohol. Rubbing
alcohol may irritate sensitive skin.
Only perform scanner maintenance as described in this chapter.
Keep the scanner and cleaning supplies away from any open flame or heat source as any
form of alcohol is flammable.
Always read the instructions in each section carefully, the instructions are specific to the part
you are installing or servicing.
Move the scanner to an area that has adequate room for opening the scanner.
If your scanner has a power cord and/or power switch, always turn off the scanner and unplug
the power cord before performing maintenance, unless the maintenance instructions below
specifically state to leave the scanner plugged in and powered on.
Always unplug the USB cable from the scanner before performing maintenance, unless the
maintenance instructions below specifically state to leave the scanner plugged in.
Wear an anti-static strap to prevent electrostatic discharge when touching metal
components.
Keep all cleaning supplies, scanner parts and accessories out of the reach of children.
Do Not Do These
Never attempt installation of any part not described in this manual.
Never service the scanner near a radiator or any other heat source.
Never use aerosol sprays or compressed air, or attempt to lubricate parts with an oil or silicon
spray.
Never service the scanner in an area where there are open liquid containers.
Never pour or spill liquid on the scanner or any of its components.
Xerox
®
DocuMate
®
5445/5460 Maintenance
34 User Guide
Hardware Properties
You can use the scanner’s properties page to keep track of scanner maintenance, change some of
the hardware options, configure the scanner interface behavior, and adjust application options
that may be available for your scanner.
To open the scanner hardware properties page:
Windows 7 and later—from the Windows Control Panel, open Hardware and Sound and
then Devices and Printers. Right-click on the scanner and then select Scan properties from
the list.
Windows Vista—from the Windows Control Panel, open Hardware and Sound and then
Scanners and Cameras. Click on the scanner icon then click on the Properties button.
Windows XP—from the Windows Control Panel when in category view, open Printers and
Other Hardware and then Scanners and Cameras. Right-click on the scanner and then
select Properties from the list.
Device Settings
The Device Settings tab shows the hardware information for your scanner. The options on the
Device Settings tab will be available based on whether or not the scanner hardware supports the
feature. Some features described herein may not be available for the current scanner. Please
disregard any information about features that you do not see in the interface for your scanner.
Scanner Details
Firmware version—this is the scanner’s hardware processor version number.
Serial number—the scanner’s unique identification number.
LLD version—the scanner’s base driver version. This is not the OneTouch software revision,
TWAIN or WIA driver versions.
Driver version—this is the version of the scanner’s TWAIN driver.
Maintenance Xerox
®
DocuMate
®
5445/5460
User Guide 35
Power Settings
Some features described herein may not be available for the current scanner.
Sleep mode—sleep mode is the low-power state when the scanner is not in use. You can
adjust the amount of time you want the scanner to wait before it goes into low power.
Click the green enter button to save any changes in the Sleep mode field.
Click the red reset button to reset to the default timeout value.
Power off—input the number of minutes you want the scanner to wait before it turns itself
off.
Click the green enter button to save any changes in the power off field.
Click the red reset button to reset to the default timeout value.
Firmware Update
This option is not available for all scanners.
Check for update—check the scanner’s firmware version against the version included with
the scanner driver. When the scanner is connected to the computer and this option is
selected, or when a different scanner of the same model is connected, a notification will show
indicating that the firmware version is out of date. Deselect this option to stop being notified
of the different version if you do not want to update the firmware.
Update—click this button to update the scanner’s firmware with the latest revision provided
in the driver installer. Follow the instructions on-screen to update the scanner’s firmware. Do
not turn off the scanner or close any on-screen dialogues while the firmware update is in
process. Turning off the scanner or closing any on-screen dialogues before you are prompted
could irrevocably damage the scanner and prevent it from working. The firmware update
software will prompt you when it is safe to power cycle the scanner.
Scanner Configuration
Counters—click the reset button next to the counter you want to set back to 0.
Show maintenance reminders—select this option be notified when it is time to clean or
replace the rollers. After cleaning or replacing the rollers, click the reset button next to the
roller counters in this screen. The amount of time between cleaning and replacing the rollers
can be adjusted in the Xerox User Utility.
Launch Xerox User Utility—the Xerox User Utility helps you monitor the scanner status and
maintenance information. This button will be disabled if the Xerox User Utility is not installed.
You can install the User Utility from the installation disc or download it from the support page
for your scanner at www.xeroxscanners.com
.
Xerox
®
DocuMate
®
5445/5460 Maintenance
36 User Guide
Driver Settings
The options in this panel are for configuring how the TWAIN interface will behave in some
scenarios. Please see the TWAIN scanning guide on the installation disc for instructions.
Clearing Paper Jams
Depending on the paper type, scanning results may be poor even when you scan documents that
are in the list of acceptable document types on page 23.
If you are getting consistent paper jams or double feed errors please try the following:
Reduce the number of items placed in the input tray.
Clean the rollers and sensors as described in the section Cleaning the Scanner on page 39.
Use the slow scanning mode in the TWAIN interface. Please refer to “Adjusting the Scan
Speed” in the TWAIN interface for more information.
Adjust the paper thickness switch and scan one page at a time. Please refer to “Manual Feed
Mode” scanning in the TWAIN interface for more information.
If your scanner stops scanning due to a paper jam in the Automatic Document Feeder, a warning
opens after a few moments.
1. Open the Automatic Document Feeder cover.
Do not attempt to remove a jammed page with the scanner closed.
Maintenance Xerox
®
DocuMate
®
5445/5460
User Guide 37
2. Remove the jammed paper and close the cover.
To reduce the number of paper jams, smooth and straighten the paper before scanning, adjust
the guides to the paper size, and insert the paper evenly into the ADF.
Note: If the paper jam occurs only at the exit area, remove the exit guides and then try scanning
again.
To detach the exit guides:
1. Close the trays.
2. Remove the input tray by carefully but firmly pulling it away from the scanner.
3. Place the scanner on its back.
Xerox
®
DocuMate
®
5445/5460 Maintenance
38 User Guide
4. Carefully and firmly pull the exit guides away from the scanner.
The exit guides are hard plastic arms that snap on to a bar in the exit path of the scanner. Be
sure to pull the exit guides straight away from the scanner. Do not bend or twist the guides
while trying to detach them as it will cause the plastic to crack and break.
5. Set the exit guides aside where you can find them.
T
WARNING: The exit guides are small enough to pose a choking hazard. Keep them in
a safe place out of the reach of children.
6. Place the scanner back in position, reattach the input tray, and adjust the exit tray for the
length of the paper you want to scan. Place your documents in the input tray and try your
scan again.
Maintenance Xerox
®
DocuMate
®
5445/5460
User Guide 39
To attach the exit guides:
1. Close the trays. Remove the input tray by carefully but firmly pulling it away from the scanner.
Place the scanner on its back.
2. Locate notches in the underside of the exit path where the guides are going to be attached.
3. Align the exit guide clips to the bar and push firmly on the guides until they snap onto the bar.
The exit guides are hard plastic arms that snap on to a bar in the exit path of the scanner. Be
sure to push the exit guides straight into the scanner. Do not bend or twist the guides while
trying to attach them as it will cause the plastic to crack and break.
4. Place the scanner back in position, reattach the input tray, and adjust the exit tray for the
length of the paper you want to scan.
Cleaning the Scanner
Regular maintenance of your scanner can help to ensure continual optimal performance.
Using a soft, lint-free cloth, wipe down all plastic surfaces on the scanner.
Cleaning the Outside of the Scanner
Excessive dust accumulation around and on the scanner will pull into the scanner during the
scanning process and clog the ventilation openings. You should clean the outside of the scanner
at least once a month to help limit the amount of dust build up in the scanner.
1. Turn off the scanner power.
2. Using a soft dusting cloth, wipe down the body of the scanner, input tray and exit area. Make
sure that the input and exit slots in the scanner are also clean.
3. When you’re finished, press the power button to turn the scanner back on.
Xerox
®
DocuMate
®
5445/5460 Maintenance
40 User Guide
Cleaning the Inside of the Scanner
Cleaning the inside of the scanner helps to keep your scanner operating at optimum performance.
You should clean the inside of the scanner at least once a week or after 2,000 pages have been
scanned. If you are getting frequent paper jams, multiple pages feeding at the same time, or
you’re seeing lines in the scanned image, it is time to clean the scanner.
When cleaning the inside of the scanner, you should clean all of the rollers, scanner glass and
background plates at the same time.
Cleaning the Scanner Glass and Background Plates
The background plates are located underneath the scanner glass in both the top and bottom of
the scanner. If you see a warning message that one of the background plates is dirty, simply clean
the scanner glass as described here.
1. Press the ADF cover release button and open the scanner.
2. The following illustration shows the location of the glass in the scanner.
3. Using a soft, dry, lint-free cloth, gently wipe clean the scanner glass and background plates.
You can use a roller cleaning paper to clean the glass plates if there is any sticky residue on
the surface.
Cleaning the Double Feed Detection Sensors
You should clean these sensors as part of your standard weekly maintenance of the scanner.
Note: Do not clean the sensors with the roller cleaning paper.
Preparation
Turn off the scanner prior to cleaning the sensors.
Maintenance Xerox
®
DocuMate
®
5445/5460
User Guide 41
You will need a cotton swab.
Cleaning the Sensors
1. Press the ADF cover release button and open the scanner.
2. The following illustration shows the location of the sensors in the scanner.
3. Carefully clean the sensors with a dry cotton swab.
Cleaning the Rollers
Preparation
You will need a roller cleaning paper for cleaning the rollers. Roller cleaning papers can be
purchased from our website at www.xeroxscanners.com in the Parts & Accessories page for
your scanner.
Xerox
®
DocuMate
®
5445/5460 Maintenance
42 User Guide
Use scissors to open the roller cleaning paper bag, cutting across the dotted line.
Note: When cleaning the rollers, do not rub the roller cleaning paper vigorously back and forth
across the roller, this will shred the roller cleaning paper and leave debris in the scanner.
Safety Precautions
Keep the roller cleaning paper away from fire, heaters or any open flame or heat source as
any form of alcohol is flammable.
Wear protective gloves as the roller cleaning paper may irritate sensitive skin.
Only clean the rollers and scanning areas, as described in this section, with the roller cleaning
paper.
Do not leave the roller cleaning paper or bag where children can access it.
Always turn off the scanner and unplug the scanner’s power and USB cable prior to using the
roller cleaning paper.
Each roller cleaning paper should only be used once.
WARNING: The roller cleaning paper is moistened with Isopropyl rubbing alcohol.
Please read and follow these precautions to ensure your safety.
1. Press the ADF cover release button and open the scanner.
Maintenance Xerox
®
DocuMate
®
5445/5460
User Guide 43
2. The following illustration shows where the rollers are located in the scanner. Use a roller
cleaning paper to clean all of the rollers indicated in the illustration.
Note: Be careful when cleaning the rollers. All of the rollers, except the free rollers, are designed to
rotate in one direction only. Do NOT force the roller to rotate in the opposite direction. Forcing the
roller to rotate will damage it, and cause the scanner to feed pages incorrectly.
3. After cleaning the scanner you need to reset the roller count in the <brandcolor>User Utility.
From the main screen click on Clear Counter next to the field After Clean Roller.
4. The clean roller count will now be reset to 0.
5. Close the User Utility.
Xerox
®
DocuMate
®
5445/5460 Maintenance
44 User Guide
Replacing the Rollers
The roller will wear out and is designed to be a user-replaceable part. A worn roller can cause
documents to feed in skewed at an angle, or multiple pages to feed at the same time. Before
replacing the roller you should clean it as excessive dust on the roller will make it appear worn and
smooth. You cannot properly diagnose a worn roller until you have cleaned it. You should generally
replace the roller between 160,000 and 200,000 scans.
Replacement parts can be purchased from the Parts & Accessories page for your scanner at
www.xeroxscanners.com
.
When replacing the rollers described in this section, you should replace all of the rollers at the
same time. Do not replace just one roller and not the other. When you are finished replacing the
roller, reset the roller count in the user utility as described on page 49.
Turn off the scanner power and unplug the power cord from the scanner. Press the ADF cover
release button and open the scanner.
Replacing the Feed Roller
1. Locate the roller in the body of the scanner and pull open the roller cover.
Maintenance Xerox
®
DocuMate
®
5445/5460
User Guide 45
2. Remove the roller from the scanner. Angle it out and away from the gear in the scanner.
3. Insert the roller into the scanner. Align the gear on the roller with the gear in the scanner and
angle the other side of the roller down into the scanner.
4. Close the roller cover. Press gently on both sides of the roller cover until it clicks into place.
Xerox
®
DocuMate
®
5445/5460 Maintenance
46 User Guide
5. When you are done replacing the roller, manually rotate the roller in the direction it feeds the
paper to verify that the roller is installed correctly.
Replacing the Double Feed Prevention Roller
1. Locate the roller in the ADF door and pull open the roller cover.
2. Remove the roller from the scanner. Slide the roller straight out from the scanner.
Maintenance Xerox
®
DocuMate
®
5445/5460
User Guide 47
3. Insert the new roller into the scanner. Make the side of the bar with the longer groove is on
the right side when looking at the scanner as indicated in the illustration below.
4. Close the roller cover.
User Utility
The User Utility is a software program designed to help maintain and troubleshoot your Xerox
scanner.
On installation you were prompted to place an icon on your Windows desktop. If you selected yes,
simply double-click on the user utility icon to open the software.
If you do not have the User Utility icon on your desktop, follow these instructions for opening the
utility from the Windows programs list:
1. Click on the start button on the Windows taskbar.
2. Click on All Programs.
3. Click on Xerox from the programs list.
4. Select User Utility to open the software.
If you are prompted to select a scanner, make sure your scanner is selected then click on OK.
Xerox
®
DocuMate
®
5445/5460 Maintenance
48 User Guide
Main Screen Options
This section briefly describes the options on the main interface of the User Utility. The following
sections contain detailed instructions on using some of the options in this utility.
Scanner Status—this area displays the status of the scanner connected as well as error code
details.
Error Code—this field displays an error code number to help you diagnosis and resolve hardware
errors. Please see Scanner Error Codes on page 49 for the full list of error codes and steps to resolve
the issue.
Scanner Information—this area displays the current hardware specifications of the scanner.
Model: the scanner hardware model.
Firmware Version: the scanner’s current firmware version.
Memory: the amount of memory currently installed on the scanner.
Interface: the connection interface to the computer.
Scanner Condition—the options in this section relate to software settings and maintenance for
the scanner.
Sleep Mode: clicking on this button opens a window for you to set the time frame for your
scanner to go into power saving mode. Please see “Setting Sleep Mode” on page 51 for
instructions.
Maintenance Xerox
®
DocuMate
®
5445/5460
User Guide 49
Vertical Line Reduction: clicking on this button initiates the vertical line adjustment utility.
Please see “Vertical Line Reduction” on page 52 for instructions.
Caution Setting: clicking this button opens a window for you to set when to receive a notice
that it is time to clean the rollers.
Scanner Counter—this section shows the number of pages scanned. Use the options in this
window to keep track of maintenance performed on the scanner.
System: displays the number of pages scanned through the ADF after the last counter
update.
After Clean Roller: displays the number of pages scanned after the last time the rollers were
cleaned and the counter reset. Please see “Cleaning the Scanner” on page 39 for instructions
on monitoring and changing this setting.
After Replace Roller: displays the number of pages scanned after the rollers have been
replaced and the counter reset. Please refer to our website www.xeroxscanners.com
for spare
parts options and instructions available for your scanner.
Update All Counters: clicking this button updates the current count display next to the 3
fields described directly above. The counters do not update automatically during document
scanning, you must click on this button to display the current count information.
Clear Counter: clicking either of these buttons clears the counters back to 0 for the
appropriate section.
About—click on the About button to see more information about the application.
Help—clicking on this button opens the help file.
Select Scanner—clicking on this button opens a window for you to select a different scanner if
you have multiple scanners installed.
Save Info—clicking on this button opens a Windows Save As dialogue for you to save the current
scanner and computer information into a .log file.
Close—clicking this button closes the User Utility.
Scanner Error Codes
The User Utility displays an error code and message in the Scanner Status field. The following
table lists the codes, messages, possible causes and common resolutions.
If you are unable to resolve the issue using the troubleshooting steps in this table, please refer to
the section “Troubleshooting” on page 55.
Xerox
®
DocuMate
®
5445/5460 Maintenance
50 User Guide
Error Code Message Cause Resolution
U11
U12
U13
U14
U15
U16
A paper jam has occurred. Paper has jammed
while being fed
through the scanner.
Open the scanner’s door, remove
documents, and then close the
door. Place the documents back
in the document input tray.
Please see page 36 for complete
instructions.
If the problem persists, clean the
rollers as described in the section
“Cleaning the Scanner” on
page 39.
U18 Paper remains in the scanner. There is paper in the
scanner.
Open the scanner’s door, remove
documents, and then close the
door. Place the documents back
in the document input tray.
U23 A multi-feed has been
detected.
Two pages have fed
through the scanner
at the same time.
Open the scanner, remove the
pages, then close the scanner.
Make sure there are no pages
stuck together. Restack the paper
in the ADF and click Retry to
continue.
If problem persists, clean the
rollers and sensors as described in
the section “Cleaning the
Scanner” on page 39.
U30 Scanner door is open! Please
close the door.
A scanner access
cover is open.
Verify all covers on the scanner
are fully closed before scanning.
Fxx System error occurred! Please
consult with a service
representative.
An unknown system
error has occurred.
Reset the scanner and computer:
Turn off the scanner power.
Unplug the USB cable and power
cable from the scanner.
Reboot (restart) the computer.
Plug the USB cable and power
cable back into the scanner.
Turn the scanner back on.
If you are still unable to scan,
contact Xerox Technical Support.
Please refer to the Technical
Support Card you received with
the scanner for contact
information.
Maintenance Xerox
®
DocuMate
®
5445/5460
User Guide 51
Setting Sleep Mode
Your scanner has a built-in power saving feature that sets the scanner into low power when the
scanner has been sitting idle for 15 minutes. This default setting conserves power and complies
with the E
NERGY STAR requirements. Power saving extends the life of the lamps by turning them off
when not in use. Depending on your scanner model, there may also be an option to set an
automatic power off waiting time.
1. Open the scanner User Utility application.
2. On the main window click on the Sleep Mode... button.
***Caution***
The rollers need to be
cleaned. Please clean the
rollers. Please select “Clear
Counter” button after
cleaning the rollers.
The number next to
After Clean Roller,
in the User Utility
main screen, has
exceeded the
maximum number
between cleaning.
The rollers should be cleaned
every 2,000 scans, or as needed if
your scanner is experiencing
frequent paper feed issues. After
cleaning the rollers click on Clear
Counter to reset the cleaning
roller count back to 0. Please refer
to “Cleaning the Scanner” on
page 39.
***Caution***
The replaceable rollers
(consumable) are reaching
the end of their usable life. To
insure reliable operation,
please replace these rollers
with Roller Exchange Kit for
your specific scanner. After
replacing the rollers, select
the “Clear Counter” button.
The number next to
After Replace
Roller, in the User
Utility main screen,
has exceeded the
maximum number
between
replacement.
The rollers should be replaced
every 100,000 scans, or as
needed if cleaning the rollers
does not improve paper feeding
issues. After replacing the rollers
click on Clear Counter to reset the
roller replacement count back to
0.
***Caution***
The inside of the scanner is
dirty, and requires routine
cleaning. To insure reliable
scanning quality, open the
scanner’s door, and carefully
clean the scanner’s conveyor
and scanning glass.
The inside of the
scanner is dirty.
Clean the scanner as described in
the section “Cleaning the
Scanner” on page 39.
Scanner is not connected. The power is off, the
power cord or USB
cable is unplugged.
Verify cables are securely
plugged into the scanner,
computer and wall. If needed,
reboot the computer.
Error Code Message Cause Resolution
Xerox
®
DocuMate
®
5445/5460 Maintenance
52 User Guide
3. When the Sleep Mode window opens, select the options you want.
Waiting Time—set the waiting time before sleep mode or power off activates when the
scanner is idle. This time can be set from 1 to 60 minutes or from 15 to 60 minutes. The
range of this setting differs depending on the scanner model.
If the wait time for Power Off is shorter than the wait time for Sleep Mode, the
scanner will not enter Sleep Mode.
(Power Off) Disable—select this option to disable the automatic power off feature. This
option may not be available for the current scanner.
4. Click OK to save the changes and close the Sleep Mode window.
Vertical Line Reduction
The vertical line reduction is used to improve the image quality of the scanned documents. If your
final scanned files are of poor quality, such as perpendicular lines or the image clarity is uneven
across the page, you may need to perform a vertical line reduction on the scanner.
To prepare for vertical line reduction:
Clean the scanner rollers, image sensors, glass and reference plates, as described in the
section “Cleaning the Scanner” on page 39.
After cleaning the scanner, do a test scan and view the final image file. Do not perform a line
reduction adjustment until after you clean the scanner and test scan. A line reduction
adjustment performed before cleaning the scanner may result in degraded image quality.
Have 3 sheets of clean white paper ready as the software will tell you when to insert it into the
scanner.
To complete a vert ical line reduction:
1. Open the scanner User Utility application.
2. On the main window click on the Vertical Line Reduction... button.
3. Click on Start Vertical Line Reduction to begin the adjustment. The utility will guide you
through the rest of the steps.
Maintenance Xerox
®
DocuMate
®
5445/5460
User Guide 53
4. When prompted to clean the scanner click on OK to proceed only if you have already cleaned
the scanner during preparation. Otherwise, follow the instructions on screen and clean the
scanner.
5. Place the 3 sheets of plain white paper in the scanner’s input tray and then click on OK.
6. The scanner will pull the pages through as it sets the adjustment. This window will
automatically close when the initial adjustment is complete.
7. Depending on your scanner model, you may be prompted to put 3 sheets of clean white
paper in the scanner. Place the pages in the scanner when prompted and then click on OK.
8. Click on OK to complete the line reduction adjustment.
Restoring the Default Adjustment
You can reset the vertical line reduction adjustment to the factory default setting if completing an
adjustment does not improve the image quality.
1. Open the scanner User Utility application.
Xerox
®
DocuMate
®
5445/5460 Maintenance
54 User Guide
2. On the main window click on the Vertical Line Reduction... button.
3. Click on the Restore Default button.
4. Click on OK to restore the factory default adjustment.
5. When the adjustment has been restored, click on OK to close the User Utility restore window.
Uninstalling Your Scanner
Use the options in the Windows Control Panel to remove the scanner driver and modules, and any
other software provided with the scanner.
Please leave the scanner’s USB cable plugged into the computer while uninstalling the scanner
driver. Unplug the USB cable when directed to do so in the instructions below.
Open the list of installed programs in the Windows Control panel.
Windows XP: Open Add/Remove Programs
Windows Vista and later: Open Programs and Features
Uninstalling the scanner driver:
1. In the list of installed programs click on Xerox
®
DocuMate
®
5445/5460 driver.
2. Click the Change/Remove or Uninstall button.
3. Click Yes when asked to confirm that you want to remove the driver.
When the driver uninstallation is complete the progress window will automatically close.
4. Turn off the scanner and unplug the USB cable.
5. Reboot the computer if you are prompted to do so.
Follow these instructions to remove any of the other software you installed with your scanner.
Depending on the software provided with your scanner, and which applications you installed
during the scanner setup, the application list may include:
•OneTouch
OneTouch OmniPage OCR module
•Nuance PaperPort
Nuance OmniPage
•Nuance Power PDF
Xerox
®
DocuMate
®
5445/5460 Maintenance
56 User Guide
Try cleaning the scanner. There is glass in the body of the scanner and underneath the lid.
Take a soft cloth and wipe across both pieces of glass. The section “Cleaning the Scanner” on
page 39 contains thorough instructions for cleaning this part of the scanner.
If cleaning the glass does not improve the image quality, try performing a vertical line
reduction adjustment. The line reduction adjustment recalibrates the scanner. Please see the
section “Vertical Line Reduction” on page 52 for instructions.
Problem: Why does my scanner not function after performing a system restore on Windows?
The system restore process may have corrupted some of the driver components. It is
recommended that you reinstall your scanner driver. Please refer to “Xerox
®
DocuMate
®
5445 /
5460 Specifications” on page 57 for installation instructions.
Problem: Why won’t my scanner buttons work after scanning with Windows Image Acquisition
(WIA)?
After performing a scan using the WIA interface you must close the application you were using
before scanning with the buttons on the scanner. This does not occur when scanning using the
TWAIN or ISIS interface.
Problem: Why won’t my scanner work after the computer has been sitting idle for several hours?
To resolve the problem, simply turn off the scanner power then turn it back on again.
This may occur after Windows goes into power saving mode to “hibernate” the computer into a
low power state. When you move your mouse or type on the keyboard it “wakes” the computer
back up and restores full power to the system. This power fluctuation during the computer’s
hibernating period may sometimes cause the scanner to lose communication to the computer.
Problem: The installation will not complete successfully. If installation finishes, the scanner’s
OneTouch options do not seem to work properly.
A likely cause is that some driver programs are already installed on your computer for another
scanner. They may be interfering with the installation and OneTouch options, and you need to
remove those other drivers and re-install your Xerox
®
scanner. You can remove these programs
from the Windows Control Panel. Please refer to the user manual provided with your other scanner
hardware for instructions about removing the driver and software for that unit.
Problem: My computer keeps giving me out of hard drive space error messages.
The minimum requirement of free hard drive space is for the installation of the scanner driver and
basic, low resolution, scanning. High resolution scans result in files that can be over 1 gigabyte in
size. Free up some space on your hard drive for the software to be able to save the scanned
images.
Problem: The paper jams the ADF.
To reduce the number of paper jams, smooth and straighten the paper before scanning, and
adjust the guides to the paper size. Paper fed into the ADF at an angle can cause the feed
mechanism to jam. If paper jams are occurring more frequently, try cleaning the roller with a soft
cloth dampened with Isopropyl rubbing alcohol. Excessive dust on the roller can make it appear
worn and will cause issues feeding paper. See “Cleaning the Scanner” on page 39 for cleaning
instructions.
User Guide 61
Regulatory Information
Basic Regulations
United States (FCC Regulations)
This equipment has been tested and found to comply with the limits for a Class B digital device,
pursuant to Part 15 of the FCC Rules. These limits are designed to provide reasonable protection
against harmful interference in a residential installation. This equipment generates, uses, and can
radiate radio frequency energy and, if not installed and used in accordance with the instruction
manual, may cause harmful interference to radio communications.
However, there is no guarantee that interference will not occur in a particular installation. If this
equipment does cause harmful interference to radio or television reception, which can be
determined by turning the equipment off and on, the user is encouraged to try to correct the
interference by one or more of the following measures:
Reorient or relocate the receiving antenna.
Increase the separation between the equipment and receiver.
Connect the equipment into an outlet on a circuit different from that to which the receiver is
connected.
Consult the dealer or an experienced radio/TV technician for help.
This device complies with Part 15 of the FCC Rules. Operation is subject to the following two
conditions: (1) This device may not cause harmful interference, and (2) this device must accept
any interference received, including interference that may cause undesired operation.
Changes and modifications to this equipment not specifically approved by Xerox may void the
user’s authority to operate this equipment.
Shielded cables must be used with this equipment to maintain compliance with FCC regulations.
European Union
The CE mark applied to this product, symbolizes our declaration of conformity with the following
applicable European Union Directives, as of the dates indicated:
December 12, 2006: Council Directive 2006/95/EC as amended. Approximation of the laws of the
member states related to low voltage equipment.
December 31, 2004: Council Directive 2004/108/EC as amended. Approximation of the laws of the
member states related to electromagnetic compatibility.
Regulatory Information Xerox
®
DocuMate
®
5445 / 5460
User Guide 63
1. Obligations or Securities of the United States Government, such as:
Bonds and Obligations of certain agencies of the government, such as FHA, etc.
Bonds. (U.S. Savings Bonds may be photographed only for publicity purposes in connection
with the campaign for the sale of such bonds.)
Internal Revenue Stamps. (If it is necessary to reproduce a legal document on which there is a
canceled revenue stamp, this may be done provided the reproduction of the document is
performed for lawful purposes.)
Postage Stamps, canceled or uncanceled. (For philatelic purposes, Postage Stamps may be
photographed, provided the reproduction is in black and white and is less than 75% or more
than 150% of the linear dimensions of the original.)
Postal Money Orders.
Bills, Checks, or Drafts of money drawn by or upon authorized officers of the United States.
Stamps and other representatives of value, of whatever denomination, which have been or
may be issued under any Act of Congress.
2. Adjusted Compensation Certificates for Veterans of the World Wars.
3. Obligations or Securities of any Foreign Government, Bank, or Corporation.
4. Copyrighted material, unless permission of the copyright owner has been obtained or the
reproduction falls within the “fair use” or library reproduction rights provisions of the copyright
law. Further information of these provisions may be obtained from the Copyright Office,
Library of Congress, Washington, D.C. 20559. Ask for Circular R21.
5. Certificates of Citizenship or Naturalization. (Foreign Naturalization Certificates may be
photographed.)
6. Passports. (Foreign Passports may be photographed.)
7. Immigration Papers.
8. Draft Registration Cards.
9. Selective Service Induction Papers that bear any of the following Registrant’s information:
Exception: U. S. Army and Navy discharge certificates may be photographed.
10. Badges, Identification Cards, Passes, or Insignia carried by military personnel, or by members
of the various Federal Departments, such as FBI, Treasury, etc. (unless photograph is ordered
by the head of such department or bureau.)
11. Reproducing the following is also prohibited in certain states: Automobile Licenses — Drivers’
Licenses — Automobile Certificates of Title.
Certificates of Indebtedness National Bank Currency Coupons from Bonds
Federal Reserve Bank Notes Silver Certificates Gold Certificates
United States Bonds Treasury Notes Federal Reserve Notes
Fractional Notes Certificates of Deposit Paper Money
Earnings or Income Dependency Status Court Record
Previous military service Physical or mental condition
Regulatory Information Xerox
®
DocuMate
®
5445 / 5460
User Guide 65
Note: this list is not inclusive and no liability is assumed for either its completeness or accuracy. In
case of doubt, contact your legal counsel.
10


Need help? Post your question in this forum.

Forumrules


Report abuse

Libble takes abuse of its services very seriously. We're committed to dealing with such abuse according to the laws in your country of residence. When you submit a report, we'll investigate it and take the appropriate action. We'll get back to you only if we require additional details or have more information to share.

Product:

For example, Anti-Semitic content, racist content, or material that could result in a violent physical act.

For example, a credit card number, a personal identification number, or an unlisted home address. Note that email addresses and full names are not considered private information.

Forumrules

To achieve meaningful questions, we apply the following rules:

Register

Register getting emails for Xerox DocuMate 5445 at:


You will receive an email to register for one or both of the options.


Get your user manual by e-mail

Enter your email address to receive the manual of Xerox DocuMate 5445 in the language / languages: English as an attachment in your email.

The manual is 2,08 mb in size.


You will receive the manual in your email within minutes. If you have not received an email, then probably have entered the wrong email address or your mailbox is too full. In addition, it may be that your ISP may have a maximum size for emails to receive.

Others manual(s) of Xerox DocuMate 5445

Xerox DocuMate 5445 User Manual - German - 81 pages


The manual is sent by email. Check your email

If you have not received an email with the manual within fifteen minutes, it may be that you have a entered a wrong email address or that your ISP has set a maximum size to receive email that is smaller than the size of the manual.

The email address you have provided is not correct.

Please check the email address and correct it.

Your question is posted on this page

Would you like to receive an email when new answers and questions are posted? Please enter your email address.


Info