684584
16
Zoom out
Zoom in
Previous page
1/38
Next page
16
EN
when there are no users present during charging. Attention: always check if the
concerning battery may endure this extra phase. For example, for many closed
maintenance free batteries this phase isn’t suitable.
Setting procedure
The battery may be connected, but is not required.
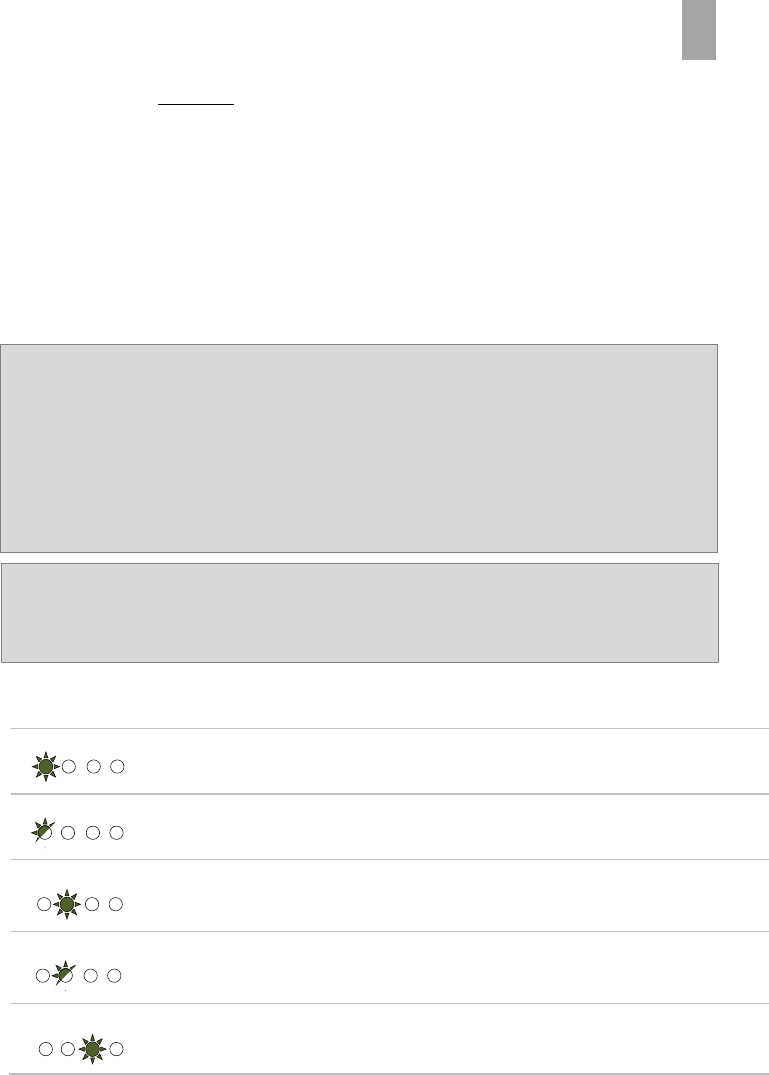
Connect the charger to the mains. Push directly afterwards, within 5 seconds, on
the ‘power/mode’ button shortly. The green ‘Power’ LED starts flashing, which
means that the charger is in its setup-mode. By way of pressing the button you
now can choose between the ‘setting’ LED’s. Each different LED combination
stands for a voltage setting. For the voltages, see page 36.
Important
The battery manufacturer determines how his battery should be recharged.The
schedule below is therefore a directive. Always check if the suggested charging
voltages match with the charging guides of your battery. If necessary, choose a
setting that suits better for the concerning battery. Most of all AGM batteries
have a large diversity of charge voltages (for this reason we apply more
suggestions). So for this type of battery it is even more important that the
advised charge voltages are verified. Never set the charger to your own opinion.
This can lead to irreparable damage to the battery.
Important
The charger can only run the set-up mode after connection with the mains. So
when the charger for instance is reactivated from its stand-by mode, it can’t be
set.
SETTING
(factory setting)
BASIC CHARGE VOLTAGES
(lead acid batteries)
(flashing)
BASIC SETTING (lead acid batteries)
WITH COMPENSATION CHARGE
OPEN SEMI-TRACTION, TRACTION
WITH COMPENSATION CHARGE
GEL, AGM
1 2 3 4
1 2 3 4
1 2 3 4
1 2 3 4
(flashing)
1 2 3 4
>>>
16


Need help? Post your question in this forum.

Forumrules


Report abuse

Libble takes abuse of its services very seriously. We're committed to dealing with such abuse according to the laws in your country of residence. When you submit a report, we'll investigate it and take the appropriate action. We'll get back to you only if we require additional details or have more information to share.

Product:

For example, Anti-Semitic content, racist content, or material that could result in a violent physical act.

For example, a credit card number, a personal identification number, or an unlisted home address. Note that email addresses and full names are not considered private information.

Forumrules

To achieve meaningful questions, we apply the following rules:

Register

Register getting emails for Xenteq LBC 512-15XTR at:


You will receive an email to register for one or both of the options.


Get your user manual by e-mail

Enter your email address to receive the manual of Xenteq LBC 512-15XTR in the language / languages: English, German, Dutch as an attachment in your email.

The manual is 0,99 mb in size.


You will receive the manual in your email within minutes. If you have not received an email, then probably have entered the wrong email address or your mailbox is too full. In addition, it may be that your ISP may have a maximum size for emails to receive.

The manual is sent by email. Check your email

If you have not received an email with the manual within fifteen minutes, it may be that you have a entered a wrong email address or that your ISP has set a maximum size to receive email that is smaller than the size of the manual.

The email address you have provided is not correct.

Please check the email address and correct it.

Your question is posted on this page

Would you like to receive an email when new answers and questions are posted? Please enter your email address.


Info