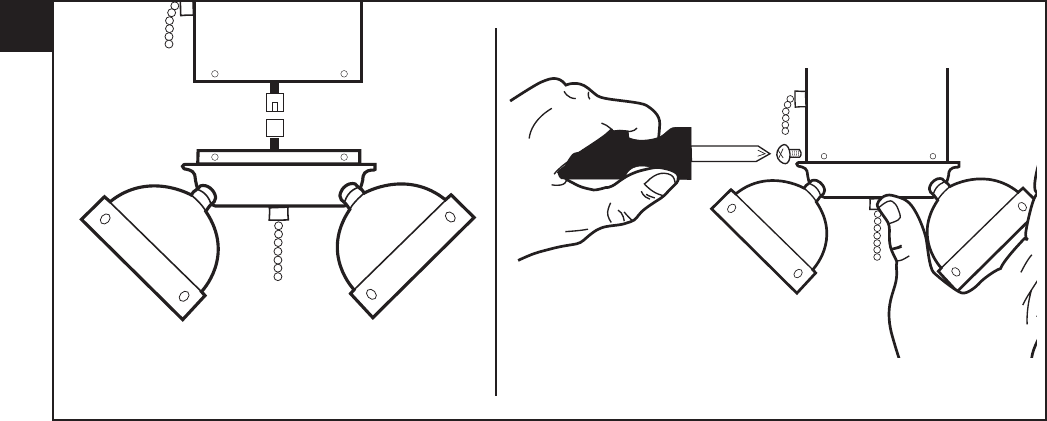
Find the molex connector in the switch housing and the molex connector in the light kit. Slide both together. Attach the light kit switch housing cap to fan switch
housing. Secure tightly with small side screws provided.
GB
D
F
I
NL
E
P
N
S
FIN
DK
Verbinden Sie den Molex-Anschluss im Gehäuse mit dem Molex-Anschluss in der Lampe. Stecken Sie die beiden Molex-Verbindungen ineinander. Befestigen Sie
die Kappe des Lampenschaltergehäuses am Ventilatorschaltergehäuse. Mit den mitgelieferten kleinen Schrauben seitlich sichern.
Cherchez le connecteur molex dans le coffrage des interrupteurs et le connecteur molex dans l’ensemble d’éclairage. Faites-les glisser l’un dans l’autre. Attachez le
capuchon du coffrage des interrupteurs de l’ensemble d’éclairage au coffrage des interrupteurs du ventilateur. Fixez bien en place à l’aide des petites vis fournies.
Individuare il connettore molex nel vano interruttore e il rispettivo connettore molex nel corredo per la luce. Farli scorrere in modo che si uniscano. Fissare il
cappuccio del vano interruttore del corredo per la luce al vano interruttore del ventilatore. Fissarli saldamente servendosi del piccolo cacciavite fornito.
Neem de molexconnector in de schakelaarbehuizing en de molexconnector in de lampset. Schuif deze samen. Bevestig de schakelaarbehuizingdop van de lampset
aan de schakelaarbehuizing van de ventilator. Zet alles stevig vast met de bijgeleverde zijschroefjes.
Identifique el conector molex en el alojamiento del interruptor y el conector molex en el juego de luces. Deslizando, junte ambos. Fije la tapa del alojamiento del
interruptor del juego de luces al alojamiento del interruptor del ventilador. Asegure firmemente con los pequeños tornillos laterales incluidos.
Verifique o conector molex na caixa do interruptor e conector molex no kit de iluminação. Faça deslizar ambos em conjunto. Ligue a tampa da caixa do
interruptor do kit de iluminação à caixa do interruptor da ventoinha. Aperte firmemente utilizando os pequenos parafusos laterais fornecidos.
Finn molex-pluggen i bryterhuset og molex-pluggen i belysningssettet. Koble disse sammen. Monter lysarmaturens bryterhus-hette på viftens bryterhus. Skru godt
sammen med de små medfølgende skruene.
Ta reda på molexkontakten i strömbrytarhuset och molexkontakten i lampsatsen. Skjut ihop dem. Fäst sockeln för lampsatsens strömbrytarhus på
fläktkontaktshuset. Skruva fast ordentligt med medföljande små skruvar.
Etsi molex-liitin sekä kytkinkotelosta että valaisinsarjasta. Työnnä liittimet yhteen. Kiinnitä valaisinsarjan kytkinkotelon kansi tuulettimen kytkinkoteloon. Kiinnitä
se tukevasti mukana tulleilla pienillä sivuruuveilla.
Find molex stikket i afbryderhuset og molex stikket i lysarmaturet. Flyt dem begge sammen. Tilkobl lysarmaturets afbryderhuskapsel til ventilatorens afbryderhus.
Skrue fast ved hjælp af de leverede små sideskruer.
Libble takes abuse of its services very seriously. We're committed to dealing with such abuse according to the laws in your country of residence. When you submit a report, we'll investigate it and take the appropriate action. We'll get back to you only if we require additional details or have more information to share.
Product:
Forumrules
To achieve meaningful questions, we apply the following rules:
First, read the manual;
Check if your question has been asked previously;
Try to ask your question as clearly as possible;
Did you already try to solve the problem? Please mention this;
Is your problem solved by a visitor then let him/her know in this forum;
To give a response to a question or answer, do not use this form but click on the button 'reply to this question';
Your question will be posted here and emailed to our subscribers. Therefore, avoid filling in personal details.
Register
Register getting emails for Westinghouse Monarch Trio at:
new questions and answers
new manuals
You will receive an email to register for one or both of the options.
Get your user manual by e-mail
Enter your email address to receive the manual of Westinghouse Monarch Trio in the language / languages: All languages as an attachment in your email.
The manual is 1,12 mb in size.
You will receive the manual in your email within minutes. If you have not received an email, then probably have entered the wrong email address or your mailbox is too full. In addition, it may be that your ISP may have a maximum size for emails to receive.
The manual is sent by email. Check your email
If you have not received an email with the manual within fifteen minutes, it may be that you have a entered a wrong email address or that your ISP has set a maximum size to receive email that is smaller than the size of the manual.
The email address you have provided is not correct.
Please check the email address and correct it.
Your question is posted on this page
Would you like to receive an email when new answers and questions are posted? Please enter your email address.