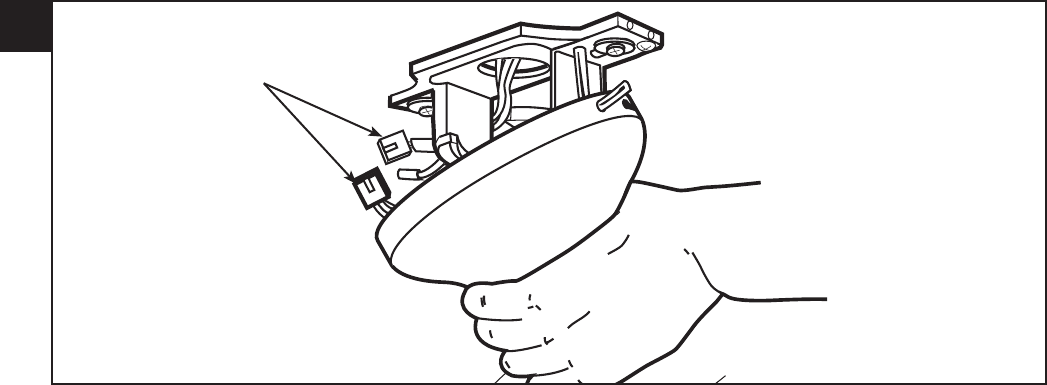
For flush mount option, raise fan assembly and place onto hook from mounting bracket into a closed hole on the canopy. This will allow for hands free wiring.
With bracket holding fan assembly, attach the male/female plug connection (1) from the fan to the terminal block. Note: The single ground wire plug from the
mounting bracket will not be connected if using the flush mount method.
12
GB
D
F
I
NL
E
P
N
S
FIN
DK
Für die bündig abschließende Option wird die Ventilatoreinheit angehoben und an einem der geschlossenen Löcher in der Abdeckung an den Haken der
Deckenplatte gehängt. Somit haben Sie beide Hände frei zur Verkabelung. Da nun die Ventilatoreinheit an der Deckenplatte hängt, können Sie den
Stecker-/ Buchsen-Anschluss (1) vom Ventilator an den Klemmblock anbringen. Hinweis: Bei bündig abschließenden Ventilatoren wird der Einzelstecker
mit dem Erdungskabel von der Deckenplatte nicht verwendet.
Si vous procédez à un montage encastré, soulevez l'assemblage du ventilateur et placez-le sur le crochet du support de montage, dans l’orifice fermé de la
garniture. Cela vous permettra d’effectuer le raccordement des fils sans tenir le ventilateur. Une fois l’assemblage du ventilateur fixé dans le support, raccordez
la prise mâle/femelle (1) du ventilateur au bloc de connexions. Remarque : si vous procédez à un montage encastré, n'utilisez pas la prise de mise à la terre
simple du support de montage.
Per il montaggio a filo del soffitto, sollevare il gruppo del ventilatore e fissarlo al gancio che protrude dalla staffa di montaggio nel foro della calotta. In tal
modo, il cablaggio potrà essere effettuato a mani libere. Mentre il gruppo del ventilatore è sostenuto dalla staffa, collegare la presa maschio/femmina (1)
del ventilatore al blocchetto terminali. Nota: con l'installazione a filo del soffitto la presa del filo di massa della staffa rimane inutilizzata.
Voor montage vlak tegen het plafond brengt u de ventilator omhoog en steekt u de haak van de montagebeugel in een gesloten gat van de plafondkap.
Hierdoor zijn uw handen vrij voor de bedrading. Terwijl de ventilator door de beugel wordt vastgehouden, zet u stekker/busverbinding (1) van de ventilator op
het kroonsteentje vast. NB: De enkele aardedraadstekker van de montagebeugel wordt niet aangesloten als u de montagemethode tegen het plafond gebruikt.
Para la opción de montaje al ras, levante el montaje del ventilador, colóquelo sobre el gancho de la placa de montaje y cuélguelo en uno de los agujeros
cerrados del dosel. De este modo, tendrá las dos manos libres para hacer el cableado. Con el soporte sosteniendo el montaje de ventilador, fije el conector
de enchufe macho/hembra (1) desde el ventilador al bloque de terminales. Nota: El conector para cables de tierra de un solo hilo del soporte de montaje no
se conectará si se emplea el método de montaje al ras.
Para a opção montagem embutida, levante a ventoinha montada e coloque-a no gancho do suporte de montagem num furo fechado da campânula. Tal
permite que as mãos fiquem livres para fazer as ligações. Com o suporte a segurar a montagem da ventoinha, faça a ligação da tomada macho/fêmea (1) da
ventoinha ao bloco terminal. Nota: A tomada de fio de terra único do suporte de montagem não fica ligado quando usa o método de montagem embutida.
Ved forsenket montering, hev vifteenheten og plasser den slik at den hekter fra monteringsbraketten til et hull med klaff i canopyenheten Dette forenkler
sammenkobling av ledningsforbindelsene. Mens braketten holder vifteenheten, tilkobles pluggforbindelsen (1) fra viften til koblingsklemmen.
Merknad: Den enkle jordledningspluggen fra monteringsbraketten kobles ikke til dersom viften monteres forsenket.
Vid infälld montering, lyft fläkten och placera den på haken från monteringshållaren i ett stängt hål på armaturkåpan. Detta gör det möjligt att använda
båda händerna vid anslutning av ledningarna. Medan fläktmonteringen hänger på hållaren, fäst han/hon- stickproppsanslutningen (1) från fläkten på
anslutningsplinten. Obs! Den entrådiga jordledningskontakten från monteringshållaren ansluts inte vid användning av infälld monteringsmetod.
Jos kyseessä on tasa-asennus, nosta tuuletinkokonaisuus roikkumaan kuvussa olevasta reiästä kiinnittimessä olevaan koukkuun. Näin kumpikin käsi on
vapaa kytkentöjen tekemistä varten. Kun kiinnitin pitää tuuletinta kiinni, kytke uros-naaraspistoke (1) tuulettimesta riviliittimeen. Huomaa: Kiinnittimestä
tulevaa yksittäistä maadoitusjohdon pistoketta ei kytketä, jos käytetään tasa-asennusmenetelmää.
For direkte loftmontering, hæv ventilatoren og anbring krogen fra monteringsholderen ind i et lukket hul i dækslet. Dette vil frigøre begge hænder for
tilslutning af ledninger. Med ventilatoren ophængt på monteringsholderen forbind han/hun stikket (1) fra ventilatoren til klemmerækken
BEMÆRK: En aflederledningsstik fra monteringsholder vil forblive utilsluttet når man bruger den direkte monteringsmetode.
Libble takes abuse of its services very seriously. We're committed to dealing with such abuse according to the laws in your country of residence. When you submit a report, we'll investigate it and take the appropriate action. We'll get back to you only if we require additional details or have more information to share.
Product:
Forumrules
To achieve meaningful questions, we apply the following rules:
First, read the manual;
Check if your question has been asked previously;
Try to ask your question as clearly as possible;
Did you already try to solve the problem? Please mention this;
Is your problem solved by a visitor then let him/her know in this forum;
To give a response to a question or answer, do not use this form but click on the button 'reply to this question';
Your question will be posted here and emailed to our subscribers. Therefore, avoid filling in personal details.
Register
Register getting emails for Westinghouse Monarch Trio at:
new questions and answers
new manuals
You will receive an email to register for one or both of the options.
Get your user manual by e-mail
Enter your email address to receive the manual of Westinghouse Monarch Trio in the language / languages: All languages as an attachment in your email.
The manual is 1,12 mb in size.
You will receive the manual in your email within minutes. If you have not received an email, then probably have entered the wrong email address or your mailbox is too full. In addition, it may be that your ISP may have a maximum size for emails to receive.
The manual is sent by email. Check your email
If you have not received an email with the manual within fifteen minutes, it may be that you have a entered a wrong email address or that your ISP has set a maximum size to receive email that is smaller than the size of the manual.
The email address you have provided is not correct.
Please check the email address and correct it.
Your question is posted on this page
Would you like to receive an email when new answers and questions are posted? Please enter your email address.