webcamXP"5.5"documentation"
" @"22"@" "
A standard Windows Open dialog will appear. Navigate to and select an image file from your hard drive and
click the Open button.
The new image will appear in the Overlay Editor window.
3.1.7.4 Adding a Network Image File
To add an image to your graphical overlay from an image file hosted on your network, click the Network
Image button. The Network Image button is the button located five from the left directly under the sample
camera view. With the Network Image button selected, click in the camera sample box where you wish your
network image file’s upper left-hand corner to appear (e.g. where you wish the image to begin).
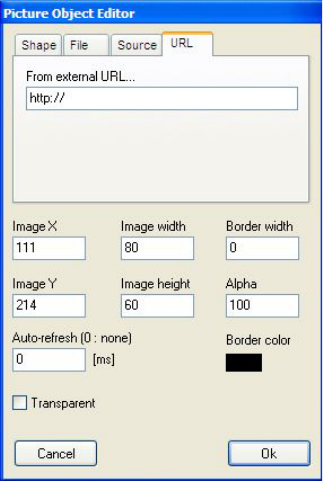
The following window will appear:
Enter the full URL of the image (including the http:// or ftp:// prefix) in the From external URL… textbox.
The ImageX and ImageY textboxes are automatically filled in using the coordinates you specified using your
mouse cursor.
Enter the width and height (both in pixels) of the image in the Image width and Image height textboxes.
Also enter a width for your image’s border by entering a pixel value in the Border width textbox.
If you wish to apply transparency, enter a non-100 value in the Alpha textbox. Alpha values represent a
percentage of transparency (0% is invisible, 100% is fully opaque).
Specify a border color by clicking on the colored box directly under the Border Color label. Click the OK
button to accept changes to your image. The image will be placed in the Overlay Editor window.
3.1.7.5 Adding a Video Source
To add a video source, click on the Video Source button. The Video Source button is the last button on the
right, located directly under the camera sample image. With the Video Source button selected, click in the
camera sample image where you wish your video source’s upper left-hand corner to be placed (e.g. where you
wish your video source to begin).
The following window will appear: