webcamXP"5.5"documentation"
" @"15"@" "
3.1.1.3 Connecting Cameras from Other Sources
Cameras can be connected to webcamXP that are not IP Cameras, and are not USB cameras connected directly
to the computer. MPEG files can be imported into webcamXP and treated as if they were full-fledged cameras.
webcamXP can also import camears that are set up as MPEG or WMF (Windows Media Format) buffering.
All of these additional source types require files to be present on the machine running webcamXP. To import
these files, you simple need to point webcamXP to the right location.
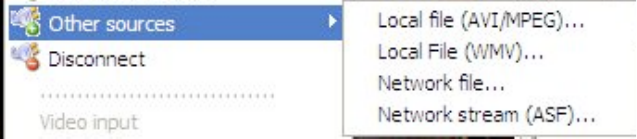
In the connection menu, place your cursor over the Other sources option. The following sub-menu will
appear:
Select the source of your additional camera. You may select from one of the following options:
• Local File (AVI / MPEG): Select this option to import an AVI or MPEG movie file. Once imported, the
file will be shown in the camera display window as if it were a live camera connected to the webcamXP
computer.
• Local File (WMV): Select this option to import a Windows Media Format (WMV) file. Once imported,
the file will be shown in the camera display window as if it were a live camera connected to the
webcamXP computer.
• Network file…: Select this option if you would like to import an AVI, MPEG, or WMV file into
webcamXP that is not hosted on the machine running webcamXP (i.e., it is located on a network
shared drive).
• Network stream (ASF):…: Select this option if you would like to select a streamed or buffered
camera source from the network.
If you selected to import a file, a standard Open dialog box will appear. Navigate to and select the file you
wish to import. Click the Open button.
3.1.2 Disconnecting Camera Sources
To disconnect a camera source, select the camera’s tile from the Source Selection box.
Right-click in the Camera Display box to display the menu and select Disconnect. The tile you selected will
become gray in the Source Selection box.
From this point, you may connect another camera to the previous camera’s tile, or remove the tile altogether.
To remove the tile completely, select it in the Source Selection box and click on the – button (located at the
top of the Source Selection box).
3.1.3 Audio Settings for Cameras
Many USB cameras are equipped with small microphones, providing sound in addition to picture. webcamXP
allows you to capture and monitor sound data along with a camera’s visual data.
In order to set up the audio services for a camera, you must select the camera’s audio driver (usually provided
by the manufacturer). Audio drivers can be downloaded from the manufacturer’s website, or may be provided
on an installation / driver CD shipped with the camera device.
Note: The current release of webcamXP does not support recording of audio from IP cameras. This is howver
possible for a few specific models in webcam 7.