805491
20
Zoom out
Zoom in
Previous page
1/36
Next page
LCD+
User Guide GB
LCD+ solar Controller 3 - 17
Bedienungsanleitung D
LCD+ Solarregler 18 - 35
Controller solare LCD+ 44-53
2
LCD+ LCD solar Controller
Installation and Operation Manual
IMPORTANT!
Before starting work the installer should carefully read this
Installation & Operation Manual, and ensure all instructions are
observed and understood.
The Solar controller should be mounted, operated and
maintained by trained personnel only. Individuals in training are
only allowed to install the product under the supervision of a
qualified installer.
Instructions in this Installation & Operation manual must be
observed when working with the controller. Incorrect operation
shall render the warrenty void. WATTS shall not be liable in the
case of improper usage. Any modifications or alterations are
not allowed for safety reasons. The Solar controller
maintenance may only be performed by service centres
approved by WATTS.
The functionality of the controller is dependant upon the model
and ancillary equipment. This installation leaflet is part of the
product and has to be kept and maintained with the controller.
APPLICATION
The Solar controller is developed for a Solar heating system.
The temperature of the tank water is controlled by temperature
difference “dt” between the solar collector and tank.
The controller is normally used in conjunction with a solar
station which includes a circulation pump and mechanical
pressure Safety valve.
The controller has been designed for use in dry environments,
e.g. in residential rooms, office spaces and industrial facilities.
Verify that the installation complies with local regulations
before operation.
SAFETY INSTRUCTIONS
Before starting work disconnect power supply!
All installation and wiring work related to the controller must be
carried out only when de-energized. The appliance should be
connected and commissioned by qualified personnel only.
Make sure to adhere to local electrical safety regulations.
The controllers are neither splash- nor drip-proof. Therefore,
they must be located in a dry environment.
Do not interchange the connections of the sensors and the
230V connections under any circumstances! Interchanging
these connections may result in life endangering electrical
hazards or the destruction of the unit and other connected
sensors and appliances.
TABLE OF CONTENTS
MAIN CHARACTERISTICS ....................................................... 3
TECHNICAL CHARACTERISTICS ............................................ 3
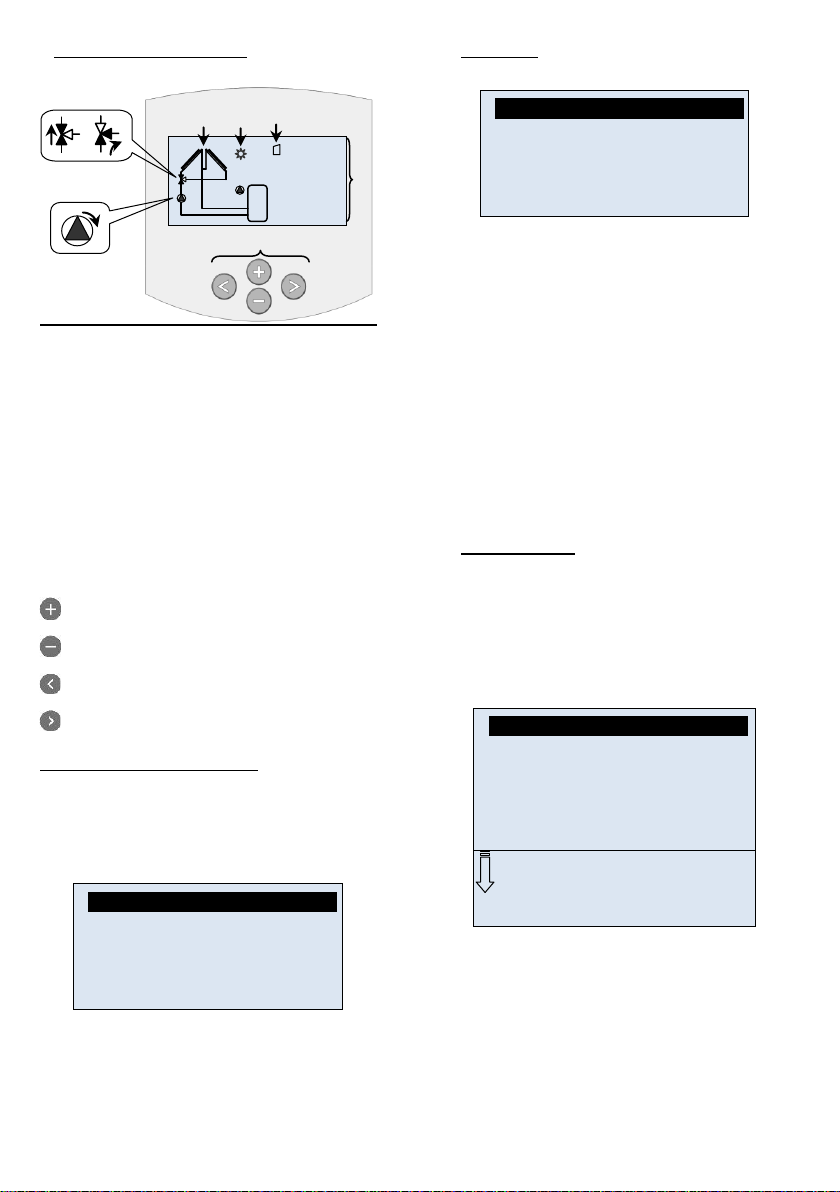
PRESENTATION (Display, keys)............................................... 4
Main menu: 4
1 Quick start menu .................................................... 4
2 Services ................................................................. 5
2.1 Language ............................................................... 5
2.2 Time & Date ........................................................... 5
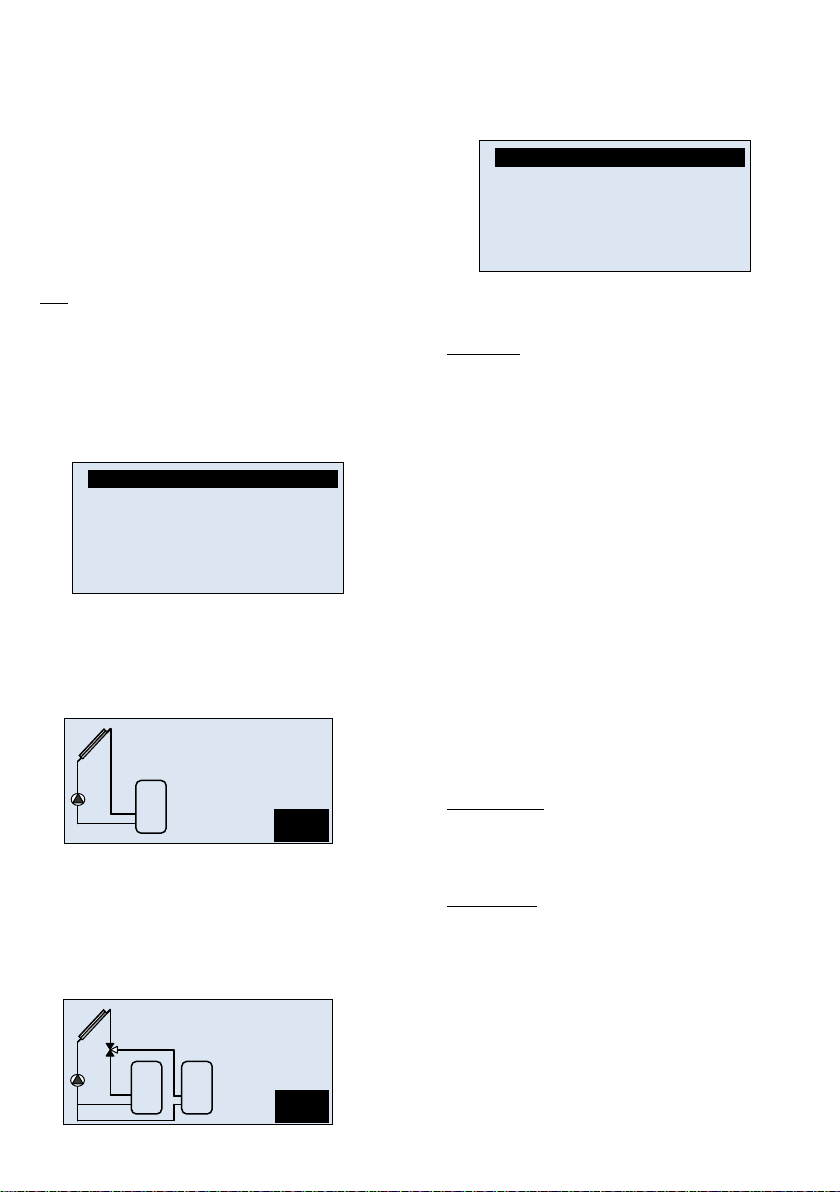
2.3 System ................................................................... 6
2.3.1 System 1 ................................................................ 6
2.3.2 System 2 ................................................................ 6
2.3.3 System 3 ................................................................ 7
2.3.4 System 4 ................................................................ 7
2.3.5 System 5 ................................................................ 7
2.3.6 System 6 ................................................................ 7
2.3.7 System 7 ................................................................ 7
2.3.8 System 8 ................................................................ 7
2.4 Outputs configuration ............................................. 8
2.4.1 P1 ........................................................................... 8
2.4.2 P2 ........................................................................... 8
2.4.3 Pump P3 ................................................................ 9
2.5 Inputs configuration .............................................. 10
2.5.1 If no flow meter ..................................................... 10
2.5.2 Grundfos sensors ................................................. 11
GDS2 (Grundfos Direct Sensor) .............................................. 11
2.5.3 Impulse Flow meter: ............................................. 11
2.5.4 Temperature Sensor ............................................ 11
2.6 Energy measurment: ............................................ 11
2.6.1 Solar Energy ........................................................ 12
2.6.2 2nd Energy ............................................................ 12
2.7 Protection function ............................................... 13
2.7.1 Max temp collector ............................................... 13
2.7.2 Overheat protection .............................................. 13
2.7.3 Cooling ................................................................. 13
2.7.4 Recooling ............................................................. 13
2.7.5 Freeze protection ................................................. 13
2.8 Degrees................................................................ 13
2.9 Tubes collector ..................................................... 13
2.10 Factory setting ...................................................... 13
3 Settings Menu ...................................................... 13
3.1 Maxtemp tank1 ..................................................... 13
3.2 dTON tank1 .......................................................... 13
3.3 dTOFF tank1 ........................................................ 13
3.4 dTFS: Fullspeed ................................................... 14
3.5 Mintemp collector ................................................. 14
3.6 Maxtemp tank2 ..................................................... 14
3.7 DtON tank2 .......................................................... 14
3.8 dTOFF tank2 ........................................................ 14
3.9 dTON return ......................................................... 14
3.10 dTOFF return ....................................................... 14
3.11 Thermostat Function ............................................ 14
3.11.1 Start...................................................................... 14
3.11.2 Hysteresis ............................................................ 14
3.11.3 Delay .................................................................... 14
3.11.4 Legionella ............................................................. 14
3.11.5 Timer .................................................................... 15
3.12 Cooling Function .................................................. 15
3.12.1 Cooling start ......................................................... 15
3.12.2 Cooling hysteresis ................................................ 15
3.13 Diff control Function ............................................. 15
3.13.1 Max cold tank ....................................................... 15
3.13.2 Min warm tank ...................................................... 15
3.13.3 dTMax .................................................................. 15
3.13.4 dTMin ................................................................... 15
3.14 Antistagnation Function ........................................ 15
3.14.1 Start Level ............................................................ 15
3.14.2 Stop Level ............................................................ 15
4 Operation Menu ................................................... 15
4.1 Automatic and Off operation................................. 15
4.2 Chimney sweep function ...................................... 16
4.3 Manual testing operation: ..................................... 16
5 Operation hours Menu ......................................... 16
5.1 Data logger set with WATTS software and SD
card 16
6 Temperatures Menu ............................................. 17
7 Special Functions ................................................. 17
7.1 Pump exercise function ........................................ 17
7.2 Dimmer function ................................................... 17
7.3 Security function ................................................... 17
8 Others .................................................................. 17
9 Notes .................................................................... 17
3
Menu structure
Service
English “Language”
Time and date
o Time
o Date
o 24/12h clock
o DST
System
o System 1 - 8
o System Parameter (if available)
Outputs Configuration
o P1 “Information of the use”
o P2 “Information of the use”
o P3 “Information of the use”
Inputs Configuration
o Fixed Flowrate value
Flow (l/min)
o Grundfos sensors
GDS1”Sensor choice”
GDS2 ”Sensor choice”
o Impulse flow meter
T6
Liter/Impulse
o Temperature Sensors
T1- T5
Calibration (Pt-1000)
Energy Measurements
o Solar Energy
Adjustments
o 2nd Energy
Adjustments
Protection func.
o Max temp coll.
o Overheat prot.
Overheat temp
o Cooling
Max temp
o Recooling
Min temp
o Freeze prot.
Freeze Temp
Degrees °C/°F
Tube collectors
Factory setting
Quick start menu
o Configuration sequence
Settings
Maxtemp tank1
dT.ON tank1
dT OFF tank1
“Only available with system with 2 tanks”
Maxtemp tank2
dT.ON tank2
dT OFF tank2
“Only available with system 6”
dT.ON return
dT OFF return
dT FS
Mintemp coll.
“Only available if P3 is used as an Extra function”
Extra Function adjustments
Operation
Automatic
Off
Chimney sweep
Manual testing
Operation h
Operation
dT
Power
Energy
SD card
Temperatures
T1
T2
T3
T4
T5
MAIN CHARACTERISTICS
- Large graphic display with backlight
- Easy use interface (4 keys with scroll menu).
- Several languages available
- SD card interface to save the recorded statistics
(Temperatures, Power, Energy, Time operation…) and
parameters.
- 2 energy counters (1 for solar energy and 1 free to specify).
- 1 Bus connection (RJ45) for Extension module (MULTIPLEX)
and communication option.
- Graphic view for Temperature, power, energy…
- 8 working systems with several extra functions possibility
- 5 Inputs for temperature sensors (PT1000 type)
- 1 Logical Input for Impulse flow meter input (for energy
measurement).
- 2 Analogue inputs for Grundfos direct sensors (Flow,
Pressure and temperature sensor)
- 2 electronics outputs for pump (Standard or PWM) with pump
exercise function.
- 1 standard output for Extra function (to control additional
heat, cooling system…)
- Automatic, Off, Manual test mode and chimney sweep
function.
- Sensors Auto checks (Short circuit and breaks)
- Collector protection (Freeze and overheat)
- Permanent memory storage
TECHNICAL CHARACTERISTICS
Operating temperature
0°C 50°C
Electrical Protection
Installation Category
Pollution Degree
IP20
CLASS I
2
Fusible
Power supply
Maximum Power
Consumption
(with all outputs activated)
5AType Fuse 230Vac
(5x20mm)
230Vac +/- 10% 50Hz
4,7A (~ 1080W)
Outputs:
P1 (Main pump with standard
or PWM speed regulation):
P2 (Pump with standard or
PWM speed regulation, valve):
P3 (Extra, Additional heat,
cooling…)
Triac max. 1A 230VAC.
Minimum power switching
>1W
Triac max. 1A 230VAC.
Minimum power switching
>1W
Relay max. 2A 230VAC
* Higher power
consumption: only possible
with external power relay
Inputs:
T1 (Collector1):
T2 (Tank1):
T3 (Extra sensor):
T4 (Extra sensor, Tank2,
Collector2):
T5 (Collector return):
T6 (Flow meter):
GDS1 & GDS2 (Grundfos
sensor):
Flow or pressure.
PT 1000 type
PT 1000 type
PT 1000 type
PT 1000 type
PT 1000 type
Impulse type (low voltage
5V)
Analogue type
(Grundfos VFS, RPS)
Sensors delivered with the
product:
2 Collectors sensor (red)
1 Tank (grey)
1 Extra (grey)
PT1000 (1.5M 180°C)
PT1000 (3M 105°C)
PT1000 (3M 105°C )
Software version
Displayed during
initialisation
Higher Version 11xx
4
PRESENTATION (Display, keys)
1: Simplified drawing of the installation.
- The graphic of the pumps turn when they are
activated.
- The filled triangles on the valve graphic indicate
the circulation
2: Solar loading is in operation.
3: SD card storage is active.
4: Temperature of different sensors, Pumps speed
indications, Power and Energy quantity stored.
A: Keypad description
Navigation key up or plus key (+)
Navigation key down or minus key (-)
Navigation key left (◄)
Navigation key right (►)
Controller information Overview:
An information screen is available to allow you to view quickly
the status of all temperature sensors and outputs connected to
the controller.
From the main display, press (◄) once to display immediately.
The outputs & Inputs screen will be displayed for 1minute,
press (►) at any time to return to the main screen.
Main menu:
First of all press (►) to enter on the navigation menu.
(The title of the active menu is highlighted in black on the top of
the display)
When you enter on the navigation menu you can choose
another submenu by moving the selection cursor with the
keys (+) or (-), then you can enter this submenu with (►).
From all menus you can press (◄) to return to the previous
menu.
*ATTENTION:
As a safety feature, all critical parameters (System and Extra
function) are not programmable 4 hours after power on. If it is
necessary to modify these parameters, you must power-down
and power-up the controller. No settings are lost when
powering-down, or after a power failure.
After 4 hours it is only possible to alter system optimization
settings.
1 Quick start menu
The “Quick start menu” helps you to configure more easily the
main parameters of your solar controller after the initial
installation.
Power-up the controller and wait until the end of the
initialisation sequence. When the main screen is displayed,
press on the key (►) to access to the “service” menu. Then go
to the bottom of the menu and select the line “Quick start
menu” and press the navigation key (►) once to progress to
the quick start configuration.
The controller will guide you through the menu to configure the
main parameters, you will be prompted to adjust the parameter
value by pressing the (+) or (-) input. Press on the (►) key to
validate the display setting and skip to the next parameter.
The controller will return automatically to the main screen when
the configuration process is complete.
1 2
3
T1_ _
_°C
T2_ _
_°C
T3_ _
_°C
T4_ _
_°C
P1_ _ _
%
_ _ _
KW
_ _ _
KWh
T1
T4
T2
T3
A
SD
 Information -
T1 xxx°C T2 xxx°C T3 xxx°C
P1 xxx% P2 xxx% P3 x
 Information -
Services
Settings
Operation
Operation h
Temperatures
 Service -
English
Time and date
System
Outputs Config.
Inputs Config.
Energy Measurements
Protection func.
Degrees °F
Tube collectors No
Factory setting No
Quick Start menu
5
Quick Start menu step by step:
1/ Language choice
- Choose your language with (+) or (-) and press (►) key to
accept.
2/ Time and Date adjustment
- Adjust the hour with (+) or (-) and press (►) key to accept.
- Adjust the minutes and press () key to accept and skip to
the next line.
The controller will skip automatically to the date line, you can
now:
- Adjust the month with (+) or (-) and press (►) key to accept.
- Adjust the day number with (+) or (-) and press (►) key to
accept.
- Adjust the Year with (+) or (-) and press (►) key to accept.
The controller will skip automatically to the clock format line, to
allow you to adjust the time format. Alter with (+) and (-) press
(►) key to accept.
It is possible to select if you require Daylight summer time
advance function with (+) and (-) press (►) key to accept.
3/ System choice
Select the required system with (+) or (-) press (►) key to
accept.
Following system selection, you will be prompted to adjust the
selected system parameters. Proceed to adjust the system
values with (+) or (-) press () key to accept and continue to
the following step in the configuration.
4/ Output configuration
Select the device connected on the output of your controller
(i.e. standard Pump, PWM pump or 3-way valve) with (+) or (-)
press () key to accept and finish the configuration.
N.B.. Depending on the system choice you may be prompted
to configure the P2 output also.
Now your controller is now set-up.
Note:
It is possible to restart the “quick start menu” operation and
follow the steps above to configure again, alternatively it is
possible to directly access a specific parameter throught the
normal menu structure if you have made an error during the
configuration.
2 Services
2.1 Language
- With (+) or (-) select the line “English” and press (►) to
highlight the line.
- Now you can change the language with (+) or (-), you have
the choice between: English, Deutsch, Français, Español,
Italiano, Nederland, Magyarul, and Portugës.
2.2 Time & Date
With (+) or (-) select the line “Time & Date” and press (►)
It is now possible to select the line which requires adjustment
with by pressing (+) or (-), when the correct line is selected
press (►) to highlight the line.
Then use the (+) or (-) to alter the value.
Time,
- Press () once to allow adjustment of the hour.
- Press () for a second time to allow adjustment of
the minutes.
- Depress (◄) twice to return to the line selection.
 Service --- -
English -
Time and date
System
Outputs Config.
Inputs Config.
Energy Measurements
Protection func.
 Time & Date --- -
Time 08:25
Date 02/03/2011
Thursday
24/12H clock 24H
D.S.T. Yes
P1
System
1
T1
T2
T1 _ _ _°C
T2 _ _ _°C
P1 _ _ _ %
 Pump 1 --- -
Type Std Pump
Speed Control Yes
Min rev pump 0%
Max rev pump 100%
T1_ _ _°C
T2_ _ _°C
T3_ _ _°C
T4_ _ _°C
P1_ _ _ %
_ _ _ KW
_ _ _ KWh
T2
T3
SD
T1 T4
 Service -
English
Time and date
System
Outputs Config.
Inputs Config.
Energy Measurements
Protection func.
Degrees °F
Tube collectors No
Factory setting No
Quick Start menu
6
Date,
- Press () once to adjust the Month.
- Press (►) twice to adjustment the Day.
- Press (►) three times to adjustment the the Year.
- Depress (◄) three times to return to the line
selection.
* The day will be automatically displayed.
24H/12H clock,
- Press (►) once to enable the desired choice for
the time format.
D.S.T.
- Daylight Summer Time, activate this function to
enable the automatic hour change between summer
and winter.
Note: If the power supply to the controller is lost the correct
time will be stored in memory for 24H. Longer periods will
require manual readjustment of the clock.
2.3 System
When the line is highlighted, press (►) to enter the
submenu.Choose between the 8 system options, by pressing
(►) key and choose your system with (+) or (-). There is also
the possibility to add different extra functions by using the P3
output (see “output configuration” Chapter 2.4)
2.3.1 System 1
Basic system, with 1 tank, 1 pump, 1 collectors array and 2
sensors.
With this system you can add extra functions with 1 or 2
sensors (Thermostat, Cooling, Antistagnation, Booster or
Diffcontrol function).
The loading of the tank1 is activated if the temperature
difference “dt between the collector (T1) and the tank1 (T2) is
sufficient.
2.3.2 System 2
System with 2 tanks, 1 pump, 1 valve, 1 collectors array and
3 sensors. With this system you can add an extra function
with 1 sensor (Thermostat, Cooling, Antistagnation or
Booster).
The loading of the tanks is activated if the temperature
difference “dt between the collector (T1) and the tanks (T2,
T4) is sufficient.
You will have different adjustments to define the priority of the
tank and also the loading function for the secondary tank.
These following parameters are available for tsytems with
2 tanks.
Priority Tank
No Prio
No priority is done on the tanks. The two tanks are loaded
independently; the only condition is that the “dt” value is
sufficient to initiate tank loading.
1
The primary tank will be the tank1 managed by the sensor T2.
It will be named with a small number “1” in the tank on the
main screen.
2
The primary tank will be the tank2 managed by the sensor T4.
It will be named with a small number “1” in the tank on the
main screen.
If a primary tank is chosen, the loading of this tank will be
made in priority, the secondary tank will be only loaded if:
- The primary tank will reach the “Maxtemp tank(x)” value
adjusted on “setting” menu.
- If the collector temperature is too small to initiate tank
loading of the primary tank. In this case the secondary tank will
be loaded with the cycle function defined by the two following
parameters. This function allows switch back from second tank
to the priority tank.
(1 cycle = “Prio Time break” + “Prio Time charge”)
Note:
All the time if the “dtMax tank(x)” value of the primary tank
becomes sufficient the loading will switch to the primary tank.
Prio Time charge
Load time duration (ON time) for the cycle function.
- To change the duration press (►) to highlight the line and
select your choice with (+) or (-). (Adjustable to 1 to 30min with
default value 15min)
Prio Time break
Break time duration (OFF time) for the cycle function.
- To change the duration press (►) to highlight the line and
select your choice with (+) or (-).(Adjustable to 1 to 30min with
default value 2min)
 System --- -
System 1
P1
System
1
T1
T2
T1 _ _ _°C
T2 _ _ _°C
P1 _ _ _ %
P1
P2
System
2
T1
T1 _ _ _°C
T2 _ _ _°C
T4 _ _ _°C
P1 _ _ _ %
T2 T4
 System --- -
System 2
Prio tank 1
Prio time charge 15m
Prio time break 2m
20
TECHNISCHE DATEN
Betriebstemperatur
0°C 50°C
Elektrische Schutzart
Installationsklasse
Verschmutzungsgrad
IP20
KLASSE II
2
Sicherung
Stromversorgung
Max. Stromverbrauch
(alle Ausgänge aktiviert)
5AT 230 V~ (5 x 20 mm)
230 V~ +/- 10 % 50 Hz
4,7 A (max. 1080 W)
Ausgänge:
P1 (Hauptpumpe mit Standard-
oder PWM-Drehzahlregelung):
P2 (Pumpe mit Standard- oder
PWM-Drehzahlregelung;
Ventil):
P3 (Nachheizung, Kühlung ...)
Triac max.1 A 230 V~.
Minimale Leistung > 1 W
Triac max. 1A 230 V~
Minimale Leistung > 1 W
Relais max. 2 A 230 V~
* Höherer
Energieverbrauch: nur
möglich mit externem
Energierelais
Eingänge:
T1 (Kollektor1):
T2 (Speicher1):
T3 (Zusatzsensor):
T4(Zusatzsensor, Speicher2,
Kollektor2):
T5 (Kollektor-Rücklauf):
T6 (Durchflusssensor):
GDS1 u. GDS2 (Grundfos-
Sensoren):
Durchflusssensor und
Drucksensor
Typ PT 1000
Typ PT 1000
Typ PT 1000
Typ PT 1000
Typ PT 1000
Impulstyp (Niederspannung
5 V)
Analog
(Grundfos VFS, RPS)
Im Lieferumfang enthaltene
Sensoren:
2 Kollektor-Sensoren (rotes
Silikonkabel)
1 Speichersensor (graues
Kunststoffkabel)
1 Zusatzsensor (graues
Kunststoffkabel)
PT1000 (1,5 M 180°C)
PT1000 (3 M 105°C)
PT1000 (3 M 105°C)
Software-Version
Wird beim Einschalten
angezeigt.
Ab Version v1005xx
DARSTELLUNG (Display, Tasten)
1: Vereinfachte Darstellung der Installation
- Sich drehende Pumpensymbole zeigen an, dass
die Pumpen aktiv sind.
- Füllung der Dreiecke im Ventilsymbol zeigt den
Kreislauf an.
2: Solaranlage in Betrieb.
3: Der SD-Kartenspeicher ist aktiv.
4: Temperatur der einzelnen Sensoren, Anzeige der
Pumpengeschwindigkeit, Leistung und der gespeicherten
Energie
A: Tastenbelegung
Nach oben oder Plus-Taste (+)
Nach unten oder Minus-Taste (-)
Nach links (◄)
Nach rechts (►)
Übersicht Reglerinformationen:
In einer Informationsanzeige werden die Zustände aller
Temperatursensoren und Ausgänge angezeigt, die mit dem
Regler verbunden sind.
Drücken Sie in der Hauptanzeige einmal auf die Taste (◄) für
die Sofortanzeige. Die Aus- und Eingangsanzeige wird eine
Minute lang angezeigt. Drücken Sie zu einem beliebigen
Zeitpunkt die Taste (►), um zur Hauptanzeige
zurückzukehren.
Hauptmenü
Mit der Taste (►) das Navigations-Menü öffnen.
(Das aktive Menü steht auf schwarzem Hintergrund ganz oben
auf dem Display.)
Im Navigations-Menü den Cursor „„ mit den Tasten (+) oder (-
) auf ein Untermenü bewegen und dieses mit der Taste (►)
öffnen.
Die Taste (◄) führt aus jedem Menü zurück zum vorherigen
Menü.
* ACHTUNG:
Um spätere Änderungen der Installation zu vermeiden, ist es
nach 4 Stunden nicht mehr möglich, die Installationsparameter
(Systeme und Extra-Funktionen) nach Anschluss des Reglers
ans Stromnetz zu ändern. Vor dem Ändern dieser Parameter
muss der Solarregler vom Netz genommen und wieder
angeschlossen werden. Dabei werden keine Einstellungen
gelöscht.
4
1 2
3
T1_ _
_°C
T2_ _
_°C
T3_ _
_°C
T4_ _
_°C
P1_ _ _
%
_ _ _ kW
_ _ _
kWh
T1
T4
T2
T3
A
SD
 Informationen -
T1 xxx°C T2 xxx°C T3 xxx°C
P1 xxx% P2 xxx% P3 x
 Informationen -
Service
Einstellungen
Betrieb
Betriebsstunden
Temperaturen
20


Need help? Post your question in this forum.

Forumrules


Report abuse

Libble takes abuse of its services very seriously. We're committed to dealing with such abuse according to the laws in your country of residence. When you submit a report, we'll investigate it and take the appropriate action. We'll get back to you only if we require additional details or have more information to share.

Product:

For example, Anti-Semitic content, racist content, or material that could result in a violent physical act.

For example, a credit card number, a personal identification number, or an unlisted home address. Note that email addresses and full names are not considered private information.

Forumrules

To achieve meaningful questions, we apply the following rules:

Register

Register getting emails for Watts Solar Controller LCD PLUS at:


You will receive an email to register for one or both of the options.


Get your user manual by e-mail

Enter your email address to receive the manual of Watts Solar Controller LCD PLUS in the language / languages: English, German as an attachment in your email.

The manual is 1.12 mb in size.


You will receive the manual in your email within minutes. If you have not received an email, then probably have entered the wrong email address or your mailbox is too full. In addition, it may be that your ISP may have a maximum size for emails to receive.

The manual is sent by email. Check your email

If you have not received an email with the manual within fifteen minutes, it may be that you have a entered a wrong email address or that your ISP has set a maximum size to receive email that is smaller than the size of the manual.

The email address you have provided is not correct.

Please check the email address and correct it.

Your question is posted on this page

Would you like to receive an email when new answers and questions are posted? Please enter your email address.


Info