This guide provides a brief introduction to Whole Home Deco Mesh Wi-Fi 6 System and the Deco app, as well as regulatory information.
Features available in Deco may vary by model and software version. Deco availability may also vary by region or ISP. All images, steps, and descriptions
in this guide are only examples and may not reect your actual Deco experience.
Conventions
In this guide, the following conventions are used:
Convention Description
DecoStands for Deco Whole Home Mesh Wi-Fi System/
Unit.
UnderlineHyperlinks are in teal and underlined. You can click to
redirect to a website or a specic section.
Teal
Key information appears in teal, including
management page text such as menus, items,
buttons and so on.
Note:Ignoring this type of note might result in a malfunction
or damage to the device.
Tips:Indicates important information that helps you make
better use of your device.
More Info
• Specic product information can be found on the product page at
https://www.tp-link.com.
• A Technical Community is provided for you to discuss our products
at https://community.tp-link.com.
• Our Technical Support contact information can be found at the
Help center of the Deco app and the Contact Technical Support
page at https://www.tp-link.com/support.
Speed/Coverage/Device Quantity Disclaimer
Maximum wireless signal rates are the physical rates derived from IEEE
Standard 802.11 specications. Actual wireless data throughput and
wireless coverage, and quantity of connected devices are not guaranteed
and will vary as a result of network conditions, client limitations, and
environmental factors, including building materials, obstacles, volume and
density of trac, and client location.
MU-MIMO Disclaimer
Use of MU-MIMO requires clients to also support MU-MIMO.
IoT Compatibility Disclaimer
IoT compatibility refers only to smart devices that can be controlled via the
Deco app. Other wireless devices can still connect to Deco for normal Wi-Fi
use.
Seamless Roaming Disclaimer
Clients need to support 802.11k/v/r and may require additional set up.
Performance may vary depending on the client device.
HomeShield Disclaimer
HomeShield includes the Free Basic Plan. Fees apply for the Pro Plan. Visit
tp-link.com/homeshield for more information.
2
Appearance
Each Deco has an LED that changes color according to its status, three RJ-45 Ethernet ports, a power slot, and a Reset button.
See the explanation below:
Tip: The product label can be found at the bottom of the product.
Pulse Yellow:
Deco is resetting.
Solid Yellow:
Deco is starting up.
Pulse Blue:
Deco is ready for setup.
Solid Blue:
Deco is setting up.
Pulse Green:
Deco is upgrading rmware.
Solid Green:
Deco is all set up and connected.
Pulse Red:
The satellite Deco is disconnected
from the main Deco.
Solid Red:
Deco has an issue.Reset Button:
Press for 1 second and release to reset Deco to factory
default settings. The light changing from pulsing yellow to
solid yellow indicates a successful reset.
Ethernet Ports:
For connecting Deco to your modem, the Ethernet outlet,
or for other internet services in Wireless Router mode.
Power Slot:
For connecting Deco to the power socket via the provided
power adapter.
3
Set Up Your Deco
The intuitive Deco app guides you through an easy setup process that gets each unit up and all your devices connected.
Follow the steps below to set up your Whole Home Deco Mesh Wi-Fi 6 System.
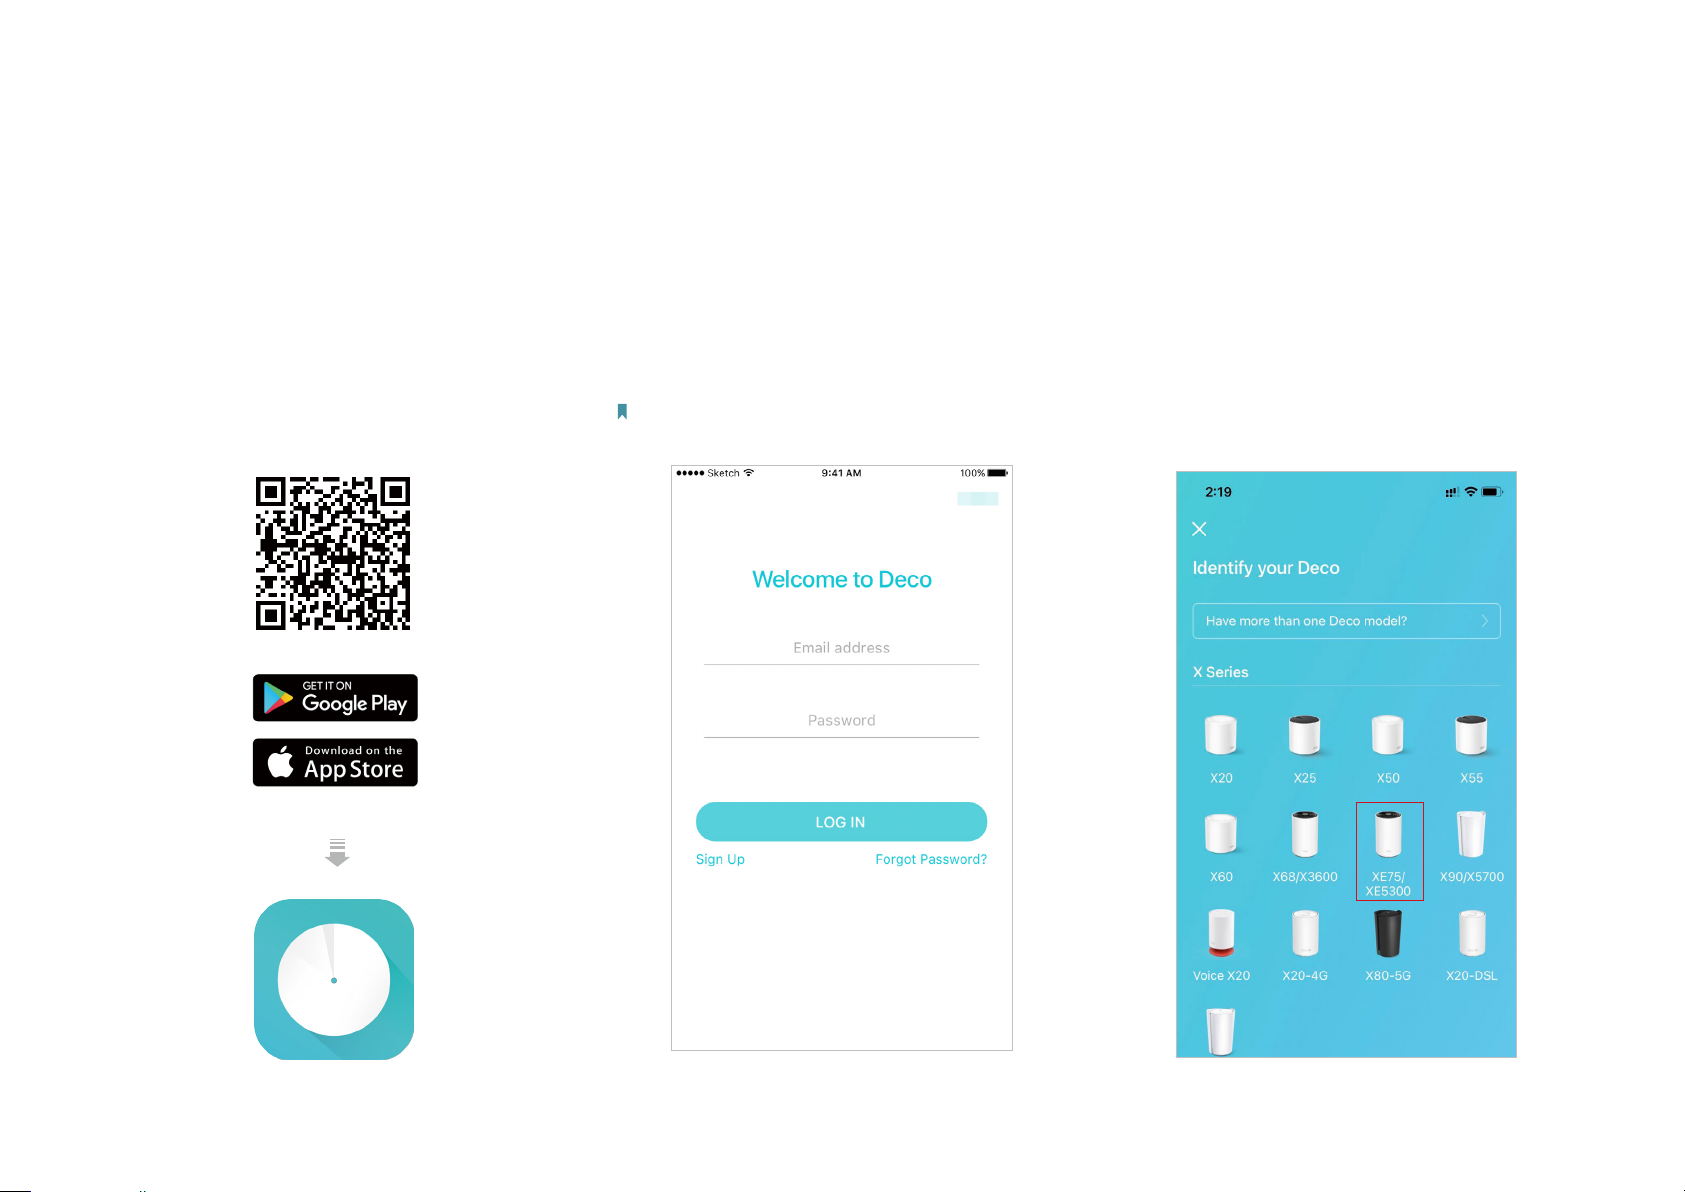
1. Download and install the Deco app
Scan the QR code below or go to Google
Play or the App Store to download the Deco
app. Install the app on your Android or iOS
smartphone or tablet.
or
2. Log in or sign up with TP-Link ID
Open the app. Use your TP-Link ID to log in. If
you don’t have a TP-Link ID, sign up rst.
Note: If you forgot your login password, tap Forgot Password?.
The Deco app will guide you through the rest.
3. Identify your Deco
Choose your Deco model.
4
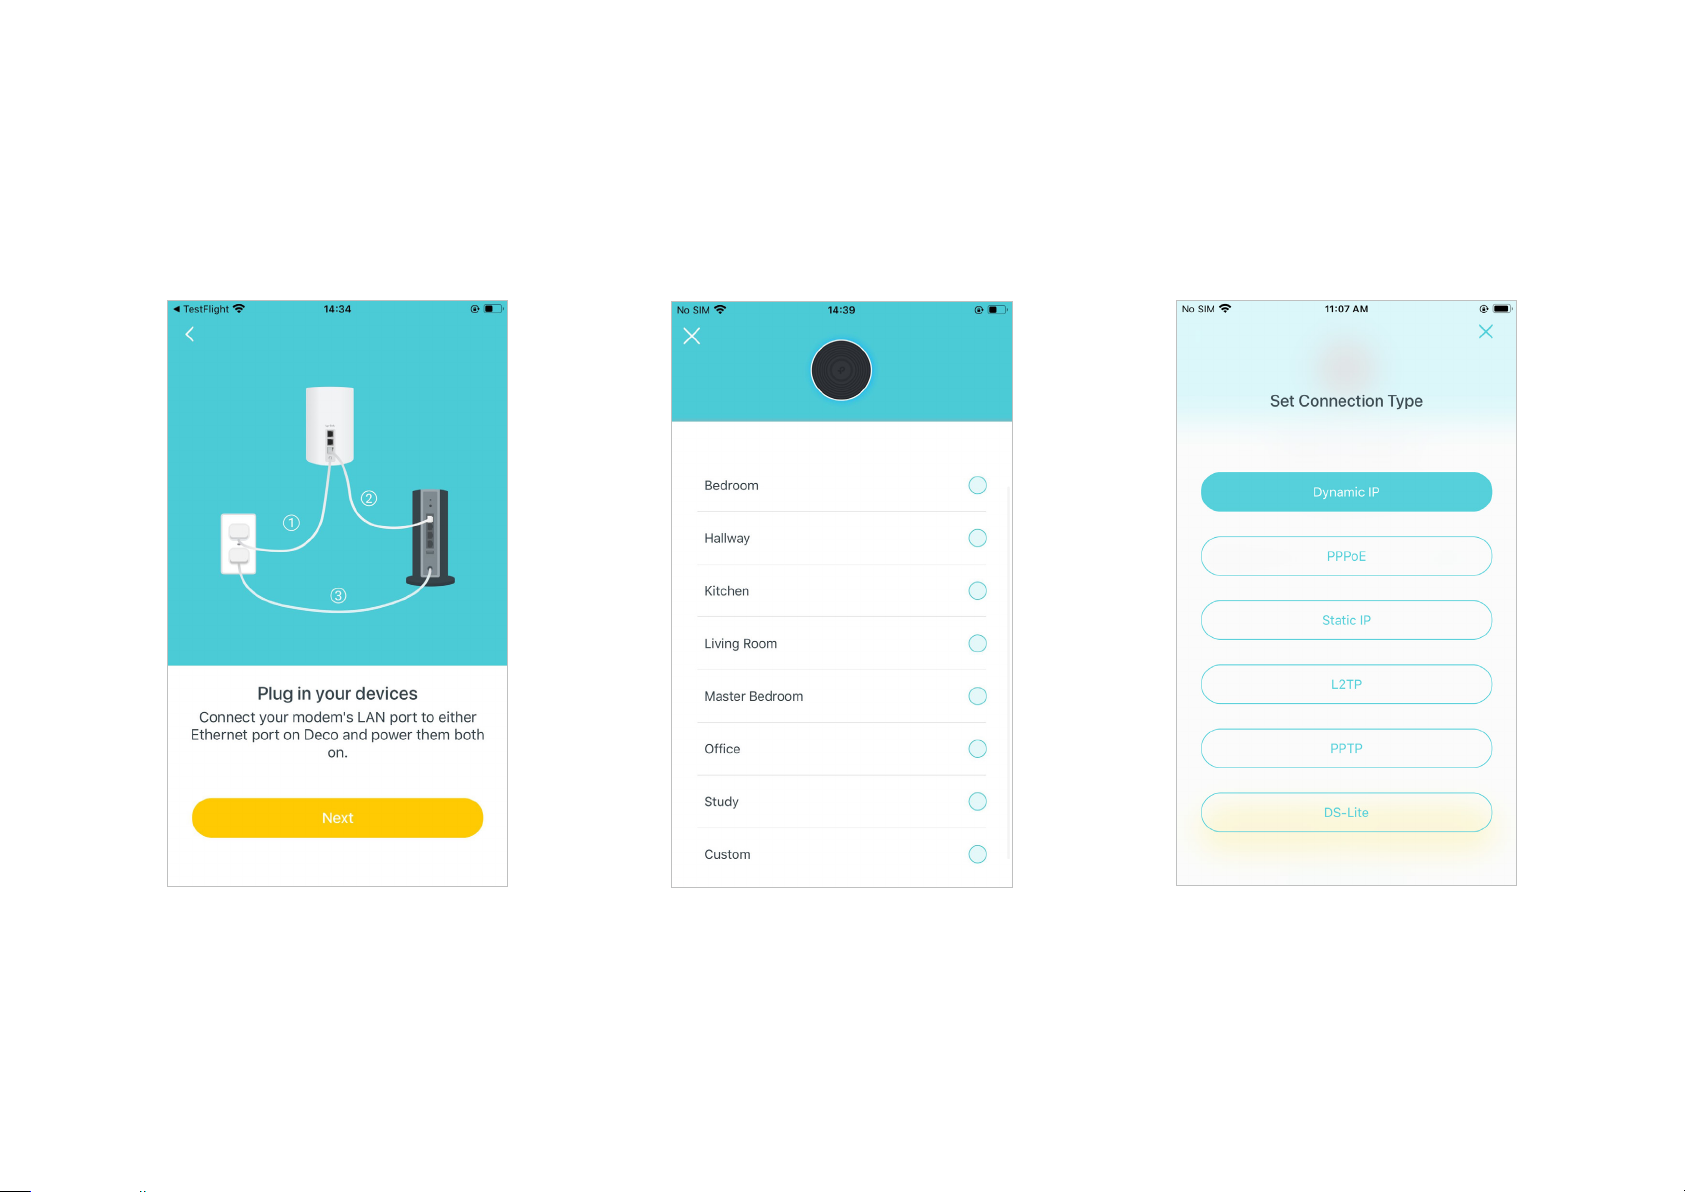
4. Plug in and power on Deco
Power o your modem. Connect your Deco to
the modem and power them both on.
If you don't have a modem, connect the
Ethernet outlet directly to your Deco.
5. Select a location
Select a location for this Deco. If its location
is not listed, you can create a new one by
choosing Custom. This will be the name of
your Deco.
6. Set up internet connection
Select the internet connection type and enter
the information. If you are not sure, contact
your internet service provider.
5
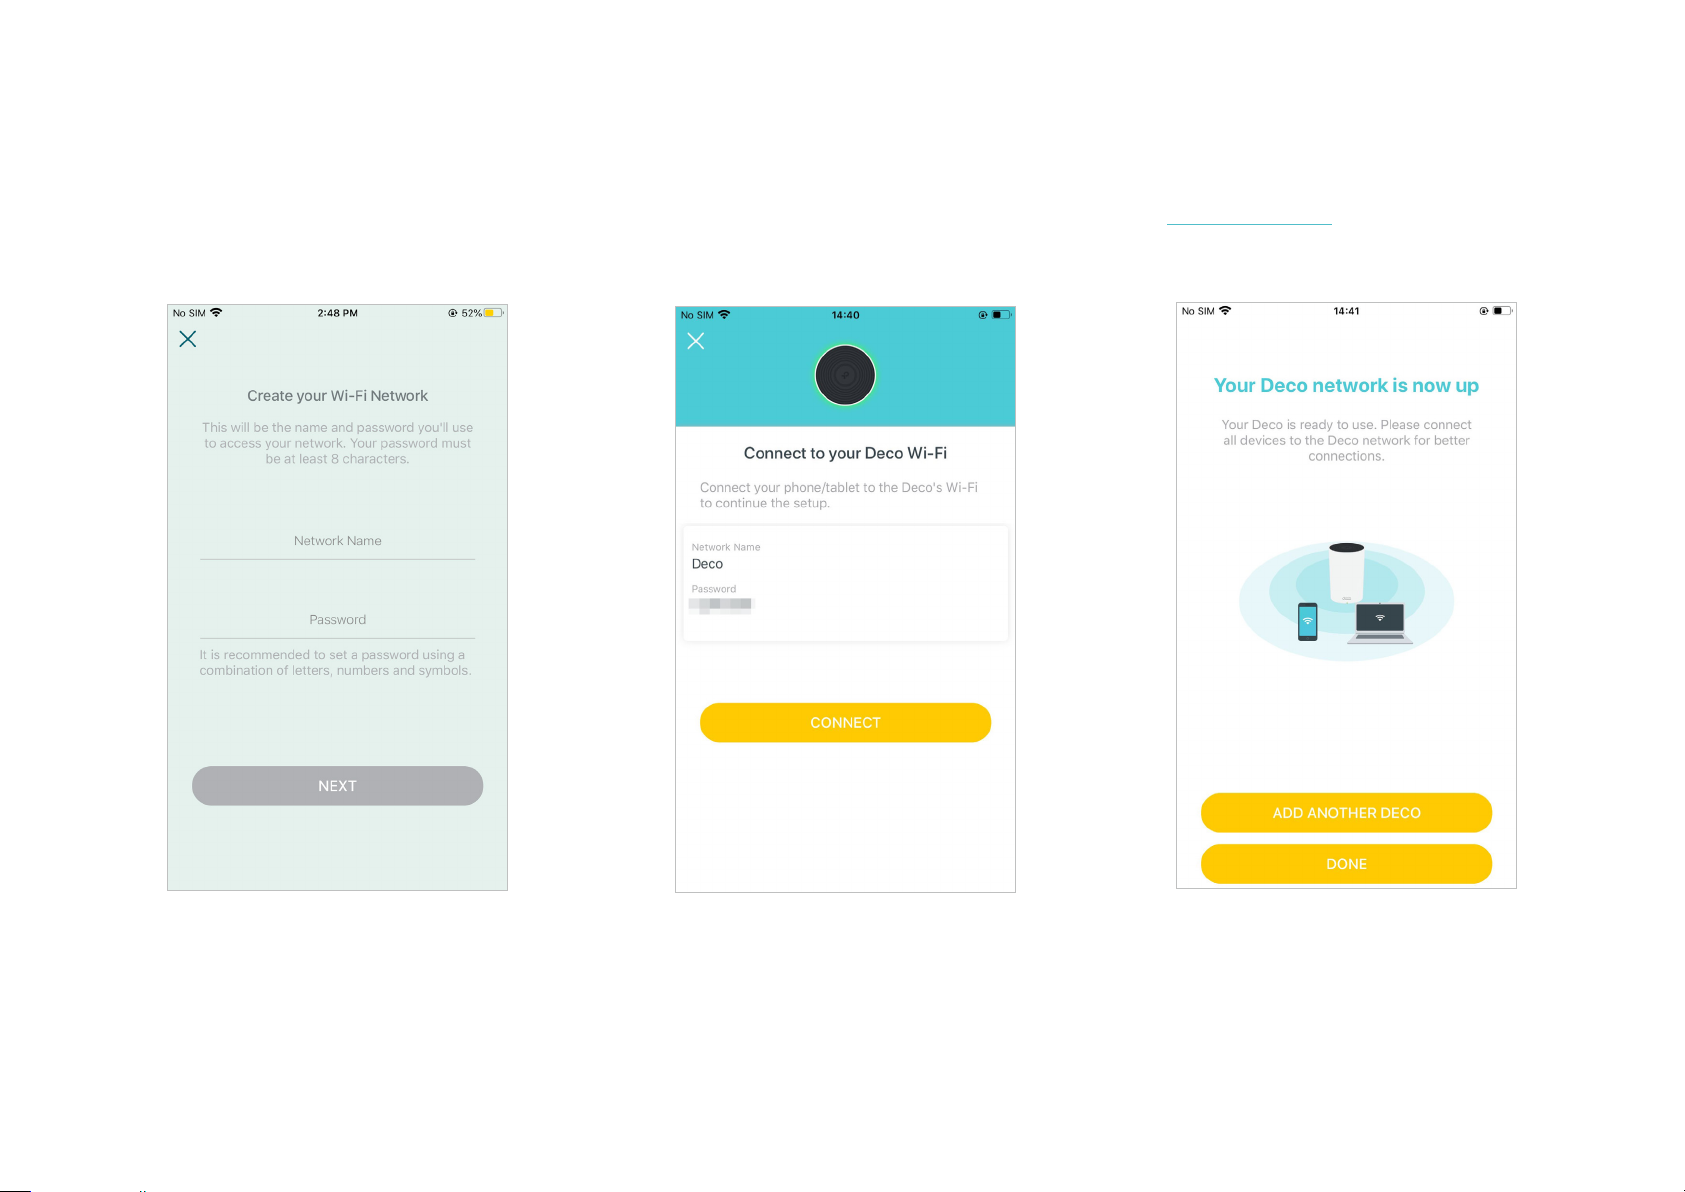
8. Connect to your Wi-Fi network
Connect your phone/tablet to the Deco's Wi-Fi.
7. Create your Wi-Fi network
Set a network name and a password. These
will be the name and password you use to
connect your devices to Wi-Fi.
9. Setup complete
Your Deco network is now up. Connect
all devices to the Deco network. You can
also Add More Decos to expand the Wi-Fi
coverage.
6
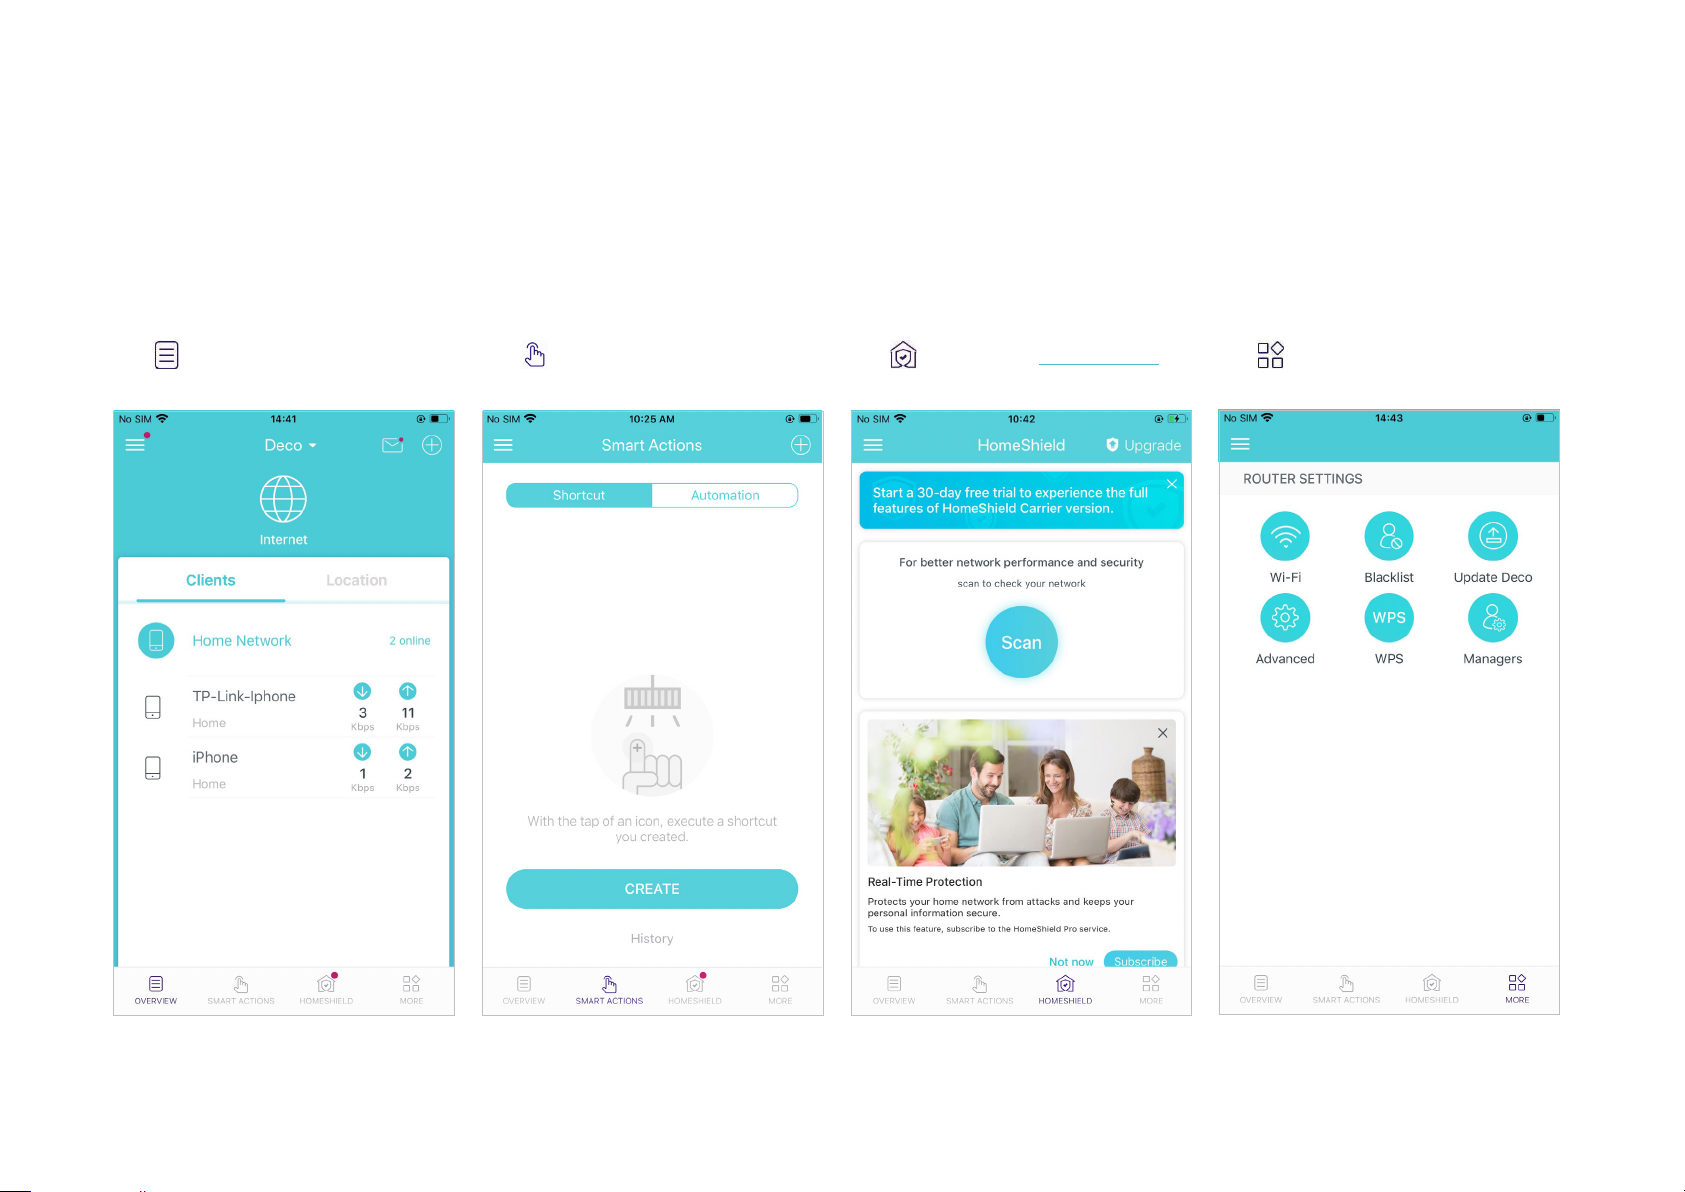
Dashboard
After you successfully set up your Deco network, you will see the dashboard of the Deco app. Here you can get an overview of the network status,
create shortcut and automation, customize your home network with enhanced security using a kit of features built to TP-Link HomeShield and set up
various advanced features.
Tap to get an overview of the
network status.
Tap to create shortcut or
automation.
Tap to enter the HomeShield
page for enhanced security.
Tap for more features.
7
Add More Decos
After creating a Deco network, you can add more Decos to the network to expand the Wi-Fi coverage and manage them easily on your Deco app.
1. In Overview, tap + > DECOS.
2. Select the Deco model you want to add, and
follow app instructions to complete the setup.
8
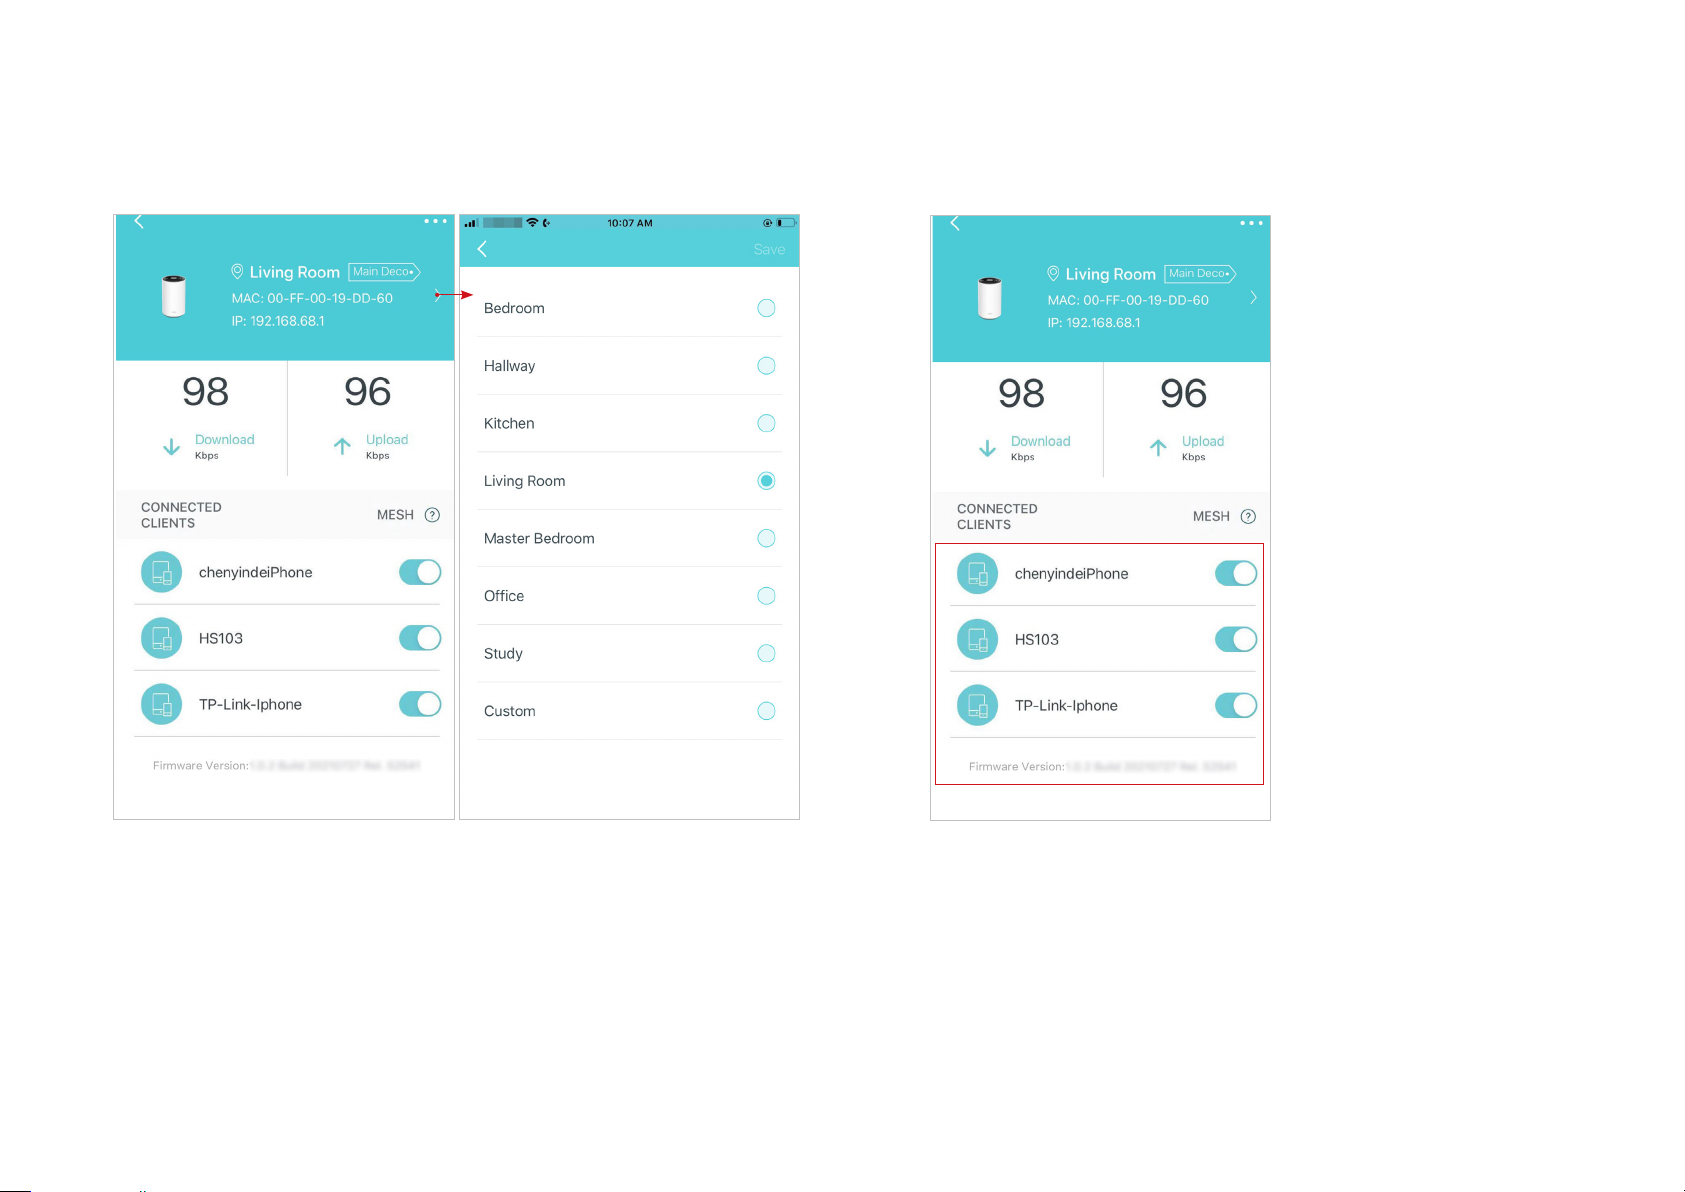
Check Deco Status
In Overview, you can check the working status (online/offline) of all the Decos, check the details (speed/Deco's IP address & MAC address/connected
clients) of each Deco, change the Deco's location/name, and more.
Tap to check all Decos' status.Tap a Deco unit to check more details.Check download/upload speed of the Deco.
9
Check the clients connected to the Deco.
Enable the Mesh feature, then the client can seamlessly switch to
the Deco that provides the fastest speed as you move around.
Change or customize the location/name of the Deco.
10
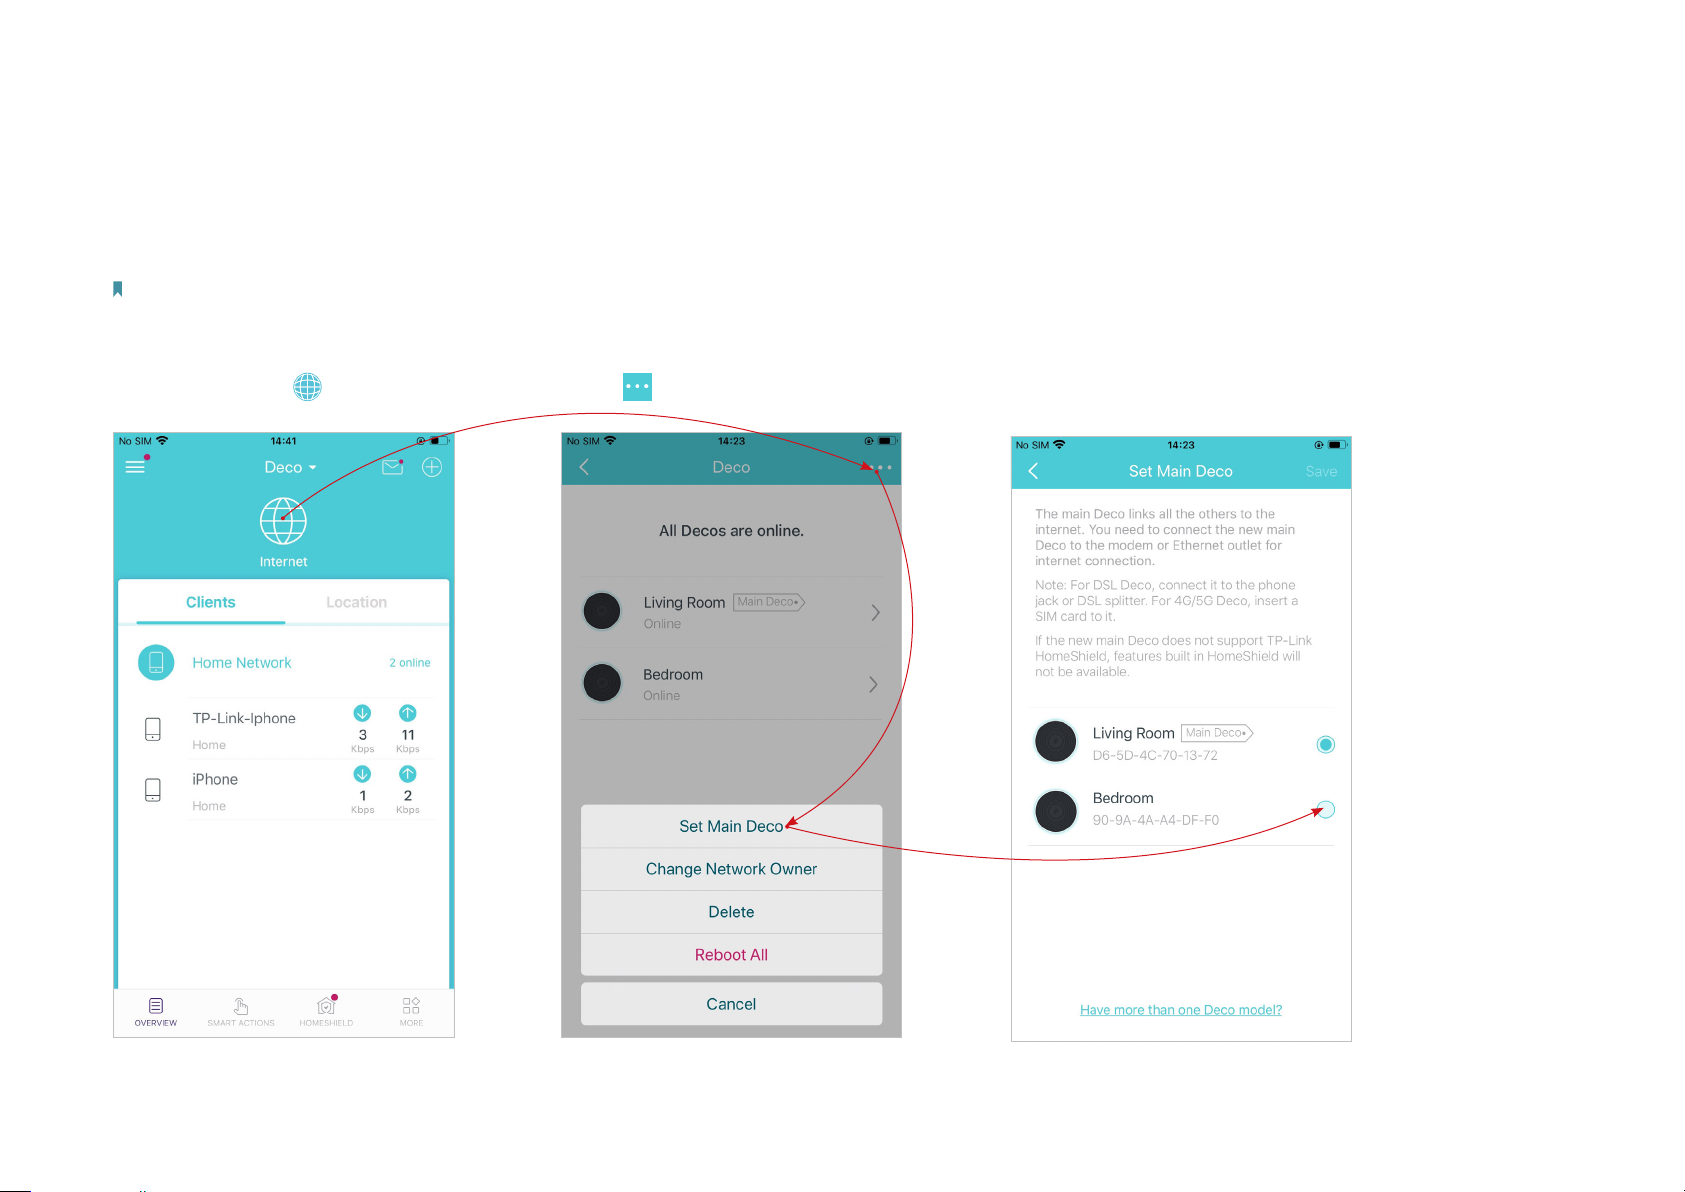
Set Main Deco
After setup, you can replace the main Deco with any satellite Deco without resetting or reconfiguring the whole network.
Follow the steps below to complete the setup process.
Note: The main Deco links all the others to the internet. After the main Deco nishes switching, you need to connect the new main Deco to the modem or Ethernet outlet for internet connection. For DSL
Deco, connect it to the phone jack or DSL splitter. For 4G/5G Deco, insert a nano SIM card to it.
1. In Overview, tap . 3. Choose a satellite Deco and follow app
instructions to complete the settings.
2. Tap > Set Main Deco.
12
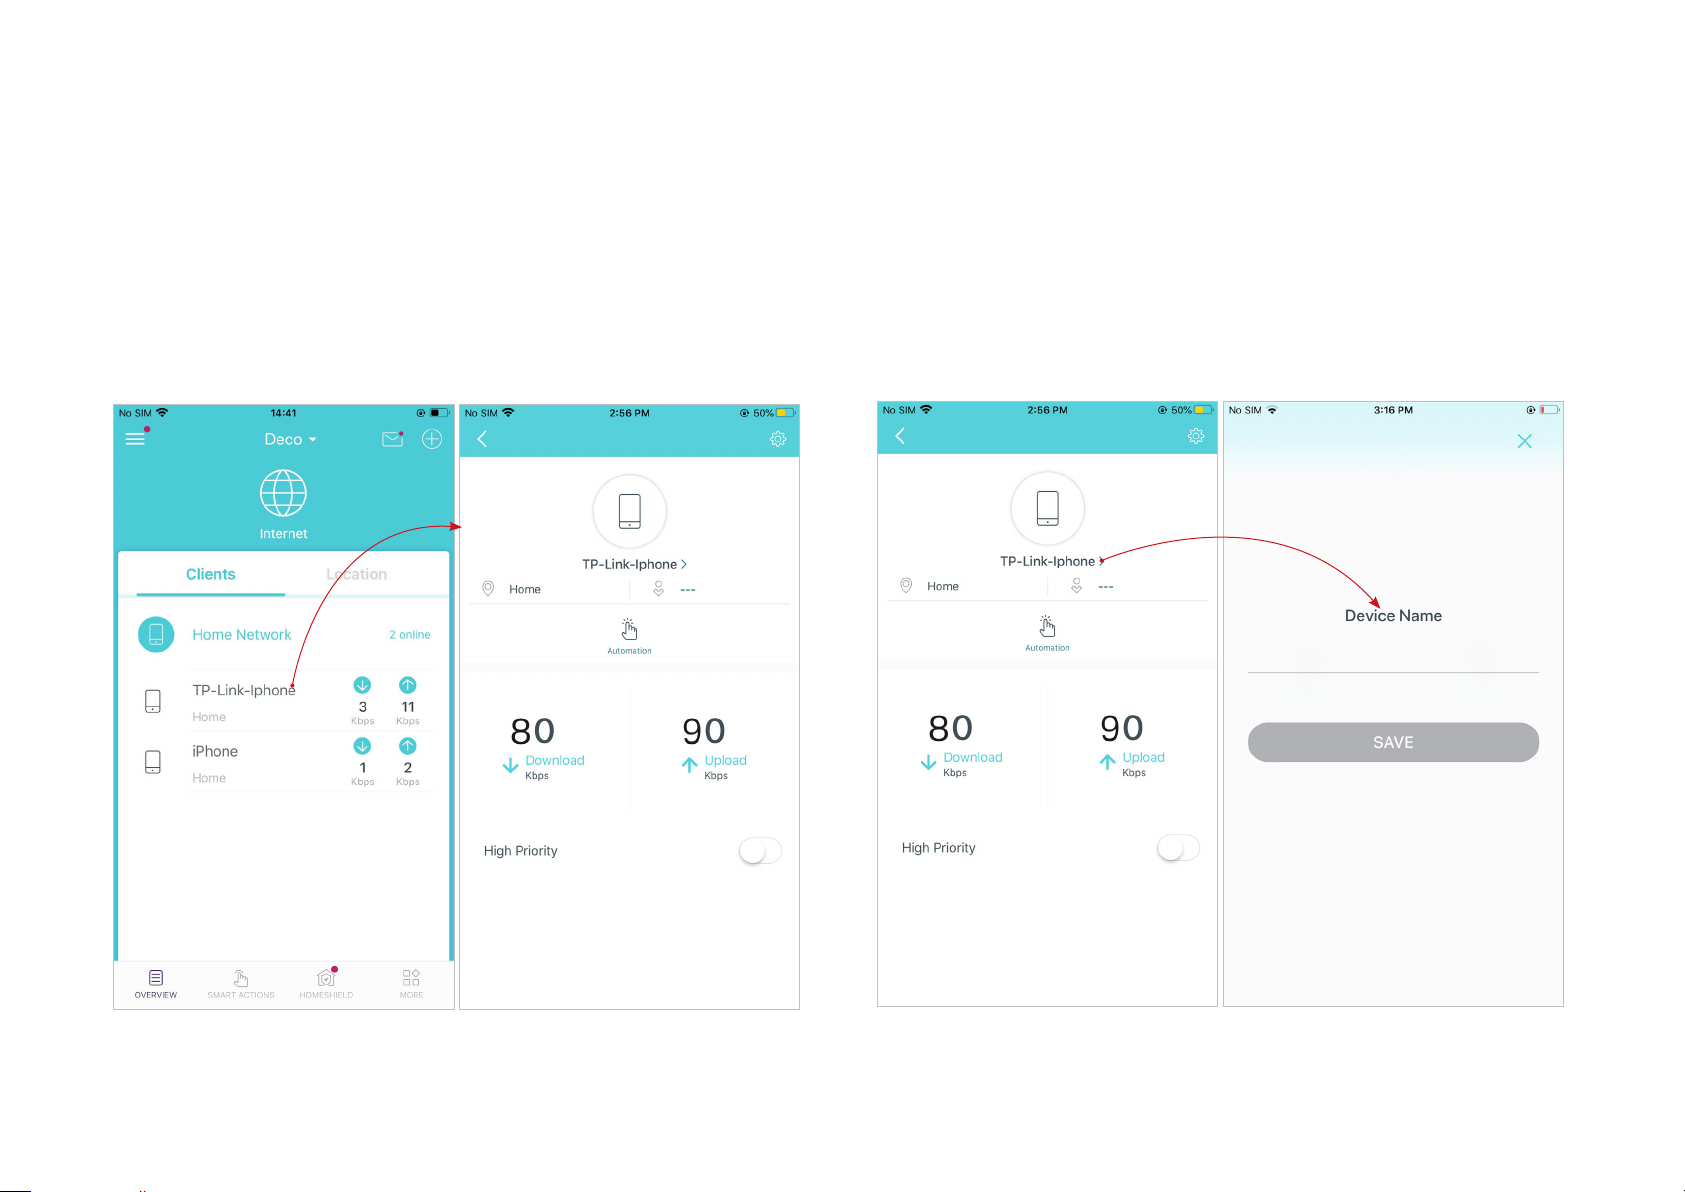
Manage Connected Devices
In Overview, you can mange your connected devices easily, such as changing the device name/type/location, enabling automation, Mesh Technology
and high priority for the device, setting a profile to manage its online activities, and more.
Tap a connected device to check the details (e.g. real-time upload and
Tap to manage the device settings, including changing the device
name/type, viewing device detailed information (IP address, MAC
address, connected network, linked Deco, etc.), and more.
Tap Location to sort the devices by customized locations so that you can
quickly find and manage the devices.
15
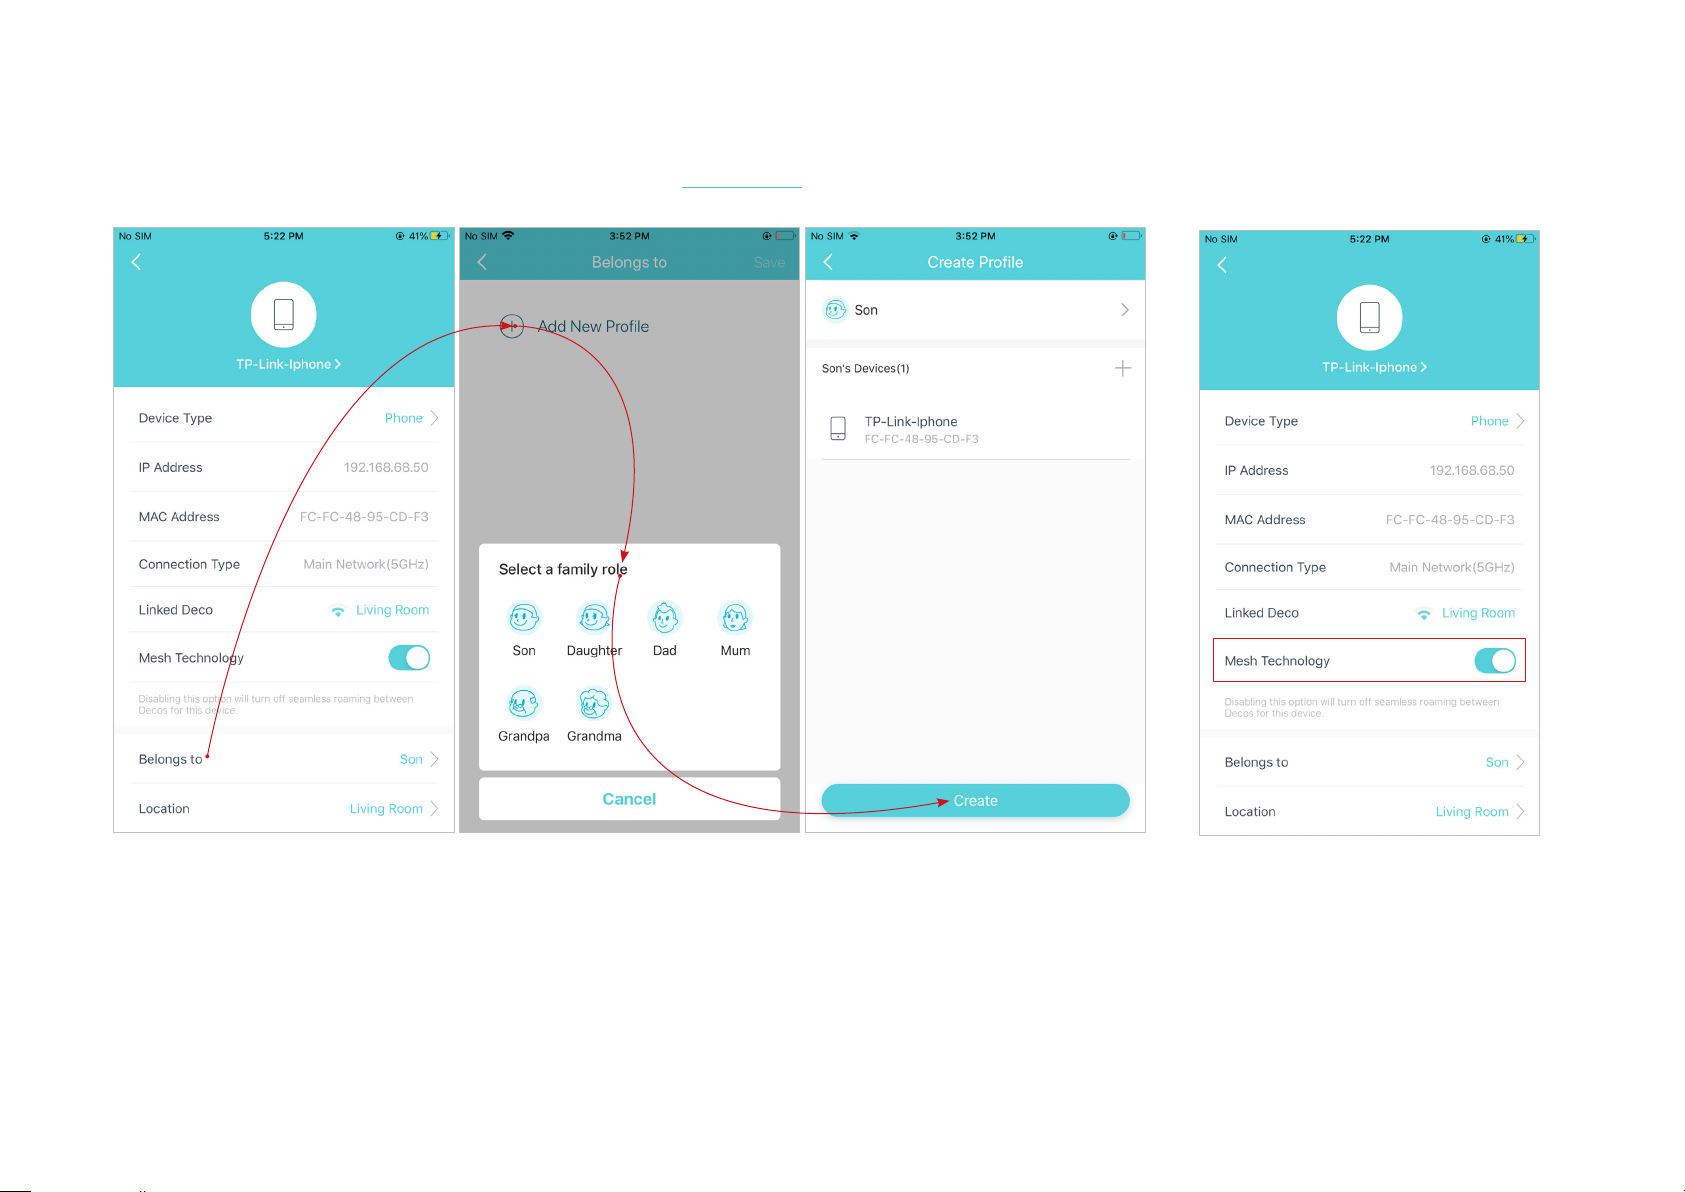
Tap Belongs to to add a unique profile for the device and manage its online activities. For example, when
and for how long this device can access the internet, block inappropriate content, and pause the internet if
necessary. For more information about the feature, refer to HomeShield.
Enable Mesh Technology and then the
device can seamlessly switch to the
Deco that provides the fastest speed
as you move around.
16
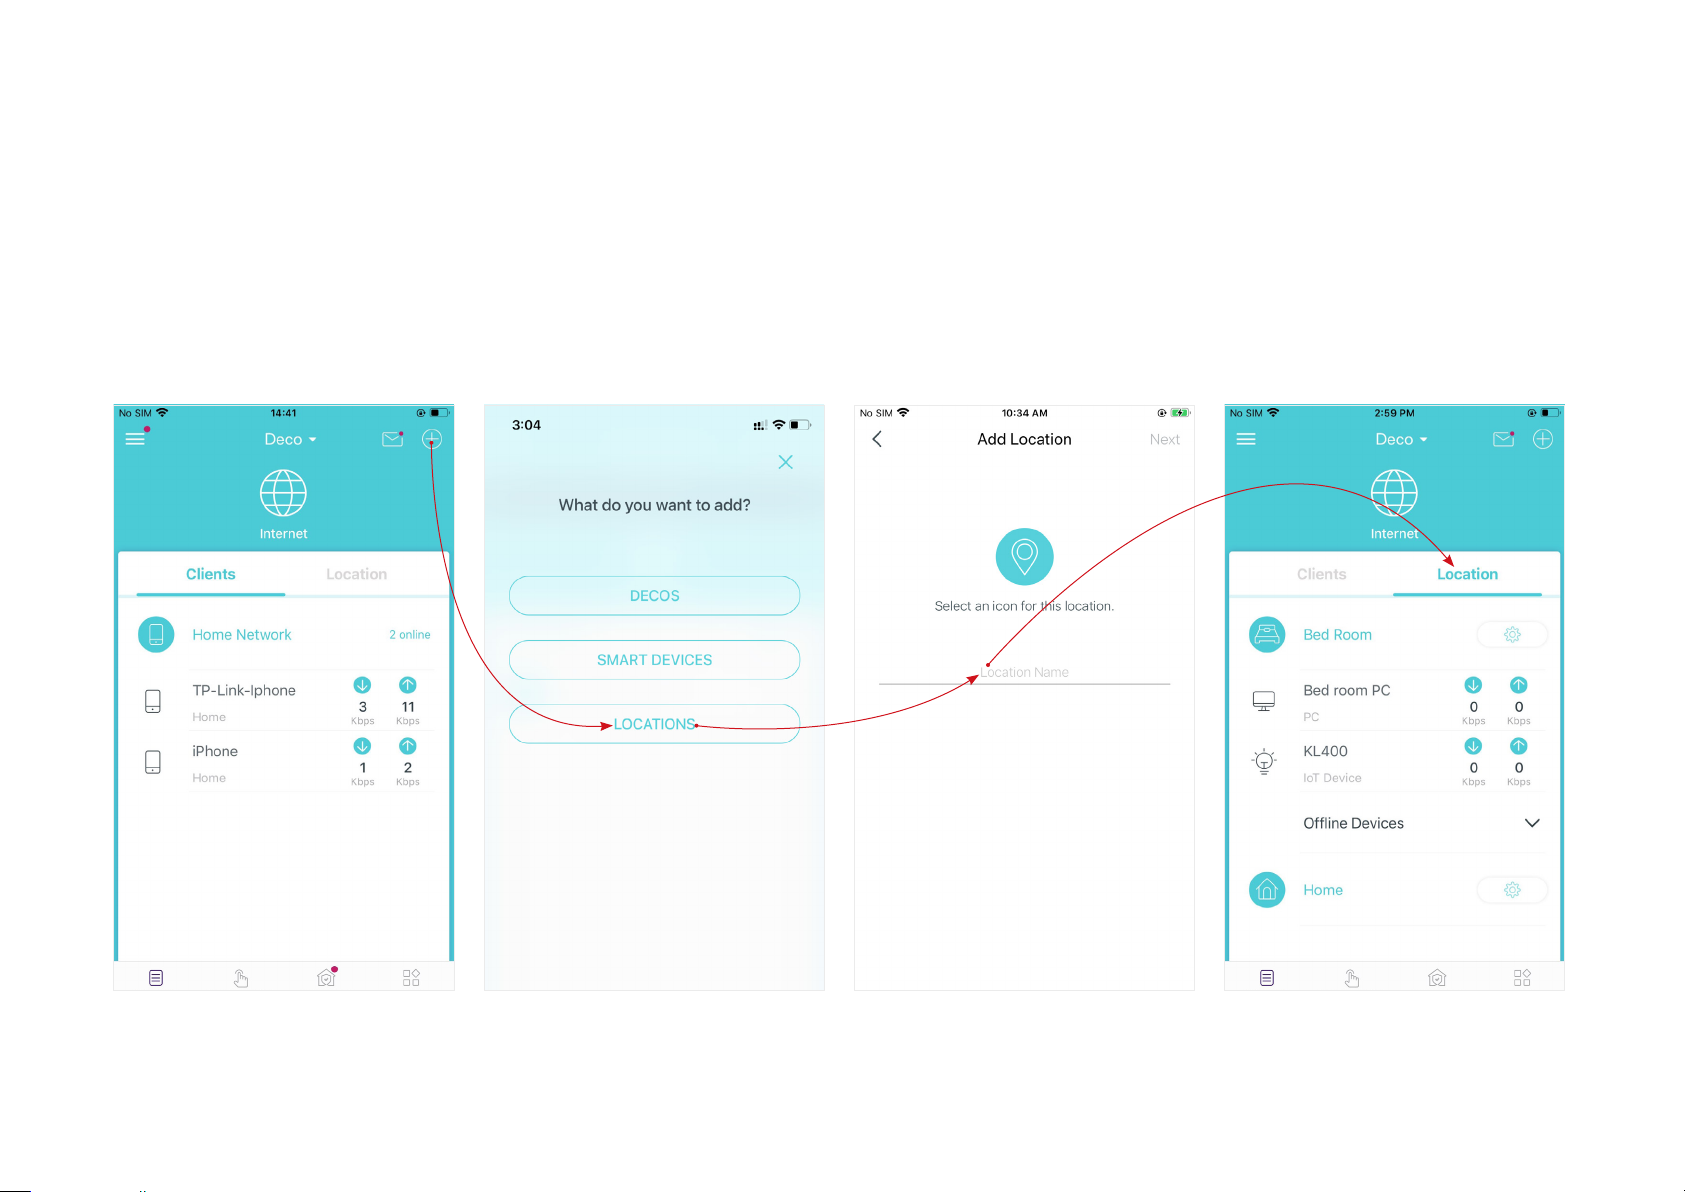
Sort Devices By Locations
After adding your devices to the Deco network, you can sort them by customized locations so that it will be more convenient and ecient to manage
your devices. For example, you can add the lights and computer in your bed room to a location set as "Bed Room", so you can quickly nd and manage
these devices.
In Overview, tap + > LOCATIONS. Follow app instructions to sort your devices by location.
18
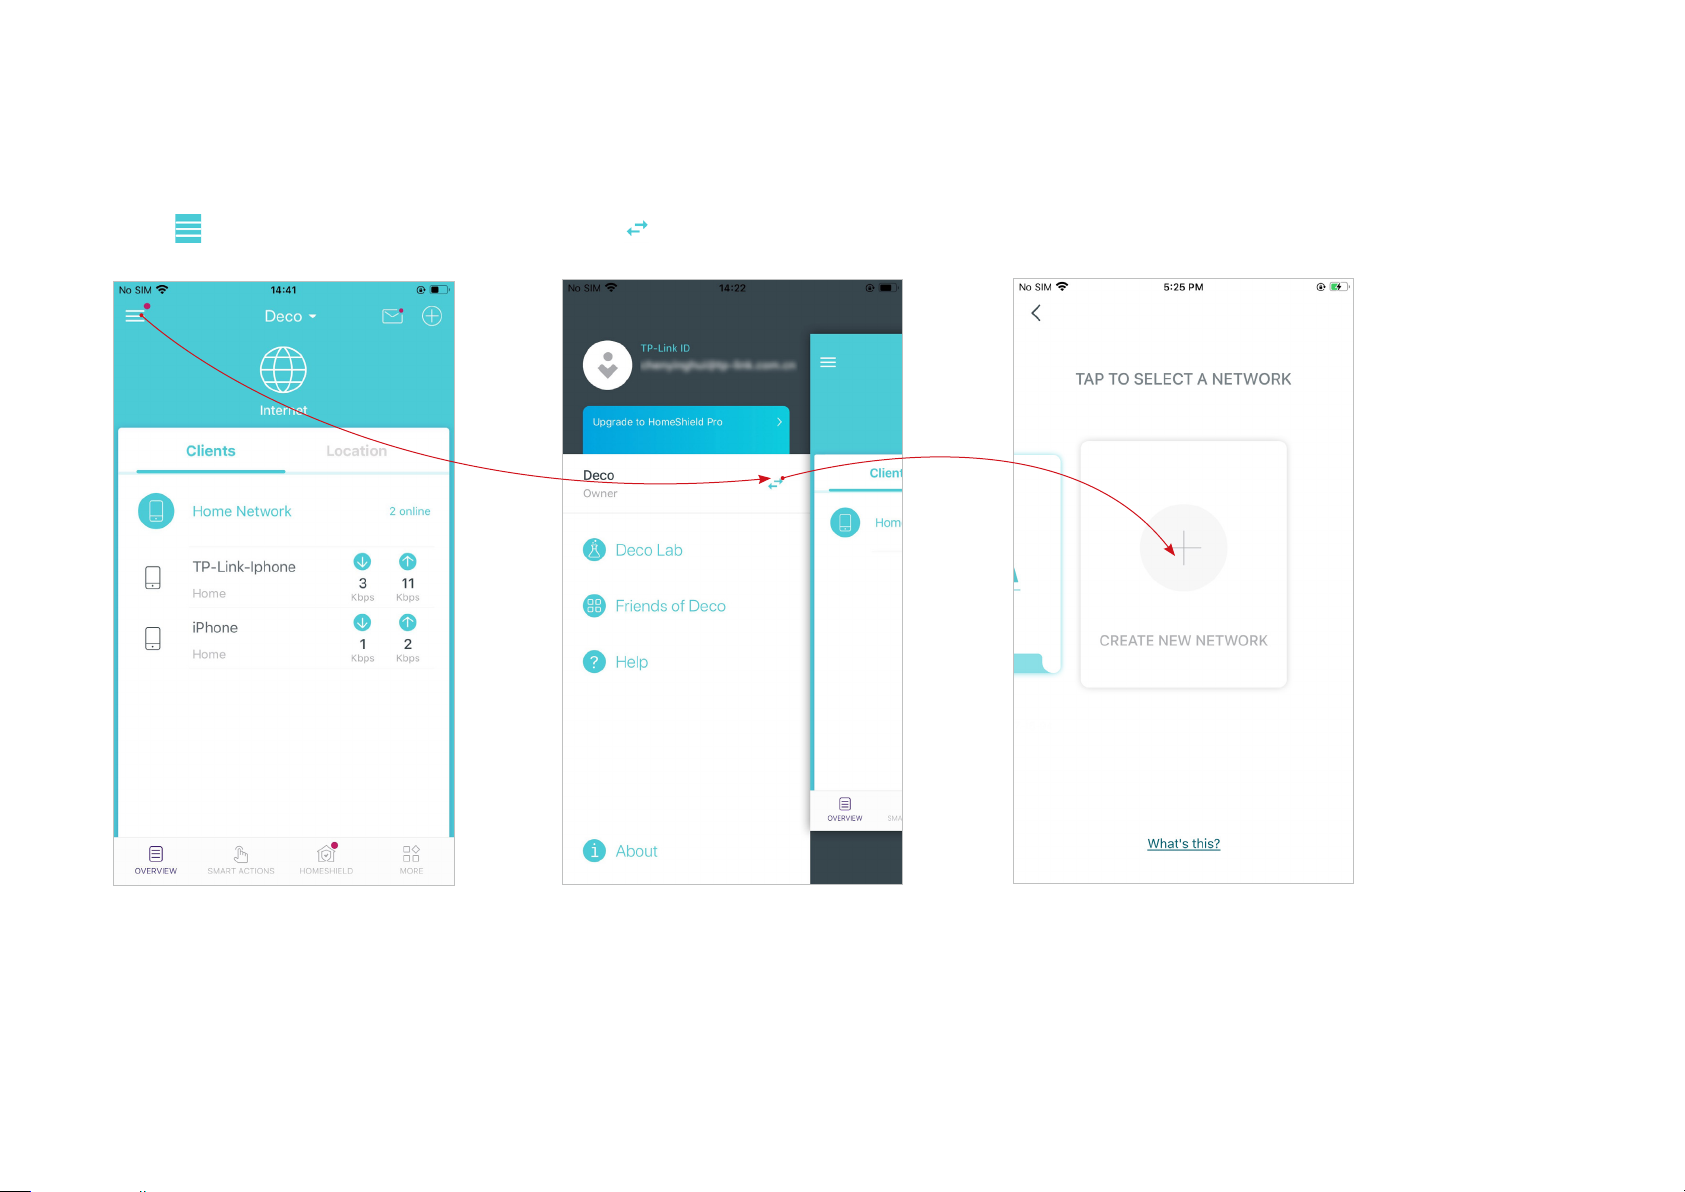
Method 2. Create a new network from the Menu page
1. Tap to open the menu.2. Tap > CREATE NEW NETWORK.3. Follow app instructions to complete
the setup.
20
Delete a Network
You can delete a Deco network if you don't need it anymore. Deleting a Deco network will reset all Decos in this network to factory default settings.
2. Tap > Delete.1. In Overview, tap .
26
7. Select the action device and set the action details. For example, set the action as below then the living room plug will turn on after you tap the
shortcut icon, and will turn o automatically after 1.5 hours.
Tip: If you have set Delay Action, you will need to wait for the time you set before the action takes eect.
Turn on/o
How long will the action last
The waiting time before the
action starts
27
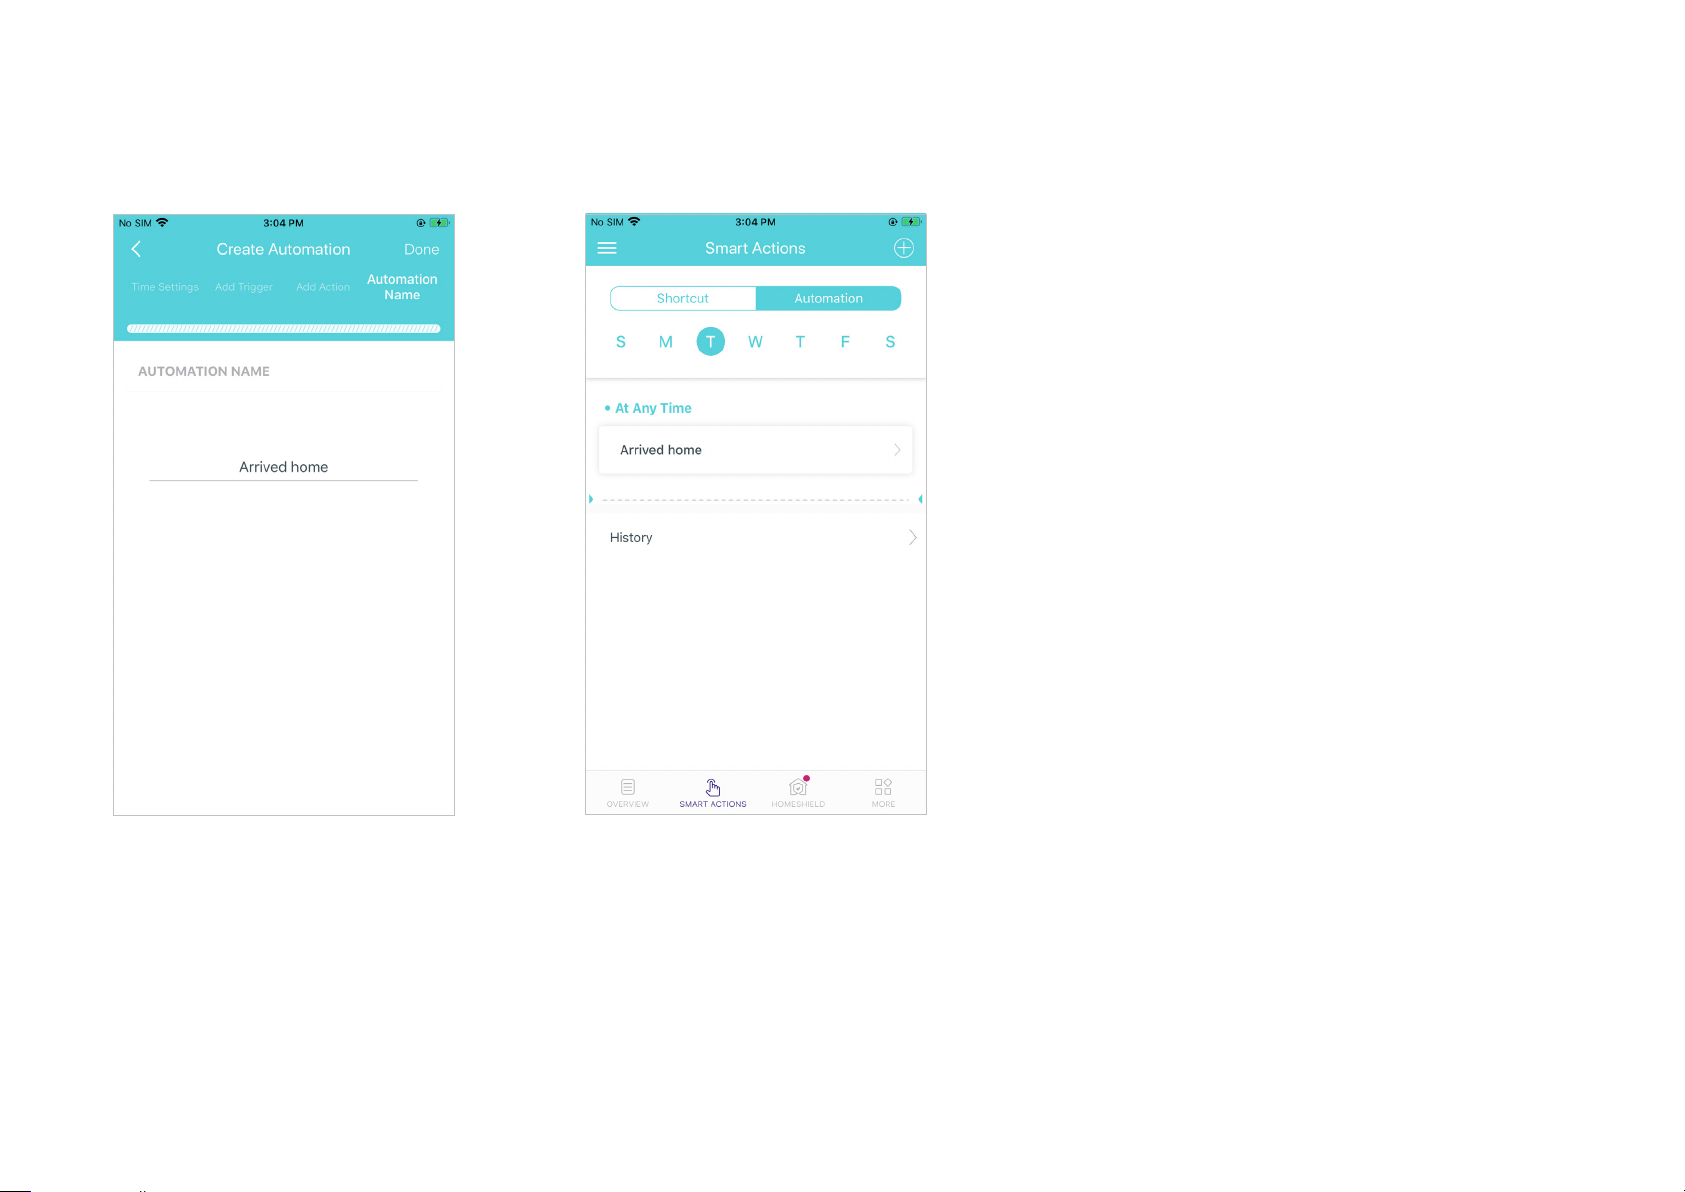
9. Automation setup completed. The
automation will take eect when the
trigger is executed.
8. Set a name for the automation.
30
6 GHz Wi-Fi is used for dedicated backhaul by default. When it is used for your Wi-Fi network connection, you can change your 6 GHz network's Wi-Fi
name and password, hide the network from Wi-Fi list, etc. Only Wi-Fi 6E-compatible devices can search for and join the 6GHz nework.
31
Guest Network
You can create and share a separate network for guests to guarantee the security and privacy of your main network.
Tap > Wi-Fi and enable Guest Network.
Manage guest network (e.g. change the Wi-Fi name and password, hide the
network from Wi-Fi list, set channel width for 5GHz Wi-Fi. etc.).
35
Advanced Features
Additional features are available under the Advanced menu. You can modify WAN settings (IPv4 & IPv6), add IPv6 rewall rules, modify LAN IP, set up
DHCP server, enable VLAN/IPTV/MAC Clone mode, reserve the same IP address for a specic device, set up port forwarding rules to make your local
computers accessible to other devices over the internet, enable TP-Link DDNS/SIP ALG/UPNP/fast roaming/beamforming, control Deco's LED, change
the operation mode, set connection alerts and notications.
Tap > Advanced.View IPv4 details or change the
internet connection type.
Enable IPv6 to set up an IPv6
internet connection.
Add IPv6 firewall rules to allow
specific devices to access the
specified services.
38
Enable UPNP to allow your local
network to dynamically open ports
for applications like gaming.
Enable Fast Roaming to allow
your wireless devices to switch
connection to different Decos.
Enable Beamforming to concentrate
Wi-Fi signal towards connected
devices for stronger connections.
Toggle off LED to turn off the light on
Deco. Configure the Night Mode to
turn off the LED light at bedtime only.
40
1. Tap > WPS.2. Tap the WPS icon on Deco app and
then on your client.
3. Your device has connected to the network
successfully if shown as below.
WPS
WPS (Wi-Fi Protected Setup) helps you to quickly and securely connect a client to the network with a tap without entering any password.
43
Control Your Deco with Alexa
Alexa Integration allows you to control your Deco using Amazon’s Alexa voice service. You can control and customize your home network by giving
simple voice commands to Alexa, such as enabling the Guest Network, turning o your Deco LEDs, and more.
Follow the steps below to use Alexa voice commands to control your Deco network.
Tip: To know more about how to set up Alexa Integration in Alexa app, refer to https://www.tp-link.com/support/faq/1571/.
Note: This feature is currently available in English (US), English (UK), German and Japanese.
In the Deco app, tap to open the menu, tap Friends of Deco > Alexa > TP-Link Router Skill, then follow the app instructions complete the setup.
45
Authentication
FCC Compliance Information Statement
Product Name: AXE5400 Tri-Band Mesh Wi-Fi 6E System
Model Number: Deco XE75
Component NameComponent Model
I.T.E POWER SUPPLYT120200-2B4
Responsible party:
TP-Link USA Corporation
Address: 10 Mauchly, Irvine, CA 92618
Website: http://www.tp-link.com/us/
Tel: +1 626 333 0234
Fax: +1 909 527 6803
E-mail: sales.usa@tp-link.com
This equipment has been tested and found to comply with the limits for a Class B digital device, pursuant to part 15 of the FCC Rules. These limits are
designed to provide reasonable protection against harmful interference in a residential installation. This equipment generates, uses and can radiate
radio frequency energy and, if not installed and used in accordance with the instructions, may cause harmful interference to radio communications.
However, there is no guarantee that interference will not occur in a particular installation. If this equipment does cause harmful interference to radio
or television reception, which can be determined by turning the equipment off and on, the user is encouraged to try to correct the interference by
one or more of the following measures:
• Reorient or relocate the receiving antenna.
• Increase the separation between the equipment and receiver.
• Connect the equipment into an outlet on a circuit different from that to which the receiver is connected.
46
• Consult the dealer or an experienced radio/ TV technician for help.
This device complies with part 15 of the FCC Rules. Operation is subject to the following two conditions:
1. This device may not cause harmful interference.
2. This device must accept any interference received, including interference that may cause undesired operation.
Any changes or modifications not expressly approved by the party responsible for compliance could void the user’s authority to operate the
equipment.
Note: The manufacturer is not responsible for any radio or TV interference caused by unauthorized modifications to this equipment. Such modifications
could void the user’s authority to operate the equipment.
FCC RF Radiation Exposure Statement
This equipment complies with FCC RF radiation exposure limits set forth for an uncontrolled environment. This device and its antenna must not be
co-located or operating in conjunction with any other antenna or transmitter.
“To comply with FCC RF exposure compliance requirements, this grant is applicable to only Mobile Configurations. The antennas used for this
transmitter must be installed to provide a separation distance of at least 20 cm from all persons and must not be co-located or operating in conjunction
with any other antenna or transmitter.”
FCC regulations restrict operation of this device to indoor use only. The operation of this device is prohibited on oil platforms, cars, trans, boats, and
aircraft, except that operation of this device is permitted in large aircraft while flying above 10000 feet. Operation of transmitters in the 5.925-7.125
GHz band is prohibited for control of or communications with unmanned aircraft systems.
We, TP-Link USA Corporation, has determined that the equipment shown as above has been shown to comply with the applicable technical standards,
FCC part 15. There is no unauthorized change is made in the equipment and the equipment is properly maintained and operated.
Issue Date: 2021-09-29
48
Any changes or modifications not expressly approved by the party responsible for compliance could void the user’s authority to operate the
equipment.
We, TP-Link USA Corporation, has determined that the equipment shown as above has been shown to comply with the applicable technical standards,
FCC part 15. There is no unauthorized change is made in the equipment and the equipment is properly maintained and operated.
Libble takes abuse of its services very seriously. We're committed to dealing with such abuse according to the laws in your country of residence. When you submit a report, we'll investigate it and take the appropriate action. We'll get back to you only if we require additional details or have more information to share.
Product:
Forumrules
To achieve meaningful questions, we apply the following rules:
First, read the manual;
Check if your question has been asked previously;
Try to ask your question as clearly as possible;
Did you already try to solve the problem? Please mention this;
Is your problem solved by a visitor then let him/her know in this forum;
To give a response to a question or answer, do not use this form but click on the button 'reply to this question';
Your question will be posted here and emailed to our subscribers. Therefore, avoid filling in personal details.
Register
Register getting emails for TP-LINK Deco XE75 - AXE5400 Tri-Band Mesh Wi-Fi 6E System at:
new questions and answers
new manuals
You will receive an email to register for one or both of the options.
Get your user manual by e-mail
Enter your email address to receive the manual of TP-LINK Deco XE75 - AXE5400 Tri-Band Mesh Wi-Fi 6E System in the language / languages: English as an attachment in your email.
The manual is 8.81 mb in size.
You will receive the manual in your email within minutes. If you have not received an email, then probably have entered the wrong email address or your mailbox is too full. In addition, it may be that your ISP may have a maximum size for emails to receive.
The manual is sent by email. Check your email
If you have not received an email with the manual within fifteen minutes, it may be that you have a entered a wrong email address or that your ISP has set a maximum size to receive email that is smaller than the size of the manual.
The email address you have provided is not correct.
Please check the email address and correct it.
Your question is posted on this page
Would you like to receive an email when new answers and questions are posted? Please enter your email address.