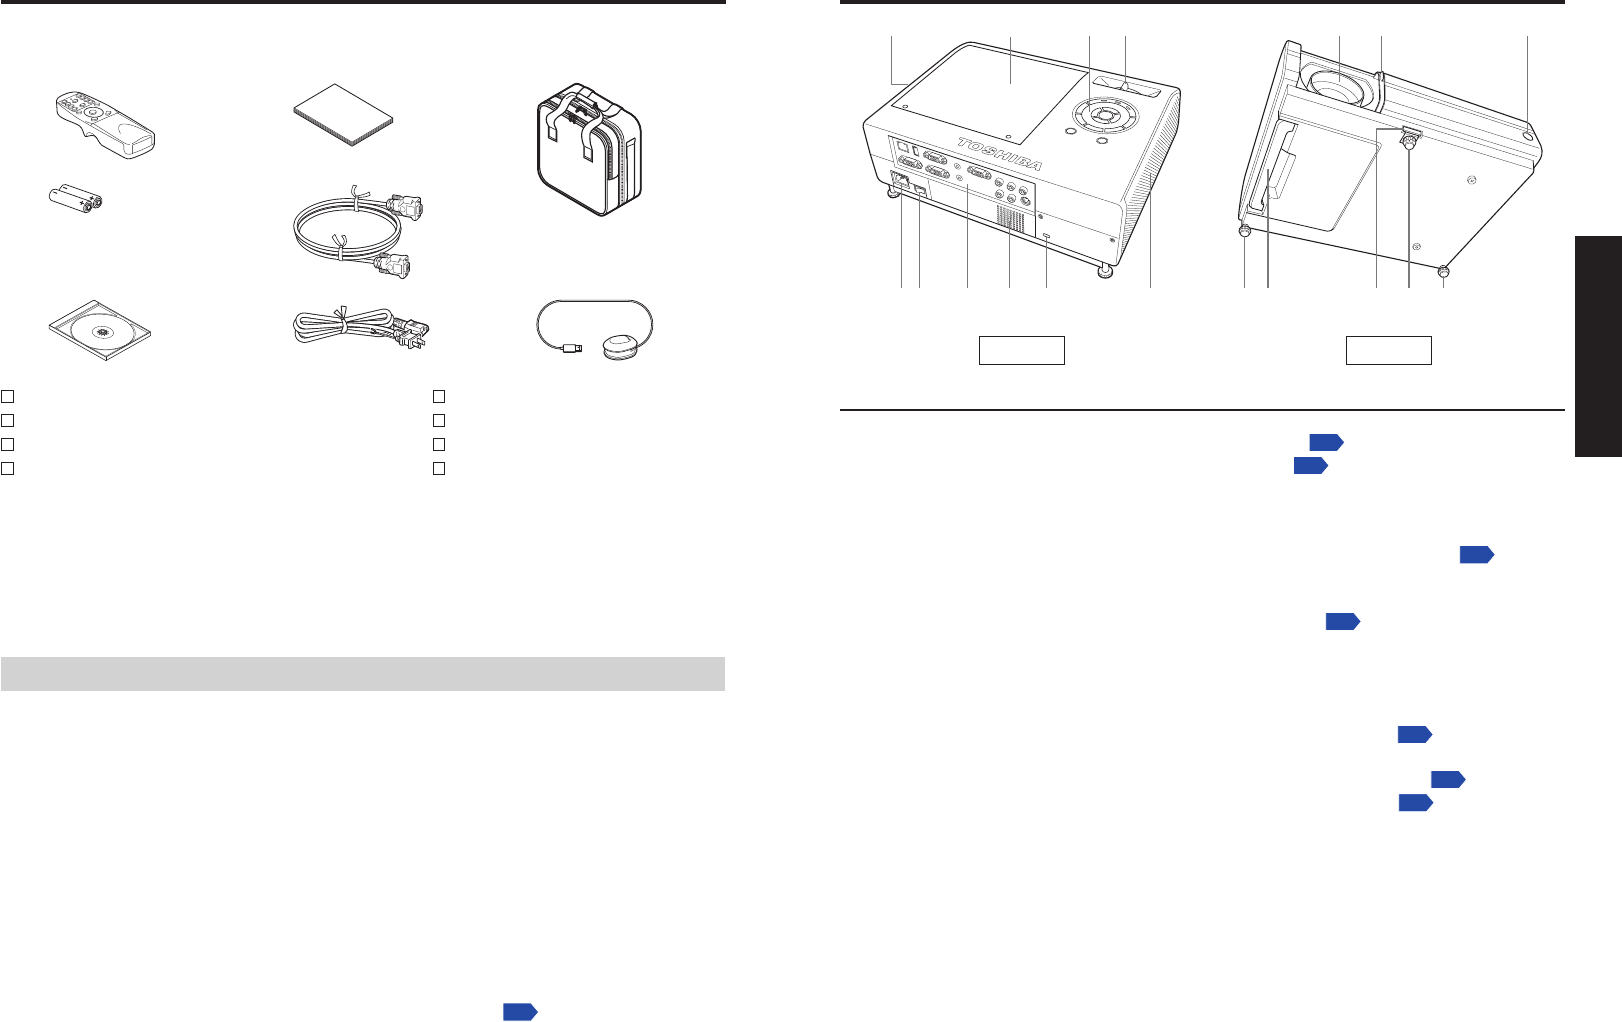
(1)Air exhaust:Expels air that has grown hot inside the projector.
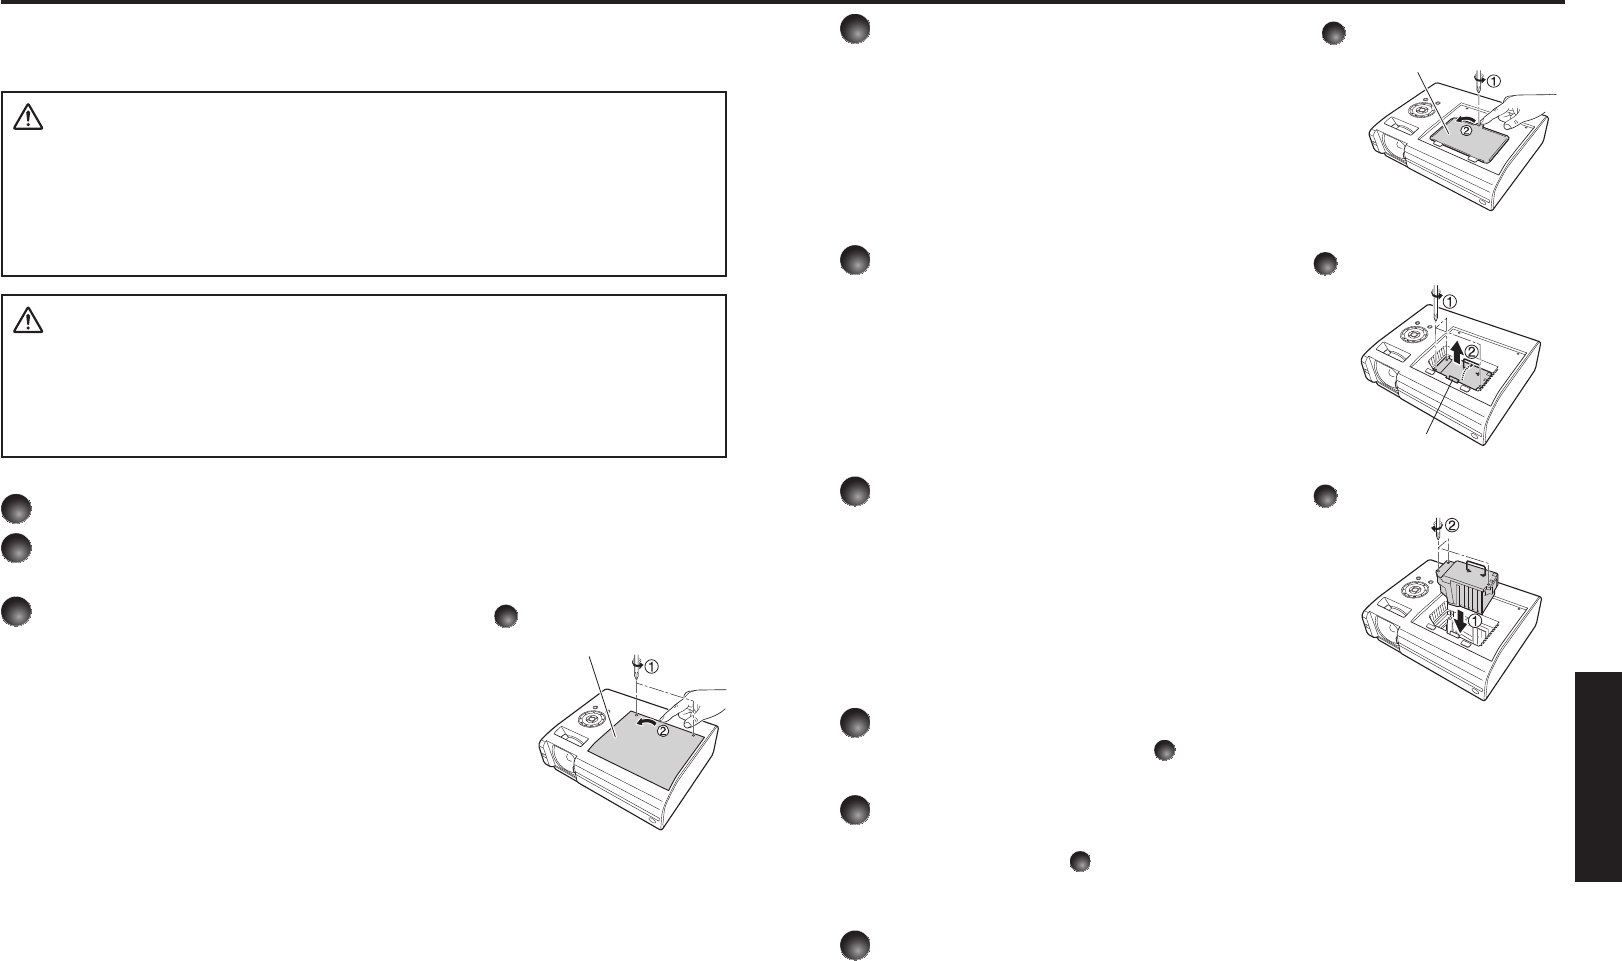
(2)Lamp cover:
Remove to replace lamp.
p.86
(3)Control panel:
Operates the projector.
p.18
(4)Focusing lever:Adjusts screen focus.
(5)Lens:Projects expanded image.
(6)Lens cover:
Slide shut when not using the projector to protect the lens.
(7)Infrared remote sensor:
Senses commands from the remote control.
p.21
(8)AC IN socket:Connect the supplied power cord here.
(9)Main power switch:AC power line ON (standby)/OFF.
(
10
)
Terminals on the rear panel
:
Connects external devices.
p.20
(
11
)Speaker:Outputs audio sound.
(
12
)Antitheft lock hole:Attach a safety cable or any other antitheft device.
(
13
)Air intake:Draws in air from outside the projector for internal cool
down.
(
14
)Tilt adjuster:
Adjusts the projector’s horizontal tilt.
p.29
(
15
)Handle:Hold to carry the projector by pulling out.
(
16
)
Foot adjuster release button
:
Press to set up or stow the foot adjuster.
p.29
(
17
)Foot adjuster:
Adjusts the vertical projection angle.
p.29
Please make sure that the following items are included in the box, along with the main unit. If
any item is missing, please contact the store immediately where you purchased the product.
(1)(4)(7)
(2)(5)
(3)(6)(8)
N
(1) Remote control
N
(2) LR03 (SIZE AAA) batteries for remote control (2)
N
(3) CD-ROM
N
(4)
Owner’s Manual
N
(5)
RGB cable (3m)
N
(6)
Power cord
(See note)
N
(7)
Carrying bag
N
(8)
Mouse remote control receiver
Note
The shape and number of supplied power cords vary depending on the product destination.
Save Original Packing Materials
The original shipping carton and packing materials will come in handy if you ever have to
ship your projector. For maximum protection, repack the set as it was originally packed at
the factory.
U
The Supplied CD-ROM
The supplied CD-ROM contains an owner’s manual, including information not available for
the printed Owner’s manual (Getting started), each Application, Project Management Utility
Manual and Quick Reference in PDF format. (PDF: Portable Document Format) Please
use Acrobat Reader 5 or more to view the manual.
N
Adobe
®
Acrobat
®
Reader
®
or Adobe
®
Reader
®
The supplied CD-ROM does not contain Acrobat
®
Reader
®
. If you can not read PDF
files, please install Acrobat Reader software in your computer by downloading it from
the Adobe Systems website.
N
Viewing the manual
Run the CD-ROM and double-click on Start.pdf. Acrobat
®
Reader
®
launches, and a
screen appears asking you that “Select your model”, then click on the model name
that you are using. After you select [Owner’s manual] on the next screen, click on the
desired language. The Owner’s Manual cover and list of bookmarks appear.Click on’s Manual cover and list of bookmarks appear.Click ons Manual cover and list of bookmarks appear. Click on
a bookmark title to view that section of the manual. Click on
p.
to view a reference
page with related information. See the Help menu for more information about Acrobat
®
Reader
®
.
1819
Preparations
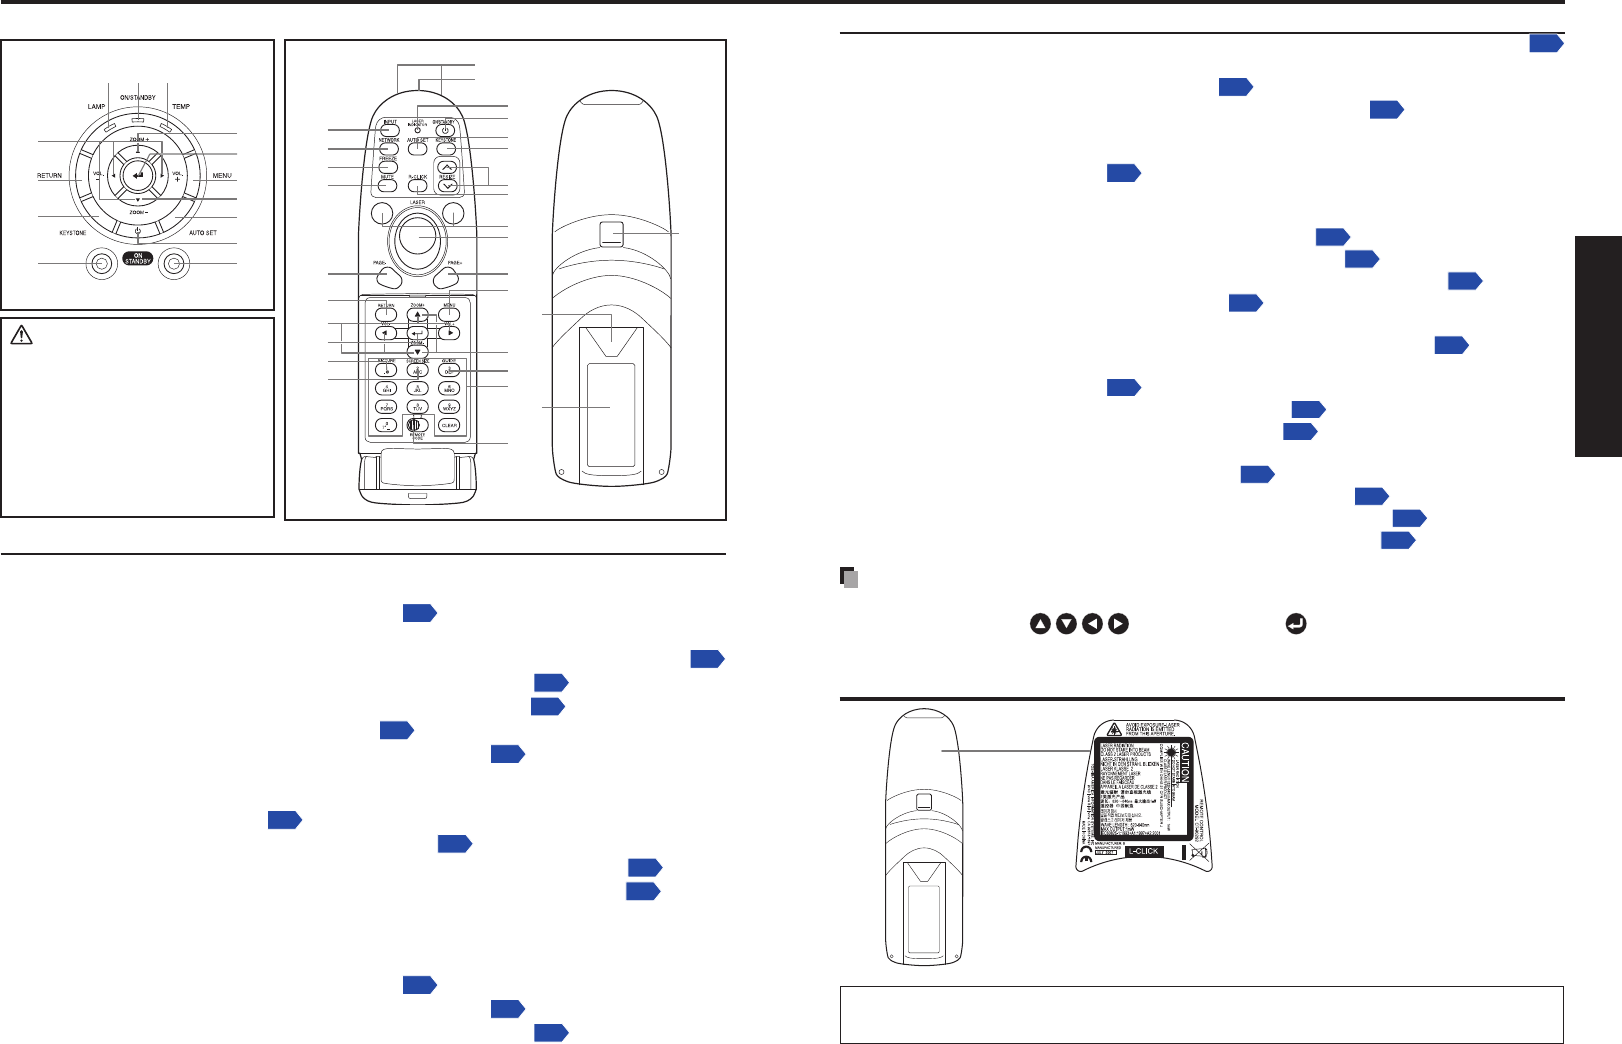
Names of each part on the control panel and remote control
(12)
(4)
(5)
(3)
(22)
(24)
(1)
(11)
(25)
(13)
(14)
(2)
(6)
(17)
(21)
(18)
(7)
(8)
(16)
(15)
(23)
(9)
(10)
(19)
(20)
Remote control transmitter
Laser light source
Battery
cover
Warning
label
Remote ControlControl panel
CAUTION
Do not look into the laser light
source of the remote control
or direct the laser pointer
toward a person or a mirror.
Handling and adjusting other
than described here may
lead to dangerous exposure
to laser.
•
•
(11)(12)(13)
(14)
(10)
(9)
(8)
(7)
(1)
(6)
(5)
(4)
(3)
(2)
Name:Main Function
Control panel
(1)ENTER button:Accepts the selected mode.
(2)MENU button:
Displays menus.
p.37
(3)ZOOM – button:Adjusts the screen size.
(4)AUTO SET button:
Performs auto-adjustment of input signals from computer.
p.31
(5)ON/STANDBY button:
Turns the power on/off (standby).
p.26
(6)NETWORK button:
Switches to network input mode.
p.50
(7)INPUT button:
Selects input.
p.28
(8)KEYSTONE button:
Adjusts keystone distortion.
p.31
(9)RETURN button:Goes back one screen.
(
10
)Selection button:Menu selections and adjustments, volume control, etc.
p.37
(
11
)LAMP indicator:
Displays lamp mode.
p.90
(
12
)ON/STANDBY indicator:
Displays whether power is on or off (standby).
p.26
(
13
)TEMP indicator:
Lights when internal temperature is too high.
p.90
(
14
)ZOOM + button:Adjusts the screen size.
Remote control
(1)ENTER button:Accepts the selected mode.
(2)MENU button:
Displays menus.
p.37
(3)KEYSTONE button:
Adjusts keystone distortion.
p.31
(4)ON/STANDBY button:
Turns the power on/off (standby).
p.26
Name:Main Function
(5)AUTO SET button:
Performs auto-adjustment of input signals from computer.
p.31
(6)ZOOM button:Adjusts the screen size.
(7)INPUT button:
Selects input.
p.28
(8)NETWORK button:
Switches to network input mode.
p.50
(9)RETURN button:Goes back one screen.
(
10
)Selection button:Menu selections and adjustments, volume control, etc.
p.37
(
11
)LASER button:Shows a laser pointer.
(
12
)Laser indicator:Lights when laser is on.
(
13
)Mouse control button:
Controls a mouse pointer.
p.22
(
14
)PAGE+ button:
Proceeds PowerPoint
®
slides.
p.22
(
15
)MUTE button:
Cuts off the picture and sound temporarily.
p.34
(
16
)FREEZE button:
Pauses image.
p.35
(
17
)Ten-Key button:Use as a ten-key pad with wireless LAN, from which
numbers and characters can be entered.
p.52
(
18
)
Remote control code switch
:Sets the code of remote control to that of the projector.
p.44
(
19
)PICTURE button:
Changes image mode.
p.34
(
20
)SCREEN SIZE button:
Changes screen size.
p.34
(
21
)GUIDE button:Displays operation guide for slideshow.
(
22
)RESIZE button:
Enlarges image.
p.33
(
23
)PAGE- button:
Goes back PowerPoint
®
slides.
p.22
(
24
)R-CLICK button:
Functions as right-click of a mouse.
p.22
(
25
)L-CLICK button:
Functions as left-click of a mouse.
p.22
Note
For the remainder of this manual, buttons are referred to as follows:
Selection buttons
⇒
; ENTER button
⇒
Label location
•
Caution – use of controls or adjustments or performance of procedures other than
those specified herein may result in hazardous radiation exposure.
2021
Preparations
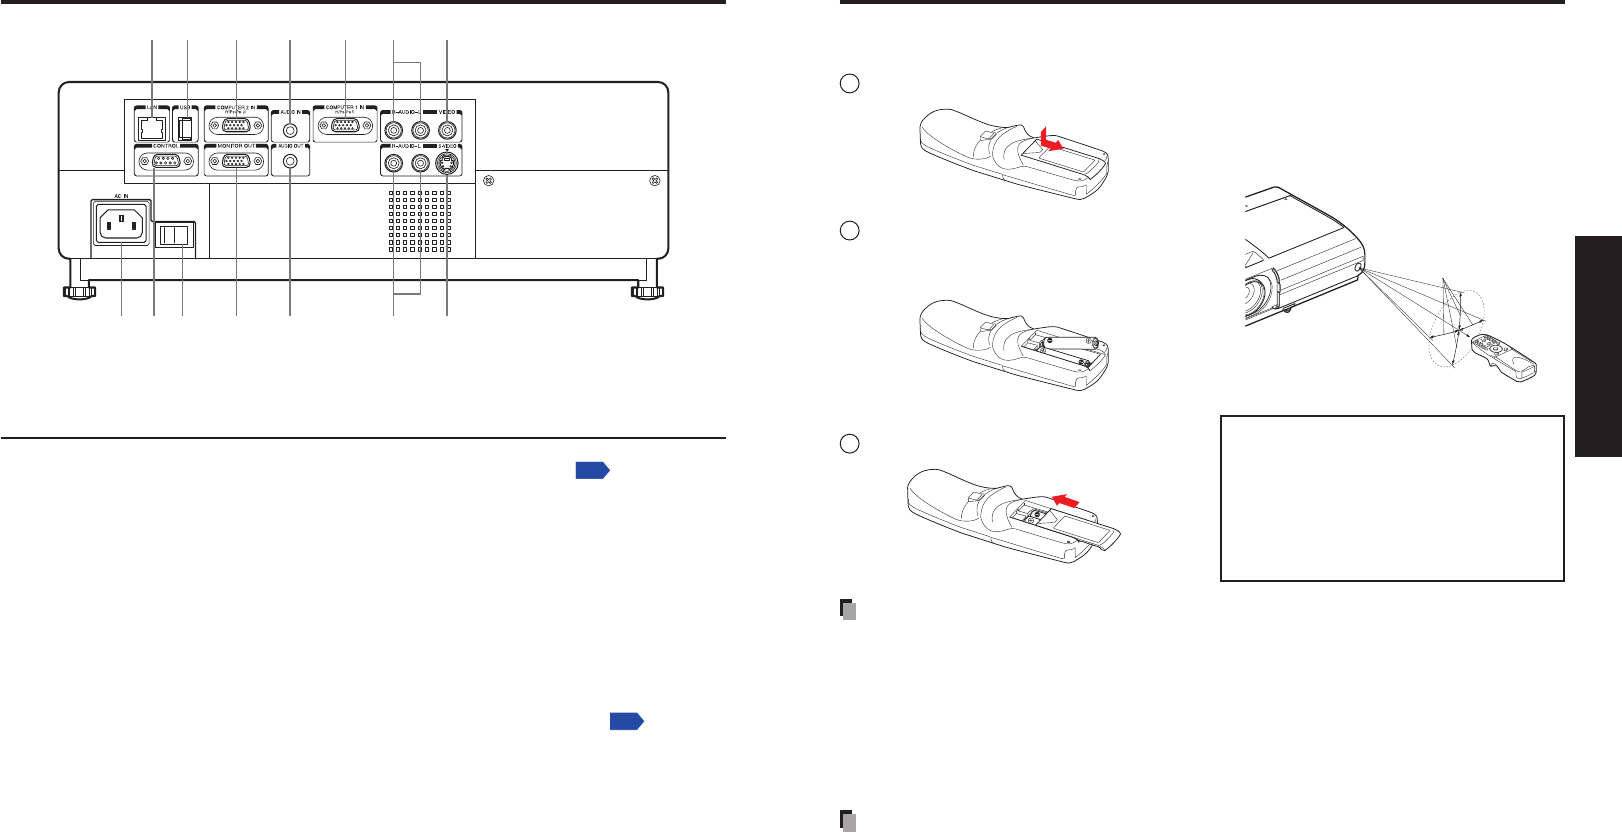
Names of the terminals on the rear panel
(
14
)(
13
)(
12
)(
11
)(8)
(7)(4)(3)(6)(5)(2)(1)
(9)(
10
)
Name:Main Function
(1)LAN terminal:Connects a network cable.
(2)USB terminal:
Connects a commercial USB memory.
p.48
(3)
COMPUTER 2 IN terminal
:
Input RGB signal from a computer or other source, or a
component video signal (Y/P
B
/P
R
) from video equipment.
(4)AUDIO IN terminal:Input audio signals from a computer, or from video
equipment with a component video signal output terminal.
(5)
COMPUTER 1 IN terminal
:
Input analog RGB signal from a computer or other source, or
a component video signal (Y/P
B
/P
R
) from video equipment.
(6)AUDIO (L/R) terminal:Input audio signals from video equipment.
(7)VIDEO terminal:Input video signals from video equipment.
(8)AC IN socket:
Connects the supplied power cord here.
(9)CONTROL terminal:
When operating the projector via a computer, connect this
to the controlling computer’s RS-232C port.
p.96
(
10
)Main power switch:AC power line ON (standby)/OFF.
(
11
)MONITOR terminal:Connect to a computer display, etc.
(
12
)AUDIO OUT terminal:Outputs audio signals.
(
13
)AUDIO (L/R) terminal:Input audio signals from video equipment.
(
14
)S-VIDEO terminal:Input S video signals from video equipment.
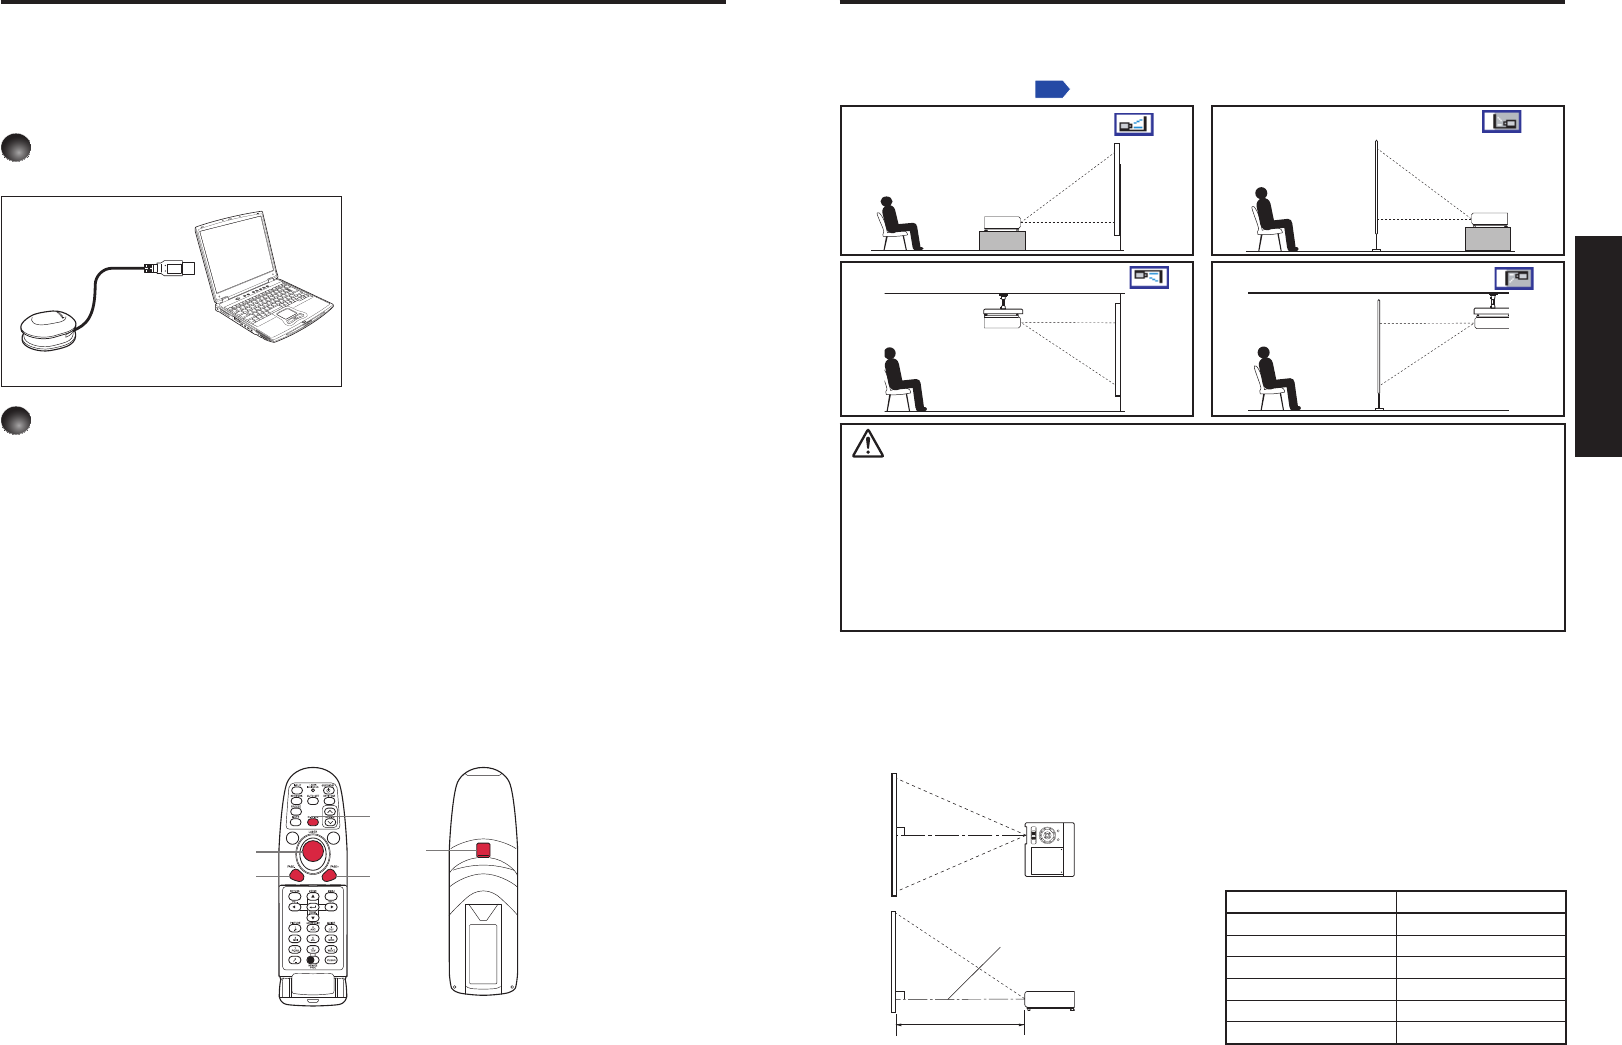
Loading dry-cell batteries
into the remote control
1
Remove the battery cover.
2
Insert the dry-cell batteries.
Be sure to align the plus and minus ends
of the batteries properly.
Two batteries (LR03, SIZE AAA) are used.
3
Replace the battery cover.
N
Operating the remote
control
Point toward the projector’s infrared
remote sensor, and press a button
on the remote control.
Operating the projector from the front
Approx. 15°
Approx. 5m
When operating the remote control
from behind the projector, the signal
beam is reflected on the projecting
surface and may travel a shorter
distance to reach the projector
depending on the shape and material
of the projecting surface.
N
•
Dry-cell batteries
Before using the batteries, be sure to observe the Safety Precautions described in
previous pages.
Remove batteries from remote control when not using for extended periods.
If the remote control stops working, or if its range decreases, replace all the batteries
with new ones.
Keep the batteries away from the reach of children.
Batteries are choking hazards and can be very dangerous if swallowed. If the batteries
are swallowed, seek medical assistance immediately.
The remote control
The remote control may fail to operate if the infrared remote sensor is exposed to bright
sunlight or fluorescent lighting.
Do not drop or bang.
Do not leave in hot or humid locations.
Do not get wet or place on top of wet objects.
Do not take apart.
In rare cases, ambient conditions could impede the operation of the remote control. If
this happens, point the remote control at the main unit again, and repeat the operation.
•
•
•
•
•
•
•
•
•
•
Preparing and using the remote control
2223
Preparations
Operating a computer using the remote control
A computer can be operated using the projector’s remote control. This function is available on
any computer with the Windows
®
98/98SE, Windows
®
Me, Windows
®
2000, Windows
®
XP, or
Windows Vista™ OS, that is equipped with a USB port which can support USB1.1 (The mouse
remote control receiver is also supported on OS 9 or OS X for the Macintosh). However,
please note that Toshiba does not guarantee the operation of all computers.
1
Connecting a computer
Connect the mouse remote control receiver (supplied) to a computer.
Mouse remote control receiver
To USB port
The remote control may fail to operate
if the mouse remote control receiver
is exposed to bright sunlight or
fluorescent lighting.
In such a case, change position or
direction of the mouse remote control
receiver and retry.
2
Operating a computer
Operate remote control’s buttons towards the mouse remote control receiver.
Moving the mouse pointer
Press the mouse control button in the direction you wish the mouse pointer to move,
then press.
To left click
Press the L-CLICK button.
To right click
Press the R-CLICK button.
To drag and drop
Holding down the L-CLICK button, move the mouse control button until the mouse
pointer is over the desired location, then release the L-CLICK button.
Using the computer’s page up [
] and down [
] function
Press the PAGE+ and PAGE- buttons to switch PowerPoint
®
slides.
Mouse control
Remote Control FrontRemote Control Rear
PAGE –
PAGE +
R-CLICK
L-CLICK
Q
Q
Q
Q
Q
Placement Styles
As shown in the figures below, this device can be placed in 4 different styles.
The factory setting is “floor-mounted front projection.” Set the [Projection mode] in the
Default setting 2 menu
p.44
, in accordance with your needs.
Floor-mounted front projection
Floor-mounted rear projection
Ceiling-mounted front projection
Ceiling-mounted rear projection
WARNING
Always obey the instructions listed in IMPORTANT SAFETY INSTRUCTIONS when
placing the unit. Attempting to clean or replace the lamp in a high location by yourself
may cause you to fall, resulting in injury.
If you wish to mount the projector on the ceiling, be sure to ask your dealer to do so.
Mounting the projector on a ceiling requires special ceiling brackets (sold separately)
and specialized knowledge. Improper mounting could cause the projector to fall,
resulting in an accident.
If the projector is ceiling-mounted, install the breaker for turning off the power in case
of anomaly. Let everyone involved with the use of the projector know that fact.
•
•
•
Projection Distance and Size
Use the figures, tables, and formulas below to determine the projection size and projection distance.
(Projection sizes are approximate values for full-size picture with no keystone adjustment.)
Placement
a is the distance (mm, feet) between the lens and the
screen, and corresponds to a range of 498 mm (1.63 ft.) to
1526 mm (5.01 ft.).
a = 0.000625 × projection size (inches)projection size (inches)(inches)inches))
2
+
12.9175 × projection size (inches) – 32.85
Projection size Projection distance a
41 inches498 mm (1.63 ft.)
50 inches615 mm (2.02 ft.)
60 inches744 mm (2.44 ft.)
80 inches1005 mm (3.30 ft.)
100 inches1265 mm (4.15 ft.)
120 inches1526 mm (5.01 ft.)
90°
a
90°
As seen from above
As seen from the side
Screen
Lens center
2425
Preparations
Connection
Before connection
Read the owner’s manual of the device you are connecting to the projector.
Some types of computer cannot be used or connected to this projector.
Check for an RGB output terminal, supported signal
p.94
, etc.
Turn off the power of both devices before connecting.
The figure is a sample connection. This does not mean that all of these devices can or
must be connected simultaneously. (Dotted lines mean items can be exchanged.)
p.96
•
•
•
•
Notes
The COMPUTER 1 IN terminal functions identically to the COMPUTER 2 IN terminal.
The MONITOR OUT terminal outputs signals from the COMPUTER 1 IN terminal or
the COMPUTER 2 IN terminal, or outputs Y/P
B/PR signals as selected with the INPUT
button. If no input is selected, the MONITOR OUT terminal outputs the input signals last
selected for each input terminal.
Signals are output from MONITOR OUT terminal even in standby mode.
However, from AUDIO OUT terminal, no audio signal is output.
A computer monitor cannot accept Y/P
B/PR signals correctly.
The AUDIO IN terminal doubles for devices connected to COMPUTER terminals 1 and 2.
When an AUDIO OUT terminal is connected, sound is not output from the projector
speaker.
Output volume of AUDIO OUT terminal can be adjusted by the VOL button.
Moving pictures played back on computers using DVD software may appear unnatural if
it is projected with this projector, but it is not a malfunction.
•
•
•
•
•
•
•
•
Audio amplifier, etc.DVD video recorder, etc.
Video recorder, etc.
Video recorder,
DVD player, etc.
Conversion adapter
BNC-pin (not supplied)
Monitor cable
Mini D-sub
15P-BNC
(not supplied)
To audio input
White (L)/Red (R)
To audio
output
White (L)/
Red (R)
AV cable
(not supplied)
S-video cable
(not supplied)
To S-video
output
To video
output
Computer
(for control)
Computer
To
RS-232C
terminal
Audio cable
(not supplied)
To audio
output
Control cable
RGB cable
(supplied)
To RGB
output
Computer
Audio cable
(not supplied)
Audio cable
(not supplied)
To audio
output
To Y/C
B
/C
R
output
Green (Y)/Blue
(C
B
)/Red (C
R
)
To audio
output
White (L)/
Red (R)
Audio cable
(not supplied)
To audio
output
RGB cable
(not supplied)
To RGB
output
Audio cable
(not supplied)
2627
Operations
Connecting the power cord
1
Insert the power cord connector
into the AC IN socket of the
projector.
2
Insert the power cord plug into a
wall or other power outlet.
Turning the power on
1
Open the lens cover.
Slide the lens cover to open. If it is left closed, the power will not be turned on.
2
Turn on the main power switch.
The ON/STANDBY indicator will change to orange,
indicating standby mode.
3
Press the ON/STANDBY button.
The power is turned on, and the ON/STANDBY
indicator lights in green. After a moment, the start-up
screen appears.
CAUTION
Do not look into the lens while the lamp is on. The strong light from the lamp may cause
damage to your eyesight.
Do not block the air intake or exhaust. Doing so could cause a fire due to internal overheating.
Do not place your hands, face, or other objects near the air exhaust, the lamp cover or
the bottom of the unit. Doing so could cause burns, deform/break the object.
•
•
•
N
N
Turning the power on and off
Operations
Notes
The start-up screen will disappear after a moment. You can dismiss the start-up screen
before this by performing any operation. You can also configure the start-up screen not
to appear via the Display setting menu
p.40
.
The first time you use the projector after purchase, after the start-up screen disappears,
the start menu is displayed
p.28
.
When [Key lock] is [On], the operation buttons of the projector do not work
p.45
.
When [Password] is [On], enter password then the start-up screen is displayed after the
Password entry screen disappears
p.35
.
Do not touch the lens directly with your hand.
If fingerprints or stains are left on the projection lens surface, they may interfere with the
projector’s ability to project images on the screen.
If the lens cover is closed while in use, after a moment the power will turn off, then the
projector goes into standby mode.
Turning the power off
1
Press the ON/STANDBY button.
A message appears on the screen, confirming that you wish to shut off the power. This
message will disappear after a moment. (This operation is no longer valid after the
message disappears.)
2
Press the ON/STANDBY button again.
When the setting of beep sound is [On], the projector beeps, and the screen
disappears, but the internal cooling fan continues to operate. Then, the projector goes
into standby mode.
During cooling, the ON/STANDBY indicator flashes. While the
indicator is flashing, the power can not be turned back on. At this
point of time, it does not matter even if you unplug the power cord.
3
Close the lens cover.
After use, close the lens cover.
Note
The projector consumes about 10W of power in standby. We recommend that you
unplug the power cord if you will not be using the projector for an extended period.
Precaution
If the power cord is unplugged before cooling is complete or the main power is turned
off, give the lamp time (about 5 minutes) to cool before plugging it back in. If the lamp
overheats, it may fail to light.
•
•
•
•
•
•
N
•
•
Power cord connector
(Supplied)
Control panel
Remote
control
2829
Operations
Basic operations
1
Turn on the power.
Turn on the power by following the instructions in “Turning the power on”
p.26
.
2
Select the language and the lamp power (When using the
first time).
When the projector is used for the first time after purchase, the start menu for language
(to display the menus and messages on the screen) and lamp power selection and
configuration is displayed in English. (If the screen is out of focus, adjust it according to
the step
6
.)
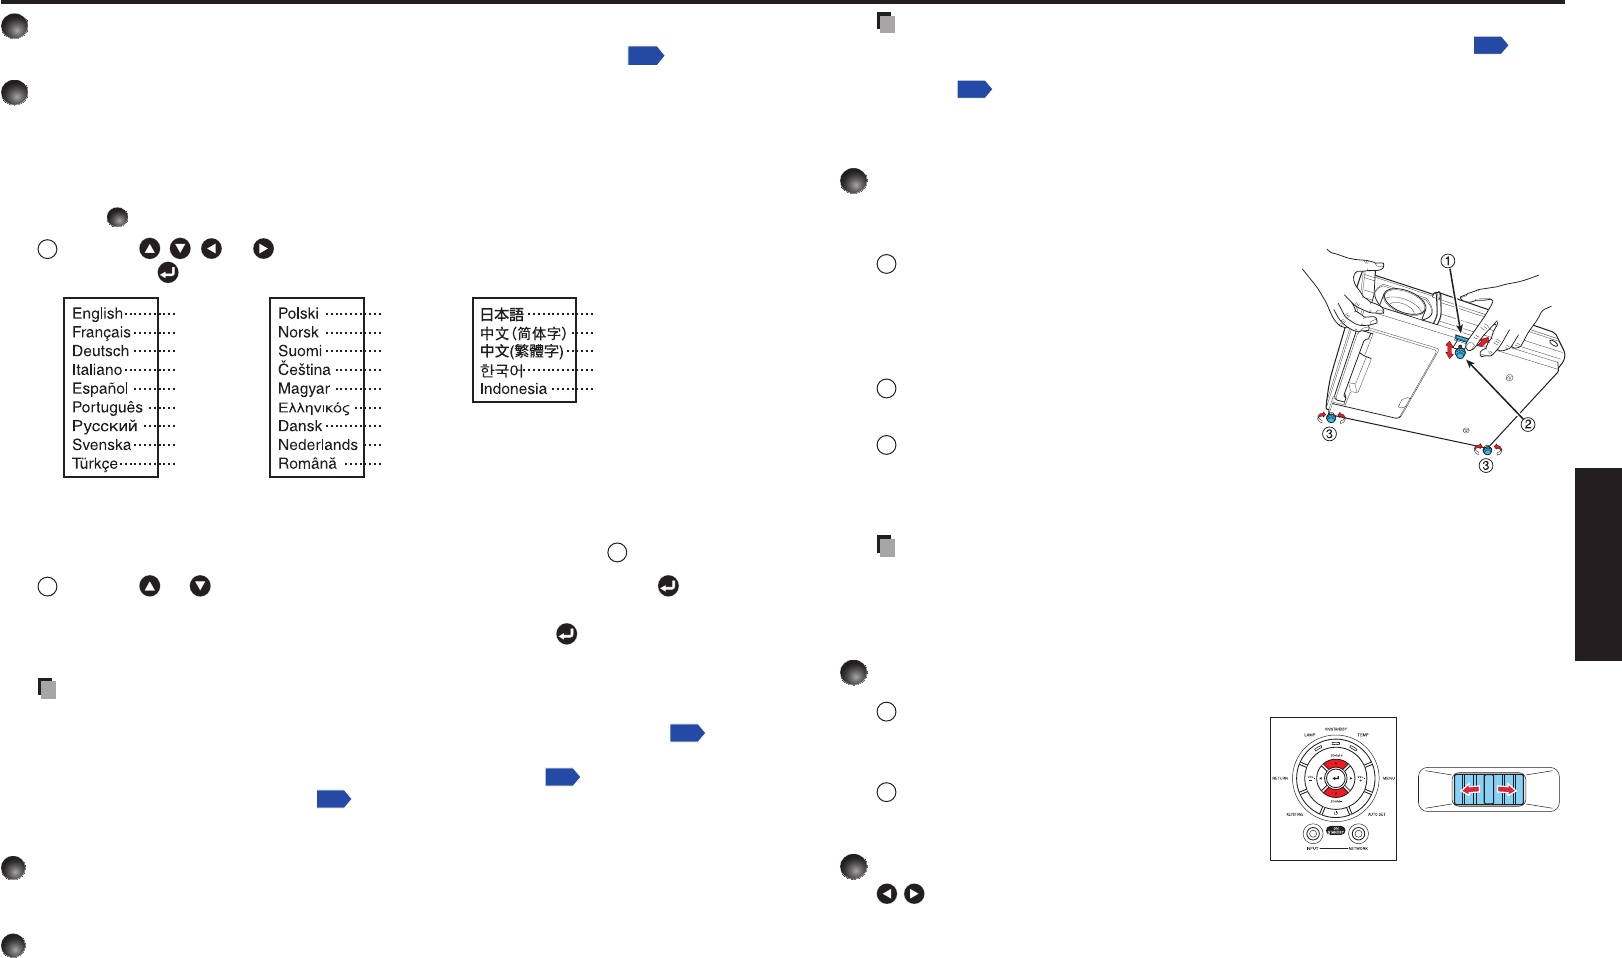
1
Use the
,
, or button to select the desired language and
press the
button.
English
French
German
Italian
Spanish
Portuguese
Russian
Swedish
Turkish
Polish
Norwegian
Finnish
Czech
Hungarian
Greek
Danish
Dutch
Rumanian
Japanese
Chinese (simplified)
Chinese (traditional)
Korean
Indonesian
Message for setup confirmation is displayed in a selected language.
Then, the menu for lamp power selection and configuration is displayed. It is
automatically set as Standard. To change the setting, follow the step
2
.
2
Use the
or button to select the lamp power and press the
button.
The lamp power, if selected, will be toggled without pressing the
button. The display
automatically disappears in a few seconds.
Notes
When the projector is turned on the next time, the start menu does not appear upon
startup. However, if [Reset all] is executed from the Default setting 2 menu
p.44
,
the start menu will be displayed the next time when the power is turned on.
The language can also be set via the Display setting menu
p.40
and Lamp power
via the Default setting 2 menu
p.44
.
This owner’s manual assumes that English has been selected.
3
Activate the connected device.
Turn on and start the connected device such as a computer.
4
Press the INPUT button.
An image of the connected equipment is projected.
Each time you press the INPUT button, it switches to the input of the connected
equipment that is outputting video signals.
•
•
•
Notes
When [Auto input search] is set to [Off] in the Default setting 1 menu
p.43
(factory setting is [On]), the Input select menu appears if you press the INPUT
button
p.43
.
If no signal is being output from the connected equipment, pressing the INPUT
button does not change the input and “There is no other input signal.” will appear.
5
Projector placement angle adjustments
The placement angle and the height of the projected image can be adjusted by the
foot adjuster.
1
Lift up the front of the projector to
the desired angle, then press the foot
adjuster release button.
The foot adjuster extends. Release the button
to lock the position.
2
To fine adjust the angle, twist the foot
adjuster.
3
To adjust the horizontal angle, use the
right and left tilt adjusters.
To stow the foot adjuster, hold up the projector while pressing the foot adjuster
release button, then slowly lower the projector.
Note
When [Auto keystone] is set to [On] in the Default setting 1 menu, the keystone
distortion will automatically be corrected based on the projector placement angle. If
you do not desire the automatic keystone correction, set [Auto keystone] to [Off].
6
Adjusting the screen size and focus
1
If you wish to make the screen size
smaller, use the ZOOM button to
adjust the screen size.
2
Use the focusing lever to adjust the
focus.
7
Adjusting the volume with the
buttons
The speaker volume can be adjusted when an audio signal is being input.
•
•
•
•
Focusing leverControl panel
3031
Operations
Notes
Note that lamp characteristics may rarely cause the brightness to fluctuate slightly.
A lamp is consumable item. If used for extended periods, images will appear dark, and
the lamp could burn out. This is characteristic of a lamp, and is not malfunction. (The
lifetime of the lamp depends on conditions of use.)
The DLP
®
chip is made using extremely advanced technology, but there may be black
spots (pixels that do not light) or bright spots (pixels that are constantly lit) on the panel.
Please note that these are not malfunctions.
Although this projector supports a wide range of RGB signals
p.94
, any resolutions not
supported by this projector (WXGA) will be expanded or shrunk, which will affect image
quality slightly. To view high-quality images, it is recommended that the computer’s
external output should be set to WXGA resolution.
With some models of computer having LCD displays or the like, displaying images
simultaneously on the projector and the monitor’s display may prevent the images from
displaying properly. If this happens, turn off the computer’s LCD display. For information
on how to turn off the LCD display, see the owner’s manual of your computer.
If no signal is being input from the connected equipment or signal input is stopped while
projecting, the “No signal” will appear.
If a signal not supported by the projector is input, the “Unsupport signal” will appear.
If an unavailable operation button is pressed, the
icon will appear.
•
•
•
•
•
•
•
•
Basic operations (Continued)
Using handy features
Using auto setting (Only for input from computer)
This function automatically adjusts the projector settings such as
sampling phase, frequency, screen position, and clamp pulse for each
type of the input signal by using simple operations.
Press the remote control’s AUTO SET button.
For computer input, the icon will appear during processing.
Notes
The image may not be projected or auto adjustment/setting may
not be performed correctly for input signals other than those
supported by the projector
p.94
,
p.95
.
If auto setting fails adjustment, adjust manually with [Position] in the Position
adjustment menu
p.39
.
Correcting the keystone distortion
When the projector placement angle against the screen
is changed while projecting the image, the picture will
undergo keystone (trapezoidal) distortion.
This projector is capable of correcting this keystone
distortion.
Before correction
After correction
The keystone distortion will be corrected automatically based on the projector’s
placement angle.
Adjusting Keystone distortion [Manual]
1
Press the KEYSTONE button.
2
Use the buttons for keystone adjustment.
Notes
Depending on the amount of keystone adjustment and the content of images, some
information may be lost, or the picture quality may suffer.
Even if [Auto keystone] is set to [On], keystone distortion can be adjusted
manually. Note that if you change the position or angle of the projector, automatic
keystone correction will be performed again.
When [Auto keystone] is set to [On], the automatic keystone correction will be
performed each time the power is turned on.
The keystone correction settings are memorized after the power has been turned off.
Therefore, it is recommended that you set [Auto keystone] to [Off], if the case is that
the projector placement angle against the screen remains unchanged and you do not
wish to change the keystone adjustment that you set.
Some adjustments using both digital zoom and keystone correction while displaying
an input image with a 16:9 aspect ratio, may affect displaying the menu properly. In
such a case, reset either digital zoom or keystone correction to use the menu.
N
•
•
N
•
•
•
•
•
•
Remote
control
Control panel
Remote
control
3233
Operations
Resizing image
The projected image can be resized (zoomed in/out).
1
Press the remote control’s RESIZE button.
Each time you press the RESIZE button, zoom ratio is up. You can keep
pressing.
2
To zoom out, press the remote control’s RESIZE
button.
Each time you press the RESIZE button, zoom ratio is
down. You can keep pressing.
(However, the image cannot be smaller than the original
size.)
3
To move the area to zoom in, use the
buttons.
You can keep pressing.
4
When the image returns to the original size by pressing RESIZE
button several times, the zoom will be reset.
Pressing the RETURN button during resizing also resets the zoom.
Notes
The icon appears while resizing.
Operating a function other than Mute will release resizing.
As zooming is processed digitally, the image quality is degraded in larger zoom
ratio.
During resizing or moving the zooming area, the image may be distorted.
N
•
•
•
•
Zooming out the images
This projector is provided with the digital zoom (electric zoom: 100 - 62%). (Note that the
display, if digitally zoomed out, may suffer from some degradation.)
1
Press the ZOOM – button.
Each time the ZOOM – button is pressed, the
image is reduced in size.
2
Press ZOOM + button to bring it back
to the original size.
Each time the ZOOM + button is pressed, the
image size increases.
(You cannot make it larger than the original
size.)
Notes
Pressing either ZOOM – or ZOOM + button will display an adjustment bar.
The adjustment value will automatically be saved.
N
•
•
Using handy features (Continued)
Remote
control
Control panel
Remote
control
3435
Operations
Using handy features (Continued)
Cutting off the picture and sound temporarily (Mute)
When you want to project the images of another projector, overhead
projector, etc. temporarily, this projector’s images and sound can be
turned off.
Press the remote control’s MUTE button.
The picture and sound are cut off. (The Mute function is released
when pressing the MUTE button again.)
Notes
The icon will appear while mute is in effect.
Operating any other functions will also cancel the muting.
Precaution
Do not close the lens cover to cut off the projected image temporarily. It may cause
the lens cover to deform due to the heat.
Changing picture mode
The projected image mode can be selected.
Press the remote control’s PICTURE button.
Pressing the button switches Bright/Standard/True color in turn.
Note
[Picture mode] of the Image adjustment menu has the same
function
p.38
.
Changing screen size
The screen size for the projected image can be changed.
Press the remote control’s SCREEN SIZE button.
Pressing the button switches Normal/Full/Thru/4:3 zoom in turn.
Notes
Thru display is available for Computer and Network-input images.
4:3 zoom display is available for Y/P
B/PR, Video and S-video-input
images.
[Screen size] of the Display setting menu has the same function
p.40
.
If you use this function on commercial video software, broadcast
or cable-broadcasting except for the purpose of your private
viewing and listening, it may infringe the copyright protected by the
copyright laws.
N
•
•
•
N
•
N
•
•
•
•
Freezing the image (Freeze)
The image being projected can be frozen. This function is to be used to
pause a video during a presentation, etc.
Press the remote control’s FREEZE button.
The picture pauses. (The Freeze function is released when pressing
the FREEZE button again.)
Notes
The icon will appear while freeze is in effect.
Other operation will also release the freeze.
Even if an image is frozen on the projector, the pictures are running
on the video or other equipment.
If you use this function on commercial video software, broadcast
or cable-broadcasting except for the purpose of your private
viewing and listening, it may infringe the copyright protected by the
copyright laws.
Setting the password
How to change password
The default password is 000000.
1
Select [Password] in the Default setting 2 menu and press the or
button.
2
Select [Password registration] in the password registration, setting
menu, and press the
button.
The password entry screen is displayed.
3
Enter the current password (6-digit number).
Enter a 6-digit number for the password using numeric keys of the remote control.
Enter [000000] (6 zeros) for the first change.
The password is not displayed. Instead it appears as [******].
4
Enter a new password (6-digit number).
5
Re-enter the same password for confirmation.
Note
Please do not forget your password. If you forget the password, you can not
release the password by yourself.
In such a case, please inquire your dealer.
•
N
•
•
•
•
N
•
•
•
Remote
control
Remote
control
Remote
control
Remote
control
3637
Operations
How to set password (from [Off] to [On])
1
Select [Password] in the Default setting 2 menu and press the or
button.
2
Select [Password setting] in the password registration, setting menu,
and press the
or
button.
3
Select [On].
4
Select [OK] and press the
button.
The password entry screen is displayed.
5
Enter the password using numeric keys of the remote control.
6
The password setting will be set as [On].
How to operate when password is [On]
1
Turn on the power.
2
The lamp lights and the password entry screen appears.
3
Enter the password using numeric keys of the remote control.
If the entered password is correct, the start-up screen appears and the projector
goes into normal operation. If the password is wrong, a message appears to prompt
you to re-enter the password, and again the password entry screen is displayed. If
you enter a wrong password for more than 5 times, the projector will automatically
power off and enter standby mode.
Note
When the password setting is [On], the password will be enabled only when the
power is turned on for the first time after the main power switch has been on.
The password function will not be activated if the power backed on while it is
standby mode without turning off the main power switch.
How to set password (from [On] to [Off])
1
Select [Password] in the Default setting 2 menu and press the or
button.
The password entry screen is displayed.
2
Enter the password using numeric keys of the remote control.
3
Select [Password setting] in the password registration, setting menu,
and press the
or
button.
4
Select [OFF].
5
Select [OK] and press the
button.
•
Using handy features (Continued)
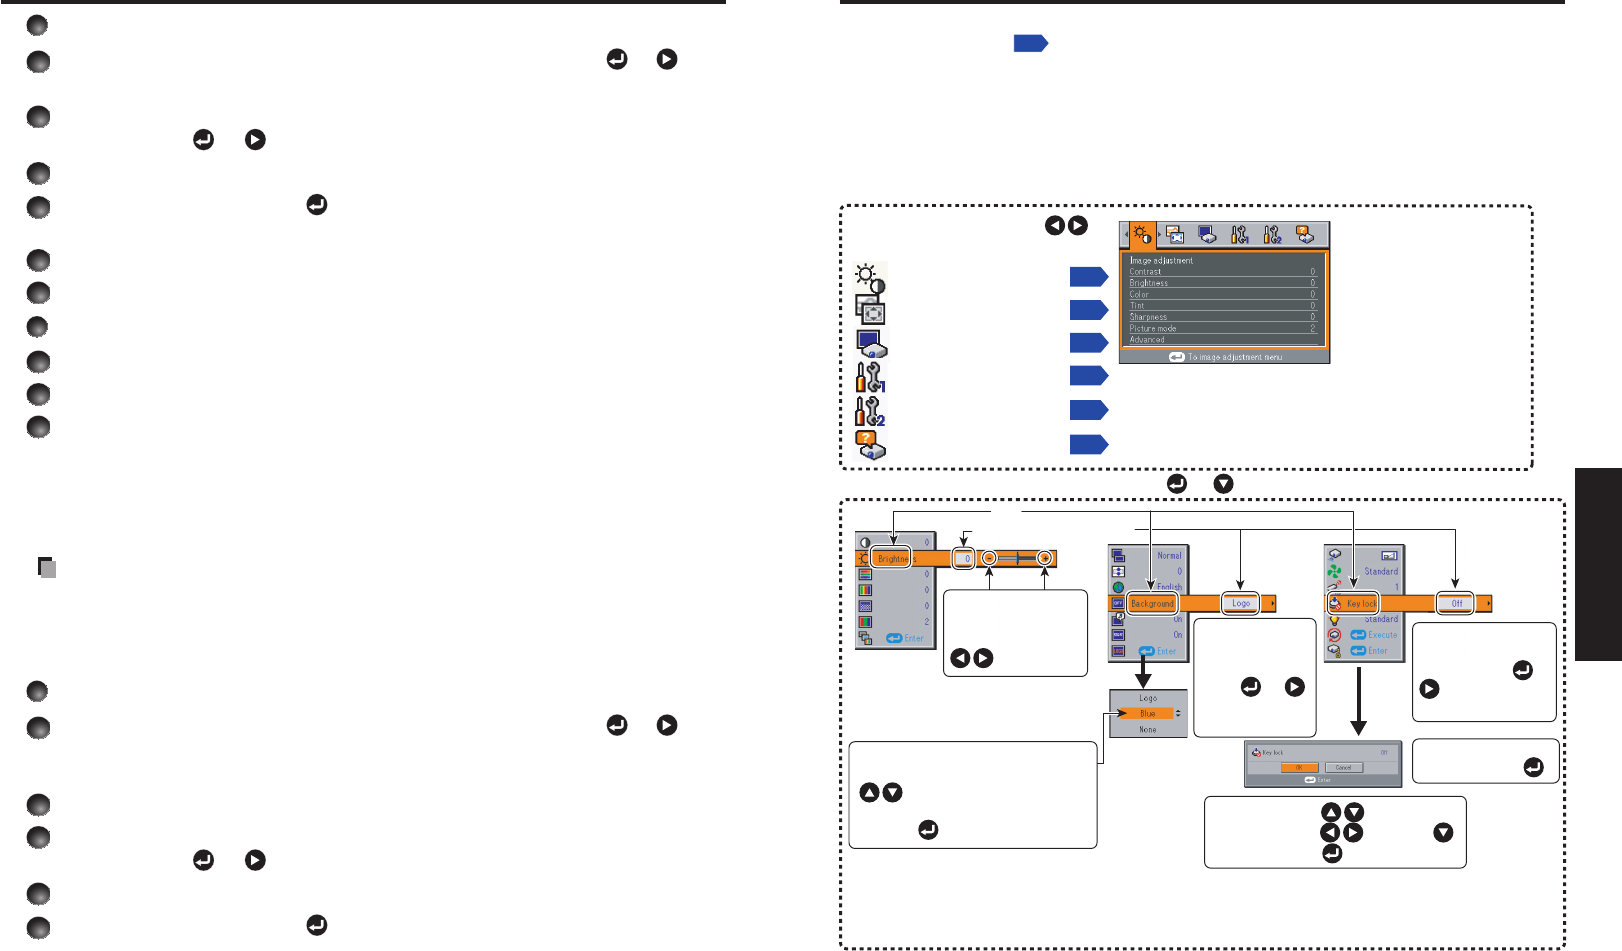
Using the menus 1
You can call up on-screen menus, and conduct a number of adjustments and settings using
the operation buttons
p.18
on the control panel (main unit side) and remote control.
Setup using the Setting display
The menu shown below is for operation instructions purposes and might differ from the
actual display.
Toggle items with .
Select items with and press .
Fix selection with .
Display the Setting display menu.
1. Press the MENU button
2. Select a Category
3. Adjustments & Settings
• The figure shows displays given for operation instructions purposes. As the display may differ depending on the item,
use the following pages as a reference.
• To return to previous item, press the RETURN button.
• When Network or USB memory input is selected, pressing the MENU button displays the Setting display (2) menu.
Item
Adjustment/Setting Value
These marks signify
the items can be
adjusted/set by using
.
These marks signify the items can
be selected from the list by using
.
After an item is selected, apply it by
pressing .
Press or to open the menu.
These marks
signify that there
are options.
Press or
to display a list of
options.
* When no item is
changed, press .
4. End Press the MENU button once more.
(The menu will disappear automatically after 30 seconds, if no operation is conducted.)
Select a category by using
.
There are following 6 categories:
Displays the current
adjustments and
settings of selected
category.
Item shown with gray
cannot be adjusted with
the current input source.
p.38
Image adjustment menu
p.39
Position adjustment menu
p.40
Display setting menu
Default setting 1 menu
p.43
Default setting 2 menu
p.44
Status display menu
p.45
These marks signify
that there are setting
screens. Press or
to display a list of
setting screens.
N
3839
Operations
The image adjustment menu
Use this menu to set or adjust image-related items. Items that can be set or adjusted
are marked with “Yes”, and those that cannot are marked with “No”. (When an item is
masked, it indicates that you cannot select for the current input.)
Item Description
Computer
Y/PB/PR
Video
S-video
Network
USB
memory
Contrast
Adjust the image contrast.
Lower
Higher
Ye sYesYe sYe sYe sYe s
Brightness
Adjust the brightness of the image.
Darker
Brighter
Ye sYesYe sYe sYe sYe s
Color
Adjust the color of the image.
Lighter
Deeper
NoYesYesYesNoNo
Tint
*1
Adjust the tint of the image color.
Reddish
Greenish
NoNoYesYesNoNo
Sharpness
Adjust the sharpness of the image.
Softer
Sharper
NoYesYesYesNoNo
Picture mode
Press . Toggle the picture mode
with
.
Bright/Standard/True color
Ye sYesYe sYe sYe sYe s
Advanced
adjustment
Press
to enter the
advanced
adjustment
Noise
reduction
*2
Adjust the screen noise reduction
level.
Softer
Stronger
Ye sYesYe sYe sYe sYe s
R-level
Adjust red of the image color.
Less red
More red
Ye sYesYe sYe sYe sYe s
G-level
Adjust green of the image color.
Less green
More green
Ye sYesYe sYe sYe sYe s
B-level
Adjust blue of the image color.
Less blue
More blue
Ye sYesYe sYe sYe sYe s
NTSC
mode
*3
Set the black level with .
US : NTSC (US) mode
JAPAN : NTSC (JAPAN) mode
NoNoYesYesNoNo
*1: [Tint] can be displayed and adjusted only when the video signal is set to [NTSC] or [NTSC4.43].
*2:[2:[: [Noise reduction] may not work depending on signal type.
*3: [NTSC mode] can be displayed and adjusted only when the video signal is set to [NTSC] or
[NTSC4.43]. NTSC mode is set to JAPAN when the language is set to Japanese. It is set to US for
other languages.
N
Using the menus 1 (Continued)
The position adjustment menu
Use this menu to set or adjust position-related items. Items that can be set or adjusted
are marked with “Yes”, and those that cannot are marked with “No”. (When an item is
masked, it indicates that you cannot select for the current input.)
Item Description
Computer
Y/PB/PR
Video
S-video
Network
USB
memory
Phase
Adjust to eliminate flicker with
YesNoNoNoNoNo
Frequency
Adjust with
to eliminate periodic
patterns and flickering when fine vertical
lines appear on the screen.
YesNoNoNoNoNo
H-positionAdjust the horizontal position of the
image.
Move left
Move right
YesNoNoNoNoNo
V-positionAdjust the vertical position of the image.
Move down
Move up
YesNoNoNoNoNo
Clamp pulse 1Adjust the clamp pulse position.
Lower
Higher
YesNoNoNoNoNo
Clamp pulse 2Adjust the clamp pulse width.
Narrower
Wider
YesNoNoNoNoNo
N
4041
Operations
Using the menus 1 (Continued)
The display setting menu
Use this menu to set screen display-related items.
(The items in gray color cannot be set with the current input selection.)
Item
Description
Screen sizeScreen size setting
[
or : Enter setting]
[
:Selection]
[Enter:
]
Normal/Full/Thru/4:3 zoom
Up/down
shift
Lets the projected images shift vertically when the screen size setting is 4:3 zoom
display (within the range of 1280 × 800).
Lower the image
Raise the image
LanguageSelect one of the languages below to use for displaying the menu and messages
[
or : Enter setting]
[
:Selection]
[Enter:
]
/ / / / / / / /
/ / / / / / / /
/ / / / / / Indonesia
BackgroundScreen to display when there is no input signal
[
or : Enter setting]
[
:Selection]
[Enter:
]
Logo/Blue/None
IconDisplay icons as function guides On Off
Start-up
screen
Display start-up screen when power is turned on On Off
User logoDisplay a logo customized by the user for the start-up screen or when there is no
input signal.
[
or : Enter setting]
[
: Selection]
Logo registration Press to display the registration menu.
Display style
Logo confirmation Press .
Reset logoYes No
N
Detailed description
[Screen size]
Normal :Enlarge an input image to fit the screen without changing the aspect
ratio of video signals.
Full :Displays an input image in 1280 × 800 dot resolution by enlarging it
to fill the entire screen.
Thru :Displays an input image in the native resolution of the video signals.
Thru display is not available for Y/P
B/PR, Video and S-Video-input
images.
The larger image than the screen size will be displayed over the
screen. The input image may appear vertically long with some
frequencies of video signals.
4:3 zoom :Displays an input image with a 4:3 aspect ratio by enlarging it
vertically. The enlarged image will be displayed over the screen. 4:3
zoom display is not available for Computer and Network-input images.
For Y/P
B/PR input, screen size setting function is not available for the video signals
with a 16:9 aspect ratio.
For the Network-input images, the size can be set only when the image is
displayed. The size setting is not available when the projector is connected to your
computer using the Network Projector (Windows Vista™) function. It may fail to
display the image to fill the entire screen with some input image sizes.
For the USB memory-input images, the size cannot be set.
Note
If you use the screen size setting function on commercial video software,
broadcast or cable-broadcasting programs to display images with the varying
aspect ratio except for the purpose of your private viewing and listening, it may
infringe the copyright protected by the copyright laws.
[Up/down shift]
Shifts the projected image vertically when [Screen size] is [4:3 zoom].
[Background]
TOSHIBA is set for [Logo] by factory setting.
If user’s logo has been registered, it is displayed when [Logo] is set for
background.
[Start-up screen]
If user’s logo has been registered and this setting is [On], the logo is displayed at
start-up.
[User logo]
Registers a part of the image that is input from computer, as a stationary picture and
displays it as a logo at start-up and when no signal is input.
•
•
•
•
•
•
•
•
•
•
4243
Operations
<Logo registration>
How to register user logo
1
Project a picture to register.
2
Select [User logo] in the Display setting menu, and press the oror
button.
3
Select <Logo registration> from the displayed menu list and press
the button.button.
4
The registration area is displayed for confirmation. Select [OK]
and press the button.button.
If the registered picture does not fall within the display area, operate the
computer to scroll the screen.
5
Registration starts.
To stop the registration, press the RETURN button.
Notes
You can register a logo when the input is set to Computer, Network and USB
memory.
For the Network-input, a logo can be registered only when the image is displayed.
For the USB memory-input, a logo cannot be registered when a thumbnail list is
displayed.
If you register a logo after keystone distortion or digital zoom has been adjusted,
those adjustments will be reset to their factory settings. However, when the logo
registration is complete, they will return to the adjustments that you made.
The area that can be registered is 640 × 400 dots at the center of the screen. To
register a company logo, prepare the image within the limit.
Only one logo can be registered. When a new image is registered, the old one is
erased.
The time needed to register or display the image varies depending on the data size.
If you use this function on commercial video software, broadcast or cable-
broadcasting except for the purpose of your private viewing and listening, it may
infringe the copyright protected by the copyright laws.
<Display style>
Select the size of the registered logo.
: Displays the registered image in original size at center of the screen.
: Displays the registered image by enlarging fully in the screen.
(As processed digitally, the image quality is degraded.)
<Logo confirmation>
You can preview the registered logo.
<Reset logo>
You can reset the registered logo and display style to the factory setting. (The logo
set for the start-up screen and background is reset.)
•
•
•
•
•
•
•
•
•
•
Using the menus 1 (Continued)
The Default setting menu
This menu shows placement status and other settings.
Default setting 1 menu
Item
Description
KeystoneScreen shrinking at bottom
Screen shrinking at top
Auto keystoneAlways correct keystone distortion automatically. On Off
Blackboard
mode
When projecting on a non-screen surface, select a color in accordance with
the projecting surface.
Press
and switch with and . Off/Green/Black/Brown/Blue/Beige
No signal
power off
Set the time to wait for the power to be turned off after the last operation is
made with no input signal. On (not turned off)
30 min.
Auto input
search
Set whether the input with signals is only selected or not. On Off
BeepBeep when operation is made. On Off
Power onSets whether to turn on the power when the ON/STANDBY button is pressed
(Manual), or when the main power switch is turned on (Auto).
Manual
Auto
Detailed description
[Blackboard mode]
Projects the image in colors more like projecting on a screen.
Precaution
The projected image may differ depending on the type, color, and material of the
blackboard and wall even if the selected color is the same as the projected screen.
[Auto input search]
[On]: Automatically searches the signals that can
be projected, and switches input from the
connected device that outputs the video
signals each time the INPUT button is
pressed. The input from the connected device
that outputs no video signals is skipped.
[Off]: Displays the Input select menu.
Toggle with
buttons and press
button.
(The input without signals can be selected.)
[Power on]
Note that if [Power on] is set to [Auto], then if the power is supplied when restored
after a power outage, the projector will come on.
N
•
Computer 1
Y/PB/PR 1
Computer 2
Y/PB/PR 2
Video
S-video
Network
USB memory
Input select
/shows whether signal is
input or not.
Input select menu
4445
Operations
Using the menus 1 (Continued)
Default setting 2 menu
Item
Description
Projection
mode
Sets projection mode in accordance with Placement Style.
p.23
(Standard)
(Rear)
(Ceiling)
(Rear ceiling)
Fan modeSets the cooling fan speed. Standard
High
Remote controlWhen 2 projectors are used and controlled by the remote control respectively,
this menu sets the code for the projector and the remote control.
[
or : Enter setting] [
: Select from 1, 2
] [: Confirm]
[
:Select OK to end
]
Press [Cancel] to return.
Key lockLock the control panel buttons.
[
or : Enter setting] [
: Select On/Off
] [: Confirm]
[
:Select OK to end
]
Press [Cancel] to return.
Lamp power
Set the lamp power. Low
Standard
Reset all
Press
. (The password and user logo are not reset.)
Resets all adjustments and settings to their factory settings. Yes
No
Password
Password setting
p.35
Press . Password registration/Password setting
Detailed description
[Fan mode]
Setting [Fan mode] to [High] increases the cooling fan speed. (The cooling fan noise
gets louder.) Set this option to use the projector, for example, at high altitude (over 1,500
meters above sea level).
Do not set Fan mode to [High] when using the projector at a lower altitude.
[Remote control]
Sets a remote control code from 2 types. You can set each code respectively for up to
2 projectors. The factory setting is [1].
To switch codes, set the same code for the projector and the remote control.
A remote control code is applied after the setting is done.
You cannot operate the remote control if the codes of the projector and the remote
control do not match.
Remote control code setting for remote control
Set the same remote control code switch as the projector.
p.18
p.19
•
•
[Key lock]
Protect from operating errors by locking on the control panel buttons of the projector.
(The remote control operations are available.)
Control panel operations are locked after the setting is done, and accordingly operation
with the control panel buttons is disabled.
To release the key lock, set the [Key lock] to [Off] using remote control. Pressing
the [RETURN] button on the projector for 10 seconds also sets the [Key lock] to [Off].
(When operating the main unit, the 2 indicators of LAMP and TEMP light in orange
for 3 seconds, and at the same time the projector beeps.) However, when Network
or USB memory input is selected, the [Key lock] cannot be set to [Off] with the
[RETURN] button on the projector.
[Lamp power]
When [Lamp power] is set to [Low], the screen becomes a little darker, but the cooling
fan noise gets quieter.
Displaying Information (Status display)
This displays information about the input signal, lamp use time, etc.
“Yes”: displayed, “No”: not displayed
ItemDescriptionComputer
Y/PB/PR
VideoS-video
Network
USB
memory
InputInput source nameYesYesYesYesYesYes
Mode nameRGB input mode
[Note 1]
YesNoNoNoNoNo
ResolutionResolution (in dots)YesNoNoNoNoNo
FrequencySync frequencyYesNoNoNoNoNo
SyncSync signal polarity
[Note 2]
YesNoNoNoNoNo
Signal formatY/P
B/PR signal formatNoYesNoNoNoNo
Video modeColor method of video signalNoNoYesYesNoNo
Lamp timeTime of lamp use
[Note 3]
Ye sYe sYe sYe sYe sYe s
Lamp reset countThe count for lamp replacementYesYesYesYesYesYes
Total time
The total time that this projector is
used.
Ye sYe sYe sYe sYe sYe s
VersionFirmware version
[Note 4]
Ye sYe sYe sYe sYe sYe s
Notes
1: The mode of supported RGB signals
p.94
is shown.
2: Sync signal polarity shown as P (positive) or N (negative) for [H/V].
3: Displays [Lamp time] as a measure of when the lamp should be replaced. (Cannot
be used as a counter of guaranteed lamp time.) When the displayed time approaches
2,000 hours, consult with a dealer about getting replacement for:
TLPLW15 for TDP-EW25 (sold separately).
4: [Version] shows the version of the projector’s internal control program. This version
is referred to for customer service, etc.
Note
The displayed information will not be refreshed if the status changes. To refresh the
information, dismiss the display, then display it again.
•
N
•
4647
Operations
Before connecting via network
Check the OS of your computer before you connect a projector with your computer via
network. This projector supports the Network Projector function of Windows Vista™
features.
If your computer’s OS is Windows Vista™ and you intend to use the Network Projector
function for network connection, see “Connection using the Network Projector (Windows
Vista™)”
p.46
, “Setting up the Network Projector/Network Utility”
p.51
and “Using the
Network Projector”
p.61
.
If your computer’s OS is Windows
®
2000 or Windows
®
XP, see “Connection using the
NetworkUtility (Toshiba original tool)
”
p.46
, “Setting up the Network Projector/Network
Utility
”
p.51
and “Using the Network Utility
”
p.64
.
Connection using the Network Projector (Windows Vista™)*
* Now referred to as “Network Projector.”
Functions
By using the Connect to a Network Projector wizard, you can connect to any available
Windows-compatible network projector over a wireless or a wired network.
You can make a presentation without any troubles of connection settings.
Notes
This function’s operation has been verified on the Ultimate and Business editions
of Windows Vista™.
To communicate in Ad hoc mode with a computer over wireless LAN also requires
IP address settings.
In case the resolution of your computer is higher than that of the projector, your
computer must be set at lower resolution.
Transferring video images and audio sound is not available.
This function does not work during the connection using the Network Utility
software.
Connection using the Network Utility (Toshiba original tool)
Functions
The following functions are available with the wired LAN, or via wireless communications
when the LAN dedicated application software: [Network Utility]
p.64
included with this
projector is used.
1) Displaying a computer’s screen via the projector
The computer’s desktop screen can be sent, as well as the screens of a variety of
software applications, to the projector for display. Likewise, the sound being played
on a computer can also be sent to the projector.
2)
Displaying a JPEG file saved on a computer via the projector
JPEG files can be sent to the projector for display. Likewise, the sound being played
on a computer can also be sent to the projector.
N
•
•
•
•
•
N
3) Displaying a video image saved on a computer via the projector
Video files can be sent to the projector for image display. As well, the sound stored
in the video file is sent to the projector.
4) Operating the projector by means of a computer
Some of the same functions available from the remote control can be performed.
Note
Network Utility is also available with Windows Vista™.
Communication mode
The wireless LAN of this projector supports both Ad hoc and Infrastructure
Communication modes.
U
Ad hoc communication mode
This is transmission mode to communicate
between wireless LAN equipment.
This mode is applicable, for example, to a
presentation in the conference room, as it requires
no other facilities. This function can only be used if
the projector is in range of the computer’s wireless signals.
Toshiba does not guarantee the converage of the radio wave in the form of figures. The
converage varies depending on the performance of each wireless LAN equipment,
existence of obstacles or other wireless LAN equipment used by nearby working
groups, etc. The coverage is generally estimated on the assumption that wireless LAN
equipment be used in an unobstructed office or conference room.
U
Infrastructure communication mode
A mixed wireless and wired LAN can be created
via wireless LAN access points. (Communication
between wireless LAN devices is also allowed.)
Connecting to the rest of the world via a wired
LAN or the Internet generally requires a high level
of security.
Use the appropriate transmission mode for your
network environment.
Caution when using the wireless LAN functions
The Wireless LAN in this unit uses the 2.4 GHz waveband. If there is a similar wireless
LAN in the area, or a wireless device using the 2.4 GHz waveband, or a microwave oven,
the communication efficiency of this apparatus will be reduced, and may become unusable,
but it is not a fault. If this happens, check an area away from the current location that will
not cause radio interference to medical, industrial and public equipment, and change to
it, or stop using the unit.
•
N
N
To LAN
Internet, etc.
Hub
Wireless LAN
access point
4849
Operations
How to use the USB terminal
This projector can connect with a commercial USB memory and a USB memory card
reader/writer that are USB2.0 compliant, a digital camera or the like and display the JPEG
and MPEG files saved in those devices.
p.49
(Toshiba does not guarantee the operation of all USB 2.0-compliant devices.)
To connect or disconnect a USB device, use the following procedure:
Connecting USB device
Plug the USB device.
Make sure the orientation is correct then plug the USB device in until it stays securely.
USB device
Disconnecting USB device
1
Switch the input to USB memory and press the MENU button twice to
display the Setting display (2), then select and run Unplug device in
the Slideshow setting menu.
The processing for disconnecting a USB device starts.
2
The message “This USB device can be unplugged safely” appears on
the screen.
3
Unplug the USB device.
Be sure to perform the above operations. Disconnecting a USB during operation
may cause a malfunction or data corruption.
Notes
A USB device can be plugged even when the power is on.
The projector may not recognize a supported USB device. In such a case, unplug
the USB device then re-plug it.
The USB terminal does not support the supplied mouse remote control receiver or
a commercial mouse controller.
A USB hub is also not supported.
Precaution
Disconnecting the power plug while the USB device is operating may cause a
malfunction or data corruption.
N
N
•
•
•
•
•
USB memories
This projector can read JPEG, MPEG1, and MPEG2 (PS) files stored in a USB memory
and display them on the screen.
This allows you to give presentations without a computer, create an advertising screen
board using the slideshow function, and more. (The projector cannot reproduce
animation effects such as those produced by Microsoft
®
PowerPoint
®
.)
L
The USB terminal
The USB terminal of the projector is USB2.0 compliant and can connect with a USB
memory, a USB memory card reader/writer, a digital camera and the like.
L
USB devices whose operation has been verified
Toshiba does not guarantee the operation of all USB devices.
Toshiba USB memory : U2E series (256MB, 512MB, 2GB)
Toshiba USB memory : U2G series (16GB)
SanDiskUSB memory : SDCZ4 series (1GB, 2GB)
SanDiskUSB memory : SDCZ6 series (1GB, 4GB)
SanDiskUSB memory : SDCZ7 series (1GB, 2GB)
Toshiba USB card R/W : IPCS078A
SanDiskUSB card R/W : SDDR-88-J70
Note that this projector does not support all USB memories, USB card readers/writers,
and digital cameras.
Backing up data
Toshiba recommends that you back up the data saved in the USB memory onto your
computer and the like before use. (Toshiba assumes no liability for losses incurred by
data lost through the use of this projector.)
Supported files
(1) Supported file extensions are .jpg, .JPG, .jpeg, .JPEG, .mpg, .MPG, .mpeg, and
.MPEG.
(2) The maximum number including both folders and files is 512.
(3) Some JPEG and MPEG files are not supported by this projector.
Regarding JPEG files, the limitations in (3) above can be alleviated by converting the
JPEG file with the supplied JPEG Conversion Tool
p.78
software application.
N
•
•
•
•
•
•
•
N
N
5051
Operations
Setup using the Setting display (2)
L
Projector settings (Be sure to read this subsection.)
Using the factory settings as-is may suffer security damage, so be sure to change
the projector settings.
1. Press the NETWORK button and press the MENU button twice
2. Select a Category
3. Make settings
Select a category by using
.
The following 5 categories are
available:
Displays the current settings
of selected category.
Item shown in gray cannot
be set with the currently set
conditions of the projector.
p.51
p.51
Network utility
setup
Network Projector
setup
p.57
Slideshow setup
Status display
p.61
The figure shows a typical example. As the display may differ depending on the
item, use the following pages as a reference.
While the video file transfer function of Network Utility or the slideshow function is
in use, the background image of the Setting display (2) does not appear.
Item
The Setting display (2) is displayed.
* Appears only when Network or USB memory input is selected.
These marks signify the items can be
selected from the list by using .
After an item is selected, apply it by
pressing .
Press or to open the menu.
4. Back RETURN button
5. End Press the MENU button or RETURN button.
(The menu disappears 30 seconds after the last operation is conducted.)
Control setting
p.58
N
Using the menus 2
Setting up the Network Projector/Network Utility
If you select
Network Utility
, the following items can be set.
Category
Item
Description
Wireless
LAN
Easy Connect
(USB memory)
[YesNo] [Enter: ]
LAN settings
Mode:Ad hocInfrastructure
SSID: Specify a desired character string (1 to 32 characters).
[ : Move left or right one character.] [ to : Set a character.]
DHCP: UseNot use
IP address: Enter using the numeric keys of the remote control.
[ : Move left or right one character.] [ to : Set a character.]
Subnet mask: Enter using the numeric keys of the remote control.
[ : Move left or right one character.] [ to : Set a character.]
Gateway: Enter using the numeric keys of the remote control.
[ : Move left or right one character.] [ to : Set a character.]
(When a file is selected, start playing the file automatically.)
Repeat
On
Off
(Play repeatedly after the end of playing)
Common
Play icon
Standard Continuous
Thumbnail
display
Switch the form of a thumbnail list.
All
File Off
Unplug deviceRun when unplugging a USB device.
Yes
No
•
•
•
•
N
L
Details on individual items
Still Image
[Auto. demo]
On: A slide show begins automatically when a USB memory is inserted and input
switches to USB memory. At this time, the JPEG files in the root directory of the
USB memory are used in the slide show. If the input has already been switched
to USB memory, the slide show begins automatically when the USB memory is
inserted.
•
To pause the slide show, press the button. Pressing this button again allows
the slide show to begin. To stop the slide show, press the RETURN button.
Off: A list of thumbnails will be displayed when connecting with a USB memory or the
like. Select a desired file from the list.
Notes
The Auto Demo function does not work when using a USB memory card reader/writer to
mount multiple media.
The Auto Demo function is available for JPEG files only.
[Interval]
You can set the display interval of time (in seconds or minutes) for slide shows to be
played automatically.
[Display effect]
When playing a slide show, the projector can give various display effects or transitions
to each slide being displayed.
The transitions available are listed below:
None
Display each slide normally.
Wipe
Display the next slide gradually upward (Wipe
↑
), downward (Wipe
↓
), to the left
(Wipe
←
), or to the right (Wipe
→
), over the current slide.
Dissolve
Display the next slide gradually in a certain fixed block pattern over the current
slide.
Cover
Display the next slide as sliding upward (Cover
↑
), downward (Cover
↓
), to the left
(Cover
←
), or to the right (Cover
→
), over the current slide.
Movie Image
[Auto. start]
On: Start playing a video file automatically when it is selected.
[Repeat]
On: Repeat automatically from the beginning when the file reaches the end.
•
•
•
•
•
•
•
•
•
•
•
Using the menus 2 (Continued)
6061
Operations
Common
[Play icon]
The slideshow icon can be displayed.
Standard
The projector handles the slideshow icon as follows depending on the “On/Off” setting
of Icon on the projector’s menu.
Icon On: The projector displays the icon upon the start of playing a slide show and
turns it off after a few seconds.
Icon Off: The projector does not display the icon.
Continuous
The projector keeps the icon displayed during the slide show.
[Thumbnail display]
Select the form of a thumbnail list.
All: Displays a thumbnail preview of JPEG files, and if any JPEG files exist in the folder
displays the leading thumbnail image.
File: Displays only a thumbnail image of JPEG files. The thumbnail image of the JPEG
files in the folder is not displayed.
Off: Displays an icon without displaying thumbnail preview.
Note
Thumbnail image of MPEG files can not be displayed.
[Unplug device]
Run when unplugging a USB memory, a USB memory card reader/writer or a digital
camera and the like.
•
•
•
•
•
•
Checking the projector status
Status display
To check the current status of the projector, select Status display in step 2 in “Projector
settings”
p.50
. The following items of information will then be displayed.
Application
The name of the application currently running on the projector is
displayed.
(Examples: Slideshow, Network Utility)
DetailsWhen inputting from USB memory
“Free space/Status” are displayed.
When inputting from network
For wireless LAN, “MAC address/Mode/Channel/SSID/
Encryption/IP address/Subnet mask/Gateway” are displayed.
For wired LAN, “Connection status/MAC address/IP address/
Subnet mask/Gateway” are displayed.
PJLink class is displayed.
VersionThe firmware version number of the network feature and the USB
memory feature is displayed.
Using the Network Projector
Setting up the projector
1
Turn the projector power on.
2
Switch the input to Network.
Make sure to set the projector’s input to Network. If the other inputs are selected, the
projector will not be recognized by the computer.
3
A password prompt will be displayed.
A password prompt will be displayed only when [Password] is set to [On] in the
Application category of the Network Projector settings.
4
By referring to “Using the menus 2”, make the wireless LAN or wired
LAN settings.
Setting up the computer
5
MakethewirelessLANorwiredLANsettings.PleaseseethehelpMake the wireless LAN or wired LAN settings. Please see the help
function of your computer for details.
6
Open the [Connect to a Network Projector] wizard by clicking on the
[Start] button, by clicking [All Programs], then clicking [Accessories],
finally clicking [Connect to a Network Projector].
7
Selectthedesiredprojectorfromthelistorentertheprojectoraddress.Select the desired projector from the list or enter the projector address.
8
When the password prompt is displayed in step
3
, enter the password.
N
N
N
Using the menus 2 (Continued)
6263
Operations
Installing the applications
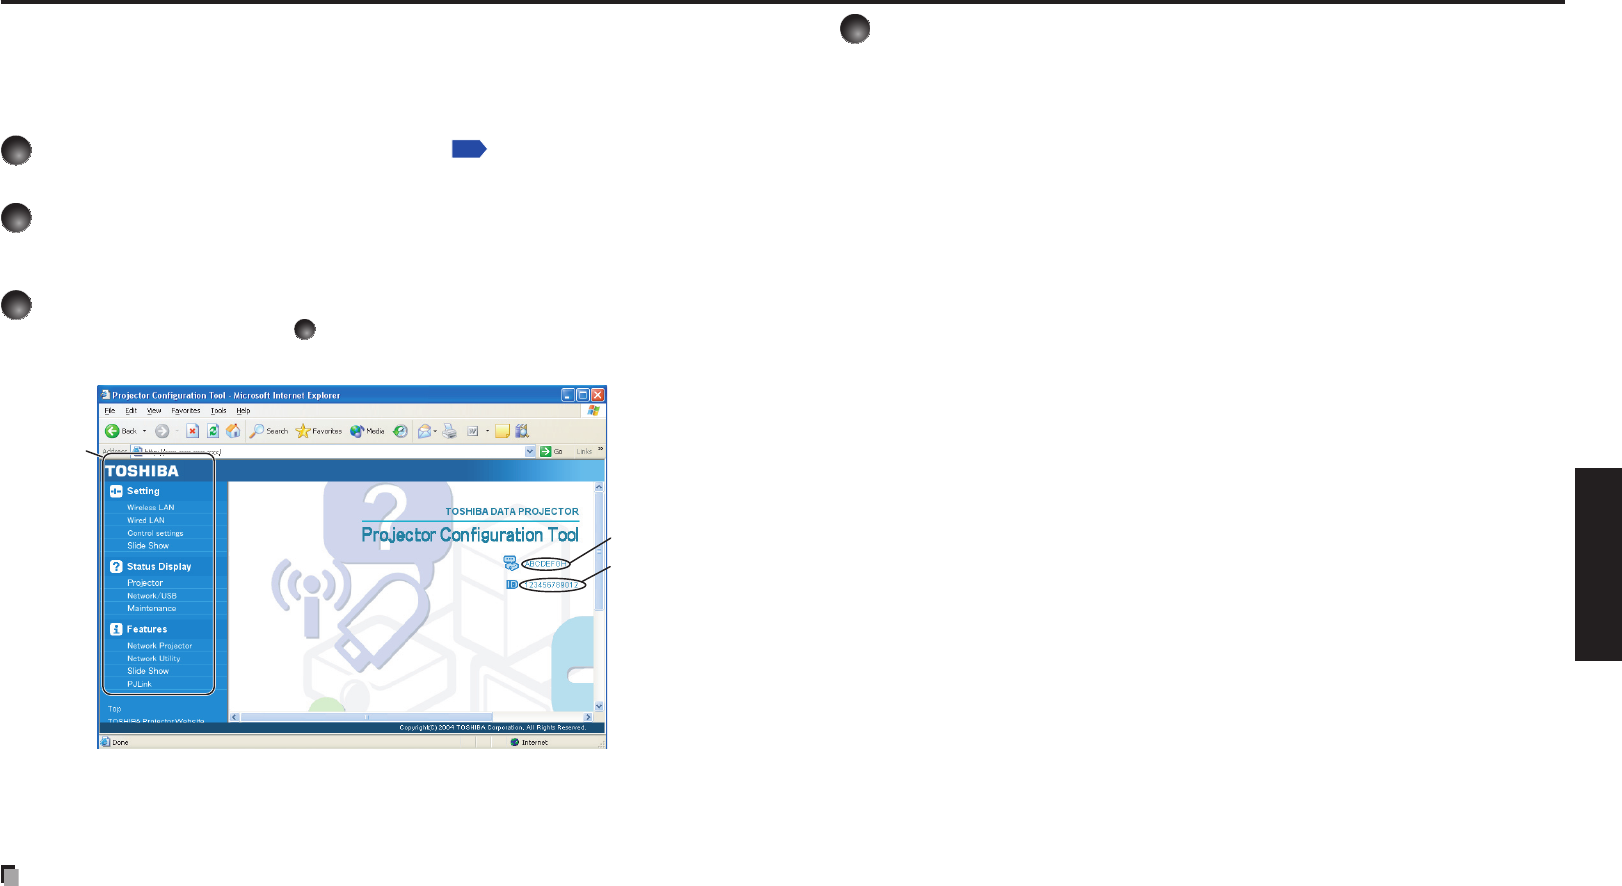
If you want to use the projector’s internal wireless LAN function, install the Network Utility
on the supplied CD-ROM onto your computer.
System Requirements
Supported OS: Windows
®
2000, Windows
®
XP and Windows Vista™ (Ultimate,
Business)
(Windows
®
98SE and Windows
®
ME are supported by JPEG
Conversion Tool.)
CPU: Pentium M 1 GHz or higher recommended
RAM: 256 MB or more recommended
Screen area (resolution): 1280 by 800 pixels recommended
* The system requirements may vary depending on the conditions of use.
Notes
Some functions of applications may not be operational with Windows Vista™.
The Windows Vista™ 64-bitversionisnotsupported.™ 64-bit version is not supported. 64-bit version is not supported.
Application Types and Major Functions
Network Utility
This application is used for network connections. Use it to send the images from the
computer’s screen to your projector, and display on the screen. In addition, also use it to
transmit the sound being played on a computer to the projector.
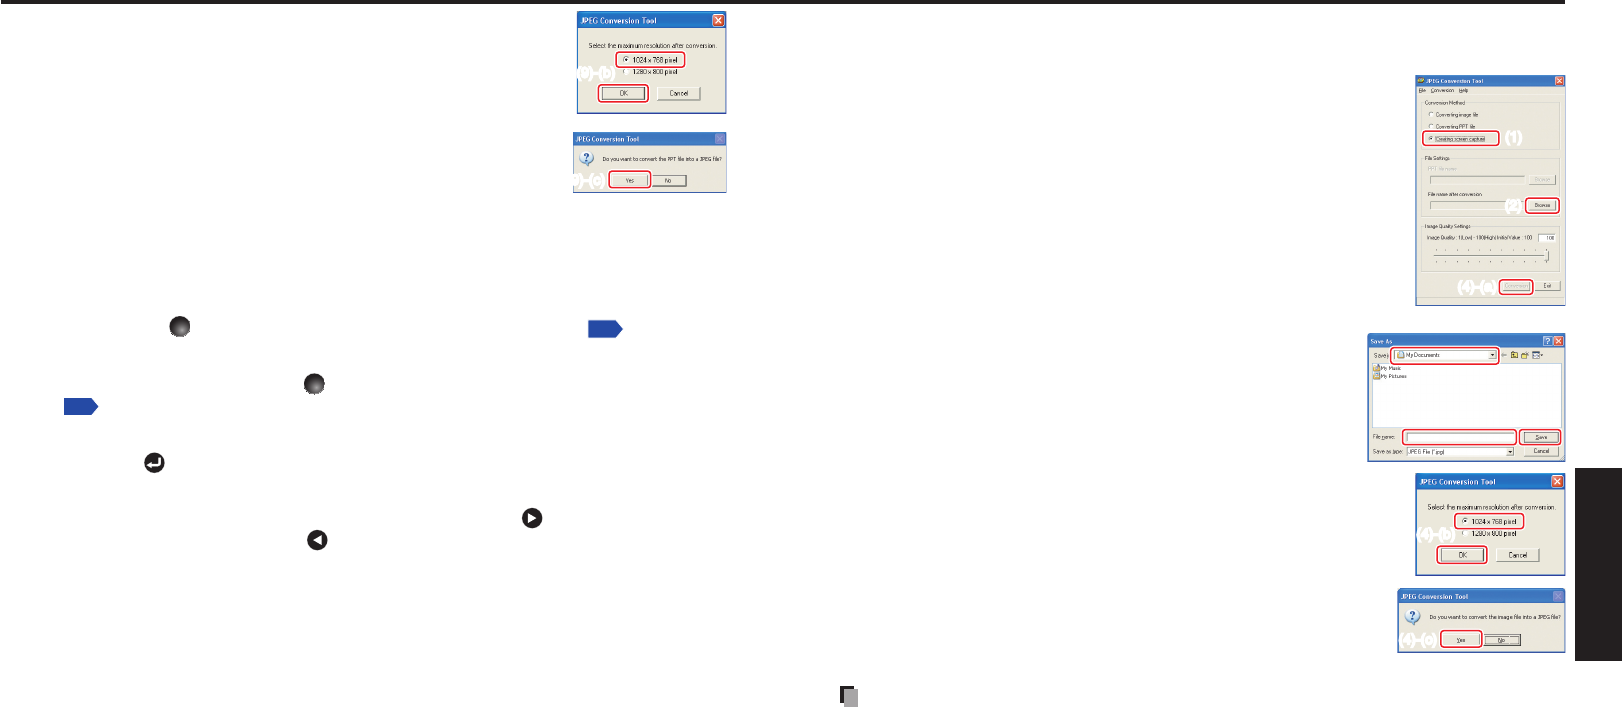
JPEG Conversion Tool
Use to convert JPEG and other files into a format that can be displayed as a slide show
using a USB memory.
How to install
Run the CD-ROM and double-click on Start.pdf. Acrobat
®
Reader™ launches, and a
screen appears asking you that “Select your model”, then click on the model name that
you are using. After you select Application on the next screen, click on Network Utility
and JPEG Conversion Tool in the application items and run setup.exe, respectively.
Follow the on-screen instructions.
During the installation, a dialog box may appear with the message “Digital Signature
Not Found” and the prompt “Do you want to continue the installation?”. Click on the
[Yes (Y)] button to continue the installation.
When installation is finished, the following shortcuts will appear on your computer’s
desktop:
Network Utility
→
Operations
p.64
JPEG Conversion Tool
→
Operations
p.78
N
•
•
N
N
How to uninstall
Uninstall [Toshiba Data Projector] and [Jpeg Conversion Tool] programs by using a
program removal utility in the [Control Panel].
Notes
Your computer screen may temporarily go out during installation, but it is not an error.
Before beginning installation or uninstallation, you need to log on as Administrator.
When the projector is operated using Windows Vista™, it is required to run application
as an administrator. See the help section of the application for details.
N
•
•
•
6465
Operations
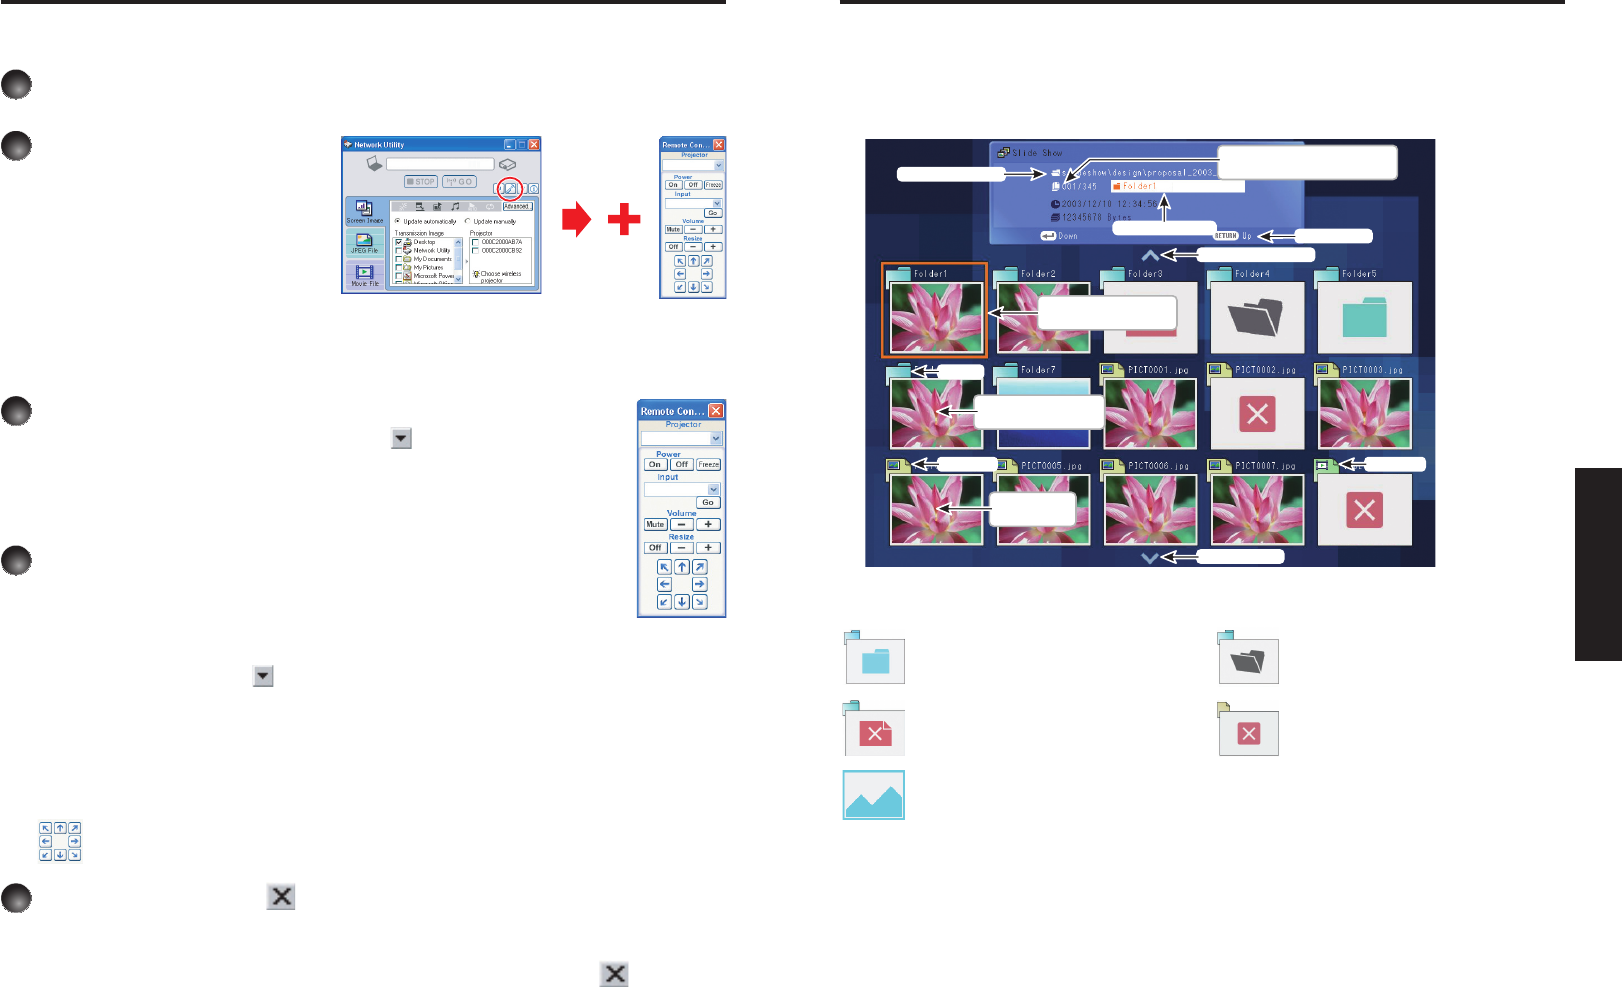
Using the Network Utility
Displaying a computer’s screen via the projector
1
Launch the Network Utility
software application.
When the Network Utility launches, the Screen
Image transmission mode window appears on
the computer screen.
To switch to the Screen Image transmission
mode window from another mode, click on the
Screen Image icon
.
2
Select Transmission mode.
Click on Update automatically or Update manually. See step
6
for the meanings of
Update automatically and Update manually.
3
Click on the Advanced button.
The Screen Image: Advanced Settings dialog
appears. Set the dialog as shown below, as
necessary.
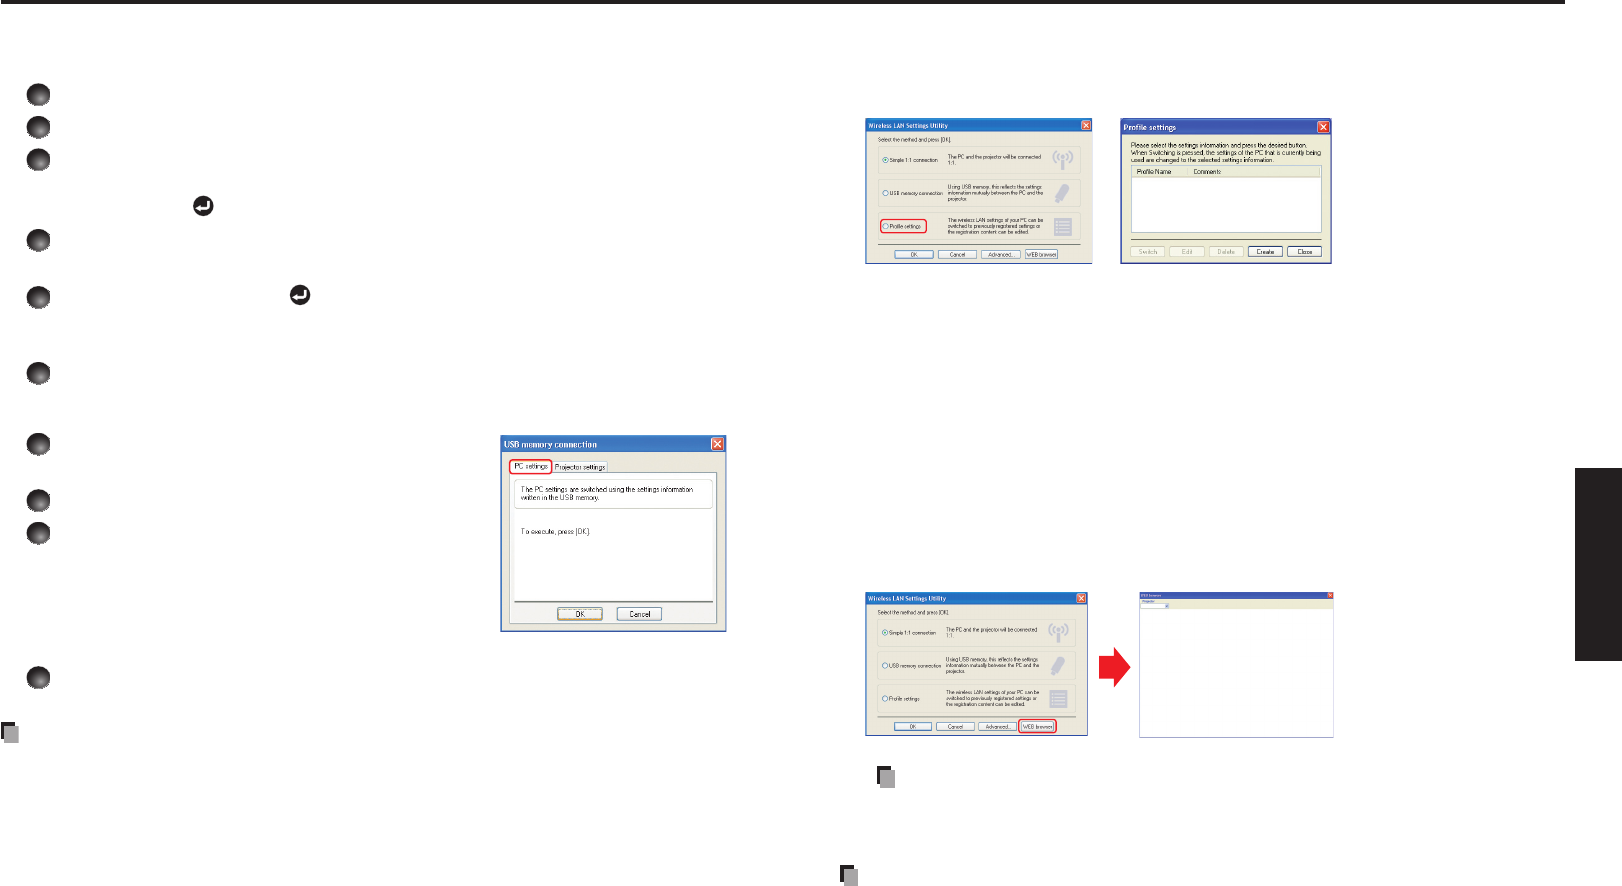
Interruption
Check the No Interruptions checkbox to
prevent other computers from interrupting the
projector, for example, during presentation.
Window Display
Select the Place in Tasktray at the start
of transmission checkbox to iconify the
Network Utility and place it in the computer’s
tasktray when transmission initiated.
To display the window, double click on this
icon, or right click and select Open from the
popup menu. Even with the Network Utility
window minimized, you can use the pop-
up menu to stop or resume transmission as
described in step
4
and later.
Transmission Mode (Image)
Selecting High quality improves the
quality of the projected image, but lowers
communication speed. Selecting High speed
has the opposite effect.
Transmission Mode (Sound)
Check the Transmit sound to a projector
(Only when connected with only one projector) checkbox to transmit the sound
being played on a computer to the projector.
Note: The sound can be sent when one projector is selected.
N
•
•
•
•
4
Select the screen image you wish
the projector to display.
Select Desktop
The computer screen image is transmitted as-is.
Select application window
Select a running application (e.g. Microsoft
®
PowerPoint
®
), and send that application’s
window only.
The desktop and a list of running applications are displayed.
Select the desired application from this list. (If the desired
application is not on the list, launch it. Note that if too many
applications are running, it will consume the computer’s
resources, which could slow communication speed.)
5
Select the projector to be
transmitted.
The IDs of projectors accessible for transmission
will be listed. (When a projector name is set,
that name appears instead of MAC address.)
Select the checkbox of the projector you wish
to transmit to from this list. Then icon
is
displayed on the projector’s screen for a few
seconds.
It is possible to select up-to four projectors.
6
Click on the button.
When “Update automatically” is selected in step
2
Screen images are sent consecutively after the button is clicked. Besides,
the sound being played on a computer can be sent to the projector.
When “Update manually” is selected in step
2
A single screen image is sent when the button is clicked.
7
To halt transmission from Update automatically, click on the
button.
If the Network Utility icon has been placed in the tasktray, double click on the icon
to display the window, then halt transmission, or right click on the icon, and halt
transmission.
Notes
It may not be possible to transmit the images from movie player or other video applications.
When using “Update automatically”, the transmitted image refresh rate depends on the
performance of the computer you are using and the surrounding radio wave environment.
The projector screen may have a few differences from the computer screen.
If you selected application window in step
4
, if that application is not active (in use), the
image may not be correctly displayed by the projector.
The projector ID is the MAC address of the wired LAN inserted into the projector.
Playing contents protected by copyright is not supported.
•
•
•
•
•
•
6667
Operations
To transmit sound, press the button then launch the application that plays the
contents including the sound. When you operate the projector using Windows Vista™,
“Switching audio play device” window will be displayed after pressing the start button
of Network Utility. Follow the instruction to switch the audio play device, and then launch
the application that plays the contents including sounds.
If no sound can be heard from the computer though the connection is stopped, re-
launch the application that plays the contents including the sound.
Transmission may not be available depending on the sound type.
Sound cannot be transmitted if multiple projectors are selected.
The audio signals transmitted by a computer become mono.
Displaying a JPEG image saved on a computer via the
projector
1
Launch the Network Utility software
application.
The Screen Image transmission mode window
appears on the computer’s screen.
2
Click on the JPEG File icon .
The Network Utility window changes to JPEG File
transmission mode.
3
Click on the Browse button, and
select the file to send.
Clicking on the Browse button displays the Open
dialog box. Select the file to send, then click on the
Open button.
The selected file is added to the pull-down list in
the Network Utility’s Transmission File field.
4
Select the file to be sent from the
pull-down list of the Transmission
File field.
Click on the Transmission File field’s button
to display the pull-down list. Select the file to be
sent from this list.
A thumbnail of the selected file appears in the
Preview box. The file displayed here will be
transmitted.
Step
3
can be skipped.
The way that drag and drop the file to be sent from the desktop or Windows Explorer
into the Preview box is also available. In this case as well, the selected file is added to
the file pull-down list Transmission File field’s.
•
•
•
•
•
N
Using the Network Utility (Continued)
5
Select the projector to be
transmitted.
The IDs of projectors accessible for transmission
will be listed. (If projector name has been set
up already, it is shown instead of the MAC
address.) Select the checkbox of the projector
to be transmitted to from this list. Then icon
is displayed on the projector’s screen for few
seconds.
It is possible to select up-to four projectors.
6
Click on the button.
The selected file’s image is displayed by the projector.
Notes
Only one file can be sent at a time. To send another file, repeat steps
4
and
6
.
Selecting a file by drag and drop may not be available with Windows Vista™.
Displaying a video file saved on a computer via the projector
1
Launch the Network Utility software application.
The Screen Image transmission mode window
appears on the computer's screen.
2
Click on the icon.
The Network Utility window changes to Movie
File transmission mode.
3
Click on the Advanced button.
The Movie file: Advanced Settings dialog
appears. Set the dialog as shown below, as
necessary.
Interruption
Check the No Interruptions checkbox to
prevent other computers from interrupting the
projector, for example, during presentation.
Transmission Mode (Sound)
Check the Transmit sound to a projector
(Only when connected with one projector)
checkbox to transmit the sound being played on
a computer to the projector.
•
•
N
•
•
6869
Operations
Autostart
Check the Start playing the file automatically when starting transmission
checkbox to automatically start playing the video file when connecting to the
projector.
Repeat
Check the Play repeatedly after the end of playing checkbox to automatically
repeat from the beginning when the file reaches the end.
4
Click on the Browse button and
select the file to send.
Clicking on the Browse button displays the Open
dialog box. Select the file to send then click on the
Open button.
The selected file is added to the pull-down list in
the Network Utility’s Select file field.
5
Select the file to send from the pull-
down list of the Transmission File
field.
Click on the Transmission File field’s button to
display the pull-down list. Select the file to send from
this list.
A thumbnail of the selected file appears in the
Preview box. The file displayed here will be
transmitted.
Step
4
can be skipped.
The way that drag and drop the file to send from the desktop or Windows Explorer into
the Preview box is also available. In this case as well, the selected file is added to the
pull-down list.
Note
Selecting a file by drag and drop may not be available with Windows Vista™.
6
Select the projector to transmit to.
The IDs of projectors accessible for transmission
will be listed. (If projector name has been set up
already, it is shown.) Select the checkbox of the
projector to be transmitted to from this list. Then
icon
is displayed on the projector's screen for
few seconds.
It is possible to select only one projector.
•
•
•
Using the Network Utility (Continued)
7
Click on the button.
The selected file's image is displayed by the projector and the Control window appears
as well.
8
Play the video file via the Control window.
The function of each button and box is as follows:
Current position:Indicates the playing position. Dragging the slider can move the
playing position.
Play:Starts playing the video file.
Freeze:The picture is paused.
Stop:Stops playing the video file.
Volume:Adjusts sound volume.
Mute:Cuts off picture and sound.
Release mute:Restores picture and sound.
Notes
Only one file can be sent at a time. To send another file, repeat steps
5
and
7
.
MPEG/AVI/ASF/WMV files can be transmitted.
The update speed of the transmitted file depends on your computer's performance and
the surrounding radio environment.
The projector ID is the MAC address of the wired LAN mounted on the projector.
The audio signals transmitted by a computer become mono.
Playing contents protected by copyright is not supported.
•
•
•
•
•
•
7071
Operations
Easy Connect utility
This feature allows users to easily connect the projector to a computer over wireless
networks, without making Wireless LAN settings via Network Utility.
Launch the Network Utility software application and click the Tool button
to bring up
the Wireless LAN Settings Utility dialog box. Select a desired connection mode in this
dialog box.
L
How to set up a simple 1:1 connection
Setting on the projector
1
Turn the projector power on.
2
Switch the input to Network.
3
Press the button on the projector control panel.
Setting on the computer
4
Launch the Network Utility software
application.
When the Network Utility launches, the
Screen Image transmission mode window
appears on the computer screen.
5
Click the Tool button .
The Wireless LAN Settings Utility dialog
box appears.
6
Select Simple 1:1 connection then
click OK.
The connection starts up.
When a connection confirmation message
appears, proceed as instructed in the
message.
7
When the connection is complete,
the computer screen image is
transmitted.
If the transmission does not start, uncheck the Confirm and immediately transmit
screen image checkbox.
Notes
This operation is allowed only when the Transmission mode is set to Ad hoc in the
projector’s wireless LAN settings.
The operation procedure of the projector setting and the computer setting can be altered
without affecting the connection setup, assuming the operation on each side is complete
within 60 seconds.
Be sure to use Network Utility version 5.0.
N
•
•
•
•
•
Using the Network Utility (Continued)
L
How to connect USB memory
Set up wireless LAN using a commercial USB memory. See
p.49
for available USB
memories.
1) Copying the computer settings to the projector
Setting on the computer
1
Insert the USB memory into the USB
terminal slot on the computer.
2
Click the Tool button
of the
Network Utility to bring up the
Wireless LAN Settings Utility dialog
box. Select USB memory connection
and click OK.
The dialog box for USB memory connection
appears.
3
Select [Projector settings] and click OK,
then enter the required setting items and
click OK.
The setting information is saved to the USB memory.
4
Unplug the USB memory from the computer.
To unplug the USB memory, follow the instructions in the user’s manual supplied
with the USB memory or the computer.
Setting on the projector
5
Turn the projector power on.
6
Switch the input to Network.
7
Insert the USB memory into the projector.
A message appears, notifying that the projector settings have been changed.
8
The projector name or the projector ID (MAC address of wired LAN)
will be displayed on the computer’s screen.
•
•
7273
Operations
2) Modifying the computer settings using the projector settings
Setting on the projector
1
Turn the projector power on.
2
Switch the input to Network.
3
Press the MENU button twice, then select Easy Connect (USB
memory) in Network Utility settings from the Setting display (2) menu
and press the
button.
4
When a confirmation window appears, insert the USB memory into the
projector.
5
Click Yes then press the button.
The wireless LAN settings are saved to the USB memory. When successfully saved,
a message appears.
6
Unplug the USB memory.
Setting on the projector
7
Launch the Network Utility software
application.
8
Insert the USB memory into the computer.
9
After a confirmation message appears,
make settings.
10
When the setting is complete, the projector name of the connected
projector or the projector ID (MAC address of wired LAN) is displayed.
Note
This operation is allowed only when the Transmission mode is set to Ad hoc in the
projector’s wireless LAN settings. Be sure to use Network Utility version 5.0.
•
•
•
Using the Network Utility (Continued)
L
Profile settings
This feature allows the user to save the computer’s wireless LAN settings.
This feature is useful when you need to change wireless LAN settings according to
where you use.
L
Advanced setting
This feature allows the user to set details for Easy Connect settings. Make the following
settings as required in this dialog.
Registering profile automatically
Check this checkbox to automatically register the settings of the Easy Connect as
profile setting data.
Switching settings automatically at start-up
Check this checkbox to automatically switch to the last used wireless LAN settings
when launching the Network Utility.
L
WEB browser
Where the computer and the projector are connected over the network, bring up the
window of Projector Configuration Tool by pressing the WEB browser button.
Precautions
If the page is not displayed correctly, re-select the projector.
When the network settings are changed, the network connection is disconnected. If
you wish to reconnect, set up the computer again.
Precaution
The simple 1:1 connection, the USB memory connection and the profile setting may not
work normally depending on the type of the wireless LAN adapter and the wireless LAN
embedded computer. When such a case arises, use the Network Utility menu to make
necessary wireless LAN settings manually.
•
•
•
•
•
7475
Operations
Operating the projector
This function can be used with any projector input.
1
Launch the Network Utility software application.
The Screen Image transmission mode window appears on the computer’s screen.
2
Click on the Remote
Control button.
The Remote Control window
appears.
As the Network Utility window is
still displayed, you can operate the
projector via the Remote Control
window, while using the Network
Utility’s functions.
While it is possible to use this function merely to operate the projector, closing the
Network Utility also closes the Remote Control window.
3
Select the projector to be operated.
In the Remote Control window, click on the button, and select the
desired projector from the pull-down list. When you make a selection, the
Remote Control window displays as shown in the right figure.
Only one projector can be selected. (It is not possible to operate multiple
projectors.)
4
Click on the Remote Control window’s buttons.
The function of each button and box is as follows:
Power On:Turns projector power on.
Power Off:Turns projector power off.
Freeze: The picture is paused.
Input (box):Click on the
button, and select the desired input from the pull-down
list.
Go:Switches to the input selected in the Input box.
Mute:Cuts off picture and sound. Click again to restore picture and sound.
Volume +/–:Adjust sound volume.
Resize OffRestores the picture to its original size.
Resize +/–:Adjusts the enlargement ratio.
:Move screen (up/down/left/right/diagonal)
5
To quit, click on the button on the Remote Control
window.
Performing this does not close the Network Utility window.
To exit both the Network Utility and the Remote Control, click on the
button on
the Network Utility window.
N
Using the Network Utility (Continued)
Projecting images stored in a USB memory
Playing a slide show from a thumbnail list
With Auto. demo set to Off in “Setting slideshow options”, data readout begins when
a USB memory is inserted and the input switches to USB memory. A list of thumbnails
will then appear on the screen.
The figure below is an example of this process:
Thumbnail image of
first file in folder
Folder
Thumbnail
image of file
JPEG fileMPEG file
Previous page exists
Current File Name
Current Folder Name
Operation Guide
Orange frame: currently
selected file or folder
Thumbnail list number
Current list No./Total number of lists
Next page exists
Symbols in the thumbnail list
Indicates that only folders are inside
the folder.
Indicates that there is no data to
be displayed in the folder.
Indicates that the JPEG, MPEG or
other file is not supported.
Indicates that an unsupported
JPEG, MPEG or other file is
present.
When the Thumbnail display is set
to Off, the screen appears like this.
N
7677
Operations
1
Plug a USB memory.
Plug a USB memory according to the procedure
in “Connecting USB device”
p.48
.
The projector starts loading data from the USB
memory and displays a thumbnail list on the
screen.
2
Searching for a target file
Use the buttons to move the orange frame over the desired file or
folder.
If there are multiple pages of thumbnails, click the
button on the bottom row to
go to the next page, and the
button on the top row to go to the previous page.
To open a folder, move the orange frame to the desired folder and press the
button. You can navigate down up to 5 levels using the same procedure. Pressing
the RETURN button returns you to the next or other upper level folder.
For JPEG files
3
Displaying slides
Pressing the button with a file selected displays the image in that file only in full-button with a file selected displays the image in that file only in full-
screen view on the screen as a slide. Pressing the
button enters the automaticbutton enters the automatic
play mode.
To return to the thumbnail list display screen, press the RETURN button.
4
Changing slides
Pressing the buttons with a slide displayed changes slides.
(
: previous slide; : next slide. These buttons are not available during an automatic
play.)
5
Rotating a slide
Pressing the buttons with a slide displayed rotates the slide 90 degrees. The
rotation information is preserved as long as you remain in the current folder.
(
: Rotate left; : Rotate right. These buttons are not available during an automatic
play.)
•
•
•
•
•
Projecting images stored in a USB memory (Continued)
For MPEG files
3
Displaying video
Pressing the button while a file is selected plays only the video image in full-
screen view. Pressing the
button again pauses the video image.button again pauses the video image.
To return to the thumbnail list display screen, press the RETURN button.
4
Fast-forwarding and rewinding video images
Pressing the buttons while a video image is displayed fast-forwards or
rewinds the video image.
(
: Fast-forward; : Rewind)
Notes
The thumbnail display order and slide order goes in order from shortest file name
to longest. If two file names have the same number of characters, they are ordered
numerically if numbers are used in the file name, and alphabetically otherwise.
It is possible to give presentations without using a computer by converting presentations
created with Microsoft
®
PowerPoint
®
into JPEG files using the JPEG Conversion Tool,
and storing them on a USB memory.
p.78
Note, however, that functions such as animation effects and hyperlinks cannot be used,
so it should be tested before the actual presentation.
Freeze function can not be used during slide show or automatic play.
A slide show is terminated when the input is switched to another.
With some USB memories, the slideshow playback may stop in the midway. When
encountering such a phenomenon, use another USB memory because the current one
is not supported.
Pressing the GUIDE button on the remote control with a slide displayed displays the
operation guide for slideshow.
When you operate the projector using the USB memory card reader/writer, up to 4
media types are supported.
•
•
•
•
•
•
•
•
•
•
7879
Operations
How to use the JPEG Conversion Tool
The JPEG Conversion Tool converts JPEG files not supported by the projector, image
files in other formats, Microsoft
®
PowerPoint
®
files, and the like into JPEG files supported
by the projector. The JPEG files converted with this tool can be displayed by sending them
using the wireless LAN
p.66
, or saving them on a USB memory.
Launching the JPEG Conversion Tool
The window shown in the figure to the right appears on the computer
screen.
Drag the Image Quality Settings slider to the left or right to set the
image quality of the file after conversion. Lower values create smaller
files, but lower the image quality. (It is not possible to restore the
quality of an image after it has been lowered.)
Converting an image file
This converts JPEG files using compression formats not supported by the projector,
Windows
®
metafiles (wmf), and bitmapped files (bmp) into JPEG files.
(1) In the Conversion Method field, select Converting image
file. (Status on launch)
(2) In the File settings field, click on the Browse button for
Original Image File Name.
The Open dialog box appears.
(3) In the Open dialog box:
(a) Specify the location of the file to be converted; and
(b) In the Files of Type field, click on the
button to select
the file format. A list of files of that format appear in the
Open dialog box.
(4) In the Open dialog box, select the file to convert, then click on
the Open button.
(5) In the JPEG Conversion Tool window, in the File
settings field, select Browse for File name after
conversion. The Save As dialog box appears.
(6) In the Save As dialog box:
(a) Specify the location in which to save the converted
file;
(b) Enter a file name of up to 8 characters in the File
Name field; and
(c) Press the Save button.
(7) (a) In the JPEG Conversion Tool, click on the
Conversion button.
(b) The resolution selection dialog box appears. Select a
desired resolution and click on the OK button.
(c) A confirmation dialog box opens. Click Yes.
The computer converts the file. When it finishes a
message appears informing you that a “JPEG file has
been created”.
N
N
Converting files created with Microsoft
®
PowerPoint
®
This process provides presentations without using a computer by converting
presentation files created with Microsoft
®
PowerPoint
®
into JPEG files, storing them on a
USB memory, and displaying them in a slide show.
To use this conversion mode, Microsoft
®
PowerPoint
®
must be installed on the
computer.
Only static images are supported by this process. Animation and audio are not
supported.
Presentation files created with Microsoft
®
PowerPoint
®
usually
consist of several slides. For this reason, the tool creates a
folder with the name specified in step (5), below, and file for
each slide is created in the folder (starting with slide001.jpg).
(1) In the Conversion Method field, select Converting PPT file.
(2) In the File settings field, click on the Browse button for PPT
File Name.
The Open dialog box appears.
(3) In the Open dialog box:
(a) Specify the location of the file to be converted; and
(b) Select the PowerPoint
®
presentation file to convert,
then click on the Open button.
(4) In the JPEG Conversion Tool window, in the File
settings field, click on the Create button for New folder
name.
The Folder create dialog box appears.
(5) In the Folder create dialog box, in the Folder Name of
document of document field, specify a folder name of 12
characters or less.
(6) In the Folder create dialog box, click on the Selection button.
The Browse Folders dialog box appears.
(7) In the Browse Folders dialog box:
(a) Specify the location in which to save the folder; and
(b) Click on the OK button.
(8) In the Folder create dialog box:
(a) Click on the Create button.
A confirmation dialog box appears;
(b) Click on the OK button.
N
•
•
(1)
(2)
(5)
(7)-(a)
(1)
(2)
(5)
(7)-(a)
(3)-(b)(3)-(b)
(3)-(a)
(4)
(6)-(b)(6)-(c)
(6)-(a)
(7)-(c)(7)-(c)
(7)-(b)(7)-(b)
(1)
(2)
(4)
(9)-(a)
(1)
(2)
(4)
(9)-(a)
(3)-(b)
(3)-(a)
(6)
(8)-(a)
(6)
(8)-(a)
(5)
(5)
(7)-(a)
(7)-(b)
(7)-(b)
(8)-(b)(8)-(b)
8081
Operations
(9) (a) In the JPEG Conversion Tool window, click on the
Conversion button.
(b) The resolution selection dialog box appears. Select a
desired resolution and click on the OK button.
(c) A confirmation dialog box opens. Click Yes.
The computer begins to convert the file. When it finishes,
a message appears informing you that a “JPEG file has
been created”.
Making a presentation with converted JPEG files
(1) Copy the folder created by the JPEG Conversion Tool, or its contents, onto a USB
memory.
(2) Use the step
1
in “Playing a slide show from a thumbnail list”
p.75
to display a
list of thumbnails.
(3) Follow the instructions in step
2
in “Playing a slide show from a thumbnail list”
p.75
to find the thumbnail of the first slide, Slide001.jpg, and move the orange
frame to it. (Select Slide001.jpg)
(4) Press the
button on the remote control. An enlarged view of the first slide
appears on the screen. This starts the presentation.
(5) To continue to the next slide, click on the remote control’s
button. To go back to
the previous slide, click on the
button.
N
Creating a screen capture and converting it into a JPEG file
This function saves the current computer screen as a JPEG file.
(1) In the Conversion Method field, select Creating screen
capture.
(2) In the File settings field, click on the Browse button for File
name after conversion.
The Save As dialog box appears.
(3) In the Save As dialog box:
(a) Specify the location in which to save the converted file;
(b) Enter a file name of up to 8 characters in the File Name
field; and
(c) Click on the Save button.
(4) (a) In the JPEG Conversion Tool window, click on the
Conversion button.
(b) The resolution selection dialog box appears. Select
a desired resolution and click on the OK button.
(c) A confirmation message appears. Click Yes.
The computer creates a screen capture, and
converts it into a JPEG file in the specified location.
When it is finished, a message appears to tell you that a
“JPEG file has been created”.
Note
The selected resolution in the dialog box will be the maximum resolution of the
converted image file. Specify the resolution in accordance with your projector’s
resolution.
N
•
How to use the JPEG Conversion Tool (Continued)
(9)-(c)(9)-(c)
(9)-(b)(9)-(b)
(1)(1)
(2)
(2)
(4)-(a)(4)-(a)
(3)-(b)(3)-(c)
(3)-(a)
(4)-(c)
(4)-(c)
(4)-(b)(4)-(b)
8283
Operations
Setting up the projector using a Web browser
How to use the “Projector Configuration Tool”
The “Projector Configuration Tool” uses the Web server features of the projector to set
up the projector using the network.
When using the “Projector Configuration Tool”, set up the Network connecting the
projector and the computer.
1
See “Checking the projector status”
p.61
to display
information on the screen and write down the IP address.
2
Invoke Internet Explorer.
Internet Explorer Ver. 6.0 or Ver. 7.0* is recommended. Enable the Javascript functions.
* Toshiba does not guarantee the operation for later versions.
3
In the address bar, enter the IP address “http://xxx.xxx.xxx.
xxx/” recorded in step
1
above.
The Web browser will then display the following page.
Projector name
Projector ID
Menu
Note: If you use a proxy server, do not enable the proxy when accessing the above IP
address.
When the wireless LAN is set to use Ad hoc mode, use the WEB browser
function in the Easy Connect menu of Network Utility.
Note
This function can be enabled using the WEB Browser function in the Easy Connect
menu of Network Utility without specifying the URL into the browser’s address bar.
N
•
4
Select items from the menu on the left.
Settings: Make settings for the Network or USB memory input menu.
Status Display: Verify the projector state.
Features: Shows the functions available with the Network or USB
memory.
Top: Returns you to the top page.
TOSHIBA Projector Site: The browser will display the home page at http://multimedia.
Libble takes abuse of its services very seriously. We're committed to dealing with such abuse according to the laws in your country of residence. When you submit a report, we'll investigate it and take the appropriate action. We'll get back to you only if we require additional details or have more information to share.
Product:
Forumrules
To achieve meaningful questions, we apply the following rules:
First, read the manual;
Check if your question has been asked previously;
Try to ask your question as clearly as possible;
Did you already try to solve the problem? Please mention this;
Is your problem solved by a visitor then let him/her know in this forum;
To give a response to a question or answer, do not use this form but click on the button 'reply to this question';
Your question will be posted here and emailed to our subscribers. Therefore, avoid filling in personal details.
Register
Register getting emails for Toshiba tdp ew25 at:
new questions and answers
new manuals
You will receive an email to register for one or both of the options.
Get your user manual by e-mail
Enter your email address to receive the manual of Toshiba tdp ew25 in the language / languages: English as an attachment in your email.
The manual is 4,71 mb in size.
You will receive the manual in your email within minutes. If you have not received an email, then probably have entered the wrong email address or your mailbox is too full. In addition, it may be that your ISP may have a maximum size for emails to receive.
The manual is sent by email. Check your email
If you have not received an email with the manual within fifteen minutes, it may be that you have a entered a wrong email address or that your ISP has set a maximum size to receive email that is smaller than the size of the manual.
The email address you have provided is not correct.
Please check the email address and correct it.
Your question is posted on this page
Would you like to receive an email when new answers and questions are posted? Please enter your email address.