Customizing the function settings.................. 57
Temporary disabling of rating level by
DVD disc ........................................................ 63
2I30201B-En_p02-131/13/06, 2:46 PM9
10
Introduction
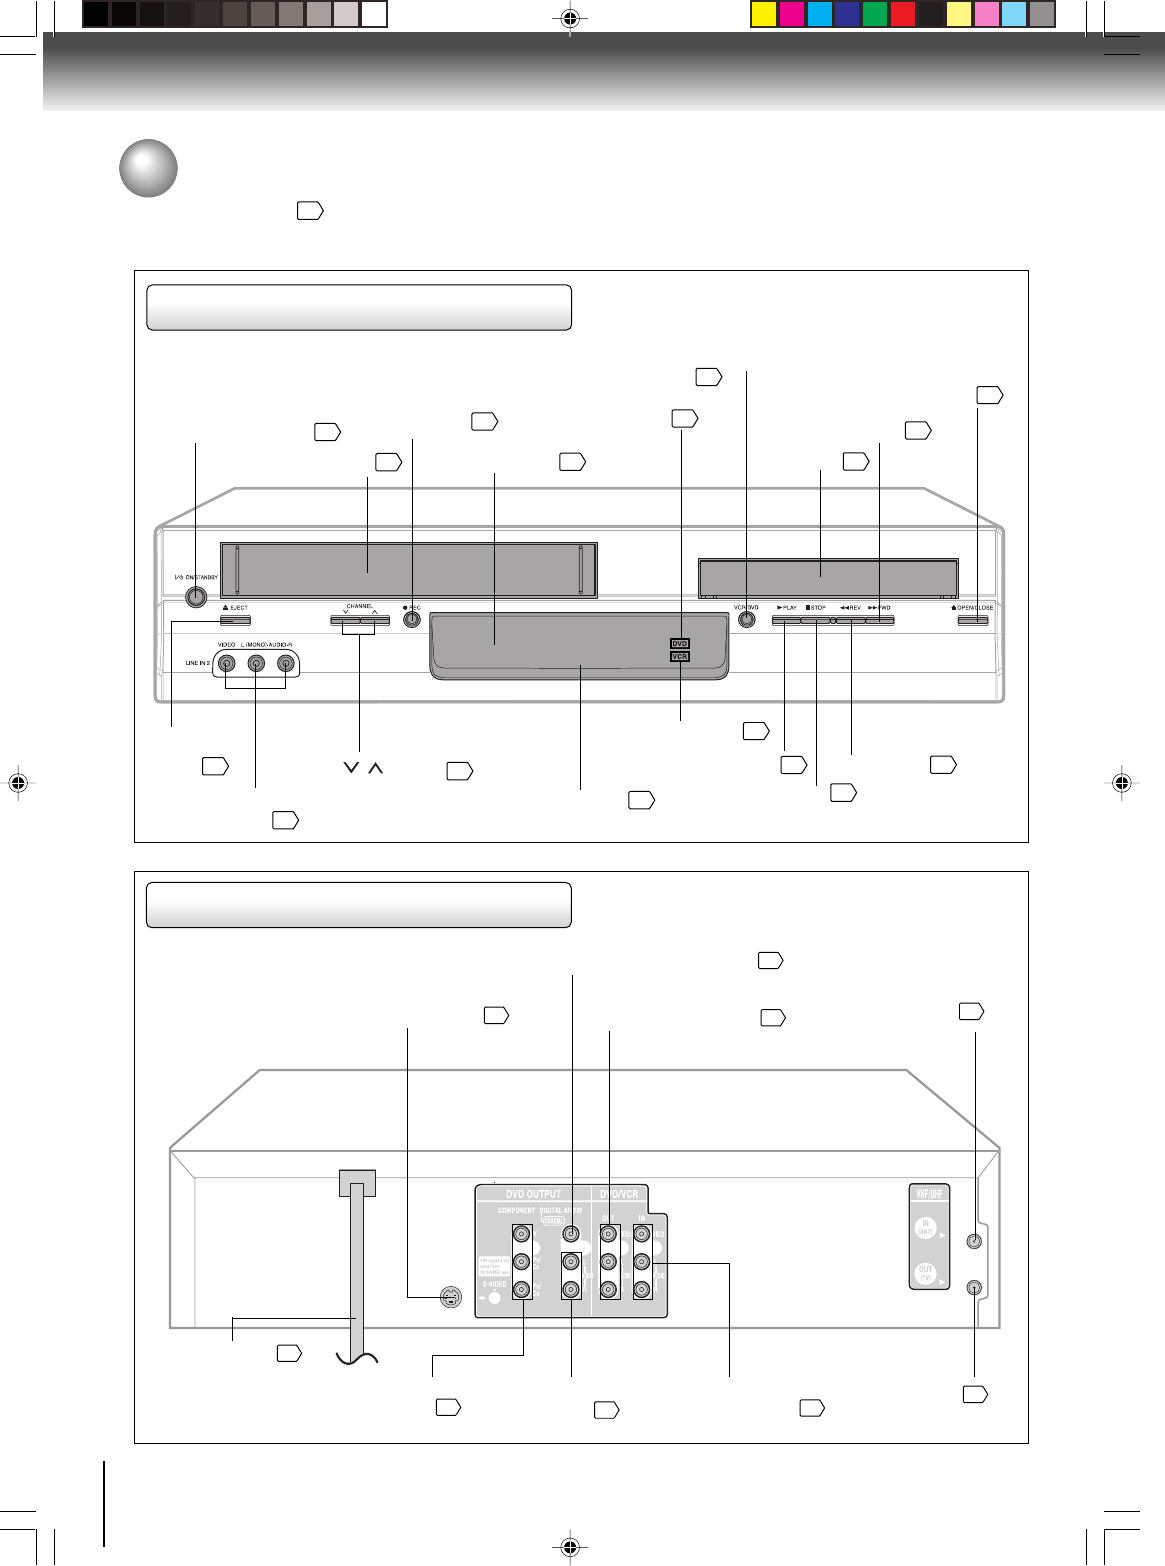
Identification of controls
See the page in for details.
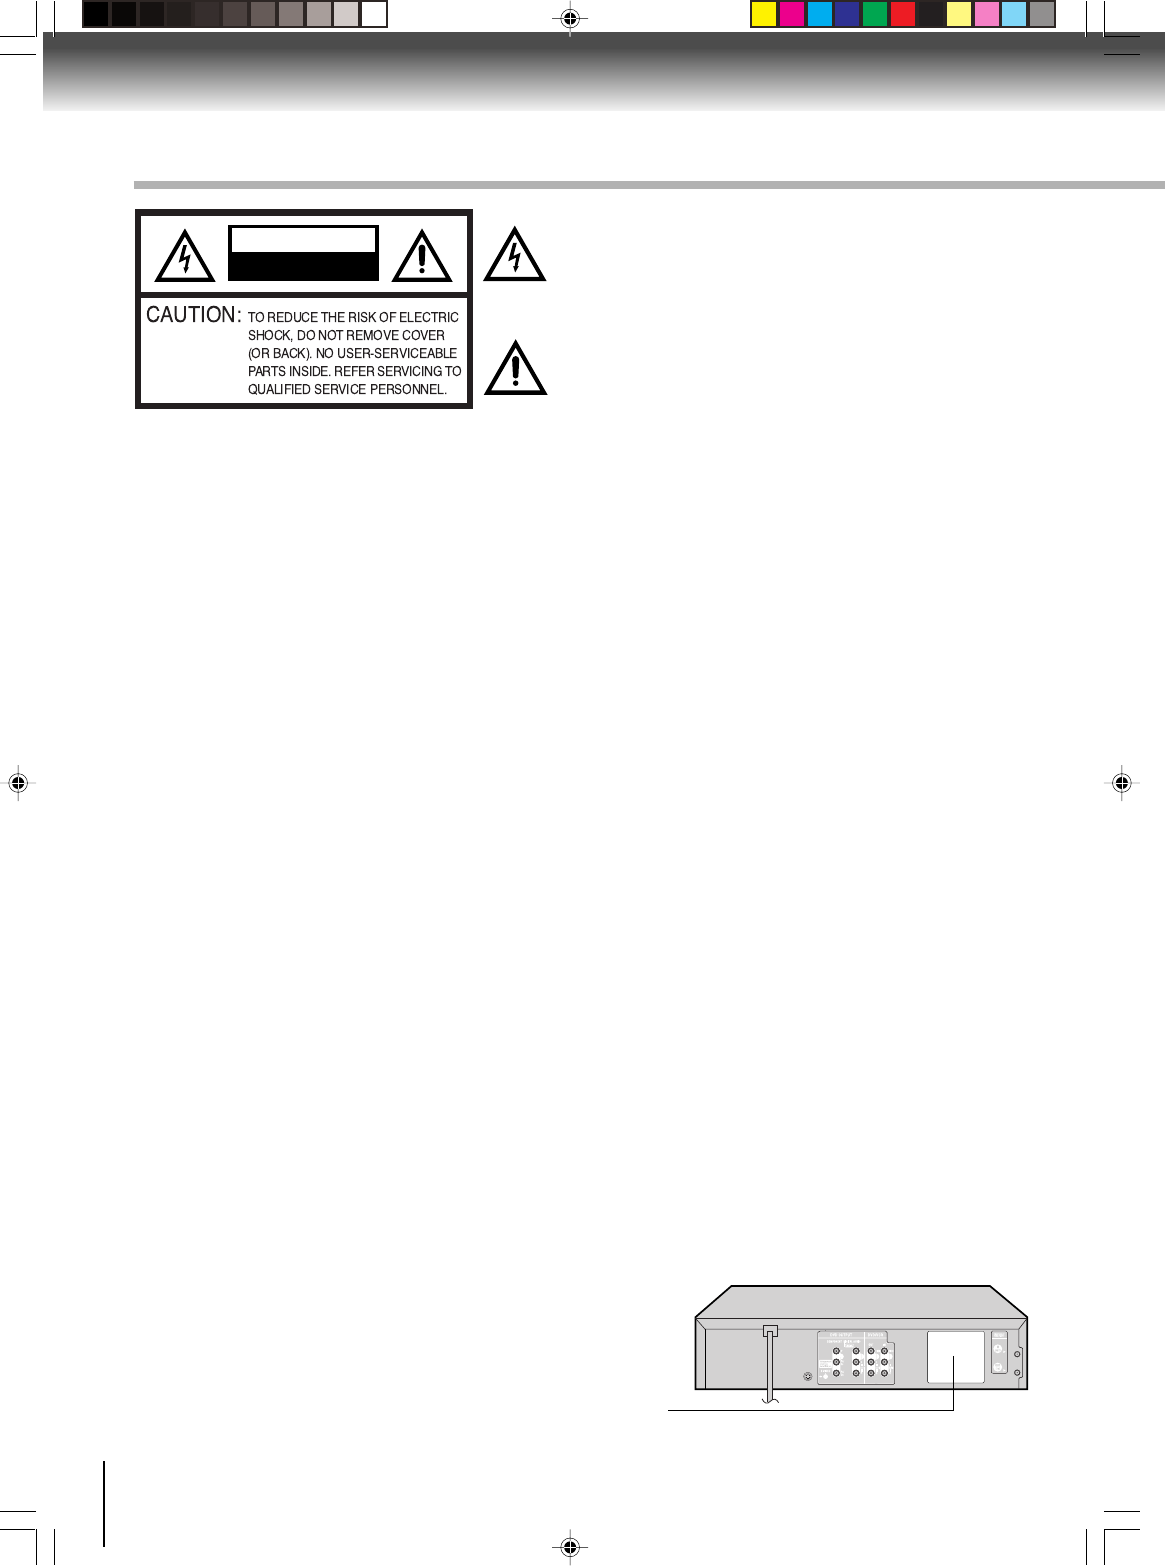
Front panel
Rear panel
ON/STANDBY button
AUDIO (L/R)/VIDEO IN
(LINE IN 2) jacks
22
40
EJECT
button
29
Disc tray
42
Display window
11
REC button
34
CHANNEL/ buttons
34
OPEN/CLOSE button
42
Remote sensor
13
VCR mode indicator
DVD mode indicator
42
22
DVD S-VIDEO OUT jack
19
DVD AUDIO (L/R)
OUT jacks
19
DVD COAXIAL DIGITAL AUDIO OUT jack
20
DVD COMPONENT
OUT jacks
19
ANT OUT jack
14
ANT IN jack
14
AUDIO (L/R)/VIDEO
IN (LINE IN1) jacks
40
DVD/VCR common AUDIO
(L/R)/VIDEO OUT jacks
18
AC power cord
5
Cassette loading slot
29
VCR/DVD mode selector
button
22
STOP button
30
PLAY button
30
REV button
30
FWD button
30
2I30201B-En_p02-131/13/06, 2:47 PM10
11
Introduction
VCR operation status
CH 125
8 : 47
AM
MON
00 : 00 : 00 SP
STEREO SAP
While watching TV
DAY OF THE WEEK
CHANNEL
TAPE SPEED
REAL TIME COUNTER
CLOCK
STEREO AND
SECOND
AUDIO
PROGRAM
(SAP)
8 : 30
AM
MON
00 : 15 : 12 SP
HI-FI
STEREO
While operating a tape
OPERATING
MODE
TAPE IN
AUTO REPEAT
HI-FI STEREO
Disc operation status
Press CALL to display VCR operation status on the screen.
To cancel the display, press CALL again.
Recording :
Rec/Pause
:
Play :
Stop :
Eject :
VCR Icons
Press DISPLAY, the status display of the disc will appear on the screen as follows.
To cancel the display, press DISPLAY again.
VCD
CHAPTER
NO.
OUTPUT SELECTION
Timer Recording indicator (VCR)
Multifunctional indicator
Recording
indicator
(VCR)
Track indicator (CD)
Tape loaded indicator (VCR)
Play indicator
VCR indicator (VCR)
Still indicator
DVD disc inserted indicator
CD inserted
indicator
AM/PM indicator
(AM is not displayed)
Progressive indicator
Display window
DVD 00:15:25 01:41:39
Title1/3 Chapter2/24
1/1 Eng Dolby Digital1/2 Eng
1/1
ELAPSED
TIME
ANGLE NO.
DISC OPERATION
TITLE NO.
TOTAL
TIME
AUDIO LANGUAGE
DVD
A KIND OF AUDIO
SUBTITLE LANGUAGE
VCD00:08:32 00:51:03
Track3/15
DISC OPERATION
TRACK NO.
ELAPSED
TIME
TOTAL
TIME
2I30201B-En_p02-131/13/06, 2:47 PM11
12
Introduction
Remote control
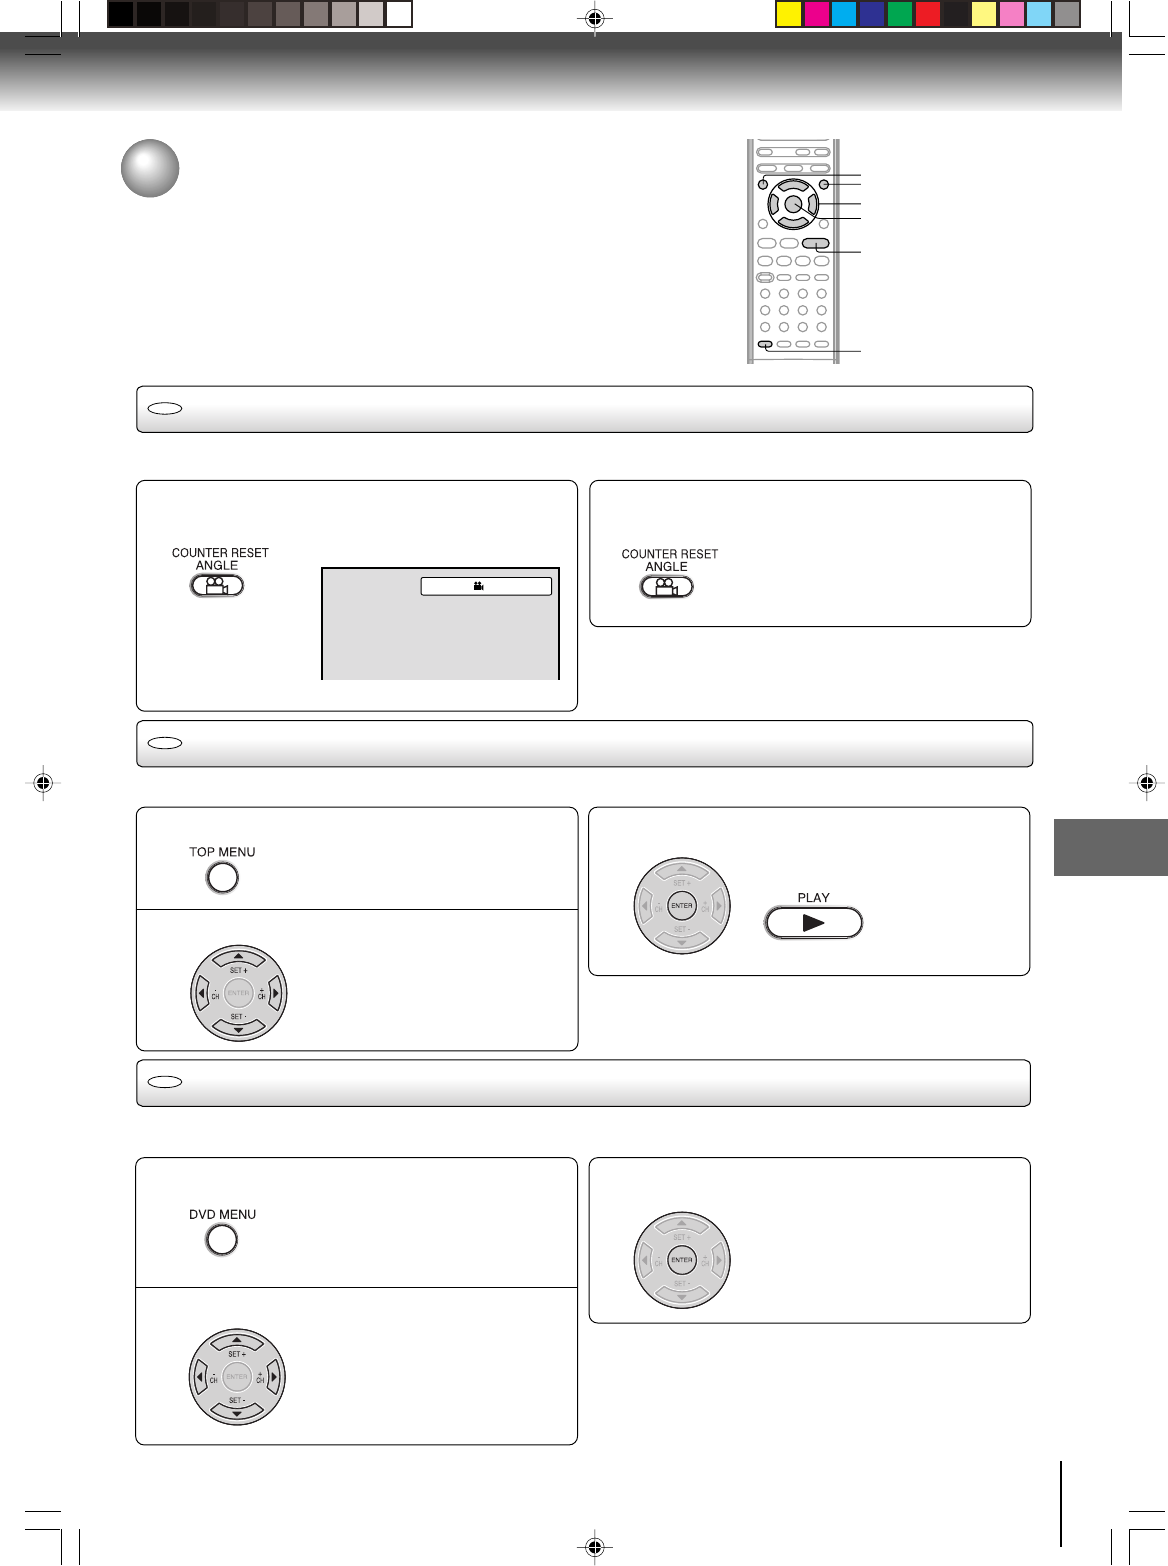
DVD MENU button
Use the DVD MENU button to display the menu
included on many DVD video discs. To operate a menu,
follow the instructions in “DVD Menu.”
49
Identification of controls (Continued)
The instructions in this manual describe the functions on the remote control. See the page in for details.
VCR DVD button
EJECT button (VCR)
ZERO RETURN button
JUMP button
ZOOM button
TOP MENU button
CLEAR button
INDEX
-
button
MARKER button
COUNTER RESET button
VCR MENU button
22
28
45
29
CLOCK/COUNTER button
33
32
45
31
CM SKIP button
45
Direct channel
Selection buttons (0
-
9)
Number buttons (0
-
9)
49
45
CANCEL button
26
45
23
34
42
PLAY button
30
44
43
PAUSE/STEP button
31
33
23
SETUP button
57
46
32
ANGLE button
49
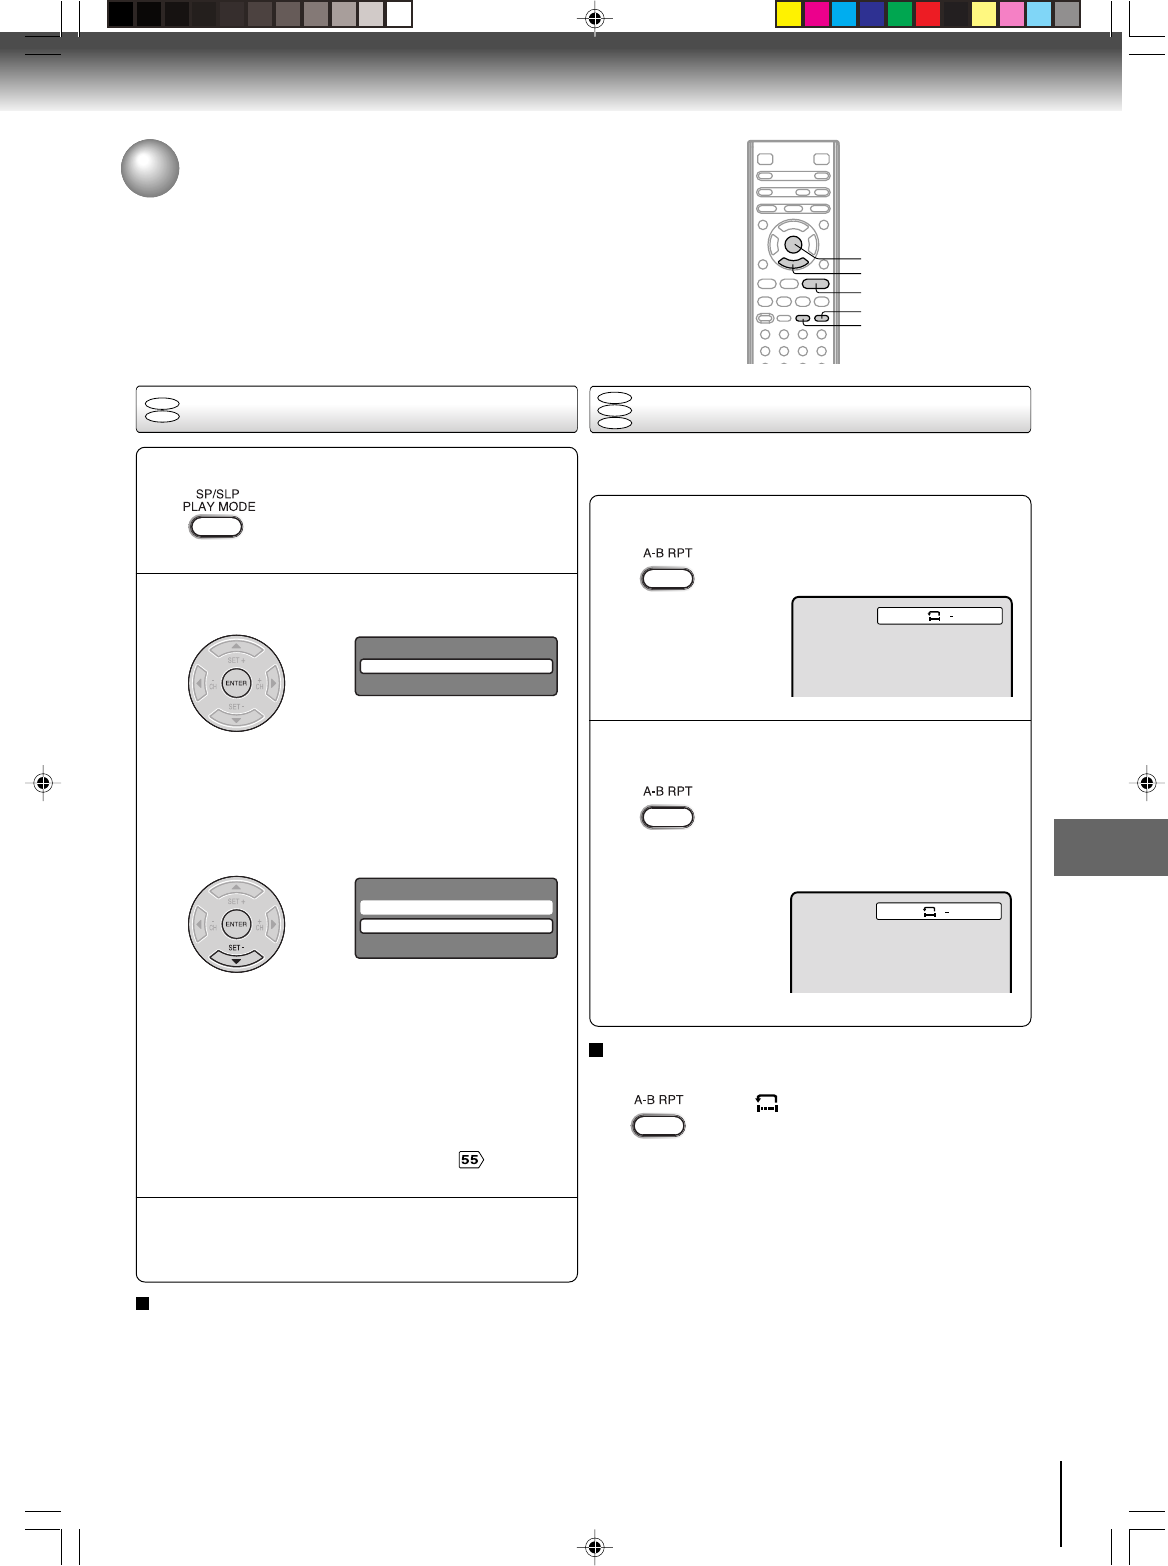
SP/SLP button
34
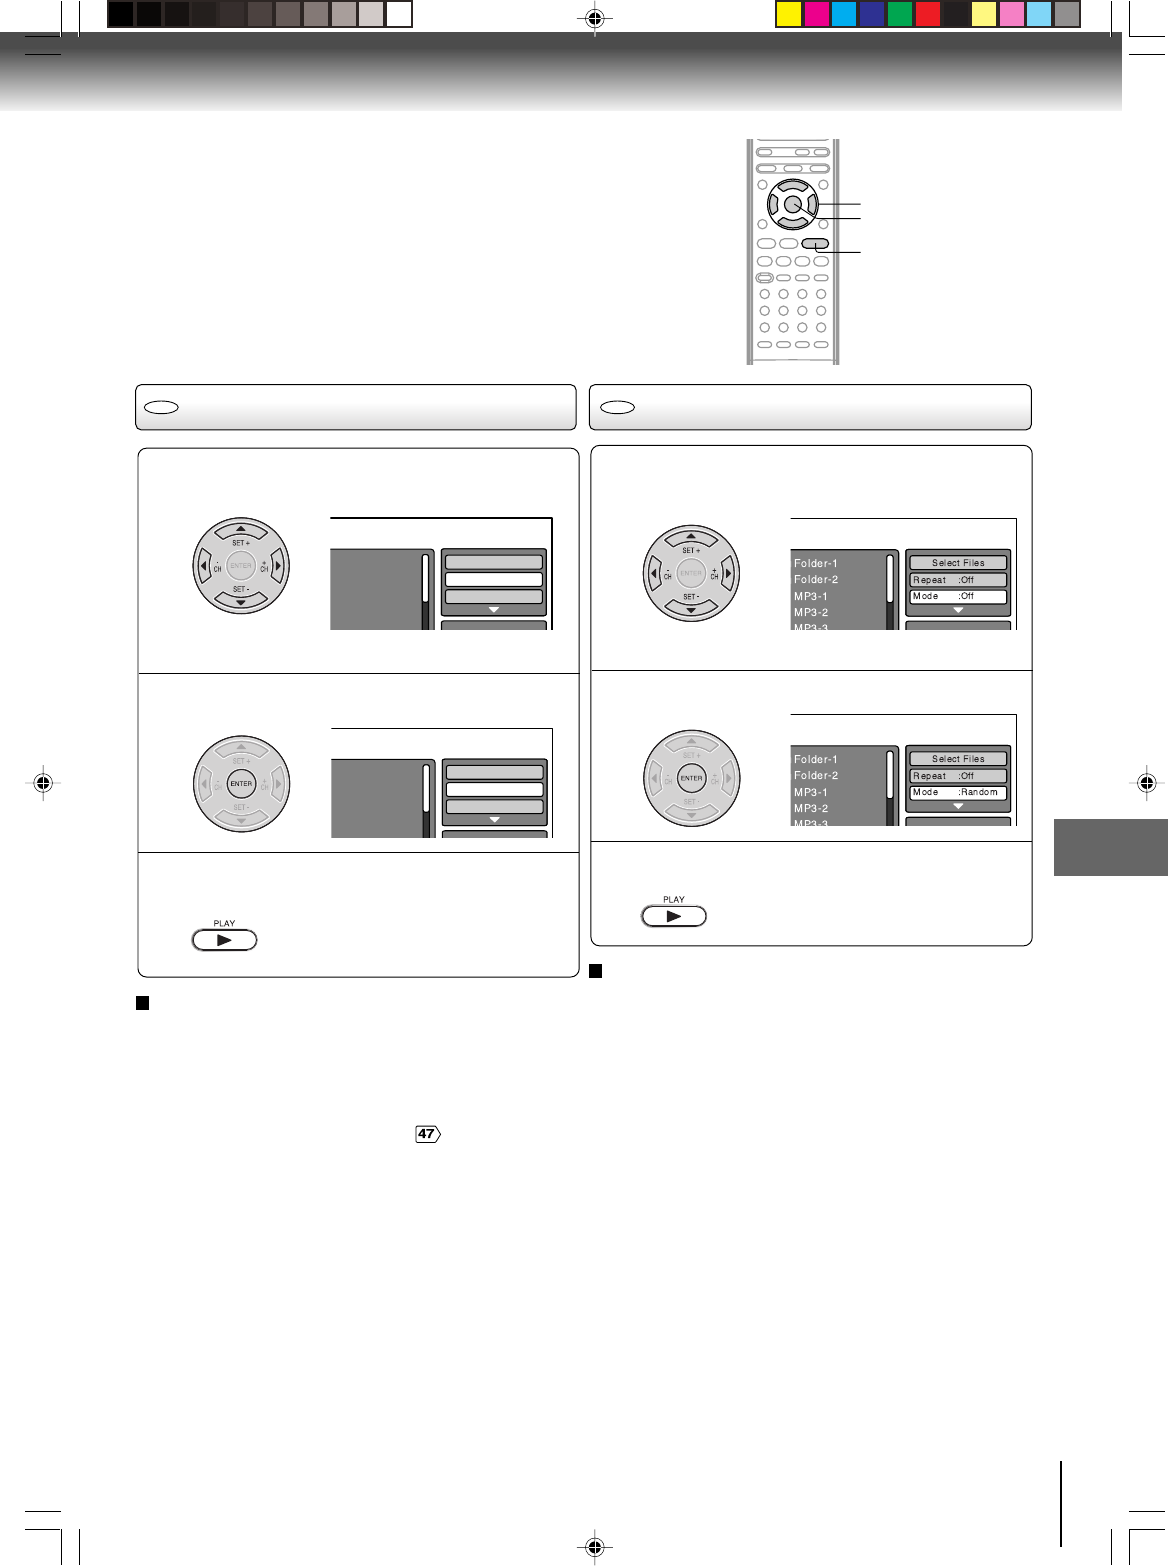
PLAY MODE button
47
CALL button
11
DISPLAY button
11
A-B RPT button
47
OPEN/CLOSE button (DVD)
42
Direction buttons
SET+/
-
buttons
CH+/
-
buttons
///
()
POWER button
INPUT SELECT button
DVD MENU button
ENTER button
RETURN button
STOP button
FWD button
SLOW button
AUDIO button
ATR button
INDEX+ button
40
49
2357
57
3042
33
44
3044
3144
50
AUDIO SELECT button
39
31
SUBTITLE button
51
button
SKIP
44
REV button
30
TV/VCR button
22
REC/OTR button
3436
TIMER REC button
37
22
SKIP button
2I30201B-En_p02-131/13/06, 2:47 PM12
13
Introduction
Operation
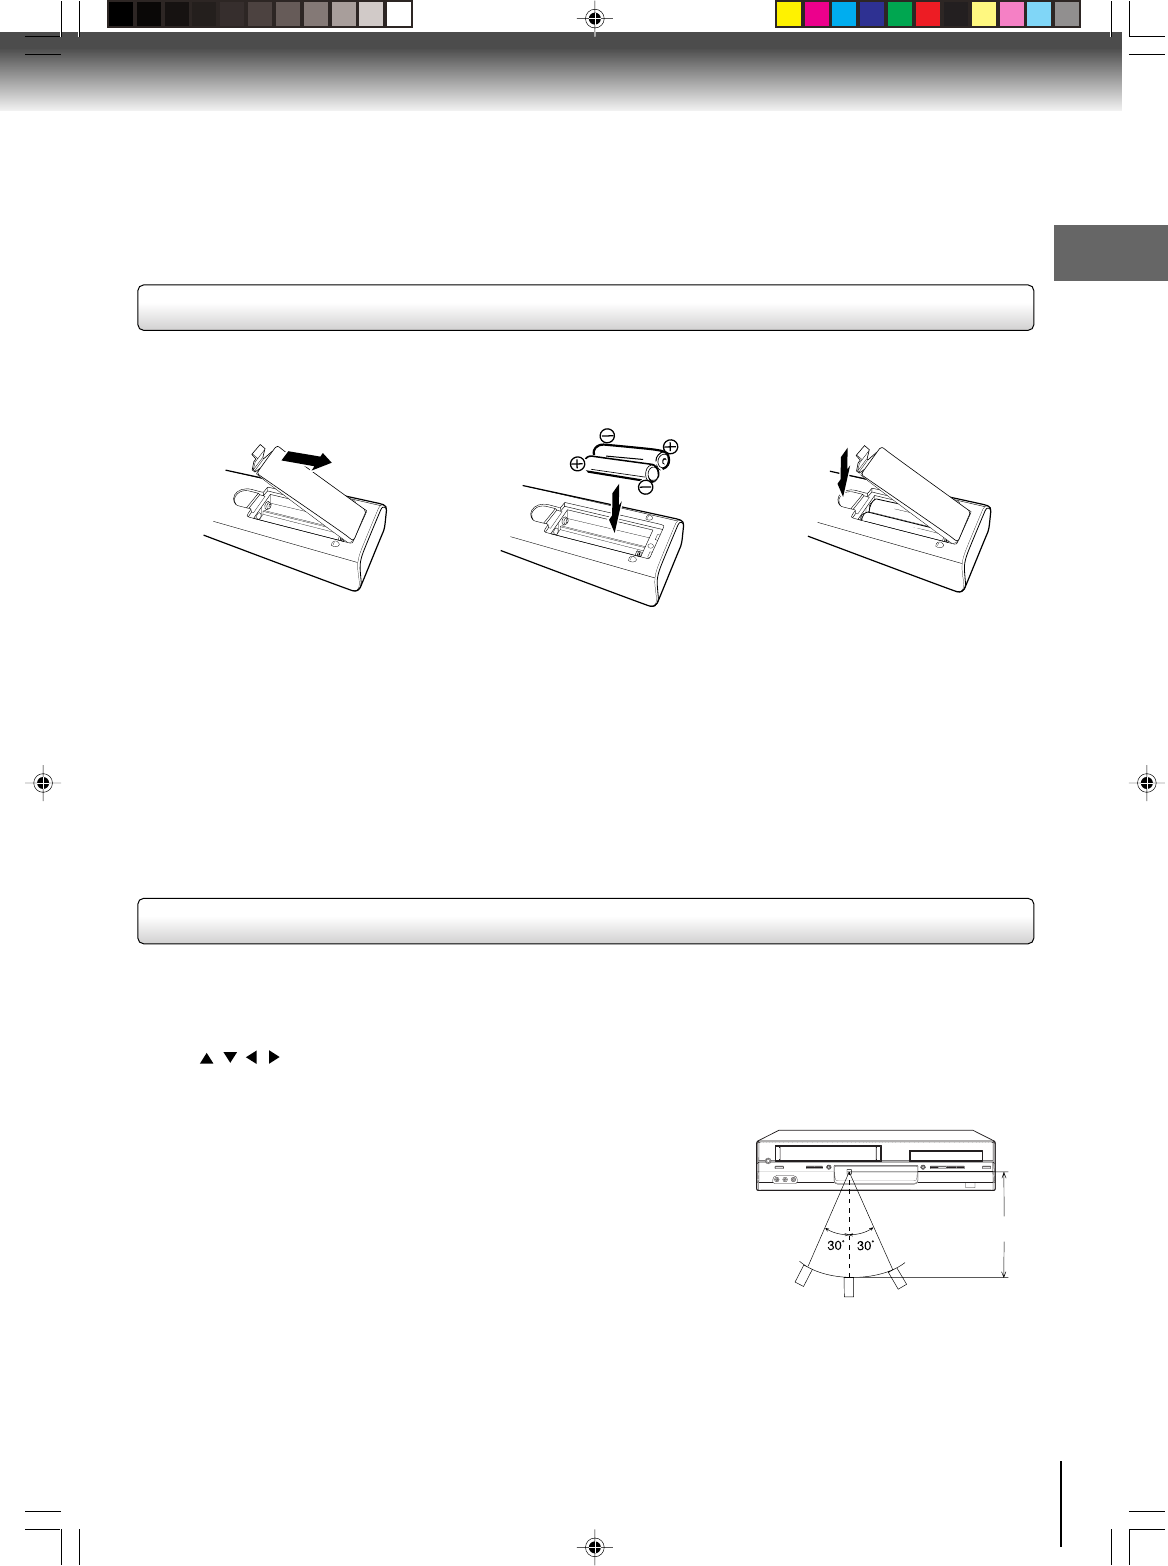
•Aim the remote control at the remote sensor and press control buttons to
operate.
•Operate the remote control within 30° angle on either side of the remote
sensor, up to a distance of approx. 7 meters.
Replace the compartment
cover.
Install two “AAA” batteries
(supplied),
paying attention to the
polarity diagram in the battery
compartment.
Open the battery compart-
ment cover in the direction of
the arrow.
Approx. 7 meters
Caution:
Never throw batteries into a fire.
Notes:
•Be sure to use AAA size batteries.
•Dispose of batteries in a designated disposal area.
•
Batteries should always be disposed of with the environment in mind. Always dispose of batteries in accordance with
applicable laws and regulations.
•If the remote control does not operate correctly, or if the operating range becomes reduced, replace batteries with
new ones.
•When necessary to replace batteries in the remote control, always replace both batteries with new ones. Never mix
battery types or use new and used batteries in combination.
•Always remove batteries from remote control if they are dead or if the remote control is not to be used for an
extended period of time. This will prevent battery acid from leaking into the battery compartment.
•Press POWER to turn the DVD/VCR on or off.
•Select your desired operating mode (DVD or VCR) using VCR DVD.
(DVD or VCR indicator on the front panel will show you which mode is selected.)
•Press CH + or CH – to move through the channels one channel at a time.
•The
///are also used to navigate on-screen menu system.
•You can directly access specific channels using Direct channel selection buttons (0–9).
•Each press of VCR DVD on the remote control, switches the screen between the VCR screen (VCR mode) and the
DVD screen (DVD mode).
1
23
Remote control basics
Inserting batteries
2I30201B-En_p02-131/13/06, 2:47 PM13
14
Connections
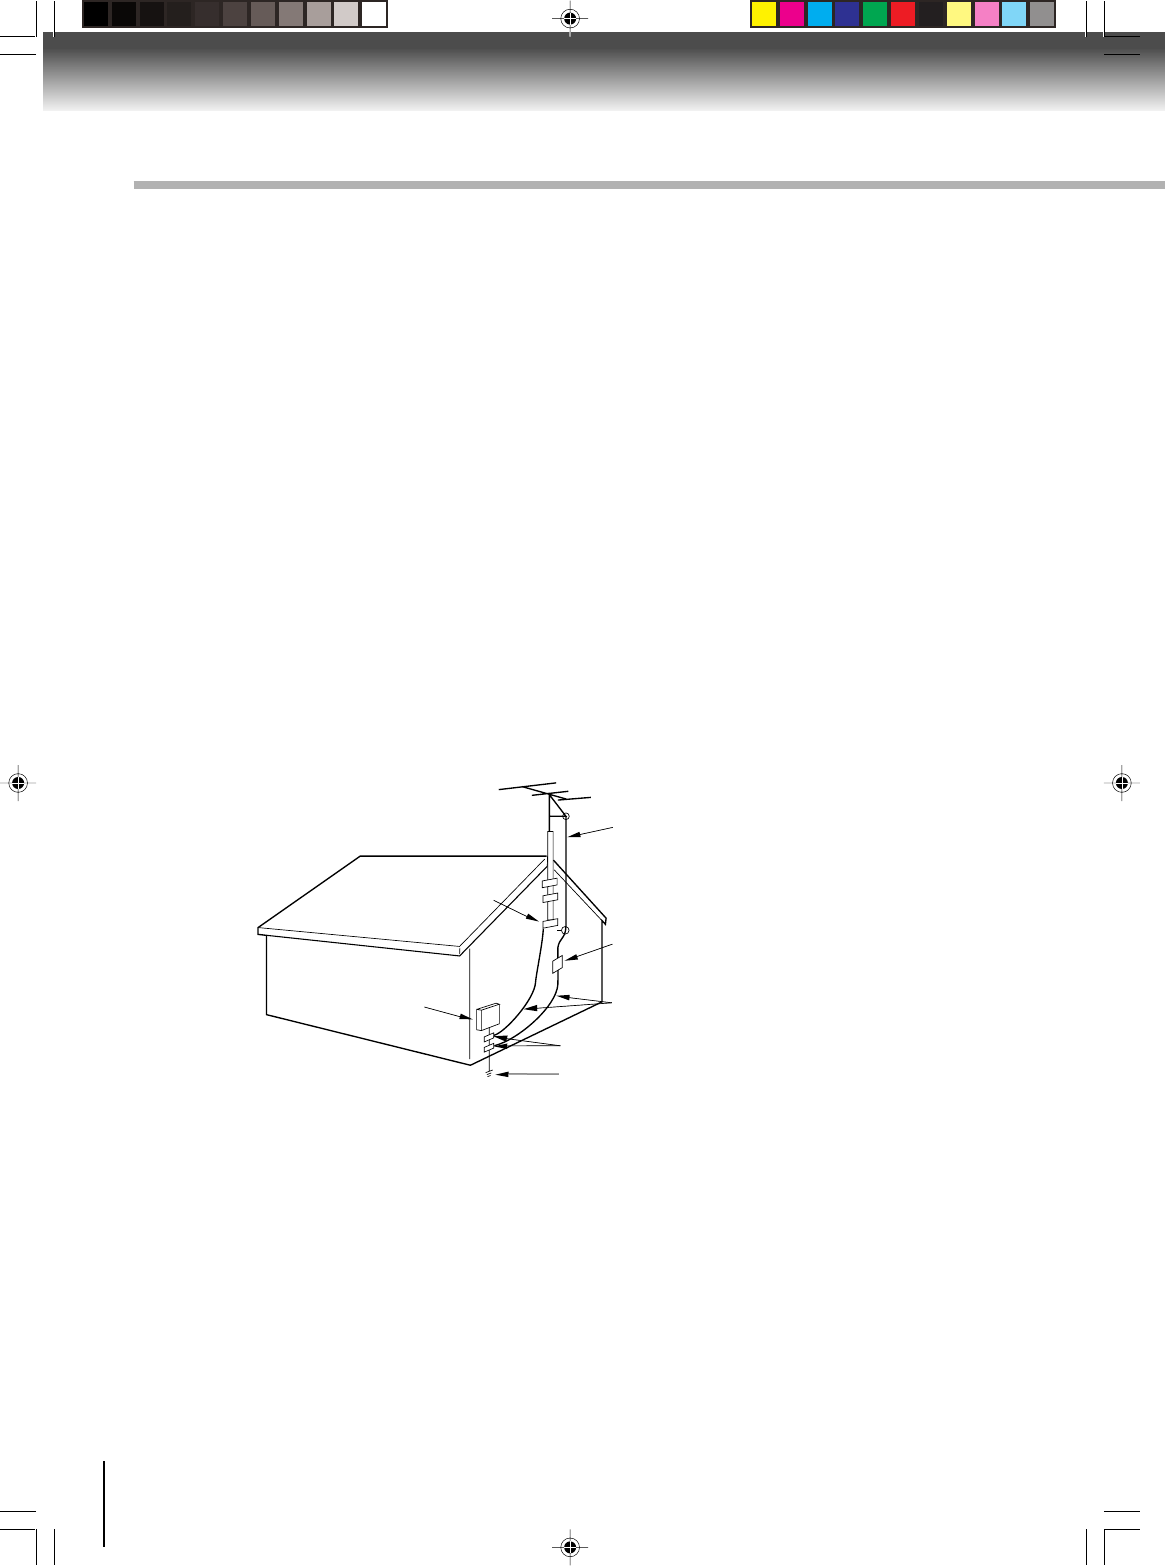
Notes:•A clear picture will not be obtained by the DVD/VCR unless the antenna signal is good. Connect the antenna to
the DVD/VCR properly.
•For better quality recording, an indoor antenna or a telescopic antenna is not recommended. The use of an outdoor type
antenna is required.
•If you are not sure about the connection, please refer to qualified service personnel.
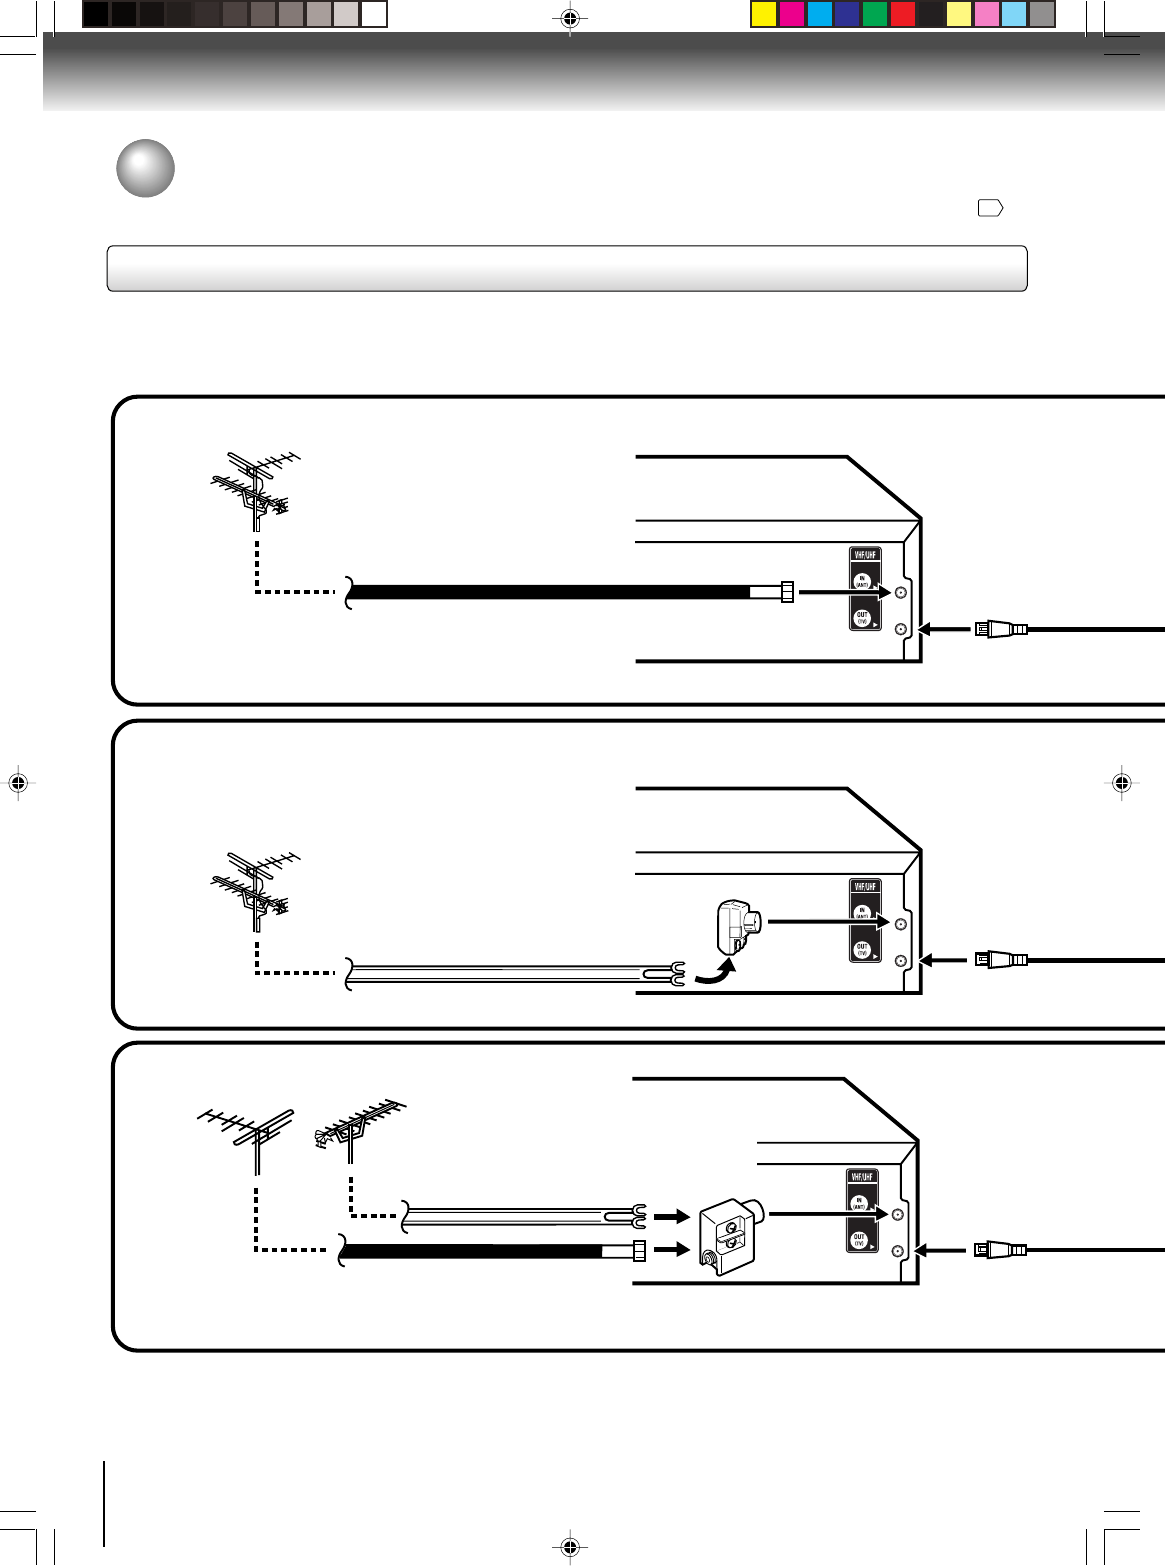
The DVD/VCR must be connected “between” the antenna and the TV. First, disconnect the antenna from the TV and
connect it to the DVD/VCR. Then connect the DVD/VCR to the TV. Below are 3 common methods of connecting an antenna
system to a DVD/VCR. Find the type of antenna system you are using and follow the connection diagram.
If both VHF and UHF antennas have 300 ohm twin lead (flat) wires, use a combiner having two 300 ohm inputs and
one 75 ohm output.
Note:
Combination VHF/UHF Antenna with 75 ohm Coaxial Cable
Combination VHF/UHF Antenna with 300 ohm Twin Lead (Flat) Wire
Separate VHF and UHF Antennas
DVD/VCR
VHF
UHF
300 ohm Twin Lead (Flat) Wire
(not supplied)
Matching Transformer 300 ohm Input 75
ohm output (not supplied)
300 ohm Twin Lead (Flat) Wire
(not supplied)
75 ohm Coaxial Cable
75 ohm Coaxial Cable
Combiner 75/300 ohm Inputs 75 ohm output
(not supplied)
DVD/VCR
DVD/VCR
Antenna connections
If you are using an antenna system, follow these instructions. If you are a Cable TV subscriber, skip ahead to page
16
for
the proper connections.
Antenna to DVD/VCR connection
1
2
3
2I30201B-En_p14-171/13/06, 2:47 PM14
15
Connections
UHF
VHF
UHF
VHF
VHF/UHF IN
Note:If a VHF or UHF antenna is used,
set the TV/CABLE menu option to
the “TV” mode.
Note:If a VHF or UHF antenna is used,
set the TV/CABLE menu option
to the “TV” mode.
Note:If a VHF or UHF antenna is used,
set the TV/CABLE menu option to
the “TV” mode.
75 ohm Coaxial Cable (supplied)
Splitter 75 ohm Input
75/300 ohm outputs
(not supplied)
Splitter 75 ohm Input
300 ohm outputs
(not supplied)
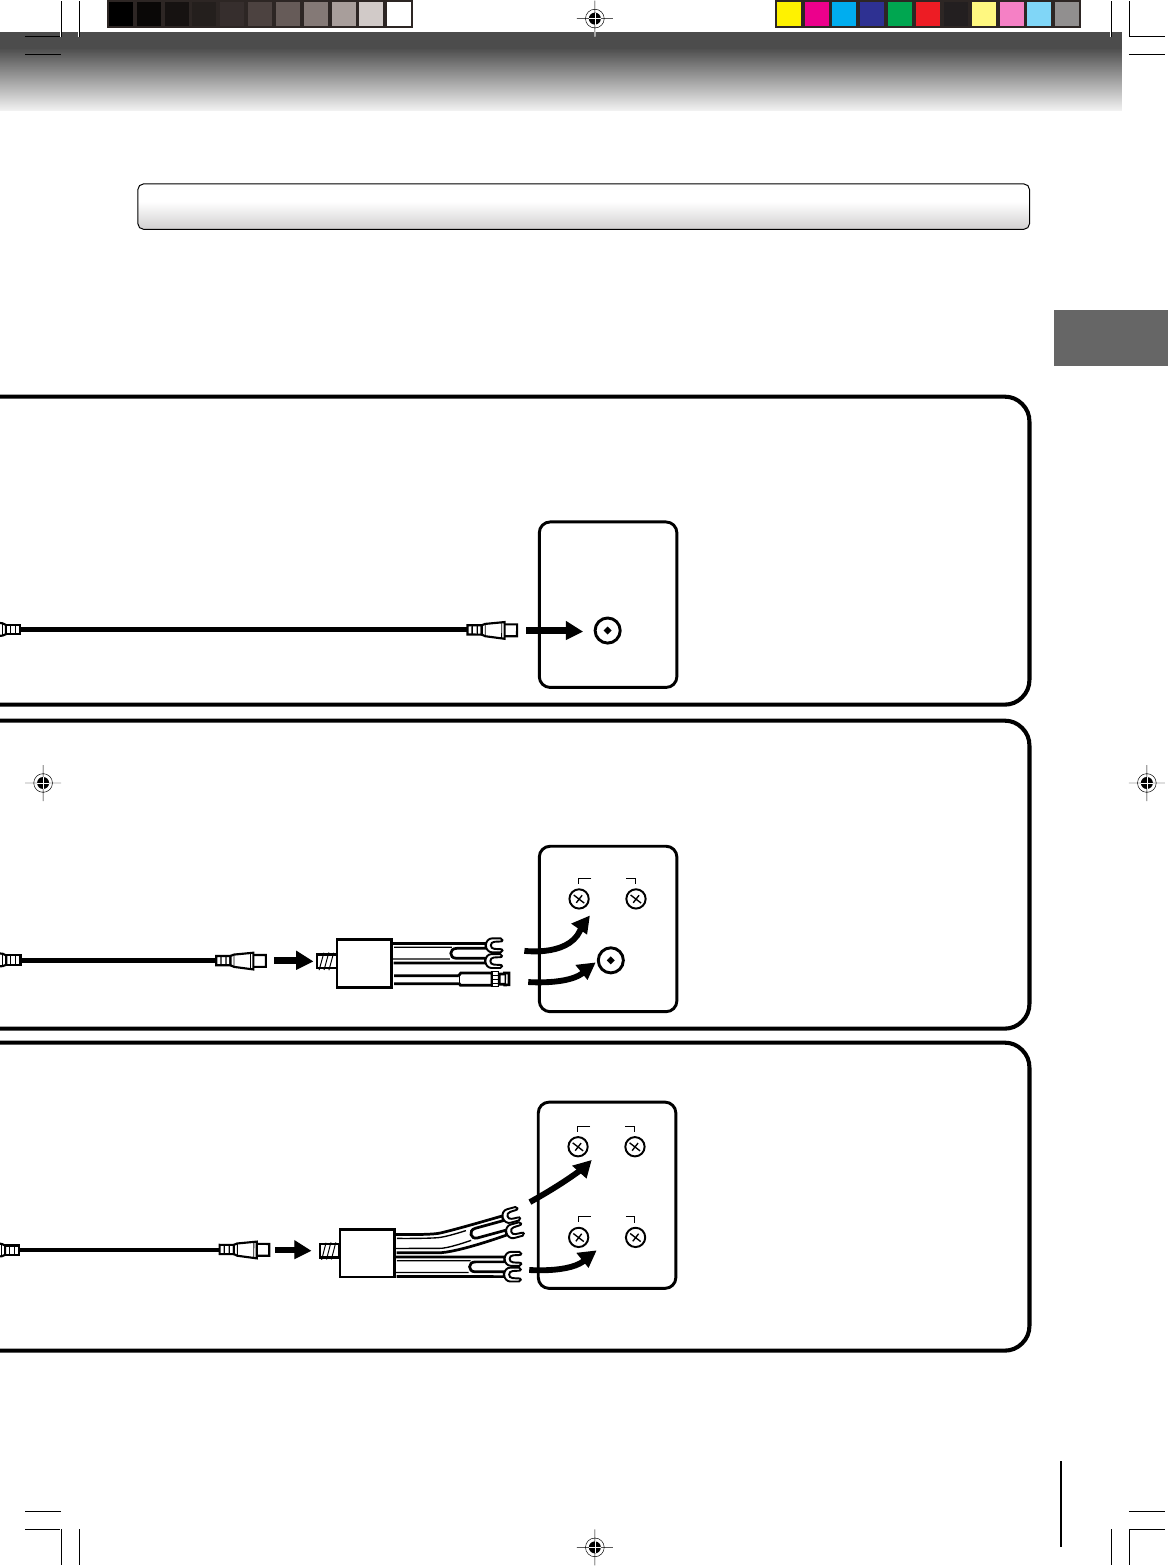
TV with single 75 ohm VHF/UHF antenna
input
TV with 300 ohm UHF and 75 ohm VHF
antenna inputs
TV with 300 ohm UHF and 300 ohm VHF
antenna inputs
After you have connected the antenna to the DVD/VCR, you must connect the DVD/VCR to the TV.
Below are 3 common methods of connecting your DVD/VCR to a TV. Find the type of TV you are using and follow the
connection diagram.
This DVD/VCR has a single 75 ohm output for connection to a TV. If your TV has separate VHF and UHF antenna
inputs (numbers 2 and 3 below), use a splitter to connect the DVD/VCR to the TV for VHF and UHF reception.
TV
TV
TV
75 ohm Coaxial Cable
(supplied)
75 ohm Coaxial Cable
(supplied)
DVD/VCR to TV connection
2I30201B-En_p14-171/13/06, 2:47 PM15
16
Connections
Cable TV connections
VHF/UHF
IN (ANT)
VHF/UHF
IN (ANT)
VHF/UHF
IN (ANT)
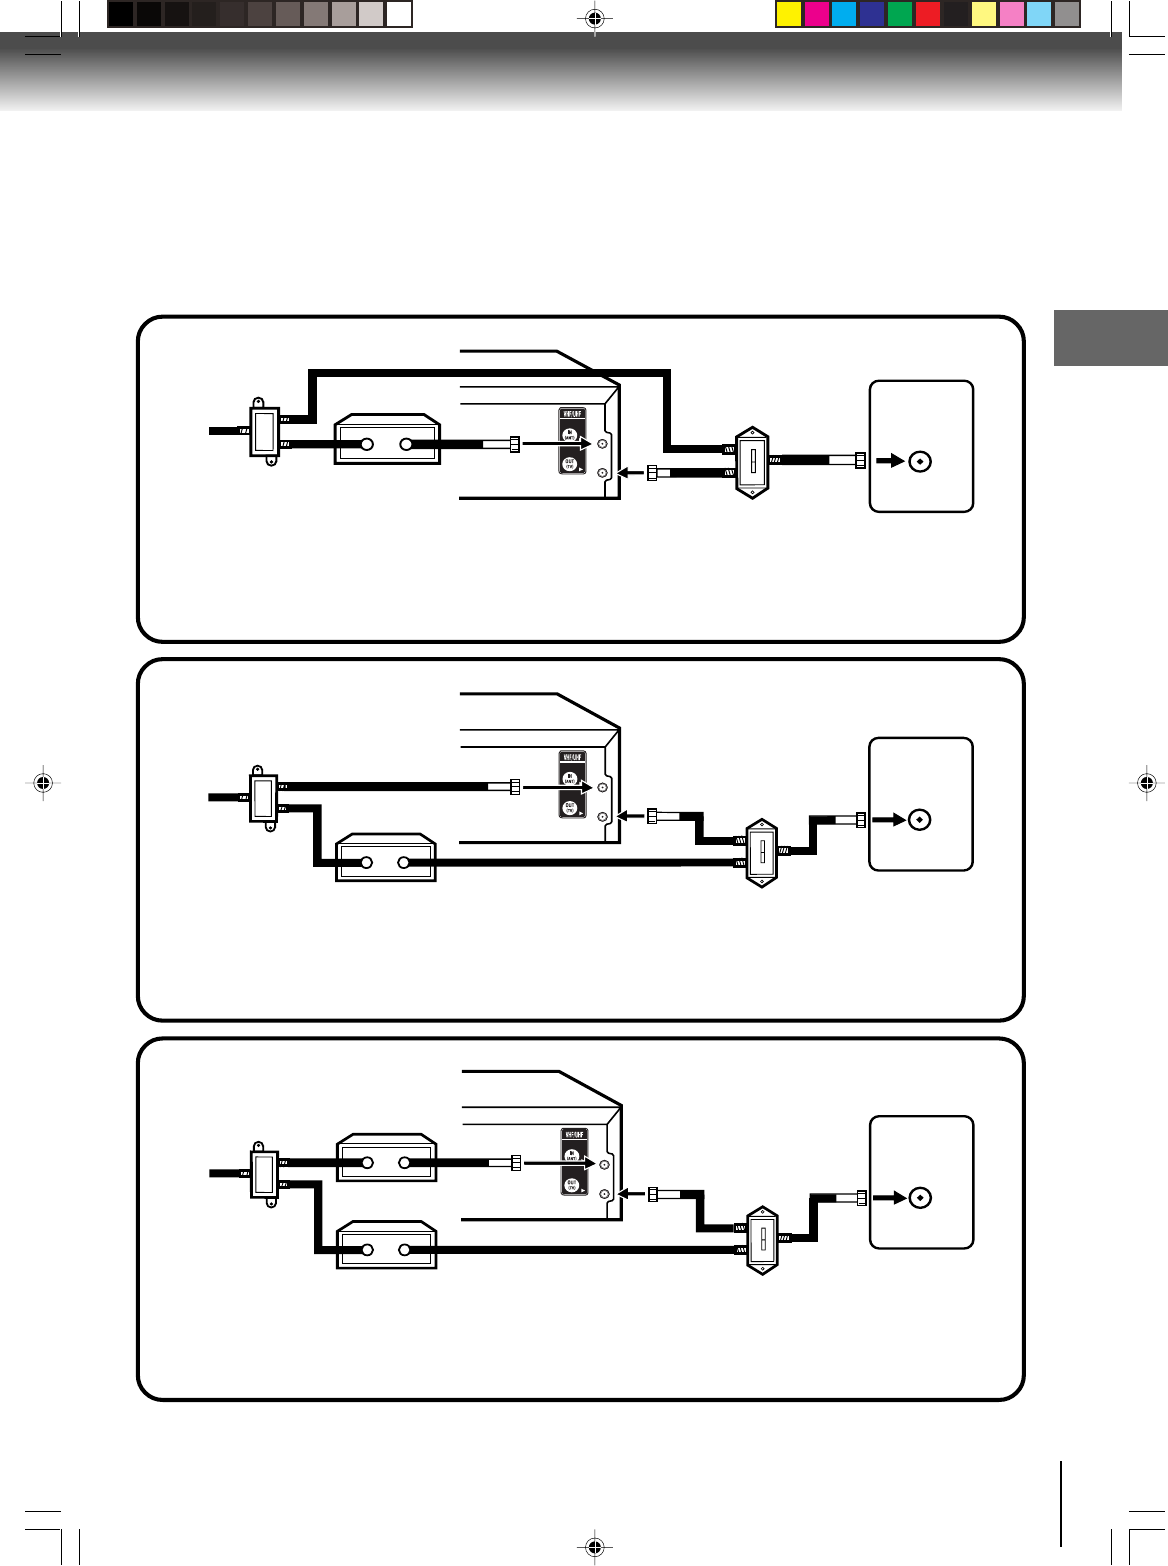
Many cable companiesoffer services permitting reception of extra channels including pay or subscription channels. This
DVD/VCR has an extended tuning range and can be tuned to most cable channels without using a cable company
supplied converter box, except for those premium channels which are intentionally scrambled. If you subscribe to a
premium channel which is scrambled, you must have a descrambler box for proper reception.
Allows:
*
Recording of nonscrambled channels.
*
Use of the programmable timer.
*
Recording of one channel while watching another.
Allows:
*
Recording of channels through the converter box
(scrambled and unscrambled).
*
Using the programmable timer to record only the
channel selected at the converter box.
Prevents:
*
Recording one channel while watching another.
*
Using the DVD/VCR tuner to select channels.
DVD/VCR
Incoming Cable
TV
Converter/
Descrambler
Incoming
Cable
TV
TV
Note:
To record from converter/descrambler, DVD/
VCR tuner must be tuned to the converter
output channel, usually channel 3 or 4.
DVD/VCR
DVD/VCR
Note:Whenever a Converter/Descrambler box is placed before the DVD/VCR, you must tune the DVD/VCR to the output of
the Converter/Descrambler box, usually channel 3 or 4.
Incoming Cable
Converter/Descrambler
Allows:
*
Recording of nonscrambled channels.
*
Use of the programmable timer.
*
Recording an unscrambled channel while watching
any channel selected at the converter box.
Prevents:Recording scrambled channels.
Note:
If you are playing a tape or using the tuner
built into the DVD/VCR, the converter must
be set to the video channel output of the DVD/
VCR (either 3 or 4).
1
2
3
2I30201B-En_p14-171/13/06, 2:47 PM16
17
Connections
VHF/UHF
IN (ANT)
A
B
VHF/UHF
IN (ANT)
A
B
This DVD/VCR cannot receive scrambled programs since it does not contain a descrambler. In order to receive scram-
bled programs, your existing descrambler must be used. Descrambler boxes are available from cable companies. Con-
sult your local cable company for more information concerning connection to their descrambler equipment. There are
many ways to connect your DVD/VCR to a cable system. Below are six common methods of connection.
IMPORTANT: Make sure the TV/CABLE menu option is set to the “CABLE” mode.
Incoming Cable
Allows:
*
Recording of one channel while watching another.
*
Using the programmable timer to record only the channel selected at the converter box.
*
Recording of all channels through the converter box.
Prevents:
*
Watching scrambled channels while recording another channel.
*
Using the DVD/VCR tuner to select channels.
DVD/VCR
Splitter
Converter/Descrambler
TV
DVD/VCR
Converter/Descrambler
A/B Switch
TV
Incoming Cable
Splitter
Allows:
*
Recording of nonscrambled channels.
*
Recording of one channel while watching another.
*
Watching premium channels through the converter while recording nonscrambled channels.
*
Using the programmable timer.
Prevents:Recording scrambled channels.
DVD/VCR
Splitter
TV
Converter/Descrambler
A/B Switch
VHF/UHF
IN (ANT)
A
B
Allows:
*
Recording of all channels through the converter box.
*
Recording a scrambled or unscrambled channel while watching another (scrambled or
unscrambled) channel.
*
Using the programmable timer to record only the channel selected at the converter box.
Prevents:Using the DVD/VCR tuner to select channels.
A/B Switch
Incoming Cable
Converter/Descrambler
4
5
6
2I30201B-En_p14-171/13/06, 2:47 PM17
18
Connections
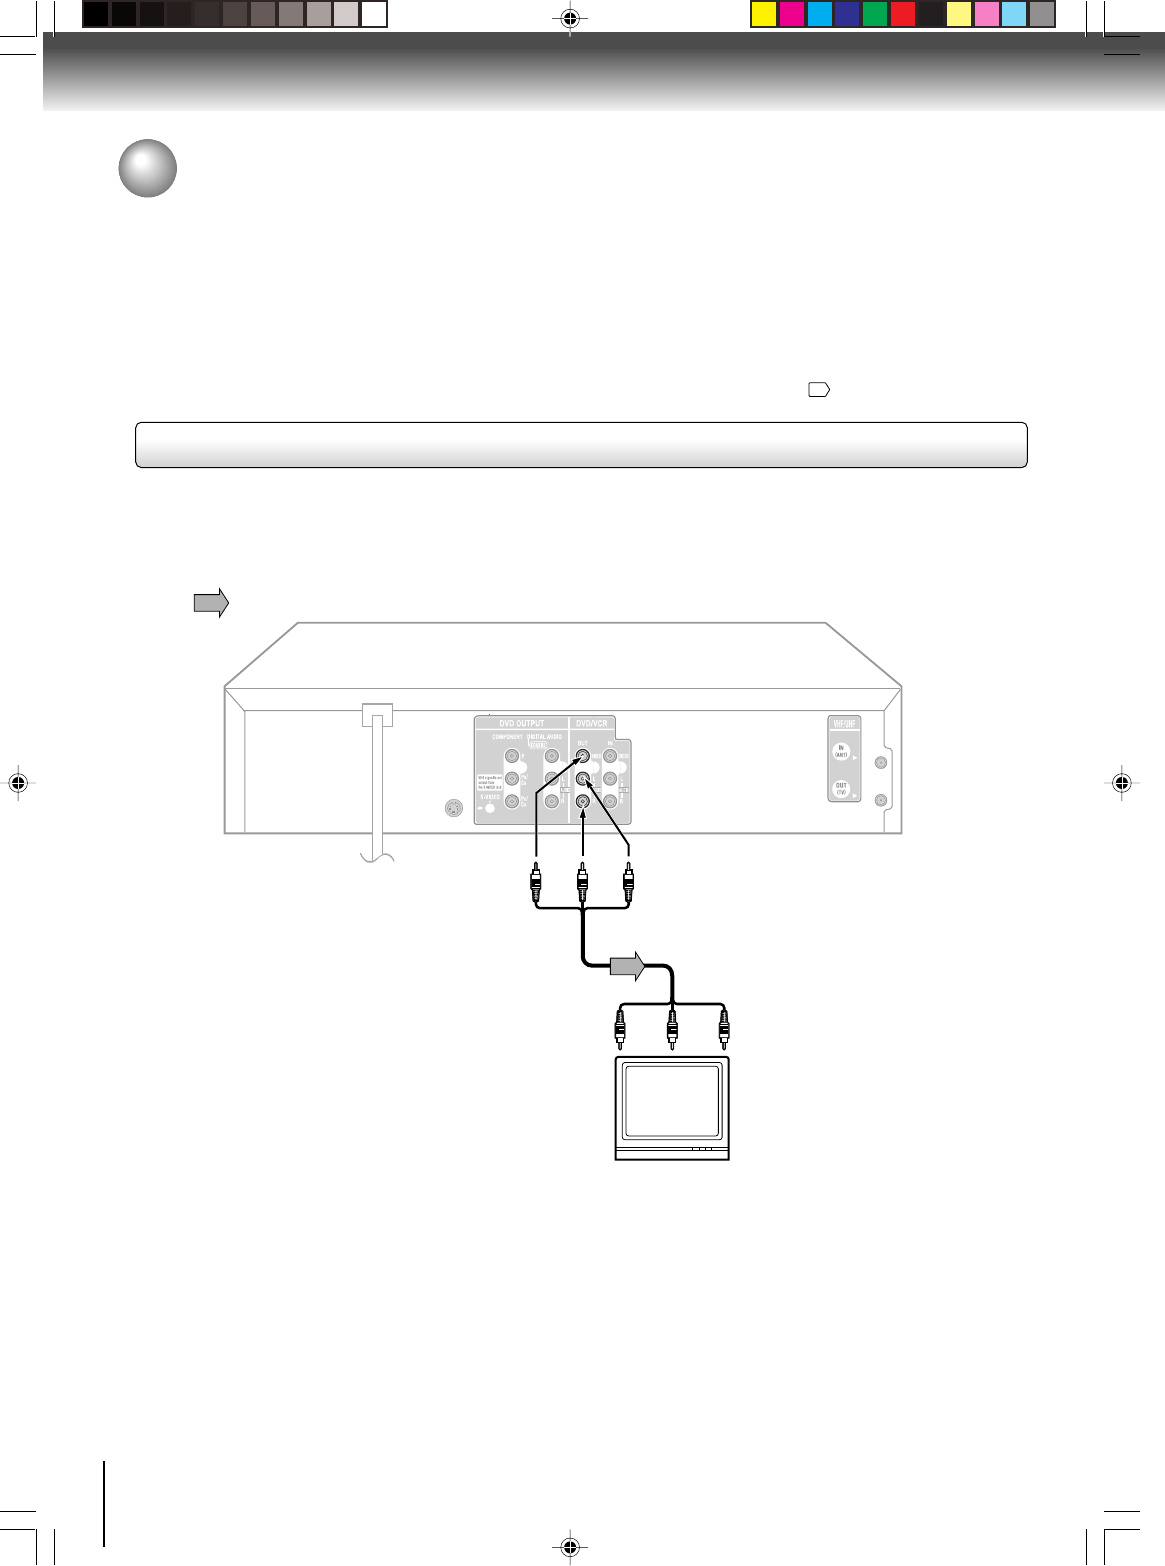
Connecting to a TV
Connect the DVD/VCR to your TV.
To VIDEO
OUT
To ANALOG AUDIO OUT
(red)(white)
(yellow)
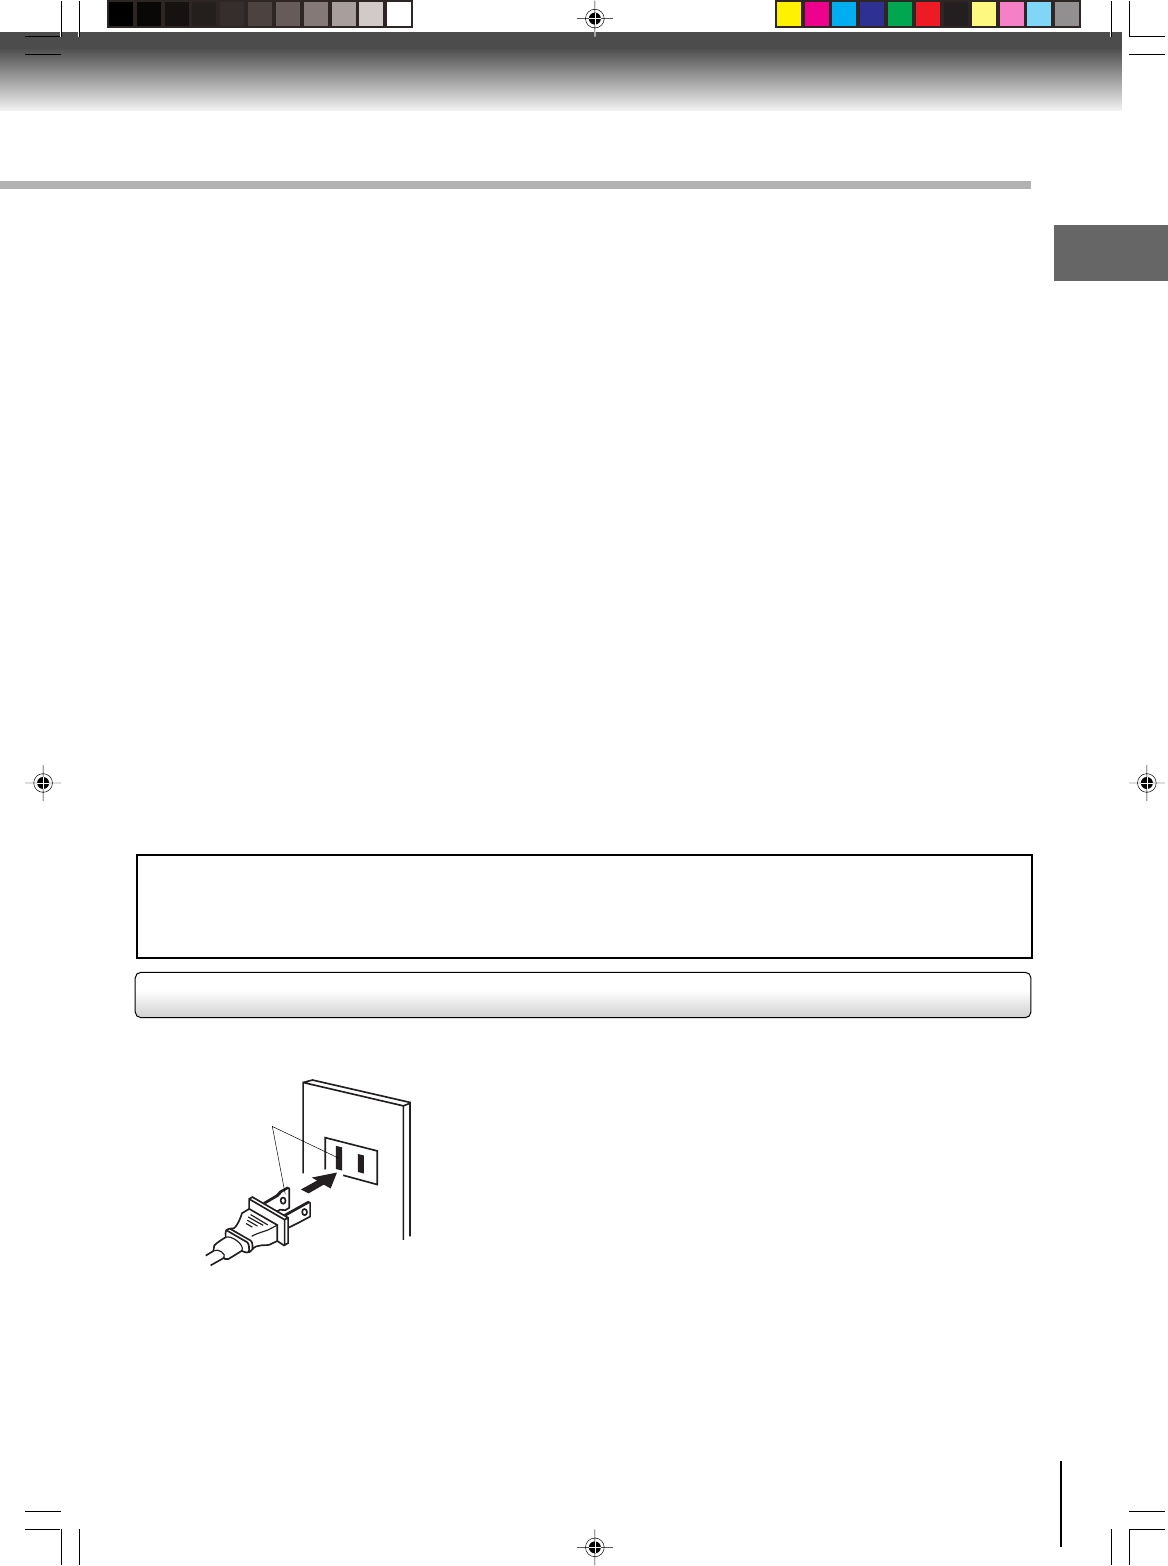
Signal flow
To wall outlet
To video input
(yellow)
(red)
Audio/video cable (supplied)
To audio inputs
(white)
Notes:
•Refer to the owner’s manual of the connected TV as well.
•When you connect the DVD/VCR to your TV, be sure to turn off the power and unplug both units from the wall outlet before
making any connections.
•If your television set has one audio input, connect the left and right audio outputs of the DVD/VCR to a Y cable adapter (not
supplied) and then connect to your TV.
•Connect the DVD/VCR directly to your TV. If you connect the DVD/VCR to a VCR, TV/VCR combination or video selector, the
playback picture may be distorted as DVD video discs are copy protected.
TV or monitor with
audio/video inputs
Basic connection
Note:This method transports VHS and DVD-video signals. For enhanced DVD-video performance, we recommend you to
connect the S-video or ColorStream
®
component video outputs to your TV/monitor also.
19
2I30201B-En_p18-251/13/06, 2:47 PM18
19
Connections
Notes:
•Refer to the owner’s manual of the connected equipment as well.
•When you connect the DVD/VCR to other equipment, be sure to turn off the power and unplug all of the equipment from the
wall outlet before making any connections.
•If you place the DVD/VCR near a tuner or radio, the radio broadcast sound might be distorted. In this case, place the DVD/
VCR away from the tuner and radio.
•The output sound of the DVD/VCR has a wide dynamic range. Be sure to adjust the receiver’s volume to a moderate
listening level. Otherwise, the speakers may be damaged by a sudden high volume sound.
•Turn off the amplifier before you connect or disconnect the DVD/VCR’s power cord. If you leave the amplifier power on, the
speakers may be damaged.
•When connecting to a TV using the S-video jack, make sure that the Progressive indicator “” on the display
window is not lit. If it is lit, the S-video outputs do not feed the correct signals and you cannot see any picture.
To turn off the Progressive indicator, select Interlaced output
62
.
Connecting to an audio system and TV equipped with S-video input/component video inputs
•Actual labels for
component video
inputs may vary
depending on the
TV manufacturer
(ex. Y, R-Y, B-Y or
Y, CB, CR).
TV or monitor with
component video inputs
To
PR/CR
video input
To PR/CR
VIDEO
OUT
Signal flow
To wall outlet
To audio inputs of
the amplifier
(red)
(white)
(red)
(white)
To Y
VIDEO
OUT
To PB/CB
VIDEO
OUT
To Y video input
To
PB/CB
video input
Audio system
To ANALOG
AUDIO OUT
To S-VIDEO
OUT
Component
video cable
(not supplied)
To S-video inputS-video cable (not supplied)
Audio cable (not supplied)
If you connect the DVD/VCR to
your TV with the DVD OUT jacks,
select the corresponding video
input on your television to watch
DVD video discs.
The S-video output and component video output transports the DVD-video signal exclusively and will deliver enhanced DVD
video picture performance.
S-video output
An S-Video connection is superior to Video (Yellow) output. Use this method for DVD playback when the connected television
has S-Video input, and does not have component video inputs.
Component video outputs
PROGRESSIVE outputs
Some TVs or monitors are equipped with component video inputs that are capable of reproducing a progressively scanned
video signal. Connecting to these inputs allows you to view the highest quality pictures with less flicker.
INTERLACED outputs
Some TVs or monitors are equipped with component video inputs. Connecting to these inputs allows you to enjoy the highest
quality DVD picture playback.
Notes:
•To switch the scan mode between the interlace and progressive modes, see page
62
.
•In some TVs or monitors, the color levels of the playback picture may be reduced slightly or the tint may change. In such a
case, adjust the TV or monitor for optimum performance.
2I30201B-En_p18-251/13/06, 2:47 PM19
20
Connections
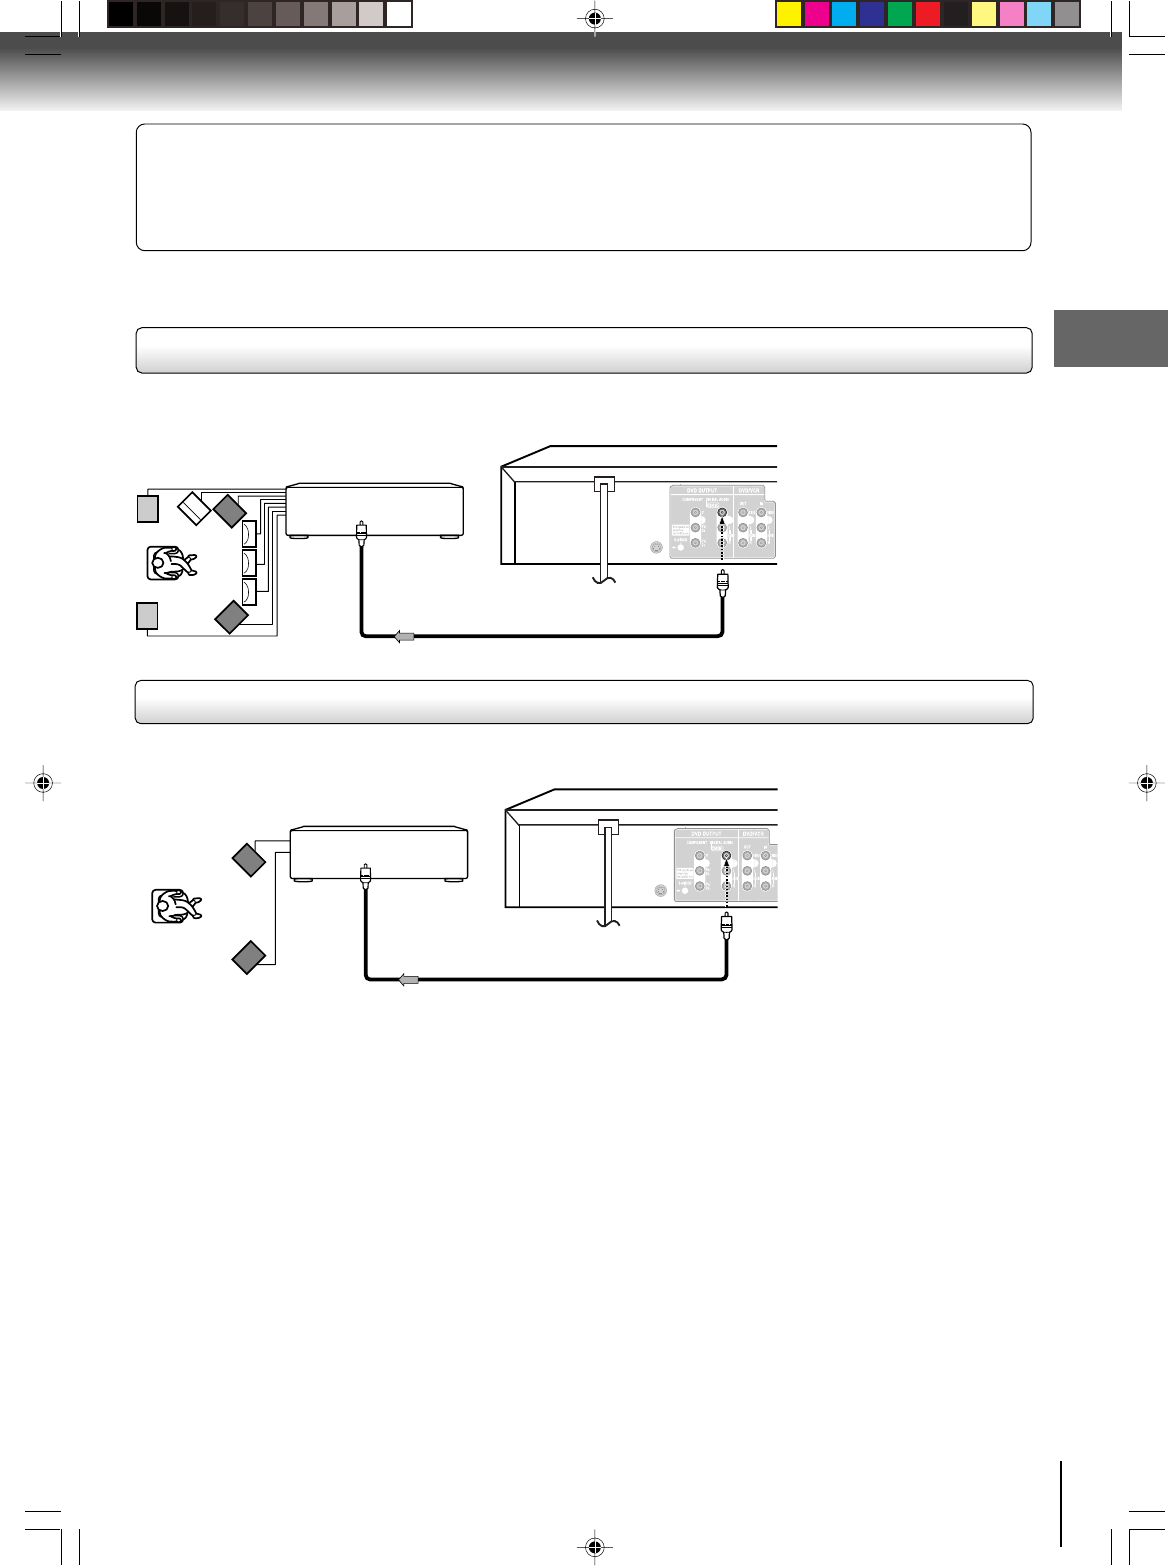
Connecting to optional audio equipment
You can enjoy high quality dynamic sounds of DVD video discs or
audio CDs by connecting the DVD/VCR to optional audio
equipment.
Connection for video signal to your TV, see
1819
.
: Front speaker
: Rear speaker
: Sub woofer
: Center speaker
: Signal flow
Connecting to an amplifier equipped with a Dolby Digital decoder
Connecting to an amplifier equipped with Dolby Surround Pro Logic
Dolby Surround Pro Logic
You can enjoy the dynamic realistic sound of Dolby Surround Pro Logic by connecting an amplifier and speaker system (right and left
front speakers, a center speaker, and one or two rear speakers).
Connecting to an amplifier equipped with a DTS decoder
Digital Theater Systems (DTS)
DTS is a high quality surround technology used in theaters and now available for home use, on DVD video discs or audio CDs.
If you have a DTS decoder or processor, you can obtain the full benefit of 5.1 channel DTS encoded sound tracks on DVD video discs
or audio CDs.
Manufactured under license from
Dolby Laboratories. “Dolby”, “Pro
Logic” and the double-D symbol
are trademarks of Dolby
Laboratories.
•Use DVD video discs encoded
via the Dolby Digital recording
system.
•Use DVD video discs or
audio CDs encoded via the
DTS recording system.
*
Connect one or two rear speakers.
The output sound from the rear
speakers will be monaural even if you
connect two rear speakers.
“DTS” and “DTS Digital Out” are
trademarks of Digital Theater
Systems, Inc.
Amplifier equipped with a
Dolby Digital decoder
75 Ω coaxial cable (not supplied)
To COAXIAL
type digital
audio input
*
Amplifier equipped with a
DTS decoder
To COAXIAL
type digital
audio input
• This selection uses the following reference mark.
To ANALOG
AUDIO OUT
To audio input
Audio cable (not supplied)
75 Ω coaxial cable (not supplied)
Dolby Digital
Dolby Digital is the surround sound technology used in theaters showing the latest movies, and is now available to reproduce this realistic effect in the
home. You can enjoy motion picture and live concert DVD video discs encoded via the Dolby Digital recording system with this dynamic realistic
sound by connecting the DVD/VCR to a 6 channel amplifier equipped with a Dolby Digital decoder or Dolby Digital processor. If you have a Dolby Pro
Logic Surround decoder, you will obtain the full benefit of Pro Logic from the same DVD movies that provide full 5.1-channel Dolby Digital soundtracks,
as well as from titles with the Dolby Surround mark.
Amplifier equipped with
Dolby Surround Pro Logic
With an amplifier equipped with Dolby Digital
Connect the equipment the same way as described in “Connecting to an amplifier equipped with a Dolby Digital decoder.” Refer to
that amplifier’s owner’s manual and set the amplifier so that you can enjoy Dolby Surround Pro Logic sound.
With an amplifier not equipped with Dolby Digital
Connect the equipment as follows.
• This connection is only suitable for Video CDs and Audio CDs.
To COAXIAL DIGITAL
AUDIO OUT
To COAXIAL DIGITAL
AUDIO OUT
2I30201B-En_p18-251/13/06, 2:47 PM20
21
Connections
75 Ω coaxial cable (not supplied)
75 Ω coaxial cable (not supplied)
Warning
When playing DTS-encoded discs (DVD video discs and audio CDs), excessive noise may be output from the analog stereo
jacks. To avoid possible damage to the audio system, you should take proper precautions when the ANALOG AUDIO OUT (L/
R) jacks of the DVD/VCR are connected to an amplification system. (Do not leave the ANALOG AUDIO OUT (L/R) wires
dangling.) To enjoy DTS Digital Surround™ playback, an external 5.1 channel DTS Digital Surround™ decoder system must
be connected to the COAXIAL DIGITAL AUDIO OUT jack of the DVD/VCR.
Connecting to an amplifier equipped with an MPEG2 audio decoder
MPEG2 sound
You can enjoy motion picture and live concert DVD video discs encoded via the MPEG2 recording system with dynamic realistic sound
by connecting an amplifier equipped with an MPEG2 audio decoder or MPEG2 audio processor.
Connecting to an amplifier equipped with a digital audio input
2 channel digital stereo
You can enjoy the dynamic sound of 2 channel digital stereo by connecting an amplifier equipped with a digital audio input and speaker
system (right and left front speakers).
Notes:
•DO NOT connect the COAXIAL DIGITAL AUDIO OUT jack of the DVD/VCR to the AC-3 RF input of a Dolby Digital Receiver.
This input on your A/V Receiver is reserved for Laserdisc use only and is incompatible with the COAXIAL DIGITAL AUDIO
OUT jack of the DVD/VCR.
•Connect the COAXIAL DIGITAL AUDIO OUT jack of the DVD/VCR to the “COAXIAL” input of a Receiver or Processor.
•Refer to the owner’s manual of the connected equipment as well.
•When you connect the DVD/VCR to other equipment, be sure to turn off the power and unplug all of the equipment from the
wall outlet before making any connections.
•The output sound of the DVD/VCR has a wide dynamic range. Be sure to adjust the receiver’s volume to a moderate
listening level. Otherwise, the speakers and your hearing may be damaged by a sudden high volume sound.
•Turn off the amplifier before you connect or disconnect the DVD/VCR’s power cord. If you leave the amplifier’s power on, the
speakers may be damaged.
•Use DVD video discs
encoded via the MPEG2
recording system.
Amplifier equipped with an
MPEG2 audio decoder
To COAXIAL
type digital
audio input
Amplifier equipped with a
digital audio input
To COAXIAL
type digital
audio input
To COAXIAL DIGITAL
AUDIO OUT
To COAXIAL DIGITAL
AUDIO OUT
2I30201B-En_p18-251/13/06, 2:47 PM21
22
Basic setup (VCR)
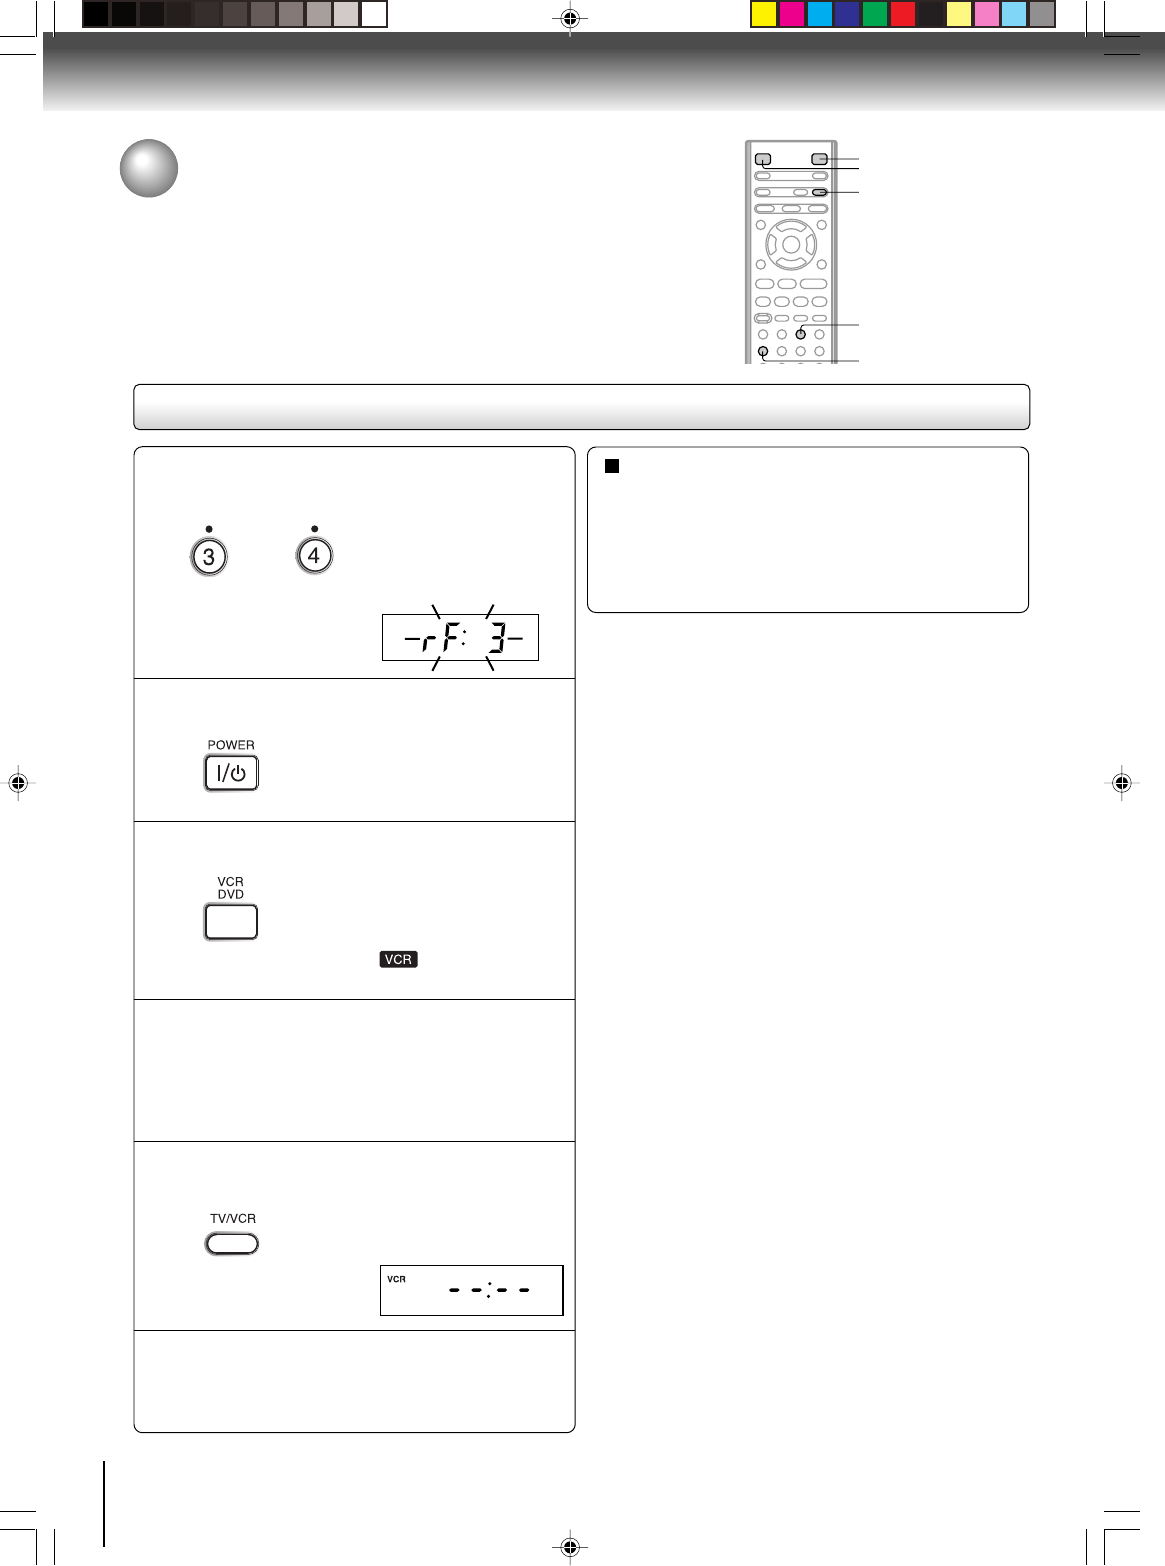
Setting the video channel
When a TV is connected with the 75 ohm coaxial cable only.
To view playback of a recorded tape or DVD disc, or to watch a
program selected by the VCR's channel selector, the TV must be set to
channel 3 or 4 (video channel).
Setting the video channel
Press POWER to turn on the DVD/VCR.
Press VCR DVD selector to select the VCR mode.
Turn ON the TV and set to CH 3 or 4 to corre-
spond with the channel selected in step 1.
Press TV/VCR to select the VCR position.
Select any channel to receive a TV station in your area.
The channel number will appear on the screen for
about 4 seconds.
1
The VCR mode indicator
will light at the right of the
display window.
2
3
4
5
6
The VCR indicator will
appear at the upper left of
the display window.
For a push-button TV tuner
If CH 3 or 4 corresponding to the video channel cannot
be tuned on your TV, proceed as follows: set the VCR
3/4 channel selector and the TV to CH 3 or 4, play
back a prerecorded tape and tune the TV to receive a
sharp color picture from the video cassette recorder.
Refer to your TV owner's manual for details.
Note:
If the unit does not operate properly, or No key operation
(by the unit and/or the remote control):Static electricity, etc.,
may affect the player's operation. Disconnect the AC power cord
once, then connect it again.
POWER
VCR DVD
TV/VCR
Press and hold 3 or 4 on the remote for 3
seconds in standby mode.
The video channel will
start to flash for 3
seconds in the display
window.
3
4
OR
2I30201B-En_p18-251/13/06, 2:47 PM22
23
Basic setup (VCR)
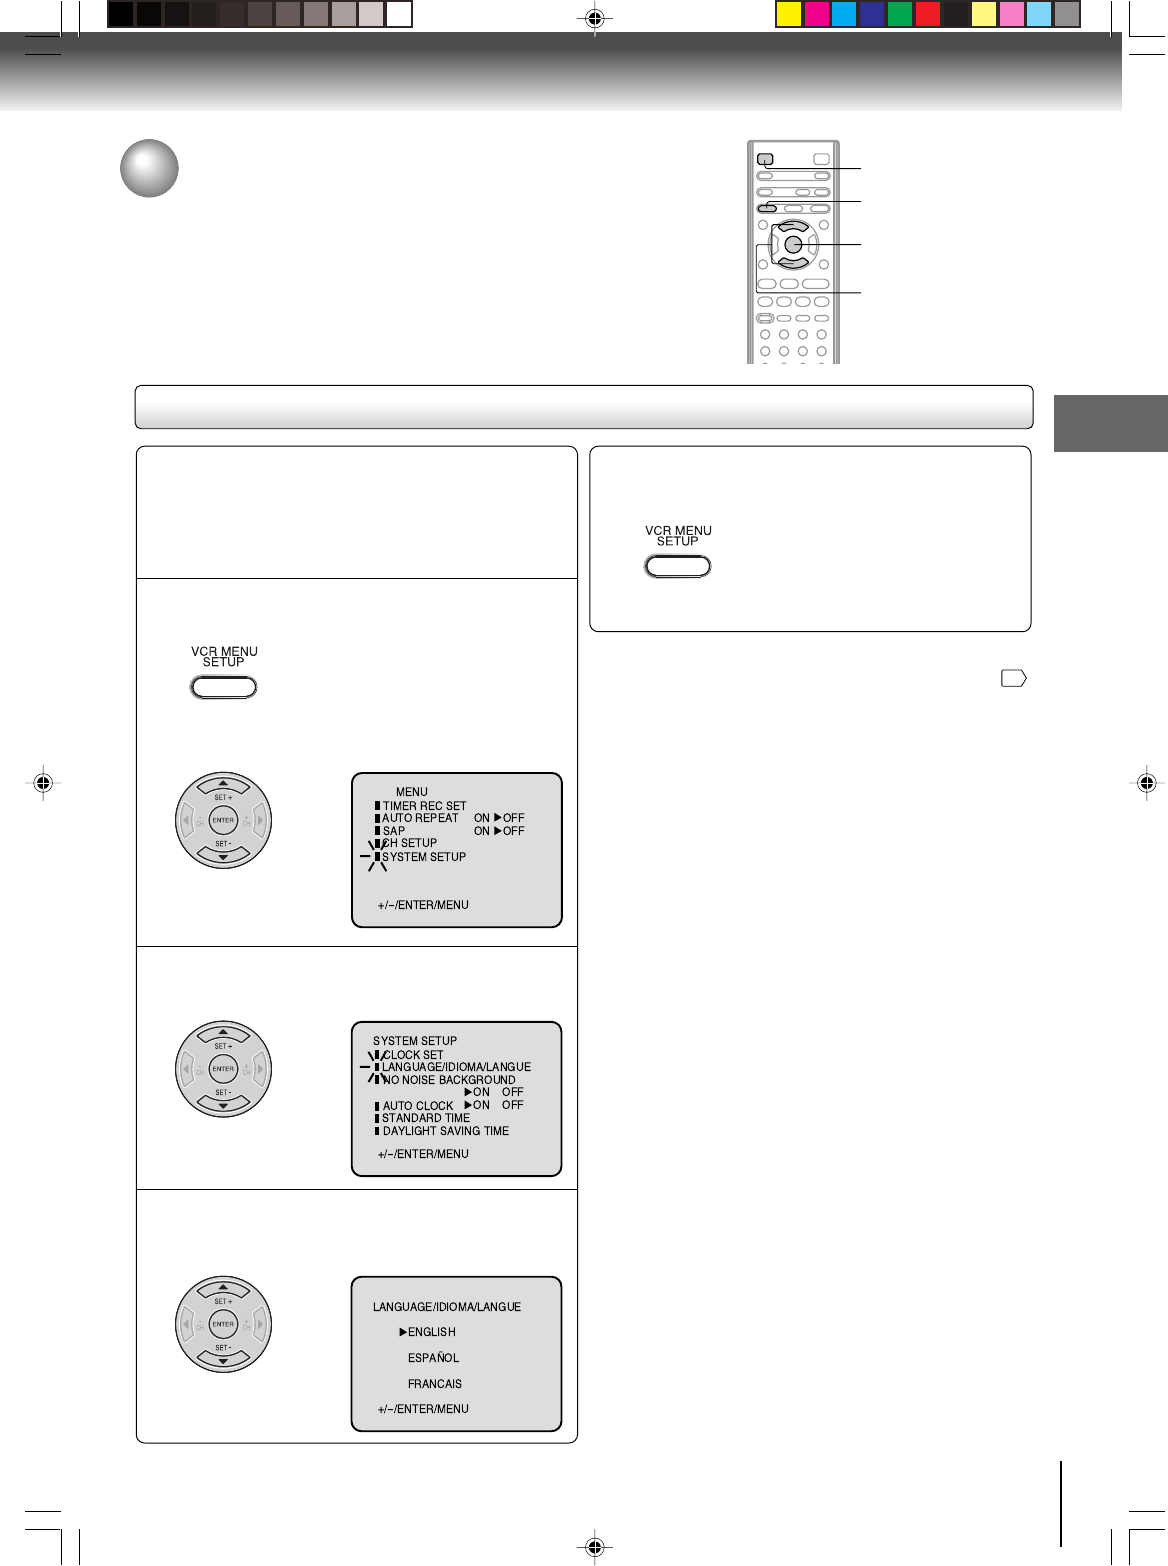
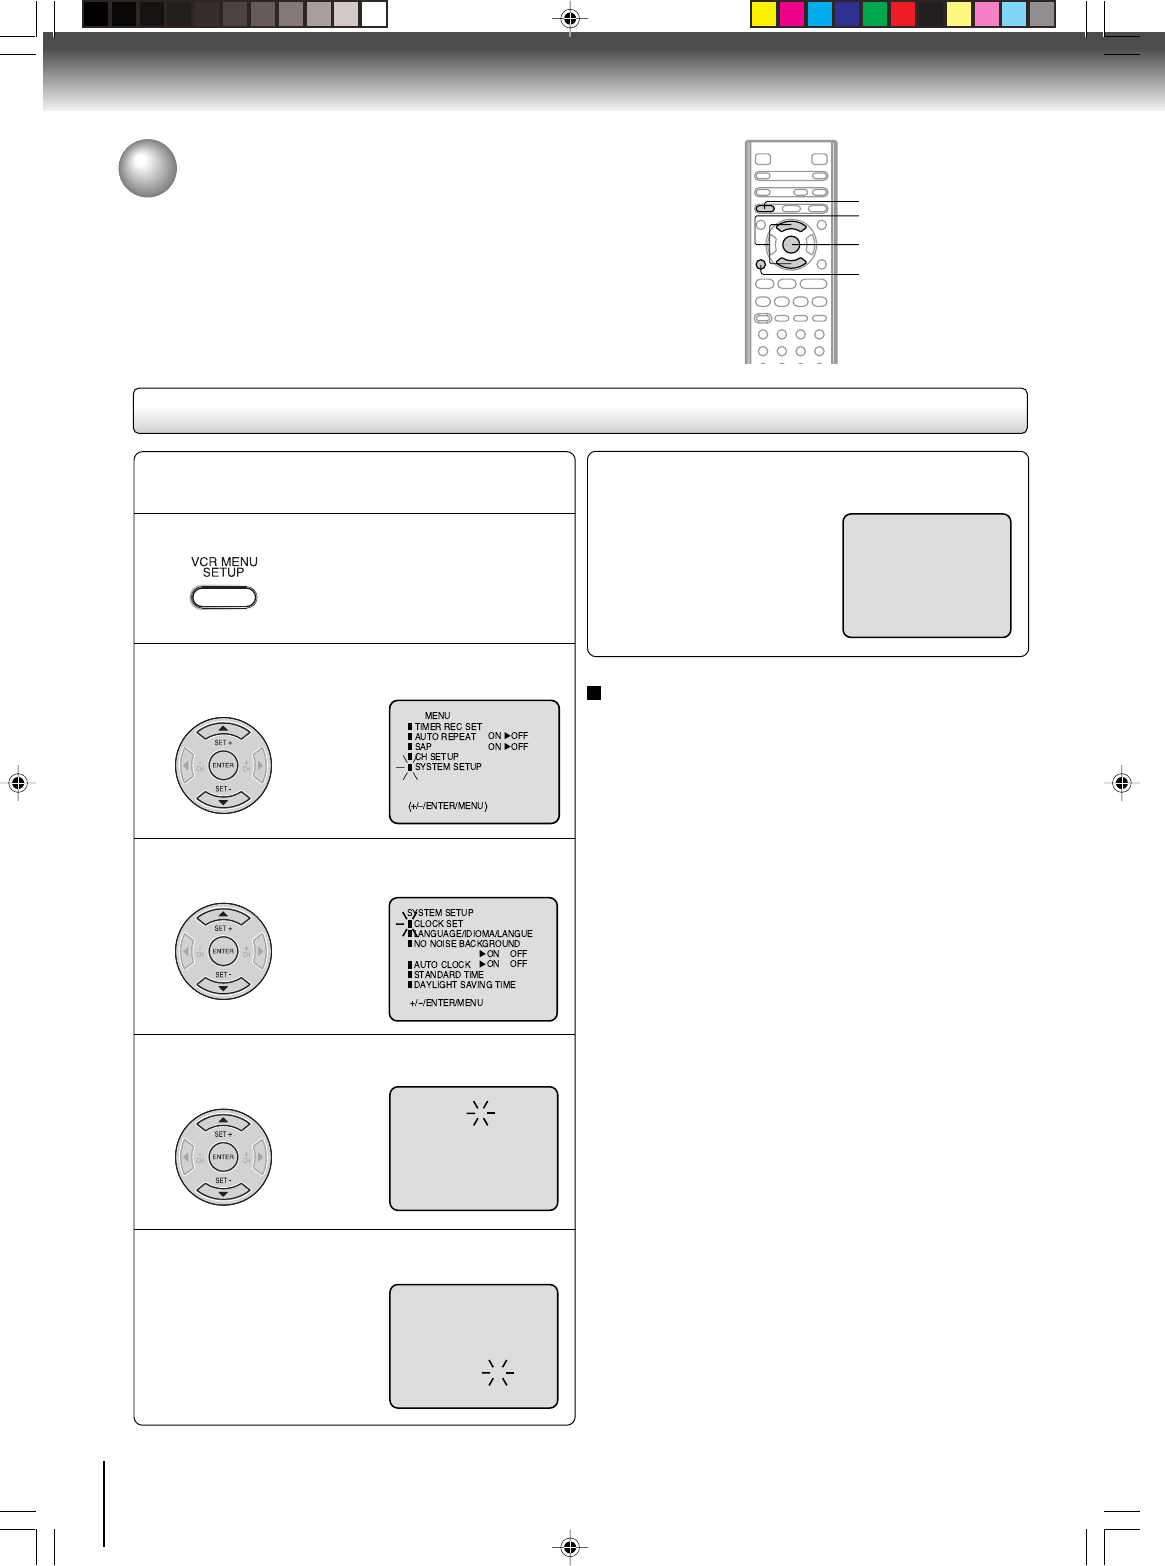
Press SET + or – to select “LANGUAGE”, then
press ENTER.
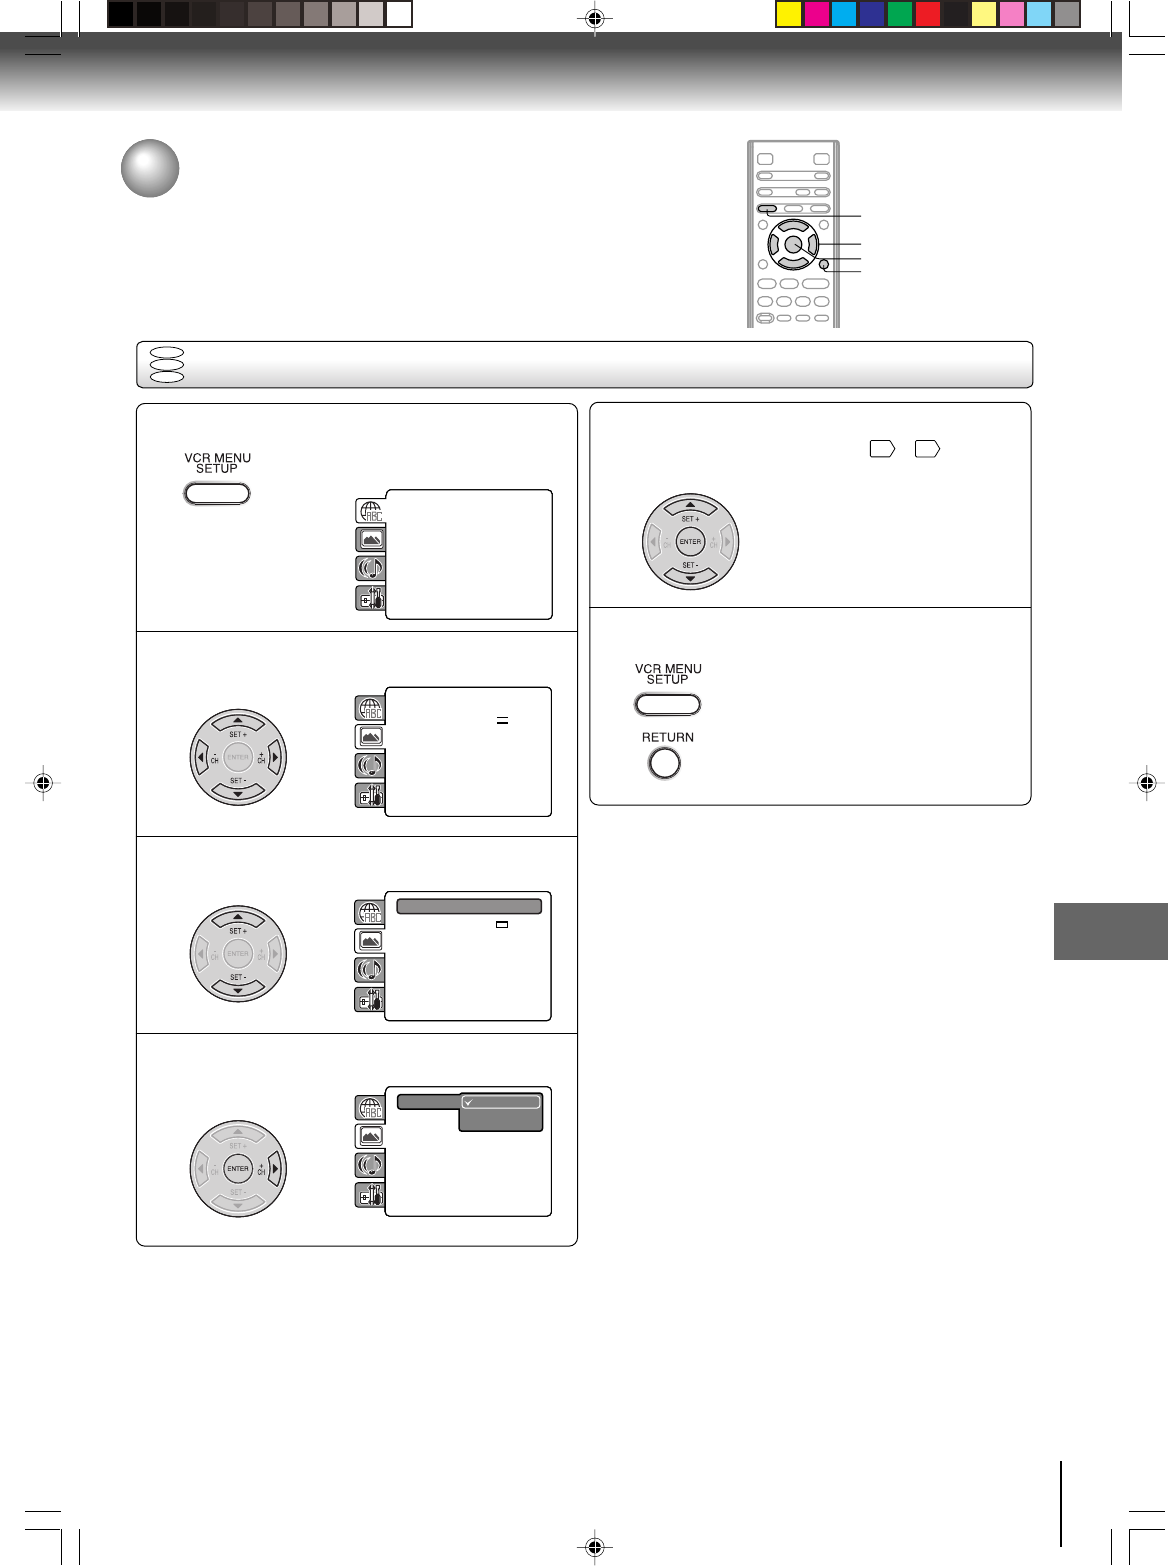
Press VCR MENU.
The VCR menu screen will appear.
Press SET + or – to select “SYSTEM
SETUP”, then press ENTER.
If you use the unit for the first time,
press VCR MENU, instead of the
“SYSTEM SETUP” menu screen of
the main menu screen in step 2 may
appear.
Setting the language
Setting the language
You can choose from three different languages (English,
French and Spanish) for the on-screen display.
1
2
Press SET + or – to select the desired language:
English (ENGLISH), Spanish (ESPAÑOL) or
French (FRANCAIS), then press ENTER.
3
Press VCR MENU until the MENU screen is
cleared.
4
〈〉
〈
〉
〈〉
Notes:
•Both the VCR and the DVD have their own player menus
57
.
•If no buttons are pressed for more than 60 seconds, the VCR
MENU screen will return to normal TV-operation automatically.
Preparation:
•Turn ON the TV and select to the corresponding
video input.
•Press VCR DVD selector to select the VCR mode.
(The VCR mode indicator will light.)
SET +/–
VCR MENU
VCR DVD
ENTER
2I30201B-En_p18-251/13/06, 2:47 PM23
24
Basic setup (VCR)
Connect the Antenna or Cable system.
•If you use a cable box, turn it on.
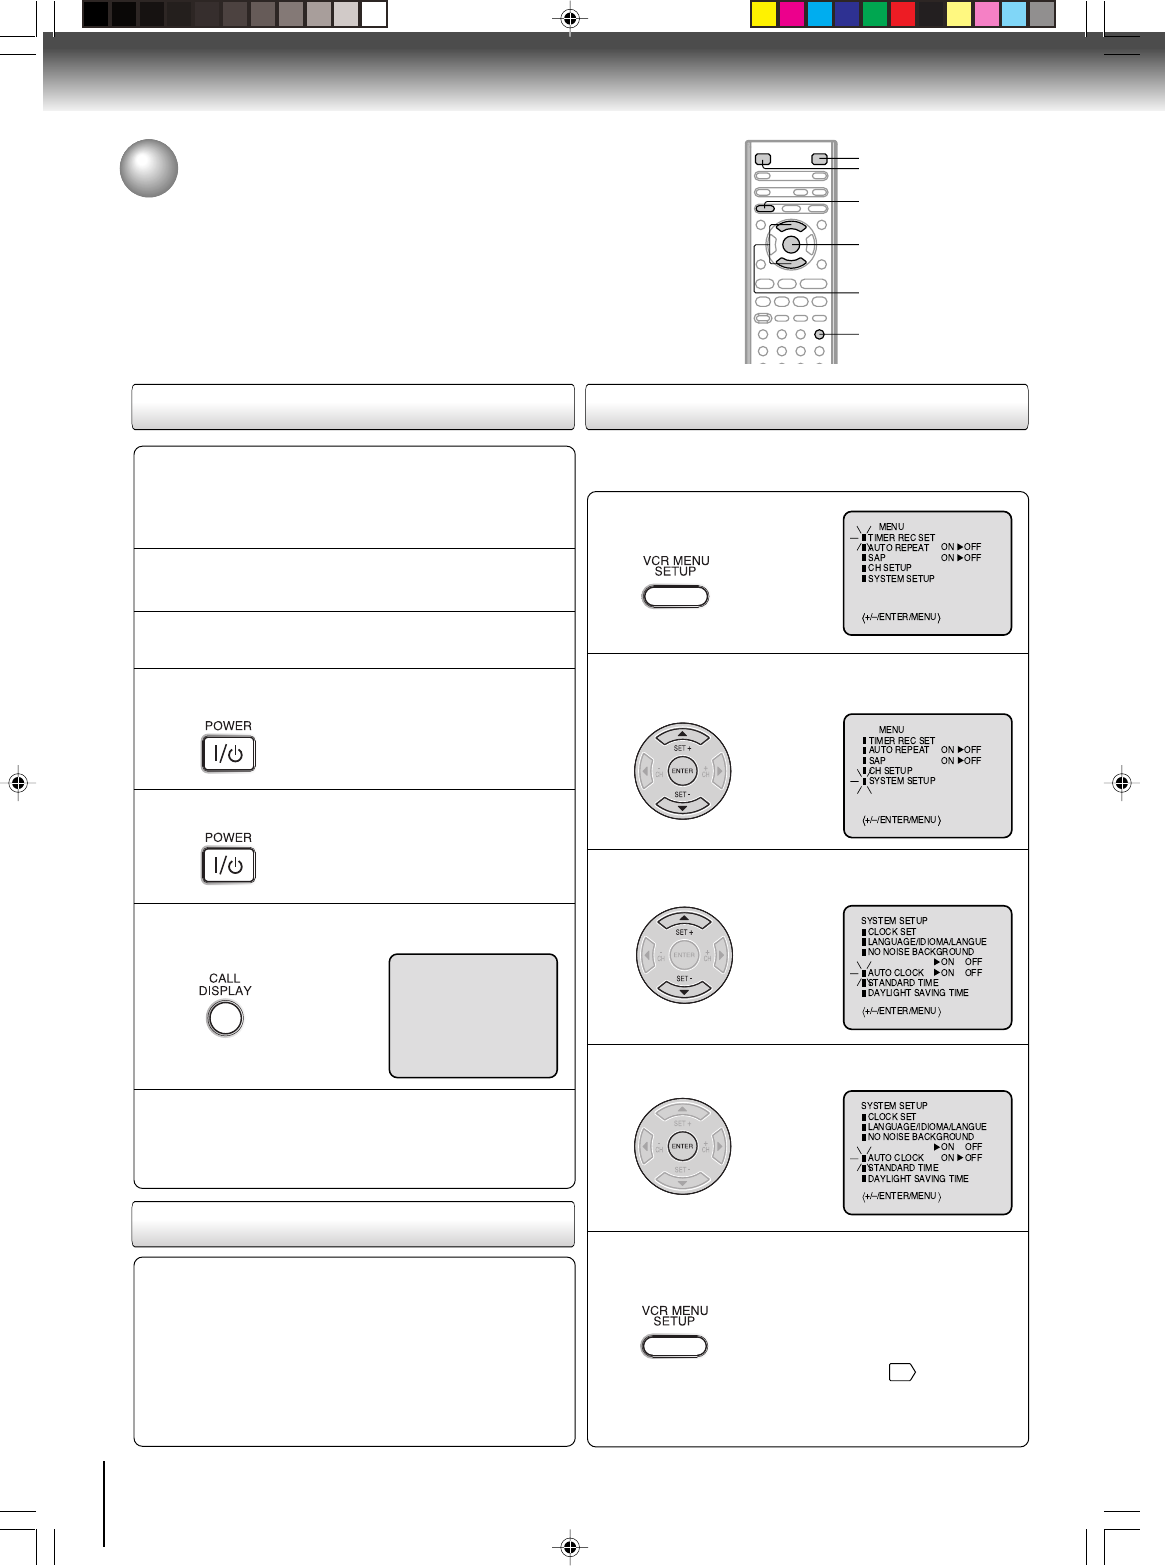
Clock setting
The AUTO CLOCK function will automatically set the built-in clock
(Month, Day, Year and Time) when the DVD/VCR is connected to an
Antenna or Cable system and it is turned off. The DVD/VCR searches
for a station in your area containing the necessary AUTO CLOCK setting
signals. Once received, it will take approximately 4 minutes for the clock
to set itself automatically.
Preparation:
•Turn ON the TV and select the corresponding video input.
•Press VCR DVD selector to select the VCR mode.
(The VCR mode indicator will light.)
1
AUTO CLOCK setting
Plug the AC power cord to the AC outlet.
2
Make sure the DVD/VCR is turned off.
•If you press POWER, the Auto Clock
set is not programmed.
3
Wait at least three minutes and press POWER.
4
Press CALL to check the clock setting on
the on screen display.
5
If the clock is not set, check the antenna
condition. The AUTO CLOCK may not
function properly if the reception condition
is not good.
6
AUTO CLOCK adjustment
To set AUTO CLOCK to off
The AUTO CLOCK adjustment will be updated at
6:00 AM, 12:00 PM and 6:00 PM everyday when the
DVD/VCR turned off.
•If you use a cable box and you want AUTO CLOCK
adjustment to be performed, the cable box must be
left on.
•The AUTO CLOCK adjustment is not effective when
there is a difference of more than 5 minutes exists
between the built-in clock time and the actual time.
When shipped from factory the AUTO CLOCK is set to “ON”.
But if you do not want AUTO CLOCK setting, it can be turned off:
Press VCR MENU.
1
Press SET + or – to select “SYSTEM SETUP”,
then press ENTER.
2
Press SET + or – to select “AUTO CLOCK”.
3
Press ENTER to select “OFF”.
4
Press VCR MENU repeatedly to return to the
normal screen.
•When the AUTO CLOCK is set to
“OFF”, the AUTO CLOCK adjust-
ment does not function. You must set
the clock manually
26
.
5
CH 125
8 : 47
AM MON
00 : 00 : 00 SP
STEREO SAP
POWER
VCR MENU
ENTER
CALL
VCR DVD
SET +/–
2I30201B-En_p18-251/13/06, 2:47 PM24
25
Basic setup (VCR)
Press VCR MENU.
1
Press SET + or – to select “SYSTEM SETUP”,
then press ENTER.
2
Press
SET + or –
to select “STANDARD TIME”
,
then press ENTER.
3
Press SET + or – to select your time zone,
then press ENTER.
4
Press VCR MENU until the MENU screen is
cleared.
5
In the rare event that you live within broadcast range of two
stations in two different time zones, the DVD/VCR may
recognize the wrong station for the AUTO CLOCK setting.
To correct the situation:
Notes:
•To be able to select the standard time, the clock must first be
set by AUTO CLOCK once.
•If you live in Newfoundland and the AUTO CLOCK does not
function properly, set the AUTO CLOCK menu option to “OFF”
and set the clock manually.
Press VCR MENU.
Press SET + or – to select “SYSTEM SETUP”,
then press ENTER.
1
Press SET + or – to select “DAYLIGHT
SAVING TIME”, then press ENTER.
2
Press SET + or – to select one of the
options, then press ENTER. Press VCR
MENU until the MENU screen is cleared.
3
Notes:
•When shipped from factory, the DAYLIGHT SAVING TIME is
set to “AUTO” position.
•When the clock is not set, DAYLIGHT SAVING TIME setting
is not available.
•When there is no DAYLIGHT SAVING TIME in your area, al-
ways select “OFF” position in step 3.
When you want to set the
DAYLIGHT
SAVING TIME
manually, on the first
Sunday in April you set to “ON”, and
on the last Sunday in October you set
to “OFF”.
ON:
OFF:
AUTO:
for manual setting
(forward one hour)
for manual setting
(back one hour)
for automatic setting
(read XDS in the signal)
〈
〉
ATLANTIC: GMT–4hours
EASTERN: GMT–5hours
CENTRAL: GMT–6hours
MOUNTAIN: GMT–7hours
PACIFIC: GMT–8hours
ALASKA: GMT–9hours
HAWAII: GMT–10hours
AUTO: AUTO SET
(GMT: Greenwich Mean Time)
〈
〉
To set DAYLIGHT SAVING TIME
You can set the DAYLIGHT SAVING TIME automatically or
manually.
To set STANDARD TIME
2I30201B-En_p18-251/13/06, 2:47 PM25
26
Basic setup (VCR)
CANCEL
Press VCR MENU.
EXAMPLE:Setting the clock to “8:30 AM” March, 25
(SAT), 2006.
1
8 : 30
AM
SAT
Manual clock setting
After setting the clock, date and time starts
functioning automatically.
6
Note:
After a power failure or disconnection of the power, the timer
settings will be lost. In this case, reset the present time.
To make corrections any time during the process
Press CANCEL repeatedly until the item you want to
change blinks, then press SET + or –.
Press SET + or – to select “SYSTEM SETUP”,
then press ENTER.
2
Press SET + or – to select “CLOCK SET”,
then press ENTER.
3
Press SET + or – to set the month, then press
ENTER.
4
Set the day, year and time as in step 4.
5
〈〉
Clock setting (Continued)
If the AUTO CLOCK process did not set the date and time correctly,
you must set them manually for timer recording and DAYLIGHT
SAVING TIME.
VCR MENU
〈+/
–
/ENTER/CANCEL/MENU
〉
MONTH
DAY
YEAR
TIME
3
1 (WED)
2006
12 : 00
AM
〈+/
–
/ENTER/CANCEL/MENU
〉
MONTH
DAY
YEAR
TIME
3
25 (SAT)
2006
8 : 30
AM
ENTER
SET +/–
2I30201B-En_p26-311/13/06, 2:47 PM26
27
Basic setup (VCR)
Tuner setting
This DVD/VCR is equipped with a channel memory feature which allows
channels to skip up or down to the next channel set into memory,
skipping over unwanted channels. Before selecting channels, they must
be programmed into the DVD/VCR’s memory. In addition to normal
VHF and UHF channels, this DVD/VCR can receive up to 113 Cable
TV channels. To use this DVD/VCR with an antenna, set the TV/CABLE
menu option to the TV mode. When shipped from the factory, this menu
option is in the CABLE mode.
Press VCR MENU. Press
SET + or –
to select
“CH SETUP”, then press ENTER.
1
Press SET + or – to select “TV/CABLE”.
2
TV/CABLE selectionSetting channels automatically
Repeat left step 1 and press SET + or – to
select “AUTO CH MEMORY”.
1
Press ENTER.
Auto tuning will begin. The channel dis-
play will count up and when finished,
the screen returns to normal.
2
Note:
You can’t select “CH SETUP” if you set the channel to “L1” or
“L2”.
Press ENTER to select the TV or CABLE
mode.
The arrow indicates the selected mode.
3
Press VCR MENU until the menu screen is
cleared.
4
TV- VHF/UHF channels
CABLE- Cable TV channels
VCR MENU
ENTER
〈〉
VCR DVD
Preparation:
•Turn ON the TV and select to the corresponding
video input.
•Press VCR DVD selector to select the VCR mode.
(The VCR mode indicator will light.)
SET +/–
2I30201B-En_p26-311/13/06, 2:47 PM27
28
Basic setup (VCR)
Repeat the step 1 on page
27
. Then press SET +
or – to select the “ADD/DELETE” and press ENTER.
1
To ADD/DELETE channels
Press VCR MENU until the menu screen is
cleared.
3
To Add or Delete channels
2
1)Press Direct channel selection buttons (0–9)
or SET +/– to select a channel number you want
to add or delete.
2)To add channels
Press ENTER until “ADD” appears on the screen.
To delete channels
Press ENTER until “DELETE” appears on the
screen. The channel number will blink.
3)Repeat step 1 and 2 to add or delete other
channel.
Tuner setting (Continued)
Noise elimination
When you don't want to receive a weak signal broadcast, a Blue
back screen can be obtained by selecting the NO NOISE BACK-
GROUND to “ON”. When the unit is shipped from the factory,
the NO NOISE BACKGROUND is set to “ON”.
Repeat the steps 1~2 on page
26
and press SET
+ or – to select “NO NOISE BACKGROUND”.
1
Press ENTER to select “ON” or “OFF” position.
2
〈
〉
Press VCR MENU until the menu screen is
cleared.
3
0–9
ENTER
VCR MENU
〈
〉
SET +/–
2I30201B-En_p26-311/13/06, 2:48 PM28
29
Basic setup (VCR)
Loading and unloading a cassette tape
Use only video cassette tapes marked .
Loading
Remove the erase prevention tab with a screwdriver.
Cover the hole with a piece of adhesive tape.
To record again
Screwdriver
Automatic tape eject
This DVD/VCR will automatically rewind the tape when the tape has ended. Once the tape is rewound to its beginning,
the cassette tape will be ejected automatically.
Push the center of the tape until it is automatically
inserted.
Insert the cassette tape with its labeled side facing up
and the erase prevention tab positioned at your left. An
inverted cassette tape cannot be inserted.
Automatic playback
When loading a cassette tape without an erase prevention tab, playback will start automatically.
Automatic power ON
When you insert a cassette tape, the DVD/VCR power will turn ON automatically.
2
Erase prevention tab
Adhesive tape
Remove the cassette tape.
Erase prevention tab
Unloading
To prevent accidental erasure
To prevent accidental erasure
Tape speed and maximum recording time
Video cassette tape
Tape Speed
SLP (Super Long Play)
T-160T-120T-90T-60T-30
2-2/3 hours2 hours1-1/2 hours1 hour30 minutes
8 hours6 hours4-1/2 hours3 hours1-1/2 hours
SP (Standard Play)
Playback (VCR)
EJECT
Playback (VCR)
or
Press EJECT on the front panel or on the remote.
1
2I30201B-En_p26-311/13/06, 2:48 PM29
30
Playback (VCR)
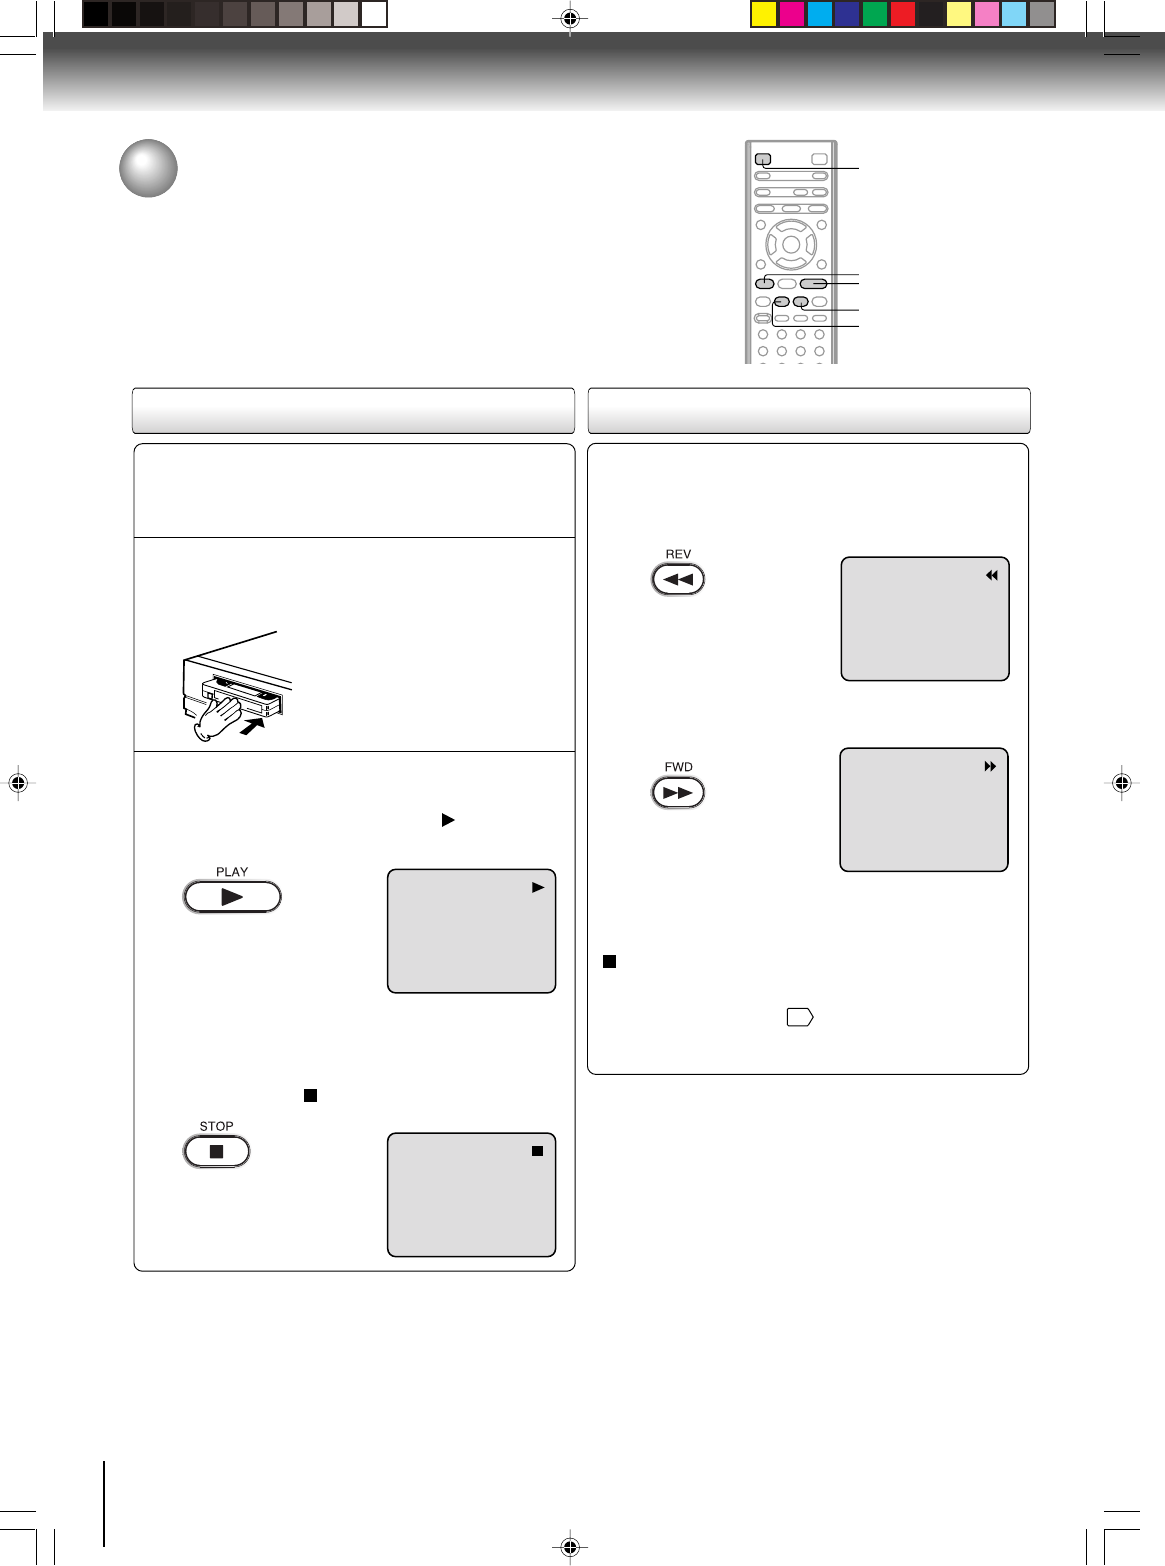
Cassette tape playback
To play a prerecorded tape.
Load a prerecorded tape
(When loading a cassette tape without the erase
prevention tab, playback will start automatically).
Preparation:
•Turn ON the TV and select the corresponding video input.
•Press VCR DVD selector to select the VCR mode.
(The VCR mode indicator will light).
1
Press PLAY.
Playback will start. “” will appear
on the screen for about 4 seconds.
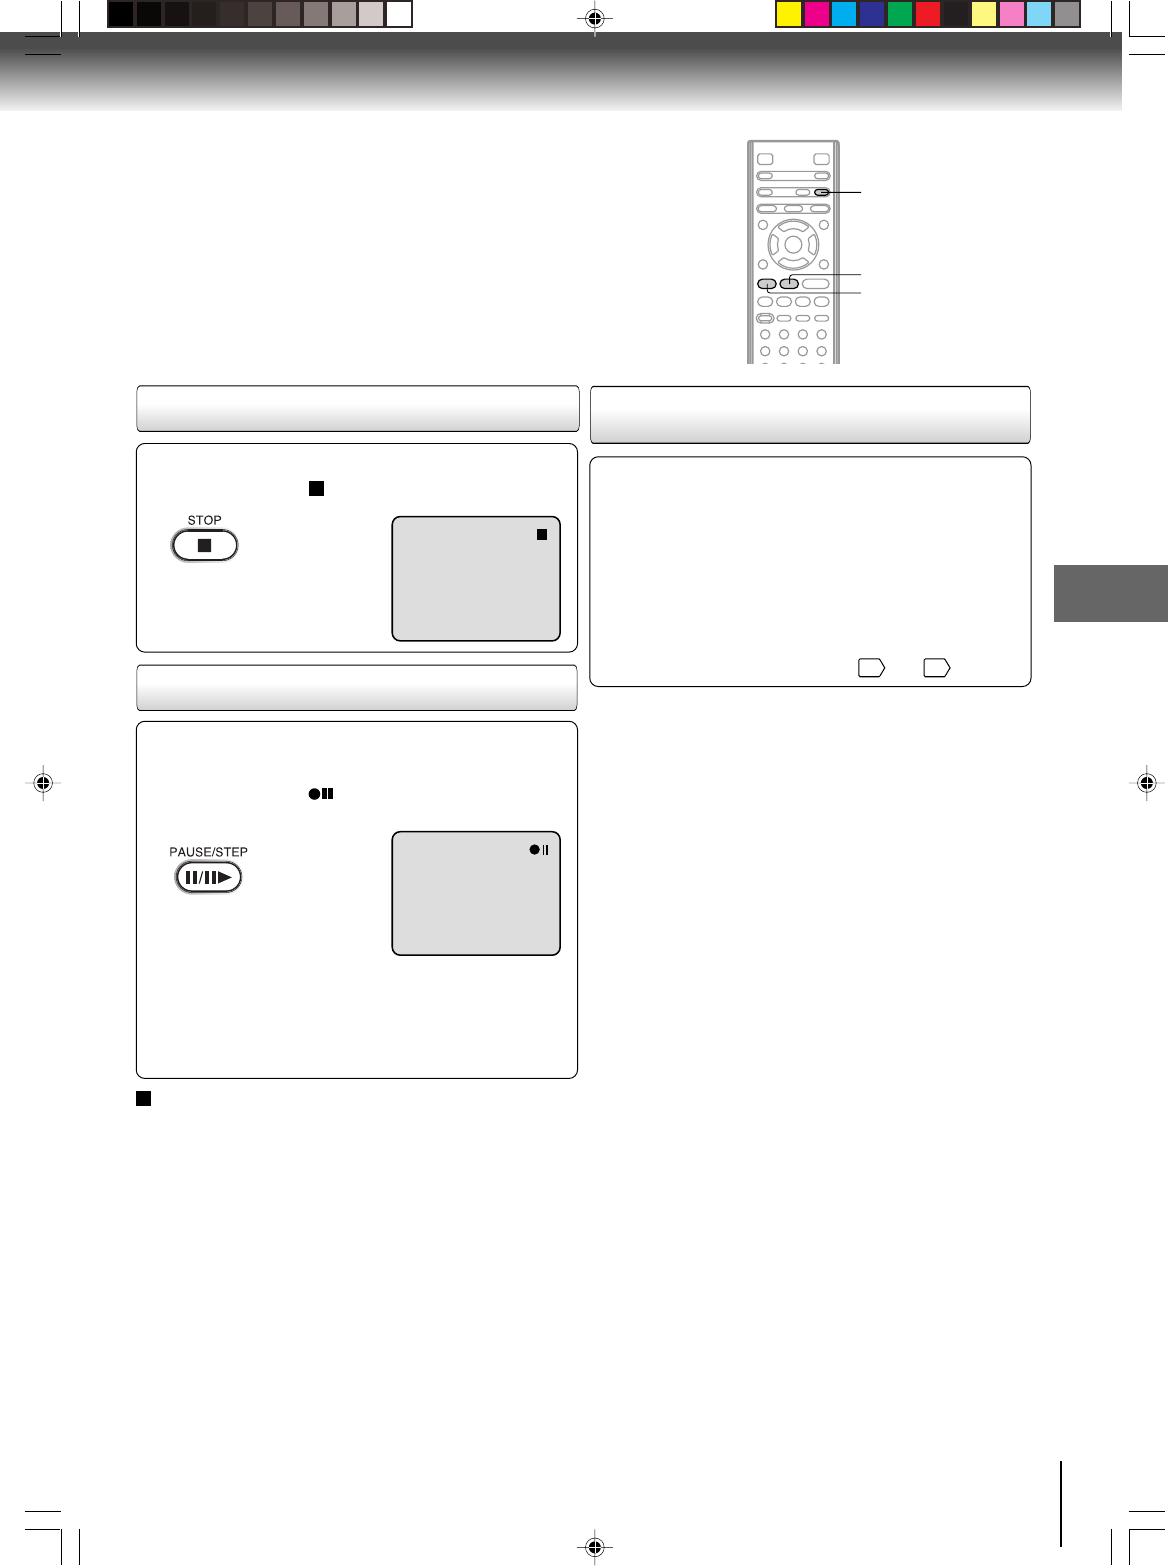
Press STOP once.
The tape will stop but remain fully
loaded and ready to play.
“ ” will appear on the screen for
about 4 seconds.
To stop playback
Stop the playback via STOP on remote control.
To discontinue the tape-winding, press STOP. To switch to
playback directly (without STOP), press PLAY.
Notes:
•This VCR selects the playback tape speed SP, LP or SLP au-
tomatically.
•The Cassette tape and DVD disc can be played back simulta-
neously. If you press VCR DVD selector, the tape playback
and DVD playback alternate with each other on the screen
(via CH3, 4 or video connection).
2
To start playback
PlaybackRewind or forward the tape
To rewind the tape:
Press REV.
To forward the tape:
Press FWD.
Forward/Reverse picture search mode
When the tape is being winded, you can switch to picture
search mode (see page
31
). To do this, press REV or
FWDand hold it down. The unit will resume the tape
advance or rewinding as soon as the button is released.
PLAY
STOP
FWD
REV
VCR DVD
2I30201B-En_p26-311/13/06, 2:48 PM30
31
Playback (VCR)
Special playback
Picture search
Reverse picture search function
Press REV once or twice during playback.
Forward picture search function
Press FWD once or twice during playback.
To return to playback, press PLAY.
Press PAUSE/STEP during playback.
To resume normal playback, press PLAY or PAUSE/STEP.
During playback press SLOW.
To return to playback, press PLAY or SLOW.
Whenever you insert a tape and start playback, the
automatic tracking feature continuously analyzes the signal
to enable optimum picture quality during playback.
Press PAUSE/STEP during playback.
Press SLOWrepeatedly. The picture advances frame by
frame.
To return to playback, press PLAY or PAUSE/STEP.
Slow tracking and vertical lock adjustment
If noise bars appear in the picture during slow motion,
press the SET +/– to reduce the noise bars.
If the still picture jitters excessively, press SET +/– to
stabilize the still picture.
Automatic tracking adjustment
If automatic tracking cannot eliminate noises well during
playback, press SET +/–to eliminate the noise. “MANUAL
TR.” will appear on the screen. Press it once for a fine
adjustment, or press and hold for a coarse adjustment.
Manual tracking adjustment
SPEED SEARCH TIMES
Adjusting tracking condition
Still picture
Slow motion
Frame by frame picture
Notes:
•
The audio output is muted during PICTURE SEARCH, STILL
PICTURE SLOW MOTION and FRAME BY FRAME
PICTURE.
•During picture search mode there will be noise bars. This is
not a defect.
•Playback will commence after approx. 5 minutes to protect
the video tape against excessive wear during pause mode.
Press ATR to reactivate automatic tracking again.
“AUTO TR.” will appear on the screen.
PICTURE SEARCH SPEED
PRESS TWICE
TAPE SPEED
PRESS ONCE
SP (Standard Play)
LP (Long Play)
SLP (Super Long Play)
5 X
9 X
15 X
3 X
7 X
9 X
REV
PLAY
FWD
SLOW
ATR
PAUSE/STEP
Video head cleaning
Video head clogging
The video heads are the means by
which the DVD/VCR reads the picture
from the tape during playback. In the
unlikely event that the heads become
dirty enough to be clogged, no picture
will be displayed. This can easily be
determined if, during playback of a
known good tape, there is good sound,
but no picture (picture is extremely
snowy). If this is the case, the DVD/
VCR need to check and clean by the
qualified service personnel.
Notes:
•
DO NOT ATTEMPT TO CLEAN THE VIDEO HEADS OR
SERVICE THE UNIT BY REMOVING THE REAR COVER.
•
Video heads may eventually wear out and should be re-
placed when they fail to produce clear pictures.
•
To help prevent video head clogging, use only good qual-
ity VHS tapes. Discard worn out tapes.
Good Picture
Snowy Picture
CM skip
Press CM SKIP during playback. The DVD/VCR will search
forward through approximately 30 seconds of the tape (e.g.
unwanted commercial time) for each press of CM SKIP (maxi-
mum six presses) and then resume normal playback.
For example:1 press: 30 seconds of tape
2 press: 60 seconds of tape
3 press: 90 seconds of tape
CM SKIP
SET +/–
2I30201B-En_p26-311/13/06, 2:48 PM31
32
Playback (VCR)
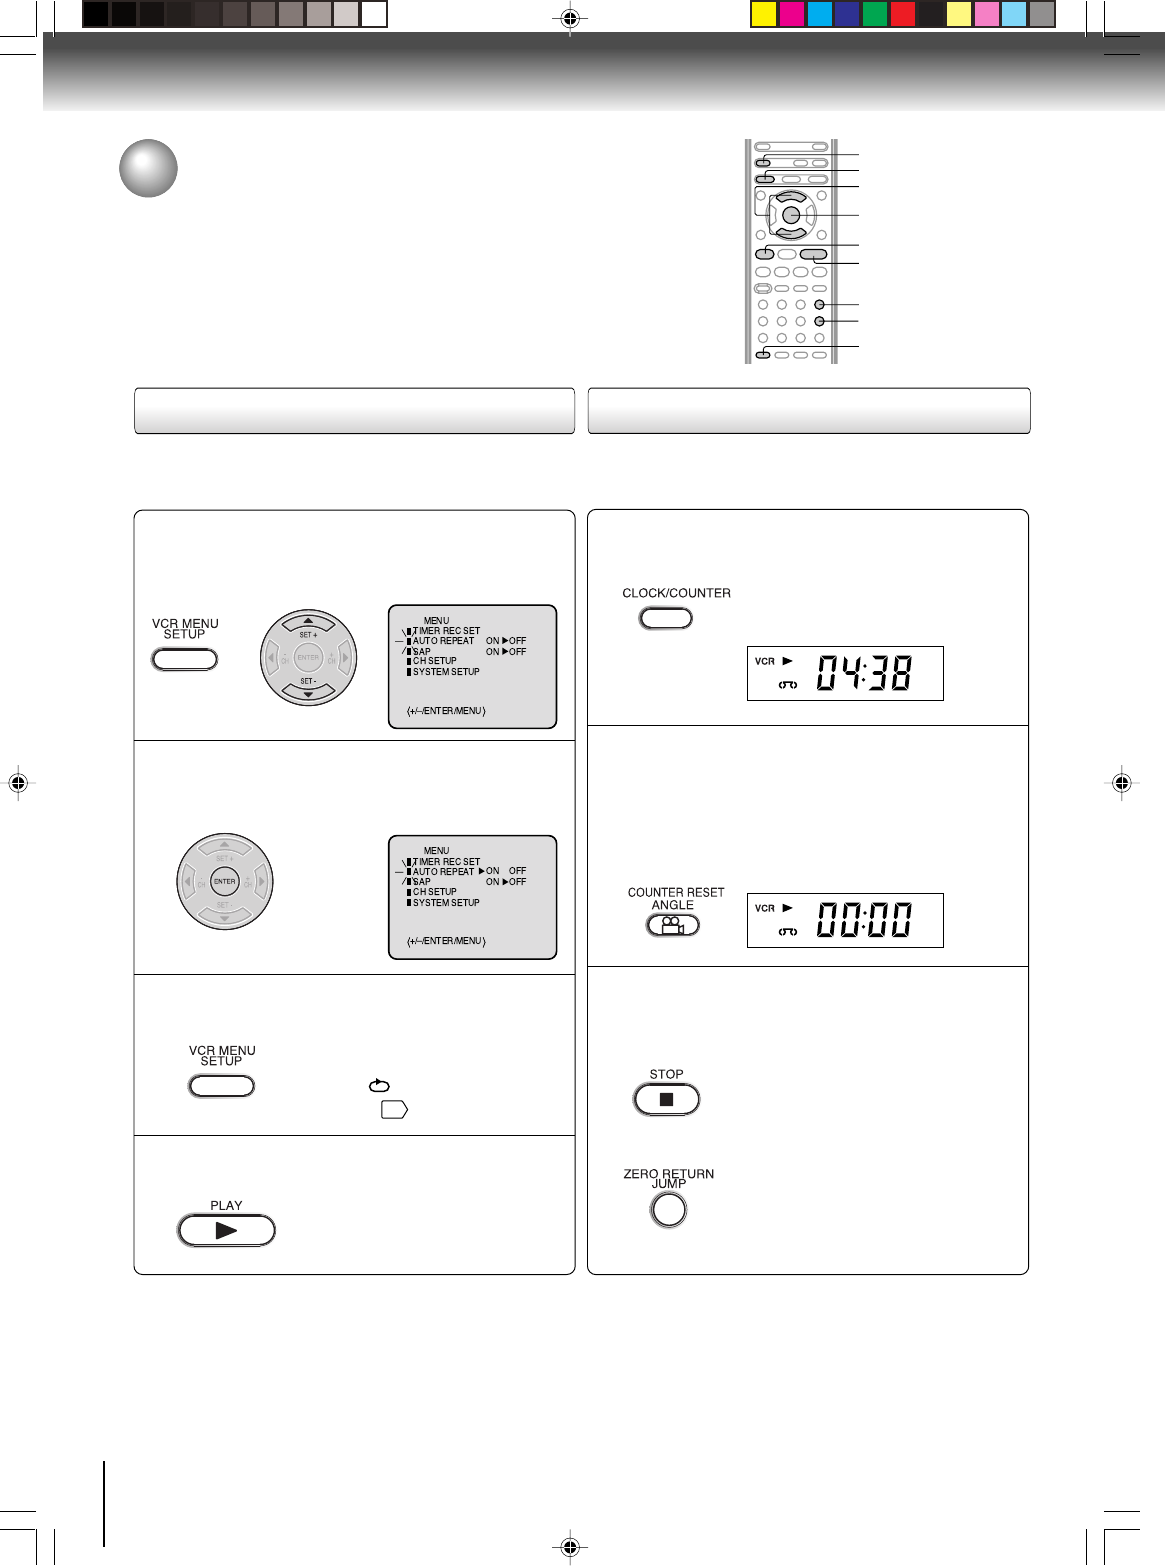
Convenience function
To cancel repeat mode:
Follow the above step 1, then press ENTER to select
“OFF” position. Press VCR MENUto return to the TV.
Press VCR MENU.
Press SET + or –to select “AUTO
REPEAT”.
1
Press ENTER to select “ON” or “OFF”.
If “ON” is selected, the playback
will be repeated endlessly.
2
Press VCR MENU until the menu screen is
cleared.
To confirm whether AUTO REPEAT
function is turning ON or OFF, press
CALL. If “” is displayed, it is
turning ON
11
.
3
To commence playback, press PLAY.
The playback will be repeated
endlessly.
4
This function rewinds the tape to the
“00:00”
counter position
automatically.
Press CLOCK/COUNTER.
The counter display shows the tape run-
ning time during playback or recording.
1
Press COUNTER RESET at the desired tape
position.
The counter display will be reset to
“00:00” position (e.g. the beginning of
recording).
2
Press STOP when playback or recording is
completed.
Press ZERO RETURN.
The tape will automatically rewind or fast
forward to the “00:00” counter position.
3
Repeat playback
The entire video tape will play until its end. The tape will
automatically rewind to the beginning and the playback will be
repeated.
Zero return function
COUNTER RESET
PLAY
VCR MENU
SET +/–
ENTER
STOP
ZERO RETURN
CLOCK/COUNTER
CALL
2I30201B-En_p32-371/13/06, 2:48 PM32
33
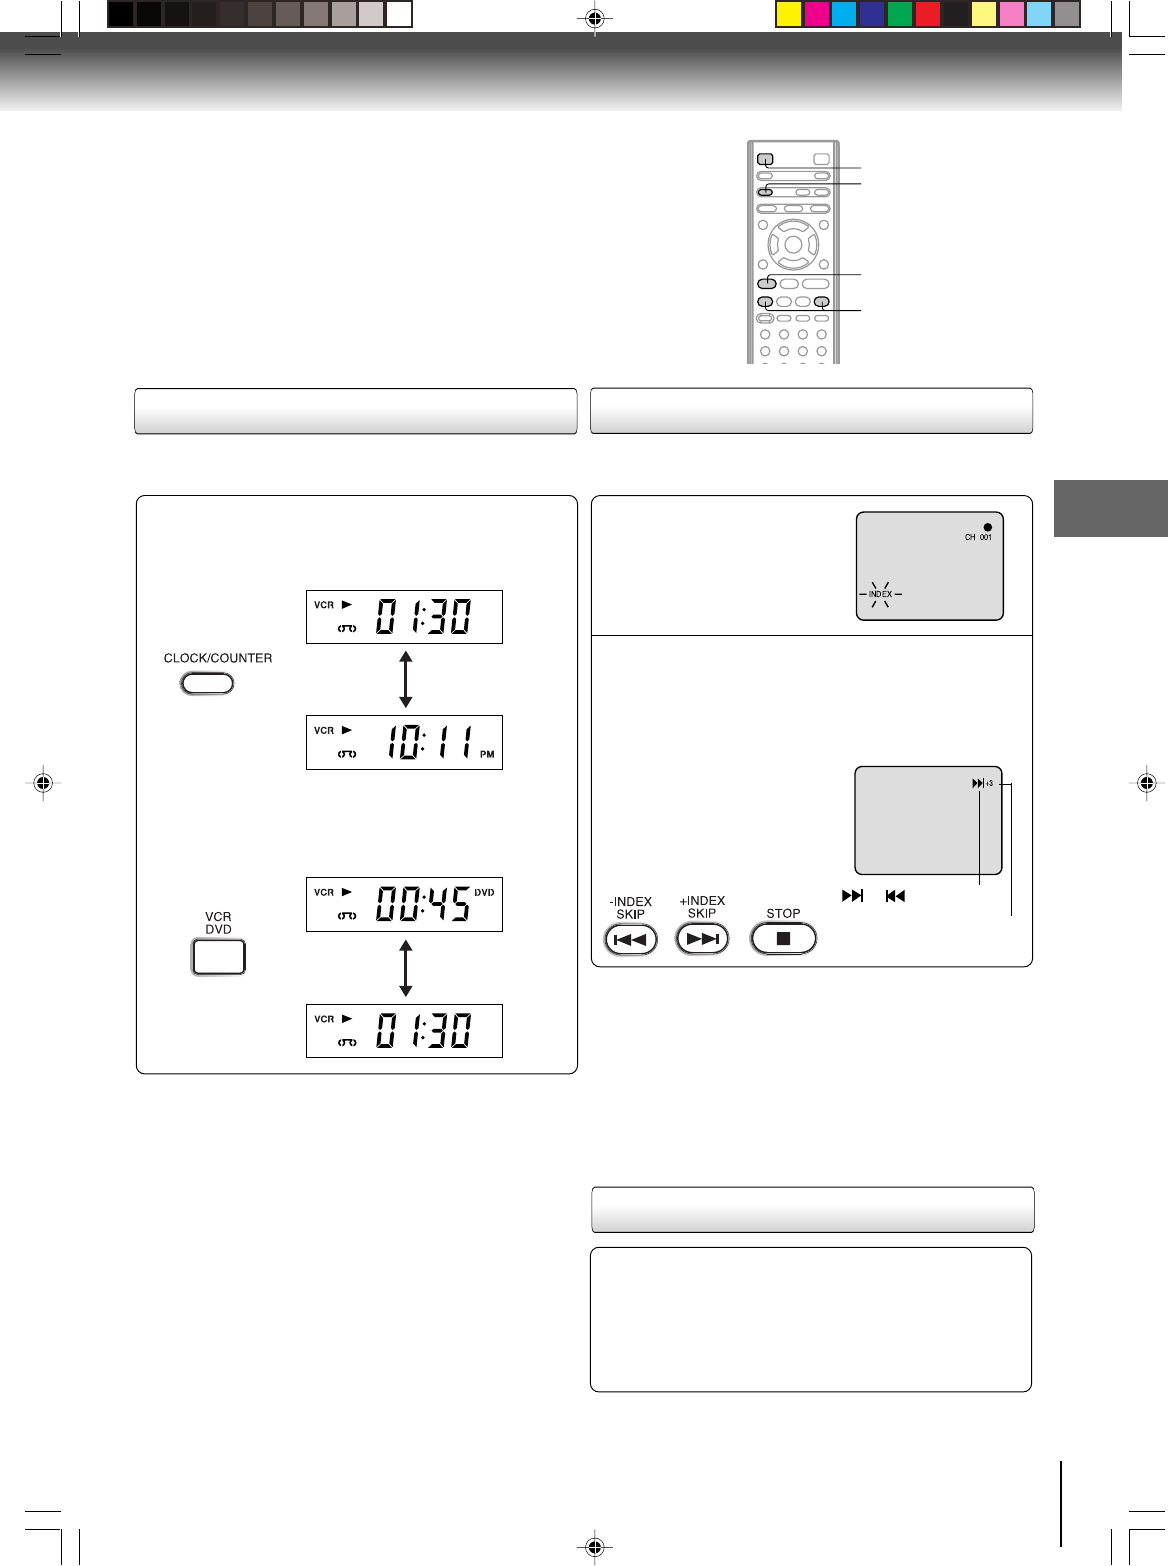
Playback (VCR)
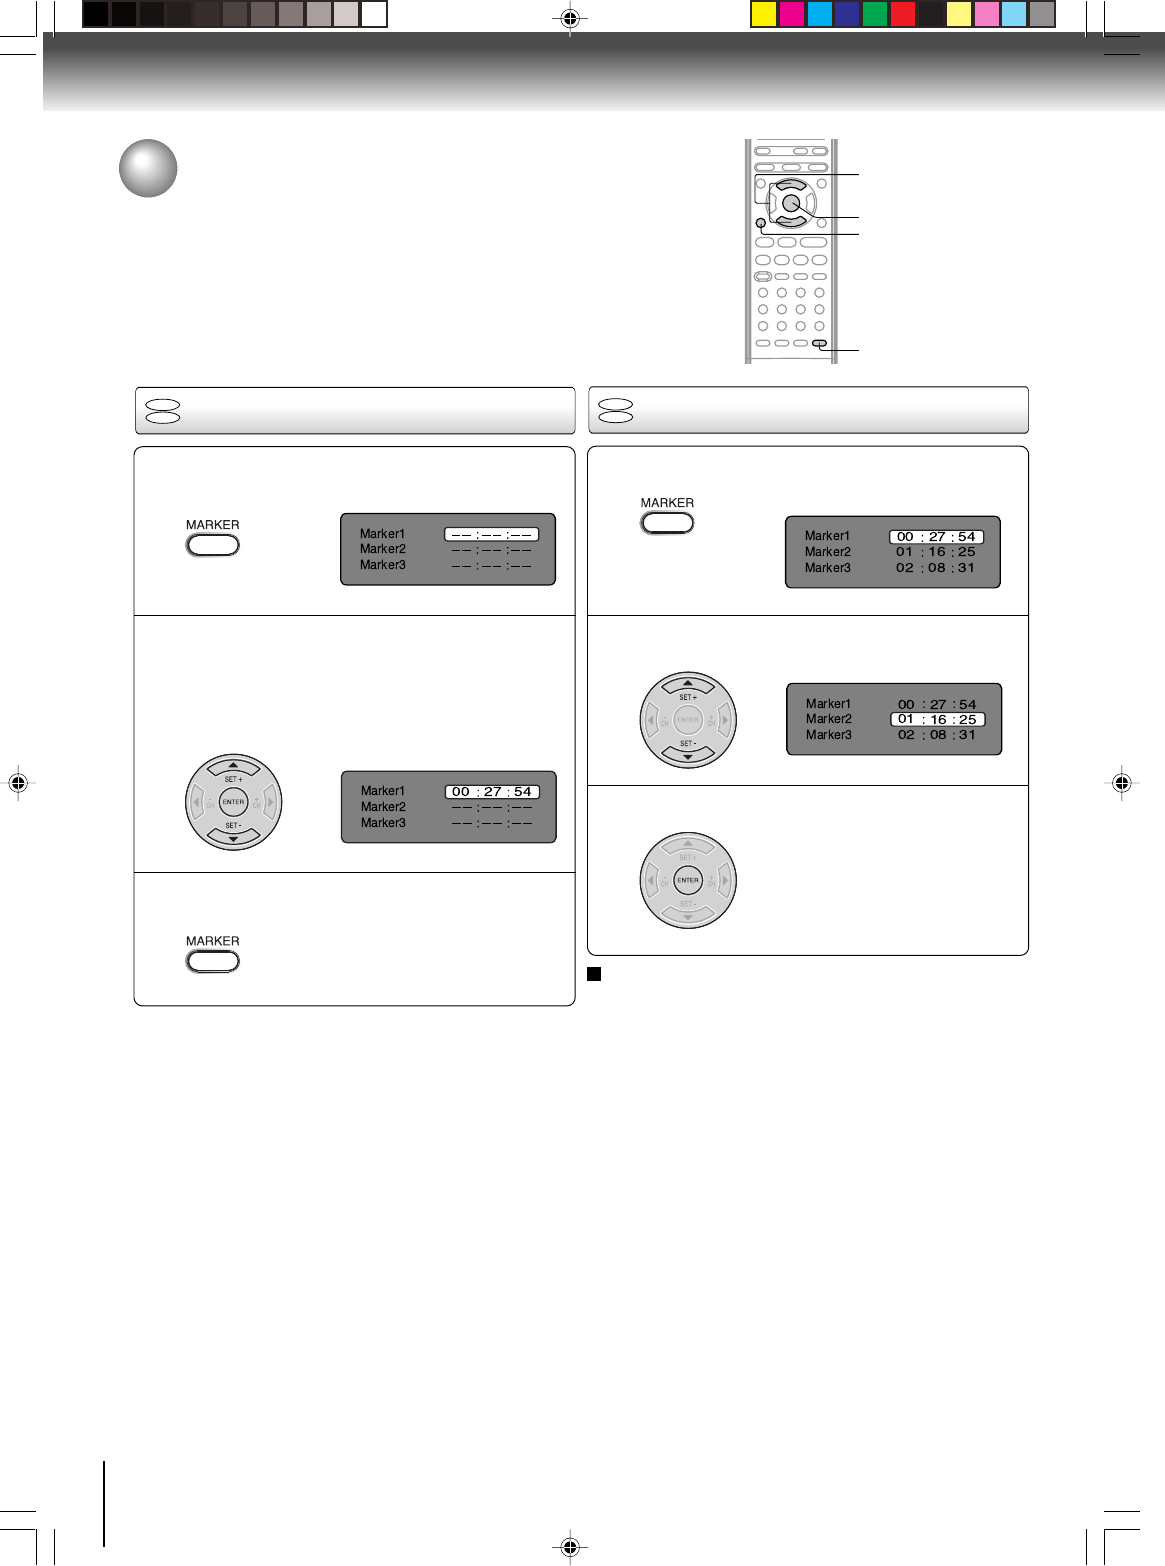
This function enables you to locate the beginning of any recording
made on the VCR.
Recording an INDEX mark
The Index Search function auto-
matically records an INDEX mark
on the tape whenever a recording
is initiated.
Index search
Press INDEX + or – during stop or play mode.
For Succeeding programs: Press INDEX +.
For Preceding programs: Press INDEX–.
(As many as 9 index points can be accessed via this
method.)
SQPB (S-VHS Quasi Playback)
You can playback video cassette tapes recorded in the
S-VHS system.
However, the picture will not have the high resolution of
S-VHS system.
Note:You cannot record S-VHS video format with this VCR.
Notes:
•When you record an INDEX mark at the very beginning of the
tape, the mark may not be found.
•During INDEX search, the tape may stop and begin to play at a
slightly different location.
•INDEX may not function properly with old or worn out video
tapes.
•INDEX marks may not be found if it is extremely close to the point
where the search began.
•During recording, if you stop recording temporarily, the INDEX
mark is not recorded on the tape.
Video index search system
Press CLOCK/COUNTER. The clock and tape counter
alternate with each other in the display window.
Notes:
•If you rewind the tape beyond “00:00”, a minus sign (“–”) will
be displayed in front of the time.
•When you load a tape, the counter will reset to “00:00”.
•The counter does not function on non-recorded (blank)
sections of the tape. When you rewind, fast forward or play
tapes through blank sections, the counter stops.
Clock/counter display
COUNTER
CLOCK
Press VCR DVD selector. The DVD mode and the
VCR mode alternate with each other in the display.
DVD mode
VCR mode
INDEX NO. (up to 9)
or is displayed
STOP
VCR DVD
INDEX
+
/
–
CLOCK/COUNTER
When the INDEX + or –is pressed,
the unit starts searching the se-
lected INDEX NO. and finds the
portion. Then playback starts au-
tomatically. To stop the Index
Search, press STOP.
2I30201B-En_p32-371/13/06, 2:48 PM33
34
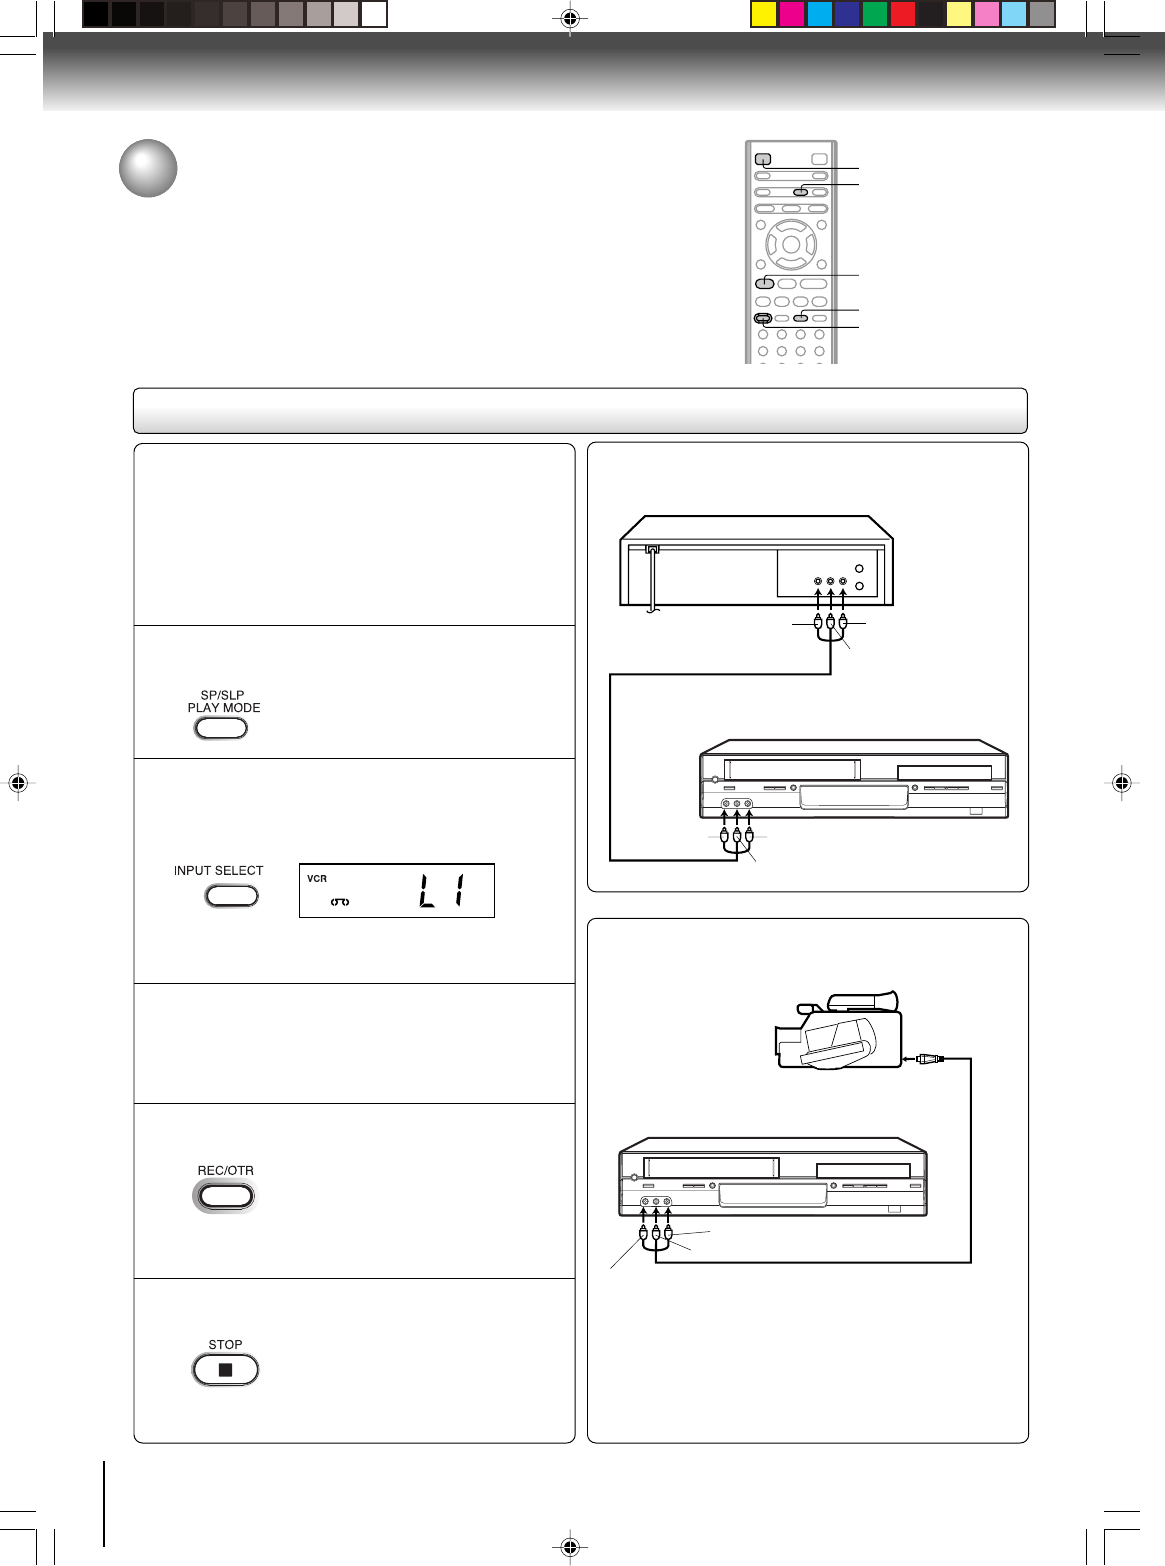
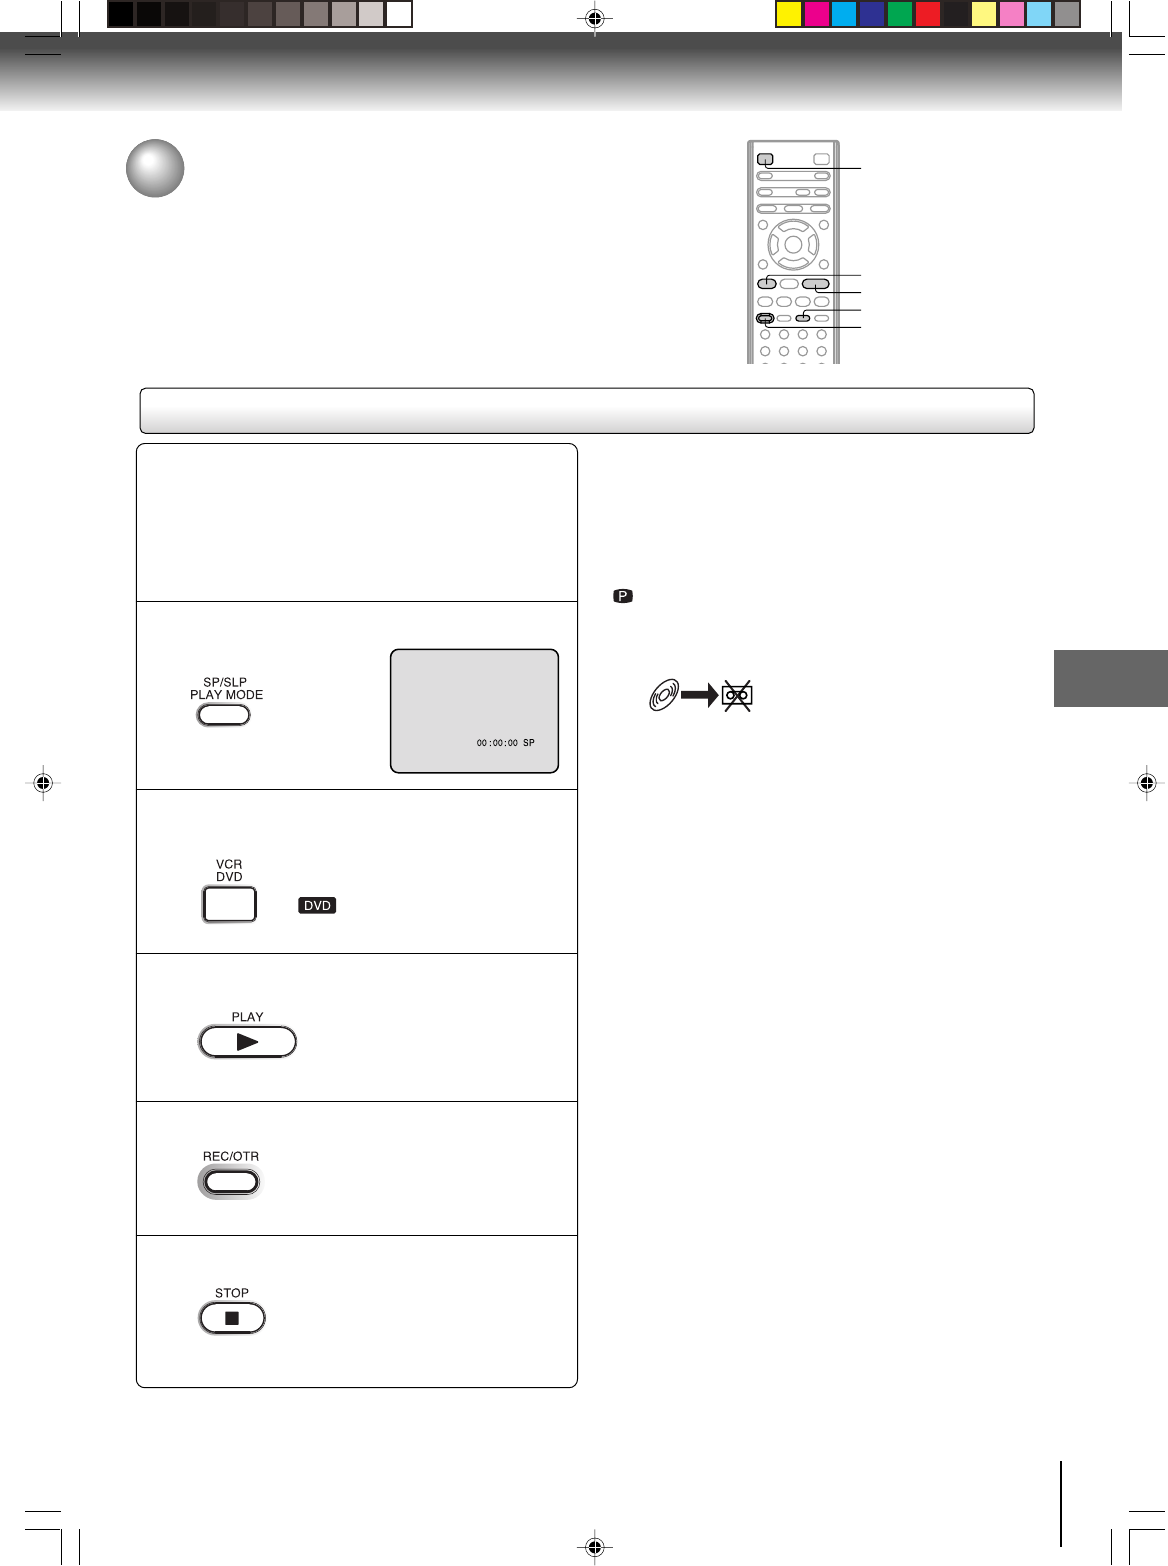
Recording (VCR)
Recording a TV program
Recording and viewing the same TV program.
Recording a TV program
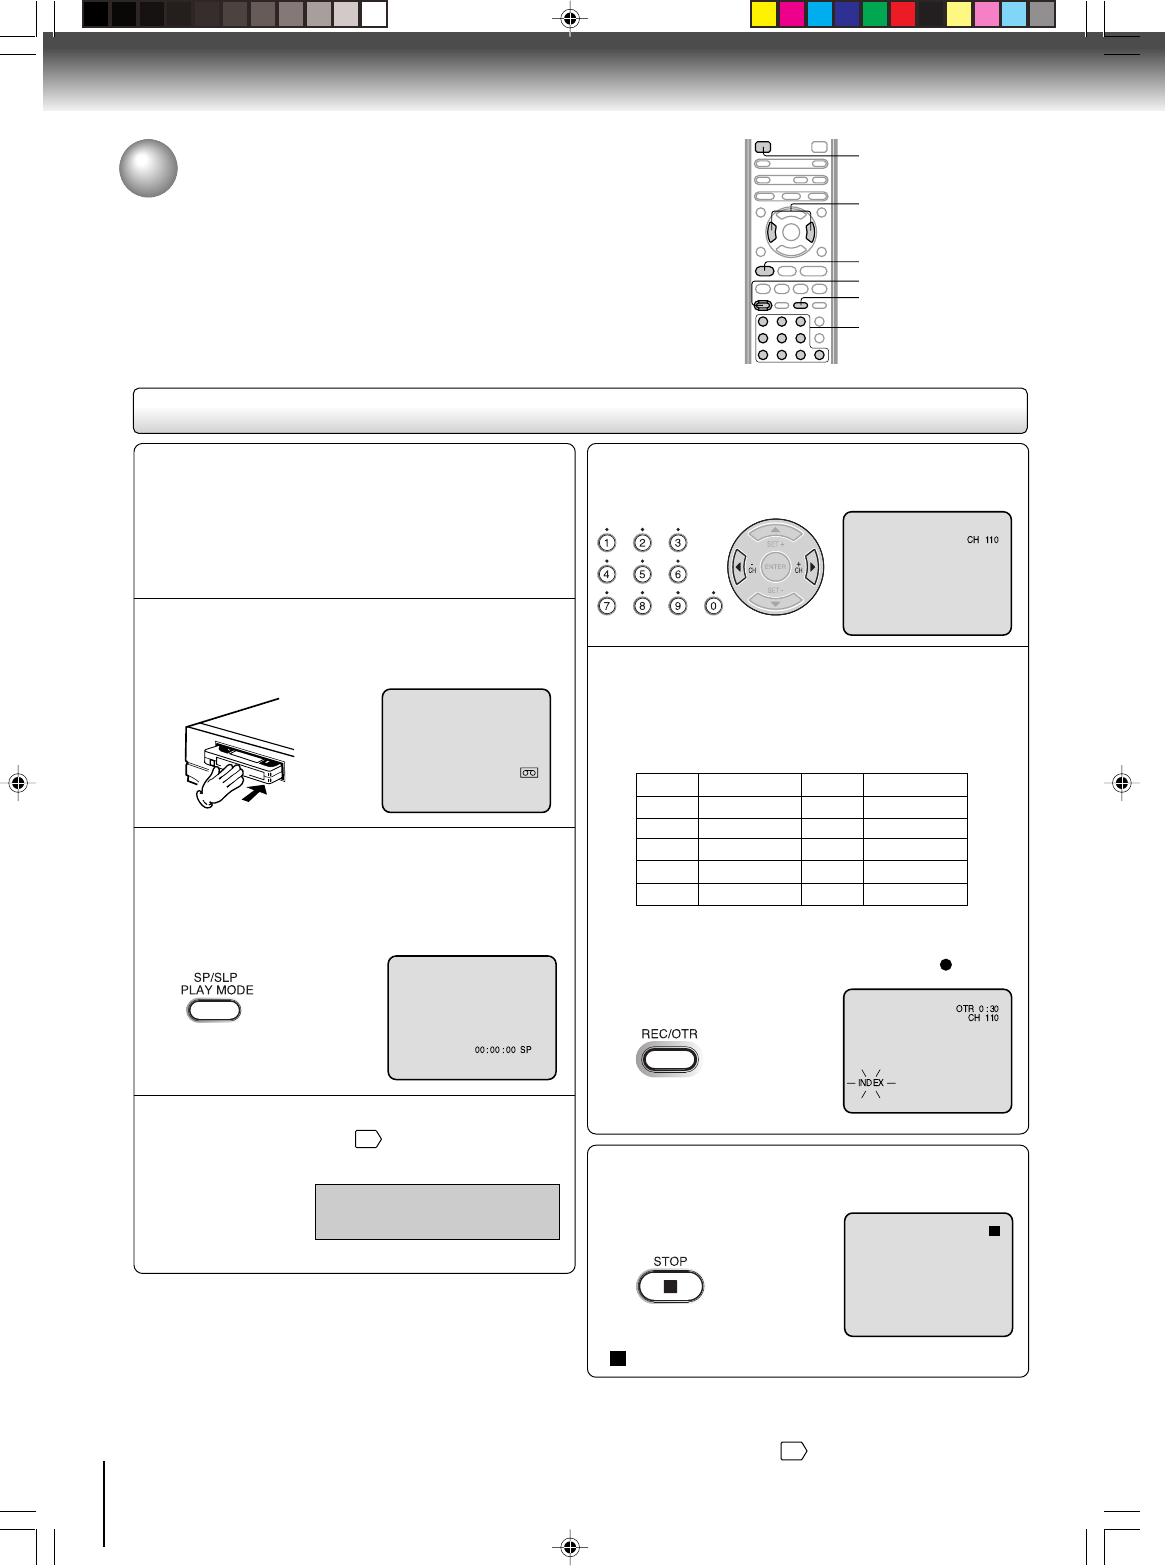
Load a cassette tape with the erase prevention
tab intact.
The DVD/VCR will automatically turn on.
1
Press SP/SLP to select the desired tape speed
SP or SLP.
The tape counter and “SP” or “SLP”
will appear on the screen for about 4
seconds.
2
Select “TV” or “CABLE” to the appropriate
position
27
.
3
TV- VHF/UHF channels
CABLE- Cable TV channels
Press Number buttons or CH +/– to select the
channel to be recorded.
4
Press REC/OTR.
“ ” will appear on the screen for
about 4 seconds and “REC” will
appear on the display window.
5
VHF/UHF/CABLE TV CHANNELS
TVCABLE TV
VHF
2-13
UHF
14-69
VHF
2-13
STD/HRC/IRC
14-36 (A) (W)
37-59 (AA) (WW)
60-85 (AAA) (ZZZ)
86-94 (86) (94)
95-99 (A-5) (A-1)
100-125 (100) (125)
01 (5A)
TV mode direct channel selection:
All channels can be instantly selected by using two
buttons. (for example, to select channel 2, press “0”, then
“2”. If you press only “2”, channel selection will be delayed
for two seconds.) For channels 10 and above, press the 2
digits in order.
CABLE mode direct channel selection:
1-9Press 0 twice and then 1-9 as required.
Example: To select “2”, Press 002.
10-12Press 0first and then the remaining 2 digits in
order from left to right.
Example: Press 012 for “12”.
13-99Press 2 digits in order.
Example: Press 22 for “22”.
100-125Press the 3 digits in order.
Example: Press 110 for “110”.
0–9
REC/OTR
CH +/–
VCR DVD
Preparation:
•Turn ON the TV and select to the corresponding
video input.
•Press VCR DVD selector to select the VCR mode.
(The VCR mode indicator will light.)
SP/SLP
2I30201B-En_p32-371/13/06, 2:48 PM34
35
Recording (VCR)
Press STOP to stop recording.
“ ” will appear on screen for about
4 seconds.
Press PAUSE/STEP to avoid recording unwanted
material. Press again to continue the recording.
“” will appear on screen for
about 4 seconds.
Notes:
•The pause function will be released after 5 minutes to
prevent damage to the tape or the VCR. The VCR will
change to the STOP mode.
•You can select a recording channel in the recording
pause mode.
To stop recording temporarily
To stop recording
TV/VCR
STOP
PAUSE/STEP
This VCR will automatically rewind the tape when the tape
has ended (except during OTR and timer recording). It will
also eject the tape.
Auto Rewind feature
Recording one program while
watching another
While the VCR is recording, select your desired channel
on the TV.
When a TV is connected with an antenna cable only,
press TV/VCR to select the TV position.
The “VCR” display will go off and recording will continue.
Select the TV channel you want to watch by using the
TV channel selector.
Note:
Some Cable TV hookups do not permit viewing one channel
while recording another. See pages
16
and
17
.
2I30201B-En_p32-371/13/06, 2:48 PM35
36
Recording (VCR)
One-touch Timer Recording (OTR)
The One-touch Timer Recording feature provides a simple and
convenient way to make a timed recording.
One-touch Timer Recording (OTR)
Press
once
twice
3 times
4 times
5 times
NORMAL REC
0:30
1:00
1:30
2:00
3:00
4:00
5:00
6:00
NORMAL REC
Recording timePress
6 times
7 times
8 times
9 times
10 times
Recording time
Load a cassette tape with the erase
prevention tab intact.
The VCR will automatically turn on.
1
Press SP/SLP to select the desired tape speed
SP or SLP.
The tape counter and “SP” or “SLP”
will appear on the screen for about 4
seconds.
2
Set “TV” or “CABLE” option to the
appropriate position
27
.
3
TV- VHF/UHF channels
CABLE- Cable TV channels
Press Direct channel selection buttons (0–9) or
CH +/– to select the channel to be recorded.
4
Press
REC/OTR
. Recording begins. Press the
button again to stop recording after 30 minutes.
Each additional press of
REC/OTR
will increase
recording time as shown in the chart below, up
to a maximum of 6 hours.
5
To cancel OTR
Press STOP or turn off the power.
“ ” will appear on the screen for about 4 seconds.
Note:
If you wish to watch the DVD playback during OTR or standard
recording, press VCR DVD selector to change to DVD mode and
perform the DVD playback
42
.
0–9
CH +/–
REC/OTR
SP/SLP
VCR DVD
STOP
Preparation:
•Turn ON the TV and select to the corresponding
video input.
•Press VCR DVD selector to select the VCR mode.
(The VCR mode indicator will light.)
Example: One-touch Timer Recording for 30 minutes.
The OTR and recording time will
appear on the screen for about 4
seconds, then change to “ ”.
2I30201B-En_p32-371/13/06, 2:48 PM36
37
Recording (VCR)
Timer recording
Timer recording can be programmed on-screen with the remote control.
The built-in timer allows automatic unattended recording of up to 8
programs within 1 month.
Timer recording
Notes:
•Press CANCEL to move cursor backward for correction.
•To record from external source set the channel to “L1” or
“L2”.
Notes:
•If the timer symbol () blinks when the timer recording ended,
the TV program has not been completely recorded because of
an insufficient tape length. Press TIMER RECto cancel the
timer program or press EJECT to remove the cassette tape.
•During timer recording standby mode, the VCR mode cannot be
operated. To use the VCR, first press TIMER REC, then press
VCR DVD selector to change to VCR mode. After VCR mode is
selected, press TIMER RECagain to put the VCR into timer
recording standby mode.
•If you press TIMER REC during timer recording, the recording
operation will be interrupted. If you press TIMER REC again
within the programmed time, the recording operation will start
again.
•After a power failure or disconnection of the power plug, all
programmed recording settings and time display will be lost
upon resumption of power. In this case, reset the clock
24
and
reprogram any timer recording.
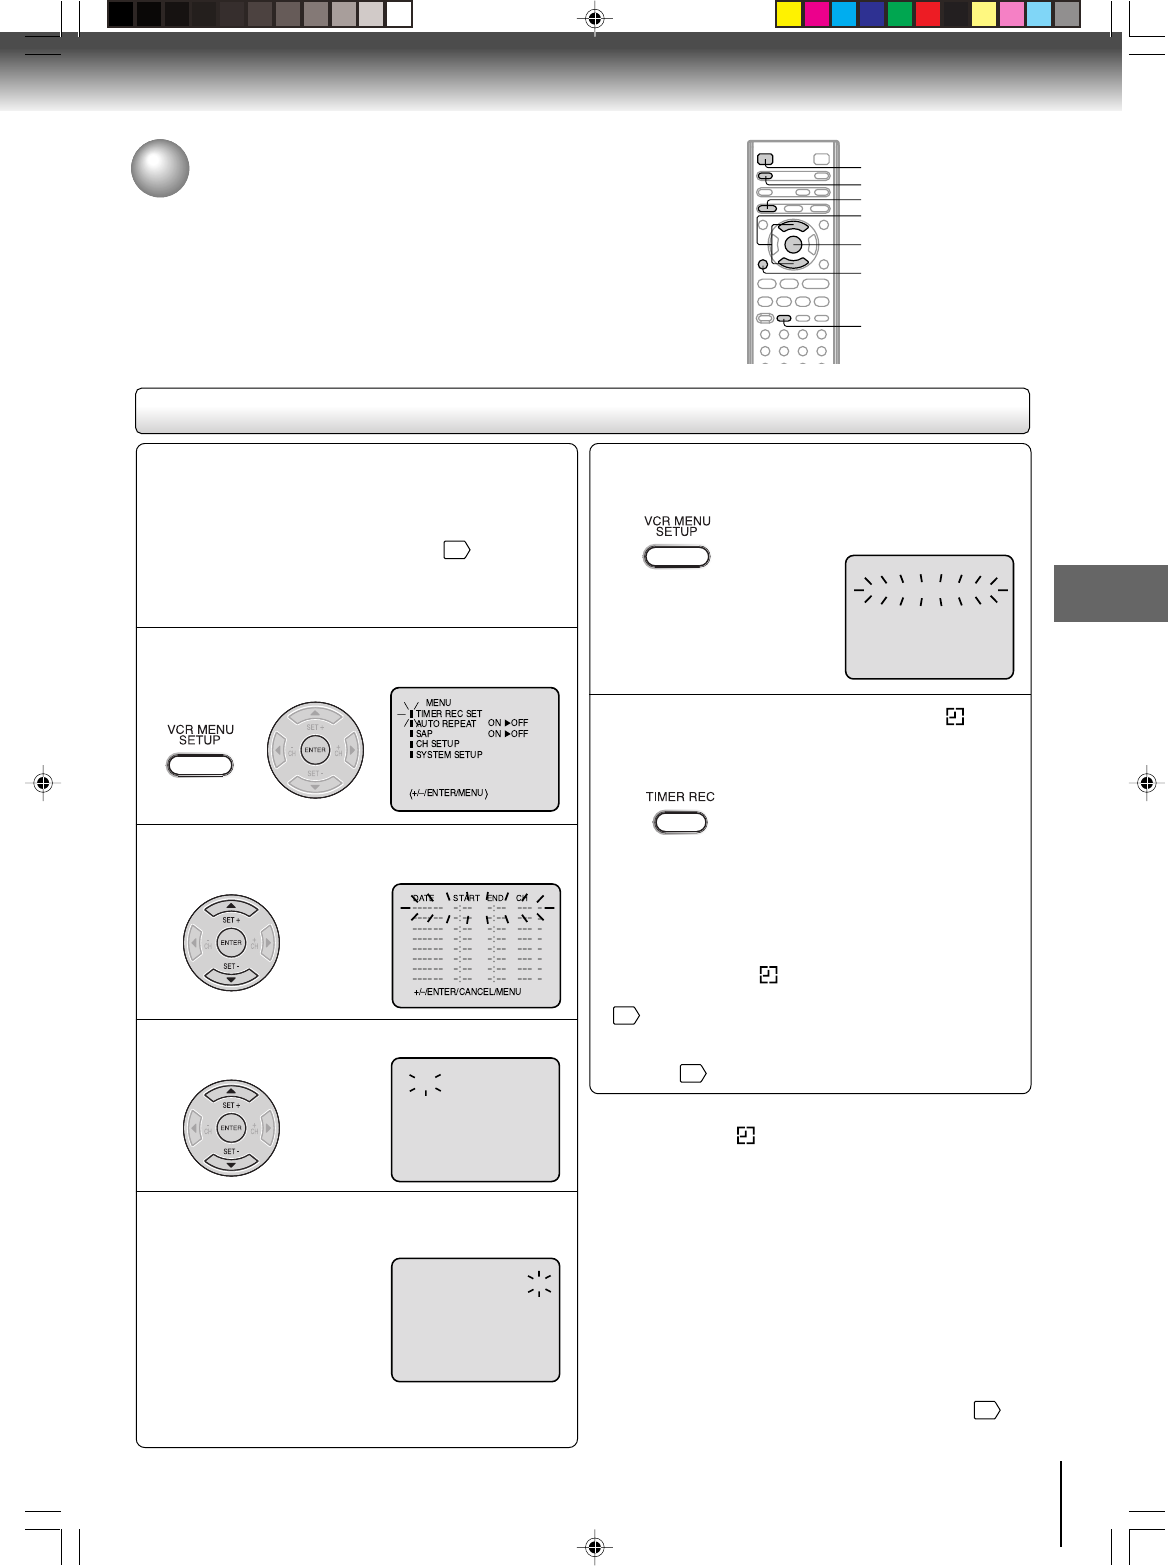
Press VCR MENU. Select “TIMER REC SET”,
then press ENTER.
Preparation:
•Press VCR DVD selector to select the VCR mode.
•Load a cassette tape with the erase prevention tab
intact.
•Check the time and date are correct
24
.
Example:Program a timer recording for the 26th day,
channel 125
(Cable TV), 11:00 - 11:30 PM on timer program
number 1 (Tape speed: SLP).
1
Press SET + or – to select one of the program
line, then press ENTER.
2
Press SET + or – to select the date, then press
ENTER.
3
Set the start time, end time, channel and tape
speed as in step 3.
4
〈+/—/ENTER/CANCEL/MENU
〉
DATESTARTENDCH
———————:———:—————
———————:———:—————
———————:———:—————
———————:———:—————
———————:———:—————
———————:———:—————
———————:———:—————
—
—
—
—
—
—
—
26(SA)
11
:00
PM
11
:30
PM
125
SLP
〈+/—/ENTER/CANCEL/MENU
〉
DATESTARTENDCH
———————:———:—————
———————:———:—————
———————:———:—————
———————:———:—————
———————:———:—————
———————:———:—————
———————:———:—————
—
—
—
—
—
—
—
26(SA)
11
:00
PM
11
:30
PM
125
SLP
To enter other programs, repeat step 2
through 4.
•To return to the normal screen,
press VCR MENU twice.
5
Press TIMER REC. The timer symbol () will
appear on the display and the VCR standbys
for recording.
At the same time, VCR mode will
change to DVD mode automatically.
You can use DVD even if the VCR is
in the timer recording mode. If you
do not use the DVD, turn the power
off.
6
Notes:
•The timer recording will start at 5 seconds before the
preset starting time.
•If the timer symbol ( ) does not appear on the display
when TIMER REC is pressed, the cassette is not inserted
29
.
•If the cassette is ejected when TIMER REC is pressed, the
erase prevention tab of the cassette may have been
removed
29
.
SET +/–
VCR DVD
ENTER
CANCEL
VCR MENU
EJECT
〈〉
〈+/
—
/ENTER/CANCEL/MENU
〉
DATESTARTENDCH
———————:———:—————
—:———:—————
———————:———:—————
———————:———:—————
———————:———:—————
———————:———:—————
———————:———:—————
———————:———:—————
—
—
—
—
—
—
—
—
26(SA)
TIMER REC
2I30201B-En_p32-371/13/06, 2:48 PM37
38
Recording (VCR)
Setting procedure
To set daily/weekly timer
To confirm Timer program:
At step 1 on page 37 select “TIMER REC SET” and
press ENTER.
The timer program list will appear on the screen.
2
The current day (Friday)SU-SA (Sunday to Saturday)
MO-SA (Monday to Saturday)
MO-FR (Monday to Friday)
WKL-WEWKL-TH (Weekly Thursday)
(Weekly Wednesday)
One month later
minus one day
Weekly (e.g. WKL-TU: each Tuesday) or daily (e.g. MO-
SA: Monday to Saturday) Timer recording
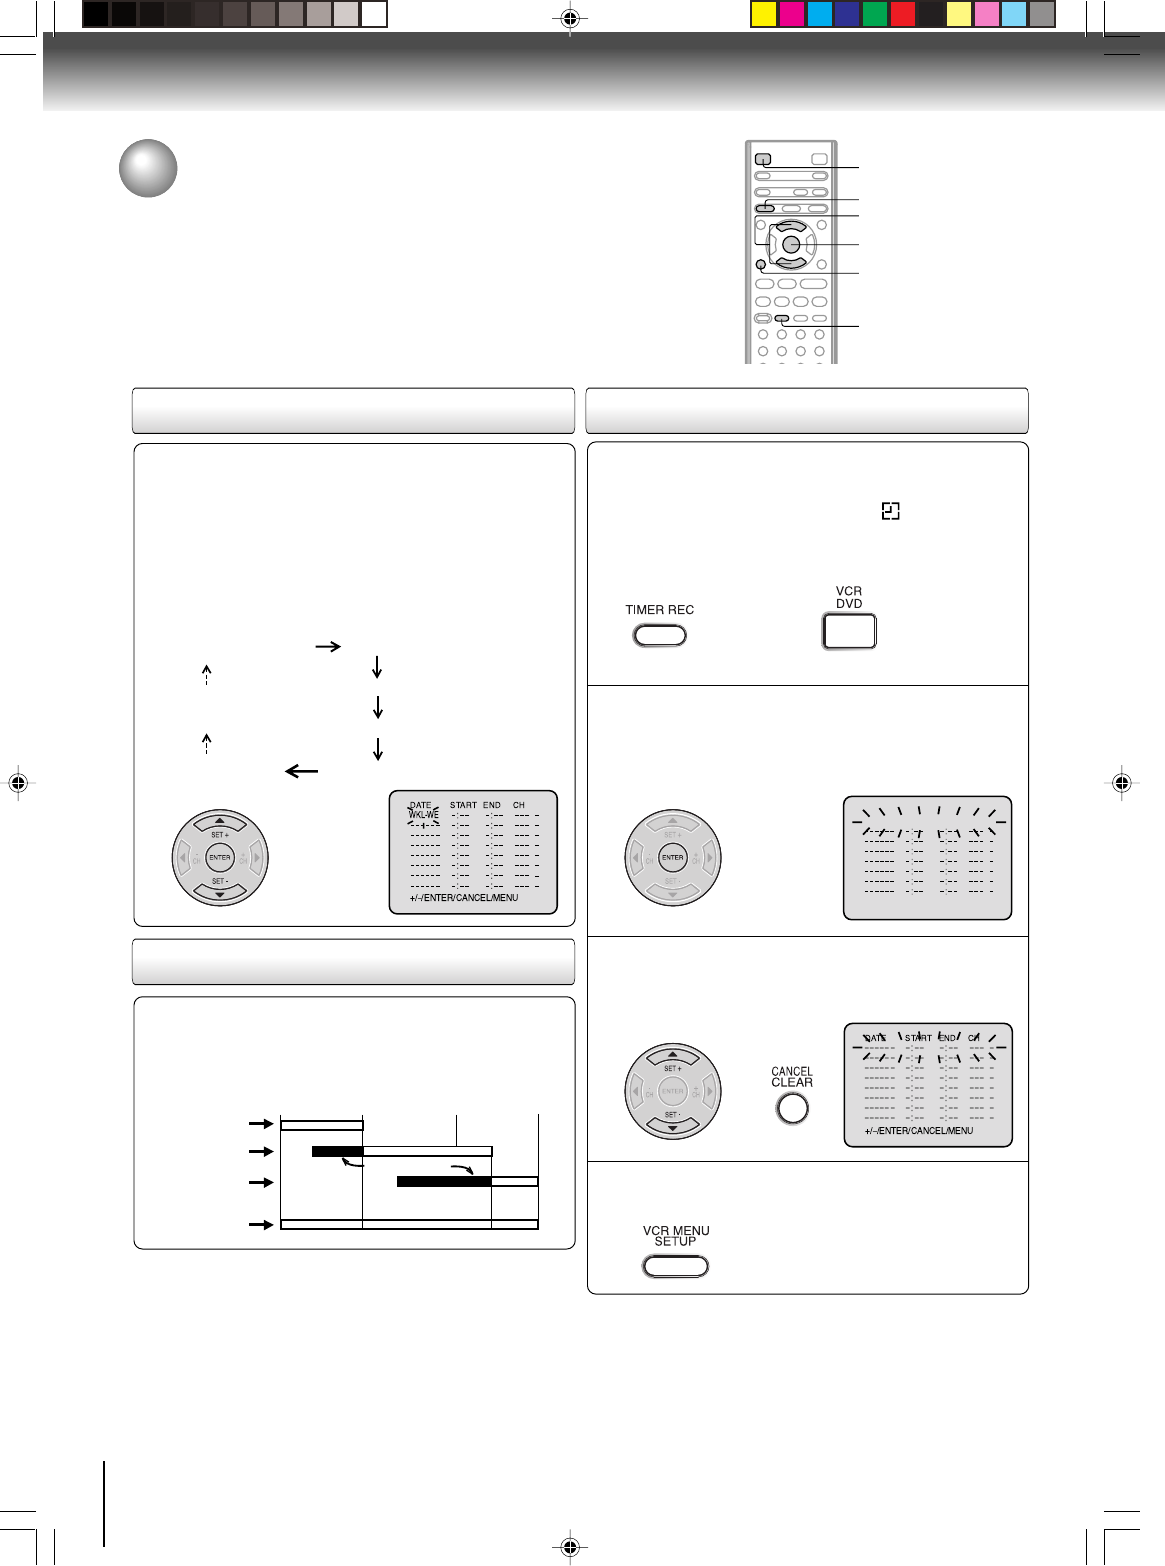
Follow the procedure of timer recording on page 37. At step
3, press SET + or –repeatedly until the desired setting
appears. Then press ENTER.
When you press SET – repeatedly, the
DATE indicator will change as follows, in
this case the day is Friday.
If the programs overlap another
Do not overlap timer programs as portions of the
conflicting programs will be lost. The first recording
time has priority over the next recording time as shown
in the diagram below.
Notes:
•The daily/weekly recording can be made continuously until the
recording is canceled or the tape reaches the end.
•During timer recording the automatic rewinding mechanism
does not function.
8 : 00
11 : 00
9 : 00
10 : 00
Program 1
Prog.1
Deleted Parts
Non Recorded Portion Parts
Prog.2Prog.3
Program 2
Program 3
Recording
Control Settings
〈〉
〈+/
—
/ENTER/CANCEL/MENU〉
DATESTARTENDCH
26(SA)
11
:00
PM
11
:30
PM
125
SLP
Notes:
•If there are other timer record programs remaining, TIMER
RECmust be pressed to reactivate the timer, otherwise the
remaining timer record programs will be ignored.
•You cannot confirm the Timer program during timer recording
operation.
•You can correct or cancel a programmed setting in program
confirm mode.
If the Timer has been activated, press TIMER
REC to deactivate the Timer.
The timer symbol () will
disappear. Then press VCR DVD
selector to change to VCR mode.
1
To cancel Timer program:
Press SET + or – to select the unwanted program,
then press CANCEL to cancel the program.
3
Press VCR MENU repeatedly until the menu
screen is cleared.
4
Timer recording (Continued)
To confirm or cancel a program
SET +/–
ENTER
VCR MENU
CANCEL
VCR DVD
TIMER REC
〈〉
2I30201B-En_p38-411/13/06, 2:49 PM38
39
Other functions (VCR)
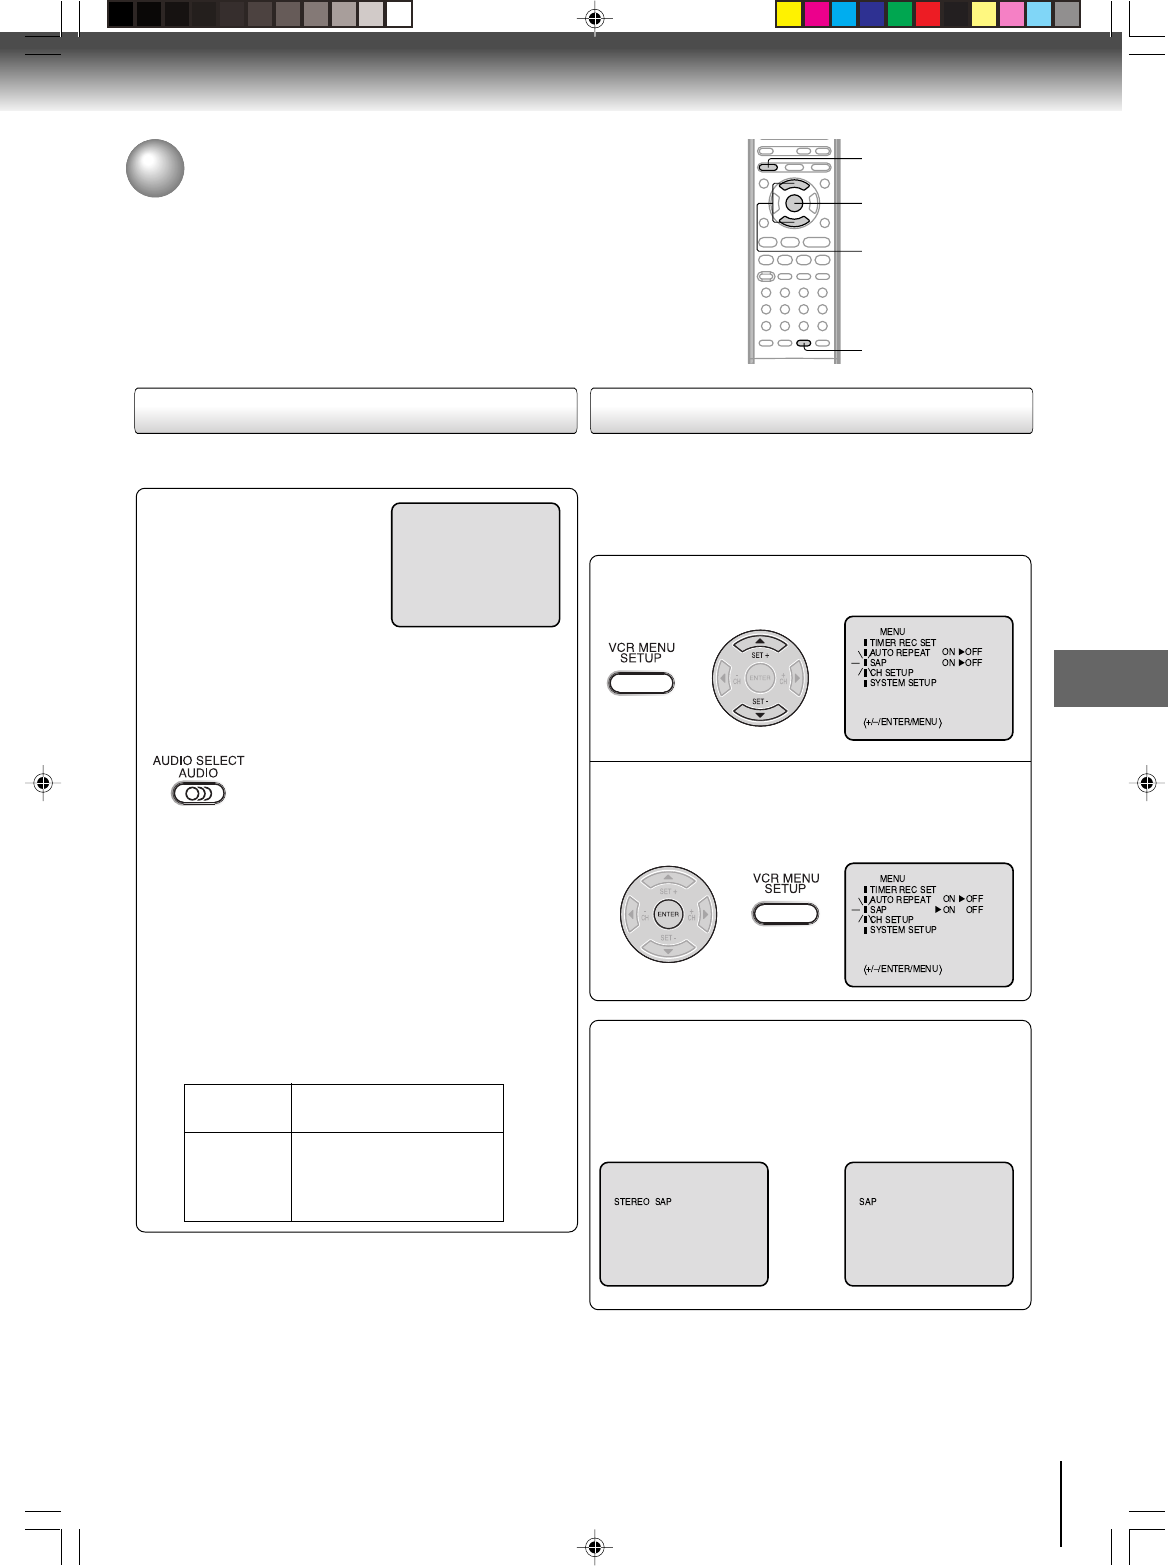
Stereo recording and playback /
Second Audio Program (SAP)
When a MTS STEREO broad-
cast is received, “STEREO” will
appear on the screen for about 4
seconds and the program can
be viewed or recorded in stereo.
The Hi-Fi stereo recording pro-
cedure is the same as for normal
recordings.
Notes:
•When playing back a tape that is not recorded in Hi-Fi stereo
mode, the audio will automatically be monaural.
•When listening to a VHS Hi-Fi video tape or MTS broadcast
through the VHF/UHF jack (Audio/Video cable not connected),
the sound will be monaural.
When viewing an MTS stereo TV program, or playing a
Libble takes abuse of its services very seriously. We're committed to dealing with such abuse according to the laws in your country of residence. When you submit a report, we'll investigate it and take the appropriate action. We'll get back to you only if we require additional details or have more information to share.
Product:
Forumrules
To achieve meaningful questions, we apply the following rules:
First, read the manual;
Check if your question has been asked previously;
Try to ask your question as clearly as possible;
Did you already try to solve the problem? Please mention this;
Is your problem solved by a visitor then let him/her know in this forum;
To give a response to a question or answer, do not use this form but click on the button 'reply to this question';
Your question will be posted here and emailed to our subscribers. Therefore, avoid filling in personal details.
Register
Register getting emails for Toshiba SDKV550 at:
new questions and answers
new manuals
You will receive an email to register for one or both of the options.
Get your user manual by e-mail
Enter your email address to receive the manual of Toshiba SDKV550 in the language / languages: English as an attachment in your email.
The manual is 4,55 mb in size.
You will receive the manual in your email within minutes. If you have not received an email, then probably have entered the wrong email address or your mailbox is too full. In addition, it may be that your ISP may have a maximum size for emails to receive.
The manual is sent by email. Check your email
If you have not received an email with the manual within fifteen minutes, it may be that you have a entered a wrong email address or that your ISP has set a maximum size to receive email that is smaller than the size of the manual.
The email address you have provided is not correct.
Please check the email address and correct it.
Your question is posted on this page
Would you like to receive an email when new answers and questions are posted? Please enter your email address.