Introducción
Español - 17
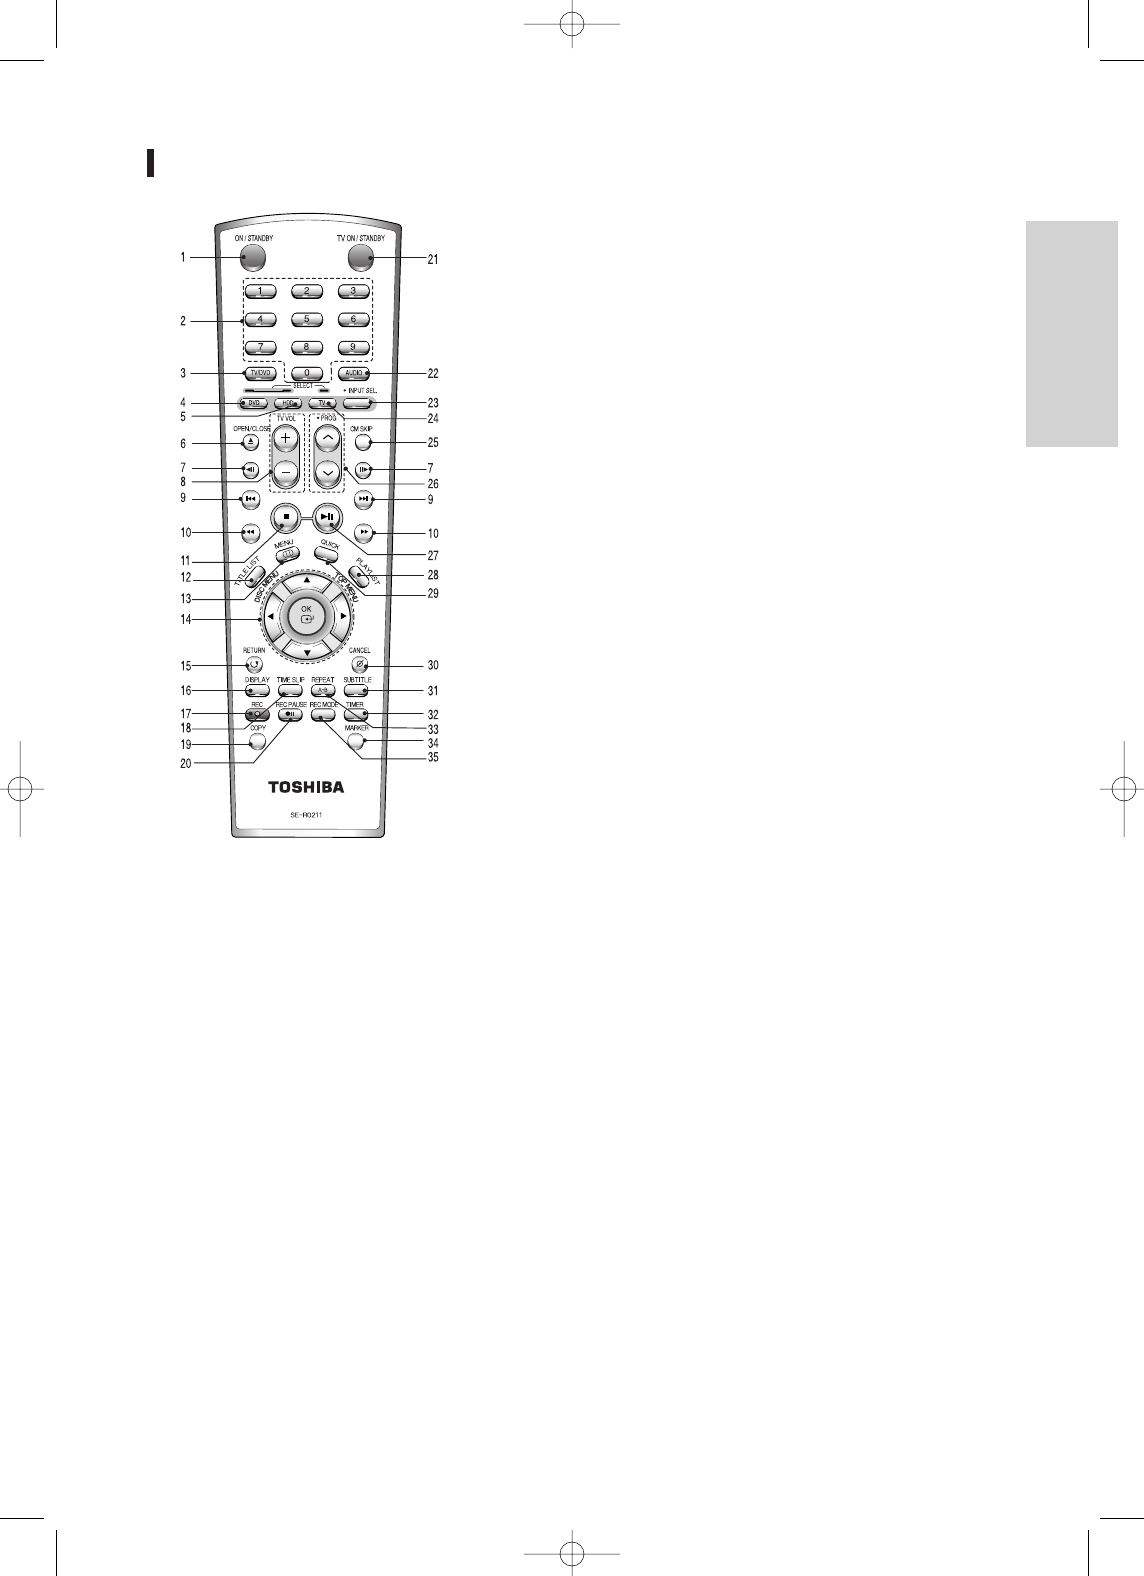
Manejo del mando a distancia
13. Botón MENU
Presenta en pantalla el menú de configuración del
GRABADOR DE DVD Y DISCO DURO.
14. Botones OK/DIRECCIÓN (Botones …†œ √ )
15. Botón RETURN
16. Botón DISPLAY
Mostrará la configuración actual o el estado del disco o
DISCO DURO.
17. Botón REC
Se utiliza para realizar una grabación en DISCO
DURO/discos DVD-RAM/-RW/-R.
18. Botón TIME SLIP
Utilice esta función para ver en la pantalla las imágenes
grabadas recientemente mientras la grabación está en
curso, con una demora de 10 segundos.
19. Botón COPY
Se pulsa para copiar DVD en DISCO DURO o DISCO
DURO en DVD. Para empezar a copiar, pulse el botón
COPY durante la reproducción.
20. REC PAUSE Button
Se utiliza para interrumpir temporalmente durante la grabación.
21. Botón TV ON/STANDBY
22. Botón AUDIO
Este botón se utiliza para acceder a diversas funciones
de audio en un disco (modo DVD).
23. Botón INPUT SEL.
Selecciona la señal de entrada en modo de entrada
externa (entrada PROG, AV1, AV2, AV3 o DV)
24. Botón TV
Se pulsa para hacer funcionar el TV.
25. Botón CM SKIP
Cuando se reproduce un programa grabado en un disco
DVD o en el DISCO DURO, la unidad puede definirse
para que salte automáticamente una parte del programa.
26. Botón PROG
Se utiliza para seleccionar un programa de TV.
27. Botón REPRODUCIR/PAUSA
Se pulsa para reproducir o interrumpir temporalmente un
disco o el DISCO DURO.
28. Botón PLAY LIST/TOP MENU
Se utiliza para volver al Menú Título o para ver la lista de
archivos grabados.
29. Botón QUICK
Se ven y se seleccionan las funciones aplicables en el
estado actual.
30. Botón CANCEL
31. Botón SUBTITLE
Se pulsa para cambiar el idioma de los subtítulos del DVD.
32. Botón TIMER
Púlselo para entrar directamente en el menú Grabación
con temporizador.
33. Botón REPEAT A-B
Permite repetir la reproducción entre el punto A y el punto B.
34. Botón MARKER
Utilice esta función para marcar una posición mientras
reproduce un disco o un disco duro.
35. Botón REC MODE
Se utiliza para fijar el tiempo de grabación y la calidad de
imagen deseados (XP/SP/LP/EP).
1. Botón ON/STANDBY
2. Botones numéricos
3. Botón TV/DVD
4. Botón DVD
Se pulsa para hacer funcionar el DVD.
5. Botón HDD
Se pulsa para hacer funcionar el DISCO DURO.
6. Botón OPEN/CLOSE
Se pulsa para abrir y cerrar la bandeja del disco.
7. Botones PASO ATRÁS / ADELANTE
Cada pulsación reproducirá un fotograma atrás o adelante.
8. Botón TV VOL
Ajuste del volumen del TV.
9. Botones SALTO ATRÁS / ADELANTE
Se pulsan para saltar adelante o atrás en un disco.
10. Botones BUSCAR ATRÁS / ADELANTE
Se pulsa para buscar adelante o atrás en un disco.
11. Botón PARAR
Se pulsa para detener la reproducción de un disco o del
DISCO DURO.
12. Botón TITLE LIST/DISC MENU
Se utiliza para entrar en la lista de vista de grabación y en
el Menú del Disco.