681664
16
Zoom out
Zoom in
Previous page
1/166
Next page
Preface > 2
P
REFACE
Every effort has been made to ensure that the information in this document is complete,
accurate, and up-to-date. The manufacturer assumes no responsibility for the results of
errors beyond its control. The manufacturer also cannot guarantee that changes in software
and equipment made by other manufacturers and referred to in this guide will not affect
the applicability of the information in it. Mention of software products manufactured by
other companies does not necessarily constitute endorsement by the manufacturer.
While all reasonable efforts have been made to make this document as accurate and helpful
as possible, we make no warranty of any kind, expressed or implied, as to the accuracy or
completeness of the information contained herein.
©2011 TOSHIBA TEC CORPORATION All rights reserved
Energy Star is a trademark of the United States Environmental Protection Agency.
Microsoft, MS-DOS and Windows are registered trademarks of Microsoft Corporation.
Apple, Macintosh, Mac and Mac OS are trademarks of Apple Inc.
Other product names and brand names are registered trademarks or trademarks of their
proprietors.
This product complies with the requirements of the Council Directives 2004/
108/EC (EMC), 2006/95/EC (LVD), 1999/5/ EC (R&TTE) and 2009/125/EC
(EuP), as amended where applicable on the approximation of the laws of the
member states relating to electromagnetic compatibility, low voltage, radio &
telecommunications terminal equipment, and energy using products
.
The following cables were used to evaluate this product to achieve EMC directive
2004/108/EC compliance and configurations other than this may affect that compliance.
CABLE TYPE LENGTH
(METRE)
CORE SHIELD
Power 1.8
✘✘
USB 5.0
LAN 15.0
✘✘
Tel 1.5
✘✘
Modular 15
✘✘
Emergency first aid > 3
E
MERGENCY
FIRST
AID
Take care with toner powder:
If swallowed, give small amounts of cold water and seek medical
attention. DO NOT attempt to induce vomiting.
If inhaled, move the person to an open area for fresh air. Seek medical
attention.
If it gets into the eyes, flush with large amounts of water for at least 15
minutes keeping eyelids open. Seek medical attention.
Spillages should be treated with cold water and soap to help reduce risk
of staining skin or clothing.
I
MPORTER
TO
THE
EU/
AUTHORISED
REPRESENTATIVE
TOSHIBA TEC GERMANY IMAGING SYSTEMS GmbH
CARL-SCHURZ-STRASSE 7
4146 NEUSS - GERMANY
TEL +49 (0) 2131 1245-0
FAX +49 (0) 2131 1245-402
E
NVIRONMENTAL
INFORMATION
E
NERGY
S
TAR
®
PROGRAM
Toshiba Tec Corporation, as a member of the ENERGY STAR Program, attaches the ENERGY
STAR logo to all products which meet the ENERGY STAR Program requirements.
The ENERGY STAR Program aims at the promotion of the development and wider usage of
office equipment including energy efficient computers in order to address environmental
issues such as global warming. Manufacturers that participate in this program can attach
the ENERGY STAR logo to products after confirming that they meet the energy saving
standards of this program. Also, these standards and logo are commonly used within the
U.S.Environmental Protection Agency (EPA) and participating countries.
Specified products, sales countries or regions may not be included.
To distinguish whether or not the product meets the ENERGY STAR Program requirements,
check if the corresponding logo is on the product.
If you have any questions, contact your service representative.
Disclaimer notice > 4
D
ISCLAIMER
NOTICE
The following notice sets out the exclusions and limitations of liability of TOSHIBA TEC
CORPORATION (including its employees, agents and sub-contractors) to any purchaser or
user (“User”) of the e-STUDIO222CS/223CS/263CS including its accessories, options and
bundled software (“Product”).
1. The exclusion and limitations of liability referred to in this notice shall be effective to
the fullest extent permissible at law. For the avoidance of doubt, nothing in this
notice shall be taken to exclude or limit TOSHIBA TEC CORPORATION’s liability for
death or personal injury caused by TOSHIBA TEC CORPORATION’s negligence or
TOSHIBA TEC CORPORATION’s fraudulent misrepresentation.
2. All warranties, conditions and other terms implied by law are, to the fullest extent
permitted by law, excluded and no such implied warranties are given or apply in
relation to the Products.
3. TOSHIBA TEC CORPORATION shall not be liable for any loss, cost, expense, claim or
damage whatsoever caused by any of the following:
(a) use or handling of the Product otherwise than in accordance with the manuals,
including but not limited to Operator’s Manual, User’s Guide, and/or incorrect or
careless handling or use of the Product;
(b) any cause which prevents the Product from operating or functioning correctly
which arises from or is attributable to either acts, omissions, events or accidents
beyond the reasonable control of TOSHIBA TEC CORPORATION including
without limitation acts of God, war, riot, civil commotion, malicious or deliberate
damage, fire, flood, or storm, natural calamity, earthquakes, abnormal voltage
or other disasters;
(c) additions, modifications, disassembly, transportation, or repairs by any person
other than service technicians authorized by TOSHIBA TEC CORPORATION; or
(d) use of paper, supplies or parts other than those recommended by TOSHIBA TEC
CORPORATION.
4. Subject to paragraph 1, TOSHIBA TEC CORPORATION shall not be liable to Customer
for:
(a) loss of profits; loss of sales or turnover; loss of or damage to reputation; loss
of production; loss of anticipated savings; loss of goodwill or business
opportunities; loss of customers; loss of, or loss of use of, any software or data;
loss under or in relation to any contract; or
(b) any special, incidental, consequential or indirect loss or damage, costs,
expenses, financial loss or claims for consequential compensation; whatsoever
and howsoever caused which arise out of or in connection with the Product or
the use or handling of the Product even if TOSHIBA TEC CORPORATION is
advised of the possibility of such damages. TOSHIBA TEC CORPORATION shall
not be liable for any loss, cost, expense, claim or damage caused by any
inability to use (including, but not limited to failure, malfunction, hang-up, virus
infection or other problems) which arises from use of the Product with
hardware, goods or software which TOSHIBA TEC CORPORATION has not
directly or indirectly supplied.
Contents > 5
C
ONTENTS
Preface . . . . . . . . . . . . . . . . . . . . . . . . . . . . . . . . . . . . . . . . . . . . . . . . . . .2
Emergency first aid . . . . . . . . . . . . . . . . . . . . . . . . . . . . . . . . . . . . . . . . . .3
Importer to the EU/authorised representative. . . . . . . . . . . . . . . . . . . . .3
Environmental information . . . . . . . . . . . . . . . . . . . . . . . . . . . . . . . . . . . .3
Energy Star
®
program . . . . . . . . . . . . . . . . . . . . . . . . . . . . . . . . . . . . . . 3
Disclaimer notice. . . . . . . . . . . . . . . . . . . . . . . . . . . . . . . . . . . . . . . . . . . .4
Contents . . . . . . . . . . . . . . . . . . . . . . . . . . . . . . . . . . . . . . . . . . . . . . . . . .5
Notes, cautions and warnings. . . . . . . . . . . . . . . . . . . . . . . . . . . . . . . . . .8
About this guide . . . . . . . . . . . . . . . . . . . . . . . . . . . . . . . . . . . . . . . . . . . .9
Documentation suite . . . . . . . . . . . . . . . . . . . . . . . . . . . . . . . . . . . . . . . 9
Purpose of this guide . . . . . . . . . . . . . . . . . . . . . . . . . . . . . . . . . . . . . . . 9
On-line usage . . . . . . . . . . . . . . . . . . . . . . . . . . . . . . . . . . . . . . . . . . . .10
Printing pages. . . . . . . . . . . . . . . . . . . . . . . . . . . . . . . . . . . . . . . . . . . .10
Introduction . . . . . . . . . . . . . . . . . . . . . . . . . . . . . . . . . . . . . . . . . . . . . .11
Overview . . . . . . . . . . . . . . . . . . . . . . . . . . . . . . . . . . . . . . . . . . . . . . .13
Front view . . . . . . . . . . . . . . . . . . . . . . . . . . . . . . . . . . . . . . . . . . . .13
Rear view . . . . . . . . . . . . . . . . . . . . . . . . . . . . . . . . . . . . . . . . . . . . .14
Control panel . . . . . . . . . . . . . . . . . . . . . . . . . . . . . . . . . . . . . . . . . . . .15
Keypad - character switching . . . . . . . . . . . . . . . . . . . . . . . . . . . . . . . . .17
Qwerty keyboard (e-STUDIO263CS only) . . . . . . . . . . . . . . . . . . . . . . . . .18
Changing the display language . . . . . . . . . . . . . . . . . . . . . . . . . . . . . . . .18
Getting started . . . . . . . . . . . . . . . . . . . . . . . . . . . . . . . . . . . . . . . . . . . .19
Switching on. . . . . . . . . . . . . . . . . . . . . . . . . . . . . . . . . . . . . . . . . . . . .19
Switching off. . . . . . . . . . . . . . . . . . . . . . . . . . . . . . . . . . . . . . . . . . . . .19
Power saving mode . . . . . . . . . . . . . . . . . . . . . . . . . . . . . . . . . . . . . . . .20
Sleep mode . . . . . . . . . . . . . . . . . . . . . . . . . . . . . . . . . . . . . . . . . . . . .20
Installing drivers and utilities . . . . . . . . . . . . . . . . . . . . . . . . . . . . . . . . .21
Windows - scanner and printer drivers. . . . . . . . . . . . . . . . . . . . . . . . .22
Mac - printer driver . . . . . . . . . . . . . . . . . . . . . . . . . . . . . . . . . . . . . .23
Fax driver (e-STUDIO223CS and e-STUDIO263CS) . . . . . . . . . . . . . . . .24
Configuration tool . . . . . . . . . . . . . . . . . . . . . . . . . . . . . . . . . . . . . . .25
ActKey utility . . . . . . . . . . . . . . . . . . . . . . . . . . . . . . . . . . . . . . . . . .26
Paper recommendations . . . . . . . . . . . . . . . . . . . . . . . . . . . . . . . . . . . . .28
Cassette trays. . . . . . . . . . . . . . . . . . . . . . . . . . . . . . . . . . . . . . . . . . . .28
Multi purpose tray . . . . . . . . . . . . . . . . . . . . . . . . . . . . . . . . . . . . . . . . .29
Face down stacker. . . . . . . . . . . . . . . . . . . . . . . . . . . . . . . . . . . . . . . . .29
Face up stacker. . . . . . . . . . . . . . . . . . . . . . . . . . . . . . . . . . . . . . . . . . .29
Duplex . . . . . . . . . . . . . . . . . . . . . . . . . . . . . . . . . . . . . . . . . . . . . . . . .29
Loading paper . . . . . . . . . . . . . . . . . . . . . . . . . . . . . . . . . . . . . . . . . . . . .30
Cassette trays. . . . . . . . . . . . . . . . . . . . . . . . . . . . . . . . . . . . . . . . . . . .30
Multi purpose tray . . . . . . . . . . . . . . . . . . . . . . . . . . . . . . . . . . . . . . . . .33
Configuring the tray settings . . . . . . . . . . . . . . . . . . . . . . . . . . . . . . . . .33
Registering custom sizes . . . . . . . . . . . . . . . . . . . . . . . . . . . . . . . . . . . .34
User authentication and access control . . . . . . . . . . . . . . . . . . . . . . . . .35
PIN authentication. . . . . . . . . . . . . . . . . . . . . . . . . . . . . . . . . . . . . . . . .35
Logging into the machine . . . . . . . . . . . . . . . . . . . . . . . . . . . . . . . . . .35
Logging out of the machine . . . . . . . . . . . . . . . . . . . . . . . . . . . . . . . .35
User name and password authentication . . . . . . . . . . . . . . . . . . . . . . . . .35
Logging into the machine . . . . . . . . . . . . . . . . . . . . . . . . . . . . . . . . . .35
Logging out of the machine . . . . . . . . . . . . . . . . . . . . . . . . . . . . . . . .35
Operation from the computer . . . . . . . . . . . . . . . . . . . . . . . . . . . . . . .36
Contents > 6
Operation . . . . . . . . . . . . . . . . . . . . . . . . . . . . . . . . . . . . . . . . . . . . . . . .38
Multi-tasking. . . . . . . . . . . . . . . . . . . . . . . . . . . . . . . . . . . . . . . . . . . . .39
Loading document(s) . . . . . . . . . . . . . . . . . . . . . . . . . . . . . . . . . . . . . . .40
Document requirements. . . . . . . . . . . . . . . . . . . . . . . . . . . . . . . . . . .40
Scannable area . . . . . . . . . . . . . . . . . . . . . . . . . . . . . . . . . . . . . . . . .40
Placing document(s) in the ADF . . . . . . . . . . . . . . . . . . . . . . . . . . . . .41
Placing document(s) on the glass . . . . . . . . . . . . . . . . . . . . . . . . . . . .42
Copying . . . . . . . . . . . . . . . . . . . . . . . . . . . . . . . . . . . . . . . . . . . . . . . . . .43
Basic operation . . . . . . . . . . . . . . . . . . . . . . . . . . . . . . . . . . . . . . . . . . .43
Increasing copy count . . . . . . . . . . . . . . . . . . . . . . . . . . . . . . . . . . . .43
Advanced operation . . . . . . . . . . . . . . . . . . . . . . . . . . . . . . . . . . . . . . . .44
Resetting copy settings . . . . . . . . . . . . . . . . . . . . . . . . . . . . . . . . . . . . .46
Auto reset . . . . . . . . . . . . . . . . . . . . . . . . . . . . . . . . . . . . . . . . . . . .46
Using the reset/logout button . . . . . . . . . . . . . . . . . . . . . . . . . . . . . . .46
Scanning . . . . . . . . . . . . . . . . . . . . . . . . . . . . . . . . . . . . . . . . . . . . . . . . .47
Scan to e-mail . . . . . . . . . . . . . . . . . . . . . . . . . . . . . . . . . . . . . . . . . . .48
Scan to network PC . . . . . . . . . . . . . . . . . . . . . . . . . . . . . . . . . . . . . . . .52
Scan to USB memory. . . . . . . . . . . . . . . . . . . . . . . . . . . . . . . . . . . . . . .55
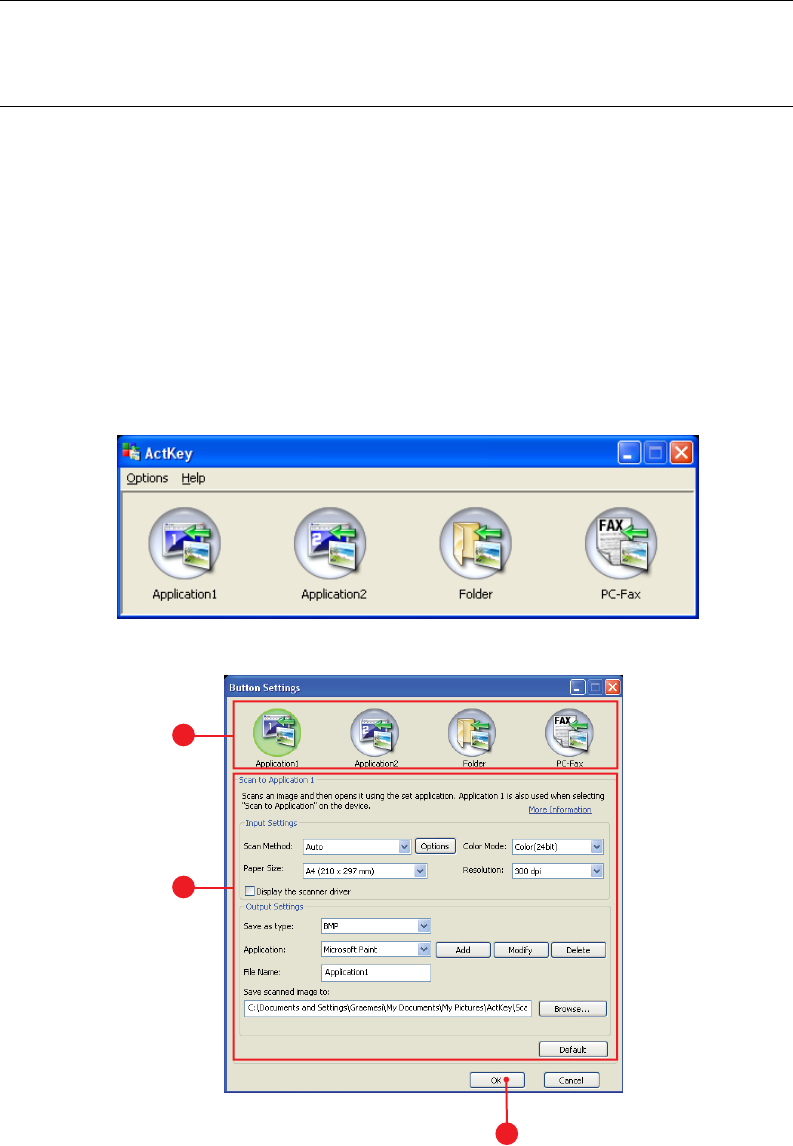
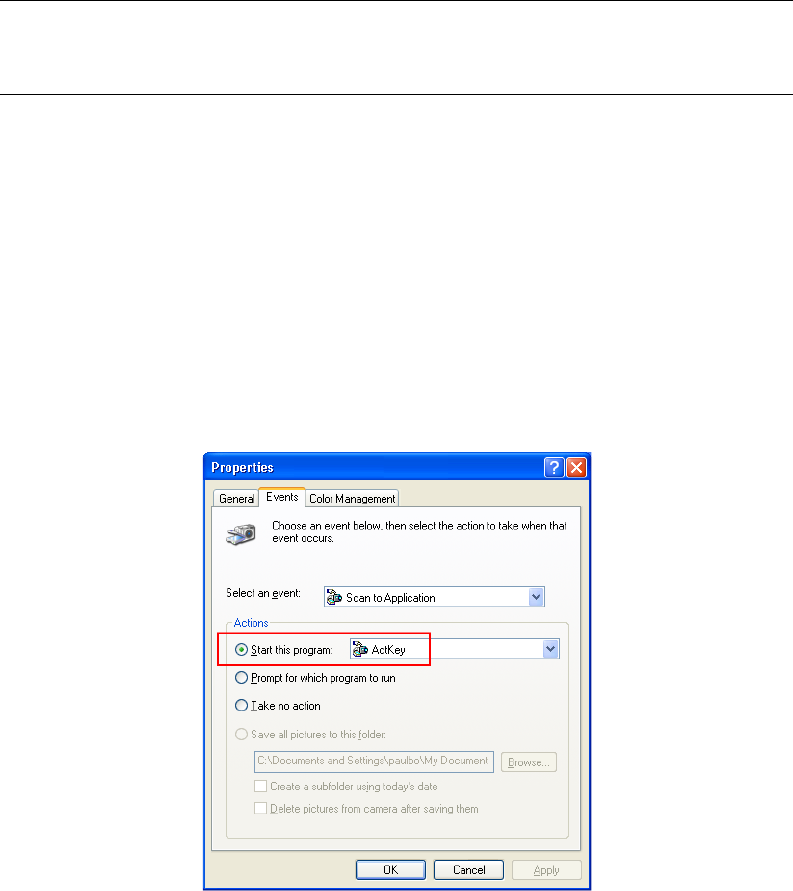
Scan to local PC . . . . . . . . . . . . . . . . . . . . . . . . . . . . . . . . . . . . . . . . . .57
ActKey interface . . . . . . . . . . . . . . . . . . . . . . . . . . . . . . . . . . . . . . . .58
Scan to remote PC. . . . . . . . . . . . . . . . . . . . . . . . . . . . . . . . . . . . . . . . .59
Managing profiles . . . . . . . . . . . . . . . . . . . . . . . . . . . . . . . . . . . . . . . . .61
Adding a new network profile . . . . . . . . . . . . . . . . . . . . . . . . . . . . . . .61
Deleting a network profile . . . . . . . . . . . . . . . . . . . . . . . . . . . . . . . . .62
Managing the address book . . . . . . . . . . . . . . . . . . . . . . . . . . . . . . . . . .63
Setting sender and reply to e-mail addresses (from/reply to) . . . . . . . . .63
Creating e-mail templates . . . . . . . . . . . . . . . . . . . . . . . . . . . . . . . . .64
Adding an e-mail address entry to the address book . . . . . . . . . . . . . . .65
Deleting an e-mail address entry from the address book . . . . . . . . . . . .65
Modifying an e-mail address entry from the address book . . . . . . . . . . .66
Adding a group entry to the address book . . . . . . . . . . . . . . . . . . . . . .66
Deleting a group address entry from the address book . . . . . . . . . . . . .67
Modifying a group address entry from the address book. . . . . . . . . . . . .67
Printing . . . . . . . . . . . . . . . . . . . . . . . . . . . . . . . . . . . . . . . . . . . . . . . . . .68
Job lists . . . . . . . . . . . . . . . . . . . . . . . . . . . . . . . . . . . . . . . . . . . . . . . .68
Print job (e-STUDIO263CS only) . . . . . . . . . . . . . . . . . . . . . . . . . . . . . . .69
Print from USB memory . . . . . . . . . . . . . . . . . . . . . . . . . . . . . . . . . . . . .70
Basic operation . . . . . . . . . . . . . . . . . . . . . . . . . . . . . . . . . . . . . . . . .70
Advanced operation . . . . . . . . . . . . . . . . . . . . . . . . . . . . . . . . . . . . . .71
Switching online/offline . . . . . . . . . . . . . . . . . . . . . . . . . . . . . . . . . . . . .72
Faxing - e-STUDIO223CS and e-STUDIO263CS only. . . . . . . . . . . . . . . .73
Sending a fax from the MFP . . . . . . . . . . . . . . . . . . . . . . . . . . . . . . . . . .73
Basic operation . . . . . . . . . . . . . . . . . . . . . . . . . . . . . . . . . . . . . . . . .73
Advanced operation . . . . . . . . . . . . . . . . . . . . . . . . . . . . . . . . . . . . . .74
Fax receiving . . . . . . . . . . . . . . . . . . . . . . . . . . . . . . . . . . . . . . . . . .83
Managing the phone book . . . . . . . . . . . . . . . . . . . . . . . . . . . . . . . . . . .86
Adding a speed dial entry to the phone book . . . . . . . . . . . . . . . . . . . .86
Adding a group entry to the phone book . . . . . . . . . . . . . . . . . . . . . . .87
Deleting a speed dial entry from the phone book. . . . . . . . . . . . . . . . . .87
Deleting a group dial entry from the phone book. . . . . . . . . . . . . . . . . .87
Modifying a speed dial entry . . . . . . . . . . . . . . . . . . . . . . . . . . . . . . . .88
Modifying a group dial entry . . . . . . . . . . . . . . . . . . . . . . . . . . . . . . . .88
Registering an entry from reception or transmission history . . . . . . . . . .88
Internet fax . . . . . . . . . . . . . . . . . . . . . . . . . . . . . . . . . . . . . . . . . . . . .89
Sending a fax from your PC . . . . . . . . . . . . . . . . . . . . . . . . . . . . . . . .89
Receiving an internet fax . . . . . . . . . . . . . . . . . . . . . . . . . . . . . . . . . .92
Adding fax numbers to the phone book . . . . . . . . . . . . . . . . . . . . . . . .93
Contents > 7
Adding new groups to the phone book . . . . . . . . . . . . . . . . . . . . . . . . .93
Importing and exporting fax numbers . . . . . . . . . . . . . . . . . . . . . . . . .94
Functions common to copy, fax and scan operations . . . . . . . . . . . . . . .95
Continuous scan mode . . . . . . . . . . . . . . . . . . . . . . . . . . . . . . . . . . . . . .95
Job macros (e-STUDIO263CS only) . . . . . . . . . . . . . . . . . . . . . . . . . . . . .96
Maintenance . . . . . . . . . . . . . . . . . . . . . . . . . . . . . . . . . . . . . . . . . . . . . .98
Replacing consumable items . . . . . . . . . . . . . . . . . . . . . . . . . . . . . . . . . .98
Toner cartridge replacement . . . . . . . . . . . . . . . . . . . . . . . . . . . . . . . .98
Image drum replacement . . . . . . . . . . . . . . . . . . . . . . . . . . . . . . . . .103
Replacing the transfer belt unit . . . . . . . . . . . . . . . . . . . . . . . . . . . . .103
Fuser replacement. . . . . . . . . . . . . . . . . . . . . . . . . . . . . . . . . . . . . .106
Cleaning. . . . . . . . . . . . . . . . . . . . . . . . . . . . . . . . . . . . . . . . . . . . . . .108
...the unit casing . . . . . . . . . . . . . . . . . . . . . . . . . . . . . . . . . . . . . . .108
...the LED head . . . . . . . . . . . . . . . . . . . . . . . . . . . . . . . . . . . . . . . .108
...the paper path in the ADF . . . . . . . . . . . . . . . . . . . . . . . . . . . . . . .110
...the underside of the ADF. . . . . . . . . . . . . . . . . . . . . . . . . . . . . . . .110
...the document glass . . . . . . . . . . . . . . . . . . . . . . . . . . . . . . . . . . .111
Installing upgrades . . . . . . . . . . . . . . . . . . . . . . . . . . . . . . . . . . . . . . . .112
Memory upgrade . . . . . . . . . . . . . . . . . . . . . . . . . . . . . . . . . . . . . . . . .112
SD card (e-STUDIO263CS only) . . . . . . . . . . . . . . . . . . . . . . . . . . . . . .115
Additional paper tray . . . . . . . . . . . . . . . . . . . . . . . . . . . . . . . . . . . . . .117
Setting the driver device options. . . . . . . . . . . . . . . . . . . . . . . . . . . . . .118
Windows . . . . . . . . . . . . . . . . . . . . . . . . . . . . . . . . . . . . . . . . . . . .118
Mac OS X . . . . . . . . . . . . . . . . . . . . . . . . . . . . . . . . . . . . . . . . . . . .118
Troubleshooting . . . . . . . . . . . . . . . . . . . . . . . . . . . . . . . . . . . . . . . . . .120
Checking the machine’s status . . . . . . . . . . . . . . . . . . . . . . . . . . . . . . .120
Checking the device and job status . . . . . . . . . . . . . . . . . . . . . . . . . . . .120
Clearing paper jams . . . . . . . . . . . . . . . . . . . . . . . . . . . . . . . . . . . . . .121
In the scanner ADF section... . . . . . . . . . . . . . . . . . . . . . . . . . . . . . .121
In the printer section... . . . . . . . . . . . . . . . . . . . . . . . . . . . . . . . . . .122
Dealing with unsatisfactory printing. . . . . . . . . . . . . . . . . . . . . . . . . . . .129
Dealing with unsatisfactory copying. . . . . . . . . . . . . . . . . . . . . . . . . . . .130
Fax problem checklist (e-STUDIO223CS and e-STUDIO263CS) . . . . . . . . .131
Specifications . . . . . . . . . . . . . . . . . . . . . . . . . . . . . . . . . . . . . . . . . . . .133
Appendix A - menu system . . . . . . . . . . . . . . . . . . . . . . . . . . . . . . . . . .134
Reports . . . . . . . . . . . . . . . . . . . . . . . . . . . . . . . . . . . . . . . . . . . . . . .135
Paper setup . . . . . . . . . . . . . . . . . . . . . . . . . . . . . . . . . . . . . . . . . . . .136
Address book . . . . . . . . . . . . . . . . . . . . . . . . . . . . . . . . . . . . . . . . . . .138
Phone book . . . . . . . . . . . . . . . . . . . . . . . . . . . . . . . . . . . . . . . . . . . .139
Profile . . . . . . . . . . . . . . . . . . . . . . . . . . . . . . . . . . . . . . . . . . . . . . . .140
Network scan destination . . . . . . . . . . . . . . . . . . . . . . . . . . . . . . . . . . .142
Store document settings . . . . . . . . . . . . . . . . . . . . . . . . . . . . . . . . . . .142
View information . . . . . . . . . . . . . . . . . . . . . . . . . . . . . . . . . . . . . . . . .143
Shutdown. . . . . . . . . . . . . . . . . . . . . . . . . . . . . . . . . . . . . . . . . . . . . .143
Easy setup . . . . . . . . . . . . . . . . . . . . . . . . . . . . . . . . . . . . . . . . . . . . .144
Admin setup . . . . . . . . . . . . . . . . . . . . . . . . . . . . . . . . . . . . . . . . . . . .145
Index. . . . . . . . . . . . . . . . . . . . . . . . . . . . . . . . . . . . . . . . . . . . . . . . . . .165
Notes, cautions and warnings > 8
N
OTES
,
CAUTIONS
AND
WARNINGS
For the protection of your product, and in order to ensure that you benefit from its full
functionality, this model has been designed to operate only with genuine original toner
cartridges. Any other toner cartridge may not operate at all, even if it is described as
“compatible”, and if it does work, your product's performance and print quality may be
degraded.
Use of non-genuine products may invalidate your warranty.
Specifications subject to change without notice. All trademarks acknowledged.
NOTE
A note provides additional information to supplement the main text.
CAUTION!
A caution provides additional information which, if ignored, may
result in equipment malfunction or damage.
WARNING!
A warning provides additional information which, if ignored, may
result in a risk of personal injury.
About this guide > 9
A
BOUT
THIS
GUIDE
D
OCUMENTATION
SUITE
This guide is part of a suite of online and printed documentation provided to help you
become familiar with your product and to make the best use of its many powerful features.
The documentation is summarised below for reference and is found on the manuals DVD/
CD unless indicated otherwise:
> Installation Safety booklet: provides information for safe use of your product.
This is a paper document that is packaged with the product and should be read before
setting up your machine.
> Set-up guide: describes how to unpack, connect and turn on your product.
This is a paper document that is packaged with the product.
> User’s Guide: helps you become familiar with your product and make the best use
of its many features. Also included are guidelines for troubleshooting and
maintenance to ensure that it performs at its best. Additionally, information is
provided for adding optional accessories as your printing needs evolve.
> Configuration Guide: provides machine, fax and network configuration
information.
> Printing Guide: helps you become familiar with the many features of the driver
software supplied with your product.
> Barcode Printing Guide: helps you become familiar with your product’s built in
barcode printing feature.
> Security Guide: helps you become familiar with your products security features.
> Installation Guides: accompany consumable items and optional accessories to
describe how to install them.
These are paper documents that are packaged with the consumables and optional
accessories.
> On-line Help: on-line information accessible from the printer driver and utility
software.
P
URPOSE
OF
THIS
GUIDE
The purpose of this guide is to provide you with in-depth information on how to use your
machine efficiently and effectively for printing, copying, scanning and faxing
1
.
NOTE
Images used in this manual may include optional features that your product
does not have installed.
NOTE
The User Guide assumes that the machine has been set up and fully
configured. Refer to the Setup Guide and Configuration Guide for guidance.
1. e-STUDIO223CS and e-STUDIO263CS only.
About this guide > 10
O
N
-
LINE
USAGE
This guide is intended to be read on screen using Adobe Reader. Use the navigation and
viewing tools provided in Adobe Reader.
There are many cross-references within this book, each highlighted as blue text. When you
click on a cross-reference the display will instantly jump to the part of the manual
containing the referenced material.
By using the button in Adobe Reader, you can navigate directly back to where you were
before.
You can access specific information in two ways:
> In the list of bookmarks down the left hand side of your screen, click on the topic of
interest to jump to the required topic. (If the bookmarks are not available, use the
“Contents” on page 5.)
> In the list of bookmarks, click on Index to jump to the Index. (If the bookmarks are
not available, use the “Contents” on page 5.) Find the term of interest in the
alphabetically arranged index and click on the associated page number to jump to
the page containing the term.
P
RINTING
PAGES
The whole manual, individual pages, or sections may be printed. The procedure is:
1. From the toolbar, select File > Print (or press the Ctrl + P keys).
2. Choose which pages you wish to print:
(a) All pages, (1), for the entire manual.
(b) Current page, (2), for the page at which you are looking.
(c) Pages from and to, (3), for the range of pages you specify by entering their
page numbers.
(d) Click OK.
1
2
3
Introduction > 11
I
NTRODUCTION
Congratulations on choosing this Multi Function Product (MFP). It is desi gned w it h advanced
features, to give you clear, vibrant colour prints and crisp black and white pages at high
speed on a range of office print media.
With this MFP, you can instantly scan paper-based documents and deliver the electronic
image to various destinations including e-mail addresses, printers, ftp servers or someone
else's computer on the network. This MFP also has a “walk-up” fax facility allowing you to
send your documents to a destination fax number instantly.
Your MFP includes these features:
> Multi-tasking to allow scanning one job while printing another to ensure greater
productivity.
> Digital Copying - An intuitive control panel, makes digital copying fast and easy.
> Up to 600 x 600dpi (dots per inch) copy resolution.
> ActKey utility - enables the MFP to receive one key touch commands from a locally
connected computer (“pull scan”).
> Scan to E-mail - Connected to an Ethernet network and a SMTP server, this MFP
allows you to transmit document(s) over the internet via e-mail. With a touch of the
e-mail on-screen button and the selection of your recipients' e-mail addresses, the
document(s) is/are first scanned and converted into an image file, and then
transmitted to remote recipients within minutes.
> Scan to Network PC - Allows you to send scanned documents to a server or a
personal computer's file folder over an intranet with FTP (File Transfer Protocol),
HTTP (Hypertext Transfer Protocol), CIFS (Common Internet File System) protocol.
The scan to filing feature removes the need for the mail server to handle large
attachments.
> Multiple Pages Sending - With the Auto Document Feeder (ADF), the MFP allows a
stack of up to 50 page document(s) to be continuously scanned.
> e-STUDIO223CS and e-STUDIO263CS: Faxing - An intuitive control panel, makes
direct faxing fast and easy.
> e-STUDIO223CS and e-STUDIO263CS: Advanced fax transmission and
reception, including delayed transmissions, sending to multiple locations,
confidential transmission and reception, and polling.
> Address Book/Phone Book/Profiles Managing - This provides a convenient way to
manage all the e-mail addresses, fax numbers and profiles (filing destinations).
> ProQ2400, multi-level technology produces subtler tones and smoother gradations
of colour to lend photographic quality to your documents.
> 600 x 600, 1200 x 600 dpi (dots per inch) and ProQ2400 print resolution for high
quality image production showing the finest detail.
> Internet Protocol version 6 (IPv6).
> Single Pass colour Digital LED technology for high speed processing of your printed
pages.
> PostScript 3, PCL 5C, PCL 6 and Epson FX emulations for industry standard operation
and wide compatibility with most computer software.
> 10Base-T and 100Base-TX network connection lets you share this valuable resource
among users on your office network.
> Photo Enhance mode to improve printouts of photographic images (not available on
PS drivers).
Introduction > 12
> Automatic two-sided (duplex) printing for economical use of paper and compact
printing of larger documents.
Additionally, the following optional features are also available:
> Additional paper tray for loading a further 530 sheets to minimise operator
intervention, or different paper stocks for letterhead stationery, alternative paper
sizes or other print media.
> Additional memory allows printing of more complex pages. For example, high
resolution banner printing.
> e-STUDIO263CS: SD card for storage of overlays, macros and downloadable fonts,
and automatic collation of multiple copies of multipage documents and the download
of ICC Profiles.
Introduction > 13
O
VERVIEW
F
RONT
VIEW
1. ADF unit.
2. ADF paper tray.
3. Operator panel.
Menu driven operator controls and LCD panel
a
.
4. USB memory port.
5. Output stacker, face down.
Standard printed copy delivery point. Holds up to
150 sheets at 80g/m².
6. Paper tray.
Standard paper tray. Holds up to 250 sheets of
80g/m² paper.
7. Multi purpose tray.
Used for feeding heavier paper stocks, envelopes
and other special media. Also for manual feeding
of single sheets when required.
a. The display language can be changed to show different languages. (see “Changing the display
language” on page 18).
8. Multi-purpose tray release recess.
9. Top cover release button.
10. Document glass.
11. ADF document glass.
12. Document cover.
13. LED heads.
14. Fuser release levers.
15. Toner cartridges (C,M,Y,K).
16. ID unit.
13
14
15
16
7
2
3
5
4
6
1
10
11
12
8
6
9
Introduction > 14
R
EAR
VIEW
When the rear paper stacker is folded down paper exits the printer through the rear of the
printer and is stacked here face up. This is mainly used for heavy print media. When used
in conjunction with the multi purpose feed tray, the paper path through the printer is
essentially straight. This avoids bending the paper around curves in the paper path and
enables feeding of up to 220g/m² media.
1. ON/OFF switch.
2. Access panel.
3. AC power socket.
4. USB interface.
5. SD card slot (e-STUDIO263CS only).
6. Network interface.
a
7. Rear, face up stacker.
8. LINE connection.
9. TEL connection.
a. The Network Interface may have a protective “plug” which must be
removed before connection can be made.
3
1
7
6
5
4
LINE TEL
98
2
Introduction > 15
C
ONTROL
PANEL
REF. DESCRIPTION
1. Liquid crystal display (LCD)
Displays operating instructions and status of your machine.
2. Panel adjust recess
The LCD panel can be swivelled upwards from its base position for ease of use.
3. Main function buttons
COPY: Pressing this button selects copy mode. This allows you to control the copying process
whereby documents to be copied are scanned in the scanner unit (document glass or ADF) and the
copies are automatically printed in the printer unit.
SCAN: Pressing this button gives access to several send modes. These allow you to select and
control the process whereby a document is scanned and the scanned data is sent: by email as an
attachment, to a local PC, to a network PC, to a USB memory stick. It also allows you to arrange for
a document to be scanned from a remote PC.
PRINT: Pressing this button selects print mode. This allows you to select and print out a stored job,
an encrypted print job or a job stored on a USB memory stick. It also allows you to print out a job
list of all recent prints, or switch the machine to an “offline” state.
FAX (e-STUDIO223CS and e-STUDIO263CS): Pressing this button selects fax send mode. This
allows you to control the process whereby a document is scanned and then the scanned data is sent
as a fax.
4. RESET/LOG OUT:
Pressing this button returns all settings of a selected function to their default values, but does not
stop any jobs that are already in progress.
At the top level screen, pressing this button logs the user out (if access control is enabled and
active).
5. ?HELP:
Pressing this button when the green LED on the START button is flashing, displays help information
on the LCD screen.
6. Keypad
Use the numeric buttons to enter, for example, number of copies or a fax number.
e-STUDIO223CS and e-STUDIO263CS: The * and # buttons are also used to navigate menus in
touch-tone systems such as voice mail (if you have a telephone handset connected), or in vertical
service codes.
Refer to “Keypad - character switching” on page 17.
20
18
19
3 1 2 12 513 1146
14 7 8 101617915
Introduction > 16
7. START:
> MONO - Pressing this button starts the copying, faxing or scanning process in black & white.
> COLOR - Pressing this button starts the copying or scanning process in colour.
Green LED illuminates when copying/scanning is possible, if the LED is unlit then that function is not
possible, e.g only the Mono button LED illuminates when faxing (colour faxing is not possible).
8. STOP: Pressing this button stops the copying or scanning process.
9. BACK: Used to cancel selections and go back to the top level of the setting. The key is also used to
cancel any previous input.
10. POWER SAVE: Pressing this button switches the power save mode on or off, its LED being
illuminated when power save mode is on. If the machine has gone into power save mode as
indicated by the screen being black and the LED being illuminated, you can return to normal mode
by pressing the POWER SAVE button.
11. JOB MACRO (e-STUDIO263CS only): Pressing this button allows you to program short-cuts to
your most used operations. For example a fax number you send to every day can be programmed in
and then allows you to perform that operation at the touch of a button. Refer to “Job macros (e-
STUDIO263CS only)” on page 96.
12. STATUS: Pressing this button gives access to the status menu screen. Use to check detailed status
information about the machine. Flashes/illuminates if there is a status item to be displayed.
13. SETTING: Pressing this button gives access to several setup options on the LCD screen, including
the administrator menu, profile options and address books settings.
14. CLEAR: Executes the following actions according to the entered items when pressed or held:
> Minimizes a setting value.
> Enters zero as a setting value.
> Clears what is entered.
> Cancels a selected item.
15. DATA IN MEMORY indicator light
LED illuminates to show data is stored in the MFP memory.
16. Arrow keys
Up: moves the cursor up.
Down: moves the cursor down.
Left: moves the cursor left. Can also be used to return to the previous screen.
Right: moves the cursor right. Can also be use to proceed to the next screen.
17. OK: Used to select and confirm current setting selections.
REF. DESCRIPTION
20
18
19
3 1 2 12 513 1146
14 7 8 101617915
Introduction > 17
K
EYPAD
-
CHARACTER
SWITCHING
Numbers, upper and lower case letters and symbols can be entered using the keypad. Press
the key multiple times to switch between characters.
The example below is based on English being the display language:
18. One-touch speed dial keys (e-STUDIO223CS and e-STUDIO263CS only): Provides one-touch
dialling of your most often used or favourite fax numbers or email addresses. Eight keys x two
groups (press the SHIFT key to switch the groups).
19. Panel lift handle (e-STUDIO263CS only): Lift panel to reveal qwerty keyboard.
20. Qwerty keyboard (e-STUDIO263CS only): Refer to “Qwerty keyboard (e-STUDIO263CS only)”
on page 18.
NOTE
When pressing multiple times, you must re-press the key within 2 seconds of
the previous press.
KEY AVAILABLE CHARACTER
11 -> 1
2 a -> b -> c -> 2 -> A -> B -> C
3 d -> e -> f -> 3 -> D -> E -> F
4 g -> h -> i -> 4 -> G -> H -> I
5 j -> k -> l -> 5 -> J -> K -> L
6 m -> n -> o -> 6 -> M -> N -> O
7 p -> q -> r -> s -> 7 -> P -> Q -> R -> S
8 t -> u -> v -> 8 -> T -> U -> V
9 w -> x -> y -> z -> 9 -> W -> X -> Y -> Z
0 SP (space) -> 0 -> SP (space)
* @ -> * -> @
# . -> _ -> - -> P -> SP (space) -> + -> ! -> “ -> $ -> % -> & -> ‘ -> (
-> ) -> , -> / -> : -> ; -> < -> = -> > -> ? -> [ -> £ -> ] -> ^ -> #
REF. DESCRIPTION
20
18
19
3 1 2 12 513 1146
14 7 8 101617915
Introduction > 18
Q
WERTY
KEYBOARD
(e-STUDIO263CS
ONLY
)
You can also enter upper and lower case letters and symbols using the qwerty keyboard.
You can switch the entry mode from normal mode, CAPS mode and CTRL mode. The mode
change is reflected on the screen keyboard display.
C
HANGING
THE
DISPLAY
LANGUAGE
The default language used by your MFP for display messages and for report printing is
English
1
. If required, this can be changed using the Panel Language Setup utility.
Normal mode You can enter lower-case
letters.
CAPS mode By pressing the CAPS key, you
can enter upper-case letters.
CTRL mode By pressing the CTRL key, you
can enter symbols.
NOTE
Numbers and certain characters cannot be entered using the qwerty
keyboard. To enter them, use the screen keyboard or keypad.
1. To ensure your product contains the latest firmware updates, it is recommended that you download
the language files from this utility during setup.
Getting started > 19
G
ETTING
STARTED
S
WITCHING
ON
1. Check that the power switch is OFF.
2. Plug the power cable into the power socket of your machine.
3. Plug the power cable into the electric socket.
4. Check that no documents are on the document glass or ADF, and the ADF cover is
closed.
5. Press the power switch ON.
S
WITCHING
OFF
1. Press the SETTING button on the control panel to enter the menu.
2. Using the arrow keys, scroll to the Shutdown menu.
3. Press the OK button.
4. Using the arrow keys, highlight Yes to continue or No to cancel.
5. Press the OK button to execute.
6. At the prompt, turn the power switch OFF.
CAUTION!
Do not turn off the power switch suddenly as this may damage your
MFP.
If you have an SD card fitted, always follow the correct shutdown
procedure to ensure that no data is lost.
Do not turn off while scanning is in progress.
Getting started > 20
P
OWER
SAVING
MODE
If you do not use the machine for a while, it will enter power saving mode to control the
power consumption of the device. To cancel or initiate power saving mode, press the
Power Save button on the control panel.
S
LEEP
MODE
Your machine transitions from power saving mode to sleep mode after a set period of time.
In sleep mode the power consumption of the device in minimal. To cancel or initiate sleep
mode, press the Power Save button on the control panel.
NOTE
If your machine is connected locally (via USB), when it transitions to Sleep
mode its status is viewed as off-line. To use the printer in this state, you must
press the Power Save button to exit sleep mode.
By default, the time interval to enter the power saving mode is set to 30
minutes. Refer to “Power Save Time” on page 162.
You can enable or disable the power saving mode. Refer to “Power Save
Enable” on page 163.
NOTE
The machine will not enter sleep mode if an error occurs and the machine
requires attention.
By default, the time interval to enter sleep mode is set to 10 minutes. Refer
to “Sleep Time” on page 162.
You can enable or disable sleep mode. Refer to “Sleep” on page 163.
Getting started > 21
I
NSTALLING
DRIVERS
AND
UTILITIES
The installation instructions below refer to USB connection. For network connection details
refer to the Configuration Guide.
If you are running Windows Server 2003 or Server 2008, you may need to follow these
steps to ensure the WIA service starts when using the scanner driver and ActKey Utility:
1. Click Start > Administrative Tools > Services.
2. Double-click Services.
3. Double-click Windows Image Acquisition (WIA).
4. From the Startup type menu, select Automatic.
5. Under Service status, click Start.
6. Click OK.
NOTE
Example screenshots have been used throughout and may not represent your
machine, however the procedure is the same.
NOTE
You must be logged on as an administrator or a member of the Administrators
group in order to complete this procedure. If your computer is connected to a
network, network policy settings may also prevent you from completing this
procedure.
NOTE
In the case of Server 2008, Desktop Experience needs to be installed.
Getting started > 22
W
INDOWS
-
SCANNER
AND
PRINTER
DRIVERS
The scanner driver is used for “Pull Scan”, i.e. Initiating a scan from your PC via software.
Compare this to “Push Scan” where you start the scan by pressing a button on the MFP's
front panel.
1. Insert the DVD/CD-ROM and click Easy Installation to start the driver installer
program.
2. Follow the on-screen instructions to install the drivers.
3. Attach the printer to a USB port of your computer.
4. Switch on the printer.
NOTE
The driver installer program is the recommended installation method.
NOTE
Do not connect the USB cable at this time. You will be instructed when to
connect the USB cable when you run the driver installer program.
Getting started > 23
M
AC
-
PRINTER
DRIVER
The information in this section is based on Mac OS X Leopard (10.5). Other versions may
appear slightly different, but the principles are the same.
1. Insert the DVD/CD-ROM and run the driver installer program.
2. Follow the on-screen instructions to install the printer driver.
3. Attach the printer to a USB port of your computer.
4. Switch on the printer.
5. Choose Apple Menu > System Preferences > Print & Fax.
6. If the printer is already in the list of printers, click “-” to remove it.
7. Click “+” to add a new printer.
8. Ensure:
> The Default tab is selected and select your machine from the list.
> Your machine is displayed as Kind “USB” in the list of available printers.
> The Print Using: selection matches your machine.
If “Generic PostScript Printer” is displayed, select a driver that matches.
9. Click Add.
10. Click Configure... and ensure the hardware options displayed match your machine.
11. The printer is added to the list of printers.
12. Restart your computer.
NOTE
This is necessary as Leopard may not be using the correct printer driver files.
NOTE
Hardware options are not configured automatically.
USBe-STUDIO263CS-EB0E1A
e-STUDIO263CS-EB0E1A
e-STUDIO263CS(PS)
Getting started > 24
F
AX
DRIVER
(e-STUDIO223CS
AND
e-STUDIO263CS)
The fax driver allows you to send faxes directly from your computer without printing the
document first.
Windows XP has built-in fax support - you can use your computer's modem to send faxes
directly from your computer.
With the fax driver you are sending the fax data from your computer to the MFP, and then
the MFP automatically sends the document.
Installing the fax driver
This is installed as part of the driver installer wizard.
NOTE
Before using the internet fax function, you need to configure the server
settings. Refer to the Configuration Guide for details.
Getting started > 25
C
ONFIGURATION
TOOL
Installation of the Configuration Tool is optional and can be found on the DVD/CD in the
Utilities folder. Follow the on-screen instructions to complete the Configuration Tool
installation.
The Configuration Tool can discover devices over USB or network connections.
1. To search and install, select Tools > Register Device.
2. Highlight the required search result and when prompted click Yes.
The Configuration Tool allows you to set up and manage your MFP. Refer to the
Configuration Guide for detailed instructions.
NOTE
Network settings, such as LDAP configuration, cannot be saved to the MFP
from the Configuration Tool. For such settings, use the MFP operator panel or
MFP web page.
Getting started > 26
A
CT
K
EY
UTILITY
The ActKey utility enables the MFP to receive one key touch commands from a connected
computer.
Installation of the ActKey utility is optional and can be found on the DVD/CD in the Utilities
folder.
Information on using the ActKey utility can be found in “Scan to remote PC” on page 59.
Setting up the ActKey utility
1. Install the ActKey utility from the DVD/CD:
Set-up will place an “ActKey” icon on your desktop.
2. Double-click this icon to open the ActKey console.
3. Select Options > Button Settings. The following screen displays.
4. Select the function you want to set in section (1).
5. Set the parameters for this function in section (2).
6. When you have completed settings, press OK (3).
The Utility will return to the ActKey console.
NOTE
The ActKey utility only supports Windows.
You must have the scanner driver installed.
3
2
1
Getting started > 27
7. To use ActKey in Local PC mode (i.e. push scanning), it must be set as the program
to handle scanner events:
(a) Select Start > Control Panel.
(b) Double-click Scanners and Cameras.
(c) Right-click the MFP icon and click Properties.
(d) Select the Events tab.
(e) Choose an event from the Select an event drop-down menu.
(f) In the Actions field, click Start this program and choose ActKey from the
drop-down menu.
(g) Click Apply.
(h) Repeat steps e to g for each event, e.g. Scan to Application, Folder and PC-Fax.
(i) Click OK to confirm.
NOTE
The following example uses Windows XP. The steps may vary if you are using
any other operating system, but the principle is the same.
Paper recommendations > 28
P
APER
RECOMMENDATIONS
Your MFP will handle a variety of print media, including a range of paper weights and sizes.
This section provides general advice on choice of media, and explains how to use each type.
The best performance will be obtained when using standard 75~90g/m² paper designed
for use in copiers and laser printers.
Use of heavily embossed or very rough textured paper is not recommended.
Pre-printed stationery can be used, but the ink must not offset when exposed to the high
fuser temperatures used in the printing process.
Envelopes
Labels
C
ASSETTE
TRAYS
If you have identical paper stock loaded in another tray (2nd tray if you have one, or multi
purpose tray) you have the printer automatically switch to the other tray when the current
tray runs out of paper. When printing from Windows applications, this function is enabled
in the driver settings. When printing from other systems, this function is enabled in the
Print Menu. (See “Auto Tray Switch:” on page 150.)
CAUTION!
Envelopes should be free from twist, curl or other deformations.
They should also be of the rectangular flap type, with glue that
remains intact when subjected to hot roll pressure fusing used in
this type of printer. Window envelopes are not suitable.
CAUTION!
Labels should also be of the type recommended for use in copiers
and laser printers, in which the base carrier page is entirely
covered by labels. Other types of label stock may damage the
printer due to the labels peeling off during the printing process.
SIZE DIMENSIONS WEIGHT (G/M²)
A6
a
a. A6 printing from Tray 1 or the MP Tray only.
105 x 148mm Light 64 - 74g/m²
Medium Light 75 - 82g/m²
Medium 83 - 104g/m²
Heavy 105 - 120g/m²
Ultra heavy1 121 - 176g/m²
Ultra heavy2 177 - 220g/m²
Tray 1/2: 64 - 176g/m²
MP Tray: 64 - 220g/m²
Duplex: 64 - 176g/m²
A5 148 x 210mm
B5 182 x 257mm
16K (184x260mm) 184 x 260mm
Executive 184.2 x 266.7mm
16K (195x270mm) 195 x 270mm
16K (197x273mm) 197 x 273mm
A4 210 x 297mm
Letter 215.9 x 279.4mm
Legal 13in. 216 x 330mm
Legal 13.5in. 216 x 343mm
Legal 14in. 216 x 356mm
Paper recommendations > 29
M
ULTI
PURPOSE
TRAY
The multi purpose tray can handle the same sizes as the cassette trays but in weights up
to 220
g/m². For very heavy paper stock use the face up (rear) paper stacker. This ensures
that the paper path through the printer is almost straight.
The multi purpose tray can feed paper widths from 76mm to 215.9mm and lengths from
127.0mm to 1320mm (banner printing).
For paper lengths exceeding 356mm (Legal 14in.) use paper stock between 90g/m² and
128g/m² and the face up (rear) paper stacker.
Use the multi purpose tray for printing on envelopes. Up to 10 envelopes can be loaded at
one time, subject to a maximum stacking depth of 10mm.
F
ACE
DOWN
STACKER
The face down stacker on the top of the printer can hold up to 150 sheets of 80g/m²
standard paper, and can handle paper stocks up to 176g/m².
Pages printed in reading order (page 1 first) will be sorted in reading order (last page on
top, facing down).
F
ACE
UP
STACKER
The face up stacker at the rear of the printer should be opened and the tray extension
pulled out when required for use. In this condition paper will exit via this path, regardless
of driver settings.
The face up stacker can hold up to 100 sheets of 80g/m² standard paper, and can handle
stocks up to 220
g/m².
Always use this stacker and the multi purpose feeder for paper stocks heavier than
176g/m².
D
UPLEX
Automatic two-sided printing on the same range of paper sizes as tray 2 (i.e. all cassette
sizes except A6), using paper stocks from 64 - 176g/m².
NOTE
The face up stacker cannot be used when printing duplex.
Loading paper > 30
L
OADING
PAPER
C
ASSETTE
TRAYS
1. Remove the paper tray from the machine.
2.
Fan the paper to be loaded at the edges (1) and in the middle (2) to ensure that all
sheets are properly separated, then tap the edges of the stack on a flat surface to
make it flush again (3).
1
2
3
Loading paper > 31
3. Load paper (letter headed paper face down and top edge towards the front of the
printer), as shown.
4. Adjust the rear stopper (a) and paper guides (b) to the size of paper being used.
5. Close the paper tray gently.
6. Set the correct paper size. Refer to “Configuring the tray settings” on page 33 and
“Registering custom sizes” on page 34.
To prevent paper jams:
> Do not leave space between the paper and the guides and rear stopper.
> Do not overfill the paper tray. Capacity depends on the type of paper stock.
> Do not load damaged paper.
> Do not load paper of different sizes or types at the same time.
> Close the paper tray gently.
a
b
Loading paper > 32
> Do not pull the paper tray out during printing (except as described below for the 2nd
tray).
NOTE
> If you have two trays and you are printing from the 1st (upper) tray, you
can pull out the 2nd (lower) tray during printing to reload it. However, if
you are printing from the 2nd (lower) tray, do not pull out the 1st (upper)
tray. This will cause a paper jam.
> For face down printing, make sure the face up (rear) stacker (a) is closed
(the paper exits from the top of the printer). Stacking capacity is
approximately 150 sheets, depending on paper weight.
> For face up printing, make sure the face up (rear) stacker (a) is open and
the paper support (b) is extended. Paper is stacked in reverse order and
tray capacity is approximately 100 sheets, depending on paper weight.
> Always use the face up (rear) stacker for heavy paper (card stock, etc.).
CAUTION!
Do not open or close the rear paper exit while printing as it may
result in a paper jam.
b
a
Loading paper > 33
M
ULTI
PURPOSE
TRAY
1. Open the multi purpose tray (a).
2. Fold out the paper supports (b).
3. Press gently down on the paper platform (c) to ensure it is latched down.
4. Load the paper and adjust the paper guides (d) to the size of paper being used.
> For single-sided printing on headed paper load the paper into the multi purpose
tray with pre-printed side up and top edge into the printer.
> For two-sided (duplex) printing on headed paper load the paper with pre-printed
side down and top edge away from the printer.
> Envelopes should be loaded face up with top edge to the left and short edge into
the printer. Do not select duplex printing on envelopes.
> Do not exceed the paper capacity of about 100 sheets or 10 envelopes. Maximum
stacking depth is 10mm.
5. Press the tray latch button inwards to release the paper platform, so that the paper
is lifted and gripped in place.
6. Set the correct paper size. Refer to “Configuring the tray settings” on page 33 and
“Registering custom sizes” on page 34.
C
ONFIGURING
THE
TRAY
SETTINGS
After you load paper in tray 1, tray 2 (optional), or the MP tray, you need to register the
loaded paper on your machine.
1. Press the SETTING button on the control panel.
2. Using the Down arrow key, scroll to Paper Setup and press OK.
3. Using the arrow keys, scroll to the required paper tray and press OK.
4. Press OK to select Paper Size.
5. Using the arrow keys, scroll to the loaded paper size and press OK.
6. Using the Down arrow key, scroll to Media Type and press OK.
7. Using the arrow keys, scroll to the type of media loaded and press OK.
8. Using the Down arrow key, scroll to Media Weight and press OK.
9. Using the arrow keys, scroll to the weight of the loaded paper and press OK.
10. Press the Left arrow key to exit the menu.
b
d
d
c
a
Loading paper > 34
R
EGISTERING
CUSTOM
SIZES
To load custom size paper, you need to register the width and length of the paper before
printing.
The range of the sizes you can set differs according to the paper tray.
1. Press the SETTING button on the control panel.
2. Using the Down arrow key, scroll to Paper Setup and press OK.
3. Using the arrow keys, scroll to the required paper tray and press OK.
4. Using the Down arrow key, scroll to Custom and press OK.
5. Using the keypad, enter the Width and Length of the loaded paper.
Press the Right arrow key to move between digits.
6. Press OK.
7. Press the Left arrow key to exit the menu.
TRAY AVAILABLE SIZE RANGE
Tray 1 Width: 105 to 216 mm (4.1 to 8.5 inches)
Length: 148 to 356 mm (5.8 to 14.0 inches)
Tray 2 (o ptional ) Width: 148 to 216 mm (5.8 to 8.5 inches)
Length: 148 to 356 mm (8.3 to 14.0 inches)
MP tray Width: 64 to 216 mm (2.5 to 8.5 inches)
Length: 127 to 1321 mm (5.0 to 52.0 inches)
NOTE
For tray 1 and tray 2, you can configure the
Custom setting only when Paper
Size
is set to Custom.
The available size range for duplex printing is the same as that for tray 2.
User authentication and access control > 35
U
SER
AUTHENTICATION
AND
ACCESS
CONTROL
If your Administrator has enabled access control on your machine, it will automatically start
up in access control mode. You will not be able to use it until you have provided valid login
information. If the access control setting is:
> PIN; you will need to provide a valid PIN (personal identification number).
> User name and password; you will need to provide a valid user name and
password.
After using it, you will be expected to log out, leaving the machine in access control mode,
unable to be used by unauthorised users.
PIN
AUTHENTICATION
L
OGGING
INTO
THE
MACHINE
1. Enter your PIN using the keypad on the control panel.
2. Press OK.
If authentication succeeds, the top screen displays.
L
OGGING
OUT
OF
THE
MACHINE
When you have finished operations, be sure to log out of the machine.
1. Press the BACK button or Left arrow key until the top screen displays.
2. Press the RESET/LOGOUT button on the control panel.
U
SER
NAME
AND
PASSWORD
AUTHENTICATION
L
OGGING
INTO
THE
MACHINE
1. Make sure that User Name is selected and then press the Right arrow key.
2. Enter your name.
3. Using the arrow keys, highlight Done and then press OK.
4. Make sure that Password is selected and then press OK.
5. Enter your password.
6. Using the arrow keys, highlight Done and then press OK.
7. At the Login screen, press OK.
If authentication succeeds, the top screen displays.
L
OGGING
OUT
OF
THE
MACHINE
When you have finished operations, be sure to log out of the machine.
1. Press the BACK button or Left arrow key until the top screen displays.
2. Press the RESET/LOGOUT button on the control panel.
NOTE
After a certain period of time, the machine automatically logs out users.
NOTE
After a certain period of time, the machine automatically logs out users.
User authentication and access control > 36
O
PERATION
FROM
THE
COMPUTER
Printing from Windows
1. Open the file you want to print.
2. From the File menu, select Print.
3. Choose the printer driver you want in Select Printer and click Preferences.
4. Select the Job Options tab.
5. Click User Auth....
6. Select the Enable User Authentication check box.
7. Enter the user name in Username and the password in Password.
Clicking Use Windows Login automatically enters your login name on Windows.
8. Click OK.
9. Click OK and then click Print.
Printing from Mac
1. Open the file you want to print.
2. From the File menu, select Print.
3. Select your machine’s printer driver.
4. Select User Auth... from the panel menu under the Printer and Presets menus.
5. Select the Enable User Authentication check box.
6. Enter the user name in User Name and the password in Password.
7. Click Print.
NOTE
The authentication type specified on the computer overrides the one specified
on the machine.
NOTE
You cannot use the PCL XPS printer driver for this function.
This procedure uses Windows 7 and NotePad as an example. The procedures
and menus may differ depending on the OS you use.
NOTE
This procedure uses Mac OS X 10.6 as an example. The procedures and menus
may differ depending on the OS you use.
User authentication and access control > 37
Faxing (Windows only)
1. Open the file you want to fax.
2. From the File menu, select Print.
3. Select your machine (fax driver) in Select Printer and click Preferences.
4. On the Setup tab, click User Authentication....
5. Select the Enable User Authentication check box.
6. Enter the user name in Username and the password in Password.
Clicking Use Windows Login automatically enters your login name on Windows.
7. Click OK.
8. Click OK and then click Print.
NOTE
This procedure uses Windows 7 and NotePad as an example. The procedures
and menus may differ depending on the OS you use.
Operation > 38
O
PERATION
With its intuitive control panel, this Multi Function Product (MFP) is designed to be easy to
use. After the machine has been configured, operating is quite straight forward.
The following sections describe how to copy, fax, and scan your documents.
Refer to “Printing” on page 68 for details of how to use the printing options available from
the control panel. For full details of how to use your machine and any optional accessories
to print jobs efficiently and effectively, please refer to the Printing Guide and the Barcode
Printing Guide.
For full details of how to access and use the security features, please refer to the Security
Guide.
NOTE
If your Administrator has enabled access control on your machine, it will
automatically start up in access control mode. You will not be able to use it
until you have provided valid login information. Refer to “User authentication
and access control” on page 35 for details.
NOTE
Fax function is available on the e-STUDIO223CS and e-STUDIO263CS only.
Operation > 39
M
ULTI
-
TASKING
Your machine can handle more than one task at a time. The table below details which
combination of tasks can be performed.
1st
2
n
d
Copy Scan to
email/
network
PC
Internet
Fax (Tx)
Scan to
USB
memory
Fax
Tx
Fax
Rx
Print
from
USB
(direct
print)
PC scan
(remote
PC)
Email to
print
Internet
Fax (Rx)
Print
Print
from
Web
(direct
print)
Copy
No Yes Yes No
Yes
a
a. Data is accepted but printing is halted until the 1st action is complete.
Yes
b
b. While only printing the first print action (scan is completed), the second action can be allowed to browse the
files on the USB memory.
Yes
Yes
a
Yes
a
Scan to
email/
network
PC
Internet
Fax (Tx)
Yes Yes Yes No Yes Yes Yes Yes Yes
Scan to
USB
memory
No No No No Yes No No Yes Yes
Fax Tx Yes Yes Yes
Yes
c
c. Operation is accepted but operation is halted until the 1st action is complete.
No Yes Yes Yes Yes
Fax Rx
No
d
d. Copy is enabled only before the start of printing of a received fax image.
Yes Yes
Yes
c
No
Yes
b
Yes
Yes
a
Yes
a
Print
from USB
(direct
print)
No Yes Yes Yes
Yes
a
Yes
b
Yes
No
e
e. The second action won't be able to do due to less available memory.
Yes
a
PC scan
(remote
PC)
No No No No Yes No No Yes Yes
Email to
print
Internet
Fax (Rx)
No Yes Yes Yes Yes
Yes
b
Yes
No
e
Yes
a
Print
Print
from Web
(direct
print)
No
f
f. Copy is enabled after completing the first print action.
Yes Yes Yes
Yes
a
Yes
b
Yes
Yes
a
Yes
a
Operation > 40
L
OADING
DOCUMENT
(
S
)
The MFP can scan/copy/send document(s) either from the ADF (Automatic Document
Feeder) or on the glass. If you need to send multiple pages, load your papers in the ADF.
The ADF can hold up to 50 pages at one time.
If you need to scan/copy/send pages from books, newspaper clippings, or paper with
wrinkles or curls, place them on the glass.
D
OCUMENT
REQUIREMENTS
Before using the ADF, please make sure that your paper meets the following specifications:
> Document(s) can range in size from 114.3 x 139.7mm to 215.9 x 355.6mm.
> Document(s) can range in weight from 60 to 120 g/m
²
.
> Document(s) should be square or rectangular and in good condition (not fragile or
worn).
> Document(s) should be free of curl, wrinkle, tears, wet ink, or punch holes.
> Document(s) should be free of staples, paper clips, paper sticky notes.
> Keep the glass clean and without any documents left on it.
S
CANNABLE
AREA
Text or images within the shaded area are not scanned.
NOTE
To transmit irregular types of document(s), place the document(s) on the
glass or make a copy first and then transmit the copy instead.
When faxing, you can load only A4, letter, or legal size documents in the ADF,
and A4 or letter size documents on the document glass. You cannot load mixed
size documents.
Operation > 41
P
LACING
DOCUMENT
(
S
)
IN
THE
ADF
1. If you have multiple pages, fan the pages to avoid paper jams. The ADF holds up to
50 pages at one time.
2. Place the document with the text face UP in the ADF:
> If your document is portrait, load with the top edge of the document in first.
> If your document is landscape, load with the left edge of the document in first.
3. Adjust the Paper Guides to centre the document in the ADF.
b
a
c
Operation > 42
P
LACING
DOCUMENT
(
S
)
ON
THE
GLASS
1. Open the document cover.
2. Place your document with the text face DOWN on the glass:
> If your document is portrait, align its top edge to the upper-left corner of the
glass.
> If your document is landscape, align its right edge to the upper-left corner of the
glass.
3. Close the document cover.
Copying > 43
C
OPYING
B
ASIC
OPERATION
1. Place your document(s) with text face UP in the ADF or face DOWN on the glass.
2. If required, press the Copy button (1) on the control panel to prompt the Copy
screen.
3. Press Mono (2) to copy your document(s) in black and white, or Colour (3) to copy
your document(s) in colour.
I
NCREASING
COPY
COUNT
The machine is preset to a copy count of 1. If you wish to increase the number of copies,
select the number of copies with the numeric keypad.
To increase the copy count:
1. If required, press the Copy button on the control panel to prompt the Copy screen.
2. Enter number of copies required using the numeric keypad. The screen display will
confirm the copy count selected.
NOTE
If your Administrator has enabled access control on your machine, it will
automatically start up in access control mode. You will not be able to use it
until you have provided valid login information. Refer to “User authentication
and access control” on page 35 for details.
NOTE
Factory default setting is Copy mode.
NOTE
If you wish to cancel the copy process, press Stop (4) to abort the operation.
NOTE
You can select up to 99 copies.
2 3 4
1
Start ready.
Copying > 44
A
DVANCED
OPERATION
Using the options available you can alter the copy output to suit your needs:
1. Press the Right arrow key.
2. Select required parameter with Down arrow key and press the OK button or the
Right arrow key to display the available options.
3. Using Up or Down arrow keys, select value and press OK.
Options are (factory default settings in bold text):
FEATURE OPTION DESCRIPTION
Scan Size A4, A5, A6, B5, Letter, Legal 13, Legal 13.5,
Legal 14, Executive
Allows you to select the document
size.
Duplex Copy OFF(Simplex), Simplex -> Duplex LE,
Simplex -> Duplex SE, Duplex -> Duplex,
Duplex LE -> Simplex, Duplex SE -> Simplex
Turns the duplex (2-sided) function
off or on.
Binding Long Edge Bind, Short Edge Bind Sets the default binding to LEF or SEF.
Display condition: Duplex Copy is set
to Duplex -> Duplex and N-up or
Repeat is ON.
Paper Feed Auto, Tray 1(A4 ) , Tray 2(A4)*, M P Tray(A4) Allows you to define the paper tray for
printing.
Auto - Allows for automatic tray
selection based on the document
image size and/or scaling setting
defined.
* If fitted.
Zoom Auto, 100%, Zoom (25-400%), A4->A5(70%),
Leg14->Let(78%), Leg13.5->Let(81%),
Leg13->Let(84%), A4->B5(86%),
A4->Let(94%), Let->A4(97%),
Fit to page(98%), B5->A4(115%),
A5->A4(141%)
Allows you to scale the copy using the
presets values or by scaling in 1%
increments up to 400% and down to 0
by entering the value using the
keypad.
Sort ON, OFF ON prints 1 entire copy/set of the
multiple copy document at a time
(e.g. pages 1,2,3,1,2,3,1,2,3,…)
OFF batch prints the multiple copy
document page by page (e.g. pages
1,1,1,2,2,2,3,3,3,…)
Copying > 45
Image
Settings
Density -3, -2, -1, 0, +1,
+2, +3
Adjust density
Darker: Keep colour intensity and
darker image.
Lighter: Reduce colour intensity and
gives lighter image.
Document Type Text, Text&Photo,
Photo, Photo
(Glossy)
Allows you to specify the type of
images on the document.
Scan Resolution Normal, Extra Fine Allows you to select the scanning
resolution. The Extra Fine setting
reproduces a higher resolution image
with greater detail, however this
requires more disk space.
Note: In Mono copy mode, the
resolution is fixed to Extra Fine.
Background Removal OFF, 1, 2, 3, 4, 5, 6 Allows you to block out the colour
background of the image (assuming
document has a colour background) -
such that the background colour is not
printed.
Contrast -3, -2, -1, 0, +1,
+2, +3
Contrast setting
High: Enhance brightness
Low: Reduce brightness
Hue -3, -2, -1, 0, +1,
+2, +3
Red / green balance adjustment.
Low: Enhance red.
High: Enhance green.
Saturation -3, -2, -1, 0, +1,
+2, +3
Saturation setting
High: Enhance image sharpness
Low: Reduce hue
RGB Red: -3, -2, -1, 0,
+1, +2, +3
Green: -3, -2, -1, 0,
+1, +2, +3
Blue: -3, -2, -1, 0,
+1, +2, +3
Adjust RGB contrast settings. Use the
arrow keys to increment and
decrement the values and to move to
the next colour setting.
Direction Portrait, Landscape Selects the default page orientation.
N-In-1 OFF
2-in-1
4-in-1: Vertical
4-in-1: Horizontal
Allows you to print multiple pages of
the document to a single sheet of
paper.
2-n-1 layout orientation and image
order is fixed. If you specify 4-in-1
you can specify horizontal or vertical
orientation. If you specify 2-in-1 or 4-
in-1, set your original documents on
the ADF, alternatively enable Continue
Scan mode and use the document
glass (see “Continue Scan” on
page 46).
Repeat OFF
x2
x4
Allows you to print multiple images of
an original document on a single
sheet.
ID Card Copy ON, OFF Allows you to set ID card copying as
the default copy mode.
FEATURE OPTION DESCRIPTION
Copying > 46
4. Press the Left arrow key or Back button to return to the start menu.
5. If access control is enabled, logout once you are finished to avoid any unauthorised
access.
R
ESETTING
COPY
SETTINGS
A
UTO
RESET
All settings you configured for your copy job return to their default values if no operation
is made for a set period of time.
The factory default setting is 3 minutes. Refer to “Operation Timeout” on page 161.
U
SING
THE
RESET
/
LOGOUT
BUTTON
By pressing the RESET/LOGOUT button, the settings you configured for your copy job
return to their default values.
After copying, press the RESET/LOGOUT key to reset the default settings for the next
user.
Continue
Scan
ON, OFF Allows you to continue scanning more
documents. Allows you to construct a
single scan job from multiple
individual sheets or originals.
Mixed Size ON, OFF Allows you to load originals of same
width but different length in the ADF.
The following document sizes can be
set concurrently; A3 and A4 LEF, B4
and B5 LEF, A4SEF and A5 LEF.
When enabled, the tray setting is
automatic, you cannot specify a tray
manually.
Margin ON, OFF Allows you to change the document
top and left margin areas.
Input range: -25 to +25mm.
Edge Erase ON, OFF Allows you to block out the peripheral
areas of the document where spurious
shadows and borders may arise when
copying with the document cover
open (such as with books and
magazines) or for other purposes.
Input range: 5 to 50mm.
FEATURE OPTION DESCRIPTION
Scanning > 47
S
CANNING
1. Place your document(s) with text face UP in the ADF or face DOWN on the glass.
2. Press the Scan button (1) on the control panel to prompt the Scan Menu screen.
3. Select the scan destination from the following options:
> E-mail
> Network PC
> USB Memory
> Local PC
> Remote PC
4. Set your scanning options as required. For further details refer to the following
sections.
5. Press Mono (2) to scan your document(s) in black and white, or Colour (3) to scan
your document(s) in colour.
NOTE
If your Administrator has enabled access control on your machine, it will
automatically start up in access control mode. You will not be able to use it
until you have provided valid login information. Refer to “User authentication
and access control” on page 35 for details.
NOTE
Local PC; select target application from the control panel on the MFP.
Remote PC; select target application from utility on your PC.
NOTE
If you wish to cancel the scan process, press Stop (4) to abort the operation.
2 3 4
1
Scanning > 48
S
CAN
TO
E
-
MAIL
Using the options available, you can enter e-mail information and alter the scan output to
suit your needs:
1. Place your document(s) with text face UP in the ADF or face DOWN on the glass.
2. Press the Scan button on the control panel to prompt the Scan Menu screen.
3. If required, use the arrow keys and scroll to E-mail, then press OK.
4. Using the options available, you can enter e-mail destination(s) and alter the scan
output to suit your needs.
NOTE
For illustration purposes only, the features shown are as accessed from the
control panel.
FEATURE OPTION DESCRIPTION
Destination
Add Destination To:
Cc:
Bcc:
Address Book Select e-mail address from
the address book.
Input range: 001-100
E-mail Group List Select destination group
from the list.
Input range: 01-20
E-mail Send History Displays the list of sent
e-mails.
Direct Input Enter e-mail address using
the on-screen keyboard.
LDAP Simple Search Use the on-screen keyboard
to enter a search value.
Advanced Search
Search Method:
User Name:
E-mail Address:
Use Advanced Search to
search the LDAP address
book by user name and/or
e-mail address.
Can display up to 100
addresses.
Scan Settings Scan Size A4, A5, A6, B5, Letter, Legal 13,
Legal 13.5, Legal 14, Executive
Allows you to select the scan
size.
Duplex Scan OFF, Long Edge Bind, Short Edge
Bind
Select the bound originals
binding position.
Scan Menu
USB Memory
Network PC
E-mail
Scanning > 49
Scan Settings
(cont.)
Image Settings Density -3, -2, -1, 0, +1,
+2, +3
Adjust density
Darker: Keep colour intensity
and darker image.
Lighter: Reduce colour
intensity and gives lighter
image.
Document
Type
Text, Text&Photo,
Photo, Photo
(Glossy)
Allows you to specify the
type of images on the
document.
Resolution 75dpi, 100dpi,
150dpi, 200dpi,
300dpi, 400dpi,
600dpi
Allows you to select the
appropriate resolution.
Remember the higher the
resolution the bigger the file
size!
Background
Removal
OFF, 1, 2, 3, 4, 5, 6 Allows you to block out any
unintended background
colour.
Contrast -3, -2, -1, 0, +1,
+2, +3
Contrast setting
High: Enhance brightness
Low: Reduce brightness
Hue -3, -2, -1, 0, +1,
+2, +3
Red / green balance
adjustment.
Low: Enhance red.
High: Enhance green.
Saturation -3, -2, -1, 0, +1,
+2, +3
Saturation setting
High: Enhance image
sharpness
Low: Reduce hue
RGB Red: -3, -2, -1, 0,
+1, +2, +3
Green: -3, -2, -1,
0, +1, +2, +3
Blue: -3, -2, -1, 0,
+1, +2, +3
Adjust RGB contrast settings.
Use the arrow keys to
increment and decrement
the values and to move to
the next colour setting.
Reply To Address Book Select e-mail address from
the address book.
Input range: 001-100
Direct Input Enter e-mail address using
the on-screen keyboard.
LDAP Simple Search Use the on-screen keyboard
to enter a search value.
Advanced Search
Search Method:
User Name:
E-mail Address:
Use Advanced Search to
search the LDAP address
book by user name and/or
e-mail address.
Can display up to 100
addresses.
FEATURE OPTION DESCRIPTION
Scanning > 50
Scan Settings
(cont.)
Edit E-mail Subject Select Subject Enter new or edit the default
e-mail subject and text
templates.
For further details refer to
“Creating e-mail templates”
on page 64.
Direct Input
E-mail Body Select Text
Direct Input
File Name User defined Use the on-screen keyboard
to enter an appropriate file
name.
Continue Scan ON, OFF Allows you to continue
scanning more documents.
Allows you to construct a
single scan job from multiple
individual sheets or originals.
Refer to “Continuous scan
mode” on page 95 for
details.
Greyscale ON, OFF Select ON to print in
grayscale.
File Format Colour:
PDF, TIFF, JPEG, XPS
Mono (Grayscale):
PDF, TIFF, JPEG, XPS
Mono (Binary):
PDF, TIFF, XPS
Select the appropriate file
format.
Encrypted PDF Not Encrypt
Encrypt Low, Medium, High
Select the appropriate
encryption level.
Compression
Rate
Color:
High, Medium, Low
Mono (Grayscale):
High, Medium, Low
Mono (Binary):
High, Medium, Raw
Select the appropriate
compression level.
Note:
Mono (Binary);
High = G4
Medium = G3
Edge Erase ON, OFF Use the keypad to enter the
width settings.
Input range: 5 to 50mm
E-mail Send History Displays the list of sent
e-mails.
NOTE
> If you want to use the address book or group list features, be sure to
register the e-mail addresses in advance. Refer to “Managing the address
book” on page 63.
> This machine allows you to send scanned document(s) to multiple e-mail
addresses. Simply select the destination you require and press OK, then
repeat until all the destinations you require are selected.
> Up to 48 characters can be entered in the “Destination”, “Reply to” and
the “Subject” fields.
> If the administrator has set SMTP or POP3 authentication, after sending
your scanned document to e-mail addresses, and if no more transmission
is required, log out of the system. This is to prevent misuse of the user's
e-mail account for sending e-mails. If there is no other operation within
3 minutes, the system will log out automatically.
FEATURE OPTION DESCRIPTION
Scanning > 51
5. Press the Mono button to scan your document(s) in black and white, or the Colour
button to scan your document(s) in colour.
On completion the machine will beep and a confirmation message displays.
6. If access control is enabled, logout once you are finished to avoid any unauthorised
access.
NOTE
If you wish to cancel the scan process, press the Stop button to abort the
operation.
NOTE
MDN (message disposition notification) and DSN (delivery status notification)
can enabled/disabled by the administrator. Refer to “MDN Response” on
page 149.
Scanning > 52
S
CAN
TO
NETWORK
PC
Before sending your document to a file server, profiles should be set up first to speed up
the process. A profile contains a list of filing parameters such as your filing protocol,
directory, file name and other scanning parameters.
1. Place your document(s) with text face UP in the ADF or face DOWN on the glass.
2. Press the Scan button on the control panel to prompt the Scan Menu screen.
3. Using the Down arrow key, scroll to Network PC and press OK.
4. Using the Down arrow key, scroll to Select Profile and press OK.
The list of registered profiles displays.
5. Using the Down arrow key, scroll to the required profile and press OK.
6. Using the Down arrow key, scroll to Scan Setting and press OK.
Using the options available, you can enter network information and alter the scan out
put to suit your needs.
NOTE
The MFP must be connected to a Network server to enable Scan to Network
PC to be set up. Refer to the Configuration Guide for details.
NOTE
Profiles can be created and managed using the machine’s web page or the MFP
Setup Tool.
You can create up to 50 profiles. Refer to “Managing profiles” on page 61.
FEATURE OPTION DESCRIPTION
Scan Size A4, A5, A6, B5, Letter, Legal 13, Legal 13.5,
Legal 14, Executive
Allows you to select the scan size.
Duplex Scan OFF, Long Edge Bind, Short Edge Bind Select the bound originals binding
position.
USB Memory
Network PC
E-mail
Scan Menu
Scanning > 53
Image Settings Density -3, -2, -1, 0, +1, +2, +3 Adjust density
Darker: Keep colour intensity and darker
image.
Lighter: Reduce colour intensity and
gives lighter image.
Document Type Text, Text&Photo,
Photo, Photo (Glossy)
Allows you to specify the type of images
on the document.
Background
Removal
OFF, 1, 2, 3, 4, 5, 6 Allows you to block out the colour
background of the image (assuming
document has a colour background) -
such that the background colour is not
printed.
Resolution 75dpi, 100dpi, 150dpi,
200dpi, 300dpi, 400dpi,
600dpi
Allows you to select the appropriate
resolution.
Remember the higher the resolution the
bigger the file size!
Contrast -3, -2, -1, 0, +1, +2, +3 Contrast setting
High: Enhance brightness
Low: Reduce brightness
Hue -3, -2, -1, 0, +1, +2, +3 Red / green balance adjustment.
Low: Enhance red.
High: Enhance green.
Saturation -3, -2, -1, 0, +1, +2, +3 Saturation setting
High: Enhance image sharpness
Low: Reduce hue
RGB Red: -3, -2, -1, 0, +1,
+2, +3
Green: -3, -2, -1, 0, +1,
+2, +3
Blue: -3, -2, -1, 0, +1,
+2, +3
Adjust RGB contrast settings. Use the
arrow keys to increment and decrement
the values and to move to the next
colour setting.
File Name User defined Use the on-screen keyboard to enter an
appropriate file name.
Subfolder User defined Enter the subdirectory where the
scanned document will be stored.
Continue Scan ON, OFF Allows you to continue scanning more
documents. Allows you to construct a
single scan job from multiple individual
sheets or originals. Refer to“Continuous
scan mode” on page 95 for details.
Greyscale ON, OFF Select ON to print in grayscale.
File Format Colour:
PDF, TIFF, JPEG, XPS
Mono (Grayscale):
PDF, TIFF, JPEG, XPS
Mono (Binary):
PDF, TIFF, XPS
Select the appropriate file format.
Encrypted PDF Not Encrypt
Encrypt Low, Medium, High
Select the appropriate encryption level.
FEATURE OPTION DESCRIPTION
Scanning > 54
7. Press the Mono button to scan your document(s) in black and white, or the Colour
button to scan your document(s) in colour.
On completion the machine will beep and a confirmation message displays.
8. If access control is enabled, logout once you are finished to avoid any unauthorised
access.
Compression
Rate
Color:
High, Medium, Low
Mono (Grayscale):
High, Medium, Low
Mono (Binary):
High, Medium, Raw
Select the appropriate compression level.
Note:
Mono (Binary);
High = G4
Medium = G3
Edge Erase ON, OFF Use the keypad to enter the width
settings.
Input range: 5 to 50mm
NOTE
If you wish to cancel the scan process, press the Stop button to abort the
operation.
FEATURE OPTION DESCRIPTION
Scanning > 55
S
CAN
TO
USB
MEMORY
1. Plug the USB memory into the USB port at the front of the machine.
2. Place your document(s) with text face UP in the ADF or face DOWN on the glass.
3. Press the Scan button on the control panel to prompt the Scan Menu screen.
4. Using the Down arrow key, scroll to USB Memory and press OK.
Using the options available, you can enter a file name and alter the scan output to
suit your needs.
FEATURE OPTION DESCRIPTION
Scan Size A4, A5, A6, B5, Letter, Legal 13, Legal 13.5,
Legal 14, Executive
Allows you to select the scan size.
Duplex Scan OFF, Long Edge Bind, Short Edge Bind Select the bound originals binding
position.
Image Settings Density -3, -2, -1, 0, +1, +2, +3 Adjust density
Darker: Keep colour intensity and darker
image.
Lighter: Reduce colour intensity and
gives lighter image.
Document Type Text, Text&Photo,
Photo, Photo (Glossy)
Allows you to specify the type of images
on the document.
Background
Removal
OFF, 1, 2, 3, 4, 5, 6 Allows you to block out the colour
background of the image (assuming
document has a colour background) -
such that the background colour is not
printed.
Resolution 75dpi, 100dpi, 150dpi,
200dpi, 300dpi, 400dpi,
600dpi
Allows you to select the appropriate
resolution.
Remember the higher the resolution the
bigger the file size!
Contrast -3, -2, -1, 0, +1, +2, +3 Contrast setting
High: Enhance brightness
Low: Reduce brightness
Scan Menu
USB Memory
Network PC
E-mail
Scanning > 56
5. Press the Mono button to scan your document(s) in black and white, or the Colour
button to scan your document(s) in colour.
On completion a confirmation message displays.
6. Remove the USB memory from the machine.
7. If access control is enabled, logout once you are finished to avoid any unauthorised
access.
Image Settings
(cont.)
Hue -3, -2, -1, 0, +1, +2, +3 Red / green balance adjustment.
Low: Enhance red.
High: Enhance green.
Saturation -3, -2, -1, 0, +1, +2, +3 Saturation setting
High: Enhance image sharpness
Low: Reduce hue
RGB Red: -3, -2, -1, 0, +1,
+2, +3
Green: -3, -2, -1, 0, +1,
+2, +3
Blue: -3, -2, -1, 0, +1,
+2, +3
Adjust RGB contrast settings. Use the
arrow keys to increment and decrement
the values and to move to the next
colour setting.
File Name User defined Use the on-screen keyboard to enter an
appropriate file name.
Continue Scan ON, OFF Allows you to continue scanning more
documents. Allows you to construct a
single scan job from multiple individual
sheets or originals. Refer to “Continuous
scan mode” on page 95 for details.
Greyscale ON, OFF Select ON to print in grayscale.
File Format Colour:
PDF, TIFF, JPEG, XPS
Mono (Greyscale):
PDF, TIFF, JPEG, XPS
Mono (Binary):
PDF, TIFF, XPS
Select the appropriate file format.
Encrypted PDF Not Encrypt
Encrypt Low, Medium, High
Select the appropriate encryption level.
Compression
Rate
Color:
High, Medium, Low
Mono (Greyscale):
High, Medium, Low
Mono (Binary):
High, Medium, Raw
Select the appropriate compression level.
Note:
Mono (Binary);
High = G4
Medium = G3
Edge Erase ON, OFF Use the keypad to enter the width
settings.
Input range: 5 to 50mm
NOTE
If you wish to cancel the scan process, press the Stop button to abort the
operation.
FEATURE OPTION DESCRIPTION
Scanning > 57
S
CAN
TO
LOCAL
PC
You can save scanned data into your local computer. When you press the START button,
the scan job starts and the ActKey utility and the scanner driver start automatically. You
can send the scanned document to a specified application, save it into a specified folder, or
send it by fax. The machine can be connected to USB interface or network, but only one
computer can be connected at the same time. Refer to the Configuration Guide for details.
1. Place your document(s) with text face UP in the ADF or face DOWN on the glass.
2. Press the Scan button on the control panel to prompt the Scan Menu screen.
3. Using the Down arrow key, scroll to Local PC and press OK.
4. If required, use the arrow keys to highlight Select A Connecting PC and press OK.
5. Using the arrow keys, highlight the appropriate connection option and press OK.
Choose either:
> From Network
> From USB Interface
6. Using the Down arrow key, highlight Select An Application and press OK.
The Select An Application screen displays the following options:
> Application
> Folder
> PC-FAX
7. Select the option you require, followed by the Colour/Mono button to start
scanning.
(a) Application
When the Application function is selected the PC's ActKey Utility executes PC
Scan in accordance with your settings for “Scan to Application1”. The scanned
image data is opened in the application specified by the ActKey Utility for
Application 1.
(b) Folder
When the Folder function is selected the ActKey Utility executes PC Scan in
accordance with your settings for “Scan to Folder”. The scanned image data is
saved in the specified folder.
NOTE
> The scan to local PC function is available for Windows only.
> Ensure that the Actkey Utility is installed and set up first.
> User action is performed at the MFP (Push Scan).
Scan Menu
Remote PC
Local PC
USB Memory
Scanning > 58
(c) Fax
When the PC-Fax function is selected, the ActKey Utility executes PC Scan in
accordance with your settings for “Scan to PC-Fax”. The scanned image data is
saved in the specified folder and is ready for the software to send as an
attachment. Complete the data on screen and send.
A
CT
K
EY
INTERFACE
Double click the ActKey Icon on your desktop. The ActKey console (below) displays.
The functions below, can now be controlled from the PC:
> Scan to Application1
> Scan to Application2
> Scan to Folder
> Scan to PC-Fax
As the cursor passes over an icon, the parameters set for that icon appear in a text box. A
single click will select that option.
“Scan to Application2” works exactly the same as scan to Application1, simply allowing an
alternative application to be selected.
Scanning > 59
S
CAN
TO
REMOTE
PC
The following example is based on your printer being connected via USB.
1. At the MFP: Place your document(s) with text face UP in the ADF or face DOWN on
the glass.
2. Press the Scan button on the control panel to prompt the Scan Menu screen.
3. Using the Down arrow key, scroll to Remote PC and press OK.
4. At your PC: Start your scanning application.
5. Select the File menu and choose Scan or Get Photo.
A dialogue box with a list of scanning sources displays.
6. Select TWAIN: eS222/223/263CS Twain.
You need to select the source only once, unless you want to choose another scanner.
7. Select a profile. Choose from:
(a) B&W Document.
(b) Grayscale Document.
(c) Color Document.
(d) Color Photograph.
NOTE
By default the PC scan mode is set to simple. To enable Secure Scan Mode
refer to “PC Scan Mode” on page 150.
NOTE
After Remote PC is selected, user action is performed at your PC (Pull Scan).
NOTE
The example below is relevant to a machine being connected via USB.
> The instructions below use PaperPort
®
11 SE (supplied with your
machine) as an example. If you use an alternative application, the
instructions and user interface will differ.
> Only the basic instructions are included here; for full instructions on how
to use PaperPort
®
11 SE, refer to the documentation that accompanies
the utility.
Scan Menu
Remote PC
Local PC
USB Memory
Scanning > 60
8. Press the Scan button to display the scanning options.
9. Press the required scan button (1) to start scanning.
10. Press Quit to continue:
(a) Press Scan More Pages (2) to continue scanning further documents.
(b) Press Scan Other Side (3) to scan the reverse side of the original document.
(c) Press Done (4) to finish scanning.
1
2 3 4
Scanning > 61
M
ANAGING
PROFILES
A
DDING
A
NEW
NETWORK
PROFILE
Register the information you configured on the computer as a profile. It is necessary when
you perform Scan To Network PC with the computer.
1. Press the SETTING button on the control panel to prompt the Setting screen.
2. Using the Down arrow key, scroll to Profile and press OK.
3. Select the desired profile number.
4. Press the Right arrow key to prompt the Operation Menu screen.
From here you can register or sort profiles.
5. When registering a new profile, press the Right arrow key to prompt the Profile
screen.
6. Ensure Profile Name: is highlighted then press the Right arrow key.
7. Using the arrow keys and on-screen keypad, enter a suitable profile name.
8. Using the arrow keys, highlight Done and press OK.
9. Using the Down arrow key, scroll to Target URL then press the Right arrow key.
10. Using the arrow keys and on-screen keypad, enter the name of the destination
computer and the shared folder name as “\\name of the destination
computer\shared folder name”.
11. Using the arrow keys, highlight Done and press OK.
12. Using the Down arrow key, scroll to User Name then press the Right arrow key.
13. Using the arrow keys and on-screen keypad, enter a suitable user name.
14. Using the arrow keys, highlight Done and press OK.
15. Using the Down arrow key, scroll to Password then press the Right arrow key.
16. Using the arrow keys and on-screen keypad, enter a suitable password.
17. Using the arrow keys, highlight Done and press OK
.
18. Using the Down arrow key, scroll to File Name then press the Right arrow key.
19. Using the arrow keys and on-screen keypad, enter a suitable file name.
20. Using the arrow keys, highlight Done and press OK.
21. Configure other items if necessary, for example:
\\PC1\SalesDev
NOTE
e-STUDIO263CS only: You can also use the qwerty keyboard to enter details.
NOTE
If domain management is done, enter “user name@domain name”.
NOTE
You can enter up to 64 characters.
By adding “#n” to the end of the file name, a serial number is automatically
assigned to the end of the name of sent files.
By adding “#d” to the end of the file name, a date is automatically assigned
to the end of the name of sent files.
Scanning > 62
22. Press OK to register the settings and save the profile entry.
The setup for Scan To Network PC is complete.
D
ELETING
A
NETWORK
PROFILE
To delete a network profile:
1. Press the SETTING button on the control panel to prompt the Setting screen.
2. Using the Down arrow key, scroll to Profile List and press OK.
3. Select the desired profile number.
4. Ensure Delete is highlighted then press the Right arrow key.
5. At the prompt:
> press OK to continue deleting the profile entry,
or...
> use the Right arrow key to highlight No, then press OK to cancel.
Scanning > 63
M
ANAGING
THE
ADDRESS
BOOK
S
ETTING
SENDER
AND
REPLY
TO
E
-
MAIL
ADDRESSES
(
FROM
/
REPLY
TO
)
You can set the e-mail address from which e-mails are sent and the address to which
responses are sent.
1. Press the SETTING button on the control panel.
2. Using the Down arrow key, scroll to Admin Setup and then press OK.
3. Using the arrow keys and on-screen keyboard, enter the administrator password.
4. Select Done and then press OK.
5. Using the Down arrow key, scroll to Scanner Setup and then press OK.
6. Using the Down arrow key, scroll to E-mail Setup and then press OK.
7. Using the Down arrow key, scroll to From/Reply to and then press OK.
8. Using the Down arrow key, scroll to From or Reply to and then press OK.
9. Using the on-screen keyboard, enter the e-mail address up to 48 characters.
10. Select Done and then press OK.
11. Using the Down arrow key, scroll to Close and then press OK.
12. Press the RESET/LOGOUT button.
NOTE
The default password is “aaaaaa”.
e-STUDIO263CS only: You can also use the qwerty keyboard to enter details.
NOTE
e-STUDIO263CS only: You can also use the qwerty keyboard to enter details.
NOTE
You can select e-mail addresses from the address book.
Scanning > 64
C
REATING
E
-
MAIL
TEMPLATES
You can create up to five e-mail templates with various subject lines and body text.
Registering a subject
1. Press the SETTING button on the control panel.
2. Using the Down arrow key, scroll to Admin Setup and then press OK.
3. Using the arrow keys and on-screen keyboard, enter the administrator password.
4. Select Done and then press OK.
5. Using the Down arrow key, scroll to Scanner Setup and then press OK.
6. Using the Down arrow key, scroll to E-mail Setup and then press OK.
7. Using the Down arrow key, scroll to Template and then press OK.
8. Make sure that Edit Subject is selected and then press OK.
9. Using the Down arrow key, select a template entry number and then press OK.
10. Using the on-screen keyboard, enter the subject up to 80 characters.
11. Select Done and then press OK.
Registering body text
1. Follow steps 1 to 7 in “Registering a subject” on page 64.
2. Using the Down arrow key, scroll to Edit Body and then press OK.
3. Using the on-screen keyboard, enter the body text up to 256 characters.
4. Select Done and then press OK.
NOTE
The default password is “aaaaaa”.
e-STUDIO263CS only: You can also use the qwerty keyboard to enter details.
NOTE
e-STUDIO263CS only: You can also use the qwerty keyboard to enter details.
NOTE
e-STUDIO263CS only: You can also use the qwerty keyboard to enter details.
Scanning > 65
A
DDING
AN
E
-
MAIL
ADDRESS
ENTRY
TO
THE
ADDRESS
BOOK
The machine can hold up to 100 e-mail addresses in the address book. To assign a new
e-mail address to the address book:
1. Press the SETTING button on the control panel.
2. Using the Down arrow key, scroll to Address Book and press OK.
3. Press OK to select E-mail Address.
4. Using the arrow keys, scroll to the required entry position and press OK.
5. Press OK to select Register.
6. Press the Right arrow key to select Name.
7. Using the keypad or arrows keys and the on-screen keypad, type in the name.
8. Highlight Done and press OK.
9. Using the Down arrow key, scroll to E-mail Address and press the Right arrow
key.
10. Using the keypad or arrows keys and the on-screen keypad, type in the new e-mail
address.
11. Highlight Done and press OK.
12. If required, use the arrow keys and scroll to Group No. then press the Right arrow
key.
13. Using the arrow keys, select the group number to assign the e-mail address to and
press OK.
The check box is selected. You can select multiple entries.
14. Press the Right arrow key to complete.
15. Press OK to confirm.
16. Press OK once more to add your entry to the address book.
17. Press the Left arrow key to exit the menu.
D
ELETING
AN
E
-
MAIL
ADDRESS
ENTRY
FROM
THE
ADDRESS
BOOK
To delete an e-mail address entry from the address book:
1. Press the SETTING button on the control panel.
2. Using the Down arrow key, scroll to Address Book and press OK.
3. Press OK to select E-mail Address.
4. Using the arrow keys, scroll to the required entry position and press OK.
5. Using the arrow keys, scroll to Delete and press OK.
6. At the prompt select Yes to continue or select No to cancel the operation.
7. Press OK.
NOTE
The maximum length of name is 16 characters.
If you do not enter a name, this column remains blank.
NOTE
The maximum length of address is 80 characters.
Scanning > 66
8. Press the Left arrow key to exit the menu.
M
ODIFYING
AN
E
-
MAIL
ADDRESS
ENTRY
FROM
THE
ADDRESS
BOOK
To edit an e-mail address entry from the address book:
1. Press the SETTING button on the control panel.
2. Using the Down arrow key, scroll to Address Book and press OK.
3. Press OK to select E-mail Address.
4. Using the arrow keys, scroll to the required entry position and press OK.
5. Press OK to select Edit.
6. Modify the Name, E-mail Address and/or Group No. details as required then press
OK.
7. Press the Left arrow key to exit the menu.
A
DDING
A
GROUP
ENTRY
TO
THE
ADDRESS
BOOK
The machine can hold up to 20 group addresses. To add a new group address to the address
book:
1. Press the SETTING button on the control panel.
2. Using the Down arrow key, scroll to Address Book and press OK.
3. Using the Down arrow key, scroll to E-mail Group and press OK.
4. Using the arrow keys, scroll to the required entry position and press OK.
5. Press OK to select Register.
6. Press the Right arrow key to select Name.
7. Using the keypad or arrows keys and the on-screen keypad, type in the name.
8. Highlight Done and press OK.
9. Using the Down arrow key, scroll to Address No. and press the Right arrow key.
10. Using the arrow keys, select the destination to assign the e-mail group to and press
OK.
The check box is selected. You can select multiple entries.
11. Press the Right arrow key to complete.
12. Press OK to confirm.
13. Press OK once more to add your entry to the address book.
14. Press the Left arrow key to exit the menu.
NOTE
The maximum length of name is 16 characters.
Scanning > 67
D
ELETING
A
GROUP
ADDRESS
ENTRY
FROM
THE
ADDRESS
BOOK
To delete a group address entry from the address book:
1. Press the SETTING button on the control panel.
2. Using the Down arrow key, scroll to Address Book and press OK.
3. Using the Down arrow key, scroll to E-mail Group and press OK.
4. Using the arrow keys, scroll to the required entry position and press OK.
5. Using the arrow keys, scroll to Delete and press OK.
6. At the prompt select Yes to continue or select No to cancel the operation.
7. Press OK.
8. Press the Left arrow key to exit the menu.
M
ODIFYING
A
GROUP
ADDRESS
ENTRY
FROM
THE
ADDRESS
BOOK
To edit a group address entry from the address book:
1. Press the SETTING button on the control panel.
2. Using the Down arrow key, scroll to Address Book and press OK.
3. Using the Down arrow key, scroll to E-mail Group and press OK.
4. Using the arrow keys, scroll to the required entry position and press OK.
5. Press OK to select Edit.
6. Modify the Name and/or Address No. details as required then press OK.
7. Press the Left arrow key to exit the menu.
Printing > 68
P
RINTING
This chapter details how to use the following print options from the control panel:
> Job Lists
> Print Job (e-STUDIO263CS only)
> Print from USB memory
> Switch Online/Offline
For full details of how to use your machine and any optional accessories to print jobs
efficiently and effectively, please refer to the Printing Guide and the Barcode Printing Guide.
e-STUDIO263CS only: For full details of how to access and use the security features,
please refer to the Security Guide.
J
OB
LISTS
You can cancel a print job by deleting it from the job list:
1. Press the Print button (1) on the control panel to prompt the Print Menu screen.
2. Press OK to select Job Lists.
3. Using the arrow keys, scroll to the job you want to cancel and then press OK.
NOTE
If your Administrator has enabled access control on your machine, it will
automatically start up in access control mode. You will not be able to use it
until you have provided valid login information. Refer to “User authentication
and access control” on page 35 for details.
2 3 4
1
Print From USB Memory
Print Job
Job Lists
Printing > 69
P
RINT
JOB
(e-STUDIO263CS
ONLY
)
This section gives a brief overview of how to select and print an encrypted job or a print
job that has been stored in the machine. For full details of how to access and use the
security features, please refer to the Security Guide.
1. Press the Print button (1) on the control panel to prompt the Print Menu screen.
2. Using the Down arrow key, scroll to Print Job and press OK.
3. Using the arrow keys, scroll to the job option you require and then press OK. Choose
from:
> Stored Job
> Encrypted Job
4. Enter the PIN or password as appropriate then press OK.
5. Using the Down arrow key, scroll to Print and press OK.
NOTE
If you select
Delete you can cancel the print job. Be aware, if you select
Delete to cancel an encrypted job, it will delete all jobs with the same
password.
2 3 4
1
Print From USB Memory
Print Job
Job Lists
Printing > 70
P
RINT
FROM
USB
MEMORY
B
ASIC
OPERATION
1. Plug the USB memory into the USB port at the front of the machine.
2. Press the Print button (1) on the control panel to prompt the Print Menu screen.
3. Using the Down arrow key, scroll to Print From USB Memory and press OK.
4. Ensure Select Print File is highlighted, then press OK.
The list of supported files on the USB stick are display.
NOTE
Supported file systems: FAT12, FAT16, FAT32.
Supported file formats: JPEG, PDF (v1.7), M-TIFF (v6 Baseline), PRN (PCL,
PS).
Supported: Up to 32 GB capacity of USB memory.
Not Supported: USB hubs, external USB HDDs and encrypted PDFs.
NOTE
Up to 100 files in supported file formats stored in USB memory are displayed
on the file list. If more files are stored in USB memory, the list of the stored
files may not be displayed properly.
You can select and print one file in your USB memory at a time.
2 3 4
1
Print From USB Memory
Print Job
Job Lists
Printing > 71
5. If your file is contained within a folder:
(a) Using the arrow keys, scroll to the required folder and press OK.
(b) Press OK to select Open Folder.
6. Using the arrow keys scroll to the file you want to print and press the OK.
7. Ensure Select is highlighted, then press OK.
8. If required, scroll to Print Setup and configure the print settings then press OK.
Refer to Advanced operation” on page 71 for details.
9. Press Mono (2) to print your document(s) in black and white, or Colour (3) to print
your document(s) in colour.
10. Remove the USB memory from the port after a message is displayed indicating that
it is OK to remove the USB memory.
A
DVANCED
OPERATION
Using the options available you can alter the print output to suit your needs:
1. Select required parameter with Down arrow key and press the OK button or the
Right arrow key to display the available options.
2. Using Up or Down arrow keys, select value and press OK.
Options are (factory default settings in bold text):
3. Press the Back button to return to the print menu.
NOTE
If required, scroll to Folder Property and press OK to check the file
information.
NOTE
If required, scroll to File Property and press OK to check the file information.
NOTE
If you wish to cancel the print process, press Stop (4) to abort the operation.
PARAMETER VALUE DESCRIPTION
Paper Feed Tray 1(A4), MP Tray(A4) Allows you to define the paper tray for
printing.
Copies 1 Enter the number of copies of a document to
be printed from 1 to 999.
Duplex Copy ON, OFF Select the copy method.
If duplex copying is specified, select the
required binding method.
Binding Long Edge Bind, Short Edge Bind Sets the default binding to LEF or SEF.
Only available when duplex is ON.
Fit ON, OFF Match the page size to the paper size. If the
page size of your file is larger or smaller than
the effective print area, the page is resized to
fit the paper size.
Printing > 72
S
WITCHING
ONLINE
/
OFFLINE
If you wish to alter the print status of your machine:
1. Press the Print button (1) on the control panel to prompt the Print Menu screen.
2. Using the Down arrow key, scroll to Switch Online/Offline and press OK.
3. Using the arrow keys, scroll to your required option and press OK.
NOTE
If you switch the machine Offline it will disable the Copy function also.
2 3 4
1
Switch Online/Offline
Print From USB Memory
Print Job
Faxing - e-STUDIO223CS and e-STUDIO263CS only > 73
F
AXING
- e-STUDIO223CS
AND
e-STUDIO263CS
ONLY
S
ENDING
A
FAX
FROM
THE
MFP
This section details how to send a fax directly from your MFP.
B
ASIC
OPERATION
1. Place your document(s) with text face UP in the ADF or face DOWN on the glass.
2. Press the Fax button (1) on the control panel to prompt the Fax Mode screen.
3. Ensure Fax is highlighted, then press OK.
4. Set your destination and send properties as required. Refer to Advanced operation”
on page 74 for details.
5. Press the Mono button (3) to start sending your document(s).
NOTE
If your Administrator has enabled access control on your machine, it will
automatically start up in access control mode. You will not be able to use it
until you have provided valid login information. Refer to “User authentication
and access control” on page 35 for details.
When faxing, you can load only A4, letter, or legal size documents in the ADF,
and A4 or letter size documents on the document glass. You cannot load mixed
size documents.
NOTE
If you wish to cancel faxing, press Stop (4) to abort the operation.
You can cancel a job that is being transmitted as long as the message
indicating the job has been completed has not displayed. Refer to “Fax job
view/cancel” on page 83 for details on how to cancel a reserved job.
When you select a broadcast job, the job itself is cancelled. If you want to
cancel an individual destination within a broadcast job, refer to “Deleting
specified destinations” on page 76.
Fax transmissions are sent in black and white only.
2 3 4
1
Faxing - e-STUDIO223CS and e-STUDIO263CS only > 74
A
DVANCED
OPERATION
Using the options available, you can alter the fax output to suit your needs:
FEATURE OPTION DESCRIPTION
Fax
Add Destination Speed Dial List Select the required speed dial number.
You can select multiple entries.
Entries must be registered in advance, refer
to Adding a speed dial entry to the phone
book” on page 86.
Group List Select the required group dial number.
You can select multiple entries.
Entries must be registered in advance, refer
to Adding a group entry to the phone book”
on page 87.
Direct Input Enter the destination fax number using the
keypad. Use the arrow keys and OK button to
select dialling function from the on-screen
options:
> - (Hyphen) Inserts a hyphen to the entered fax
number.
> Pause Pauses two seconds when dialling. You
can use multiple pauses.
> Tone Switches to tone dialling if pulse dialling
is set.
> PreFix Inserts a prefix number registered in
advance.
Tx History Select a destination from the ten most recent
transmissions.
Rx History Select a destination from the ten most recent
receptions.
Fax Functions Scan Size A4, Letter, Legal 13,
Legal 13.5, Legal 14
Allows you to select the paper size to match
the document size.
Resolution Normal, Fine, Extra-
Fine, Photo
Allows you to specify the type of images on
the document.
Density -3, -2, -1, 0, +1, +2,
+3
Adjust density
Darker: Keep colour intensity and darker
image.
Lighter: Reduce colour intensity and gives
lighter image.
Duplex Scan OFF, Long Edge Bind,
Short Edge Bind
Select the bound originals binding position.
Continue Scan ON, OFF Allows you to continue scanning more
documents. Allows you to construct a single
fax job from multiple individual sheets or
originals. Refer to “Continuous scan mode” on
page 95 for details.
Faxing - e-STUDIO223CS and e-STUDIO263CS only > 75
Manual feed
If you wish to send multiple sets of documents from the ADF or flatbed, enable the
“continuous scan” feature. Refer to “Continuous scan mode” on page 95 for full details.
Fax Functions
(cont.)
TTI ON, OFF Prints the sender name on the header of the
transmitted fax. By default, the name you
specified in Sender ID is printed. Refer to
“Sender ID” on page 144.
TTI Select user defined Select the user defined TTI header.
Note: TTI must be ON.
Transmit
Confirmation
Report
ON, OFF Select ON to print a fax confirmation after
transmission.
Delayed Tx OFF
Date
Time
Delayed transmission allows you to fax
documents at a specific date and time.
Up to one hundred transmission times can be
scheduled up to one month in advance.
Fcode Polling ON, OFF To turn ON, use the numeric keypad to enter
the sub-address of the remote machine.
If required, use the numeric keypad to enter
the password of the remote machine.
Fcode Tx ON, OFF F Code transmission is a function to
communicate using sub addresses or
passwords in accordance with the standard of
ITU-T. by creating and registering F Code
boxes you can execute confidential
communication and notice board
communication.
Use the numeric keypad to enter the sub-
address.
If required, use the numeric keypad to enter
the password of the remote machine.
Note: up to 20 F code boxes can be
registered, Up to 30 documents can be stored
in one box.
Note: Polling and FPolling must be OFF.
Memory Tx ON, OFF Select OFF to enable real time transmission,
i.e. fax transmission synchronisation with
scanning.
Fax Job View/
Cancel
View or cancel a reserved fax job from the
list.
Fax History Tx History Check the transmission or reception history
and results of a fax job.
Rx History
FEATURE OPTION DESCRIPTION
Faxing - e-STUDIO223CS and e-STUDIO263CS only > 76
Broadcasting
This function allows you to send a fax to multiple recipients at the same time. By combining
abbreviation dials, groups and entering addresses using the numeric keypad, you can
specify up to 100 destinations at one time.
Deleting specified destinations
You can cancel an individual destination within a broadcast job.
1. Make sure that the required destination is selected on the fax standby screen and
then press OK.
2. Using the arrow keys, scroll to the destination you want to delete and then press
OK.
A check box is selected. You can select multiple entries.
3. When you have selected all the destinations to be deleted, press the Right arrow
key.
4. Make sure that Delete this destination is selected and then press OK.
Manual redial
Your machine is set to redial automatically (refer to “Redial Tries” on page 147), if you wish
to manually redial:
1. Press the FAX button on the control panel.
2. Press OK to select Fax.
3. Press OK to select Add Destination.
4. Using the Down arrow key, scroll to Tx History and press OK.
5. Using the arrow keys, scroll to the required destination and press OK.
The check box is selected. You can select multiple entries.
6. When you have selected all the destinations, press the Right arrow key.
7. Press OK to select Finish Destination Selection.
8. Press the Mono button (3) to start sending your document(s).
NOTE
When real time transmission (Memory Tx set to OFF) or polling is executed
during broadcasting data, they are executed preferentially. In the case of
polling, it is executed preferentially when there is only one address specified.
When Broadcast Destination is enabled, the destination numbers are
displayed before transmission. Refer to “Broadcast Destination” on page 146.
Faxing - e-STUDIO223CS and e-STUDIO263CS only > 77
F Code communication
F Code transmission is a function to communicate, using sub addresses or passwords in
accordance with the ITU-T standard. By creating F code boxes/sub addresses/passwords,
you can execute secure communication, bulletin box communication and polling
communication.
Sub address and ID code
> A sub address is a number to distinguish various F code boxes that are set in the
memory.
> A password is a key to prevent wrongful sending and receiving.
> An ID code is a key to access a secure box.
By using a sub address, the following functions can be used:
> F Code Confidential Communication
When an F code confidential box is set in the recipient machine, by specifying the sub
address of its box, confidential communication can be executed.
On the receiving side of the confidential communication, unless the specified ID code
is entered, a received document cannot be printed, therefore, this function is useful
when sending a document that needs a security protection. Refer to:
> “Transmission using a sub address (F code transmission)” on page 80.
> “Printing stored documents” on page 82.
> F Code Bulletin Box Communication
When the F code bulletin box is set in the recipient machine, by specifying the sub
address of its notice board, a document can be sent to the bulletin box or a document
stored in the bulletin box can be taken out (polling). (A password can be specified, if
necessary.) Refer to:
> “Transmission using a sub address (F code transmission)” on page 80.
> “Receiving using a sub address (F code polling)” on page 81.
> “Storing documents in a bulletin box” on page 81.
Registering an F code box
To use F code communication, register an F code box. Register a sub address in each F code
box.
1. Press the SETTING button on the control panel.
2. Using the Down arrow key, scroll to Admin Setup and press OK.
3. Using the arrow keys and on-screen keypad, enter the Administrator password.
Highlight Done and press OK.
4. Using the Down arrow key, scroll to Fax Setup and press OK.
5. Using the Down arrow key, scroll to Fcode Box and press OK.
6. Using the arrow keys, scroll to the required entry position and press OK.
NOTE
Up to 16 F code boxes can be registered.
NOTE
Make sure to register a sub address.
When a secret number is set, only the specific person can operate the F code
box.
Faxing - e-STUDIO223CS and e-STUDIO263CS only > 78
7. Press OK to select Register.
8. Select a type of F code box:
> Bulletin Box - refer to “Registering an F code Bulletin box” on page 78
> Confidential Box - refer to “Registering an F code confidential box” on page 78.
Registering an F code Bulletin box
1. Press OK to select Bulletin Box.
2. Press the Right arrow key to select Box Name.
(a) Using the arrow keys and on screen keyboard, enter a box name.
(b) Highlight Done and press OK.
3. Using the Down arrow, scroll to Sub-Address and press the Right arrow key.
(a) Using the keypad enter the sub address.
(b) Highlight Done and press OK.
4. Using the Down arrow key, scroll to I.D.Code and press the Right arrow key:
(a) Register an ID Code number (4 digits) using the numeric keypad.
(b) Press OK.
5. Press OK to complete.
Registering an F code confidential box
1. Press OK to select Confidential Box.
2. Press the Right arrow key to select Box Name.
(a) Using the arrow keys and on screen keyboard, enter a box name.
(b) Highlight Done and press OK.
NOTE
If using one-byte characters, up to 16 characters can be registered.
NOTE
A sub address can be registered using up to 20 digits. Numbers, # and * can
be registered.
If you make a mistake when entering the digits, press the Clear button to
delete and then enter the correct digit.
NOTE
The ID code is not displayed, write it down and keep it safe!
NOTE
If using one-byte characters, up to 16 characters can be registered. If using
double-byte characters, up to 8 characters can be registered.
Faxing - e-STUDIO223CS and e-STUDIO263CS only > 79
3. Using the Down arrow, scroll to Sub-Address and press the Right arrow key.
(a) Using the keypad enter the sub address.
(b) Highlight Done and press OK.
4. Using the Down arrow key, scroll to I.D.Code and press the Right arrow key:
(a) Register an ID Code number (4 digits) using the numeric keypad.
(b) Press OK.
5. If required, use the Down arrow key to scroll to Hold Time. Press the Right arrow
key:
(a) Enter the required hold time (00 ~ 31) using the numeric keypad.
(b) Press OK.
6. Press OK to complete.
NOTE
A sub address can be registered using up to 20 digits. Numbers, # and * can
be registered.
If you make a mistake when entering the digits, press the Clear button to
delete and then enter the correct digit.
NOTE
The ID code is not displayed, write it down and keep it safe!
NOTE
Specify a retention period between 0 and 31 days.
If “00” is specified, the data will be retained for an indefinite period.
Retention period input range is between 0 and 31 days). When 0 is set,
documents are retained for an indefinite period.
Faxing - e-STUDIO223CS and e-STUDIO263CS only > 80
Deleting an F code box
1. Press the SETTING button on the control panel.
2. Using the Down arrow key, scroll to Admin Setup and press OK.
3. Using the arrow keys and on-screen keypad, enter the Administrator password.
Highlight Done and press OK.
4. Using the Down arrow key, scroll to Fax Setup and press OK.
5. Using the Down arrow key, scroll to Fcode Box and press OK.
6. Using the arrow keys, scroll to the required entry position and press OK.
7. Using the Down arrow key, scroll to Delete and press OK.
8. Using the arrow keys, highlight Yes to continue or No to cancel.
9. Press the OK button to execute.
Transmission using a sub address (F code transmission)
By entering a sub address and ID code, F code confidential transmission, F code bulletin
transmission and F code polling transmission can be performed.
1. Place your document(s) with text face UP in the ADF or face DOWN on the glass.
2. Press the Fax button on the control panel to prompt the Fax Ready screen.
3. Press OK to select Fax.
4. Using the Down arrow key, scroll to Fax Functions and press OK.
5. Using the Down arrow key, scroll to Fcode Tx and press OK.
6. Using the arrow keys, scroll to Yes and press OK.
7. Using the numeric keypad, enter the sub-address of the box registered in the
recipient machine.
8. Highlight Done and press OK.
9. Press the Left arrow key to exit.
10. Press OK to select Add Destination.
11. Using the arrow keys, scroll to the required destination input method and press OK.
12. Specify a destination.
13. Press OK to complete.
14. Press the Mono button to start sending your document(s).
NOTE
You cannot delete an F code box in which documents are stored, it must be
empty.
NOTE
Before operating, ensure you have the necessary sub address and ID code to
hand.
Faxing - e-STUDIO223CS and e-STUDIO263CS only > 81
Receiving using a sub address (F code polling)
By entering a sub address and ID code, a document stored in the bulletin box of a recipient
machine can be taken out (polling).
1. Press the Fax button on the control panel to prompt the Fax Ready screen.
2. Press OK to select Fax.
3. Using the Down arrow key, scroll to Fax Functions and press OK.
4. Using the Down arrow key, scroll to Fcode Polling and press OK.
5. Using the arrow keys, scroll to ON and press OK.
6. Using the numeric keypad, enter the sub-address of the box registered in the sender
machine.
7. Highlight Done and press OK.
8. Press the Left arrow key to exit.
9. Press OK to select Add Destination.
10. Using the arrow keys, scroll to the required destination input method and press OK.
11. Specify a destination.
12. Press OK to complete.
13. Press the Mono button to start receiving your document(s)
Storing documents in a bulletin box
1. Place your document(s) with text face UP in the ADF or face DOWN on the glass.
2. Press the SETTING button on the control panel.
3. Using the Down arrow key, scroll to Store Document Settings and press OK.
4. Press OK to select Store.
5. Press OK to select Fcode Bulletin Board.
6. Select the F code box in which to store the document.
7. If an ID code is set, enter the number (4 digits) using the numeric keypad. Press
OK.
8. Select a method of storing documents:
> Over Write: replace a document in the box.
> Add: add a new document to the box.
9. Using the arrow keys, highlight Yes to continue or No to cancel.
10. Press the OK button to execute.
NOTE
Before operating, ensure you have the necessary sub address and ID code to
hand.
NOTE
Before operating, ensure you have registered the bulletin box in the F-Code
box.
Faxing - e-STUDIO223CS and e-STUDIO263CS only > 82
Printing stored documents
Print secure received documents, documents received in the bulletin box and documents
stored in the bulletin box.
1. Press the SETTING button on the control panel.
2. Using the Down arrow key, scroll to Store Document Settings and press OK.
3. Using the Down arrow key, scroll to Print and press OK.
4. Press OK to select Fcode Box.
5. Select the F code box storing the document you want to print.
6. If an ID code is set, enter the number (4 digits) using the numeric keypad. Press
OK.
7. Select the file number of the document you want to print. Press OK.
8. Using the arrow keys, highlight Yes to continue or No to cancel.
9. Press the OK button to execute.
The document that is stored or received is printed.
Deleting stored documents
1. Press the SETTING button on the control panel.
2. Using the Down arrow key, scroll to Store Document Settings and press OK.
3. Using the Down arrow key, scroll to Delete and press OK.
4. Press OK to select Fcode Bulletin Board.
5. Select the F code box storing the document you want to delete. Press OK.
6. If an ID code is set, enter the number (4 digits) using the numeric keypad. Press
OK.
7. Select the file number of the document you want to delete. Press OK.
8. Using the arrow keys, highlight Yes to continue or No to cancel.
9.
Press the OK button to execute.
NOTE
When a document is received into an F code box, the F code receiving notice
is printed.
Check the F code box number and print the stored document.
NOTE
Confidential received documents are automatically deleted after printing.
Documents that are received or stored in the bulletin box are not deleted after
printing.
Faxing - e-STUDIO223CS and e-STUDIO263CS only > 83
Fax job view/cancel
If you no longer require a stored fax job, you can cancel and remove it from your MFP’s
memory.
1. Press the Fax button on the control panel to prompt the Fax Mode screen.
2. Using the arrow keys, scroll to Fax and press OK.
3. Using the Down arrow key, scroll to Fax Job View/Cancel and press OK.
4. Using the Down arrow key, scroll to the fax job you wish to delete and press OK.
5. Check the job contents, then press the Right arrow key.
6. Using the Down arrow key, scroll to Delete and press OK.
7. Using the arrow keys, select Yes to continue or No to cancel and press OK.
Fax job reports and listings
Refer to “Reports” on page 135.
F
AX
RECEIVING
Your MFP is set to receive faxes automatically, if you wish to change this to manual receive
refer to “Forced Memory Rx” on page 147 for details.
Your MFP is set to fax ready reception mode, if you wish to change this refer to “Reception
Mode” on page 164.
The machine behaviour differs depending on the specified reception mode.
When the machine is receiving faxes, the DATA IN MEMORY indicator is lit and the sender
information is displayed on screen. The indicator remains lit while the data is stored in
memory.
Fax ready mode
This is the factory default setting; your machine is set so that it automatically receives
faxes.
Tel/Fax ready mode
When the machine is set to Tel/Fax Ready Mode, you can receive calls and faxes. You must
connect an external telephone in advance to receive calls, refer to the Configuration Guide
for details.
NOTE
When you select a broadcast job, the job itself is deleted. If you wish to cancel
an individual destination within the broadcast job, refer to “Deleting specified
destinations” on page 76 for details.
NOTE
If the MFP is actively sending or receiving a fax, then any incoming faxes will
be rejected.
NOTE
> The sender name and fax number registered on the sender machine are
displayed on screen.
> If the memory overflows while the machine is receiving data, the
reception is cancelled. If this happens, ask the sender to resend the fax.
Faxing - e-STUDIO223CS and e-STUDIO263CS only > 84
Receiving faxes
The machine automatically starts fax reception.
Receiving calls
The telephone starts ringing when it receives calls.
1. Pick up the handset to talk when the machine rings.
2. If necessary, press the mono START button and then put down the handset to
receive faxes.
Ans/Fax ready mode
When the machine is set to Ans/Fax Ready Mode, you can use an answering machine and
receive faxes automatically. You must connect an external answering machine in advance,
refer to the Configuration Guide for details.
Receiving faxes
The machine automatically starts fax reception.
Receiving calls
The answering machine rings, the reply message starts, and then it starts recording a
message.
Tel ready mode
Tel Ready Mode is recommended if you often use the external telephone connected to the
machine. You must connect an external telephone in advance to receive calls, refer to the
Configuration Guide for details.
Receiving calls
The telephone starts ringing when it receives calls.
Receiving faxes
The telephone starts ringing when it receives a signal.
1. Pick up the handset when the machine rings.
2. Press the mono START button and then put down the handset to receive faxes.
Forward mode
When the machine is set to Forward Mode, it automatically forwards the received faxes to
a specified destination. You must specify a forwarding destination in advance.
NOTE
Depending on the answering machine and the sender machine, Ans/Fax
Ready Mode
may not operate correctly.
NOTE
You can register one forwarding destination for this function.
Faxing - e-STUDIO223CS and e-STUDIO263CS only > 85
DRD
This mode allows the machine to detect a distinctive ring if it has been enabled on the
phone line. In this mode, the machine distinguishes the DRD type of the sender. The
machine then answers only when it matches the registered DRD type.
You can register up to four DRD types:
Type 1: short-long
Type 2: long-long
Type 3: short-short-long
Type 4: short-long-short
Refer to “DRD Type” on page 164.
Printing received faxes
The machine automatically prints out the received fax.
Images larger than the specified paper are reduced, discarded, or printed onto multiple
sheets of paper depending on the reception print settings. Refer to “Rx Reduc. Rate” on
page 147.
If the machine cannot print received faxes due to a lack of paper or a paper jam, it will
store the received fax data temporarily it’s memory. When the problem is resolved, it starts
printing automatically.
NOTE
> Use only standard or recycled paper.
> Available paper sizes are A4, letter, or legal.
NOTE
For details on how to load paper, refer to “Loading paper” on page 30.
For details on how to clear paper jams, refer to “Clearing paper jams” on
page 121.
To check the reception history, refer to “Rx History” on page 75.
Faxing - e-STUDIO223CS and e-STUDIO263CS only > 86
M
ANAGING
THE
PHONE
BOOK
The following section describes how to add/remove/modify speed and group dial entries to/
from the Phone Book.
A
DDING
A
SPEED
DIAL
ENTRY
TO
THE
PHONE
BOOK
The machine can hold up to 100 speed dial numbers in the phone book. To add a new speed
dial number to the phone book:
1. Press the SETTING button on the control panel.
2. Using the Down arrow key, scroll to Phone Book and press OK.
3. Press OK to select Speed Dial List.
4. Using the arrow keys, scroll to the required entry position and press OK.
5. Press OK to select Register.
6. Press the Right arrow key to select Name.
7. Using the keypad or arrows keys and the on-screen keypad, type in the name.
8. Highlight Done and press OK.
9. Using the Down arrow key, scroll to Fax Number and press the Right arrow key.
10. Using the keypad, type in the destination fax number.
11. Highlight Done and press OK.
12. If required, use the arrow keys and scroll to Group No. then press the Right arrow
key.
13. Using the arrow keys, select the group number to assign the fax number to and
press OK.
The check box is selected. You can select multiple entries.
14. Press the Right arrow key to complete.
15. Press OK to confirm.
16. Press OK once more to add your entry to the phone book.
NOTE
The maximum length of name is 24 characters.
NOTE
The maximum length of number is 40 digits.
If the destination fax number has an “extension number”, press the Pause
button between numbers. The machine will enter a pause when dialling.
If your MFP is connected to a PBX (private branch exchange), you will need to
add a Prefix in order to access to the outside line. Refer to the Configuration
Guide for details.
If you need to change the dialling method for the region, press the
Tone
button to change the call parameters for this particular number.
If you make a mistake while entering the number, press the Clear button to
delete the last digit.
NOTE
Numbers registered to groups from the Speed Dial function are synchronized
with the numbers that are registered to groups using the Group No. function.
Faxing - e-STUDIO223CS and e-STUDIO263CS only > 87
17. Press the Left arrow key to exit the menu.
A
DDING
A
GROUP
ENTRY
TO
THE
PHONE
BOOK
The machine can hold up to 20 group dial settings. To add a new group dial number to the
phone book:
1. Press the SETTING button on the control panel.
2. Using the Down arrow key, scroll to Phone Book and press OK.
3. Using the Down arrow key, scroll to Group No. Book and press OK.
4. Using the arrow keys, scroll to the required entry position and press OK.
5. Press OK to select Register.
6. Press the Right arrow key to select Name.
7. Using the keypad or arrows keys and the on-screen keypad, type in the name.
8. Highlight Done and press OK.
9. Using the Down arrow key, scroll to Speed Dial and press the Right arrow key.
10. Using the arrow keys, select the speed dial number you wish to assign to the group
and press OK.
The check box is selected. You can select multiple entries.
11. Press the Right arrow key to complete.
12. Press OK to confirm.
13. Press OK once more to add your entry to the phone book.
14. Press the Left arrow key to exit the menu.
D
ELETING
A
SPEED
DIAL
ENTRY
FROM
THE
PHONE
BOOK
To delete a speed dial entry from the phone book:
1. Press the SETTING button on the control panel.
2. Using the Down arrow key, scroll to Phone Book and press OK.
3. Press OK to select Speed Dial List.
4. Using the arrow keys, scroll to the required entry position and press OK.
5. Using the arrow keys, scroll to Delete and press OK.
6. At the prompt select Yes to continue or select No to cancel the operation.
7. Press OK.
8. Press the Left arrow key to exit the menu.
D
ELETING
A
GROUP
DIAL
ENTRY
FROM
THE
PHONE
BOOK
To delete a group dial entry from the phone book:
1. Press the SETTING button on the control panel.
2. Using the Down arrow key, scroll to Phone Book and press OK.
3. Using the Down arrow key, scroll to Group No. Book and press OK.
4. Using the arrow keys, scroll to the required entry position and press OK.
NOTE
The maximum length of name is 16 characters.
Faxing - e-STUDIO223CS and e-STUDIO263CS only > 88
5. Using the arrow keys, scroll to Delete and press OK.
6. At the prompt select Yes to continue or select No to cancel the operation.
7. Press OK.
8. Press the Left arrow key to exit the menu.
M
ODIFYING
A
SPEED
DIAL
ENTRY
To modify a speed dial entry:
1. Press the SETTING button on the control panel.
2. Using the Down arrow key, scroll to Phone Book and press OK.
3. Press OK to select Speed Dial List.
4. Using the arrow keys, scroll to the required entry position and press OK.
5. Press OK to select Edit.
6. Modify the Name, Fax Number and/or Group No. details as required then press OK.
7. Press the Left arrow key to exit the menu.
M
ODIFYING
A
GROUP
DIAL
ENTRY
To modify a group dial entry:
1. Press the SETTING button on the control panel.
2. Using the Down arrow key, scroll to Phone Book and press OK.
3. Using the Down arrow key, scroll to Group No. Book and press OK.
4. Using the arrow keys, scroll to the required entry position and press OK.
5. Press OK to select Edit.
6. Modify the Name, and/or Speed Dial details as required then press OK.
7. Press the Left arrow key to exit the menu.
R
EGISTERING
AN
ENTRY
FROM
RECEPTION
OR
TRANSMISSION
HISTORY
1. Press the Fax button on the control panel to prompt the Fax Mode screen.
2. Ensure Fax is highlighted, then press OK.
3. Using the Down arrow key, scroll to Fax History and press OK.
4. Using the arrow keys, highlight Tx History or Rx History as appropriate and press
OK.
5. Using the arrow keys, scroll to the required entry and press OK.
6. Check the entry contents and then press the Right arrow key.
7. Press OK to select Register To Speed Dial.
8. Using the arrow keys, scroll to the required entry position and press OK.
9. Continue the registration process as described in Adding a speed dial entry to the
phone book” on page 86.
The fax number is automatically entered. You do not have to enter it manually.
Faxing - e-STUDIO223CS and e-STUDIO263CS only > 89
I
NTERNET
FAX
S
ENDING
A
FAX
FROM
YOUR
PC
Basic operation
1. At the MFP: Place your document(s) with text face UP in the ADF or face DOWN on
the glass.
2. Press the Fax button on the control panel to prompt the Fax Mode screen.
3. Using the Down arrow key, scroll to Internet Fax and press OK.
4. Set your destination and send properties as required. Refer to Advanced operation”
on page 91 for details.
5. At your PC: From your application’s File menu, select Print.
6. In the Select Printer window, highlight the fax driver option.
7. Press the Preferences button to display the fax driver window.
8. On the Setup tab:
(a) Select the appropriate media size from the drop-down menu.
(b) Set the resolution quality to Extra fine, Fine or Standard.
(c) Set the orientation to Portrait or Landscape.
9. On the Cover Sheet tab:
(a) Set the cover sheet usage settings as appropriate.
(b) Select a cover sheet format.
10. On the Sender tab:
(a) Enter your name.
(b) Enter your fax number.
NOTE
You must have the fax driver installed on your PC. Download the latest fax
driver from your support website.
Faxing - e-STUDIO223CS and e-STUDIO263CS only > 90
(c) Enter comments if required.
(d) If required select the Add an outside call number checkbox and enter the
Outside call number as appropriate.
11. On the Recipient tab:
(a) Click the Recipient... button.
(b) Select a fax number from the Phone book panel on the right hand side. Refer
to “Adding fax numbers to the phone book” on page 93.
(c) Press the Add button to add this number to the recipient list.
(d) Repeat (b) and (c) as required to create the recipient list.
(e) If you need to remove a number from the recipient list, highlight the appropriate
name and then press the Delete button.
(f) Once you have completed your list, press the OK button to close the Select
Recipients window.
12. Press the OK button to close the fax driver window.
13. Press OK to start sending your fax.
NOTE
If you wish to cancel faxing during transmission to the MFP:
1. Double-click the printer icon in the notification area.
2. Select the job from the print queue.
3. From the Document menu, select Cancel.
Once the job is stored in the MFP, you cannot cancel it from the PC, instead
you must cancel it directly from the machine. Refer to “Fax job view/cancel”
on page 83 for details.
Faxing - e-STUDIO223CS and e-STUDIO263CS only > 91
Advanced operation
Using the options available, you can alter the fax output to suit your needs:
FEATURE OPTION DESCRIPTION
Internet Fax
Add
Destination
To:
Cc:
Bcc:
Address Book Select e-mail address from the
address book.
Input range: 001-100
Email Group List Select destination group from the
list.
Input range: 01-20
Email Send History Displays the list of sent e-mails.
Direct Input Enter e-mail address using the on-
screen keyboard.
LDAP Simple Search Use the on-screen keyboard to
enter a search value.
Advanced Search
Search Method:
User Name:
Email Address:
Use Advanced Search to search
the LDAP address book by User
Name and/or E-mail address.
Scan Setting Scan Size A4, Letter, Legal 13, Legal 13.5,
Legal 14
Allows you to select the paper size
to match the document size.
Density -3, -2, -1, 0, +1, +2, +3 Adjust density
Darker: Keep colour intensity and
darker image.
Lighter: Reduce colour intensity
and gives lighter image.
Resolution Normal, Fine, Extra-Fine, Photo Allows you to specify the type of
images on the document.
Background
Removal
OFF, 1, 2, 3, 4, 5, 6 Allows you to block out the colour
background of the image
(assuming document has a colour
background) - such that the
background colour is not printed.
Reply to Address Book Select e-mail address from the
address book.
Input range: 001-100
Direct Input Enter e-mail address using the on-
screen keyboard.
LDAP Simple Search Use the on-screen keyboard to
enter a search value.
Advanced Search
Search Method:
User Name:
E-mail Address:
Use Advanced Search to search
the LDAP address book by User
Name and/or E-mail address.
Edit E-mail Subject Select Subject Enter new or edit the default e-
mail subject and text templates.
For further details refer to
“Creating e-mail templates” on
page 64.
Direct Input
E-mail Body Select Text
Direct Input
Faxing - e-STUDIO223CS and e-STUDIO263CS only > 92
R
ECEIVING
AN
INTERNET
FAX
The machine automatically prints the internet faxes it receives. If the document is larger
than A4 size, the machine automatically reduces it to the size of the paper in the specified
paper tray.
Scan Setting
(cont.)
File Name User defined Use the on-screen keyboard to
enter an appropriate file name.
Duplex Scan ON, OFF Turns the duplex (2-sided)
function off or on.
Continue
Scan
ON, OFF Allows you to continue scanning
more documents. Allows you to
construct a single fax job from
multiple individual sheets or
originals. Refer to “Continuous
scan mode” on page 95 for
details.
Compression
Rate
High, Medium, Low Select the appropriate
compression level.
Internet Fax
Tx History
Check the transmission history
and results of an internet fax job.
FEATURE OPTION DESCRIPTION
Faxing - e-STUDIO223CS and e-STUDIO263CS only > 93
A
DDING
FAX
NUMBERS
TO
THE
PHONE
BOOK
To add a fax destination number to the phone book:
1. From your application’s File menu, select Print.
2. In the Select Printer window, highlight the fax driver option.
3. Press the Preferences button to display the fax driver window.
4. Click the Phone book... button.
The phone book screen displays.
5. Select FAX number -> New (FAX number).
6. Type in the fax number destination Name.
7. Type in the required FAX number.
8. If required, type in a Comment.
9. Press the OK button to save.
A
DDING
NEW
GROUPS
TO
THE
PHONE
BOOK
To add a new group to the phone book:
1. From your application’s File menu, select Print.
2. In the Select Printer window, highlight the fax driver option.
3. Press the Preferences button to display the fax driver window.
4. Click the Phone book... button.
The phone book screen displays.
5. Select FAX number -> New (Group).
6. Type in the Group name.
7. If required, type in a Comment.
NOTE
you can register up to 1000 destinations.
Faxing - e-STUDIO223CS and e-STUDIO263CS only > 94
8. Add recipients to the group list:
(a) Select a fax number from the Phone book panel on the right hand side.
(b) Press the Add-> button to add this number to the group list.
(c) Repeat steps (a) and (b) as required to create the group list.
(d) If you need to remove a number from the recipient list, highlight the appropriate
name and then press the <-Delete button.
9. Once you have completed your list, press the OK button to close the New Group
window.
I
MPORTING
AND
EXPORTING
FAX
NUMBERS
By using the import and export functions, you can manage fax numbers in a phone book
created on another computer.
1. In Windows:
Windows 7: select Start > Devices and Printers.
Vista: select Start > Control Panel > Hardware and Sound > Printers.
Server 2008: select Start > Control Panel > Printers.
XP: select Start > Control Panel > Printer and Other Hardware > Printers and
Faxes.
Server 2003: select Start > Printers and Faxes.
2000: select Start > Settings > Printers.
2. Right-click your machine icon and select Printer Preferences.
3. In the Setup tab, click the Phone Book button.
4. From the pull-down menu, click Tool > Export.
5. In the Export File screen, enter a name for the file and click the Save button. The
phone book is saved.
6. Import the saved phone book file to the other computer:
(a) In the fax driver installed on the computer that the phone book file was
imported, start the phone book in the same way, and click Tool > Import in
the menu.
(b) In the Import File screen, select a phone book file to import. When the Open
button is clicked, data is imported to the phone book.
NOTE
Maximum 100 recipients in any one group.
NOTE
You can add a new fax number directly by clicking the New (FAX number)...
button and adding an entry to the phone book panel.
NOTE
Registration of groups cannot be exported. (Destinations included in the group
are exported.)
Functions common to copy, fax and scan operations > 95
F
UNCTIONS
COMMON
TO
COPY
,
FAX
AND
SCAN
OPERATIONS
C
ONTINUOUS
SCAN
MODE
If you need to scan, copy or fax multiple sets of documents from the ADF or document
glass, enable the “Continue Scan” option.
To set the fax to continuous scan:
1. Place your document(s) with text face UP in the ADF or face DOWN on the glass.
2. Press the Fax button on the control panel to prompt the Fax Ready screen.
3. Ensure Fax is highlighted, then press OK.
4. Using the Down arrow key, scroll to Fax Functions and press OK.
5. Using the Down arrow key, scroll to Continue Scan and press OK.
6. Select ON and press OK.
7. Press the BACK button to exit the menu and return to the Fax Ready screen.
8. Set your send properties as required.
9. Press Mono to start scanning the first document.
Once the current scanning operation is complete, the screen will display “Please set next
document”. If you have further documents to scan, ensure Start Scan is highlighted then
press OK to continue scanning or use the Down arrow key to select Scan Complete.
NOTE
The example below uses the fax feature, however, the scan and copy features
follow the same process.
Functions common to copy, fax and scan operations > 96
J
OB
MACROS
(e-STUDIO263CS
ONLY
)
If you have a routine copy, fax or scan job that you perform on a regular basis, you can
program the steps into your MFP and create a “short cut” allowing you to perform the steps
at the touch of a button. You can create up to ten short cuts using the Job Macro function.
You can create a macro for the following functions:
> Copying (colour and/or mono)
> Printing from USB memory
> Scanning to e-mail
> Scanning to network PC
> Scanning to USB memory
> Fax sending
> Internet fax sending
Creating:
To register a short cut:
1. Key in the steps you wish to program; for example if you wish to program a copy job
that is double-sided, A5 scan size and the output is 20 copies:
(a) Press the Copy button on the control panel.
(b) Press the Right arrow key.
(c) Press OK to select Scan Size.
(d) Using the Down arrow key, scroll to A5 then press OK.
(e) Using the Down arrow key, scroll to Duplex Copy then press OK.
(f) Using the Down arrow key, highlight the required duplex option then press OK.
(g) Press the Back button.
(h) Using the numeric keypad, type in 20.
2. Press the Job Macro button on the control panel to prompt the Job Macro screen.
3. Using the arrow keys, select a job number you wish to associate to your program.
4. Press OK.
5. Press OK again.
6. Using the arrow keys and on-screen keyboard enter an appropriate title for the
macro.
7. Highlight Enter on-screen then press OK.
8. Select Yes to continue, or No to exit without saving.
9. Press the OK button to complete the registration.
NOTE
Changes to an existing speed dial number or adding a new speed dial number
are not carried over to previously configured Job Macros. The Job Macro must
be reprogrammed to reflect the changes/editions to the speed dial directory.
NOTE
You cannot edit the steps within a program, if you wish to change them then
you must reprogram the job number.
Functions common to copy, fax and scan operations > 97
Using:
To use a pre-programmed short cut:
1. Press the Job Macro button on the control panel to prompt the Job Macro screen.
2. Using the arrow keys, scroll to the macro you wish to use then press OK.
3. Ensure Restore is highlighted then press OK.
4. Check the settings and then press OK.
5. At the prompt, select Yes to execute the program or No to exit.
Deleting:
To delete a Job Macro function:
1. Press the Job Macro button on the control panel to prompt the Job Macro screen.
2. Using the arrow keys, scroll to the macro you wish to delete then press OK.
3. Using the arrow keys, scroll to Delete then press OK.
4. At the prompt, select Yes to confirm deletion or No to exit.
Editing the title:
To edit a Job Macro title:
1. Press the Job Macro button on the control panel to prompt the Job Macro screen.
2. Using the arrow keys, scroll to the macro you wish to edit then press OK.
3. Using the arrow keys, scroll to Title Edit then press OK.
4. Using the arrow keys and on-screen keyboard enter an appropriate title for the
macro.
5. Highlight Enter on-screen then press OK.
NOTE
If access control is enabled and you are not permitted to use certain functions,
a message will display and then the screen will return to the confirmation
prompt. Select No to return to the
Job Macro screen.
Maintenance > 98
M
AINTENANCE
R
EPLACING
CONSUMABLE
ITEMS
Only use genuine original consumables to ensure the best quality and
performance from your hardware. Non original products may adversely affect
your printer's performance and invalidate your warranty.
T
ONER
CARTRIDGE
REPLACEMENT
The toner used in this printer is a very fine dry powder. It is contained in four cartridges:
one each for cyan, magenta, yellow and black.
Have a sheet of paper handy so that you have somewhere to place the used cartridge while
you install the new one.
Dispose of the old cartridge responsibly, inside the recycle bag that came with the new
cartridge. Follow any regulations, recommendations, etc., which may be in force
concerning waste recycling.
If you do spill any toner powder, lightly brush it off. If this is not enough, use a cool, damp
cloth to remove any residue.
Do not use hot water, and never use solvents of any kind. They will make stains permanent.
NOTE
When the LCD display indicates TONER LOW, or if print appears faded, first
open the top cover and try tapping the cartridge a few times to evenly
distribute the toner powder. This will enable you to obtain the best “yield” from
your toner cartridge.
CAUTION!
To avoid toner wastage and possible toner sensor errors, do not
change the toner cartridge(s) until “TONER EMPTY” is displayed.
WARNING!
If you inhale any toner or get it in your eyes, drink a little water or
bathe your eyes liberally in cold water. Seek medical attention
immediately.
Maintenance > 99
1. Gently raise the scanner.
2. Press the cover release (a) and open the top cover (b) fully.
WARNING!
If the MFP has been powered on, the fuser will be hot. This area is
clearly labelled. Do not touch.
a
b
Maintenance > 100
3. Note the positions of the four cartridges. It is essential that they go back in the same
order.
(a) Slide the coloured release collar on the cartridge to be replaced fully towards
the right hand side of the printer.
(b) Lift the right-hand end of the cartridge and then draw the cartridge to the right
to release the left-hand end as shown, and withdraw the toner cartridge out of
the printer.
4. Put the cartridge down gently onto a piece of paper to prevent toner from marking
your furniture.
1. Yellow cartridge 2. Magenta cartridge
3. Cyan cartridge 4. Black cartridge
1
2
3
4
b
a
Maintenance > 101
5. Clean the top of the ID unit with a clean, lint free cloth.
6. Remove the new cartridge from its box but leave its wrapping material in place for
the moment.
7. Gently shake the new cartridge from end to end several times to loosen and
distribute the toner evenly inside the cartridge.
8. Remove the wrapping material.
9. Holding the cartridge by its top centre, lower it into the printer over the image drum
unit from which the old cartridge was removed.
10. Insert the left end of the cartridge into the top of the image drum unit first, pushing
it against the spring on the drum unit, then lower the right end of the cartridge down
onto the image drum unit.
11. Pressing gently down on the cartridge to ensure that it is firmly seated, slide the
coloured collar fully towards the left hand side of the printer. This will lock the
cartridge into place and release toner into the image drum unit.
Maintenance > 102
12. Gently wipe the LED head surface with a clean, lint free cloth.
13. Close the top cover and press down firmly so that the cover latches closed.
14. Gently lower the scanner.
b
c
a
Maintenance > 103
I
MAGE
DRUM
REPLACEMENT
The image drum assembly comes complete with its own installation details which give full
instructions on replacement. You are advised to follow these instructions carefully.
R
EPLACING
THE
TRANSFER
BELT
UNIT
The belt unit is located under the image drum assembly.
Switch off the MFP and allow the fuser to cool for about 10 minutes before opening the
cover. Refer to “Switching off” on page 19 for details.
1. Gently raise the scanner.
2. Press the cover release (a) and open the top cover (b) fully.
3. Holding it by its handles, lift the image drum assembly, complete with toner
cartridges, up and out of the printer.
WARNING!
If the MFP has been powered on, the fuser will be hot. This area is
clearly labelled. Do not touch.
a
b
Maintenance > 104
4. Place the assembly in a safe place away from direct sources of heat and light.
5. Pull the locking levers at each side of the transfer belt up and towards the front of
the machine.
6. Using the locking levers (a), lift the belt (b) upwards and withdraw from the
machine.
7. Lower the new belt unit into place, with the drive gear towards the rear of the
printer. Locate the drive gear into the gear inside the printer by the rear right corner
of the unit, and lower the belt unit flat inside the printer.
8. Push the locking levers towards the rear of the machine. This will secure the belt
unit in place.
CAUTION!
The green image drum surface at the base of each cartridge is very
delicate and light sensitive. Do not touch it and do not expose it to
normal room light for more than 5 minutes. If the drum unit needs
to be out of the printer for longer than this, please wrap the
cartridge inside a black plastic bag to keep it away from light.
Never expose the drum to direct sunlight or very bright room
lighting.
b
a
a
Maintenance > 105
9. Holding the image drum assembly by its handles, lower it into place in the machine,
locating the pegs at the sides into their slots in the sides of the printer cavity.
10. Close the top cover and press down firmly so that the cover latches closed.
11. Gently lower the scanner.
Maintenance > 106
F
USER
REPLACEMENT
The fuser is located inside the printer just behind the toner cartridges.
Switch off the MFP and allow the fuser to cool for about 10 minutes before opening the
cover. Refer to “Switching off” on page 19 for details.
1. Gently raise the scanner.
2. Press the cover release (a) and open the top cover (b) fully.
3. Identify the fuser handle (a) on the top of the fuser unit.
4. Pull the two fuser retaining levers (b) towards the front of the printer so that they
are fully upright.
5. Holding the fuser by its handle (a), lift the fuser straight up and out of the printer. If
the fuser is still warm, place it on a flat surface which will not be damaged by heat.
6. Remove the new fuser from its packaging and remove the transit material.
WARNING!
If the MFP has recently been powered on, some fuser components
will be very hot. Handle the fuser with extreme care, holding it only
by its handle, which will only be mildly warm to the touch. A
warning label clearly indicates the area.
a
b
b
b
a
Maintenance > 107
7. Holding the new fuser by its handle, make sure that it is the correct way round. The
retaining levers (b) should be fully upright, and the two locating lugs (c) should be
towards you.
8. Lower the fuser into the printer, locating the two lugs (c) into their slots in the sides
of the printer cavity.
9. Push the two retaining levers (b) towards the rear of the printer to lock the fuser in
place.
10. Close the top cover and press down firmly so that the cover latches closed.
11. Gently lower the scanner.
b
b
c
b
b
Maintenance > 108
C
LEANING
...
THE
UNIT
CASING
1. Switch the printer off. Refer to “Switching off” on page 19 for details.
2. Wipe the unit surface with a soft cloth moistened sparingly with water or neutral
detergent.
3. Use a soft dry cloth to dry the unit surface.
4. Switch the printer on.
...
THE
LED
HEAD
Clean the LED heads when printing does not come out clearly, has white lines or when text
is blurred.
There is no need to switch off the printer to clean the lens.
1. Gently raise the scanner.
2. Press the cover release (a) and open the top cover (b) fully.
CAUTION!
Use a clean, moist, lint-free cloth for cleaning. Do not use benzine,
thinners or alcohol as a cleaning agent.
a
b
Maintenance > 109
3. Gently wipe the LED head surface with a clean, lint free cloth.
4. Close the top cover and press down firmly at both sides so that the cover latches
closed.
5. Gently lower the scanner.
CAUTION!
Do not use methyl alcohol or other solvents on the LED head as
damage to the lens surface will occur.
Maintenance > 110
...
THE
PAPER
PATH
IN
THE
ADF
If marks are found on an image which has been read by the ADF, or the ADF does not feed
documents smoothly, follow the cleaning procedure below.
1. Switch the MFP OFF. Refer to “Switching off” on page 19 for details.
2. Open the ADF top cover.
3. Moisten a soft, clean, lint-free cloth and wipe the feed rollers (1) by moving the cloth
from side to side.
4. Rotate the rollers forward with your finger and repeat step 3 until the rollers are
clean.
5. Carefully lift inner cover (2).
6. Wipe rollers (3 & 4) by moving the cloth from side to side.
7. Rotate the rollers forward with your finger and repeat step 6 until the rollers are
clean.
8. Return the inner cover to its original position.
9. Close the ADF top cover.
...
THE
UNDERSIDE
OF
THE
ADF
1. Open the document cover.
2. Moisten a soft, clean, lint free cloth and remove any marks, as shown.
3. Close the document cover.
1
3
4
2
Maintenance > 111
...
THE
DOCUMENT
GLASS
The document glass needs to be cleaned occasionally to ensure optimum image quality and
performance.
1. Open the document cover.
2. Moisten a soft, clean, lint free cloth and remove any marks, as shown.
3. Close the document cover.
Installing upgrades > 112
I
NSTALLING
UPGRADES
This section explains how to install optional equipment into your MFP. This includes:
> additional RAM memory
> SD card (e-STUDIO263CS only)
> additional paper tray
M
EMORY
UPGRADE
The basic models come equipped with 256MB of main memory. This can be upgraded with
an additional memory board of 256MB or 512MB, giving a maximum total memory capacity
of 768MB.
1. Switch the MFP off and disconnect the power cable. Refer to “Switching off” on
page 19 for details.
2. Remove the outer access cover and place it safely to one side.
3. Turn locking screw (a) anti-clockwise and remove the inner access cover (b). Place it
safely to one side.
4. Carefully remove the new memory board from its wrapping. Try to handle the board
only by its short edges, avoiding contact with any metal parts as far as possible. In
particular, avoid touching the edge connector.
b
a
Installing upgrades > 113
5. Notice that the memory board has a small cutout in the edge connector, which is
closer to one end than the other.
6. Identify the RAM expansion slot in the printer.
7. If the RAM expansion slot already contains a memory upgrade board, that board will
have to be removed before you can install the new one. To remove it, proceed as
follows, otherwise skip to step 8.
(a) Release retaining clips and pull the board out of the slot.
(b) Place the removed memory board in the antistatic bag which originally
contained the new memory board.
8. Hold the new memory board by its short edges, so that the edge connector faces in
towards the RAM expansion slot, and the small cutout is closer to the rear of the
printer.
9. Gently push the board into the RAM expansion slot until it latches in and will not go
any further.
10. Replace the inner access cover (b) and turn locking screw (a) clockwise to secure it
shut.
b
a
Installing upgrades > 114
11. Replace the access cover and latch it closed.
12. Reconnect the power cable and switch the MFP on.
13. When the machine is ready, print a menu map as follows:
(a) Press the SETTING button.
(b) Press the OK button to select Reports.
(c) Press the OK button to select Configuration.
(d) Press the OK button once more to execute.
(e) When the Configuration map is printed, press the Back button to exit the menu
system.
14. Examine the first page of the menu map.
Near the top of the page, between the two horizontal lines, you will see the current
printer configuration. This list contains the figure for total memory size.
This should indicate the total memory now installed.
Installing upgrades > 115
SD
CARD
(e-STUDIO263CS
ONLY
)
The SD card enables collating of printed pages and can be used to store overlays and
macros, fonts, and secure or proof documents waiting to be printed.
Your machine is fitted with a 4GB class 6 SD card as standard. If you wish you can upgrade
this as your machine supports 16GB class 6 SD cards. After replacement, you need to
configure the printer driver settings. Refer to “Setting the driver device options” on
page 118.
1. Switch the MFP off and disconnect the power cable. Refer to “Switching off” on
page 19 for details.
2. Remove the outer access cover and place it safely to one side.
3. Turn locking screw (a) anti-clockwise and remove the inner access cover (b). Place it
safely to one side.
4. Notice that the SD card has one chamfered corner.
b
a
Installing upgrades > 116
5. Gently push the SD card into the slot as shown.
6. Replace the inner access cover (b) and turn locking screw (a) clockwise to secure it
shut.
7. Replace the access cover and latch it closed.
8. Reconnect the power cable and switch the MFP on.
9. When the machine is ready, print a menu map as follows:
(a) Press the SETTING button.
(b) Press the OK button to select Reports.
(c) Press the OK button to select Configuration.
(d) Press the OK button once more to execute.
(e) When the Configuration map is printed, press the Back button to exit the menu
system.
10. Examine the first page of the menu map.
Near the top of the page, between the two horizontal lines, you will see the current
printer configuration. This should now indicate that the SD card is installed.
b
a
Installing upgrades > 117
A
DDITIONAL
PAPER
TRAY
1. Switch the MFP off and disconnect the power cable. Refer to “Switching off” on
page 19 for details.
2. Place additional paper tray on desired location.
3. Observing safety rules for lifting and, using locating guides, place machine on top of
the additional paper tray.
4. Fit retaining clips as shown.
5. Reconnect the power cable and switch the MFP on.
All that remains is to adjust the printer driver to make full use of the new features
(“Setting the driver device options” on page 118).
Installing upgrades > 118
S
ETTING
THE
DRIVER
DEVICE
OPTIONS
Once your new upgrade has been installed, you may need to update the printer driver so
that the additional features are available to your applications.
Accessories such as additional paper trays will only be usable if the printer driver on your
computer knows they are there.
In some cases the hardware configuration of your machine is automatically detected when
the driver is installed. However, it is advisable to at least check whether all of the available
hardware features are listed in the driver.
This procedure is essential if you subsequently add extra hardware features to your
machine after the drivers have been installed and set up.
Remember that if your machine is shared between users on different computers, the driver
must be adjusted on each user’s machine.
W
INDOWS
1. Access the driver’s Properties window.
(a) Open the “Printers” window via the Start Menu or from the Windows Control
Panel.
(b) Right-click the icon for this machine, and choose the “properties” option from
the pop-up menu.
2. Select the “Device” tab.
3. Set the options for any devices you have just installed.
4. Click OK to close the window and save your changes.
M
AC
OS X
Snow Leopard (Mac OS X 10.6) and Leopard (Mac OS X 10.5)
1. Open the Mac OS X Print & Fax Preferences.
2. Ensure your machine is selected.
3. Click Options & Supplies.
4. Click Driver.
5. Select all hardware options appropriate to your machine and click OK.
Tiger (Mac OS X 10.4)
1. Open the Mac OS X Print & Fax Preferences.
2. Ensure your machine is selected.
3. Click Printer Setup….
4. Click the menu and choose Installable Options….
5. Select all hardware options appropriate to your machine and click Apply
Changes….
Installing upgrades > 119
Panther (Mac OS X 10.3)
1. Open the Mac OS X Print & Fax Preferences.
2. Click Printing.
3. Click Set Up Printers….
4. Ensure your machine is selected and click Show Info….
5. Click the menu and choose Installable Options….
6. Select all hardware options appropriate to your machine and click Apply
Changes….
Troubleshooting > 120
T
ROUBLESHOOTING
C
HECKING
THE
MACHINE
S
STATUS
From the STATUS key on the control panel, you can check the status of your machine.
The STATUS key illuminates or flashes when any trouble is occurring in your machine.
1. Press the STATUS key on the control panel to open the status menu.
2. Ensure that System Status is selected and then press OK.
3. Using the arrow keys, scroll to the item you want to check and then press OK.
C
HECKING
THE
DEVICE
AND
JOB
STATUS
You can check the device status, such as the residual life of the consumable items, and job
lists from the STATUS key.
1. Press the STATUS key on the control panel to open the status menu.
2. Using the Down arrow key, scroll to Device Information and then press OK.
3. Using the arrow keys, scroll to the item you want to check and then press OK.
Choose from:
> Copy/Print: Displays the list of copy/print jobs currently stored in the machines
memory.
> Fax Job View/Cancel: displays the list of fax jobs currently stored in the
machine’s memory.
> Supplies Status: Displays consumable status information.
> Counter:
Print Count: Displays the print count from all available trays.
Scan Count: Displays the number of pages scanned from the flatbed and ADF.
Troubleshooting > 121
C
LEARING
PAPER
JAMS
Provided that you follow the recommendations in this guide on the use of print media, and
you keep the media in good condition prior to use, your MFP should give years of reliable
service. However, paper jams occasionally do occur, and this section explains how to clear
them quickly and simply.
Jams can occur due to paper misfeeding from a paper tray or at any point on the paper
path through the MFP. When a jam occurs, the machine immediately stops, and the
STATUS LED on the control panel informs you of the event.
If printing multiple pages (or copies), do not assume that, having cleared an obvious sheet,
others will not also be stopped somewhere along the path. These must also be removed in
order to clear the jam fully and restore normal operation.
I
N
THE
SCANNER
ADF
SECTION
...
If a sheet is well advanced out of the ADF, simply grip it and pull gently to draw it fully out.
1. Lift the ADF cover (1).
2. Remove any loose paper from the entry to the sheet feeder.
3. If there is any paper trapped in the feed mechanism:
(a) Lift the feeder mechanism (2).
(b) Remove any paper from ADF mechanism.
4. Lower the ADF cover (1).
5. Press the STOP button to restore the scanning head to the correct position.
NOTE
You can also refer to the instructions on how to clear paper jams by pressing
the ?HELP key on the control panel while the error message is displayed.
NOTE
If it does not remove easily, do not use excessive force.
2
1
Troubleshooting > 122
I
N
THE
PRINTER
SECTION
...
1. If a sheet is well advanced out of the top of the printer, simply grip it and pull gently
to draw it fully out. If it does not remove easily, do not use excessive force. It can be
removed from the rear later.
2. Gently raise the scanner.
3. Press the cover release (a) and open the top cover (b) fully.
4. Holding it by its handles, lift the image drum assembly, complete with the toner
cartridges, up and out of the printer.
WARNING!
If the MFP has been powered on, the fuser will be hot. This area is
clearly labelled. Do not touch.
a
b
Troubleshooting > 123
5. Put the assembly down gently onto a piece of paper to prevent toner from marking
your furniture and to avoid damaging the green drum surface, and cover.
CAUTION!
The green image drum surface at the base of the Image Drum is
very delicate and light sensitive. Do not touch it and do not expose
it to normal room light for more than 5 minutes. If the drum unit
needs to be out of the printer for longer than this, please wrap the
cartridge inside a black plastic bag to keep it away from light.
Never expose the drum to direct sunlight or very bright room
lighting.
Troubleshooting > 124
6. Look into the printer to check whether any sheets of paper are visible on any part of
the belt unit.
(a) To remove a sheet with its leading edge at the front of the belt (a), lift the
plastic guard (e) at the front of the printer, then carefully lift the sheet from the
belt and pull it forwards into the internal drum cavity and withdraw the sheet.
(b) To remove a sheet from the central area of the belt (b), carefully separate the
sheet from the belt surface and withdraw the sheet.
(c) To remove a sheet just entering the fuser (c), separate the trailing edge of the
sheet from the belt, push the fuser pressure release lever (d) towards the front
and down to release the fuser’s grip on the sheet, and withdraw the sheet
CAUTION!
Do not use any sharp or abrasive objects to separate sheets from
the belt. This may damage the belt surface.
d
e
c
b
a
2
1
Troubleshooting > 125
through the drum cavity area. Then allow the pressure release lever to rise
again.
(d) To remove a sheet in the fuser, move the two retaining levers (e) towards the
front of the machine to release the fuser. Withdraw the fuser unit using the
handle (f).
(e) Press release lever (g) and pull the trapped paper from the fuser.
(f) Replace fuser unit into the machine and move locking levers (e) toward the rear
of the machine.
NOTE
If the sheet is well advanced into the fuser (only a short length is still visible),
do not attempt to pull it back.
d
f
e
e
g
e
e
Troubleshooting > 126
7. If you were duplex printing when the jam occurred, check the duplex paper path:
(a) Pull the locking levers at each side of the transfer belt up and towards the front
of the machine.
(b) Using the locking levers (a), lift the belt (b) upwards and withdraw from the
machine.
(c) Look into the printer to check whether any sheets of paper are visible on any
part of the paper path. Pull out any sheets found in this area.
(d) Lower the belt unit into place, with the drive gear towards the rear of the printer.
Locate the drive gear into the gear inside the printer by the rear right corner of
the unit, and lower the belt unit flat inside the printer.
(e) Push the locking levers towards the rear of the machine. This will secure the belt
unit in place.
b
a
a
Troubleshooting > 127
8. Holding the image drum assembly by its handles, lower it into place in the machine,
locating the pegs at the sides into their slots in the sides of the printer cavity.
9. Lower the top cover but do not press down to latch it closed yet. This will protect the
drum from excessive exposure to room lighting while you check the remaining areas
for jammed sheets.
10. Open the rear exit tray (h) and check for a sheet of paper in the rear path area (i).
> Pull out any sheets found in this area.
> If the sheet is low down in this area and difficult to remove, it is probably still
gripped by the fuser. In this case raise the top cover, reach around and press
down on the fuser pressure release lever (d).
11. If you are not using the rear exit tray, close it once any paper has been removed
from this area.
h
i
d
Troubleshooting > 128
12. Pull out the paper tray and ensure that all paper is stacked properly, is undamaged,
and that the paper guides are properly positioned against the edges of the paper
stack. When satisfied, replace the tray.
13. Close the top cover and press down firmly so that the cover latches closed.
14. Gently lower the scanner.
When the jam has been cleared, if Jam Recovery is enabled in the Printer Adjust menu,
the MFP will attempt to reprint any pages lost due to paper jams (see “Jam Recovery:” on
page 151).
Troubleshooting > 129
D
EALING
WITH
UNSATISFACTORY
PRINTING
SYMPTOMS POSSIBLE CAUSES STEPS TO TAKE
Vertical white lines can
be seen on the printed
page.
The LED head is dirty. Wipe the LED head with a soft,
lint-free cloth.
The toner is low. Open the top cover and tap the
cartridge a few times to evenly
distribute any remaining toner. If
symptoms persist, replace the
toner cartridge.
Foreign materials may be
present in the image drum.
Replace the image drum
cartridge.
Light-shielding film of the
image drum cartridge is dirty.
Wipe the film with a soft, lint-
free cloth.
Printed images are
fading vertically.
The LED head is dirty. Wipe the LED head with a soft,
lint-free cloth.
The toner is low. Open the top cover and tap the
cartridge a few times to evenly
distribute any remaining toner. If
symptoms persist, replace the
toner cartridge.
The paper is not suitable for
the printer unit.
Use recommended paper.
Printing is light. The toner cartridge is not
properly seated.
Reinstall the toner cartridge.
The toner is low. Open the top cover and tap the
cartridge a few times to evenly
distribute any remaining toner. If
symptoms persist, replace the
toner cartridge.
The paper is moist. Use paper stored in proper
temperature and humidity
conditions.
The paper is not suitable for
the printer unit.
Use recommended paper.
Thickness and type of paper
are inappropriate.
Set the correct value of media
type and media weight in the
Media menu or set one value
thicker for media weight.
Recycled paper is being used. Set one value thicker for media
weight in the Media menu.
Partially faded images.
White spots and lines
appear in solid
printing.
Paper is moist or dry. Use paper stored in proper
temperature and humidity
conditions.
Vertical lines appear. The image drum cartridge is
damaged.
Replace the image drum
cartridge.
The toner is low. Open the top cover and tap the
cartridge a few times to evenly
distribute any remaining toner. If
symptoms persist, replace the
toner cartridge.
Troubleshooting > 130
D
EALING
WITH
UNSATISFACTORY
COPYING
As well as the suggestions provided in “Dealing with unsatisfactory printing” on page 129,
ensure that the scanner unit glass is clean at all times. Refer to “Cleaning” on page 108.
Horizontal Lines and
spots appear
periodically.
When the interval is about
94mm (4in), the image drum
(the green tube) is damaged
or dirty.
Wipe it lightly with a soft cloth.
Replace the image drum
cartridge when it is damaged.
When the interval is about
30mm (1.2in), there may be
foreign particles in the image
drum cartridge.
Open/close the top cover, and
print again.
When the interval is about
86mm (3.4in), the fuser unit
is damaged.
Replace the fuser unit.
The image drum cartridge
has been exposed to light.
Replace the image drum
cartridge if the problem is not
resolved.
White area of paper is
lightly stained.
Paper contains static. Use paper stored in proper
temperature and humidity
conditions.
Too thick paper is used. Use thinner paper.
The toner is low. Open the top cover and tap the
cartridge a few times to evenly
distribute any remaining toner. If
symptoms persist, replace the
toner cartridge.
Periphery of the letters
is smudged.
The LED head is dirty. Wipe the LED head with a soft,
lint-free cloth.
Toner comes off when
it is rubbed.
The thickness and type of the
paper are incorrectly set.
Set the correct value of media
type and media weight in the
Media menu or set one value
lighter for media weight.
Recycled paper is used. Set one value thicker for media
weight in the Media menu.
Glossiness is not
uniform.
The thickness and type of the
paper are incorrectly set.
Set the correct value of media
type and media weight in the
Media menu or set one value
lighter for media weight.
SYMPTOMS POSSIBLE CAUSES STEPS TO TAKE
Troubleshooting > 131
F
AX
PROBLEM
CHECKLIST
(e-STUDIO223CS
AND
e-STUDIO263CS)
If a problem occurs, read through the list of problems and solutions before calling for
service.
The machine will not dial a telephone number: Check the power cable and wall outlet.
Make sure that the telephone line (not external telephone or handset) is connected to the
LINE socket on the back of the machine. If an external telephone is installed, lift the
handset and check for a dial tone. If there is no dial tone, there may be a problem with the
telephone line. If there is a dial tone, the machine may be using the wrong dialling method
(pulse or tone) for the region. If alternating tones are heard instead of dialling pulses and
the region uses pulse dialling, change the call parameters (“MF(Tone)/DP(Pulse)” on
page 163).
The display shows a communications error: This indicates any of a number of
problems.
> The machine may be incompatible with the remote machine, or the remote machine
may not be able to perform the function requested of it such as polling or
confidential faxing.
> The remote machine may also be out of paper or experiencing a paper jam.
> Bad telephone line conditions can also cause communication errors. Try sending the
fax again and check to make sure that the correct telephone number is being dialled.
> If a prefix number must be dialled to get an outside line, or if the call is to an
international destination, a pause may need to be entered after the dial prefix or
international dialling code to tell the machine to wait for a dial tone. If there are
frequent problems communicating with a particular remote machine, try
programming the number into a speed dial key, and then change the parameters for
that key.
> Lastly, either the local or remote machine may require servicing. Try sending a fax to
another location to check the local machine.
Faxing is possible but the image of the document printed by the remote machine
is very poor: If the faxed document has small type, complex illustrations, photos, or is
very light or very dark, try changing the fax density settings (see “Density” on page 146).
Copy the document on the machine to determine how it will transmit. The problem may be
caused by telephone line interference. Try sending the document again later.
Fax sent but received message was completely blank: Make sure that the document
is loaded correctly before faxing; with text face UP in the ADF or face DOWN on the glass.
Image of received fax is very poor: Try making a copy of a document on the local
machine to make sure it is working properly. If there is still a problem, contact the person
sending the fax and ask them to change their fax quality and density settings. Ask the
person to make a copy of the document on their machine to ensure that it is working
properly. Then ask them to send the fax again.
Dialling was tried with a Speed Dial/Group Dial number but nothing happened:
Make sure that the Speed Dial number being used is programmed correctly.
Documents received are light or have vertical streaks on them, and machine is not
out of toner: Gently wipe the lens surface of the MFP's LED array, and then check to see
if the machine is working properly (see “...the LED head” on page 108). Then check to see
if the toner or image drum need replacing (see “Replacing consumable items” on page 98).
Machine is set for delayed transmission but it did not send: Check the display to
make sure that the MFP is set to the correct time and date (see “Time Setup” on page 163).
MFP will not poll a remote machine.: Call the person at the remote machine and make
sure that they have loaded documents and that their machine is set to polling transmission
mode.
Troubleshooting > 132
Machine is connected to a PBX but it is not possible to dial out: Be certain that the
dial prefix is entered before the telephone number for each number dialled or programmed
into the machine. Additionally, the machine must be programmed for PBX operation before
it will work with a PBX (refer to the Configuration Guide for details).
Machine always answers before it’s possible to use the external telephone: If an
external telephone is connected, increase the machine’s ring response setting (see “Ring
Response” on page 147).
Faxes received sometimes look distorted: If the document received is wider or longer
than the paper loaded in the paper tray, the machine automatically reduces the width or
length of the document so that it will fit on the paper. This type of problem could also be
communication related.
Specifications > 133
S
PECIFICATIONS
e-STUDIO222CS - FC-222CS
e-STUDIO223CS - FC-223CS
e-STUDIO263CS - FC-263CS
ITEM SPECIFICATION
e-STUDIO222CS e-STUDIO223CS e-STUDIO263CS
Dimensions 427 x 509 x 445mm (W x D x H)
Weight 29Kg approx.
Power supply 220 to 240VAC (range 198 to 264 VAC)
Power consumption
Sleep: <1.2 W <1.5 W
Power saving: < 20 W
Stand-by: 100 W
Operating (Average): 500 W 570 W
Operating (Max.): 1170 W
Operating environment Operating 10 to 32 °C/20 to 80% RH
(optimum 25 °C wet, 2 °C dry)
Idle: 0 to 43 °C/10 to 90% RH
(optimum 26.8 °C wet, 2 °C dry)
Print environment Colour 17 to 27 °C @ 50 to 70% RH
Noise (Sound pressure level)
Operating:
Print
Copy
52dB(A)
54dB(A)
54dB(A)
55.5dB(A)
Standby:
Power saving:
Inaudible
Inaudible
Appendix A - menu system > 134
A
PPENDIX
A -
MENU
SYSTEM
The top-level function menus are:
> Reports
> Paper Setup
> Address Book
> Phone Book
> Profile
> Network Scan Destination
> Store Document Settings
> View Information
> Shutdown
> Easy Setup
> Admin Setup
The menu trees are given to the lowest menu item level. Typically, this can be a parameter
that can be set by selecting from a range of values provided or a command that can be
executed to display or print a status or setting value.
Appendix A - menu system > 135
R
EPORTS
ITEM OPTION OPTION/DESCRIPTION
Configuration Yes, No Prints out a report of the machine’s
configuration
System File List Yes, No Prints out a file list
Demo Page 01:Demo_Page Yes, No Prints a
Demonstration page
Error Log Yes, No Prints out an error log
MFP Usage Yes, No Prints a full report of the machine usage.
Network
Information
Yes, No Prints out a report of the Network
configuration
Fax
a
a. e-STUDIO223CS and e-STUDIO263CS only.
Speed Dial List Enter the Admin
Password
Yes, No Prints the list of fax
numbers registered
for speed dials.
Group List Enter the Admin
Password
Yes, No Prints the list of fax
numbers registered
under groups.
Fax Tx/Rx Log Enter the Admin
Password
Yes, No Prints the list of the
communication
results for the latest
100 fax jobs
received or sent.
Fcode Box List Yes, No Prints the list of fcode boxes.
Block Junk Fax Yes, No Prints the list of blocked senders.
E-mail/Internet Fax Journal Report Enter the Admin
Password
Yes, No Prints the results of
the latest 50
Internet Fax jobs.
Address Book Enter the Admin
Password
Yes, No Prints the registered
address list.
Print PCL Font List Yes, No Prints the list of PCL font samples.
PSE Font List Yes, No Prints the list of PostScript font samples.
PPR Font List Yes, No Prints the list of IBM PPR font samples.
FX Font List Yes, No Prints the list of EPSON FX font samples.
Color Tuning
Pattern
Yes, No Prints a color tuning pattern for adjusting
gradation characteristics.
Color Profile List Yes, No Prints the list of colour profiles.
Appendix A - menu system > 136
P
APER
SETUP
ITEM OPTION OPTION/DESCRIPTION
Tray 1 Paper Size A4/A5/A6/B5/
Letter/Legal13/
Legal13.5/Legal14/
Executive/
16K(184x260mm)/
16K(195x270mm)/
16K(197x273mm)/
Custom
Sets paper in Tray 1.
Custom Width:
105~210~216mm
Length:
148~297~356mm
Enter paper width and length.
Media Type Plain/Letter Head/
Bond/Recycled/Card
Stock/Rough/Glossy
Select the type of media loaded in this tray.
This will help the MFP to adjust its internal
operating parameters, such as engine
speed and fusing temperature, to better
accommodate the media to be fed. For
example, letterhead may benefit from a
slightly lower fusing temperature to ensure
that its ink does not offset.
Media Weight Light/Medium Light/
Medium/Heavy/
Ultra Heavy1
Adjusts the MFP for the weight of paper
stock loaded in this tray.
Tray 2 Paper Size A4/A5/B5/Letter/
Legal13/Legal13.5/
Legal14/Executive/
16K(184x260mm)/
16K(195x270mm)/
16K(197x273mm)/
Custom
Sets paper in Tray 2.
Custom Width:
148~210~216mm
Length:
210~297~356mm
Enter paper width and length.
Media Type Plain/Letter Head/
Bond/Recycled/Card
Stock/Rough/Glossy
Select the type of media loaded in this tray.
This will help the MFP to adjust its internal
operating parameters, such as engine
speed and fusing temperature, to better
accommodate the media to be fed. For
example, letterhead may benefit from a
slightly lower fusing temperature to ensure
that its ink does not offset.
Media Weight Light/Medium Light/
Medium/Heavy/
Ultra Heavy1
Adjusts the MFP for the weight of paper
stock loaded in this tray.
Appendix A - menu system > 137
MP Tray Paper Size A4/A5/A6/B5/
Letter/Legal13/
Legal13.5/Legal14/
Executive/
16K(184x260mm)/
16K(195x270mm)/
16K(197x273mm)/
Custom/COM-9
Envelope/COM-10
Envelope/Monarch
Envelope/DL
Envelope/C5
Envelope/Index
Card
Select the size of paper to be fed from the
multi purpose tray.
Custom Width:
64~210~216mm
Length:
127~297~1321mm
Enter paper width and length.
Media Type Plain/Letter Head/
Labels/Bond/
Recycled/Card
Stock/Rough/Glossy
Select the type of media to be fed from the
multi purpose tray so that the MFP can
adjust its internal parameters to better
accommodate the selected type of media.
Media Weight Light/Medium Light/
Medium/Heavy/
Ultra Heavy1/Ultra
Heavy2
Select the media weight to be fed from the
multi purpose tray.
Select Tray
Fax
a
Tray 1: ON/OFF/ON(Prior) Fax: Set tray for
received Fax.
Tray usage, priority
given to trays set to
ON(Prior), then ON.
If tray is set to OFF,
it will not be used.
Tray 2: ON/OFF/ON(Prior)
MP Tray: ON/OFF/ON(Prior)
Copy Tray 1: ON/OFF/ON(Prior) Copy: Set tray for
copy jobs.
If Tray Selection is
set to “Auto”: Tray
usage, priority
given to trays set to
ON, then ON(Prior).
If tray is set to OFF,
it will not be used.
Tray 2: ON/OFF/ON(Prior)
MP Tray: ON/OFF/ON(Prior)
a. e-STUDIO223CS and e-STUDIO263CS only.
ITEM OPTION OPTION/DESCRIPTION
Appendix A - menu system > 138
A
DDRESS
BOOK
ITEM OPTION OPTION/DESCRIPTION
E-mail Address Select an address number.
Max. 100 entries.
Register Name user defined Enter a name for the e-mail address entry.
Max. 16 characters.
E-mail Address user defined Enter the e-mail address.
Max. 80 digits.
Group No. Add to a registered group.
Edit Edit settings. Refer to options above for
details.
Delete Yes, No Delete entry.
Sort By Name Sort list of entries by name.
Sort By Number Sort list of entries by number.
E-mail Group Select a group number.
Max. 20 group entries.
Register Name user defined Enter a name for the e-mail group entry.
Max. 16 characters.
Address No. Select and assign addresses from resultant
list.
Max. 100 entries can be register to a group.
Edit Edit settings. Refer to options above for
details.
Delete Yes, No Delete entry.
Sort By Name Sort list of entries by name.
Sort By Number Sort list of entries by number.
Appendix A - menu system > 139
P
HONE
BOOK
NOTE
e-STUDIO223CS and e-STUDIO263CS only.
ITEM OPTION OPTION/DESCRIPTION
Speed Dial Select a speed dial number.
Max. 100 speed dial entries.
Register Name user defined Enter a name for the speed dial entry.
Max. 24 characters.
Fax Number user defined Enter the fax number for the speed dial
entry.
Max. 40 digits.
Group No. Add to a registered group.
Edit Edit settings. Refer to options above for
details.
Delete Yes, No Delete entry.
Sort By Name Sort list of entries by name.
Sort By Number Sort list of entries by number.
Group No. Select a group number.
Max. 20 group entries.
Register Name user defined Enter a name for the group dial entry.
Max. 16 characters.
Speed Dial Select and assign speed dial entries from
resultant list.
Max. 100 entries can be register to a group.
Edit Edit settings. Refer to options above for
details.
Delete Yes, No Delete entry.
Sort By Name Sort list of entries by name.
Sort By Number Sort list of entries by number.
Appendix A - menu system > 140
P
ROFILE
ITEM OPTION VALUE/DESCRIPTION
No. Select a profile number.
Register Profile Name user defined Sets a profile name.
Max. 16 characters.
Protocol CIFS, FTP, HTTP Selects a protocol to use for storing files.
Target URL user defined Sets a server address and a directory to store the
scanned data.
Max. 144 characters.
Port No. 1 ~ 445 ~65535 Sets a port number.
PASV Mode OFF Sets whether to use the FTP Passive mode.
Display condition: Protocol set to FTP.
User Name user defined Sets a user name to use for logging onto the
server.
Max. 32 characters.
Password user defined Sets a password to use when logging onto the
server.
Max. 32 characters.
CIFS Character
Set
UFT-16, ASCII Sets a character set to use in CIFS.
Display condition: CIFS is set as a protocol.
Encode
Communication
None Selects an encryption method for communication.
Not available when using CIFS protocol. Choices
vary depending on the protocol selected.
Scan Size A4, A5, A6, B5,
Letter, Legal 13,
Legal 13.5, Legal 14,
Executive
Selects a scan size.
Image Settings Density 0 Sets the density of
images.
Document Type Text&Photo Sets the image quality.
Background Removal 3 Sets the default setup of
the background removal.
Resolution 200dpi Selects a resolution.
Contrast 0 Sets the contrast.
Hue 0 Sets the red-green colour
balance.
Saturation 0 Sets the colour saturation.
RGB R:[0], G:[0], B:[0] Sets the RGB contrast.
File Name user defined Sets a file name. Max. 64 characters.
The following options can be set as the default file
name:
#n: adding a serial number from 00000 to 99999
#d: adding the date of a file creation
(yymmddhhmmss)
Greyscale OFF, ON Select ON to print in grayscale.
Appendix A - menu system > 141
Register
(cont.)
File Format Color PDF, TIFF, JPEG,
XPS
Sets a file format for
scanning.
Mono (Greyscale) PDF, TIFF, JPEG,
XPS
Mono (Binary) PDF, TIFF, XPS
Encrypted PDF Not Encrypt Encryption disabled.
Encrypt Low, Medium, High Set encryption level.
Also enable/disable
document open and
permissions passwords.
Compression Rate Color High, Medium, Low Sets a compression rate
for scanning.
Mono (Greyscale) High, Medium, Low
Mono (Binary) High, Medium, Raw
Edge Erase OFF Sets whether to erase the
edge shadow created in
the surrounding of 2-page
spread documents.
ON Width:
5 mm
Sets an erasing width.
Range: 5 to 50 mm.
Edit Edit profile settings. Refer to options above for
details.
Delete Yes, No Delete profile.
Sort By
Name
Sort list of entries by name.
Sort By
Number
Sort list of entries by number.
ITEM OPTION VALUE/DESCRIPTION
Appendix A - menu system > 142
N
ETWORK
SCAN
DESTINATION
S
TORE
DOCUMENT
SETTINGS
ITEM OPTION OPTION/DESCRIPTION
No. Select a destination number.
Register Destination user defined Sets a destination name.
Max. 16 characters.
Destination
Address
user defined Sets a destination sddress.
Max. 16 characters.
Port No. 9968 Sets a port number.
Available range: 1 to 65535.
Edit Destination Edit destination name.
Destination Address Edit destination address.
Port No. Edit port no.
Delete Yes, No Deletes destination.
Sort By Name Sort list of entries by name.
Sort By Number Sort list of entries by number.
ITEM OPTION OPTION/DESCRIPTION
Store Fcode Bulletin
Board
Over Write Stores documents in a bulletin box.
Delete Fcode Bulletin Board Deletes accumulated documents.
Received Documents
Print Fcode Box Prints accumulated documents.
Reserved Tx Doc.
Received Documents
Appendix A - menu system > 143
V
IEW
INFORMATION
S
HUTDOWN
ITEM OPTION OPTION/DESCRIPTION
System
Information
Serial No.
Asset No.
Lot No.
CU Version
PU Version
Scanner Version
Total Me mo r y
Flash Memory
SD Memory Card
a
a. e-STUDIO263CS only.
Displays system information
Network
IPv4 Address
b
Subnet Mask
b
Gateway Address
b
MAC Address
NIC Program Version
IPv6 Address (Local)
c
IPv6 Address (Global)
c
b. Appears only when the "TCP/IP" setting is "Enable" and the "IP Version" setting is "IPv4".
c. Appears only when the "TCP/IP" setting is "Enable" and the "IP Version" setting is "IPv6".
Displays network information
ITEM OPTION OPTION/DESCRIPTION
Shutdown Yes, No Select Yes to perform a controlled shutdown
of the MFP, ensuring that all files on the
internal hard disk are closed before power is
turned off. Only power the MFP off when the
display indicates that shutdown is complete.
Appendix A - menu system > 144
E
ASY
SETUP
NOTE
The Easy Setup menu is blocked by the Admin password.
ITEM OPTION OPTION/DESCRIPTION
Date/Time Setting user defined Using the arrow keys, select your time zone,
in relation to GMT, from the list. Press OK to
continue.
Not Summer
Time
Now Summer
Time
Manual Day
Month
Year
Using the keypad
and arrow keys,
enter the correct
date and time.
Hour
Minute
Second
Server Set Address of SNTP
Server (Primary)
user defined
Set SNTP Server
(Secondary)
Fax Setting
a
Fax Number user defined Using the keypad and on screen options,
enter the fax number of this machine.
Sender ID user defined Using the arrow keys and on screen
keyboard, enter the sender ID.
Network Setting Manual
Auto
IP Address Specifies whether IP address allocation is
automatic (DHCP) or manually assigned.
Display condition: TCP/IP protocol must be
enabled.
Subnet Mask Current assigned subnet mask.
To change, enter the address using the
keypad. Press OK to register new address.
Display condition: TCP/IP protocol must be
enabled.
Default Gateway Current assigned gateway address.
To change, proceed as above.
Display condition: TCP/IP protocol must be
enabled.
DNS Server
(Primary)
Current assigned DNS server (primary).
DNS Server
(Secondary)
Current assigned DNS server (secondary).
WINS Server
(Primary)
Current assigned WINS server (primary).
WINS Server
(Secondary)
Current assigned WINS server (secondary).
Appendix A - menu system > 145
A
DMIN
SETUP
E-mail Setting Set IP Address of
Mail Server
user defined Enter the IP address of the mail server.
From user defined Enter the sender’s address
No Authentication Set the
authentication
method.
SMTP Auth User Name
Password
POP Before SMTP Set Address of
POP3 Server
User Name
Password
a. e-STUDIO223CS and e-STUDIO263CS only.
NOTE
The Admin Setup option is blocked by a password.
ITEM OPTION DEFAULT VALUE/DESCRIPTION
Copy Setup Default Settings Scan size A4 Refer to Advanced
operation” on page 44
for further details.
Duplex Document ->
Bind Position
OFF(Simplex)
Zoom 100%
Sort ON
Image Settings
Density :
Document Type :
Scan Resolution :
Background Removal :
Contrast :
Hue :
Saturation :
RGB :
0
Text&Photo
Normal
3
0
0
0
R:0/G:0/B:0
Direction Portrait
ID Card Copy OFF
Continue Scan OFF
Mixed Size OFF
Margin OFF
Edge Erase OFF
ITEM OPTION OPTION/DESCRIPTION
Appendix A - menu system > 146
Fax Setup
a
Default Settings Resolution Normal Refer to “Advanced
operation” on page 74
for further details.
Density 0
Scan Size A4
Continue Scan OFF
TTI ON
Transmit Confirmation
Report
OFF
Memory Tx ON
Fcode Box
Register Confidential Box
Box Name
Sub-Address
Hold Time
I.D.Code
user defined
user defined
0
user defined
Confidential Box:
received data
cannotbe printed
without entering ID
code (for secret
documents).
You can also enter a
Box Name, Password
and specify the hold
time for your secure
box.
Range: 00 - 31
Bulletin Box
Box Name
Sub-Address
user defined
user defined
Bulletin Box: Enable
to transmit/receive
documents to/from
Bulletin.
Edit Edit settings. Refer to options above for
details.
Delete Yes, No Delete entry.
Security
Function
ID Check Tx OFF Check and match the
last four digits of the
destination fax
numbers with those
registered in the
target. If ON, the MFP
will send only when
they match.
Broadcast Destination ON Fax number
confirmation screen
displays before
sending the fax.
Confirm Dial OFF When ON, you will be
asked to reenter the
destination fax
number.
The fax will only be
sent when the two
numbers match.
ITEM OPTION DEFAULT VALUE/DESCRIPTION
Appendix A - menu system > 147
Fax Setup
a
(cont.)
Other Settings Redial Tries 2 time(s) Set the number of
redial attempts.
Range: 0 - 10 time(s)
Redial Interval 1 minute(s) Set the time between
redial attempts.
Range: 0 - 5
minute(s)
Forced Memory Rx
Setting
I.D.Code
OFF
user defined
Block Junk Fax
Setting
Registered List
OFF
select from list
Can prevent
unnecessary fax
reception.
Ring Response 1 Ring Enter the number of
rings required before
receiving an incoming
fax.
Dialling Pause Duration 2 second(s) Enter the pause
duration required.
Range: 0 - 10
second(s)
Rx Reduc. Rate Auto Select the Rx
reduction rate.
Reduc. Margin 24 mm Select the reduction
margin.
Range: 1 - 100 mm
ECM Mode ON Error correction mode
(ECM) automatically
detects and corrects
errors in the fax
transmission process
that are sometimes
caused by telephone
line noise.
Prefix user defined Enter the require
dialing prefix (if you
are connected via a
PBX then you need to
enter a prefix to
obtain an outside line
connection).
Received Time Stamp OFF Set to ON if you want
the time stamp
printed on incoming
faxes.
Print Check Message ON If enabled, when a
transmission error
occurs the error
content is reported.
ITEM OPTION DEFAULT VALUE/DESCRIPTION
Appendix A - menu system > 148
Fax Setup
a
(cont.)
Fax Setting Service Bit OFF
Country Code International Select the country in
which the MFP is
situated.
H/Modem Rate (For Tx) 33.6 Kbps Specify modem rate.
H/Modem Rate (For Rx) 33.6 Kbps Specify modem rate.
PBX Line OFF
Forwarding Setting OFF
TAD Mode Type 3 Specify TAD mode
type.
Tel Priority Mode OFF
CNG Detection OFF
T/F Timer Programming 20 seconds
Soft Ringer Volume High Select volume level.
Remote Receive Number OFF
Internet Fax
Setup
Default Settings Scan Size A4 Refer to Advanced
operation” on page 91
for further details.
Density 0
Resolution Normal
Background Removal 3
Continue Scan OFF
Compression Rate Low
Scanner
Setup
Default Settings Scan Size A4 Allows you to select
the scan size.
Image Settings
Density :
Document Type :
Background Removal :
Resolution :
Contrast :
Hue :
Saturation :
RGB :
0
Text&Photo
3
200dpi
0
0
0
R:0/G:0/B:0
Allows you to adjust
image settings.
Continue Scan OFF Allows you to continue
scanning more
documents. Allows
you to construct a
single scan job from
multiple individual
sheets or originals.
Greyscale OFF Select ON to print in
grayscale.
File Format
Color:
Greyscale:
Mono:
PDF
PDF
PDF
Select the appropriate
file format.
ITEM OPTION DEFAULT VALUE/DESCRIPTION
Appendix A - menu system > 149
Scanner
Setup (cont.)
Default Settings
(cont.)
Encrypted PDF Setting
Document Open
Password:
Permissions Password:
Display Default
Password:
user defined
user defined
Disable
Set the encryption
passwords and display
option.
Compression Rate
Color:
Greyscale:
Mono:
Low
Low
High
Select the appropriate
compression level.
Edge Erase OFF Input range: 5 to
50mm.
E-mail Setup
File Name user defined
Tem p late E d it Su b ject
Edit Body
Select template from list
From / Reply To From:
Address Book
Select e-mail address
from the address
book.
Direct Input Enter e-mail address
using the on-screen
keyboard.
LDAP Simple Search Use the on-screen
keyboard to enter a
search value.
Advanced Search
Search Method
User Name
E-mail Address
Use Advanced Search
to search the LDAP
address book by user
name and/or
e-mail address.
Reply To: user defined
Broadcast
Destination
ON
MDN Response OFF
A/R Full Print OFF
MCF Report OFF Select ON to print a
fax confirmation after
transmission.
Timeout of MCF
Report
15 minutes
Print Check
Message
OFF If enabled, when a
transmission error
occurs the error
content is reported.
ITEM OPTION DEFAULT VALUE/DESCRIPTION
Appendix A - menu system > 150
Scanner
Setup (cont.)
USB Memory
Setup
File Name user defined Max. 64 characters.
#n:Assigns a
consecutive number
as the file name.
#d:Assigns a created
date and time
(YYMMDDHHMMSS
format) as the file
name.
TWAIN Setup Network TWAIN ON
Port No. 9967 Range: 1 - 65535
PC Scan Mode Simple Scan
Mode
Timeout Setting 5 minute(s) Range: 1 - 30
minute(s)
Scanner
Calibration
Execute Yes, No
Print From
USB Memory
Setup
Default Settings Paper Feed Tray 1(A4) Selects the default
tray for paper feed,
Tray 1 (upper), Tray 2
(lower, if installed) or
MP Tray (multi
purpose tray).
Copies 1 Enter the number of
copies of a document
to be printed.
Duplex OFF Switches the Duplex
(2 sided) function ON/
OFF.
Binding Long Edge Bind Display condition:
duplex setting is
enabled.
Fit ON Sets the printing
mode that can fit print
data in the printable
area.
Print Setup Print Menu Tray Configuration
Paper Feed:
Auto Tray Switch:
Tray Sequ ence:
MP Tray Usage:
Media Check:
Tray 1
ON
Down
Do Not Use
Enable
Adjust tray
configuration settings.
ITEM OPTION DEFAULT VALUE/DESCRIPTION
Appendix A - menu system > 151
Print Setup
(cont.)
Print Menu
(cont.)
Print Setup
Copies:
Duplex:
Binding:
Resolution:
Toner Save Mode:
Mono-Print Speed:
Orientation:
Lines Per Page:
Edit Size:
Width:
Length:
1
OFF
Long Edge Bind
600x1200dpi
OFF
Auto
Portrait
64 Line(s)
Cassette Size
210 mm
297 mm
Adjust print setup.
Printer Adjust
Manual Timout:
Wait Timeout:
Print Mode Without
Color Toner:
Jam Recovery:
Paper Black Setting:
Paper Color Setting:
SMR Setting:
BG Setting:
60 seconds
40 seconds
Alarm
Enable
0
0
0
0
Adjust general printer
settings.
Print Position Adjust
Front X Adjust:
Front Y Adjust:
Back X Adjust:
Back Y Adjust:
0.00 mm
0.00 mm
0.00 mm
0.00 mm
Range: -2.00 to
+2.00 mm
Drum Cleaning OFF Set to produce idling
of a drum before
printing in order to
reduce horizontal
white lines. This
shortens image drum
life.
Hex Dump OFF Prints out the data
received from the
host PC in hexidecimal
code.
ITEM OPTION DEFAULT VALUE/DESCRIPTION
Appendix A - menu system > 152
Print Setup
(cont.)
Color Menu Density Control Auto If set to Auto, image
density will be
automatically
adjusted at power on,
when a new image
drum or toner
cartridge is installed,
and at intervals of
100, 300 and 500
drum counts. If a 500
drum count interval
occurs during a print
job it will occur at the
end of that job, and
will take up to 55
seconds. If set to
manual, this
adjustment will only
be performed when
initiated by the next
menu item.
Adjust Density Execute Selecting this will
perform the auto
density set up
immediately.
Color Tuning/Print
Pattern
Yes, No Selecting this item
prints the colour
tuning pattern to help
you adjust the colour
balance.
Cyan Highlight 0 Adjusts image density
for each colour
component (cyan,
magenta, yellow and
black). Normal setting
is 0.
Cyan Mid-Tone 0
Cyan Dark 0
Magenta Highlight 0
Magenta Mid-Tone 0
Magenta Dark 0
Yellow Highlight 0
Yellow Mid-Tone 0
Yellow Dark 0
Black Highlight 0
Black Mid-Tone 0
Black Dark 0
Cyan Darkness 0 Adjusts darkness of
each colour (cyan,
magenta, yellow and
black). Normal setting
is 0.
Magenta Darkness 0
Yellow Darkness 0
Black Darkness 0
ITEM OPTION DEFAULT VALUE/DESCRIPTION
Appendix A - menu system > 153
Print Setup
(cont.)
Color Menu
(cont.)
Adjust Registration Execute Performs automatic
colour registration
adjustment. Normally
this is done on power
on and when the top
cover is opened and
then closed. This
process accurately
aligns the cyan,
magenta and yellow
images to the black
image.
Cyan Reg Fine Adj 0 Performs fine
adjustment of image
timing in relation to
the black image
component.
Magenta Reg Fine Adj 0
Yellow Reg Fine Adj 0
Ink Simulation OFF Selects from a range
of industry standard
colour swatches.
UCR Low Selects the limitation
of the toner layer
thickness.
If paper curl occurs in
dark printing,
selecting Medium or
Low sometimes helps
reduce curl.
CMY100% Density Disable When enabled, black
areas are produced
using 100% C, M, and
Y instead of black.
This results in a
glossier finish.
CMYK Conversion ON Setting to OFF will
simplify the
conversion process of
CMYK data, which will
reduce process time.
This setting is ignored
when Ink Simulation
function is used.
System
Configuration
Menu
Personality Auto Emulation This item selects
which industry
standard emulation
your MFP should use.
When set to Auto,
incoming data is
examined and the
correct emulation is
automatically selected
each time a print job
is received.
ITEM OPTION DEFAULT VALUE/DESCRIPTION
Appendix A - menu system > 154
Print Setup
(cont.)
System
Configuration
Menu (cont.)
Alarm Release Manual When Manual, non-
critical warnings, such
as requests for a
different paper size,
can be cleared by
pressing the RESET
button. When set to
Auto, they are cleared
when the print job
resumes.
Auto Continue OFF Determines whether
or not the MFP will
automatically recover
from a memory
overflow condition.
Error Report OFF If ON, the MFP will
print error details
when a PostScript
emulation error
occurs.
PCL Setup Font Source Resident Specifies the location
of the PCL default
font. Normally this will
be internal unless
additional fonts are
installed in the
expansion POM slot or
additional fonts have
been downloaded to
RAM as permanent
fonts.
Font No. I0 Sets the PCL font
number.
Font Pitch 10.00 CPI Sets the width of the
PCL default font.
Font Height 12.00 point(s) Sets the height of the
PCL default font.
Symbol Set PC-8 PCL symbol set. If the
font source and
number are changed
to one which does not
support the selected
symbol set, this must
be changed to an
available symbol set
for that font.
A4 Print Width 78 Column Sets the number of
columns subject to
Auto LF with A4 paper
in PCL. This is the
value when Auto CR/
LF Mode is set to OFF
with the 10CPI
character.
White Page Skip OFF Selects whether blank
pages are printed or
not.
ITEM OPTION DEFAULT VALUE/DESCRIPTION
Appendix A - menu system > 155
Print Setup
(cont.)
PCL Setup
(cont.)
CR Function CR Selects whether a
received carriage
return character
(0Dh) also causes a
line feed.
LF Function LF Selects whether a
received line feed
character (0Ah) also
causes a carriage
return.
Print Margin Normal Sets the non-printable
page area. Normal is
PCL compatible.
True B lack OFF Selects whether black
image data is printed
using black toner
(True Black ON) or
100% CMY. (Valid in
PCL emulation mode
only.)
Pen Width Adjust ON The thinnest line
width in PCL, a 1-dot
line, may look broken.
ON: when the
thinnest line width is
specified, line width is
emphasized to look
wider.
OFF: the line appears
as specified.
Tray ID#
Tray 2 :
MP Tray :
5
4
Sets the number to
specify Tray 2 and MP
Tray for the paper
feed destination
command in PCL5e
emulation.
PS Setup L1 Tray Type 1 Switches between
Postscript types.
SIDM Setup SIDM Manual ID# 2 Set up Pn specified in
MANUAL by MANUAL-
1 ID No.FX/PPR Emu
in CSF control
command (ESC EM
Pn).
SIDM Manual2 ID# 3 Set up Pn specified
MANUAL by MANUAL-
2 ID No.FX/PPR Emu
in CSF control
command(ESC EM
Pn).
SIDM MP Tray ID# 4 Set up Pn specified
TRAYO(MP Tray) by
MP Tray ID No.FX/PPR
Emu in CSF control
command(ESC EM
Pn).
ITEM OPTION DEFAULT VALUE/DESCRIPTION
Appendix A - menu system > 156
Print Setup
(cont.)
SIDM Setup
(cont.)
SIDM Tray1 ID# 1 Set up Pn specified
TRAY 1by Tray 1 ID
No.FX/PPR Emu in
CSF control
command(ESC EM
Pn).
SIDM Tray2 ID# 5 Set up Pn specified
TRAY 2 by Tray 2 ID
No.FX/PPR Emu in
CSF control command
(ESC EM Pn).
IBM PPR Setup Character Pitch 10 CPI Specifies character
pitch in IBM PPR
emulation.
Font Condense 12CPI to 20CPI Specifies 12CPI pitch
for Condense Mode.
Character Set SET-2 Specifies a character
set.
Symbol Set IBM-437 Specifies a symbol
set.
Letter O Style Disable Specifies the style
that replaces 9BH
with letter o and 9DH
with a zero
Zero Character Normal Sets the zero to be
slashed or unslashed.
Line Pitch 6 LPI Specifies the line
spacing.
White Page Skip OFF Selects whether blank
pages are printed or
not.
CR Function CR Selects whether a
received carriage
return character
(0Dh) also causes a
line feed.
LF Function LF Selects whether a
received line feed
character (0Ah) also
causes a carriage
return.
Line Length 80 Column Specifies the number
of characters per line.
Form Length 11.7 inch Specifies the length of
paper.
TOF Position 0.0 inch Specifies the distance
of print from the top
edge of the paper.
Left Margin 0.0 inch Specifies the distance
of print from the left
hand edge of the
paper.
ITEM OPTION DEFAULT VALUE/DESCRIPTION
Appendix A - menu system > 157
Print Setup
(cont.)
IBM PPR Setup
(cont.)
Fit To Letter Disable Sets the printing
mode that can fit print
data, equivalent to 11
inches (66 lines), in
the LETTER-size
printable area.
Text Heig h t Same Sets the height of a
character.
SAME: Regardless of
CPI, same height
DIFF: As CPI,
character heights
vary.
EPSON FX
Setup
Character Pitch 10 CPI Specifies character
pitch in this
emulation.
Character Set SET-2 Specifies a character
set.
Symbol Set IBM-437 Specifies a symbol
set.
Letter O Style Disable Specifies the style
that replaces 9BH
with letter o and 9DH
with a zero
Zero Character Normal Sets the zero to be
slashed or unslashed.
Line Pitch 6 LPI Specifies the line
spacing.
White Page Skip OFF Selects whether blank
pages are printed or
not.
CR Function CR Selects whether a
received carriage
return character
(0Dh) also causes a
line feed.
Line Length 80 Column Specifies the number
of characters per line.
Form Length 11.7 inch Specifies the length of
paper.
TOF Position 0.0 inch Specifies the distance
of print from the top
edge of the paper.
Left Margin 0.0 inch Specifies the distance
of print from the left
hand edge of the
paper.
Fit To Letter Disable Sets the printing
mode that can fit print
data, equivalent to 11
inches (66 lines), in
the LETTER-size
printable area.
ITEM OPTION DEFAULT VALUE/DESCRIPTION
Appendix A - menu system > 158
Print Setup
(cont.)
EPSON FX
Setup (cont.)
Text Heig h t Same Sets the height of a
character.
SAME: Regardless of
CPI, same height
DIFF: As CPI,
character heights
vary.
Network
Menu
Network Setup TCP/IP Enable Enables or disables
this network protocol.
IP Version IPv4 Set up the IP version.
Display condition:
TCP/IP protocol must
be enabled.
NetBEUI Disable Enables or disables
this network protocol.
NetBIOS Over TCP Enable Enables or disables
this network protocol.
Display condition:
TCP/IP protocol must
be enabled.
NetWare Disable Enables or disables
this network protocol.
EtherTalk Disable Enables or disables
this network protocol.
Frame Type Auto Selects the Ethernet
MAC layer frame type.
Display condition:
Netware must be
enabled.
IP Address Set Auto Specifies whether IP
address allocation is
automatic (DHCP) or
manually assigned.
Display condition:
TCP/IP protocol must
be enabled.
IPv4 Address xxx.xxx.xxx.xxx Current assigned IP
address.
To change, enter the
address using the
numerical keypad.
Press Enter to
register new address.
Display condition:
TCP/IP protocol must
be enabled.
Subnet Mask xxx.xxx.xxx.xxx Current assigned
subnet mask. To
change, proceed as
above.
Display condition:
TCP/IP protocol must
be enabled.
ITEM OPTION DEFAULT VALUE/DESCRIPTION
Appendix A - menu system > 159
Network
Menu (cont.)
Network Setup
(cont.)
Gateway Address xxx.xxx.xxx.xxx Current assigned
gateway address. To
change, proceed as
above.
Display condition:
TCP/IP protocol must
be enabled.
DNS Server (Primary) user defined The IP address of your
DNS server (primary).
DNS Server (Secondary) user defined The IP address of your
DNS server
(secondary).
WINS Server (Primary) user defined The IP address of your
WINS server
(primary).
WINS Server
(Secondary)
user defined The IP address of your
WINS server
(secondary).
Web Enable Enables or disables
web config. facility.
Display condition:
TCP/IP protocol must
be enabled.
Telnet Disable Enables or disables
Telnet config. facility.
Display condition:
TCP/IP protocol must
be enabled.
FTP Disable Enables or disables
communication via
FTP.
Display condition:
TCP/IP protocol must
be enabled.
IPSec Disable Enable via the web
page.
SNMP Enable Enables or disables
SNMP of FTP (TCP/IP
or NetWare).
Display condition:
TCP/IP protocol must
be enabled.
ITEM OPTION DEFAULT VALUE/DESCRIPTION
Appendix A - menu system > 160
Network
Menu (cont.)
Network Setup
(cont.)
Network Scale Normal Normal: Can work
effectively even when
connected to a HUB
that has a spanning
tree feature.
However, printer start
up time gets longer
when computers are
connected to two or
three small LANs.
Small: Computers can
cover from two or
three small LANs to a
large LAN, but it may
not work effectively
when it is connected
to a HUB with a
spanning tree feature.
HUB Link Setting Auto Negotiate Sets the hub linking
method.
Network PS-Protocol RAW Select PostScript data
format for the
network port.
Factory Defaults Execute Select Yes to reload
the settings present
when the unit was
setup by the
manufacturer.
Mail Server
Setup
SMTP Server user defined Set the host name for
the SMTP server.
SMTP Port 25 Set the port number.
SMTP Encryption None Select encryption
method.
POP3 Server user defined Set the IP address or
host name for the
POP3 server.
POP3 Port 110 Set the port number.
POP3 Encryption None Select encryption
method.
Authentication Method None Set the authentication
method.
SMTP User ID user defined Set a user ID for the
SMTP server.
SMTP Password user defined Set a password for the
SMTP server.
POP User ID user defined Set a user ID for the
POP3 server.
POP Password user defined Set a password for the
POP3 server.
ITEM OPTION DEFAULT VALUE/DESCRIPTION
Appendix A - menu system > 161
Network
Menu (cont.)
LDAP Server
Setting
Server Setting
LDAP Server:
Port No.:
Timeout:
Max. Entries:
Search Root:
user defined
389
30 second(s)
100 Entries
user defined
Edit the LDAP server
settings.
Attribute
Name1:
Name2:
Name3:
E-mail Address:
Additional Filter:
cn
sn
givenName
mail
user defined
Edit the LDAP search
attribute if required.
Authentication
Method: Anonymous
Set the authentication
method for LDAP.
User ID: user defined Set a user ID and
password for the
LDAP server.
Displays when
authentication
method is set.
Password: user defined
Encryption None Set the encryption
method.
Secure Protocol
Server Setting
Domain user defined Domain must be
registered in the DNS
server.
Management Default Mode Copy
Operation Clear Operation Timeout 3
Clear After Job OFF
Sound Control Key Touch Tone Volume Middle Select key touch
volume level.
Fax Buzzer Volume Middle Select volume level.
Local Interface USB Menu
Soft Reset:
Speed:
USB PS_Protocol:
Offline Receive:
Serial Number:
Disable
480Mbps
RAW
Disable
Enable
Default settings listed,
these can be changed
if required.
System Setup Access Control Disable Enable access control
to restrict usage to
authorised user only.
Unit Of Measure Millimeter Select unit of
measure.
Date Format dd/mm/yyyy Select desired date
format.
Allow All Reports To
Print
Disable Enable/disable report
printing.
Near Life LED Enable Enable/disable near
life LED.
ITEM OPTION DEFAULT VALUE/DESCRIPTION
Appendix A - menu system > 162
Management
(cont.)
System Setup
(cont.)
Status In Near Life Enable Enable: Display a
near-life warning.
Disable: Do not
display a near-life
warning.
Address Information
Lock Time Out
3 minute(s) Enter time-out
duration.
USB Memory Interface Enable Select disable to turn
off scan to USB
function.
Panel Contrast 0 Adjust the LCD panel
contrast.
Power Save Power Save Time 30 minutes Select desired time
interval before
machine enters power
save mode.
Sleep Time 10 minutes Select desired time
interval before
machine enters sleep
mode.
Silent Mode ON Enable/disable silent
mode.
ECO Mode ON When ON, if the
machine is in power
save mode and you
send a small print job
(1 or 2 pages), the
machine will print the
job without warming
the fuser to the
“normal” operating
temperature
beforehand.
Memory Setup Receive Buffer Size Auto Specify the size of the
buffer you want to use
to receive data.
Resource Save OFF Specify the size of the
buffer you want to use
for resource saving.
Storage
Maintenance
Setup
Check File System Execute Making changes will
automatically restart
the system.
Erase SD Memory Card Execute Deletion of all data
stored in the SD Card.
Data cannot be
recovered.
Initial Lock Enable Enable/disable initial
lock.
ITEM OPTION DEFAULT VALUE/DESCRIPTION
Appendix A - menu system > 163
Management
(cont.)
Encryption
Setup
Job Limitation Disable Enable/disable
limitation setting.
Language Maint
Setup
Initialize Execute Making changes will
automatically restart
the system.
Admin Password New Password user defined Enter new password.
Retype your password
when prompted to
verify.
Note: password must
be six characters or
more.
Enter Password (Verify) user defined
Reset Settings Execute Continuing will
automatically restart
the system.
Job Log Setup Save Job Log Disable
Print Statistics Supplies Report Disable Indication of
frequency of
consumable
exchange/non
indication is set.
Reset Main Counter Execute Zeros the counter.
User Install Time Setup Auto Setup
SNTP Server
(Primary):
SNTP Server
(Secondary):
user defined
user defined
Set todays date and
time automatically.
Manual
Date:
Time:
user defined
user defined
Enter todays date and
time using the
keypad. Use the arrow
keys to move between
digits.
Set Daylight Saving ON Enable/disable
daylight saving
setting.
Time Zone 00:00 Range: -12:00 to
+12:00 minutes in 15
minute increments.
Power Save Power Save Enable ON Enable/disable power
save mode.
Sleep ON Enable/disable sleep
mode.
High Humid Mode OFF If moistened paper is
curled significantly
after printing, change
the setting to ON.
Note: Moistened
paper means paper
that has been left in a
high-humidity
environment.
MF(Tone)/DP(Pulse) Tone Select the appropriate
dialling method for
the region you are in.
ITEM OPTION DEFAULT VALUE/DESCRIPTION
Appendix A - menu system > 164
User Install
(cont.)
Reception Mode Fax Ready Mode Specify the reception
mode.
DRD Type Type 1 Allows the machine to
detect a distinctive
ring if it has been
enabled on the phone
line. Refer to “DRD”
on page 85.
Dial Tone Detection OFF Enable/disable dial
tone detection.
Busy Tone Detection ON Enable/disable busy
tone detection.
TTI Register/
Edit
TTI 1:
TTI 2:
TTI 3:
user defined Register/Edit transmit
terminal identification
(TTI) settings.
Standard TTI TTI 1 Select default TTI
from the registered
list.
TTI Number user defined Enter your fax
number.
TTI Calendar Type dd/mm/yyyy Specify the TTI
calendar date format.
Super G3 ON OFF=G3,
ON=SuperG3
Erase Privacy Data Execute Continuing will delete
all settings and
registered data.
a. e-STUDIO223CS and e-STUDIO263CS only.
ITEM OPTION DEFAULT VALUE/DESCRIPTION
Index > 165
0MM10012200
I
NDEX
A
Address book
adding a group entry
........ 66
adding an email entry....... 65
deleting a group entry ...... 67
deleting an email entry..... 65
editing a group entry........ 67
editing an email entry ...... 66
B
Belt
how to replace
................ 103
C
Cleaning the LED head........ 108
D
Duplex
paper size and weight
limits
.............................. 29
E
Envelopes
loading
.............................. 33
F
Fax job view/cancel button ... 83
Fuser
how to replace
................ 106
I
Installing drivers
fax
.................................... 24
printer..........................22, 23
TWAIN .............................. 22
Installing MFP drivers and
Utilities
Setting up the ActKey
Utility
.............................. 26
Installing utilities................... 21
L
Loading documents
in the ADF
......................... 40
on the glass ...................... 42
M
Multi purpose tray
how to use
........................ 33
paper metrics ................... 29
Multi-tasking ......................... 39
O
Operation
Scan to PC (server) option.
55
Sending Document(s) via
E-mail
............................. 48
P
Paper
loading cassette trays
...... 30
loading letterhead ............ 31
recommended types......... 28
supported sheet sizes....... 28
Phone book
adding a group dial entry
.87
adding a speed dial entry .86
deleting a group dial entry87
deleting a speed dial entry87
Printer overview.................... 13
Problem checklist
fax issues
....................... 131
unsatisfactory printing.... 129
S
SD Card
how to install
.................. 115
T
Toner
how to replace
.................. 98
U
Upgrades
additional paper tray
...... 117
memory .......................... 112
SD card........................... 115
R101120J7100-TTEC
07113601 iss1
16


Need help? Post your question in this forum.

Forumrules


Report abuse

Libble takes abuse of its services very seriously. We're committed to dealing with such abuse according to the laws in your country of residence. When you submit a report, we'll investigate it and take the appropriate action. We'll get back to you only if we require additional details or have more information to share.

Product:

For example, Anti-Semitic content, racist content, or material that could result in a violent physical act.

For example, a credit card number, a personal identification number, or an unlisted home address. Note that email addresses and full names are not considered private information.

Forumrules

To achieve meaningful questions, we apply the following rules:

Register

Register getting emails for Toshiba e-STUDIO 263cs at:


You will receive an email to register for one or both of the options.


Get your user manual by e-mail

Enter your email address to receive the manual of Toshiba e-STUDIO 263cs in the language / languages: English as an attachment in your email.

The manual is 12,62 mb in size.


You will receive the manual in your email within minutes. If you have not received an email, then probably have entered the wrong email address or your mailbox is too full. In addition, it may be that your ISP may have a maximum size for emails to receive.

Others manual(s) of Toshiba e-STUDIO 263cs

Toshiba e-STUDIO 263cs User Manual - German - 183 pages

Toshiba e-STUDIO 263cs Quick start guide - Dutch - 27 pages


The manual is sent by email. Check your email

If you have not received an email with the manual within fifteen minutes, it may be that you have a entered a wrong email address or that your ISP has set a maximum size to receive email that is smaller than the size of the manual.

The email address you have provided is not correct.

Please check the email address and correct it.

Your question is posted on this page

Would you like to receive an email when new answers and questions are posted? Please enter your email address.


Info