8
Protalker PT
1 Inleidi
Hartelijk dank voor het aanschaffen van de Protalker PT-1078. Dit is een radiocommunicatieapparaa
maximaal 10 km en een laag vermogen. Er zijn geen gebruikskosten, op de minimale kosten na van het opladen van de batterijen.
De Protalker PT-1078 werkt op 8 kanalen. De rad
onderdompeling: het zal in water blijven drijven en kan gedurende 30 minuten tot 1 meter onder het wateroppervlak worden gehouden
zonder te worden beschadigd.
2 Gebruiksdoel
Het kan worden gebruikt voor verschillende recreationele doeleinden. Bijvoorbeeld om contact te hn
2 of meer voertuigen of tijdens het fietsen of skiën. Ook kunt u hiermee
3 CE-markering
De CE-markering op het toestel, de handleiding en de verpakking geeft aan dat het toestel voldoet aan de basiseisen van de
R&TTE-richtlijn 1995/5/EG.
4 V
4.1 Algemeen
Lees de onderstaande informatie over veiligheid en een correct gebruik zorgvuldig door. Raak vertrouwd met alle functies van het
toestel. Bewaar deze handleiding op een veilige plaats voor later gebruik.
4.2 Brandwonden
• Raak de antenne niet aan als de afdekking van de antenne is beschadigd, w
huid bij het zenden, kan dit leiden tot kleine brandwonden.
• Batterijen kunnen schade aan materiaal veroorzaken, bijvoorbeeld brandplekken, als geleidend materiaal (zoals
sieraden, sleutels of kralenkettingen) in aanraking komt met de blootliggende contacten. Het materiaal kan een elektrisch
circuit sluiten (kortsluiting) en erg heet worden. Hanteer opgeladen batterijen met zorg, vooral als u deze in een zak, tas
of andere houder met metalen voorwerpen plaatst.
4.3 Letsels
• Plaats het toestel niet boven een airbag of in de buurt van de plaats waar de airbag zich opblaast. Airbags worden met
veel kracht opgeblazen. Als een PMR zich bevindt in de radius van de ai
kan het toestel met grote kracht worden weggeslingerd waardoor de inzittend
• Houd de PMR ten minste 15 centimeter verwijderd van een pacemaker
• Schakel uw PMR onmiddellijk UIT in geval van interferentie met medische apparatuur
4.4 Exp
• V
batterijen kunnen contactvonken ontstaan, die een explosie kunnen veroorzaken.
• Schakel uw PMR uit wanneer u zich bevindt in een omgeving waar explosiegevaar bestaat. V
dergelijke omgeving brand of een explosie veroorzaken, met lichamelijk letsel of zelfs de dood tot gevolg.
• Gooi batterijen nooit in het vuur
4.5 V
• Houd de batterijen uit de buurt van kinderen.
4.6 Regelgevi
• In bepaalde landen is het verboden om onder het rijden uw PMR te gebruiken. Ga in dit geval aan de kant staan voordat
u het toestel gebruikt.
• Schakel uw PMR UIT aan boord van een vliegtuig wanneer u hierom wordt verzocht. Gebruik van de PMR dient in
overeenstemming te zijn met de voorschriften van de luchtvaartmaatschappij of de instructies van de bemanning.
• Schakel uw PMR UIT op plaatsen waar waarschuwingsbordjes u vragen dit te doen. Ziekenhuizen of gezondheidscentra
kunnen apparaten gebruiken die gevoelig zijn voor van buitenaf komende radiofrequentiesignalen.
• Het vervangen of wijzigen van de antenne kan de PMR-radiospecificaties beïnvloeden en inbreuk maken op de
CE-voorschriften. Niet-goedgekeurde antennes kunnen de radio ook beschadigen.
4.7 Opmerkinge
• Raak de antenne niet aan tijdens het zenden; dit kan het bereik beïnvloeden.
• V
5 Reinigi
• Reinig het toestel met een vochtige doek. Gebruik hiervoor alleen water
het toestel; deze kunnen de behuizing beschadigen en naar binnen lekken, wat kan leiden tot blijvende beschadigingen.
• Gebruik een droge, pluisvrije doek om de batterijcontacten te reinigen.
6 Het product afvoer
Na afloop van de levenscyclus van het product mag u het niet met het normale huishoudelijke afval weggooien, maar
moet u het naar een inzamelpunt brengen voor recycling van elektrische en elektronische apparatuur.
aangeduid door het symbool op het product, in de handleiding en/of op de verpakking.
Sommige materialen waaruit het product is vervaardigd, kunnen worden hergebruikt als u ze naar een inzamelpunt
brengt. Door onderdelen of grondstoffen van gebruikte producten te hergebruiken, levert u een belangrijke bijdrage
aan de bescherming van het milieu. Wend u tot de plaatselijke overheid voor meer informatie over de inzamelpunten
bij u in de buurt.
7 Een PMR-toestel gebruiken
Om met andere PMR-toestellen te kunnen communiceren, moeten deze allemaal op hetzelfde kanaal en subkanaal (CTC
zijn afgestemd en zich binnen het ontvangstbereik bevinden (tot max. 10 km in open veld). Aangezien deze toestellen vrij toegankelijke
frequentiebanden (kanalen) gebruiken, delen alle werkende toestellen dezelfde kanalen (8 kanalen in totaal – bijlage A).
Privacy is daarom niet gegarandeerd. Iedereen met een PMR die op uw
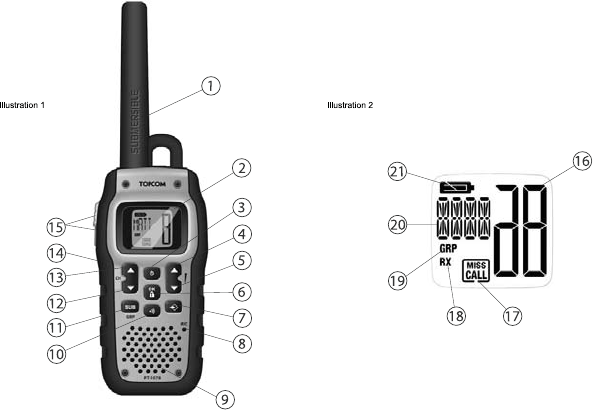
Als u wilt communiceren (een spraaksignaal uitzenden), drukt u op de PTT-toets .
Zodra deze toets wordt ingedrukt, wordt de zendmodus van hee
PMR-toestellen binnen het uitzendbereik, die op hetzelfde kanaal staan afgestemd en in de stand-bymodus (niet zenden) staan,
kunnen uw bericht horen. U moet wachten totdat uw gesprekspartner
zal het toestel een geluidssignaal laten horen als het Roger-signaal is ingeschakeld (zie hoofdstuk “13.12 Roger-pieptoon in-/
uitschakelen”). U hoeft enkel de PTT-toets in te drukken en in de microfoon te spreken om te antwoorden.
8 De verpakking bevat
• 2 x Protalker P
• 1 x Duo-oplader
• 1 x stroomadapter
• 2 x NiMH-batterij
• 2 x riemclip
• Gebruikershandleiding
• Kaart met serviceadres en hotlinenummers
9 Om te beginn
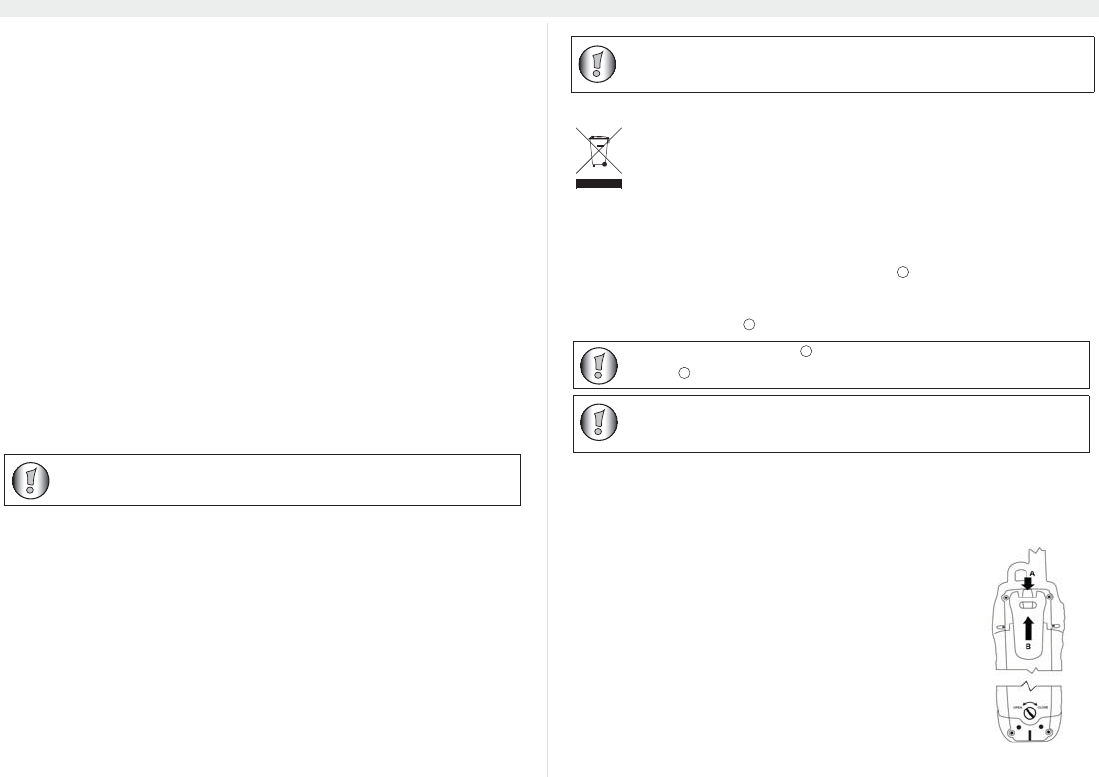
9.1 De ri
1. Druk de riemclip (B) in de richting van de antenne terwijl u het lipje van de clip
(A) naar buiten trekt, om de riemclip van het toestel te verwijderen.
2. Bij het terugplaatsen van de riemclip geeft een hoorbare klik aan dat de
riemclip op zijn plaats is vergrendeld.
9.2 De batteri
1. Open het batterijgedeelte. Gebruik een schroevendraaier
de schroef linksom te draaien.
2. Plaats de batterij. Het label op de batterij geeft de juiste positie van de batterij
aan.
3. Controleer de rubberafdichting rond het batterijvak voordat u het deksel weer
sluit. V
vreemde bestanddelen onder de afdichting aanwezig zijn.
4. Sluit het deksel van het batterijvak en draai de schroef weer vast (rechtsom).
Omgevingen waar explosiegevaar bestaat, zijn
vallen brandstoftankruimtes, zoals o
chemicaliën; omgevingen waar d
en elke andere omgeving waar u ge
Nadat uw radio in water ond
komt omdat er water is achtergebleve
overtollige water te verwijderen. Hiern
water is blootgesteld, moet u d
Als 2 of meer gebruikers de P tegelijkertijd indrukken, o
sterkste signaal, waarbij alle andere sign
PTT-toets te drukken) als het kanaal vrij is.
Het bereik van de radiogolven wor
constructies, de onregelmatigheid
tussen twee of meerdere PMR's in sommig
meters beperkt kan zijn. U zult gauw mer
obstakels tussen de gebruikers is.
Protalker PT - 1078.b