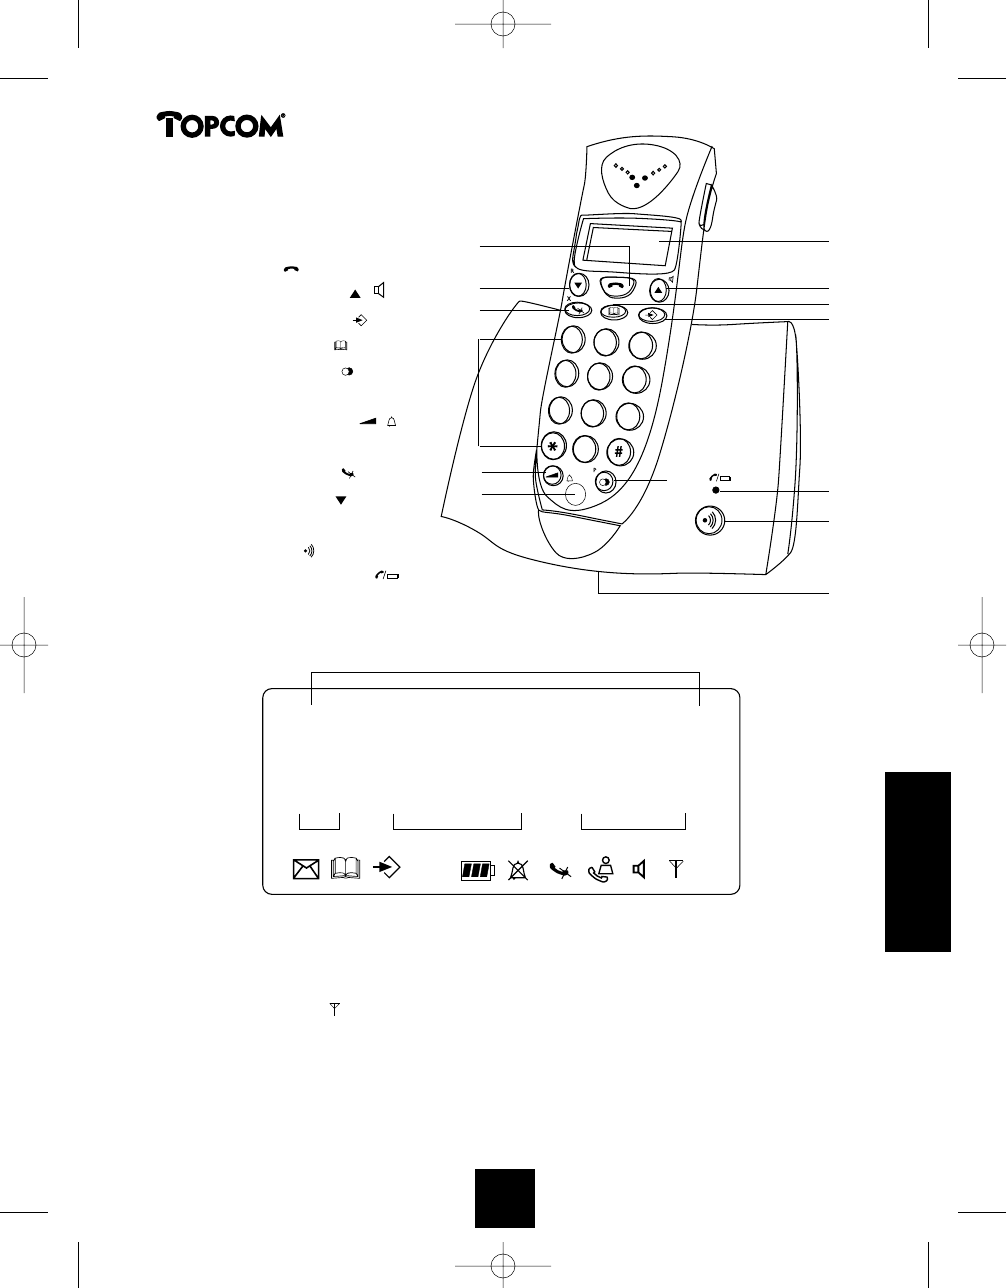
300649
68
Zoom out
Zoom in
Previous page
1/70
Next page
Handleiding
Mode d’emploi
User Guide
Butler 1010
HANDL. B1010 26-03-2001 12:08 Page 1
HANDL. B1010 26-03-2001 12:08 Page 2
Butler 1010
!! Belangrijk !!
Om de ‘Nummerweergave’ te kunnen gebruiken,
moet deze dienst geactiveerd zijn op uw telefoonlijn.
Om deze dienst te activeren, hebt U hiervoor meestal een apart
abonnement van uw telefoonmaatschappij nodig.
Indien U geen nummerweergavefunctie hebt op uw telefoonlijn,
zullen de inkomende telefoonnummers NIET op de display van
uw toestel verschijnen.
!! Important !!
Pour utiliser la fonction ‘Caller ID/Clip’ (affichage de l’appelant),
ce service doit être activé sur votre ligne téléphonique. Généralement,
vous avez besoin d’un abonnement séparé de votre compagnie de
téléphone pour activer cette fonction.
Si vous n’avez pas la fonction ‘Caller ID - Affichage Appelant’ sur
votre ligne téléphonique, les numéros de téléphone entrants
n’apparaîtront PAS sur l’écran de votre téléphone.
!! Important !!
To use ‘Caller ID’ (display caller), this service has to be activated on
your phone line. Normally you need a separate subscription from
your telephone company to activate this function.
If you don’t have the Caller ID function on your phone line,
the incoming telephone numbers will NOT be shown on
the display of your telephone.
NL De in deze handleiding beschreven mogelijkheden worden gepubliceerd onder
voorbehoud van wijzigingen.
F Les possibilités décrites dans ce manuel sont publiées sous réserve de modifications.
GB The features described in this manual are published with reservation to modifications.
D Die in dieser Bedienungsanleitung umschriebenen Möglichkeiten, werden vorbehaltlich
Änderungen publiziert.
HANDL. B1010 26-03-2001 12:08 Page 4
NEDERLANDS
1 INSTALLATIE 7
2 TOETSEN/LED 8
3 DISPLAY (LCD) 8
4 WERKING 9
4.1 Een taal instellen 9
4.2 Telefoneren 9
4.2.1 Een externe oproep 9
4.2.2 Blokkiezen 10
4.2.3 Terugbellen van het laatst gevormde nummer 10
4.2.4 Terugbellen van één van de 5 laatst gevormde nummers 10
4.2.5 Een geprogrammeerd nummer uit het Telefoonboek oproepen 10
4.2.6 Een interne oproep : een andere handset oproepen 11
4.3 Een oproep ontvangen 11
4.3.1 Een externe oproep ontvangen 11
4.3.2 Een interne oproep ontvangen 11
4.3.3 Ontvangst van een externe oproep tijdens een intern gesprek 11
4.4 Handenvrijfunctie aan-/uitschakelen 12
4.5 Een oproep naar een andere handset doorverbinden 12
4.6 Waarschuwing Buiten Bereik 12
4.7 Instellen van het luidsprekervolume 12
4.8 Vermelding van de gespreksduur op de display 13
4.9 Uitschakeling microfoon (mute) 13
4.10 Pauzetoets 13
4.11 Conferentiegesprek (twee interne DECT handsets en één externe beller) 13
4.12 Een verloren handset terugvinden (paging) 13
4.13 Gebruik van het alfanumerisch klavier 13
4.14 Het Telefoonboek 14
4.14.1 Een nummer en een naam aan het Telefoonboek toevoegen 14
4.14.2 Een nummer uit het Telefoonboek opzoeken 14
4.14.3 Naam of nummer van het Telefoonboek wijzigen 15
4.14.4 Naam en nummer van het Telefoonboek wissen 15
4.15 De handset aan-/uitschakelen 16
4.15.1 De handset uitschakelen 16
4.15.2 De handset aanschakelen 16
4.16 Instellen van het belvolume van de handset 16
4.16.1 Instellen van het belvolume voor externe oproepen (0-9) 16
4.16.2 Instellen van het belvolume voor interne oproepen (1-9) 16
4.17 Instellen van de belmelodie van de Handset 17
4.17.1 Instellen van een belmelodie voor externe oproepen (0-9) 17
4.17.2 Instellen van een belmelodie voor interne oproepen (0-9) 17
4.18 Vergrendeling van het klavier 18
4.19 Toetstonen aan-/uitschakelen 18
4.20 De R- toets (flash) 18
4.21 PINcode veranderen 19
4.22 Aanmelden van een handset op een Butler 1000, 1010, 1210 basis 19
Butler 1010
5
HANDL. B1010 26-03-2001 12:08 Page 5
6
4.23 Aanmelden van Butler 1010 handset op Butler 575/575+ & Cocoon100/100+ & 20
Butler 2000 basis
4.24 Aanmelden van een Butler 1800T handset op een Butler 1010 basis 20
4.25 Afmelden van een handset aan een basis 21
4.26 Een basis selecteren 21
4.26.1 Automatische selectie 21
4.26.2 Manuele selectie 22
4.27 Vergrendeling van uitgaande gesprekken 22
4.28 Standaardinstellingen (reset) van de parameters 23
4.29 Complete reinitialisatie van het toestel 23
5 NUMMERWEERGAVE (CALLER ID/CLIP) 24
5.1 Datum en tijd instellen 24
5.2 De Oproeplijst 25
5.3 Een nummer van de Oproeplijst oproepen 25
5.4 Een nummer van de Oproeplijst in het Telefoonboek opslaan 25
5.5 Nummers van de Oproeplijst wissen 26
5.5.1 Eén nummer wissen 26
5.5.2 Alle nummers wissen 26
6 VOICE MAIL INDICATIE 26
7 GARANTIE 26
Butler 1010
HANDL. B1010 26-03-2001 12:08 Page 6
NEDERLANDS
1 INSTALLATIE
Als u het toestel voor het eerst wil gebruiken, moet u er eerst en vooral voor zorgen dat de
batterij gedurende 20 uren opgeladen wordt. Doet u dit niet, dan werkt het toestel niet
optimaal.
Bij de installatie gaat u dus als volgt te werk :
Steek het ene uiteinde van de adapter in het stopcontact en het andere uiteinde in de
adapter-aansluiting aan de onderzijde van het toestel.
Verbindt u het ene uiteinde van de telefoonlijn met de wandcontactdoos van het telefoonnet
en het andere uiteinde met de onderzijde van het toestel.
Open de batterijruimte (zie hieronder).
Steek de batterij in de batterijruimt en sluit de batterij-connector aan op de handset.
Sluit de batterijruimte.
Plaats de handset op de basis gedurden 20 uren. De Lijn/Laad-indicator (LED) op de
basis licht op.
Stand van de batterij :
De batterij is volledig opgeladen.
De batterij is half leeg (50%).
De batterij is zwak. Als de batterij zwak is, hoort u waarschuwingssignalen en het
batterij-symbool op de display knippert.
Butler 1010
7
wandcontactdoos
van het telefoonnet
telefoonlijn-
aansluiting
stopcontact
adapter-
aansluiting
HANDL. B1010 26-03-2001 12:09 Page 7
Butler 1010
1
2
3
4
5
6
7
8
0
9
1
14
13
12
6
8
7
9
10
11
2
3
5
4
2 TOETSEN/LED
1 Display
2 Lijntoets
3 Omhoog-/Handenvrijtoets
/
4 Programmeertoets
5 Telefoonboektoets
6 Herkies-/Pauzetoets /P
7 Microfoon
8 Volume-/Beltoon-toets /
9 Alfanumerische toetsen
10 Wis/Mute-toets
11 Omlaag-/Flash-toets /R
12 Basis
13 Paging-toets
14 Lijn/Laad indicator (LED)
3 DISPLAY (LCD)
1 Aantal ontvangen oproepen.
2 Vermelding van de datum (dag/maand) bij ontvangen oproepen.
3 Vermelding van het uur (uur:minuten) bij ontvangen oproepen.
4 Oproepinformatie.
5 Symbool display ( ):
- dit symbool betekent dat de handset zich binnen het bereik van de basis bevindt
- als dit symbool begint te knipperen, betekent dit dat u zich buiten het bereik van
de basis bevindt. Ga dichter naar de basis zodat de verbinding tussen basis en
handset kan hersteld worden.
4
8
00000000000000
88888/88888:88
12 3
HANDL. B1010 26-03-2001 12:09 Page 8
NEDERLANDS
6 Symbool display ( ):
- dit symbool betekent dat het toestel oproepen ontvangen heeft die automatisch
opgeslagen worden in de Oproeplijst.
7 Symbool display ( ):
- dit symbool betekent dat de mute-functie geactiveerd is, de microfoon is uitgeschakeld
tijdens een gesprek.
8 Symbool display ( ):
- dit symbool verschijnt op het scherm als men telefoneert of een oproep ontvangt.
9 Symbool display ( ):
- dit symbool betekent dat de beltoon uitgeschakeld is. Als men een oproep ontvangt,
rinkelt het toestel niet. Bij een interne oproep rinkelt het toestel wel.
10 Symbool display ( ):
- dit symbool geeft de stand van de batterij weer.
11 Symbool display ( ):
- dit symbool betekent dat u zich in het menu bevindt.
12 Symbool display ( ):
- dit symbool verschijnt als u de nummers van het Telefoonboek doorloopt.
13 Symbool display ( ):
- dit symbool verschijnt als u een Voice Mail boodschap hebt ontvangen (zie hoofdstuk 6).
14 Symbool display ( ) :
- dit symbool betekent dat de handenvrij-functie geactiveerd is. U kan nu spreken
zonder de hoorn in de hand te nemen.
4 WERKING
4.1 Een taal instellen
Het toestel heeft 5 display-talen : zie display talen tabel op de verpakking!!
Om de juiste taal in te stellen, doet u het volgende :
Druk op de Programmeertoets .
Druk enkele keren op de Omhoog- of Omlaagtoets tot ‘INSTELLING’ (SETTING) op de
display verschijnt
Druk op de Programmeertoets .
‘TAAL’ (LANGUAGE) verschijnt op de display.
Druk op de Programmeertoets .
Op de display verschijnt de taal die ingesteld is.
Druk enkele keren op de Omhoog- of Omlaagtoets om de taal te selecteren die u
wenst te gebruiken.
Als de gewenste taal op de display verschijnt, drukt u op de Programmeertoets ter bevestiging
of druk meermaals op de Mute/Wis-toets om het menu te verlaten.
4.2 Telefoneren
4.2.1 Een externe oproep
Druk op de Lijntoets .
De Lijn/Laad-indicator (LED) op de basis knippert. ‘EXT’ en het Oproep-symbool
verschijnen op de display.
Butler 1010
9
HANDL. B1010 26-03-2001 12:09 Page 9
Butler 1010
U hoort de kiestoon. Geef het gewenste telefoonnummer in.
Het nummer verschijnt op de display en wordt gevormd.
Druk, na het gesprek, op de Lijntoets om de verbinding te verbreken of leg de handset
op de basis.
4.2.2 Blokkiezen
Geef het gewenste telefoonnummer in. U kan het nummer corrigeren door op de Wis/Mute-
toets te drukken.
Druk op de Lijntoets .
De Lijn/Laad-indicator (LED) op de basis knippert. ‘EXT’ en het Oproep-symbool
verschijnen op de display.
Het telefoonnummer wordt automatisch gevormd.
Druk, na het gesprek, op de Lijntoets om de verbinding te verbreken of leg de handset
op de basis.
4.2.3 Terugbellen van het laatst gevormde nummer
Druk op de Lijntoets .
De Lijn/Laad-indicator (LED) op de basis knippert. ‘EXT’ en het Oproep-symbool
verschijnen op de display.
U hoort de kiestoon.
Druk op de Herkiestoets . Het nummer dat u als laatste hebt opgebeld, wordt automatisch
gevormd zonder dat u het nummer opnieuw moet vormen.
4.2.4 Terugbellen van één van de 5 laatst gevormde nummers
Druk op de Herkiestoets . Het nummer dat u het laatst hebt opgebeld, verschijnt op de
display. Als u één van de 5 laatst gevormde nummers wil terugbellen, drukt u enkele keren
op de Herkiestoets tot het gewenste nummer op de display verschijnt.
Druk op de Lijntoets .
Het nummer dat op de display staat, wordt automatisch gevormd zonder dat u het nummer
opnieuw moet vormen.
Druk, na het gesprek, op de Lijntoets om de verbinding te verbreken of leg de handset
op de basis.
4.2.5 Een geprogrammeerd nummer uit het Telefoonboek oproepen
Het toestel beschikt over een Telefoonboek waarin u de telefoonnummers van ontvangen
oproepen met naam kan programmeren. Als u een nummer uit het Telefoonboek wil oproepen,
doet u het volgende :
Druk op de Telefoonboektoets . Het eerste nummer van het Telefoonboek, verschijnt op
de display.
Druk meermaals op de Omhoog- of Omlaagtoets om het telefoonnummer te selecteren
dat u wenst te bellen.
Druk op de Lijntoets .
Het nummer dat op de display staat, wordt automatisch gevormd zonder dat u het nummer
opnieuw moet vormen.
Druk, na het gesprek, op de Lijntoets om de verbinding te verbreken of leg de handset
op de basis.
10
HANDL. B1010 26-03-2001 12:09 Page 10
NEDERLANDS
Butler 1010
11
4.2.6 Een interne oproep : een andere handset oproepen
Deze functie werkt enkel wanneer meerdere handsets zijn aangemeld op het basisstation!
Druk op de Programmeertoets .
Druk enkele keren op de Omhoog- of Omlaagtoets tot ‘INTERCOM’ verschijnt op de
display.
Druk op de Programmeertoets .
‘INT‘ verschijnt op de display.
Geef het nummer van de handset in die u wenst op te roepen.
Druk, na het gesprek, op de Lijntoets , of leg de handset op de basis.
4.3 Een oproep ontvangen
4.3.1 Een externe oproep ontvangen
Alle aangemelde handsets rinkelen als u een oproep ontvangt.
Het Oproep-symbool knippert op de display.
Het telefoonnummer van de oproeper verschijnt op de display indien u beschikt over de
dienst nummerweergave (CLIP). Raadpleeg hiervoor uw telefoonmaatschappij. De naam van
de oproeper verschijnt eveneens op de display als:
- de naam geprogrammeerd werd in het Telefoonboek
- indien het netwerk de naam samen met het telefoonnummer doorstuurt
(enkel FSK CID-systeem).
Druk op de Lijntoets om de externe oproep aan te nemen.
Tijdens het gesprek verschijnen ‘EXT’ en het symbool op de display. De gespreksduurteller
begint te lopen.
Druk, na het gesprek, op de Lijntoets om de verbinding te verbreken of leg de handset
op de basis.
4.3.2 Een interne oproep ontvangen
Deze functie werkt enkel wanneer men meerdere handsets heeft aangemeld op het basisstation!
De handset rinkelt.
‘INT’ en het nummer van de handset die u probeert te bereiken, verschijnen op de display.
Het Oproep-symbool knippert op de display.
Druk op de Lijntoets om de interne oproep aan te nemen.
Tijdens het gesprek verschijnen ‘INT’, het handsetnummer van de oproeper en het symbool
op de display. De gespreksduurteller begint te lopen.
Druk, na het gesprek, op de Lijntoets om de verbinding te verbreken of leg de handset
op de basis.
4.3.3 Ontvangst van een externe oproep tijdens een intern gesprek
Als men een externe oproep ontvangt tijdens een intern gesprek, weerklinkt een aankloptoon
(dubbele beep) bij beide handsets die intern in gesprek zijn.
Druk tweemaal op de Lijntoets om de externe oproep aan te nemen.
Druk, na het gesprek, op de Lijntoets , of leg de handset op de basis.
HANDL. B1010 26-03-2001 12:09 Page 11
12
4.4 Handenvrij-functie aan-/uitschakelen
Deze functie laat u toe een gesprek te voeren zonder dat u de hoorn in de hand hoeft te nemen.
Als u in gesprek bent, drukt u op de Omhoog-/Handenvrij-toets
/
om de handenvrij-functie
aan te schakelen.
Druk op dezelfde toets om de handenvrij-functie uit te schakelen.
Opmerking : Als u handenvrij aan het telefoneren bent en u wil het volume aanpassen,
druk dan op de Volume-toets .
Opgepast !! Langdurig gebruik van de handenvrij-functie heeft tot gevolg dat de batterijen
sneller leeg zullen zijn !
4.5 Een oproep naar een andere handset doorverbinden
U bent in gesprek met een externe beller.
Druk op de Programmeertoets .
‘INTERCOM’ verschijnt op de display.
Druk op de Programmeertoets .
De externe oproep staat nu in wacht.
‘INT‘ verschijnt op de display.
Geef het nummer van de handset in waarnaar u de oproep wil doorverbinden.
Als de opgebelde handset wordt opgenomen, kan u een intern gesprek voeren. Druk op de
Lijntoets en de externe oproep wordt doorverbonden.
Als de opgebelde handset niet opneemt, druk dan op de Omlaag-toets om de externe
oproep terug aan te nemen.
4.6 Waarschuwing Buiten Bereik
Als de handset zich buiten het bereik van de basis bevindt, weerklinkt een waarschuwingssignaal.
‘ZOEKEN’ (SEARCHING) verschijnt op de display en het symbool knippert op de display.
Ga dichter naar de basis.
Zodra u terug binnen het bereik van de basis bent, weerklinkt een signaal en het symbool
knippert niet meer.
4.7 Instellen van het luidsprekervolume
Gebruik de Volume/Beltoon-toets / om het volume van de luidspreker (handset) in te stellen.
U kan kiezen tussen 5 niveaus. Standaard staat het toestel op niveau ‘3’ ingesteld.
Tijdens een gesprek kan u het volume als volgt aanpassen :
Druk op de Volume/Beltoon-toets / .
Het niveau van het huidig ingestelde volume verschijnt op de display.
Gebruik de cijfertoetsen om het gewenste niveau (1-5) in te stellen.
Druk op de Volume/Beltoon-toets / ter bevestiging.
Opmerking : U hebt 8 seconden de tijd om het gewenste volume in te stellen, zoniet keert het toestel
terug naar standby-modus en blijft het volume onveranderd.
Butler 1010
HANDL. B1010 26-03-2001 12:09 Page 12
NEDERLANDS
13
4.8 Vermelding van de gespreksduur op de display
Zodra u op de Lijntoets drukt, verschijnt de gespreksduur op de display (minuten-seconden).
Bvb. “ 01-20 “ voor 1 minuut en 20 seconden.
Na elke oproep blijft de gespreksduur nog 5 seconden zichtbaar op de display.
4.9 Uitschakeling microfoon (mute)
Het is mogelijk de microfoon tijdens een gesprek uit te schakelen door op de Wis-/Mute-toets
te drukken. U kan nu vrij spreken zonder dat de beller u kan horen.
U bent in gesprek. De Lijn/Laad-indicator (LED) op de basis knippert en het Oproep-
symbool verschijnt op de display.
Druk op de Wis/Mute-toets om de microfoon uit te schakelen.
Het symbool ‘X’ verschijnt op de display ( ).
Als u het gesprek wil verderzetten, drukt u nogmaals op de Wis/Mute-toets .
Het symbool ‘X’ verdwijnt van de display ( ). Uw correspondent kan u weer horen.
4.10 Pauzetoets
Als u een telefoonnummer vormt en u wil een pauze aan dit nummer toevoegen, druk dan, op
de gewenste plaats in het nummer, op de Pauzetoets .
Als u dit nummer oproept, dan wordt deze pauze (van 3s) automatisch gevormd.
4.11 Conferentiegesprek (twee interne DECT handsets en één externe beller)
U kan tegelijkertijd met één interne en één externe beller een telefoongesprek voeren.
Als u in gesprek bent met een externe beller, druk op de Programmeertoets .
‘INTERCOM’ verschijnt op de display.
Druk op de Programmeertoets .
De externe oproep staat nu in wacht.
‘INT‘ verschijnt op de display.
Geef het nummer van de handset in die u wenst te betrekken bij de oproep.
Als de opgebelde handset wordt opgenomen, houd de ‘#’-toets gedurende 3 seconden gedrukt.
‘CONFERENT’ (CONFERENCE) verschijnt op de display.
U bent nu in verbinding met één externe en één interne beller (conferentiegesprek).
4.12 Een verloren handset terugvinden (paging)
Als u een handset niet meer terugvindt, druk dan kort op de Paging-toets van de basis.
Alle handsets die aangemeld zijn op de basis, laten een signaal horen waardoor u de verloren
handset kan traceren.
Om het signaal te stoppen, drukt u kort op de Lijntoets van de handset.
4.13 Gebruik van het alfanumerisch klavier
Gebruik het alfanumerisch klavier om tekst in te geven. Om een letter te selecteren, drukt u op
de overeenstemmende toets. Bvb. als u op numerische toets ’5’ drukt, verschijnt het eerste
karakter (j) op de display, druk meerdere mÏ24len als u de andere karakters onder deze toets
wil selecteren.
Druk 2x op toets ‘2’ om de letter ‘B’ te selecteren. Wil u zowel ‘A’ en ‘B’ na elkaar invoeren,
druk dan eerst éénmaal op toets ‘2’ om ‘A’ te selecteren, wacht 2 seconden tot de cursor naar
de volgende plaats gaat en druk dan tweemaal op toets ‘2’ om ‘B’ te selecteren.
Butler 1010
HANDL. B1010 26-03-2001 12:09 Page 13
14
Butler 1010
Verkeerd ingevoerde karakters kan u wissen met behulp van de Wistoets . Het karakter voor
de cursor zal gewist worden. U kan de cursor verplaatsen door te drukken op de Omhoog- en
Omlaag-toetsen .
Beschikbare karakters
Druk op de juiste toetsen om de volgende karakters te verkrijgen :
Toetsen Eerste Tweede Derde Vierde Vijfde
druk druk druk druk druk
1 + - / 1
2 A B C 2
3 D E F 3
4 G H I 4
5 J K L 5
6 M N O 6
7 P Q R S 7
8 T U V 8
9 W X Y Z 9
0 SPATIE 0
4.14 Het Telefoonboek
4.14.1 Een nummer en een naam aan het Telefoonboek toevoegen
Druk op de Programmeertoets .
Druk enkele keren op de Omhoog- of Omlaagtoets tot ‘TELEFOONBK’ (PHONE BOOK) op
de display verschijnt.
Druk op de Programmeertoets .
‘ZOEKEN’ (SEARCH) verschijnt op de display.
Druk enkele keren op de Omhoog- of Omlaagtoets tot ‘NIEUW TOEV’ (ADD NEW) op de
display verschijnt.
Druk op de Programmeertoets .
‘NAAM’ (NAME) verschijnt op de display.
Geef de naam in. Gebruik hiervoor de alfanumerische toetsen.
Druk op de Programmeertoets .
Geef het telefoonnummer in. Gebruik hiervoor de alfanumerische toetsen.
Druk op de Programmeertoets .
Er weerklinkt een lange beeptoon. De naam en het nummer zijn opgeslagen in het
Telefoonboek.
4.14.2 Een nummer uit het Telefoonboek opzoeken
Druk op de Programmeertoets .
Druk enkele keren op de Omhoog- of Omlaagtoets tot ‘TELEFOONBK’ (PHONE BOOK) op
de display verschijnt.
Druk op de Programmeertoets .
HANDL. B1010 26-03-2001 12:09 Page 14
NEDERLANDS
15
Butler 1010
‘ZOEKEN’ (SEARCH) verschijnt op de display.
Druk op de Programmeertoets .
Geef de eerste letters van de gewenste naam in.
Druk op de Programmeertoets .
De eerste naam, die met deze letters overeenkomt, verschijnt op het scherm.
Druk op de Omhoog- of Omlaagtoets om de andere nummers in het Telefoonboek te
doorlopen.
Wanneer het gewenste nummer op het scherm verschijnt, dan zal het nummer automatisch
gevormd worden na het drukken van de lijntoets .
4.14.3 Naam of nummer van het Telefoonboek wijzigen
Druk op de Programmeertoets .
Druk enkele keren op de Omhoog- of Omlaagtoets tot ‘TELEFOONBK’ (PHONE BOOK)
op de display verschijnt.
Druk op de Programmeertoets .
‘ZOEKEN’ (SEARCH) verschijnt op de display.
Druk enkele keren op de Omhoog- of Omlaagtoets tot ‘BEWERKEN’ (EDIT) op de display
verschijnt.
Druk op de Programmeertoets .
Het eerste nummer van het Telefoonboek verschijnt op de display.
Druk op de Omhoog- of Omlaagtoets tot het gewenste nummer op de display verschijnt.
Druk op de Programmeertoets om het geselecteerde geheugennummer te veranderen.
Druk op de Wistoets om de naam letter per letter te wissen en gebruik het alfanumerisch
klavier om de correcte naam in te geven.
Druk op de Programmeertoets .
Druk op de Wistoets om het nummer cijfer per cijfer te wissen en gebruik het alfanumerisch
klavier om de juiste nummer in te geven.
Druk op de Programmeertoets om de uitgevoerde wijzigingen te bewaren.
4.14.4 Naam en nummer van het Telefoonboek wissen
Druk op de Programmeertoets .
Druk enkele keren op de Omhoog- of Omlaagtoets tot ‘TELEFOONBK’ (PHONE BOOK)
op de display verschijnt.
Druk op de Programmeertoets .
‘ZOEKEN’ (SEARCH) verschijnt op de display.
Druk enkele keren op de Omhoog- of Omlaagtoets tot ‘WISSEN’ (DELETE) op de display
verschijnt.
Druk op de Programmeertoets .
Het eerste nummer van het Telefoonboek verschijnt op de display.
Druk op de Omhoog- of Omlaagtoets tot het nummer, dat u wil wissen, op de display
verschijnt.
Druk op de Wistoets .
‘WISSEN ?’ (DELETE ?) verschijnt op de display.
Druk op de Programmeertoets om het wissen te bevestigen.
HANDL. B1010 26-03-2001 12:09 Page 15
16
4.15 De handset aan-/uitschakelen
4.15.1 De handset uitschakelen
De handset is aangeschakeld.
Druk op de Programmeertoets .
Druk enkele keren op de Omhoog- of Omlaagtoets tot ‘HS UIT ?’ (POWER OFF?) verschijnt
op de display.
Druk op de Programmeertoets . Het toestel schakelt zichzelf uit. U kan geen nummers
meer vormen, noch oproepen ontvangen.
Opm. : Wenst u het menu te verlaten zonder de handset uit te schakelen, druk dan op de Wis/Mute-
toets .
4.15.2 De handset aanschakelen
De handset is uitgeschakeld.
Druk op de Programmeertoets . Het toestel schakelt zichzelf aan.
4.16 Instellen van het belvolume van de handset
Indien u wenst, kan u het belvolume van een binnenkomende oproep aanpassen. U beschikt
over 10 niveaus. Het belvolume van interne en externe oproepen kan u apart instellen zodat u
een verschil hoort.
Als u niveau ‘0’ kiest, verschijnt het symbool op de display en hoort u geen beltoon bij een
binnenkomende externe oproep (bij een interne oproep hoort u nog steeds een beltoon).
Niveau ‘9’ is het hoogste niveau. Standaard staat het toestel op niveau ‘5’ ingesteld.
4.16.1 Instellen van het belvolume voor externe oproepen (0-9)
Druk op de Programmeertoets .
Druk enkele keren op de Omhoog- of Omlaagtoets tot ‘BEL INST’ (RING SEL) op de display
verschijnt.
Druk op de Programmeertoets .
‘EXTERN’ (EXTERNAL) verschijnt op de display.
Druk op de Programmeertoets .
Druk enkele keren op de Omhoog- of Omlaagtoets tot ‘VOLUME’ op de display verschijnt.
Druk op de Programmeertoets .
Het niveau van het huidig gebruikte volume verschijnt op de display.
Geef een nummer in tussen 0 en 9 om het gewenste belvolume te selecteren. Gebruik
hiervoor het cijferklavier.
Druk op de Programmeertoets ter bevestiging.
4.16.2 Instellen van het belvolume voor interne oproepen (1-9)
Druk op de Programmeertoets .
Druk enkele keren op de Omhoog- of Omlaagtoets tot ‘BEL INST’ (RING SEL) op de display
verschijnt.
Butler 1010
HANDL. B1010 26-03-2001 12:09 Page 16
NEDERLANDS
17
Druk op de Programmeertoets .
‘EXTERN’ (EXTERNAL) verschijnt op de display.
Druk enkele keren op de Omhoog- of Omlaagtoets tot ‘INTERN’ (INTERNAL) op de
display verschijnt.
Druk op de Programmeertoets .
Druk enkele keren op de Omhoog- of Omlaagtoets tot ‘VOLUME’ op de display verschijnt.
Druk op de Programmeertoets .
Het niveau van het huidig gebruikte volume verschijnt op de display.
Geef een nummer in tussen 1 en 9 om het gewenste belvolume te selecteren. Gebruik
hiervoor het cijferklavier.
Druk op de Programmeertoets ter bevestiging.
4.17 Instellen van de belmelodie van de Handset
Indien u wenst, kan u de belmelodie van een binnenkomende oproep aanpassen. U beschikt
over 9 belmelodieën (1-9). Standaard staat belmelodie ‘5’ ingesteld.
4.17.1 Instellen van een belmelodie voor externe oproepen (0-9)
Druk op de Programmeertoets .
Druk enkele keren op de Omhoog- of Omlaagtoets tot ‘BEL INST’ (RING SEL) op de display
verschijnt.
Druk op de Programmeertoets .
‘EXTERN’ (EXTERNAL) verschijnt op de display.
Druk op de Programmeertoets .
‘MELODIE’ (MELODIES) verschijnt op de display.
Druk op de Programmeertoets .
De huidig ingestelde belmelodie verschijnt op de display.
Geef een nummer in tussen 1 en 9 om de gewenste belmelodie te selecteren. Gebruik
hiervoor het cijferklavier.
Druk op de Programmeertoets ter bevestiging.
4.17.2 Instellen van een belmelodie voor interne oproepen (0-9)
Druk op de Programmeertoets .
Druk enkele keren op de Omhoog- of Omlaagtoets tot ‘BEL INST’ (RING SEL) op de display
verschijnt.
Druk op de Programmeertoets .
‘EXTERN’ (EXTERNAL) verschijnt op de display.
Druk enkele keren op de Omhoog- of Omlaagtoets tot ‘INTERN’ (INTERNAL) op de
display verschijnt.
Druk op de Programmeertoets .
‘MELODIE’ (MELODIES) verschijnt op de display.
Druk op de Programmeertoets .
De huidig ingestelde belmelodie verschijnt op de display.
Geef een nummer in tussen 1 en 9 om de gewenste belmelodie te selecteren. Gebruik
hiervoor het cijferklavier.
Druk op de Programmeertoets ter bevestiging.
Butler 1010
HANDL. B1010 26-03-2001 12:09 Page 17
18
4.18 Vergrendeling van het klavier
Als u het alfanumerisch klavier vergrendelt, is het onmogelijk om nog een telefoonnummer te
vormen. Enkel de Programmeertoets kan nog gebruikt worden. ‘KLAV BLOKK’ (KEY LOCKED)
staat op het scherm.
Druk op de Programmeertoets .
Druk enkele keren op de Omhoog- of Omlaagtoets tot ‘KLAVIER’ (KEY SETUP) op de display
verschijnt.
Druk op de Programmeertoets .
‘KLAV BLOK’ (KEY LOCK) verschijnt op de display.
Druk op de Programmeertoets .
De huidige toestand van het klavier verschijnt op het scherm :
- ‘BLOKK AAN’ (LOCK) : het klavier is vergrendeld
- ‘BLOKK UIT’ (UNLOCK) : het klavier is niet vergrendeld
Druk op de Omhoog- of Omlaagtoets om uw keuze te maken.
Druk op de Programmeertoets ter bevestiging.
4.19 Toetstonen aan-/uitschakelen
U kan het toestel zodanig instellen dat er een toon weerklinkt telkens als u op een toets drukt.
Druk op de Programmeertoets .
Druk enkele keren op de Omhoog- of Omlaagtoets tot ‘KLAVIER’ (KEY SETUP) op de display
verschijnt.
Druk op de Programmeertoets .
Druk enkele keren op de Omhoog- of Omlaagtoets tot ‘TOETSTONEN’ (KEY CLICK) op de
display verschijnt.
Druk op de Programmeertoets .
De huidige toestand verschijnt op het scherm :
-‘TOETST AAN’ (CLICK ON) : toetstonen aanschakelen
-‘TOETST UIT’ (CLICK OFF) : toetstonen uitschakelen
Druk op de Omhoog- of Omlaagtoets om uw keuze te maken.
Druk op de Programmeertoets ter bevestiging.
4.20 De R-toets (flash)
Druk op de Flashtoets ‘R’ om bepaalde diensten te gebruiken zoals “2de oproep” (indien deze
functie door uw telefoonmaatschappij aangeboden wordt); of om oproepen door te verbinden
als u gebruik maakt van een binnenhuiscentrale (PABX).
De Flashtoets ‘R’ is een korte onderbreking op de lijn. U kan de flash tijd instellen op 100ms of
250ms. Standaard staat deze op 100ms! Indien uw systeem echter een langere flashtijd nodig
heeft, doet u het volgende:
Druk op de Programmeertoets .
Druk enkele keren op de Omhoog- of Omlaagtoets tot ‘INSTELLING’ (SETTING) op de
display verschijnt.
Druk op de Programmeertoets .
Druk enkele keren op de Omhoog- of Omlaagtoets tot ‘FLASH’ (RECALL) op de display
verschijnt.
Druk op de Programmeertoets .
Butler 1010
HANDL. B1010 26-03-2001 12:09 Page 18
NEDERLANDS
19
Butler 1010
Druk enkele keren op de Omhoog- of Omlaagtoets om de flashtijd te selecteren:
- ‘FLASH KORT’ (SHORT) = 100ms
- ‘FLASH LANG’ (LONG) = 250ms
Druk op de Programmeertoets ter bevestiging.
4.21 PINcode veranderen
Bepaalde functies zijn enkel toegankelijk als u de PINcode van het toestel kent. Dankzij deze
geheime code worden instellingen beschermd die enkel door u mogen veranderd worden. De
PINcode bestaat uit 4 cijfers. De standaard ingestelde PINcode is ‘0000’. Als u de standaard
PINcode wil wijzigen en uw eigen geheime code wil instellen, doet u het volgende :
Druk op de Programmeertoets .
Druk enkele keren op de Omhoog- of Omlaagtoets tot ‘INSTELLING’ (SETTING) op de
display verschijnt.
Druk op de Programmeertoets .
Druk enkele keren op de Omhoog- of Omlaagtoets tot ‘PIN CODE’ op de display verschijnt.
Druk op de Programmeertoets .
‘OUDE PIN’ (OLD CODE) verschijnt op de display.
Geef de oude PINcode in. Gebruik hiervoor de cijfertoetsen.
Druk op de Programmeertoets .
‘NIEUWE PIN’ (NEW CODE) verschijnt op de display.
Geef de nieuwe PINcode in. Gebruik hiervoor de cijfertoetsen.
Druk op de Programmeertoets .
‘HERHAAL’ (AGAIN) verschijnt op de display.
Geef de nieuwe PINcode nogmaals in. Gebruik hiervoor de cijfertoetsen.
Druk op de Programmeertoets .
U hoort een bevestigingstoon. De nieuwe PINcode is ingesteld.
Opgepast : Vergeet uw persoonlijke PINcode niet ! Mocht dit toch gebeuren, dan moeten de standaard-
instellingen terug ingesteld worden (reset - zie hoofdstuk 4.28).
4.22 Aanmelden van een handset op een Butler 1000, 1010, 1210 basis
Om te kunnen telefoneren en oproepen te kunnen ontvangen, moet een nieuwe handset
aangemeld worden op de basis. U kan 5 handsets op één basis aanmelden. Elk handset is bij
uitlevering standaard aangemeld als handset 1 op de bijgeleverde basis (basis 1).
!!! U hoeft enkel deze aanmelding uit te voeren: !!!
indien de handset is afgemeld op zijn basis (bij een reinitialisatie bv)
wanneer u een andere handset op deze basis wilt aanmelden.
De onderstaande procedure is enkel geldig voor een Butler 1000, 1010, 1210 handset en
basis!!
Houd de Paging-toets op de basis 10 seconden ingedrukt tot de Lijn/Laad-indicator op
de basis snel begint te knipperen. De Lijn/Laad-indicator zal gedurende één minuut snel
knipperen. Tijdens deze minuut is de basis in aanmeld-modus en moet u het volgende doen om
de handset aan te melden :
Druk op de Programmeertoets .
Druk enkele keren op de Omhoog- of Omlaagtoets tot ‘BASIS AANM’ (BASE SUB) op de
display verschijnt.
Druk op de Programmeertoets .
‘BASIS _’ (BASE _) verschijnt op de display.
HANDL. B1010 26-03-2001 12:09 Page 19
20
Geef een nummer van de basis in die u aan de handset wil aanmelden (1-4). Gebruik
hiervoor het cijferklavier.
Opmerking : Elke handset kan op 4 verschillende DECT basissen aangemeld worden. Elke basis krijgt een
nummer van 1 tot 4 in de handset. Als U een nieuwe handset aanmeldt, mag U een basisnummer
toewijzen, gebruik bij voorkeur ‘1’ .
‘ZOEKEN’ (SEARCHING) en het symbool verschijnen op de display.
De RFPI code (elke basis heeft een unieke RFPI code) verschijnt op de display en er weerklinkt
een signaal als de basis gevonden wordt door de handset.
Druk op de Programmeertoets .
‘PIN CODE’ (PIN) verschijnt op de display.
Geef de 4-cijferige PINcode van de basis in (standaard PINcode is ‘0000’). Gebruik hiervoor
het cijferklavier.
Druk op de Programmeertoets .
De handset is aangemeld op de basis.
4.23 Aanmelden van Butler 1010 handset op Butler 575/575+ & Cocoon100/100+
& Butler 2000 basis
Houd de Paging-toets op de Butler 575/575+ of Cocoon100/100+ of Butler 2000 basis
+/- 15 seconden ingedrukt tot u een bieptoon hoort. De basis bevindt zich nu is aanmeldmodus.
Gedurende 1 minuut is de basis in aanmeld-modus en moet u het volgende doen om de hand-
set aan te melden :
Druk op de Programmeertoets .
Druk enkele keren op de Omhoog- of Omlaagtoets tot ‘BASIS AANM’ (BASE SUB) op de
display verschijnt.
Druk op de Programmeertoets .
‘BASIS _’ (BASE _) verschijnt op de display.
Geef een nummer van de basis in die u aan de handset wil aanmelden (1-4). Gebruik
hiervoor het cijferklavier.
‘ZOEKEN’ (SEARCHING) en het symbool verschijnen op de display.
De RFPI code (elke basis heeft een unieke RFPI code) verschijnt op de display en er weerklinkt
een signaal als de basis gevonden wordt door de handset.
Druk op de Programmeertoets .
‘PIN CODE’ (PIN) verschijnt op de display.
Geef de 4-cijferige PINcode van de basis in (standaard PINcode is ‘1590’). Gebruik hiervoor
het cijferklavier.
Druk op de Programmeertoets .
De handset is aangemeld op de basis.
4.24 Aanmelden van een Butler 1800T handset op een Butler 1010 basis
De onderstaande procedure is enkel geldig voor een Butler 1800T handset en Butler 1010
basis! Houd de Paging-toets op de basis 10 seconden ingedrukt tot de Lijn/Laad-indicator
op de basis snel begint te knipperen. De Lijn/Laad-indicator zal gedurende één
minuut snel knipperen. Tijdens deze minuut is de basis in aanmeld-modus en moet u het
volgende doen om de handset aan te melden :
Butler 1010
HANDL. B1010 26-03-2001 12:09 Page 20
NEDERLANDS
21
Butler 1010
Druk 1 maal op de -toets.
Druk op de OK-toets en kies een basis (1-4) met de -toetsen.
Druk op de OK-toets.
Geef de pin code van uw basisstation in. Meestal : 0000.
Druk op de OK-toets. De Butler 1800T zoekt nu uw DECT-basis. Zodra deze gevonden
wordt, ziet U de identificatiecode van deze basis op de display.
Druk op de OK-toets ter bevestiging of druk op de ESC-toets om de aanmelding te annuleren.
4.25 Afmelden van een handset aan een basis
Het is mogelijk een handset van een basis af te melden. Dit doet u in geval een handset
beschadigd is en moet vervangen worden door een nieuwe.
Opgelet : U kan enkel een andere handset afmelden, niet de handset die u gebruikt voor deze afmeldings-
procedure.
Druk op de Programmeertoets .
Druk enkele keren op de Omhoog- of Omlaagtoets tot ‘INSTELLING’ (SETTING) op de
display verschijnt.
Druk op de Programmeertoets .
Druk enkele keren op de Omhoog- of Omlaagtoets tot ‘AFM HANDS’ (REMOVE HS) op de
display verschijnt.
Druk op de Programmeertoets .
‘PIN CODE’ (PIN) verschijnt op de display.
Geef uw 4-cijferige PINcode in (standaard PINcode is ‘0000’). Gebruik hiervoor het cijferklavier.
Druk op de Programmeertoets .
‘AFM HANDS’ (REMOVE HS) verschijnt op de display.
Geef het nummer van de handset in die u wil afmelden (1 –5). Gebruik hiervoor het cijferklavier.
Druk op de Programmeertoets .
‘AFM HANDS’ (REMOVE HS) verschijnt op de display en de handset is afgemeld.
Op de afgemelde handset verschijnt ‘NT AANGEM’ (NOT SUB).
4.26 Een basis selecteren
Als uw handset is aangemeld op meerdere basisstations (max. 4), dan dient U een basis te
selecteren omdat een handset maar kan communiceren met één basis tegelijkertijd. Er zijn twee
mogelijkheden:
4.26.1 Automatische selectie
Als u ‘automatische selectie’ instelt, dan zal de handset automatisch de dichtstbijzijnde basis
kiezen in standby.
Druk op de Programmeertoets .
Druk enkele keren op de Omhoog- of Omlaagtoets tot ‘INSTELLING’ (SETTING) op de
display verschijnt.
Druk op de Programmeertoets .
Druk enkele keren op de Omhoog- of Omlaagtoets tot ‘BASIS SEL’ (BASE SEL) op de
display verschijnt.
Druk op de Programmeertoets .
HANDL. B1010 26-03-2001 12:09 Page 21
22
Druk enkele keren op de Omhoog- of Omlaagtoets tot ‘AUTO’ op de display verschijnt.
Druk op de Programmeertoets .
‘ZOEKEN’ (SEARCHING) en het symbool verschijnen op de display.
Er weerklinkt een signaal als de handset een basis gevonden heeft.
4.26.2 Manuele selectie
Als u ‘manuele selectie’ instelt, dan zal de handset enkel de basis kiezen die u ingesteld hebt.
Druk op de Programmeertoets .
Druk enkele keren op de Omhoog- of Omlaagtoets tot ‘INSTELLING’ (SETTING) op de
display verschijnt.
Druk op de Programmeertoets .
Druk enkele keren op de Omhoog- of Omlaagtoets tot ‘BASIS SEL’ (BASE SEL) op de
display verschijnt.
Druk op de Programmeertoets.
Druk enkele keren op de Omhoog- of Omlaagtoets tot ‘MANUEEL’ (MANUAL) op de
display verschijnt.
Druk op de Programmeertoets .
‘BASIS_’ (BASE_) verschijnt op het display.
Geef het nummer in van de basis die u wil selecteren (1-4). Gebruik hiervoor het cijferklavier.
Druk op de Programmeertoets .
‘ZOEKEN’ (SEARCHING) en het symbool verschijnen op de display.
Er weerklinkt een signaal als de geselecteerde basis is gevonden.
Opmerkingen :
Vooraleer u een basis kan selecteren, dient deze eerst aan de handset aangemeld te worden.
Als ‘NT AANGEM’ (NOT SUB) op de display verschijnt, betekent dit dat de geselecteerde basis niet bestaat
of dat de handset niet aangemeld is.
4.27 Vergrendeling van uitgaande gesprekken
U kan de handsets zodanig programmeren dat bepaalde telefoonnummers niet kunnen opgeroepen
worden bvb. ‘00’ internationale nummers kunnen niet opgebeld worden. Tot 5 nummers (van max.
5 cijfers) kunnen vergrendeld worden. U gaat als volgt te werk :
Druk op de Programmeertoets .
Druk enkele keren op de Omhoog- of Omlaagtoets tot ‘INSTELLING’ (SETTING) op de
display verschijnt.
Druk op de Programmeertoets .
Druk enkele keren op de Omhoog- of Omlaagtoets tot ‘BLOKKEREN’ (BARRING) op de
display verschijnt.
Druk op de Programmeertoets .
‘PIN CODE’ (PIN) verschijnt op de display.
Geef uw PINcode in.
Druk op de Programmeertoets .
‘PIN BLOKK’ (BAR NUM) verschijnt op de display. U bevindt zich in geheugen “1. _ _ _ _ _”.
Druk op de Omhoog- of Omlaagtoets om één van de 5 geheugens te selecteren.
Geef het nummer in (max. 5 cijfers) dat vergrendeld moet worden bvb 01486.
Butler 1010
HANDL. B1010 26-03-2001 12:09 Page 22
NEDERLANDS
23
Druk op de Programmeertoets .
‘HS _ _ _ _ _’ = (nummer van de handset (1-5)) en ‘01486’ (= de vergrendelde cijfers)
verschijnen op de display.
Geef de nummers van de handsets in die de vergrendelde cijfers niet mogen uitbellen.
bvb. Druk op de cijfertoets 2, 3 en 5. Op het scherm verschijnt : HS _2 3_5 01486
Deze handsets mogen geen nummers vormen die met ‘01486’ beginnen.
Druk op de Programmeertoets ter bevestiging.
Herhaal dezelfde procedure als hierboven indien u meerdere nummers wil blokkeren (max. 5)!
4.28 Standaardinstellingen (reset) van de parameters
U kan de standaardinstellingen (default) van het toestel terugplaatsen zodat het zich in dezelfde
staat bevindt als bij aankoop. Hiervoor hebt u de PINcode nodig.
De standaard instellingen zijn:
Klavier : niet vergrendeld
Klaviertonen : actief
Luidsprekervolume : niveau 3
Belmelodie : 1
Belvolume : 5
Selectie basis : automatisch
Flash tijd : 100ms
U doet het volgende om de standaardinstellingen terug in te stellen :
Druk op de Programmeertoets .
Druk enkele keren op de Omhoog- of Omlaagtoets tot ‘INSTELLING’ (SETTING) op de
display verschijnt.
Druk op de Programmeertoets .
Druk enkele keren op de Omhoog- of Omlaagtoets tot ‘RESET’ op de display verschijnt.
Druk op de Programmeertoets .
‘PIN CODE’ (PIN) verschijnt op de display.
Geef uw PINcode in.
Druk op de Programmeertoets .
4.29 Complete reinitialisatie van het toestel
Deze functie laat u toe het toestel volledig te reïnitialiseren zonder dat u daarvoor de PINcode
nodig hebt. Hierdoor zullen alle Telefoonboekgeheugens gewist worden, alle handsets zullen
afgemeld zijn, alle standaardinstellingen zijn terug ingesteld en de standaard PINcode staat
terug op ‘0000’.
U doet het volgende:
Koppel de batterij los van het toestel
Houd de ‘*’-toets ingedrukt en koppel de batterij terug aan tot de handset aanhoudend
rinkelt en de display oplicht. Laat de ‘*’-toets los en druk op de Programmeertoets .
De handset vindt de basis terug en er weerklinkt een signaal.
Druk kort op de ‘*’-toets.
Butler 1010
HANDL. B1010 26-03-2001 12:09 Page 23
24
‘RESET ?‘ verschijnt op de display.
Druk op de Programmeertoets ter bevestiging of ontkoppel de batterij om de procedure
te stoppen.
‘RESET OK’ (RESETTING) verschijnt op de display en een lange beeptoon weerklinkt.
‘NT AANGEM’ (NOT SUB) verschijnt op de display. De handset is volledig gereïnitialiseerd.
Nadien dient u alle handsets terug aan te melden zoals beschreven in punt 4.21! U dient echter
de basis niet meer in aanmeld-modus te plaatsen aangezien dit nu automatisch gebeurt!
5 NUMMERWEERGAVE (CALLER ID/CLIP)
(Deze dienst werkt enkel als u een abonnement hebt op CLIP- of nummerweergave. Raadpleeg
hiervoor uw telefoonmaatschappij). Als men een oproep ontvangt, verschijnt het telefoonnummer
van de oproeper, de datum en het uur op de display van de handset. Het toestel kan oproepen
in FSK en DTMF ontvangen. Indien de naam geprogrammeerd staat in het Telefoonboek wordt
de naam van het Telefoonboek weergegeven!
Het toestel kan 30 oproepen bewaren in een Oproeplijst die later overlopen kunnen worden.
Het toestel bewaart nooit tweemaal dezelfde oproep. Als het geheugen vol is, vervangen de
nieuwe oproepen automatisch de oudste in het geheugen.
Bij een ongelezen of niet beantwoorde oproep, knippert het symbool op de display.
Als de Oproeplijst leeg is en u drukt op de Omhoog-toets , weerklinken er drie beeptonen.
U kan de gegevens van een binnenkomende oproep als volgt bekijken :
Druk op de Omhoog-toets . De naam (indien meegestuurd door het netwerk of aanwezig
in het Telefoonboek-geheugen) van de oproeper, het volgnummer van de oproep in de
Oproeplijst en de datum en het uur van de oproep verschijnen op de display.
Druk op de Omlaag-toets . Het telefoonnummer van de oproeper verschijnt op de display.
5.1 Datum en tijd instellen
Indien bij een binnenkomende oproep de datum en de tijd niet worden meegestuurd samen
met het oproepnummer, kan men de de datum en de tijd van de binnenkomende oproep niet
zien op de display.
Door de datum en de tijd in te stellen, zal deze informatie, samen met het nummer, worden
weergegeven bij elke binnenkomende oproep !
• Druk op de Programmeertoets .
• Druk enkele keren op de Omhoog- of Omlaagtoets tot ‘INSTELLING’ (SETTING) op de
display verschijnt.
• Druk op de Programmeertoets .
• ’DAG/TIJD’ (DATE/TIME) verschijnt op de display.
• Druk nogmaals op de Programmeertoets .
Butler 1010
HANDL. B1010 26-03-2001 12:09 Page 24
NEDERLANDS
25
Als ‘JAAR’ (YEAR) op de display verschijnt, geef dan de laatste 2 cijfers van het jaar in
(00=2000, 01=2001, ...) en druk op de Programmeertoets ter bevestiging.
• Als ‘MAAND’ (MONTH) verschijnt, geef dan de maand in (01=januari, 02=februari, ...) en
druk op de Programmeertoets ter bevestiging.
• Als ‘DAG’ (DAY) verschijnt, geef dan de dag van de maand in en druk op de
Programmeertoets ter bevestiging.
• Als ‘UUR’ (HOUR) verschijnt, geef dan het huidige uur in (in 24u formaat) en druk op de
Programmeertoets ter bevestiging.
• Als ‘MINUTEN’ (MINUTE) verschijnt, geef dan de minuten in en druk op de Programmeertoets
ter bevestiging.
De datum en het uur zijn nu ingesteld !
5.2 De Oproeplijst
De ontvangen oproepen komen in de Oproeplijst terecht (max. 30 nummers).
Druk kort op de Omhoog-toets om de meest recente oproep te bekijken.
De naam van de meest recente oproep verschijnt op de display. Is er geen naam beschikbaar,
verschijnt ‘GEEN NAAM’ (NO NAME) op de display.
Als het een privenummer betreft, verschijnt ‘NT BESCHIK’ (UNAVAL) op de display.
De datum en het uur van ontvangst zijn aan elke oproep verbonden.
Druk kort op de Omlaag-toets om het telefoonnummer, die bij de oproep hoort, te bekijken.
Druk kort op de Omlaag-toets om de andere nummers van de lijst te doorlopen.
Opmerkingen :
Indien er gedurende 15 seconden niet op de Omhoog- of Omlaag-toets wordt gedrukt, keert het
toestel terug naar standby-modus.
Na ontvangst van een oproep, blijft het nummer van de oproeper nog 15 seconden na de laatste beltoon
zichtbaar op de display.
Nummerweergave is niet mogelijk als u in gesprek bent.
5.3 Een nummer van de Oproeplijst oproepen
Druk op de Omhoog-toets om naar de Oproeplijst te gaan.
Druk op de Omhoog-toets om de gewenste oproep te zoeken. Druk de Omlaag-toets
om het telefoonnummer te bekijken.
Als het nummer op de display staat, drukt u op de Lijntoets en het nummer wordt
automatisch gevormd. (De symbolen en ‘EXT’ verschijnen op de display en de gespreks-
duurteller loopt.)
5.4 Een nummer van de Oproeplijst in het Telefoonboek opslaan
Druk op de Omhoog-toets om naar de Oproeplijst te gaan.
Druk op de Omhoog- toets om het gewenste nummer te zoeken.
Druk tweemaal op de Telefoonboektoets .
‘BEWAREN’ (STORE) verschijnt op de display
Het nummer is opgeslagen in het Telefoonboek. Indien het een oproep was zonder naam
Butler 1010
HANDL. B1010 26-03-2001 12:09 Page 25
‘GEEN NAAM’ (NO NAME) kan u achteraf een naam toevoegen aan dit nummer in het
Telefoonboek.
Het toestel keert terug naar standby-modus.
5.5 Nummers van de Oproeplijst wissen
5.5.1 Eén nummer wissen
Druk op de Omhoog-toets om naar de Oproeplijst te gaan.
Druk op de Omhoog- toets om de oproep die u wil wissen, te zoeken.
Als deze oproep op de display verschijnt, druk dan op de Wistoets .
‘WISSEN ?’ (DELETE ?) verschijnt op de display.
Druk op de Programmeertoets ter bevestiging of de Wistoets om te annuleren.
De oproep is gewist en de volgende oproep verschijnt op de display.
5.5.2 Alle nummers wissen
Druk op de Omhoog-toets om naar de Oproeplijst te gaan.
Houd de Wistoets ingedrukt tot ‘WIS ALLES’ (DELETE ALL) op de display verschijnt.
Druk op de Programmeertoets ter bevestiging of op de Wistoets om te annuleren.
Alle oproepen zijn gewist.
6 VOICE MAIL INDICATIE
Deze functie werkt enkel als u beschikt over de voice mail of phone mail dienst, en als het
netwerk deze indicatie doorstuurt samen met de Caller-ID/CLIP informatie!
Als u een nieuwe boodschap ontvangen hebt in uw Voice Mail systeem, zal het ‘ ’-icoon op
de display verschijnen. Nadat u uw boodschappen beluisterd hebt, zal het ‘ ’-icoon verdwijnen.
7 GARANTIE
Garantie : 1 jaar op defecten van het toestel
Opgelet : Stuur uw toestel terug in de originele verpakking.
Vergeet uw aankoopbewijs niet bij uw toestel te steken.
De garantie is niet geldig zonder aankoopbewijs.
Butler 1010
26
HANDL. B1010 26-03-2001 12:09 Page 26
FRANÇAIS
Butler 1010
27
1 INSTALLATION 29
2 TOUCHES/DEL 30
3 ECRAN (LCD) 30
4 FONCTIONNEMENT 31
4.1 Sélectionner une langue 31
4.2 Téléphoner 32
4.2.1 Un appel externe 32
4.2.2 Sélection d'un bloc 32
4.2.3 Rappel du dernier numéro formé 32
4.2.4 Rappel de l'un des 5 derniers numéros formés 32
4.2.5 Appeler un numéro programmé à partir du Répertoire 32
4.2.6 Un appel interne : appeler un autre combiné 33
4.3 Recevoir un appel 33
4.3.1 Recevoir un appel externe 33
4.3.2 Recevoir un appel interne 33
4.3.3 Réception d'un appel externe au cours d'une conversation interne 34
4.4 Activer/ Désactiver la fonction mains-libres 34
4.5 Transférer un appel vers un autre combiné 34
4.6 Avertissement Hors de portée 34
4.7 Régler le volume du haut-parleur 34
4.8 Affichage de la durée de la conversation sur l'écran 35
4.9 Coupure du microphone (mute) 35
4.10 Touche Pause 35
4.11 Conversation en conférence (deux combinés internes DECT et un appelant externe) 35
4.12 Retrouver un combiné perdu (paging) 36
4.13 Utilisation du clavier alphanumérique 36
4.14 Le Répertoire 36
4.14.1 Ajouter un numéro et un nom au Répertoire 36
4.14.2 Chercher un numéro dans le Répertoire 37
4.14.3 Modifier un nom ou un numéro dans le Répertoire 37
4.14.4 Effacer un nom et un numéro du Répertoire 38
4.15 Activer/Désactiver le combiné 38
4.15.1 Désactiver le combiné 38
4.15.2 Activer le combiné 38
4.16 Régler le volume de la sonnerie du combiné 38
4.16.1 Régler le volume de la sonnerie pour les appels externes (0-9) 38
4.16.2 Régler le volume de la sonnerie pour les appels internes (1-9) 39
4.17 Sélectionner le type de sonnerie (mélodie) du combiné 39
4.17.1 Sélectionner un type de sonnerie (mélodie) pour les appels externes (0-9) 39
4.17.2 Sélectionner un type de sonnerie (mélodie) pour les appels internes (0-9) 40
4.18 Verrouillage du clavier 40
4.19 Activer/Désactiver les tonalités des touches 40
4.20 La touche R (flash) 41
4.21 Modifier le code PIN 41
4.22 Annoncer un combiné à une base Butler 1000, 1010, 1210 42
HANDL. B1010 26-03-2001 12:09 Page 27
4.23 Annoncer un combiné Butler 1010 à une base Butler 575/575+ & 42
Cocoon100/100+ & Butler 2000
4.24 Annoncer un combiné Butler 1800T à une base Butler 1010 43
4.25 Annuler l‘annonce d'un combiné à une base 43
4.26 Sélectionner une base 44
4.26.1 Sélection automatique 44
4.26.2 Sélection manuelle 44
4.27 Verrouillage des appels sortants 45
4.28 Réglages standard (reset) des paramètres 45
4.29 Réinitialisation complète de l'appareil 46
5 AFFICHAGE DU NUMERO (CALLER ID/CLIP) 46
5.1 Régler la date et l’heure 47
5.2 La Liste des appels 47
5.3 Appeler un numéro de la Liste des appels 48
5.4 Stocker un numéro de la Liste des appels dans le Répertoire 48
5.5 Effacer des numéros de la Liste des appels 48
5.5.1 Effacer un seul numéro 48
5.5.2 Effacer tous les numéros 48
6 INDICATION VOICE MAIL 49
7 GARANTIE 49
Butler 1010
28
HANDL. B1010 26-03-2001 12:09 Page 28
FRANÇAIS
1 INSTALLATION
Si vous utilisez l’appareil pour la première fois, vous devrez avant tout veiller à ce que la batterie
soit mise en charge pendant 20 heures. Si vous ne le faites pas, le fonctionnement de l’appareil
ne sera pas optimal.
Pour l’installation, vous procédez comme suit :
Insérez une extrémité de l’adaptateur dans la prise et l’autre extrémité dans le raccordement
de l’adaptateur sur la face inférieure de l’appareil.
Reliez maintenant une extrémité de la ligne téléphonique à la prise téléphonique murale et
l’autre extrémité à la face inférieure de l’appareil.
Ouvrez le logement de la batterie (voir ci-dessous).
Insérez la batterie dans son logement et raccordez le connecteur des batteries au combiné.
Fermez le logement de la batterie.
Placez le combiné sur la base pendant 20 heures. L’indicateur DEL Ligne/Charge
s’allume sur la base.
Etat de la batterie :
La batterie est entièrement chargée.
La batterie est à moitié vide (50%).
La batterie est faible. Si la batterie est faible, vous entendrez des signaux d’avertissement
et le symbole de la batterie clignotera sur l’écran.
Butler 1010
29
ligne téléphonique
dans la prise
ligne téléphonique
l‘adaptateur
dans la prise
l‘adaptateur
HANDL. B1010 26-03-2001 12:09 Page 29
1
2
3
4
5
6
7
8
0
9
1
14
13
12
6
8
7
9
10
11
2
3
5
4
Butler 1010
30
4
12 3
2 TOUCHES/DEL
1 Ecran
2 Touche Ligne
3 Touche Monter/Mains-libres
/
4 Touche de Programmation
5 Touche du Répertoire
6 Touche Rappel/Pause /P
7 Microphone
8 Touche Volume/Tonalité
d’appel /
9 Touches alphanumériques
10 Touche Effacer/Mute
11 Touche Descendre/Flash /R
12 Base
13 Touche Paging
14 Indicateur Ligne/Charge (DEL)
3 ECRAN (LCD)
1 Nombre d’appels reçus.
2 Affichage de la date (jour/mois) en cas d’appels reçus.
3 Affichage de l’heure (heure:minutes) en cas d’appels reçus.
4 Informations concernant l’appel.
00000000000000
88888/88888:88
HANDL. B1010 26-03-2001 12:09 Page 30
FRANÇAIS
Butler 1010
31
5 Symbole écran ( ):
- ce symbole signifie que le combiné se situe à portée de la base.
- lorsque ce symbole se met à clignoter, cela signifie que vous vous trouvez hors de
portée de la base. Rapprochez-vous de la base pour que la liaison entre la base et le
combiné puisse être rétablie.
6 Symbole écran ( ):
- ce symbole signifie que l’appareil a reçu des appels qui sont automatiquement stockés
dans la Liste des Appels.
7 Symbole écran ( ):
- ce symbole signifie que la fonction Mute est activée, que le microphone est désactivé
pendant une conversation.
8 Symbole écran ( ):
- ce symbole apparaît sur l’écran lorsqu’on téléphone ou qu’on reçoit un appel.
9 Symbole écran ( ):
- ce symbole signifie que la tonalité d’appel est désactivée. L’appareil ne sonne pas
lorsqu’on reçoit un appel. L’appareil sonne toutefois en cas d’appel interne.
10 Symbole écran ( ):
- ce symbole reproduit l’état de la batterie.
11 Symbole écran ( ):
- ce symbole signifie que vous vous trouvez dans le menu.
12 Symbole écran ( ):
- ce symbole apparaît lorsque vous parcourez les numéros du Répertoire.
13 Symbole écran ( ):
- ce symbole apparaît lorsque vous avez reçu un message Voice Mail (voir chapitre 6).
14 Symbole écran ( ):
- ce symbole signifie que la fonction mains-libres est activée. Maintenant vous pouvez
parler sans décrocher le combiné.
4 FONCTIONNEMENT
4.1 Sélectionner une langue
L’appareil dispose de 5 langues d’affichage : voir le tableau des langues d’affichage sur l’emballage !!
Pour sélectionner la langue voulue, vous procédez comme suit :
Appuyez sur la touche de Programmation .
Appuyez à plusieurs reprises sur la touche Monter ou Descendre jusqu’à ce que l’écran
affiche ‘REGLAGES’.
Appuyez sur la touche de Programmation .
L’écran affiche ‘LANGUE’.
Appuyez sur la touche de Programmation .
L’écran affiche la langue sélectionnée.
Appuyez à plusieurs reprises sur la touche Monter ou Descendre afin de sélectionner la
langue que vous souhaitez utiliser.
Lorsque la langue souhaitée apparaît à l’écran, vous appuyez sur la touche de Programmation
pour confirmer ou vous appuyez à plusieurs reprises sur la touche Mute/Effacer pour
quitter le menu.
HANDL. B1010 26-03-2001 12:09 Page 31
4.2 Téléphoner
4.2.1 Un appel externe
Appuyez sur la touche Ligne .
L’indicateur Ligne/Charge (DEL) clignote sur la base. L’écran affiche ‘EXT’ et le symbole
d’appel .
Vous entendez la tonalité d’appel. Introduisez le numéro de téléphone souhaité.
Le numéro s’affiche à l’écran et est formé.
Après la conversation, vous appuyez sur la touche Ligne pour couper la communication
ou vous posez le combiné sur la base.
4.2.2 Sélection d’un bloc
Introduisez le numéro de téléphone souhaité. Vous pouvez corriger le numéro en appuyant
sur la touche Effacer/Mute .
Appuyez sur la touche Ligne .
L’indicateur Ligne/Charge (DEL) clignote sur la base. L’écran affiche ‘EXT’ et le symbole
d’appel .
Le numéro de téléphone est formé automatiquement.
Après la conversation, vous appuyez sur la touche Ligne pour couper la communication
ou vous posez le combiné sur la base.
4.2.3 Rappel du dernier numéro formé
Appuyez sur la touche Ligne .
L’indicateur Ligne/Charge (DEL) clignote sur la base. L’écran affiche ‘EXT’ et le symbole
d’appel .
Vous entendez la tonalité d’appel.
Appuyez sur la touche Rappel . Le numéro que vous avez appelé en dernier est formé
automatiquement sans que vous ayez à former une nouvelle fois ce numéro.
4.2.4 Rappel de l’un des 5 derniers numéros formés
Appuyez sur la touche Rappel . Le numéro que vous avez appelé en dernier apparaît à
l’écran. Si vous souhaitez rappeler l’un des 5 derniers numéros formés, vous appuyez à plusieurs
reprises sur la touche Rappel jusqu’à ce que l’écran affiche le numéro souhaité.
Appuyez sur la touche Ligne .
Le numéro affiché à l’écran est formé automatiquement sans que vous ayez à former une
nouvelle fois ce numéro.
Après la conversation, vous appuyez sur la touche Ligne pour couper la communication
ou vous posez le combiné sur la base.
4.2.5 Appeler un numéro programmé à partir du Répertoire
L’appareil dispose d’un Répertoire dans lequel vous pouvez programmer les numéros de téléphone
des appels reçus accompagnés du nom correspondant. Si vous souhaitez appeler un numéro à
partir du Répertoire, vous procédez comme suit :
Appuyez sur la touche Répertoire . Le premier numéro du Répertoire apparaît à l’écran.
Butler 1010
32
HANDL. B1010 26-03-2001 12:09 Page 32
FRANÇAIS
Appuyez à plusieurs reprises sur la touche Descendre ou Monter pour sélectionner le
numéro de téléphone que vous souhaitez appeler.
Appuyez sur la touche Ligne .
Le numéro affiché à l’écran est formé automatiquement sans que vous ayez à former une
nouvelle fois ce numéro.
Après la conversation, vous appuyez sur la touche Ligne pour couper la communication
ou vous posez le combiné sur la base.
4.2.6 Un appel interne : appeler un autre combiné
Cette fonction n’est applicable que si plusieurs combinés sont annoncés à la même station de
base !
Appuyez sur la touche de Programmation .
Appuyez sur la touche Monter ou Descendre l’écran affiche ‘INTERCOM’.
Appuyez sur la touche de Programmation .
‘INT‘ apparaît à l’écran.
Introduisez le numéro du combiné que vous souhaitez appeler.
Après la conversation, vous appuyez sur la touche Ligne ou vous posez le combiné
manuel sur la base.
4.3 Recevoir un appel
4.3.1 Recevoir un appel externe
Tous les combinés manuels imputés à la base sonnent lorsque vous recevez un appel.
Le symbole d’appel clignote sur l’écran.
Le numéro de téléphone de l’appelant apparaît à l’écran si vous disposez du service
d’affichage du numéro (CLIP). Consultez votre compagnie du téléphone à ce sujet. Le nom
de l’appelant apparaît également à l’écran si :
- le nom a été programmé dans le Répertoire
- le réseau transmet le nom en même temps que le numéro de téléphone
(uniquement le système FSK CID).
Appuyez sur la touche Ligne pour prendre l’appel externe.
Pendant la conversation, l’écran affiche ‘EXT’ et le symbole . Le compteur de durée de
conversation est enclenché.
Après la conversation, vous appuyez sur la touche Ligne pour couper la communication
ou vous posez le combiné sur la base.
4.3.2 Recevoir un appel interne
Cette fonction n’est applicable que si plusieurs combinés sont annoncés à la même station de base !
Le combiné sonne.
‘INT’ et le numéro du combiné que vous essayez d’atteindre apparaissent à l’écran.
Le symbole d’appel clignote sur l’écran.
Appuyez sur la touche Ligne pour prendre l’appel interne.
Pendant la conversation, l’écran affiche ‘INT’, le numéro du combiné et le symbole .
Le compteur de durée de conversation est enclenché.
Après la conversation, vous appuyez sur la touche Ligne pour couper la communication
ou vous posez le combiné sur la base.
Butler 1010
33
HANDL. B1010 26-03-2001 12:09 Page 33
4.3.3 Réception d’un appel externe au cours d’une conversation interne
Lorsque vous recevez un appel externe au cours d’une conversation interne, vous entendez une
tonalité d’interpellation (double bip) dans les deux combinés qui sont en contact pour une
conversation interne.
Appuyez à deux reprises sur la touche Ligne pour prendre l’appel externe.
Après la conversation, vous appuyez sur la touche Ligne ou vous posez le combiné sur la
base.
4.4 Activer/désactiver la fonction mains-libres
Cette fonction vous permet de téléphoner sans décrocher le combiné. Quand vous téléphonez,
appuyez sur la touche Monter/Mains-libres
/
pour activer la fonction mains-libres.
Appuyez sur la même touche pour désactiver la fonction mains-libres.
Remarque :Quand vous téléphonez en mode mains-libres et vous voulez changer le
volume, appuyez sur la touche Volume .
Attention !! Quand on utilise la fonction mains-libres longtemps, les batteries seront
épuisées plus vite !
4.5 Transférer un appel vers un autre combiné
Vous êtes en communication avec un appelant externe.
Appuyez sur la touche de Programmation .
L’écran affiche ‘RECHERCHE’.
Appuyez sur la touche de Programmation .
L’appel externe est maintenant en attente.
L’écran affiche ‘INT‘.
Introduisez le numéro du combiné auquel vous souhaitez transférer l’appel.
Lorsque le combiné appelé est décroché, vous pouvez avoir une conversation interne.
Appuyez sur la touche Ligne et l’appel externe est transféré.
Si le combiné appelé ne décroche pas, appuyez sur la touche Descendre pour reprendre
l’appel externe.
4.6 Avertissement Hors de portée
Lorsque le combiné se trouve hors de portée de la base, il émet un signal d’avertissement.
L’écran affiche ‘RECHERCHE’ et le symbole clignote sur l’écran.
Rapprochez-vous de la base.
Dès que vous êtes à nouveau à portée de la base, l’appareil émet un signal et le clignotement
du symbole est interrompu.
4.7 Régler le volume du haut-parleur
Utilisez la touche Volume/Tonalité d’appel / pour régler le volume du haut-parleur (combiné).
Vous avez le choix entre 5 niveaux. Le réglage standard prévoit le niveau ‘3’.
Au cours d’une conversation, vous pouvez adapter le volume comme suit :
Appuyez sur la touche Volume/Tonalité d’appel / .
Butler 1010
34
HANDL. B1010 26-03-2001 12:09 Page 34
FRANÇAIS
Le niveau du réglage actuel du volume apparaît à l’écran.
Utilisez les touches numériques pour sélectionner le niveau souhaité (1-5).
Appuyez sur la touche Volume/Tonalité d’appel / pour confirmation.
Remarque : vous disposez de 8 secondes pour régler le volume souhaité. Sinon, l’appareil revient au
mode standby et le volume reste inchangé.
4.8 Affichage de la durée de la conversation sur l’écran
Dès que vous appuyez sur la touche Ligne , la durée de la conversation apparaît à l’écran
(minutes-secondes). Par exemple : “ 01-20 “ pour 1 minute et 20 secondes.
Après chaque communication, la durée de la conversation reste visible à l’écran pendant
5 secondes.
4.9 Coupure du microphone (mute)
Il est possible de désactiver le microphone en cours de conversation en appuyant sur la touche
Effacer/Mute . Vous pouvez maintenant parler librement sans que l’appelant puisse vous
entendre.
Vous êtes en communication. L’indicateur Ligne/Charge (DEL) clignote sur la base et le
symbole d’appel apparaît à l’écran.
Appuyez sur la touche Effacer/Mute pour désactiver le microphone.
Le symbole ‘X’ apparaît sur l’écran ( ).
Si vous souhaitez poursuivre la conversation, vous appuyez une nouvelle fois sur la touche
Effacer/Mute .
Le symbole ‘X’ disparaît alors de l’écran ( ). Votre correspondant peut vous entendre à
nouveau.
4.10 Touche Pause
Si vous formez un numéro de téléphone et si vous souhaitez ajouter une pause à ce numéro,
vous appuyez sur la touche Pause à l’endroit souhaité du numéro.
Lorsque vous appelez ce numéro, cette pause (de 3 s) sera insérée automatiquement.
4.11 Conversation en conférence (deux combinés internes DECT et un appelant
externe)
Vous pouvez avoir simultanément une conversation avec un appelant interne et un appelant
externe.
Si vous êtes en communication avec un appelant externe, appuyez sur la touche de
Programmation .
L’écran affiche ‘INTERCOM’.
Appuyez sur la touche de Programmation .
L’appel externe est maintenant en attente.
L’écran affiche ‘INT‘.
Introduisez le numéro du combiné que vous souhaitez impliquer dans la communication.
Lorsque le combiné appelé est décroché, vous maintenez la touche ‘#’ enfoncée pendant
3 secondes.
‘CONFERENCE’ apparaît à l’écran.
Vous êtes maintenant en communication avec un appelant externe et un appelant interne
(conversation en conférence).
Butler 1010
35
HANDL. B1010 26-03-2001 12:10 Page 35
4.12 Retrouver un combiné perdu (paging)
Si vous ne retrouvez plus un combiné, appuyez brièvement sur la touche Paging de la base.
Tous les combinés annoncés à cette base émettent un signal qui vous permet de localiser le
combiné perdu. Pour interrompre le signal, vous appuyez sur la touche Ligne du combiné.
4.13 Utilisation du clavier alphanumérique
Utilisez le clavier alphanumérique pour introduire un texte. Pour sélectionner une lettre, vous
appuyez sur la touche correspondante. Par exemple : si vous appuyez sur la touche numérique ’5’,
le premier caractère (j) apparaît à l’écran. Appuyez sur la touche à plusieurs reprises si vous voulez
sélectionner les autres caractères de cette touche.
Appuyez 2x sur la touche ‘2’ pour sélectionner la lettre ‘B’. Si vous voulez introduire successive-
ment un ‘A’ et un ‘B’, vous appuyez d’abord une seule fois sur la touche ‘2’ pour sélectionner
le ‘A’, vous attendez 2 secondes jusqu’à ce que le curseur se déplace vers l’emplacement sui-
vant et appuyez encore deux fois sur la touche ‘2’ pour sélectionner le ‘B’.
Les caractères fautivement introduits peuvent être effacés à l’aide de la touche Effacer . Le
caractère qui se trouve devant le curseur sera alors effacé. Vous pouvez déplacer le curseur à
l’aide des touches Monter et Descendre .
Caractères disponibles
Activez les touches appropriées pour obtenir les caractères suivants :
Touches Première Deuxième Troisième Quatrième Cinquième
pression pression pression pression pression
1 + - / 1
2 A B C 2
3 D E F 3
4 G H I 4
5 J K L 5
6 M N O 6
7 P Q R S 7
8 T U V 8
9 W X Y Z 9
0 ESPACE 0
4.14 Le Répertoire
4.14.1 Ajouter un numéro et un nom au Répertoire
Appuyez sur la touche de Programmation .
Appuyez à plusieurs reprises sur la touche Monter ou Descendre jusqu’à ce que l’écran
affiche ‘ANNUAIRE’.
Appuyez sur la touche de Programmation .
L’écran affiche ‘RECHERCHER’.
Appuyez à plusieurs reprises sur la touche Monter ou Descendre jusqu’à ce que l’écran
affiche ‘AJOUTER’.
Butler 1010
36
HANDL. B1010 26-03-2001 12:10 Page 36
FRANÇAIS
Appuyez sur la touche de Programmation .
L’écran affiche ‘‘NOM’‘.
Introduisez le nom. Utilisez pour cela les touches alphanumériques.
Appuyez sur la touche de Programmation .
Introduisez le numéro de téléphone. Utilisez pour cela les touches alphanumériques.
Appuyez sur la touche de Programmation .
Vous entendrez un bip prolongé. Le nom et le numéro sont stockés dans le Répertoire.
4.14.2 Chercher un numéro dans le Répertoire
Appuyez sur la touche de Programmation .
Appuyez à plusieurs reprises sur la touche Monter ou Descendre jusqu’à ce que l’écran
affiche ‘ANNUAIRE’.
Appuyez sur la touche de Programmation .
L’écran affiche ‘RECHERCHER’.
Appuyez sur la touche de Programmation .
Introduisez les premières lettres du nom souhaité.
Appuyez sur la touche de Programmation .
Le premier nom correspondant à ces lettres apparaît à l’écran.
Appuyez sur la touche Monter ou Descendre pour parcourir les autres numéros du
Répertoire.
Lorsque le numéro souhaité apparaît à l’écran, ce numéro sera automatiquement formé
après avoir appuyé sur la touche Ligne .
4.14.3 Modifier un nom ou un numéro dans le Répertoire
Appuyez sur la touche de Programmation .
Appuyez à plusieurs reprises sur la touche Monter ou Descendre jusqu’à ce que l’écran
affiche ‘ANNUAIRE’.
Appuyez sur la touche de Programmation .
L’écran affiche ‘RECHERCHER’.
Appuyez à plusieurs reprises sur la touche Monter ou Descendre jusqu’à ce que l’écran
affiche ‘CONSULTER’.
Appuyez sur la touche de Programmation .
Le premier numéro du Répertoire apparaît à l’écran.
Appuyez sur la touche Monter ou Descendre jusqu’à ce que l’écran affiche le numéro
souhaité.
Appuyez sur la touche de Programmation pour modifier le numéro sélectionné dans la
mémoire.
Appuyez sur la touche Effacer afin d’effacer le nom lettre par lettre et utilisez le clavier
alphanumérique pour introduire le nom correct.
Appuyez sur la touche de Programmation .
Appuyez sur la touche Effacer pour effacer le numéro chiffre par chiffre et utilisez le clavier
alphanumérique pour introduire le numéro exact.
Appuyez sur la touche de Programmation pour sauvegarder les modifications effectuées.
Butler 1010
37
HANDL. B1010 26-03-2001 12:10 Page 37
4.14.4 Effacer un nom et un numéro du Répertoire
Appuyez sur la touche de Programmation .
Appuyez à plusieurs reprises sur la touche Monter ou Descendre jusqu’à ce que l’écran
affiche ‘ANNUAIRE’.
Appuyez sur la touche de Programmation .
L’écran affiche ‘RECHERCHER’.
Appuyez à plusieurs reprises sur la touche Monter ou Descendre jusqu’à ce que l’écran
affiche ‘EFFACER’.
Appuyez sur la touche de Programmation .
Le premier numéro du Répertoire apparaît à l’écran.
Appuyez sur la touche Monter ou Descendre jusqu’à ce l’écran affiche le numéro que
vous souhaitez effacer.
Appuyez sur la touche Effacer
.
L’écran affiche ‘EFFACE ?’ .
Appuyez sur la touche de Programmation pour confirmer l’effacement
4.15 Activer/désactiver le combiné
4.15.1 Désactiver le combiné
Le combiné est activé.
Appuyez sur la touche de Programmation .
Appuyez à plusieurs reprises sur la touche Monter ou Descendre jusqu’à ce que l’écran
affiche ‘ARRET’.
Appuyez sur la touche de Programmation . L’appareil se débranche de lui-même. Vous ne
pouvez plus former de numéros, ni recevoir des appels.
Remarque : Si vous souhaitez quitter le menu sans désactiver le combiné, appuyez sur la touche
Effacer/Mute .
4.15.2 Activer le combiné
Le combiné est désactivé.
Appuyez sur la touche de Programmation . L’appareil s’active lui-même.
4.16 Régler le volume de la sonnerie du combiné
Si vous le souhaitez, vous pouvez régler le volume de la sonnerie pour un appel entrant. Vous
disposez de 10 niveaux. Vous pouvez régler séparément le niveau de la sonnerie d’un appel
interne et celui-ci d’un appel externe, pour que vous entendiez une différence.
Si vous optez pour le niveau ‘0’, l’écran affiche le symbole et vous n’entendez aucune sonnerie
en cas d’appel entrant externe (en cas d’appel entrant interne, vous entendrez toujours la sonnerie).
Le niveau ‘9’ est le niveau le plus élevé. Le réglage standard de l’appareil prévoit le niveau ‘5’.
4.16.1 Régler le volume de la sonnerie pour les appels externes (0-9)
Appuyez sur la touche de Programmation .
Appuyez à plusieurs reprises sur la touche Monter ou Descendre jusqu’à ce que l’écran
affiche ‘REGL SONNE’.
Butler 1010
38
HANDL. B1010 26-03-2001 12:10 Page 38
FRANÇAIS
Appuyez sur la touche de Programmation .
L’écran affiche ‘EXTERNE‘.
Appuyez sur la touche de Programmation .
Appuyez à plusieurs reprises sur la touche Monter ou Descendre jusqu’à ce que l’écran
affiche ‘VOLUME’.
Appuyez sur la touche de Programmation .
Le niveau du volume actuellement sélectionné apparaît à l’écran.
Introduisez un chiffre compris entre 0 et 9 pour sélectionner le niveau souhaité pour la
sonnerie. Utilisez pour cela le clavier numérique.
Appuyez sur la touche de Programmation pour confirmer.
4.16.2 Régler le volume de la sonnerie pour les appels internes (1-9)
Appuyez sur la touche de Programmation .
Appuyez à plusieurs reprises sur la touche Monter ou Descendre jusqu’à ce que l’écran
affiche ‘REGL SONNE’.
Appuyez sur la touche de Programmation .
L’écran affiche ‘EXTERNE‘.
Appuyez à plusieurs reprises sur la touche Monter ou Descendre jusqu’à ce que l’écran
affiche ‘INTERNE’.
Appuyez sur la touche de Programmation .
Appuyez à plusieurs reprises sur la touche Monter ou Descendre jusqu’à ce que l’écran
affiche ‘VOLUME’.
Appuyez sur la touche de Programmation .
Le niveau du volume actuellement sélectionné apparaît à l’écran.
Introduisez un chiffre compris entre 1 et 9 pour sélectionner le niveau souhaité pour la sonnerie.
Utilisez pour cela le clavier numérique.
Appuyez sur la touche de Programmation pour confirmer.
4.17 Sélectionner le type de sonnerie (mélodie) du combiné
Si vous le souhaitez, vous pouvez adapter le type de sonnerie (mélodie) accompagnant un
appel entrant. Vous disposez de 9 mélodies (1-9). Le réglage standard prévoit la mélodie ‘5’.
4.17.1 Sélectionner un type de sonnerie (mélodie) pour les appels externes (0-9)
Appuyez sur la touche de Programmation .
Appuyez à plusieurs reprises sur la touche Monter ou Descendre jusqu’à ce que l’écran
affiche ‘REGL SONNE’.
Appuyez sur la touche de Programmation .
L’écran affiche ‘EXTERNE‘.
Appuyez sur la touche de Programmation .
L’écran affiche ‘MELODIE‘.
Appuyez sur la touche de Programmation .
La mélodie actuellement sélectionnée apparaît à l’écran.
Introduisez un chiffre compris entre 1 et 9 pour sélectionner la mélodie souhaitée. Utilisez
pour cela le clavier numérique.
Appuyez sur la touche de Programmation pour confirmer.
Butler 1010
39
HANDL. B1010 26-03-2001 12:10 Page 39
4.17.2 Sélectionner un type de sonnerie (mélodie) pour les appels internes (0-9)
Appuyez sur la touche de Programmation .
Appuyez à plusieurs reprises sur la touche Monter ou Descendre jusqu’à ce que l’écran
affiche ‘REGL SONNE’.
Appuyez sur la touche de Programmation .
L’écran affiche ‘EXTERNE‘.
Appuyez à plusieurs reprises sur la touche Monter ou Descendre jusqu’à ce que l’écran
affiche ‘INTERNE’.
Appuyez sur la touche de Programmation .
L’écran affiche ‘MELODIE‘.
Appuyez sur la touche de Programmation .
La mélodie actuellement sélectionnée apparaît à l’écran.
Introduisez un chiffre compris entre 1 et 9 pour sélectionner la mélodie souhaitée. Utilisez
pour cela le clavier numérique.
Appuyez sur la touche de Programmation pour confirmer.
4.18 Verrouillage du clavier
Si vous verrouillez le clavier alphanumérique, il est impossible de former encore un numéro de
téléphone. Vous ne pouvez plus utiliser que la touche de Programmation. L’écran affiche ‘CLV
BLOQUE’.
Appuyez sur la touche de Programmation .
Appuyez à plusieurs reprises sur la touche Monter ou Descendre jusqu’à ce que l’écran
affiche ‘CLAVIER’.
Appuyez sur la touche de Programmation .
L’écran affiche ‘ACCES CLAVIER‘.
Appuyez sur la touche de Programmation .
L’état actuel du clavier s’affiche à l’écran :
- ‘CLAV BLOQ’ : le clavier est verrouillé
- ‘CLAV ACTIF’ : le clavier est déverrouillé
Appuyez sur la touche Monter ou Descendre pour effectuer votre choix.
Appuyez sur la touche de Programmation pour confirmer.
4.19 Activer/désactiver les tonalités des touches
Vous pouvez régler l’appareil de façon à faire retentir une tonalité chaque fois que vous appuyez
sur une touche.
Appuyez sur la touche de Programmation .
Appuyez à plusieurs reprises la touche Monter ou Descendre jusqu’à ce que l’écran affiche
‘CLAVIER’.
Appuyez sur la touche de Programmation .
Appuyez à plusieurs reprises la touche Monter ou Descendre jusqu’à ce que l’écran affiche
‘BIP TOUCHE’.
Appuyez sur la touche de Programmation .
L’état actuel s’affiche à l’écran :
- ‘BIP ACTIF ’ : activer les tonalités
- ‘BIP DESACT’ : désactiver les tonalités
Appuyez sur la touche Monter ou Descendre pour effectuer votre choix.
Appuyez sur la touche de programmation pour confirmer.
Butler 1010
40
HANDL. B1010 26-03-2001 12:10 Page 40
FRANÇAIS
4.20 La touche R (flash)
Appuyez sur la touche Flash ‘R’ pour utiliser certains services comme “2ème appel” (si cette
fonction est proposée par votre compagnie du téléphone); ou pour transférer des appels si vous
utilisez un central téléphonique (PABX). La touche Flash ‘R’ correspond à une brève coupure de
la ligne. Vous pouvez régler la durée du flash à 100ms ou 250ms. Le réglage standard prévoit
100ms ! Si votre système nécessite toutefois une durée flash plus longue, procédez comme suit :
Appuyez sur la touche de Programmation .
Appuyez à plusieurs reprises sur la touche Monter ou Descendre jusqu’à ce que l’écran
affiche ‘REGLAGES’.
Appuyez sur la touche de Programmation .
Appuyez à plusieurs reprises sur la touche Monter ou Descendre jusqu’à ce que l’écran
affiche ‘R’.
Appuyez sur la touche de Programmation .
Appuyez à plusieurs reprises sur la touche Monter ou Descendre pour sélectionner la
durée du flash :
- COURT = 100ms
- LONG = 250ms
Appuyez sur la touche de Programmation pour confirmer.
4.21 Modifier le code PIN
Certaines fonctions ne sont accessibles que si vous connaissez le code PIN de l’appareil. Grâce à
ce code secret, vous pouvez protéger des réglages que vous êtes seul à pouvoir modifier. Le
code PIN est composé de 4 chiffres. Le réglage standard prévoit le code PIN ‘0000’. Si vous
souhaitez modifier le code PIN standard et introduire votre propre code secret, vous procédez
comme suit :
Appuyez sur la touche de Programmation .
Appuyez à plusieurs reprises sur la touche Monter ou Descendre jusqu’à ce que l’écran
affiche ‘REGLAGES’.
Appuyez sur la touche de Programmation .
Appuyez à plusieurs reprises sur la touche Monter ou Descendre jusqu’à ce que l’écran
affiche ‘CODE PIN’.
Appuyez sur la touche de Programmation .
L’écran affiche ‘ANC CODE’.
Introduisez l’ancien code PIN. Utilisez pour cela les touches numériques.
Appuyez sur la touche de Programmation .
L’écran affiche ‘NV CODE’.
Introduisez le nouveau code PIN. Utilisez pour cela les touches numériques.
Appuyez sur la touche de Programmation .
L’ecran afffiche ’CONFIRMEZ’.
Introduisez une nouvelle fois le nouveau code PIN. Utilisez pour cela les touches numériques.
Appuyez sur la touche de Programmation .
Vous entendez une tonalité de confirmation. Le nouveau code PIN est consigné.
Attention : N’oubliez pas votre code PIN personnel ! Si cela devait arriver, il faudrait reconsigner tous les
réglages standard (reset – voir chapitre 4.28).
Butler 1010
41
HANDL. B1010 26-03-2001 12:10 Page 41
4.22 Annoncer un combiné à une base Butler 1000, 1010, 1210
Pour pouvoir téléphoner et recevoir des appels, il faut annoncer un nouveau combiné à la base.
Vous pouvez annoncer 5 combinés à une seule base. Lors de la livraison, les réglages standard
prévoient que chaque combiné soit annoncé à la base fournie (base 1) en tant que combiné 1.
!!! Vous n’avez à effectuer cette annonce que dans les cas suivants : !!!
si l’annonce du combiné a été annulée au niveau de sa base (en cas de réinitialisation, par
exemple)
lorsque vous souhaitez annoncer un autre combiné à cette même base.
La procédure ci-dessous n’est valable que pour un combiné et une base
Butler 1000, 1010, 1210 !!
Maintenez la touche Paging de la base enfoncée pendant 10 secondes jusqu’à ce que
l’indicateur Ligne/Charge de cette base commence à clignoter à intervalles rapides.
L’indicateur Ligne/Charge clignotera très vite pendant une minute. Pendant cette minute,
la base se trouve en mode d’annonce et vous devrez effectuer les manipulations suivantes
pour annoncer le combiné :
Appuyez sur la touche de Programmation .
Appuyez à plusieurs reprises sur la touche Monter ou Descendre jusqu’à ce que l’écran
affiche ‘ENREG BASE’.
Appuyez sur la touche de Programmation .
L’écran affiche ‘BASE _‘.
Introduisez le numéro de la base que vous souhaitez annoncer au combiné (1-4).
Utilisez pour cela le clavier numérique.
Remarque : Chaque combiné peut être annoncé à 4 bases DECT différentes. Chaque base reçoit un numéro
de 1 à 4 au niveau du combiné. Si vous annoncez un nouveau combiné, vous pouvez lui attribuer un numéro
de base. Utilisez de préférence le ‘1’ .
L’écran affiche ‘RECHERCHE’ et le symbole .
Le code RFPI (chaque base dispose d’un code RFPI unique) apparaît à l’écran et un signal
retentit lorsque la base a été détectée par le combiné.
Appuyez sur la touche de Programmation .
L’écran affiche ‘PIN’.
Introduisez le code PIN de la base en 4 chiffres (le code PIN standard est ‘0000’). Utilisez
pour cela le clavier numérique.
Appuyez sur la touche de Programmation .
Le combiné est annoncé à la base.
4.23 Annoncer un combiné Butler 1010 à une base Butler 575/575+ &
Cocoon100/100+ & Butler 2000
Maintenez la touche Paging de la base Butler 575/575+ ou Cocoon100/100+ ou Butler 2000
enfoncée pendant ± 15 secondes jusqu’à ce que vous entendiez un bip. La base se trouve
maintenant en mode d’annonce et vous devrez effectuer les manipulations suivantes pour
annoncer le combiné :
Appuyez sur la touche de Programmation .
Appuyez à plusieurs reprises sur la touche Monter ou Descendre jusqu’à ce que l’écran
affiche ‘ENREG BASE’.
Butler 1010
42
HANDL. B1010 26-03-2001 12:10 Page 42
FRANÇAIS
Appuyez sur la touche de Programmation .
L’écran affiche ‘BASE _‘.
Introduisez le numéro de la base que vous souhaitez annoncer au combiné (1-4). Utilisez
pour cela le clavier numérique.
L’écran affiche ‘RECHERCHE’ et le symbole .
Le code RFPI (chaque base dispose d’un code RFPI unique) apparaît à l’écran et un signal
retentit lorsque la base a été détectée par le combiné.
Appuyez sur la touche de Programmation .
L’écran affiche ‘PIN’.
Introduisez le code PIN de la base en 4 chiffres (le code PIN standard est ‘1590’). Utilisez
pour cela le clavier numérique.
Appuyez sur la touche de Programmation .
Le combiné est annoncé à la base.
4.24 Annoncer un combiné Butler 1800T à une base Butler 1010
La procédure mentionnée ci-dessous est seulement valable pour un combiné Butler 1800T et
une base Butler 1010 ! Maintenez la touche Paging de la base enfoncée pendant 10 secon-
des jusqu’à ce que l’indicateur Ligne/Charge de cette base commence à clignoter à inter-
valles rapides.
L’indicateur Ligne/Charge clignotera très vite pendant une minute. Pendant cette minute,
la base se trouve en mode d’annonce et vous devrez effectuer les manipulations suivantes pour
annoncer le combiné :
Appuyez 1 fois sur la touche .
Appuyez sur la touche OK et choisissez une base (1-4) à l’aide des touches .
Appuyez sur la touche OK.
Introduisez le code PIN de votre station de base. Généralement : 0000.
Appuyez sur la touche OK. Le Butler 1800T cherche maintenant votre base DECT. Dès que
celle-ci a été détectée, vous apercevrez le code d’identification de cette base sur l’écran.
Appuyez sur la touche OK pour confirmer ou appuyez sur la touche ESC pour annuler
l’annonce.
4.25 Annuler l’annonce d’un combiné à une base
Il est possible d’annuler l’annonce d’un combiné à une base. Cette opération s’impose
lorsqu’un combiné est endommagé et doit être remplacé par un nouvel appareil.
Attention : Vous ne pouvez annuler que l’annonce d’un autre combiné, pas celle du combiné que vous utili-
sez pour cette procédure d’annulation.
Appuyez sur la touche de Programmation .
Appuyez à plusieurs reprises sur la touche Monter ou Descendre jusqu’à ce que l’écran
affiche ‘REGLAGES’.
Appuyez sur la touche de Programmation .
Appuyez à plusieurs reprises sur la touche Monter ou Descendre jusqu’à ce que l’écran affiche
‘SUP COMB’.
Appuyez sur la touche de Programmation .
L’écran affiche ‘PIN’.
Butler 1010
43
HANDL. B1010 26-03-2001 12:10 Page 43
Introduisez votre code PIN en 4 chiffres (le code PIN standard est ‘0000’). Utilisez pour cela le
clavier numérique.
Appuyez sur la touche de Programmation .
L’écran affiche ‘SUP COMB’.
Introduisez le numéro du combiné dont vous souhaitez annuler l’annonce. Utilisez
pour cela le clavier numérique (1 –5).
Appuyez sur la touche de Programmation .
L’écran affiche ‘SUP COMB’ et l’annonce du combiné est annulée.
L’écran du combiné dont l’annonce a été annulée affiche ‘ANNULE’.
4.26 Sélectionner une base
Lorsque votre combiné est annoncé à plusieurs stations de base (max. 4), vous devez sélection-
ner une base car un combiné ne peut communiquer qu’avec une seule base en même temps. Il
existe deux possibilités :
4.26.1 Sélection automatique
Si vous optez pour ‘sélection automatique’, le combiné optera automatiquement pour la base
la plus proche qui se trouve en standby.
Appuyez sur la touche de Programmation .
Appuyez à plusieurs reprises sur la touche Monter ou Descendre jusqu’à ce que l’écran
affiche ‘REGLAGES’.
Appuyez sur la touche de Programmation .
Appuyez à plusieurs reprises sur la touche Monter ou Descendre jusqu’à ce que l’écran
affiche ‘SELEC BASE’.
Appuyez sur la touche de Programmation .
Appuyez à plusieurs reprises sur la touche Monter ou Descendre jusqu’à ce que l’écran
affiche ‘AUTO’.
Appuyez sur la touche de Programmation .
L’écran affiche ‘RECHERCHE’ et le symbole .
Le combiné émet un signal indiquant qu’il a détecté une base.
4.26.2 Sélection manuelle
Si vous optez pour ‘sélection manuelle’, le combiné ne choisira que la base que vous avez con-
signée.
Appuyez sur la touche de Programmation .
Appuyez à plusieurs reprises sur la touche Monter ou Descendre jusqu’à ce que l’écran
affiche ‘REGLAGES’.
Appuyez sur la touche de Programmation .
Appuyez à plusieurs reprises sur la touche Monter ou Descendre jusqu’à ce que l’écran
affiche ‘SELEC BASE’.
Appuyez sur la touche de Programmation .
Appuyez à plusieurs reprises sur la touche Monter ou Descendre jusqu’à ce que l’écran
affiche ‘MANUEL’.
Appuyez sur la touche de Programmation .
L’écran affiche ‘BASE _‘.
Butler 1010
44
HANDL. B1010 26-03-2001 12:10 Page 44
FRANÇAIS
Introduisez le numéro de la base que vous souhaitez sélectionner (1-4). Utilisez pour cela le
clavier numérique.
Appuyez sur la touche de Programmation .
L’écran affiche ‘RECHERCHE’ et le symbole .
Le combiné émet un signal lorsqu’il a détecté la base sélectionnée.
Remarques :
Avant de pouvoir sélectionner une base, il faut d’abord annoncer le combiné à cette station de base.
Si l’écran affiche ‘NON ENREG’, cela signifie que la base sélectionnée n’existe pas ou que le combiné
n’a pas été annoncé.
4.27 Verrouillage des appels sortants
Vous pouvez programmer les combinés de façon à ne pas permettre l’appel de certains numéros de
téléphone comme, par exemple, les numéros internationaux ‘00’. On peut verrouiller jusqu’à 5
numéros (de max. 5 chiffres).
Vous procédez comme suit :
Appuyez sur la touche de Programmation .
Appuyez à plusieurs reprises sur la touche Monter ou Descendre jusqu’à ce que l’écran
affiche ‘REGLAGES’.
Appuyez sur la touche de Programmation .
Appuyez à plusieurs reprises sur la touche Monter ou Descendre jusqu’à ce que l’écran
affiche ‘LIMITATION’.
Appuyez sur la touche de Programmation .
L’écran affiche ‘PIN’.
Introduisez votre code PIN.
Appuyez sur la touche de Programmation .
L’écran affiche ‘NUM INTER’. Vous vous trouvez dans la mémoire “1. _ _ _ _ _”.
Appuyez sur la touche Monter ou Descendre pour sélectionner l’une des 5 mémoires.
Indiquez le numéro (max. 5 chiffres) qui doit être verrouillé. Par exemple : 01486.
Appuyez sur la touche de Programmation .
‘HS _ _ _ _ _’ = numéro du combiné (1-5) et ‘01486’ = les chiffres verrouillés affichent à l’écran.
Introduisez les numéros des combinés qui ne peuvent pas appeler les chiffres verrouillés.
Par exemple : Appuyez sur les touches numériques 2, 3 et 5. L’écran affiche : HS _2 3_5
01486. Ces combinés ne peuvent pas former de numéros commençant par ‘01486’.
Appuyez sur la touche de Programmation pour confirmer.
Répétez la même procédure ci-dessus si vous souhaitez bloquer plusieurs numéros (max. 5) !
4.28 Réglages standard (reset) des paramètres
Vous pouvez ramener l’appareil aux réglages standard (par défaut) qui étaient consignés lors de
l’achat. Pour cela, vous avez besoin du code PIN.
Les réglages standard sont :
Clavier : non verrouillé
Tonalités clavier : activées
Volume haut-parleur : niveau 3
Butler 1010
45
HANDL. B1010 26-03-2001 12:10 Page 45
Type de sonnerie (mélodie): 1
Volume de sonnerie : 5
Sélection base : automatique
Durée Flash : 100ms
Vous procédez comme suit pour revenir aux réglages standard :
Appuyez sur la touche de Programmation .
Appuyez à plusieurs reprises sur la touche Monter ou Descendre jusqu’à ce que l’écran
affiche ‘REGLAGES’.
Appuyez sur la touche de Programmation .
Appuyez à plusieurs reprises sur la touche Monter ou Descendre jusqu’à ce que l’écran
affiche ‘INITIALISE’.
Appuyez sur la touche de Programmation .
L’écran affiche ‘PIN’.
Introduisez votre code PIN.
Appuyez sur la touche de Programmation .
4.29 Réinitialisation complète de l’appareil
Cette fonction vous permet de réinitialiser complètement votre appareil sans avoir besoin du
code PIN. En appliquant cette fonction, vous effacerez toutes les mémoires du Répertoire, vous
annulerez l’annonce de tous les combinés, vous réactiverez tous les réglages standard et vous
ramènerez le code PIN à ‘0000’. Procédez comme suit :
Désaccouplez la batterie de l’appareil.
Maintenez la touche ‘*’ enfoncée et rétablissez l’accouplement à la batterie jusqu’à ce que le
combiné sonne sans interruption et que l’écran s’allume. Relâcher la touche ‘*’ et appuyez
sur la touche de Programmation .
Le combiné détecte la base et émet un signal.
Appuyez brièvement sur la touche ‘*’.
L’écran affiche ‘RAZ ?‘.
Appuyez sur la touche de Programmation pour confirmer ou désaccouplez la batterie
pour interrompre la procédure.
L’écran affiche ‘RAZ OK‘ et l’appareil émet un bip prolongé.
L’écran affiche ‘ANNULE‘. Le combine est complètement réinitialisé.
Vous devrez ensuite rétablir l’annonce de tous les combinés conformément à la description du
point 4.21!! Vous ne devez toutefois plus placer la base en mode d’annonce puisque cette
opération se fait maintenant automatiquement !
5 AFFICHAGE DU NUMERO (CALLER ID/CLIP)
(Ce service ne fonctionne que si vous avez un abonnement ‘CLIP’ ou ‘Affichage du numéro’.
Consultez votre compagnie du téléphone à ce sujet)
Butler 1010
46
HANDL. B1010 26-03-2001 12:10 Page 46
FRANÇAIS
Lorsqu’on reçoit un appel, le numéro de téléphone de l’appelant apparaît sur l’écran du combiné.
L’appareil peut recevoir des appels en modes FSK et DTMF. Si le nom est programmé dans le
Répertoire, l’écran affiche le nom du Répertoire !
L’appareil peut stocker dans une Liste des appels jusqu’à 30 appels qui pourront être consultés
ultérieurement. L’appareil ne conserve jamais deux fois le même appel. Lorsque la mémoire est
pleine, les nouveaux appels remplacent automatiquement les plus anciens appels stockés dans
la mémoire.
En cas d’appel non lu ou non répondu, le symbole clignote sur l’écran. Lorsque la Liste des
appels est vide et que vous appuyez sur la touche Monter , l’appareil émettra trois bips.
Vous pouvez consulter les données correspondantes à un appel entrant comme suit :
Appuyez sur la touche Monter . Le nom (si envoyé par le réseau ou présent dans la
mémoire du Répertoire) de l’appelant, le numéro d’ordre de l’appel dans la Liste des appels,
la date et l’heure de l’appel s’affichent sur l’écran.
Appuyez sur la touche Descendre . Le numéro de téléphone de l’appelant s’affiche sur
l’écran.
5.1. Régler la date et l’heure
Si vous recevez un appel entrant et votre compagnie téléphonique n’envoie pas la date et
l’heure avec le numéro de téléphone, on ne verra pas la date et l’heure sur l’écran chaque fois
on reçoit un appel.
Quand vous réglez la date et l’heure, chaque appel entrant sera visible sur l’écran avec indica-
tion de la date et l’heure !
Appuyez sur la touche de Programmation .
Appuyez plusieurs fois sur la touche Monter ou Descendre jusqu’à l’affichage de
‘REGLAGES’ à l’écran.
Appuyez sur la touche de Programmation .
’JOUR/HEURE’ apparaît à l’écran.
Appuyez encore une fois sur la touche de Programmation .
Quand ‘ANNEE’ s’affiche à l’écran, introduisez les 2 derniers chiffres de l’année (00=2000,
01=2001, ...) et appuyez sur la touche de Programmation pour confirmer.
Quand ‘MOIS’ s’affiche à l’écran, introduisez le mois (01=janvier, 02=février, ...) et appuyez
sur la touche de Programmation pour confirmer.
Quand ‘JOUR’ s’affiche à l’écran, introduisez le jour et appuyez sur la touche de
Programmation pour confirmer.
Quand ‘HEURE’ s’affiche à l’écran, introduisez l’heure actuelle (en format 24h) et appuyez
sur la touche de Programmation pour confirmer.
Quand ‘MINUTES’ s’affiche à l’écran, introduisez les minutes et appuyez sur la touche de
Programmation pour confirmer.
La date et l’heure sont maintenant réglées !
5.2 La Liste des appels
Les appels reçus sont enregistrés dans la Liste des appels (max. 30 numéros).
Appuyez brièvement sur la touche Monter afin de consulter l’appel le plus récent.
Le nom de l’appel le plus récent est affiché à l’écran. Si aucun nom est disponible, l’écran
affiche ‘SANS NOM’.
Butler 1010
47
HANDL. B1010 26-03-2001 12:10 Page 47
S’il s’agit d’un numéro privé, l’écran affiche ‘INDISPONIB’.
La date et l’heure de réception sont liées à chaque appel.
Appuyez brièvement sur la touche Descendre pour consulter le numéro de téléphone
correspondant à l’appel.
Appuyez brièvement sur la touche Monter pour parcourir les autres numéros de la liste.
Remarques :
Si ni la touche Monter , ni la touche Descendre ne sont activées pendant 15 secondes, l’appareil
revient au mode standby.
Après réception d’un appel, le numéro de l’appelant reste visible à l’écran pendant 15 secondes après la
dernière tonalité.
L’affichage du numéro n’est pas possible si vous êtes en communication.
5.3 Appeler un numéro de la Liste des appels
Appuyez sur la touche Monter pour consulter la Liste des appels.
Appuyez sur la touche Monter pour chercher l’appel souhaité. Appuyez sur la touche
Descendre pour consulter le numéro de téléphone.
Lorsque le numéro est affiché à l’écran, vous appuyez sur la touche Ligne et le numéro
est automatiquement formé. (Les symboles et ‘EXT’ apparaissent sur l’écran et le compteur
de durée de la conversation est enclenché).
5.4 Stocker un numéro de la Liste des appels dans le Répertoire
Appuyez sur la touche Monter pour consulter la Liste des appels.
Appuyez sur la touche Monter pour chercher le numéro souhaité.
Appuyez deux fois sur la touche Répertoire .
L’écran affiche ‘MEMORISER’.
Le numéro est stocké dans le Répertoire. S’il s’agit d’un appel sans nom (SANS NOM), vous
pouvez ultérieurement ajouter le nom à ce numéro dans le Répertoire.
L’appareil revient au mode standby.
5.5 Effacer des numéros de la Liste des appels
5.5.1 Effacer un seul numéro
Appuyez sur la touche Monter pour consulter la Liste des appels.
Appuyez sur la touche Monter chercher l’appel que vous souhaitez effacer.
Lorsque cet appel s’affiche à l’écran, vous appuyez sur la touche Effacer .
L’écran affiche ‘EFFACE ?’.
Appuyez sur la touche de Programmation pour confirmer ou sur la touche Effacer pour
annuler.
L’appel est effacé et l’appel suivant apparaît à l’écran.
5.5.2 Effacer tous les numéros
Appuyez sur la touche Monter pour consulter la Liste des appels.
Maintenez la touche Effacer enfoncée jusqu’à ce que l’écran affiche ‘EFF TOUT’.
Appuyez sur la touche de Programmation pour confirmer ou sur la touche Effacer pour
annuler.
Tous les appels sont effacés.
Butler 1010
48
HANDL. B1010 26-03-2001 12:10 Page 48
FRANÇAIS
6 INDICATION VOICE MAIL
Vous ne pouvez utiliser cette fonction que si vous disposez du service Voice mail ou Phone mail
et si le réseau transmet cette indication en même temps que les informations concernant le
code Caller ID (Affichage Appelant/Clip) ! Si vous avez reçu un nouveau message dans votre
système de Voice mail, l’écran affichera l’icône ‘ . Lorsque vous aurez écouté vos messages,
l’icône ‘ ’ disparaîtra.
7 GARANTIE
Garantie : 1 an sur les défauts de l’appareil.
Attention : Renvoyez votre appareil dans son emballage d’origine.
N’oubliez pas de joindre votre preuve d’achat à l’appareil.
La garantie n’est pas valable sans preuve d’achat.
Butler 1010
49
HANDL. B1010 26-03-2001 12:10 Page 49
1 INSTALLATION 52
2 KEYS/LED 53
3 DISPLAY (LCD) 53
4 OPERATION 54
4.1 Setting the language 54
4.2 Making Calls 54
4.2.1 External Call 54
4.2.2 Number preparation 55
4.2.3 Redialling the last number dialled 55
4.2.4 Redial one of the last 5 numbers dialled 55
4.2.5 Calling a programmed number from the Phone Book 55
4.2.6 An internal call: calling another handset 56
4.3 Receiving a Call 56
4.3.1 Receiving an external call 56
4.3.2 Receiving an internal call 56
4.3.3 Receiving an external call during an internal call 56
4.4 Activate/Deactivate handsfree function 57
4.5 Transferring a call to another handset 57
4.6 Out of Range Warning 57
4.7 Setting the speaker volume 57
4.8 Call Duration Indicator on the Display 57
4.9 Turning off the microphone (mute) 58
4.10 Pause key 58
4.11 Conference call (two internal DECT handsets and one external caller) 58
4.12 Locating a misplaced handset (paging) 58
4.13 Using the alphanumeric keypad 58
4.14 The Phone Book 59
4.14.1 Adding a number and a name to Phone Book 59
4.14.2 Looking up a number in the Phone Book 59
4.14.3 Changing a name or number in the Phone Book 60
4.14.4 Deleting name and number from the Phone Book 60
4.15 Turning the handset on/off 60
4.15.1 Turning the handset off 60
4.15.2 Turning the handset on 60
4.16 Setting the ring volume level on the handset 61
4.16.1 Setting the ring volume for external calls (0-9) 61
4.16.2 Setting the ringer volume for internal calls (1-9) 61
4.17 Setting the ringer melody on the handset 61
4.17.1 Setting a ringer melody for external calls (0-9) 61
4.17.2 Setting a ringer melody for internal calls (0-9) 62
4.18 Locking the key pad 62
4.19 Turning key click on/off 62
Butler 1010
50
HANDL. B1010 26-03-2001 12:10 Page 50
ENGLISH
4.20 The R key (flash) 63
4.21 Changing the PIN code 63
4.22 Subscribing a handset with a Butler 1000, 1010, 1210 base unit 63
4.23 Subscribing Butler 1010 handset on Butler 575/575+ & Cocoon100/100+ &
Butler 2000 base unit 64
4.24 Subscribing a Butler 1800T handset to a Butler 1010 base unit 65
4.25 Removing subscription of a handset with a base unit 65
4.26 Selecting a base unit 65
4.26.1 Automatic selection 65
4.26.2 Manual selection 66
4.27 Barring outgoing calls 66
4.28 Default settings (reset)of the parameters 67
4.29 Complete Reinitialisation of the telephone 67
5 CALLER ID/CLIP 68
5.1 Setting the date and time 68
5.2 The Call List 69
5.3 Calling a number from the Call List 69
5.4 Storing a number from the Call List in the Phone Book 69
5.5 Deleting numbers from the Call List 69
5.5.1 Deleting one number 69
5.5.2 Delete all numbers 70
6 VOICE MAIL INDICATOR 70
7 GARANTEE 70
Butler 1010
51
HANDL. B1010 26-03-2001 12:10 Page 51
1 INSTALLATION
Before you use the telephone for the first time, you must first make sure the battery is charged
for 20 hours. If you do not do this, the telephone will not work optimally.
For installation, do the following:
Plug one end of the adaptor into the outlet and the other end into the adapter jack on the
bottom of the telephone.
Connect one end of the telephone cord with the wall phone jack and the other end to the
bottom of the telephone.
Open the battery compartment (see below).
Put the battery in the battery compartment and connect the battery connector to the handset
Close the battery compartment.
Leave the handset on the base unit for 20 hours. The Line/Charge indicator (LED) on
the base unit will light up.
Battery indicator:
The battery is fully charged.
The battery is half drained (50%)
The battery is low. When the battery is low, you will hear warning signals and the
battery symbol on the display will blink.
Butler 1010
52
wall phone jack
telephone connection
adapter outlet
adapter jack
HANDL. B1010 26-03-2001 12:10 Page 52
1
2
3
4
5
6
7
8
0
9
1
14
13
12
6
8
7
9
10
11
2
3
5
4
4
12 3
ENGLISH
Butler 1010
53
2 KEYS/LED
1 Display
2 Line key
3 Up/Handsfree key /
4 Programming key
5 Phonebook key
6 Redial/Pause key /P
7 Microphone
8 Volume/Ringer key /
9 Alphanumeric keys
10 Delete/Mute key
11 Down/Flash key /R
12 Base
13 Paging key
14 Line/Charge indicator (LED)
3 DISPLAY (LCD)
1 Number of calls received.
2 Date (day/month) of calls received.
3 Time (hour:minutes) of calls received.
4 Call information.
5 Symbol display ( ):
- this symbol means that the handset is located within the range of the base unit.
- when this symbol starts blinking, this means you are beyond the range of the
base unit. Move closer to the base unit so that the connection between the base unit
and the handset can be restored.
00000000000000
88888/88888:88
HANDL. B1010 26-03-2001 12:10 Page 53
Butler 1010
54
6 Symbol display ( ):
- this symbol means that the telephone has received calls that are automatically
stored in the Call List.
7 Symbol display ( ):
- this symbol means that the mute function is activated, the microphone is turned off
during a conversation.
8 Symbol display ( ):
- this symbol appears on the display when one makes or receives a call.
9 Symbol display ( ):
- this symbol means that the ringer is turned off. When one receives a call, the
telephone does not ring. The telephone will ring when one receives an internal call.
10 Symbol display ( ):
- this symbol is the battery indicator.
11 Symbol display ( ):
- this symbol means you are in the menu.
12 Symbol display ( ):
- this symbol appears when you browse the numbers in the Phone Book.
13 Symbol display ( ):
- this symbol appears when you have received a voice mail message (see chapter 6).
14 Symbol display ( ):
- this symbol means that the handsfree function is activated. You can now talk without
having to pick up the handset.
4 OPERATION
4.1 Setting the language
The telephone has 5 display languages: see display languages table on packaging!!
To set the language, do the following:
Press the Programming key .
Press the Up or Down key repeatedly until ‘SETTING’ appears on the display
Press the Programming key .
‘LANGUE’ appears on the display.
Press the Programming key .
The language set appears on the display.
Press the Up or Down key repeatedly to select the language you would like to use.
Once the desired language appears on the display, press the Programming key to confirm
your selection or repeatedly press the Mute/Delete key to leave the menu.
4.2 Making Calls
4.2.1 External Call
Press the Line key .
The Line/Charge indicator (LED) on the base unit will blink. ‘EXT’ and the Call symbol
appear on the display.
HANDL. B1010 26-03-2001 12:10 Page 54
ENGLISH
You will hear the dial tone. Dial the telephone number you wish to call.
The number appears on the display and is dialled.
After finishing your call, press the Line key to hang up or put the handset back on the
base unit.
4.2.2 Number preparation
Dial the telephone number you wish to call. You can correct the number by pressing the
Delete/Mute key .
Press the Line key .
The Line/Charge indicator (LED) on the base unit will blink. ‘EXT’ and the Call symbol
appear on the display.
The telephone number is dialled automatically.
After finishing your call, press the Line key to hang up or put the handset back on the
base unit.
4.2.3 Redialling the last number dialled
Press the Line key .
The Line/Charge indicator (LED) on the base unit will blink. ‘EXT’ and the Call symbol
appear on the display.
You will hear the dial tone.
Press the Redial key . The number you last called is dialled automatically without having to
re-enter the number.
4.2.4 Redial one of the last 5 numbers dialled
Press the Redial key . The number you last called appears on the display. If you would like
to dial one of the last 5 numbers dialled, press the Redial key a few times until the desired
number appears on the display.
Press the Line key .
The number shown on the display is dialled automatically without you having to re-enter the
number.
After finishing your call, press the Line key to hang up or put the handset back on the
base unit.
4.2.5 Calling a programmed number from the Phone Book
The telephone has a Phone Book in which you can program the telephone number of calls
received by name. If you would like to call a number from the Phone Book, do the following:
Press the Phone Book key . The first number of the Phone Book appears on the display.
Press the Up or Down key repeatedly to select the telephone number you wish to call.
Press the Line key .
The number shown on the display, is dialled automatically without you having to re-enter the
number.
After finishing your call, press the Line key to hang up or put the handset back on the
base unit.
Butler 1010
55
HANDL. B1010 26-03-2001 12:10 Page 55
4.2.6 An internal call: calling another handset
This function only works if multiple handsets are subscribed to the base unit !
Press the Programming key .
Press the Up or Down key repeatedly until ‘INTERCOM’ appears on the display.
Press the Programming key .
‘INT‘ appears on the display
Dial the number of the handset you would like to call.
After finishing your call, press the Line key to hang up or put the handset back on the
base unit.
4.3 Receiving a Call
4.3.1 Receiving an external call
All subscribed handsets will ring when you receive a call.
The Call symbol blinks on the display.
The telephone number of the caller appears on the display if you have Caller ID service (CLIP).
Consult your telephone company. The name of the caller also appears on the display if:
- the name is programmed into the Phone Book
- the network sends the name together with the telephone number
(FSK CID system only).
Press the Line key to accept the external call.
During the call ‘EXT’ and the symbol appear on the display. The call timer starts running.
After finishing your call, press the Line key to hang up or put the handset back on the
base unit.
4.3.2 Receiving an internal call
This function only works if multiple handsets are subscribed to the base unit!
The handset rings.
‘INT’ and the number of the handset you are trying to reach, appear on the display. The Call
symbol blinks on the display.
Press the Line key to accept the internal call.
During the call, ‘INT’, the handset number of the caller and the symbol appear on the
display. The call timer starts running.
After finishing your call, press the Line key to hang up or put the handset back on the
base unit.
4.3.3 Receiving an external call during an internal call
If you receive an external call during an internal call, you will hear a call waiting tone (double
beep) on both handsets being used for an internal call.
Press the Line key twice to accept the external call.
After finishing your call, press the Line key to hang up or put the handset back on the
base unit.
Butler 1010
56
HANDL. B1010 26-03-2001 12:10 Page 56
ENGLISH
4.4 Activate/deactivate handsfree function
This function allows you to communicate without having to pick up the handset. When you are
on the phone, press the Up/Handsfree key / to activate the handsfree function.
Press the same button to deactivate the handsfree function.
Note : When you are calling in handsfree mode and you want to change the volume, press the Volume
button .
Attention !! When you use the handsfree function for a long time, the batteries will be empty quickly !
4.5 Transferring a call to another handset
You have an external caller on the line.
Press the Programming key .
‘INTERCOM’ appears on the display.
Press the Programming key .
The external call is now on hold.
‘INT‘ appears on the display.
Dial the number of the handset to which you would like to transfer the call.
If the handset dialled is answered, you can have an internal conversation. Press the Line key
and the external call is transferred.
If the handset dialled is not answered, press the Down key to speak to the external caller
again.
4.6 Out of Range Warning
If the handset is out of range of the base unit, a warning signal will sound.
‘SEARCHING’ appears on the display and the symbol blinks on the display.
Move closer to the base unit.
As soon as you are back within range of the base unit, a signal sounds and the symbol
stops blinking.
4.7 Setting the speaker volume
Use the Volume/Ringer key / to set the volume of the speaker (handset). You can choose
from 5 levels. The telephone is set to level ‘3’ by default.
During a call, you can change the volume as follows:
Press the Volume/Ringer key / .
The volume level currently set appears on the display.
Use the number keys to set the desired level (1-5).
Press the Volume/Ringer key / to confirm your selection.
Note : You have 8 seconds to set the desired volume; if you do not, the telephone returns to standby
mode and the volume remains unchanged.
4.8 Call Duration Indicator on the Display
As soon as you press the Line key the call duration appears on the display (minutes-seconds).
E.g. “ 01-20 “ for 1 minute and 20 seconds.
The call duration remains visible on the display for 5 seconds after each call.
Butler 1010
57
HANDL. B1010 26-03-2001 12:10 Page 57
4.9 Turning off the microphone (mute)
It is possible to turn off the microphone during a call by pressing the Delete/Mute key . Now
you can speak freely without the caller being able to hear you.
You are on the phone. The Line/Charge indicator (LED) on the base unit will blink and
the Call symbol appears on the display.
Press the Delete/Mute key to turn off the microphone.
The symbol ‘X’ appears on the display ( ).
When you want to resume the conversation, press the Delete/Mute key again.
The symbol ‘X’ disappears from the display ( ). The person on the other end of the line can
hear you again.
4.10 Pause key
If you dial a telephone number and you would like to add a pause to this number, press the
Pause key at the desired place in the number.
When you call this number, this pause (3 seconds) is automatically included.
4.11 Conference call (two internal DECT handsets and one external caller)
You can have a telephone conversation with one internal and one external caller at the same
time.
While on the line with an external caller, press the Programming key .
‘INTERCOM’ appears on the display.
Press the Programming key .
The external call is now on hold.
‘INT‘ appears on the display.
Dial the number of the handset you would like to include in the call.
Once the handset dialled is answered, keep the ‘#’ key pressed for 3 seconds.
‘CONFERENCE’ appears on the display.
Now you are connected to one external and one internal caller (conference call).
4.12 Locating a misplaced handset (paging)
If you cannot find the handset, briefly press the Paging key on the base unit.
All handsets subscribed with the base unit will sound a signal so you can locate the misplaced
handset. To stop the signal, briefly press the Line key on the handset.
4.13 Using the alphanumeric keypad
Use the alphanumeric keypad to type text. To select a letter, press the corresponding key. E.g.
if you press the alphanumeric key ’5’, the first character (j) appears on the display. Press it
repeatedly to select other characters from this key.
Press the ‘2’ key twice to select the letter ‘B’. If you would like to select both ‘A’ and ‘B’ after
each other, first press the ‘2’ key once to select ‘A’, wait 2 seconds until the cursor moves to the
next position and then press the ‘2’ key twice to select ‘B’. You can delete characters mistakenly
typed by using the Delete key . The character in front of the cursor will be deleted. You can
move the cursor by pressing the Up and Down keys .
Butler 1010
58
HANDL. B1010 26-03-2001 12:10 Page 58
ENGLISH
Available characters
Press the right keys to get the following characters:
Keys First Second Third Fourth Fifth
press press press press press
1 + - / 1
2 A B C 2
3 D E F 3
4 G H I 4
5 J K L 5
6 M N O 6
7 P Q R S 7
8 T U V 8
9 W X Y Z 9
0 SPACE 0
4.14 The Phone Book
4.14.1 Adding a number and a name to the Phone Book
Press the Programming key .
Press the Up or Down key repeatedly until ‘PHONE BOOK’ appears on the display.
Press the Programming key .
‘SEARCH‘ appears on the display.
Press the Up or Down key repeatedly until ‘ADD NEW’ appears on the display.
Press the Programming key .
‘NAME‘ appears on the display.
Enter the name. Use the alphanumeric keys.
Press the Programming key .
Enter the telephone number. Use the alphanumeric keys.
Press the Programming key .
You will hear a long beep. The name and the number are stored in the Phone Book.
4.14.2 Looking up a number in the Phone Book
Press the Programming key .
Press the Up or Down key repeatedly until ‘PHONE BOOK’ appears on the display.
Press the Programming key .
‘SEARCH‘ appears on the display.
Press the Programming key .
Enter the first letters of the desired name.
Press the Programming key .
The first name, corresponding with these letters appears on the display.
Press the Up or Down key to browse for other numbers in the Phone Book.
Once the desired number appears on the display, the number will be automatically dialled
once the Line key is pressed.
Butler 1010
59
HANDL. B1010 26-03-2001 12:10 Page 59
4.14.3 Changing a name or number in the Phone Book
Press the Programming key .
Press the Up or Down key repeatedly until ‘PHONE BOOK’ appears on the display.
Press the Programming key .
‘SEARCH‘ appears on the display.
Press the Up or Down key repeatedly until ‘EDIT’ appears on the display.
Press the Programming key .
The first number in the Phone Book appears on the display.
Press the Up or Down key until the desired number appears on the display.
Press the Programming key to change the selected number programmed into the memory.
Press the Delete key to delete each letter of the name and use the alphanumeric keypad
to enter the correct name.
Press the Programming key .
Press the Delete key to delete each digit of the number and use the alphanumeric keypad to
enter the correct number.
Press the Programming key to save the changes made.
4.14.4 Deleting name and number from the Phone Book
Press the Programming key .
Press the Up or Down key repeatedly until ‘PHONE BOOK’ appears on the display.
Press the Programming key .
‘SEARCH‘ appears on the display.
Press the Up or Down key repeatedly until ‘DELETE’ appears on the display.
Press the Programming key .
The first number in the Phone Book appears on the display.
Press the Up or Down key until the number you want to delete appears on the display.
Press the Delete key .
‘DELETE ?’ appears on the display.
Press the Programming key to confirm that you want to delete it.
4.15 Turning the handset on/off
4.15.1 Turning the handset off
The handset is turned on.
Press the Programming key .
Press the Up or Down key repeatedly until ‘POWER OFF?’ appears on the display.
Press the Programming key . The telephone turns itself off. You cannot dial any more
numbers, nor receive any calls.
Note : If you would like to leave the menu without turning off the handset, press the Delete/Mute key .
4.15.2 Turning the handset on
The handset is turned off.
Press the Programming key . The telephone turns itself on.
Butler 1010
60
HANDL. B1010 26-03-2001 12:10 Page 60
ENGLISH
4.16 Setting the ring volume level on the handset
If you want, you can change the ring volume of an incoming call. You have 10 levels. You can
set the ring volume of internal and external calls separately so you can hear a difference.
If you select level ‘0’, the symbol appears on the display and you no longer hear the phone
ring when an external call is received (you still hear it ring for internal calls).
Level ‘9’ is the highest level. The telephone is set to level ‘5’ by default.
4.16.1 Setting the ring volume for external calls (0-9)
Press the Programming key .
Press the Up or Down key repeatedly until ‘RING SEL’ appears on the display.
Press the Programming key .
‘OUTSIDE‘ appears on the display.
Press the Programming key .
Press the Up or Down key repeatedly until ‘VOLUME’ appears on the display.
Press the Programming key .
The current volume level used appears on the display.
Enter a number between 0 and 9 to select the desired ringer volume. Use the number keypad
to do this.
Press the Programming key to confirm your selection.
4.16.2 Setting the ringer volume for internal calls (1-9)
Press the Programming key .
Press the Up or Down key repeatedly until ‘RING SEL’ appears on the display.
Press the Programming key .
‘EXTERNAL‘ appears on the display.
Press the Up or Down key repeatedly until ‘INTERNAL’ appears on the display.
Press the Programming key .
Press the Up or Down key repeatedly until ‘VOLUME’ appears on the display.
Press the Programming key .
The current volume level appears on the display.
Enter a number between 1 and 9 to select the desired ringer volume. Use the number keypad
to do this.
Press the Programming key to confirm your selection.
4.17 Setting the ringer melody on the handset
If you want, you can change the ringer melody for an incoming call. You have 9 ringer melo-
dies to choose from (1-9). By default, the ringer melody is set to ‘5’.
4.17.1 Setting a ringer melody for external calls (0-9)
Press the Programming key .
Press the Up or Down key repeatedly until ‘RING SEL’ appears on the display.
Press the Programming key .
‘EXTERNAL‘ appears on the display.
Press the Programming key .
‘MELODIES‘ appears on the display.
Butler 1010
61
HANDL. B1010 26-03-2001 12:10 Page 61
Press the Programming key .
The currently set ringer melody appears on the display.
Enter a number between 1 and 9 to select he desired ringer melody. Use the number keypad
to do this.
Press the Programming key to confirm your selection.
4.17.2 Setting a ringer melody for internal calls (0-9)
Press the Programming key .
Press the Up or Down key repeatedly until ‘RING SEL’ appears on the display.
Press the Programming key .
‘EXTERNAL‘ appears on the display.
Press the Up or Down key repeatedly until ‘INTERNAL’ appears on the display.
Press the Programming key .
‘MELODIES‘ appears on the display.
Press the Programming key .
The currently set ringer melody appears on the display.
Enter a number between 1 and 9 to select the desired ringer melody. Use the number keypad
for this.
Press the Programming key to confirm your selection.
4.18 Locking the key pad
If you lock the alphanumeric keypad, it is impossible to dial a telephone number.
Only the Programming key can still be used. ‘KEY LOCKED’ will be displayed on the display.
Press the Programming key .
Press the Up or Down key repeatedly until ‘KEY SETUP’ appears on the display.
Press the Programming key .
KEY LOCK‘ appears on the display.
Press the Programming key .
The current status of the keypad appears on the display:
- ‘LOCK’: the keypad is locked
- ‘UNLOCK’: the keypad is not locked
Press the Up or Down key to make your selection.
Press the Programming key to confirm your selection.
4.19 Turning key click on/off
You can set the telephone to make a sound whenever you press a key.
Press the Programming key .
Press the Up or Down key repeatedly until ‘KEY SETUP’ appears on the display.
Press the Programming key .
Press the Up or Down key repeatedly until ‘KEY CLICK’ appears on the display.
Press the Programming key .
The current status appears on the display:
- ‘CLICK ON’: turn on key click
- ‘CLICK OFF’: turn off key click
Press the Up or Down key to make your selection.
Press the Programming key to confirm your selection.
Butler 1010
62
HANDL. B1010 26-03-2001 12:11 Page 62
ENGLISH
4.20 The R key (flash)
Press the Flash key ‘R’ to use certain services such as “call waiting” (if your telephone company
offers this feature); or to transfer calls if you use a telephone exchange (PABX). The Flash key
‘R’ is a brief interruption of the line. You can set the flash time to 100ms or 250ms. This is set
to 100ms by default! However, if your system requires a longer flash time, do the following:
Press the Programming key .
Press the Up or Down key repeatedly until ‘SETTING’ appears on the display
Press the Programming key .
Press the Up or Down key repeatedly until ‘RECALL’ appears on the display.
Press the Programming key .
Press the Up or Down key repeatedly to select the flash time:
- SHORT = 100ms
- LONG = 250ms
Press the Programming key to confirm your selection.
4.21 Changing the PIN code
Certain functions are only available if you know the PIN code of the telephone. Thanks to this
secret code, settings are displayed that only you can change. The PIN code has 4 digits. The
default PIN code setting is ‘0000’. If you would like to change the default PIN code and set
your own secret code, do the following:
Press the Programming key .
Press the Up or Down key repeatedly until ‘SETTING’ appears on the display.
Press the Programming key .
Press the Up or Down key repeatedly until ‘PIN CODE’ appears on the display.
Press the Programming key .
‘OLD CODE’ appears on the display.
Enter the old PIN code. Use the number keys.
Press the Programming key .
‘NEW CODE’ appears on the display.
Enter the new PIN code in. Use the number keys.
Press the Programming key .
‘AGAIN’ appears on the display.
Enter the new PIN code again. Use the number keys.
Press the Programming key .
You hear a confirmation tone. The new PIN code has been set.
Caution : Do not forget your personal PIN code. If you do, you have to restore the default settings
(reset – see section 4.28).
4.22 Subscribing a handset to a Butler 1000, 1010, 1210 base unit
In order to be able to make and receive telephone calls, a new handset has to be subscribed to
the base unit. You can subscribe 5 handsets to one base unit. By default, each handset is sub-
scribed as handset 1 on the base unit upon delivery (base unit 1).
!!! You only need to subscribe the handset if: !!!
the handset subscription has been removed from the base unit (e.g. for reinitialisation)
you want to subscribe a different handset to this base unit.
Butler 1010
63
HANDL. B1010 26-03-2001 12:11 Page 63
The underlined procedure is only applicable to a Butler 1000, 1010, 1210 handset and base
unit!!
Keep the Paging key on the base unit pressed for 10 seconds until the Line/Charge indicator
on the base unit begins to blink rapidly. The Line/Charge indicator will blink rapidly
for one minute. During this minute, the base unit is in subscribing mode and you must do the
following to subscribe the handset:
Press the Programming key .
Press the Up or Down key repeatedly until ‘BASE SUB’ appears on the display.
Press the Programming key .
‘BASE _‘ appears on the display.
Enter a number of the base unit you would like to subscribe the handset to (1-4).
Use the number keypad.
Note: Each handset can be subscribed to 4 different DECT base units. Each base unit is assigned a
number from 1 to 4 in the handset. When you subscribe a new handset, you can assign a base unit
number. It is best to use ‘1’ .
‘SEARCHING’ and the symbol appears on the display.
The RFPI code (each base unit has a unique RFPI code) appears on the display and a signal
sounds when the handset has found the base unit.
Press the Programming key .
‘PIN’ appears on the display.
Enter the 4-digit PIN code of the base unit in (default PIN code is ‘0000’). Use the number
keypad.
Press the Programming key .
The handset is subscribed to the base unit.
4.23 Subscribing Butler 1010 handset on Butler 575/575+ & Cocoon100/100+ &
Butler 2000 base unit
Press the Paging key on the Butler 575/575+ or Cocoon100/100+ or Butler 2000 base unit
for +/- 15 seconds until you hear a beep. The base unit is now in subscribing mode. For 1
minute, the base unit is in subscribing mode and you have to do the following to subscribe the
handset:
Press the Programming key .
Press the Up or Down key repeatedly until ‘BASE SUB’ appears on the display.
Press the Programming key .
‘BASE _‘ appears on the display.
Enter a number for the base unit to which you would like to subscribe the handset (1-4).
Use the number keypad.
‘SEARCHING’ and the symbol appear on the display.
The RFPI code (each base unit has a unique RFPI code) appears on the display and a signal
sounds once the base unit is found by the handset.
Press the Programming key .
‘PIN’ appears on the display.
Enter the 4-digit PIN code of the base unit (default PIN code is ‘1590’). Use the number keypad.
Press the Programming key .
The handset is subscribed to the base unit.
Butler 1010
64
HANDL. B1010 26-03-2001 12:11 Page 64
ENGLISH
4.24 Subscribing a Butler 1800T handset to a Butler 1010 base unit
The below procedure only applies to a Butler 1800T handset and Butler 1010 base unit!!
Press the Paging key on the base unit for 10 seconds until the Line/Charge indicator
op the base unit starts to blink quickly. The Line/Charge indicator will blink quickly for one
minute. During this minute, the base unit is in subscribing mode and you must do the
following to subscribe the handset:
Press the key once.
Press the OK key and select a base unit (1-4) with the keys.
Press the OK key.
Enter the PIN code of your base unit. Usually: 0000.
Press OK. The Butler 1800T now searches for your DECT base unit. As soon as it finds it, you
will see the identification code of this base unit on the display.
Press OK to confirm your selection or press ESC to cancel the subscription.
4.25 Removing subscription of a handset to a base unit
It is possible to cancel subscription of a handset to a base unit. You would do this if a
handset is damaged and has to be replaced by a new one.
Caution: You can only cancel subscription of another handset, not the handset you are using to do the
cancellation procedure.
Press the Programming key .
Press the Up or Down key repeatedly until ‘SETTING’ appears on the display.
Press the Programming key .
Press the Up or Down key repeatedly until ‘REMOVE HS’ appears on the display.
Press the Programming key .
‘PIN’ appears on the display.
Enter your 4-digit PIN code in (default PIN code is ‘0000’). Use the number keypad.
Press the Programming key .
‘REMOVE HS’ appears on the display.
Dial the number of the handset you want to remove (1 –5). Use the number keypad.
Press the Programming key .
‘REMOVE HS’ appears on the display and the handset is removed
NOT SUB’ appears on the handset removed.
4.26 Selecting a base unit
If your handset is subscribed to several base unit stations (max. 4) , you must select a base unit
because the handset can only communicate with one base unit at a time. There are two possibilities:
4.26.1 Automatic selection
If you set the handset to ‘automatic selection’, the handset will automatically choose the closest
base unit in standby.
Press the Programming key .
Press the Up or Down key repeatedly until ‘SETTING’ appears on the display.
Press the Programming key .
Butler 1010
65
HANDL. B1010 26-03-2001 12:11 Page 65
Press the Up or Down key repeatedly until ‘BASE SEL’ appears on the display.
Press the Programming key .
Press the Up or Down key repeatedly until ‘AUTO’ appears on the display.
Press the Programming key .
‘SEARCHING’ and the symbol appear on the display.
A signal sounds once the handset has found a base unit.
4.26.2 Manual selection
If you set the handset to ‘manual selection’, the handset will only choose the base unit you
have set.
Press the Programming key .
Press the Up or Down key repeatedly until ‘SETTING’ appears on the display.
Press the Programming key .
Press the Up or Down key repeatedly until ‘BASE SEL’ appears on the display.
Press the Programming key .
Press the Up or Down key repeatedly until ‘MANUAL’ appears on the display.
Press the Programming key .
‘BASE -‘ appears on the display.
Enter the number of the base unit you want to select (1-4). Use the number keypad.
Press the Programming key .
‘SEARCHING’ and the symbol appear on the display.
A signal sounds once the selected base unit has been found.
Notes :
Before you can select a base unit, the base unit must be subscribed to the handset first.
If ‘NOT SUB’ appears on the display, this means the selected base unit does not exist or the handset has
not been subscribed.
4.27 Barring outgoing calls
You can program the handsets to bar calls to certain telephone numbers so that for instance ‘00’
international numbers cannot be called. Up to 5 numbers (of max. 5 digits) can be barred.
To do this, do the following:
Press the Programming key .
Press the Up or Down key repeatedly until ‘SETTING’ appears on the display.
Press the Programming key .
Press the Up or Down key repeatedly until ‘BARRING’ appears on the display.
Press the Programming key .
‘PIN’ appears on the display.
Enter your PIN code
Press the Programming key .
‘BAR NUM ’ appears on the display. You are in memory “1. _ _ _ _ _”.
Press the Up or Down key to select one of the 5 memories.
Enter the number (max. 5 digits) to be barred, e.g. 01486.
Press the Programming key .
‘HS _ _ _ _ _’ (= number on the handset (1-5)) ‘01486’ (= the barred numbers) appear on
Butler 1010
66
HANDL. B1010 26-03-2001 12:11 Page 66
ENGLISH
the display.
Enter the numbers of the handsets from which the barred numbers cannot be called.
e.g. Press the number key 2, 3 and 5. On the display, this will appear: HS _2 3_5 01486
These handsets can no longer dial numbers beginning with ‘01486’.
Press the Programming key to confirm your selection.
Repeat the same procedure described above if you would like to bar other numbers (max. 5)!
4.28 Default settings (reset) of the parameters
You can reset the standard (default) settings in the telephone so that they are the same they
were when you bought the telephone. You need the PIN code to do this.
The default settings are:
Keypad: not locked
Key clicks: active
Speaker volume: level 3
Ringer melody: 1
Ringer volume : 5
Selection base unit: automatic
Flash time: 100ms
To restore the default settings, do the following:
Press the Programming key .
Press the Up or Down key repeatedly until ‘SETTING’ appears on the display.
Press the Programming key .
Press the Up or Down key repeatedly until ‘RESET’ appears on the display.
Press the Programming key .
‘PIN’ appears on the display.
Enter your PIN code.
Press the Programming key .
4.29 Complete Reinitialisation of the telephone
This function allows you to completely reinitialise the telephone without requiring your PIN
code. This will delete all Phone Book memory entries, all handsets will be removed, all default
settings will be restored and the default PIN code will be restored to ‘0000’.
Do the following:
Disconnect the battery in the telephone.
Keep the ‘*’ key pressed and reconnect the battery until the handset rings continually and
the display lights up. Release the ‘*’ button and press the Programming key .
The handset finds the base unit and a signal sounds.
Briefly press the ‘*’ key.
‘RESET ?‘ appears on the display.
Press the Programming key to confirm your selection of disconnect the battery to
discontinue the procedure.
‘RESETTING‘ appears on the display and a long beep tone sounds.
Butler 1010
67
HANDL. B1010 26-03-2001 12:11 Page 67
‘NOT SUB‘ appears on the display. The handset is completely reinitialised.
Afterwards, you must resubscribe all handsets as described in point 4.21! However you no
longer need to set the base unit to subscription mode, because this now happens automatically!
5 CALLER ID/CLIP
(This service only works when you have a Caller ID/Clip subscription. Contact your telephone
company).
When you receive a call, the telephone number of the caller, the date and time appears on the
handset display. The telephone can receive calls in both FSK and DTMF. If the name is program-
med in the Phone Book, the name in the Phone Book is displayed!
The telephone can store 30 calls in a Call List that can be reviewed later. The telephone never
stores the same call twice. When the memory is full, the new calls automatically replace the
oldest calls in the memory. The symbol on the display blinks if the call is not read or not
answered. If the Call List is empty and you press the Up key , three beep tones will sound.
You can view the information of an incoming call as follows:
Press the Up key . The name (if sent by the network or present in the Phone Book memory)
of the caller, the sequence number of the call in the Call List, the date and time of the call
appear on the display.
Press the Down key . The telephone number of the caller appears on the display.
5.1. Setting the date and time
When you receive an incoming call and the date and time are not sent together with the
telephone number, this means that the date and the time will not be shown on the display. By
setting the date and time, they will be shown on the display, together with the telephone
number, every time a call comes in !
Press the Programming key .
Press the Up or Down key a few times until ‘SETTING’ appears on the display.
Press the Programming key .
’DATE/TIME’ appears on the display.
Press the Programming key again.
When ‘YEAR’ appears on the display, enter the 2 last numbers of the year (00=2000,
01=2001, ...) and press the Programming key to confirm.
When ‘MONTH’ appears on the display, enter the month (01=January, 02=February, ...) and
press the Programming key to confirm.
When ‘DAY’ appears on the display, enter the day of the month and press the Programming
key to confirm.
Butler 1010
68
HANDL. B1010 26-03-2001 12:11 Page 68
ENGLISH
When ‘HOUR’ appears on the display, enter the current hour (in 24h format) and press the
Programming key to confirm.
When ‘MINUTES’ appears on the display, enter the minutes and press the Programming key
to confirm.
The date and time are now set !
5.2 The Call List
The calls received are stored in the Call List (max. 30 numbers).
Briefly press the Up key to view the most recent call.
The name of the most recent caller appears on the display. If no name is available, ‘NO
NAME’ appears on the display.
If it is a private number, ‘UNAVAL’ appears on the display.
The date and time the call was received are linked to each call.
Briefly press the Down key to view the telephone number of the call.
Briefly press the Down key to browse other numbers on the list.
Notes :
If neither the Up or Down key is pressed for 15 seconds, the telephone will return to standby mode.
After a call is received, the number of the caller remains on the display for 15 seconds after the last ring.
Caller ID is not available while you are on the line.
5.3 Calling a number from the Call List
Press the Up key to go to the Call List
Press the Up key to look up the desired call. Press the Down key to view the telephone
number.
Once the number is on the display, press the Line key and the number is dialled automatically.
(The symbols and ‘EXT’ appear on the display and the call timer starts.)
5.4 Storing a number from the Call List in the Phone Book
Press the Up key to go to the Call List.
Press the Up key to look up the desired number.
Press the Phone Book key twice.
‘STORE’ appears on the display.
The number is stored in the Phone Book. If the call was displayed without a name (NO
NAME), you can add a name to this number in the Phone Book afterwards
The telephone returns to standby-modus.
5.5 Deleting numbers from the Call List
5.5.1 Deleting one number
Press the Up key to go to the Call List.
Press the Up key to find the call you would like to delete.
Once this call appears on the display, press the Delete key .
‘DELETE?’ appears on the display.
Press the Programming key to confirm your selection or the Delete key to cancel.
The call is deleted and the next call appears on the display.
Butler 1010
69
HANDL. B1010 26-03-2001 12:11 Page 69
70
5.5.2 Delete all numbers
Press the Up key to go to the Call List.
Keep the Delete key pressed until ‘DELETE ALL’ appears on the display.
Press the Programming key to confirm your selection or the Delete key to cancel.
All calls are deleted.
6 VOICE MAIL INDICATOR
This function only works if you have the voice mail or phone mail service and if the network
sends this indication along with the caller ID (CLIP) information!
When you receive a new message in your voice mail system, the ‘ icon will appear on the
display. Once you have listened to your messages, the ‘ icon will disappear.
7 WARRANTY
Warranty : 1 year for defects of the telephone.
Caution : Return your telephone in its original packaging.
Do not forget to include proof of purchase with your telephone.
The warranty is not valid without proof of purchase.
Butler 1010
HANDL. B1010 26-03-2001 12:11 Page 70
www.topcom.be
HANDL. B1010 26-03-2001 12:11 Page 72
68


Need help? Post your question in this forum.

Forumrules


Report abuse

Libble takes abuse of its services very seriously. We're committed to dealing with such abuse according to the laws in your country of residence. When you submit a report, we'll investigate it and take the appropriate action. We'll get back to you only if we require additional details or have more information to share.

Product:

For example, Anti-Semitic content, racist content, or material that could result in a violent physical act.

For example, a credit card number, a personal identification number, or an unlisted home address. Note that email addresses and full names are not considered private information.

Forumrules

To achieve meaningful questions, we apply the following rules:

Register

Register getting emails for Topcom butler 1010 at:


You will receive an email to register for one or both of the options.


Get your user manual by e-mail

Enter your email address to receive the manual of Topcom butler 1010 in the language / languages: English, Dutch, French as an attachment in your email.

The manual is 0,48 mb in size.


You will receive the manual in your email within minutes. If you have not received an email, then probably have entered the wrong email address or your mailbox is too full. In addition, it may be that your ISP may have a maximum size for emails to receive.

The manual is sent by email. Check your email

If you have not received an email with the manual within fifteen minutes, it may be that you have a entered a wrong email address or that your ISP has set a maximum size to receive email that is smaller than the size of the manual.

The email address you have provided is not correct.

Please check the email address and correct it.

Your question is posted on this page

Would you like to receive an email when new answers and questions are posted? Please enter your email address.


Info