659037
7
Zoom out
Zoom in
Previous page
1/17
Next page
Kat. Nr. 98.1017
Bedienungsanleitung
Instrucciones de uso
Istruzioni per l’uso
Mode d'emploi
Handleiding
Instructions
Achtung:
Bitte entsorgen Sie Altgeräte und leere Batterien nicht über den Hausmüll. Geben Sie diese
bitte zur umweltgerechten Entsorgung beim Handel oder entsprechenden Sammelstellen
gemäß nationaler oder lokaler Bestimmungen ab.
Attention:
Please do not dispose of old electronic devices and empty batteries in household waste. To pro-
tect the environment, take them to your retail store or to appropriate collection sites according
to national or local regulations.
Attention:
Les vieux appareils électroniques et piles usagées ne doivent pas être jetées avec les ordures
ménagères. Dans le souci de protéger l'environnement veuillez les emmener dans un site appro-
prié de récupération ou chez votre revendeur selon les spécifications nationales et locales.
Attenzione:
Le batterie scariche e apparecchi elettrici smessi non devono essere smaltiti insieme all'immon-
dizia domestica, bensì dovranno essere riconsegnate al negoziante o ad altri enti preposti per il
riciclo in conformità alle vigenti disposizioni nazionali o locali.
Opgepast:
Batterijen en technische apparaten mogen niet met het huisvuil worden weggegooid. Breng ze
naar de inzamelplaatsen of bij uw detaillist naar de daarvoor bestemde containers volgens de
nationale of lokale bepalingen.
Atención:
El aparato y las baterías usadas no deben ser depositadas con los residuos
normales de la casa. Por favor deposítelas en el comercio especializado
o bien en los centros de recogida y reciclaje previstos para ello según
el reglamento nacional o local.
Anleitung No. 98.1017_03/06 09.03.2006 14:34 Uhr Seite 1
2
2
5
1
6
3
7
4
3
Anleitung No. 98.1017_03/06 09.03.2006 14:34 Uhr Seite 2
FUNK - WECKER MIT INNENTEMPERATUR
Funktionen:
Funkuhr mit höchster Genauigkeit
Sekundenanzeige
Anzeige von Wochentag und Datum
Weckalarm mit Schlummerfunktion
Innentemperatur (-10° bis 60 °C / 14° bis 140 °F)
Hintergrundbeleuchtung
inkl. Batterien
Bedienungselemente:
1. Display mit Uhrzeit, Kalender und Temperatur
2. SNOOZE/LIGHT-Taste
3. “+” -Taste
4. “SET/WAVE” -Taste
5. “-” -Taste
6. “SNZ/ALM ON/OFF” -Schalter
7. “RESET” -Taste (im Batteriefach)
Bedienung:
Öffnen Sie das Batteriefach und legen Sie die Batterien (2 x 1,5 V AA) ein, +/- Pol wie abge-
bildet. Ziehen Sie die Schutzfolie vom Display ab. Das Gerät ist jetzt betriebsbereit.
4 5
Empfang der Funkzeit:
Nach dem Einlegen der Batterien stellt sich die Uhr auf 12.00 h, Samstag 01.01.
Nun beginnt die Basisstation den Empfang des Funksignals für die Uhrzeit. Das DCF-
Empfangszeichen blinkt und wird bei erfolgreichem Empfang ständig im LCD angezeigt.
Das WAVE OK Symbol erscheint auf dem Display und die funkgesteuerte Zeit wird ange-
zeigt.
Sollte kein Zeitcode empfangen worden sein, wird der Empfang alle 3 Stunden für
10 min. aktiviert.
Sie können die Initialisierung auch manuell starten. Drücken Sie die "SET/WAVE” Taste.
Die Uhrzeit aktualisiert sich jeden Tag um 12 Uhr nachts. Ist kein Empfang des Funksig-
nals für die Uhrzeit möglich, erfolgt der Versuch nochmals um 1 Uhr, 2 Uhr und 3 Uhr
nachts (geringste Störeinflüsse).
Falls der Funkwecker kein DCF-Signal empfangen kann (z.B. wegen Störungen, Über-
tragungsdistanz, etc.), kann die Zeit auch manuell eingestellt werden. Die Uhr arbeitet
dann wie eine normale Quarz-Uhr.
Während des Empfangs des Funksignals der Uhrzeit ist eine Bedienung der Tasten nicht
möglich.
Die Zeitübertragung erfolgt von einer Cäsium Atom-Funkuhr, die von der Physikalisch
Technischen Bundesanstalt in Braunschweig betrieben wird. Die Abweichung beträgt
weniger als 1 Sekunde in einer Million Jahren. Die Zeit ist kodiert und wird von Mainflin-
gen in der Nähe von Frankfurt am Main durch ein DCF-77 (77.5 kHz) Frequenzsignal
übertragen mit einer Reichweite von ca. 1.500 km. Ihr Funkwecker empfängt das Signal,
wandelt es um und zeigt immer die exakte Zeit an. Auch die Umstellung von Sommer-
und Winterzeit erfolgt automatisch. Der Empfang hängt hauptsächlich von der geo-
graphischen Lage ab. Im Normalfall sollten innerhalb des Radius von 1.500 km aus-
gehend von Frankfurt bei der Übertragung keine Probleme auftauchen.
Anleitung No. 98.1017_03/06 09.03.2006 14:34 Uhr Seite 3
Bitte beachten Sie folgende Hinweise:
Es wird empfohlen, einen Abstand von mindestens 1,5 – 2 Metern zu eventuell stören-
den Geräten wie Computerbildschirmen und Fernsehgeräten einzuhalten.
In Stahlbetonbauten (Kellern, Aufbauten) ist das empfangene Signal natürlicherweise
schwächer. In Extremfällen wird empfohlen, das Gerät in Fensternähe zu platzieren
und/oder durch Drehen das Funksignal besser zu empfangen.
Nachts sind die atmosphärischen Störungen meist geringer und ein Empfang ist in den
meisten Fällen möglich. Ein einziger Empfang pro Tag genügt, um die Genauigkeit zu
gewährleisten und Abweichungen unter 1 Sekunde zu halten.
Einstellungen für Uhrzeit und Kalender:
Halten Sie die “SET/WAVE” Taste für 3 Sekunden gedrückt. Die Zeitzone und Sprachein-
stellung für den Wochentag fängt an zu blinken. Sie können mit der “+“ Taste die Zeit-
zone und der “-“ Taste die Spracheinstellung für den Wochentag einstellen.
Spracheinstellung für den Wochentag: Englisch (EN), Deutsch (DE), Französisch (FR), Itali-
enisch (IT).
Die Zeitzoneneinstellung wird benötigt, wenn das DCF Signal empfangen werden kann,
die Zeitzone sich aber von der deutschen Zeit unterscheidet (z.B. 1 =eine Stunde später).
Bestätigen Sie mit der “SET/WAVE“-Taste. Die Jahresanzeige fängt an zu blinken und Sie
können mit der “+“ und “-“ Taste das Jahr einstellen.
Bestätigen Sie mit der “SET/WAVE“-Taste. Nun können Sie nacheinander Datum und
Uhrzeit einstellen. Halten Sie die “+“ und “-“ Taste gedrückt, gelangen Sie in den
Schnelllauf.
Bestätigen Sie jeweils mit der “SET/WAVE”-Taste. Sie können mit der “+“ Taste das
6 7
12-Stunden (12HR) oder 24-Stunden-Zeitsystem (24HR) und der “-“ Taste °C oder °F als
Maßeinheit für die Temperatur einstellen.
Bestätigen Sie mit der “SET/WAVE“-Taste.
Einstellung der Alarmzeit:
Drücken Sie die “+” oder “-“ Taste im Normalmodus. Die Alarmzeit erscheint im Display.
Sie können nun mit der “+“ oder “-“ Taste die Alarmzeit einstellen. Halten Sie die “+“
und “-“ Taste gedrückt, gelangen Sie in den Schnelllauf.
Das Gerät verlässt automatisch den Alarmmodus, wenn länger als 3 Sekunden keine
Taste gedrückt wird.
Schieben Sie den Schalter “SNZ/ALM ON/OFF“ auf die Position ALM ON. Das Alarm-Sym-
bol erscheint auf dem Display. Die Alarm-Funktion ist aktiviert.
Während das Wecksignal ertönt, können Sie es mit der “SNOOZE/LIGHT“ Taste ausschalten.
Snooze-Funktion:
Schieben Sie den Schalter “SNZ/ALM ON/OFF“ nach Einstellung der Alarmzeit auf die
Position SNZ, um die Snooze-Funktion zu aktivieren. Das Snooze-Symbol Zz erscheint auf
dem Display.
Wenn der Wecker klingelt, lösen Sie die Snooze-Funktion mit der Taste “SNOOZE/LIGHT“
aus. Der Alarmton wird dann für 5 Minuten unterbrochen.
Um die Snooze-Funktion zu deaktivieren, schieben Sie den Schalter “SNZ/ALM ON/OFF“
auf die Position ALM ON. Um den Alarm ganz auszuschalten, schieben Sie den Schalter
auf die Position ALM OFF.
Beleuchtung:
Mit der Taste “SNOOZE/LIGHT“ können Sie die Anzeige beleuchten.
Anleitung No. 98.1017_03/06 09.03.2006 14:34 Uhr Seite 4
RADIO CONTROLLED ALARM CLOCK WITH INDOOR TEMPERATURE
Functions:
Highest precision Radio-controlled clock
Seconds display
Display of day and date
Alarm with snooze function
Indoor temperature (-10° to 60 °C / 14° to 140 °F)
Backlight
Batteries included
Operating Elements:
1. Display for time, calendar and temperature
2. “SNOOZE/LIGHT” button
3. “+” button
4. “SET/WAVE” button
5. “-” button
6. “SNZ/ALM ON/OFF” switch
7. “RESET” button (in the battery compartment)
Operation:
Open the battery compartment and insert the batteries (2 x 1,5 V AA), polarity as illustra-
ted. Pull off the protection foil on the display. The unit is now ready to use.
Instandhaltung:
Drücken Sie die “RESET“ Taste im Batteriefach mit einem spitzen Gegenstand, wenn
das Gerät nicht einwandfrei funktioniert.
Tauschen Sie die Batterien aus, wenn die Anzeige oder der Alarmton schwächer wird.
Achtung:
Bitte entsorgen Sie Altgeräte und leere Batterien nicht über den Hausmüll. Geben Sie
diese bitte zur umweltgerechten Entsorgung beim Handel oder entsprechenden Sam-
melstellen gemäß nationaler oder lokaler Bestimmungen ab.
Setzen Sie das Gerät keinen extremen Temperaturen, Vibrationen und Erschütterun-
gen aus.
Reinigen Sie das Gerät mit einem weichen, leicht feuchten Tuch. Keine Scheuer- oder
Lösungsmittel verwenden!
Bitte unternehmen Sie keine eigenen Reparaturversuche. Bei Reklamationen wenden
Sie sich an Ihren Händler. Vor der Reklamation bitte Batterien austauschen. Bei Öff-
nung oder unsachgemäßer Behandlung erlischt die Garantie.
8 9
Anleitung No. 98.1017_03/06 09.03.2006 14:34 Uhr Seite 5
Radio controlled time reception:
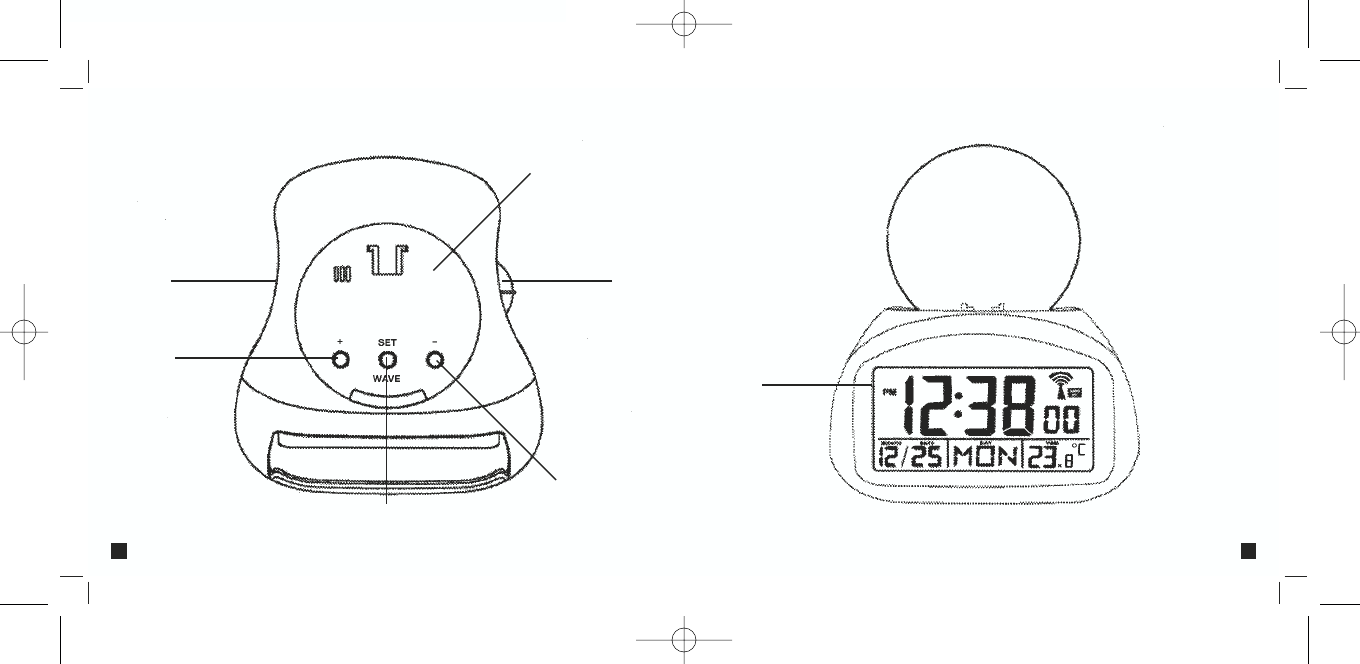
After the initial setup, the display shows 12.00 h, Saturday 01.01.. The DCF tower icon in
the clock display starts flashing. This indicates that the clock has detected the presence
of a radio signal and is trying to receive it. When the time code is received, the WAVE OK
symbol becomes lit and the radio-controlled time will be displayed.
If the time reception was not successful, it will repeat a 10-minute reception every
3 hours.
The clock is able to scan the time signal manually by “SET/WAVE“ button.
The clock automatically scans the time signal at midnight everyday to maintain accurate
timing. If the reception fails, it will repeat again at 1.00 a.m. 2.00a.m. and 3.00 a.m.
In case the clock cannot detect the DCFsignal (for example due to disturbances,
transmitting distance, etc.), the time can be set manually. The clock will then work as a
normal quartz clock.
Buttons will not function while scanning DCF signal unless they are well received.
The time base for the radio controlled time is a Cesium Atomic Clock operated by the
Physikalisch Technische Bundesanstalt Braunschweig which has a time deviation of less
than one second in one million years. The time is coded and transmitted from Main-
flingen near Frankfurt via frequency signal DCF-77 (77.5 kHz) and has a transmitting
range of approximately 1,500 km. Your radio-controlled alarm clock receives this signal
and converts it to show the precise time in summer or wintertime. The quality of the
reception depends greatly on the geographic location. In normal cases, there should be
no reception problems within a 1,500km radius around Frankfurt.
Please take note of the following:
Recommended distance to any interfering sources like computer monitors or TV sets is a
minimum of 1.5 - 2 metres.
10 11
Within ferro-concrete rooms (basements, superstructures), the received signal is natural-
ly weakened. In extreme cases, please place the unit close to a window and/or point its
front or back towards the Frankfurt transmitter.
During night-time, the atmospheric disturbances are usually less severe and reception is
possible in most cases. A single daily reception is adequate to keep the accuracy deviati-
on below 1 second.
Setting of clock and calendar:
Hold “SET/WAVE“ button for 3 seconds to enter setting mode. The time zone and day-
of-week language indicator is flashing. Press “+“ button to adjust the setting of time
zone or “-“ button to adjust the setting of day-of-week language.
Day-of-week language: English (EN), German (DE), French (FR), Italian (IT).
The time zone is used for the countries where the DCF signal can be received but the
time zone is different from the German time (e.g. 1=one hour later).
Press “SET/WAVE“ button to confirm the setting. The year indicator is flashing. Press “+“
or “-“ buttons to adjust the setting.
Press “SET/WAVE“ button to confirm the setting. Now set date and time one after the
other. Holding “+“ or “-“ buttons, you will enter fast mode.
Press “SET/WAVE“ button to confirm each setting. Press “+“ button to select 12 or
24 hours mode or “-“ button to select °C or °F for temperature unit.
Press “SET/WAVE“ button to confirm the setting.
Alarm clock function:
Press “+“ or “-“ button to select Alarm Time in normal mode.
Press “+“ or “-“ buttons to adjust the alarm time. Holding “+“ or “-“ buttons, you will
enter fast mode.
Anleitung No. 98.1017_03/06 09.03.2006 14:34 Uhr Seite 6
The instrument will quit the Alarm mode, if there is no button used within 3 seconds.
Slide SNZ/ALM ON/OFF switch to ALM ON position. The alarm symbol appears on the dis-
play. The alarm function is activated.
Once the alarm starts to ring, you can stop the alarm sound by pressing SNOOZE/LIGHT
button.
Snooze function:
Slide SNZ/ALM ON/OFF switch to the position SNZ after setting the alarm time. The
snooze symbol Zz appears on the display. The snooze function is activated.
Once the alarm starts to ring, you can activate the snooze function by pressing SNOOZE/
LIGHT button. The alarm will be interrupted for 5 minutes.
To deactivate the snooze function slide SNZ/ALM ON/OFF switch to the position ALM ON.
To stop the alarm completely, slide the switch to the ALM OFF position.
Backlight:
Press the SNOOZE/LIGHT button to light up the display.
Maintenance:
Use a pin to press the RESET button if the unit does not work properly.
Replace the batteries when the display becomes weak or the alarm level declines.
Attention:
Please do not dispose of old electronic devices and used batteries in household waste.
To protect the environment, take them to your retail store or to nearest civic amenity
site to be disposed of according to national or local regulations.
Do not expose the instrument to extreme temperatures, vibration or shock.
12 13
Clean it with a soft damp cloth. Do not use solvents or scouring agents.
Please do not try to repair the unit. Contact the original point of purchase. Please
change the batteries before complaining. No guarantee if the instrument is handled
or opened improperly
Anleitung No. 98.1017_03/06 09.03.2006 14:34 Uhr Seite 7
RÉVEIL RADIO PILOTÉ AVEC TEMPÉRATURE INTÉRIEURE
Fonctions:
Horloge radio pilotée de la plus extrême précision
Affichage de secondes
Affichage de jour et date
Alarme avec fonction snooze
Température intérieure (-10° à 60 °C / 14° à 140 °F)
Eclairage de fond
Batteries inclues
Eléments de commande:
1. Affichage avec l´heure actuelle, calendrier et température intérieure
2. Touche SNOOZE/LIGHT
3. Touche « + »
4. Touche SET/WAVE
5. Touche « - »
6. Commutateur SNZ/ALM ON/OFF
7. Touche RESET (dans le compartiment de la pile)
Opération:
Ouvrir le compartiment de la pile et insérer les batteries (2 x 1,5 V AA), polarité +/- comme
illustré. Tirer la feuille de protection de l´affichage. L´instrument est maintenant prêt à
fonctionner.
14 15
Réception de l’heure radio:
Après la première mise en service 12.00 H, samedi, 01.01. apparaît sur le display. Le sym-
bole de transmission radio DCF commence à clignoter. L’horloge a repéré un signal radio
et tente de le capter. Dès la réception du code horaire, le symbole WAVE OK est affiché
sur le display, et l’heure radio s’affiche.
Si l’heure radio ne s’affiche pas, la réception est actualisée chaque heure pour 10 min.
On peut également activer le signal radio manuellement à l'aide de la touche SET/WAVE.
L’heure est réactualisée tous les jours à 24 heures. Si la réception du signal radio de
l'heure est impossible, la tentative de réception recommence à 1 heures, 2 heures et
3 heures le matin (Moins de parasitage).
Si votre réveil radio piloté ne peut pas recevoir le signal DCF (p. ex. en raison de la
présence de perturbations, d’une distance de transmission excessive etc.), vous pouvez
procéder à un paramétrage manuel. Dans ce cas, l’horloge fonctionne comme une
horloge à quartz normale.
Pendant la réception du signal de l'heure, il n'est pas possible d'utiliser les touches.
La transmission de l’heure radio s’effectue selon une horloge atomique au césium,
exploitée par la Physikalisch Technische Bundesanstalt de Braunschweig (Institut Fédéral
Physico-Technique de Braunschweig). L’écart de précision de cette horloge est de
1 seconde pour un million d’années seulement. L’heure est distribuée à partir de Main-
fingen, près de Francfort sur le Main, par un signal DCF-77 (77,5 kHz), avec une portée
d’environ 1.500 km. Votre réveil radio piloté reçoit ce signal, le convertit et affichera
ainsi toujours l’heure exacte. Le passage de l’heure d’hiver à l’heure d’été et vice-versa
s’effectue également en mode automatique. La réception est essentiellement fonction
de votre position géographique. En règle générale, dans un rayon de 1.500 km autour
de Francfort, aucun problème de transmission ne devrait apparaître.
Anleitung No. 98.1017_03/06 09.03.2006 14:35 Uhr Seite 8
7


Need help? Post your question in this forum.

Forumrules


Report abuse

Libble takes abuse of its services very seriously. We're committed to dealing with such abuse according to the laws in your country of residence. When you submit a report, we'll investigate it and take the appropriate action. We'll get back to you only if we require additional details or have more information to share.

Product:

For example, Anti-Semitic content, racist content, or material that could result in a violent physical act.

For example, a credit card number, a personal identification number, or an unlisted home address. Note that email addresses and full names are not considered private information.

Forumrules

To achieve meaningful questions, we apply the following rules:

Register

Register getting emails for TFA 98.1017 at:


You will receive an email to register for one or both of the options.


Get your user manual by e-mail

Enter your email address to receive the manual of TFA 98.1017 in the language / languages: English, German, French, Italian, Spanish as an attachment in your email.

The manual is 0,1 mb in size.


You will receive the manual in your email within minutes. If you have not received an email, then probably have entered the wrong email address or your mailbox is too full. In addition, it may be that your ISP may have a maximum size for emails to receive.

The manual is sent by email. Check your email

If you have not received an email with the manual within fifteen minutes, it may be that you have a entered a wrong email address or that your ISP has set a maximum size to receive email that is smaller than the size of the manual.

The email address you have provided is not correct.

Please check the email address and correct it.

Your question is posted on this page

Would you like to receive an email when new answers and questions are posted? Please enter your email address.


Info