658429
14
Zoom out
Zoom in
Previous page
1/24
Next page
PRODUCT MANUAL
ENGLISH VERSION
harmonyG
Introduction . . . . . . . . . . . . . . . . . . . . . . . . . . . . . . . 4
QuickStart . . . . . . . . . . . . . . . . . . . . . . . . . . . . . . . . .6
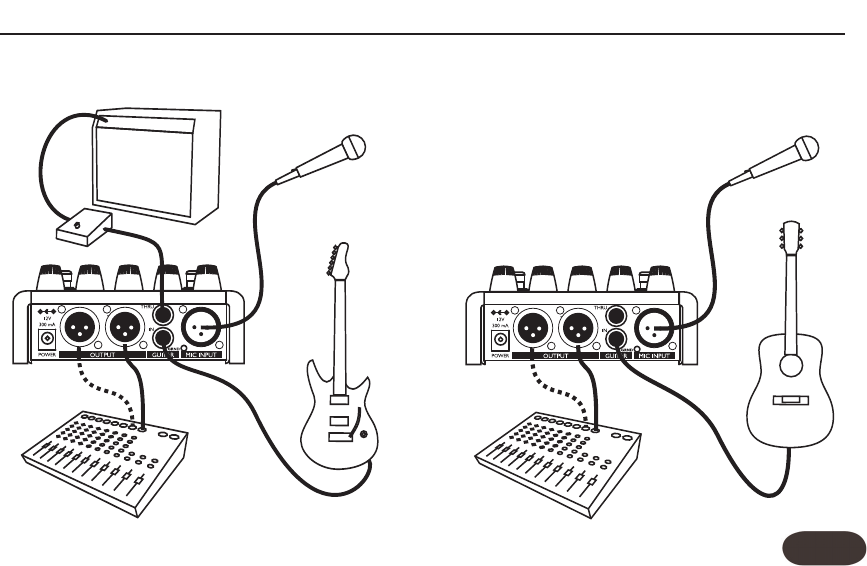
Typical Setups . . . . . . . . . . . . . . . . . . . . . . . . . . . .11
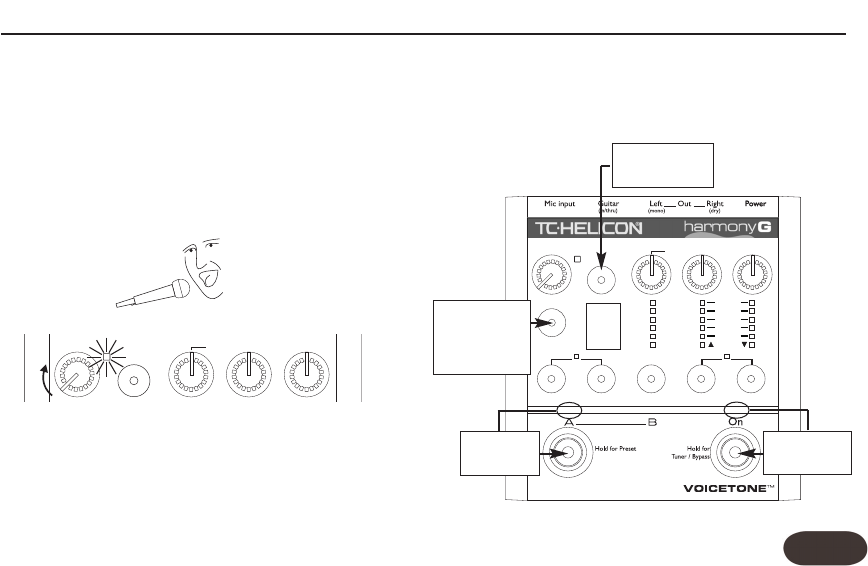
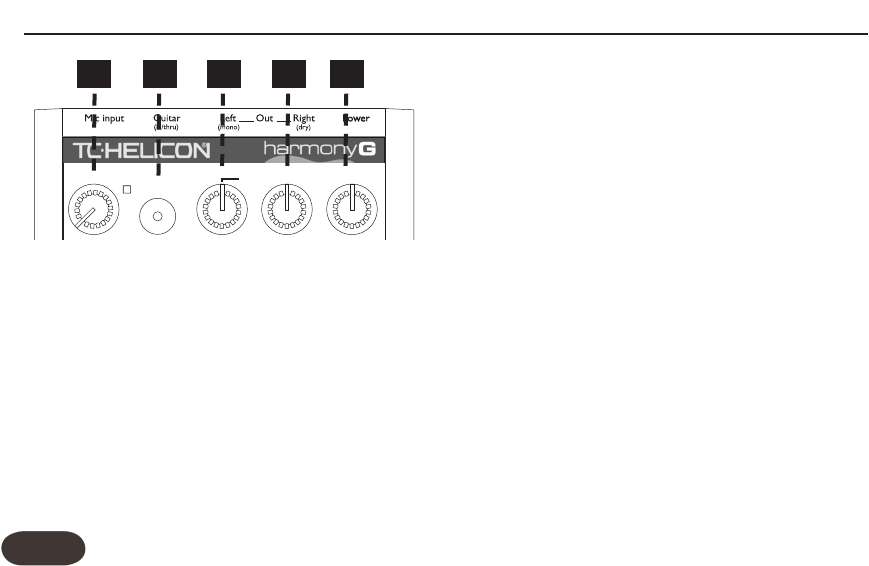
Front Panel Diagram . . . . . . . . . . . . . . . . . . . . .12-14
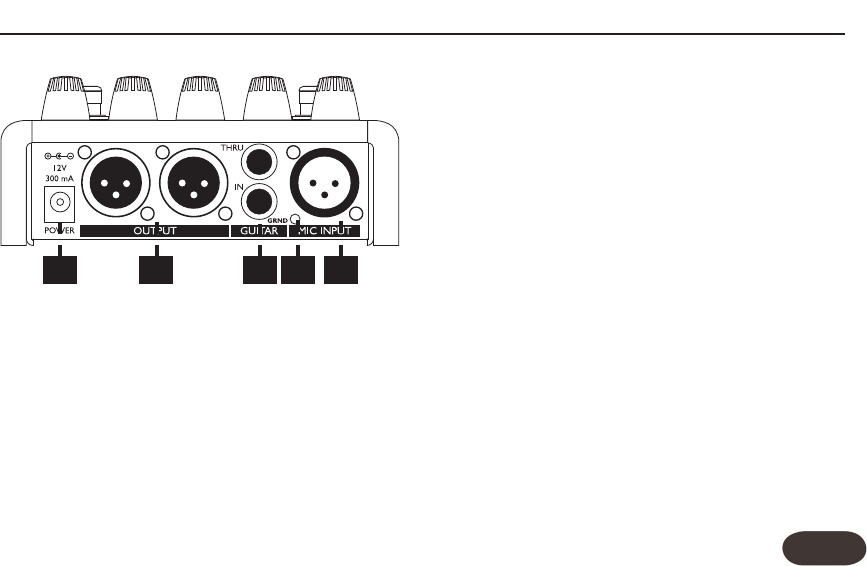
Back Panel Diagram . . . . . . . . . . . . . . . . . . . . . . .15
Getting To Know Harmony-G
Loading Presets . . . . . . . . . . . . . . . . . . . . . . . . . . . .16
Making Harmonies . . . . . . . . . . . . . . . . . . . . . . . . . .16
Using the Tone Button . . . . . . . . . . . . . . . . . . . . . . .16
Mixing . . . . . . . . . . . . . . . . . . . . . . . . . . . . . . . . . . . .16
Adjusting the Harmony Level . . . . . . . . . . . . . . . . . .16
Changing the FX Volume . . . . . . . . . . . . . . . . . . . . .16
Adjusting the Guitar Volume . . . . . . . . . . . . . . . . . .17
Thicken Your Voice with the Double Button . . . . . . .17
Editing Presets . . . . . . . . . . . . . . . . . . . . . . . . . . . . .17
What Do the Voice 1&2 Buttons Do? . . . . . . . . . . . .17
What Does Higher Lower etc. Mean? . . . . . . . . . . .18
Storing Edited Presets . . . . . . . . . . . . . . . . . . . . . . .18
Changing the FX . . . . . . . . . . . . . . . . . . . . . . . . . . .18
Using the Tuner . . . . . . . . . . . . . . . . . . . . . . . . . . . .18
For Advanced Users
How to Use the Manual Button . . . . . . . . . . . . . . . .19
Advanced FX Style Select . . . . . . . . . . . . . . . . . . . .19
How to Use Alternate Tone Settings . . . . . . . . . . . .20
Guitar Reverb and Detune . . . . . . . . . . . . . . . . . . . .20
Changing the Number of Presets . . . . . . . . . . . . . .21
External Mixing with Mono and Dry Outputs . . . . . .22
Performing a Factory Reset . . . . . . . . . . . . . . . . . . .22
How to Change the Tuning Reference . . . . . . . . . . .22
FAQ and Troubleshooting . . . . . . . . . . . . . . . . . . .23
Specifications . . . . . . . . . . . . . . . . . . . . . . . . . . . . .25
Table of Contents
TC Helicon Vocal Technologies Ltd.
info@tc-helicon.com
Manual revision 1.1 – SW – V 1.0 Prod. No: E60509011
English Version
4
Welcome to VoiceTone Harmony-G
Harmony-G was built for the singer who wants the
highest quality and most interesting live vocal production
possible. It puts a complete vocal production center
into your hands including harmony singers that follow
your singing and guitar playing.
Ease of use and convenience were of utmost
importance in the design of Harmony-G. This allows
singers to utilize all of its features quickly and easily.
Harmony-G presents a selection of professionally-
authored patches. When out-of-the-box sounds aren't
enough, Harmony-G provides editing controls to
customize the presets to your preference.
Product information is updated regularly, so be sure to
check www.tc-helicon.com for the latest news.
Features:
o Adds one or two harmony voices directed by your
guitar playing
o Overdub-style vocal doubling feature adds richness
to your lead voice
o High quality reverb and delay effects
o Guitar signal can be sent to your guitar amp or
routed through Harmony-G’s effects
o Part A/B switch to allow instant selection of your
two favorite sounds
o Quick and easy tweaking and storage of presets
o XLR mic level input and output in stereo or mono
o Clean, studio quality mic preamp with phantom
power
Introduction
5
About TC-Helicon
At TC-Helicon we truly believe that the voice is the
world's most beautiful instrument. We don't mean to
degrade other beautiful instruments, but the singing
voice is the anthropological source for all things melodic.
You should know there is a dedicated group of
engineers, researchers and product specialists based in
Victoria BC, Canada, who spend every waking moment
of their working lives listening, talking, singing, and
interacting with singers and those who have passion for
the singing voice.
All this knowledge and experience is used to design
products respecting and empowering the modern
vocalist. Our products focus on removing barriers and
inspiring creativity in performance. That's why our
products range from near-field personal vocal monitors
to floor-based vocal multi-effects pedals.
Enjoy!
The TC-Helicon Team
a TC Group company
Introduction
6
Step 1:
Connect your microphone to a mic cable
Step 2:
Connect the mic cable to the Mic Input on Harmony-G
Quick Start
Make sure Harmony-G is not powered at this time.
NOTE:
7
Step 3:
While you’re connecting and setting up, lower the fader
on your mixer channel to off. Connect a mic cable from
the Left/(mono) Out to a mic input on your sound
system.
Step 4:
Connect a 1/4” guitar cable from your electric or
acoustic guitar to the Guitar IN. For now, we won’t use
the Guitar THRU so the guitar sound will be mixed with
your voice and effects. It will come out of the Left
(mono) main output.
Quick Start
Input
Tone
Guitar FX Harmony
Preset
Manual Double FX Voice 1 Voice 2
Hall
Room
Echo
Slap
Combi
SFX
Higher
High
Low
Lower
Bass
Octave
48V Stereo
3
Auto
#
Pan
8
Step 5:
Set the Input Knob fully left then set the Guitar, FX and
Harmony knobs to the 12 O’Clock position.
Step 6:
Connect Harmony-G's power adapter to main power
and to the Power Input on Harmony-G. There is no
power switch so plugging it in automatically turns it on.
Quick Start
Input
Tone
Guitar FX Harmony
Preset
Hall
Room
Eh
Higher
High
L
3
Auto
#
9
Step 7:
While singing through your microphone, raise the Input
Knob until the Input Light turns green, sometimes
orange on louder parts, but never red.
Step 8:
In preparation for your first listen, check that the LEDs
conform to the status shown in the boxes below. You
can press the button associated with the LEDs to change
them if necessary.
Quick Start
Input
Tone
Guitar FX Harmony
3
Auto
3
1
Press so
LED is ON
Press so
LED is OFF
Press to light
LED
Press to load
Preset 1 if it’s
not already
loaded
10
Step 9:
Slowly raise the fader on your mixer channel as you sing
into your mic. Once you’ve reached a comfortable
listening level you should hear your voice clearly with
some reverb effect added.
It’s important to take a moment and tune your guitar
before checking out the harmonies. Hold the On button
to enter Harmony-G’s Tuner/Bypass mode. Pluck a single
string at a time to see its pitch.You will see which note
it’s closest to in the Preset display and whether the string
is sharp or flat in the LED bank above the FX and Voice
1 and Voice 2 buttons. Adjust each string until they’re all
in tune.
Now you’re ready to hear Harmony-G’s harmony
voices. Press the On footswitch and sing a song you
know while strumming the guitar chords to the song.
Remember that your guitar directs the harmonies so
ensure that your guitar volume control is turned up.
Quick Start
You can now experiment with all of Harmony-G’s
features starting by pressing the Preset button to load
the different presets and then pressing the A/B
footswitch to hear each preset’s A and B settings.
Please read this short manual to ensure you get the
most from Harmony-G!
11
Typical Setups
Electric Guitar Setup
The dotted line indicates optional stereo operation
Acoustic Guitar Setup
12
3. Guitar Mix Knob
Controls your guitar volume when it’s routed to the main
outputs (when the Guitar Thru jack is not used).The center
Auto detent position automatically balances your guitar
volume with your voice. Adjusting above or below the Auto
position removes the automatic guitar level feature.
4. FX (Effects) Level Knob
Raises or lowers the mix level of the effect selected with
the FX button.
5. Harmony Level Knob
Adjusts the mix levels of the harmony and double effects.
Front Panel
Input
Tone
Guitar FX Harmony
3
Auto
1 2 3 4 5
1. Input Knob and LED
Adjust the Input Knob so that while you sing, the LED
beside it flashes green, sometimes orange but never red.
2.Tone Button
This engages the Live Engineer Effects which
automatically modifies your voice and makes it sound
smoother and brighter. When engaged, this effect is
always on your voice, even in Bypass.
13
6. Preset Select Button and Preset Display
Press to cycle through the 5 presets numbered 1 to 5 shown
in the Preset display. Hold to store changes you make. The
sharp sign (#) is used in the Tuner and Manual modes.
7. 48 Volt Phantom Power LED
For condensor mics, hold the Manual and Double buttons
for 2 seconds to engage and disengage phantom power.
8. Manual Mode Button
Press to toggle guitar control of the harmonies. See how
to use this feature in the “For Advanced Users” section.
9. Double Voice Button
Press this button to simulate the sound of you singing
along with yourself for added thickness.
10. FX Button and LED Display
Pressing the FX button cycles through the effect styles
and FX Off (no LEDs lit) for the current preset.
11. Stereo Select Button
Press and hold the Voice 1 and Voice 2 buttons for 2
seconds to toggle between stereo and mono output.
12.Voice Buttons and Display
Press either of the Voice 1 or Voice 2 buttons to:
a) change the associated voice’s harmony interval
b) enable the harmony voice when its LED is off
c) turn the voice off
The same interval for both voices adds thickness to the
harmony voices.
Front Panel
Preset
Manual Double FX Voice 1 Voice 2
Hall
Room
Echo
Slap
Combi
SFX
Higher
High
Low
Lower
Bass
Octave
48V Stereo
3
#
6
7
12
8 9 10 11
Back Panel
15
operation see “External Mixing with Mono and Dry
Outputs” in the “For Advanced Users” section.
3. Guitar Connections
Plug a 1/4” cable directly from your guitar into the IN
jack. If you use effect pedals, they should be connected
after Harmony-G. The input is high impedance. Plug a
1/4” cable from the THRU jack to your first effect pedal
or to your amplifier/PA.
4. Guitar Ground Lift
If you hear a buzz when you plug in a cable from the
THRU to your amp or PA, press this button in. If the
THRU jack is not used and your guitar sound is routed
internally, the Ground Lift switch should be left out.
5. Mic Input
Plug an XLR-equipped microphone cable from your mic
into this jack.
1 2 3
4
5
1. Power Input
Accepts the connector from the supplied DC power
adaptor. Connecting power to Harmony-G turns it on
immediately as there is no on/off switch on the product.
2. Outputs
These XLR jacks supply the main output of Harmony-G
in stereo or mono. For more information on mono
14


Need help? Post your question in this forum.

Forumrules


Report abuse

Libble takes abuse of its services very seriously. We're committed to dealing with such abuse according to the laws in your country of residence. When you submit a report, we'll investigate it and take the appropriate action. We'll get back to you only if we require additional details or have more information to share.

Product:

For example, Anti-Semitic content, racist content, or material that could result in a violent physical act.

For example, a credit card number, a personal identification number, or an unlisted home address. Note that email addresses and full names are not considered private information.

Forumrules

To achieve meaningful questions, we apply the following rules:

Register

Register getting emails for TC Helicon VoiceTone Harmony G at:


You will receive an email to register for one or both of the options.


Get your user manual by e-mail

Enter your email address to receive the manual of TC Helicon VoiceTone Harmony G in the language / languages: English as an attachment in your email.

The manual is 1,34 mb in size.


You will receive the manual in your email within minutes. If you have not received an email, then probably have entered the wrong email address or your mailbox is too full. In addition, it may be that your ISP may have a maximum size for emails to receive.

Others manual(s) of TC Helicon VoiceTone Harmony G

TC Helicon VoiceTone Harmony G User Manual - German - 25 pages


The manual is sent by email. Check your email

If you have not received an email with the manual within fifteen minutes, it may be that you have a entered a wrong email address or that your ISP has set a maximum size to receive email that is smaller than the size of the manual.

The email address you have provided is not correct.

Please check the email address and correct it.

Your question is posted on this page

Would you like to receive an email when new answers and questions are posted? Please enter your email address.


Info