573154
6
Zoom out
Zoom in
Previous page
1/11
Next page
6
Legen Sie die Unterlegscheiben (26) über die Halterungen, setzen Sie je ein
Verbindungsstück (25) passgenau über jede Halterung, stecken Sie je eine
flache, kurze Schraube (33) durch das Verbindungstück (25) und ziehen Sie die
Schraube (33) mit einem passenden Schraubendreher fest.
Befestigen Sie nun die Griffe (21) an der Grillschale (7).
Setzen Sie die Griffe (21) entsprechend der Form der Grillschale (7) auf die
Einstecköffnungen (9) der Grillschale (7) und befestigen Sie die Griffe (21) von
unten mit den spitzen, langen Schrauben (31). Legen Sie je 1 Unterlegscheibe
(30) über die Schraube, bevor Sie diese festdrehen.
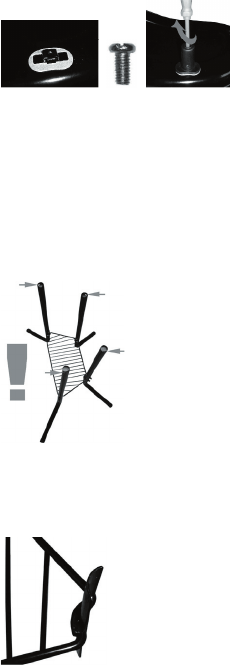
Setzen Sie nun den Geräteständer zusammen.
Achten Sie darauf, dass die Biegungen der gebogenen Rohre (18) nach innen
zeigen.
WICHTIG! Die geraden Rohre (16) haben an jedem Ende je 1 Bohrung. Achten
Sie darauf, dass die ovale Bohrung nach oben zeigt und außerdem nach außen
gerichtet ist (s. Pfeilmarkierungen auf der Abbildung)! Hier wird die Grillschale
(7) befestigt!
Stecken Sie die geraden Rohre (16) und die gebogenen Rohre (18) zusammen.
Achten Sie darauf, dass die runden Bohrungen beider Rohre (16, 18)
deckungsgleich übereinander liegen!
Setzen Sie die Verbindungsstücke (28) von innen auf die Ecken des
Ablagegitters.
6


Need help? Post your question in this forum.

Forumrules


Report abuse

Libble takes abuse of its services very seriously. We're committed to dealing with such abuse according to the laws in your country of residence. When you submit a report, we'll investigate it and take the appropriate action. We'll get back to you only if we require additional details or have more information to share.

Product:

For example, Anti-Semitic content, racist content, or material that could result in a violent physical act.

For example, a credit card number, a personal identification number, or an unlisted home address. Note that email addresses and full names are not considered private information.

Forumrules

To achieve meaningful questions, we apply the following rules:

Register

Register getting emails for Superior GL2000-RL1 at:


You will receive an email to register for one or both of the options.


Get your user manual by e-mail

Enter your email address to receive the manual of Superior GL2000-RL1 in the language / languages: German as an attachment in your email.

The manual is 1,72 mb in size.


You will receive the manual in your email within minutes. If you have not received an email, then probably have entered the wrong email address or your mailbox is too full. In addition, it may be that your ISP may have a maximum size for emails to receive.

The manual is sent by email. Check your email

If you have not received an email with the manual within fifteen minutes, it may be that you have a entered a wrong email address or that your ISP has set a maximum size to receive email that is smaller than the size of the manual.

The email address you have provided is not correct.

Please check the email address and correct it.

Your question is posted on this page

Would you like to receive an email when new answers and questions are posted? Please enter your email address.


Info