767660
14
Zoom out
Zoom in
Previous page
1/87
Next page
la cubierta deben estar firmemente unidas.
Asegúrese de que las ranuras de ventilación no
estén obstruidas y libres de polvo u objetos extraños.
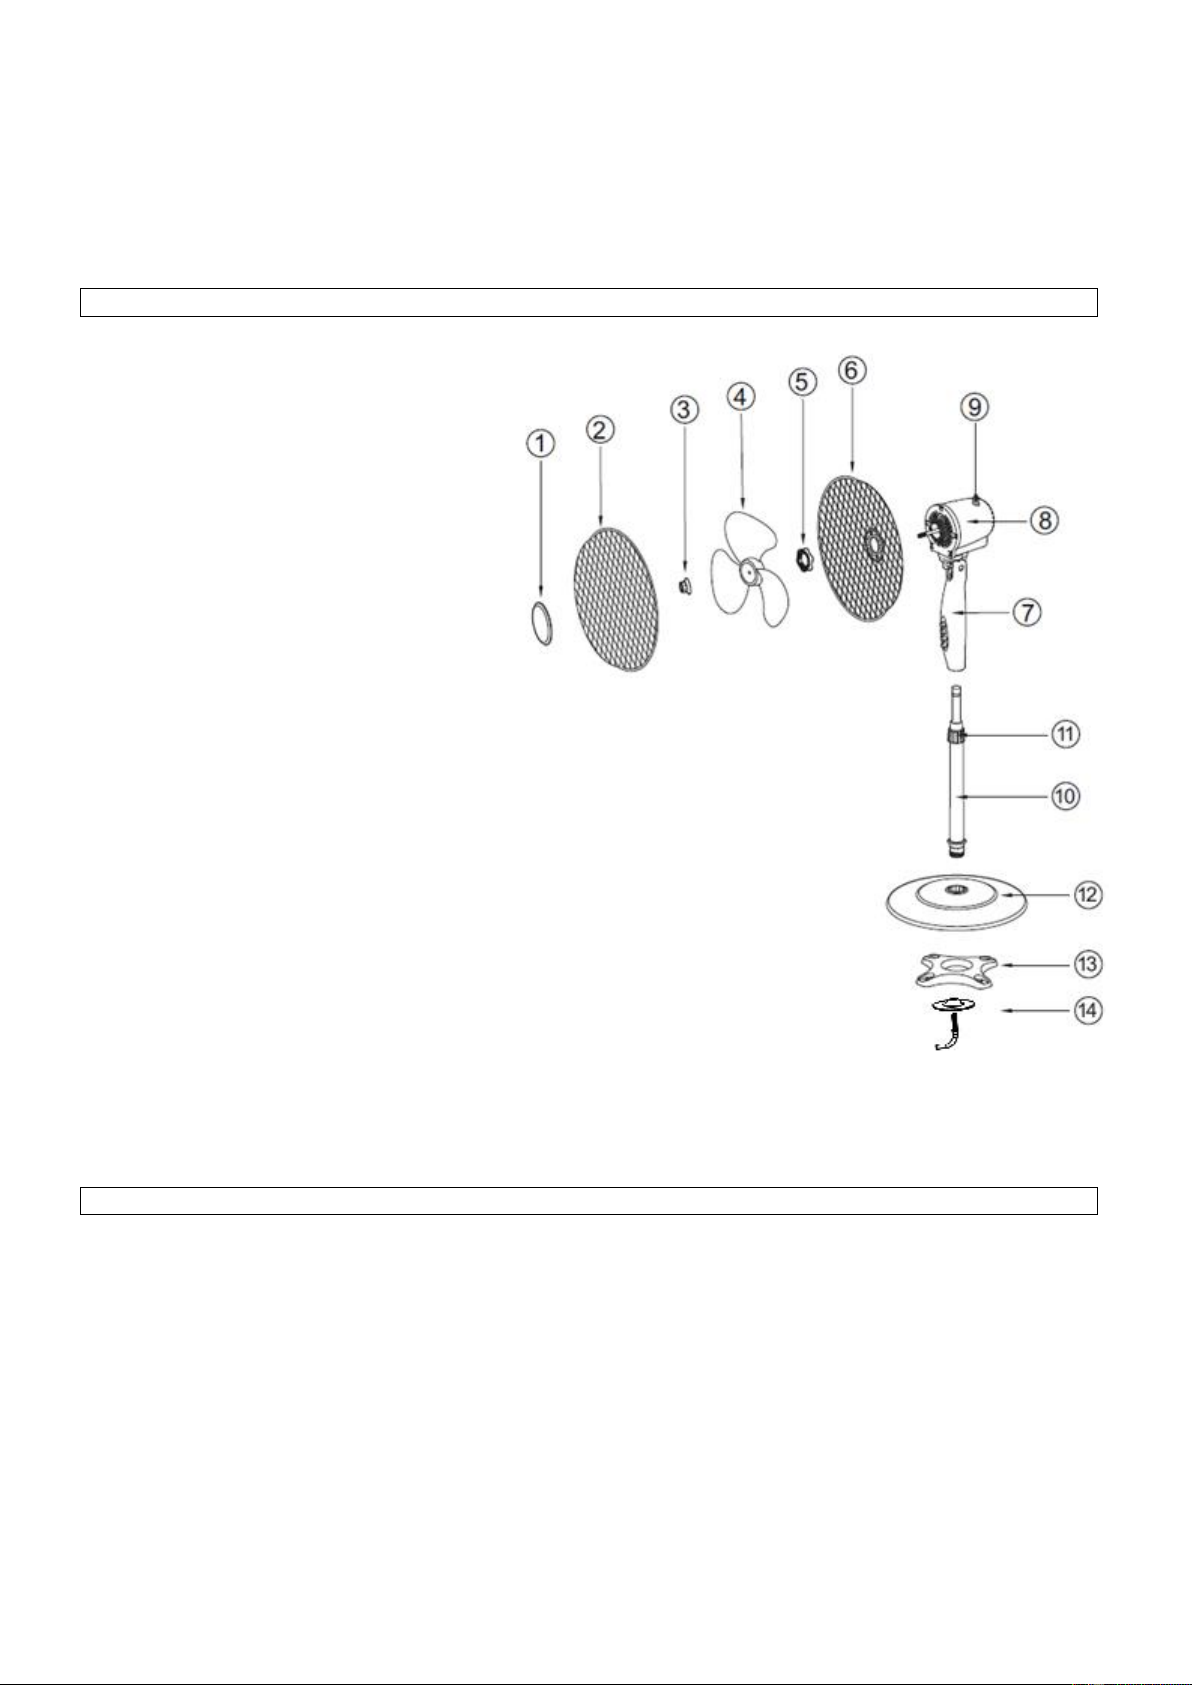
Nombre de las partes
1. Cubierta de la rejilla de protección
2. Rejilla de protección frontal
3. Tope de protección
4. Hélice
5. Tuerca de seguridad de la
rejilla de protección
6. Rejilla de protección posterior
7. Caja de controles
8. Carcasa del motor
9. Cabezal oscilante
10. Barra telescópica
11. Ajuste de altura
12. Base
13. Peso
14. Tuerca de la base
CUIDADO
1. No enchufe el cable de corriente alterna a la toma de corriente antes de haber montado por completo el
ventilador.
2. Utilice una fuente de alimentación eléctrica conforme a lo especificado en la placa de características
situada en la parte trasera de la caja de interruptores.
Montaje
1. Montaje de la base:
Inserte la barra telescópica (10) en la base (12). Con la tuerca de la base (14) fije el peso (13) a la base
(12).
2. Fijación de la caja de controles:
¡Precaución! Bajo ningún concepto retire la parte superior de la barra telescópica (10).
Afloje el ajuste de altura (11) y con cuidado extienda el tubo retraído en el interior de la barra telescópica
(10).
(1) Afloje el tornillo de ajuste de la caja de interruptores (7)
girándolo hacia la izquierda
(2) Coloque ahora el agujero situado en el fondo de la caja de
interruptores encima del tubo interior.
(3) Apriete firmemente el tornillo de ajuste de la caja de
interruptores girándolo en el sentido del reloj.
14


Need help? Post your question in this forum.

Forumrules


Report abuse

Libble takes abuse of its services very seriously. We're committed to dealing with such abuse according to the laws in your country of residence. When you submit a report, we'll investigate it and take the appropriate action. We'll get back to you only if we require additional details or have more information to share.

Product:

For example, Anti-Semitic content, racist content, or material that could result in a violent physical act.

For example, a credit card number, a personal identification number, or an unlisted home address. Note that email addresses and full names are not considered private information.

Forumrules

To achieve meaningful questions, we apply the following rules:

Register

Register getting emails for Suntec Klimatronic CoolBreeze 4000 SV at:


You will receive an email to register for one or both of the options.


Get your user manual by e-mail

Enter your email address to receive the manual of Suntec Klimatronic CoolBreeze 4000 SV in the language / languages: English, German, Dutch, French, Italian, Polish, Portuguese, Spanish as an attachment in your email.

The manual is 2,09 mb in size.


You will receive the manual in your email within minutes. If you have not received an email, then probably have entered the wrong email address or your mailbox is too full. In addition, it may be that your ISP may have a maximum size for emails to receive.

The manual is sent by email. Check your email

If you have not received an email with the manual within fifteen minutes, it may be that you have a entered a wrong email address or that your ISP has set a maximum size to receive email that is smaller than the size of the manual.

The email address you have provided is not correct.

Please check the email address and correct it.

Your question is posted on this page

Would you like to receive an email when new answers and questions are posted? Please enter your email address.


Info