The equipment is delivered suitably packaged. When unpacking, carefully remove and check the integrity of the parts.
Important
•
Keep the packaging materials for future use.
PLANNING OF SYSTEM INSTALLATION
The robot is not diffi cult to install, but requires some preliminary planning in order to fi nd the best area for installing the charging station, power
supply unit and for laying out the perimeter wire.
•
The charging station must be positioned on the edge of the lawn,
preferably in the largest area from which other areas of the lawn are
easily accessible. The area where the charging station is installed is
hereinafter referred to as the “Primary Area.”
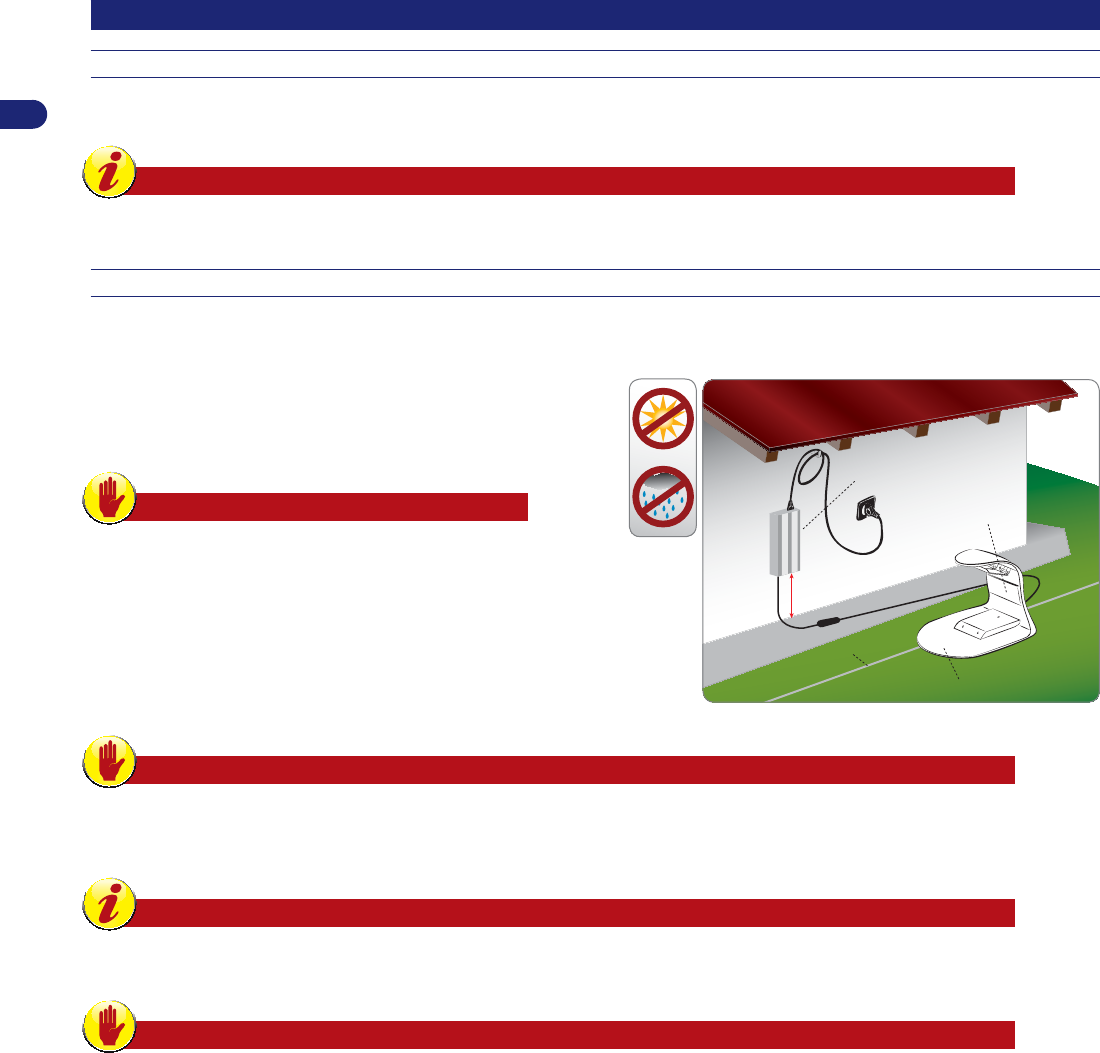
Warning – Caution
Position the power supply unit in an area that cannot be
reached by children. For example, at a height above 160
cm (63 ").
Power supply unit
perimeter wire
charging station
Min. height. 160 cm
/ 63 "
transmitter
Warning – Caution
When connecting the electricity, it is necessary that a power outlet is positioned near the installation area. Make sure the
connection to the mains power complies with the applicable laws. To operate in complete safety, make sure the electrical
system, which is connected to the power supply unit, is equipped with a well-functioning earthing system.
Important
It is advisable to install the unit in a cabinet for electric components (for outdoor or indoor use), equipped with a key lock,
and well-ventilated to maintain a correct air circulation.
Warning – Caution
Make sure only authorised people have access to the power supply.
•
The robot must be able to easily fi nd the charging station at the end of the work cycle, which will also be the starting point for a new work
cycle and for reaching any other work areas, hereinafter referred to as “Secondary Areas.”.
•
Position the charging station according to these rules:
-
On level ground.
-
On compact and stable ground with good drainage.
-
Preferably in the area of the longer lawn.
-
In case of sprinklers, make sure the water jets are not directed inside the charging station.
-
Make sure the entrance of the charging station is positioned as shown in the fi gure, so that the robot can enter it by following the perimeter
wire in a clockwise direction.
-
There must be a straight area of 400 cm (157.48 ") in front of the base.
•
The charging station must be well fastened to the ground. To prevent a small step from forming at the front of the base, position a small
piece of fake grass at its entrance to stop this from occurring. Alternatively, remove part of the grassy surface and install the base fl ush with
the grass.
•
The charging station is connected to the power supply unit via a cord that must move away from the charging station on the outside of the
Libble takes abuse of its services very seriously. We're committed to dealing with such abuse according to the laws in your country of residence. When you submit a report, we'll investigate it and take the appropriate action. We'll get back to you only if we require additional details or have more information to share.
Product:
Forumrules
To achieve meaningful questions, we apply the following rules:
First, read the manual;
Check if your question has been asked previously;
Try to ask your question as clearly as possible;
Did you already try to solve the problem? Please mention this;
Is your problem solved by a visitor then let him/her know in this forum;
To give a response to a question or answer, do not use this form but click on the button 'reply to this question';
Your question will be posted here and emailed to our subscribers. Therefore, avoid filling in personal details.
Register
Register getting emails for Stiga Autoclip 325 at:
new questions and answers
new manuals
You will receive an email to register for one or both of the options.
Get your user manual by e-mail
Enter your email address to receive the manual of Stiga Autoclip 325 in the language / languages: English, German, Dutch, Danish, French, Italian, Polish, Portuguese, Swedish, Spanish, Norwegian, Finnish as an attachment in your email.
The manual is 112,13 mb in size.
You will receive the manual in your email within minutes. If you have not received an email, then probably have entered the wrong email address or your mailbox is too full. In addition, it may be that your ISP may have a maximum size for emails to receive.
The manual is sent by email. Check your email
If you have not received an email with the manual within fifteen minutes, it may be that you have a entered a wrong email address or that your ISP has set a maximum size to receive email that is smaller than the size of the manual.
The email address you have provided is not correct.
Please check the email address and correct it.
Your question is posted on this page
Would you like to receive an email when new answers and questions are posted? Please enter your email address.