- 10 - - 11 -
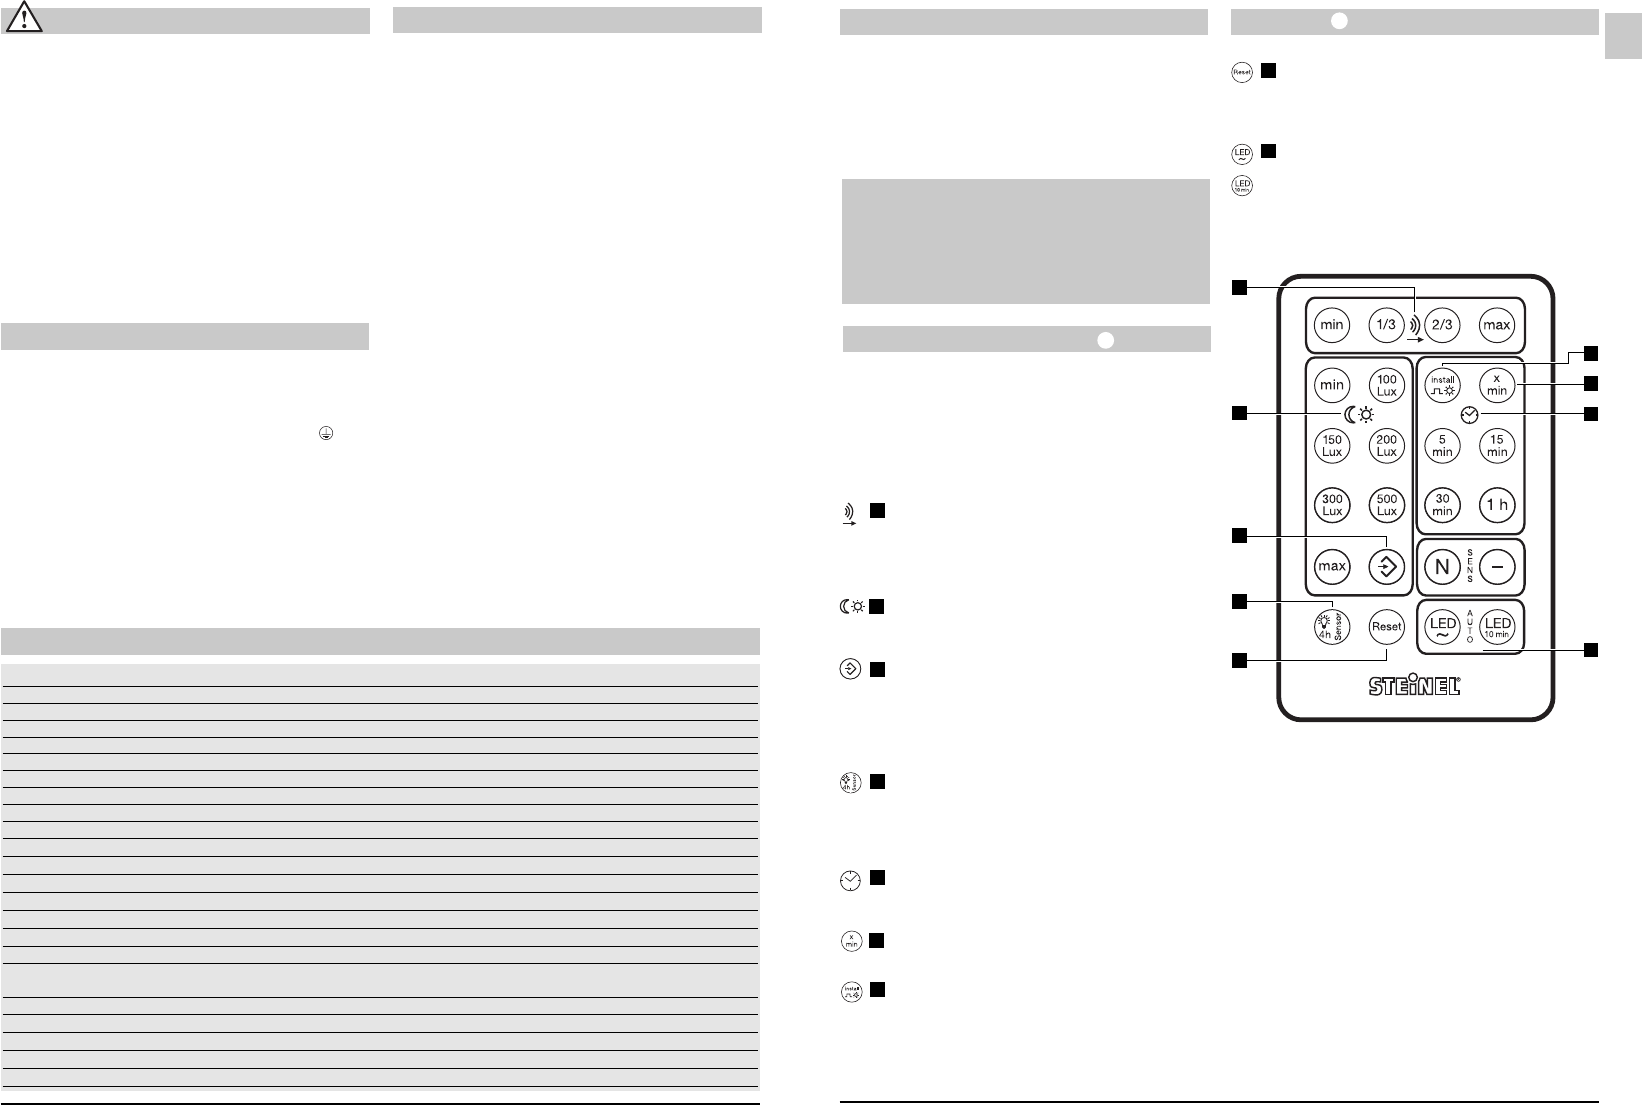
Important: all functions can only be changed by
remote control RC2 (prod. no. EAN 4007841 737818).
Once the light has been installed, the best distance
for setting functions is within a radius of approx. 1 m
vertically below the sensor unit. The LED
flashes
red to indicate that the function has been set.
Reach setting
Factory setting: maximum reach (8 m)
Reach can be set from a minimum of 1 m,
1/3, 2/3 to a maximum of 8 m by pressing
these buttons.
Twilight setting
Factory setting: daylight operation (2000 lux)
Pressing these buttons sets the chosen
response threshold from a minimum of 2 lux,
100 lux, 150 lux, 200 lux, 300 lux, 500 lux to
a maximum of 2000 lux.
Twilight setting using the memory button /
Teach mode. This button must be pressed
at the level of light at which you want the
sensor to respond to movement from now on.
The current twilight value is saved.
Manual override
Pressing this button switches the light ON for
4 hours. The light then returns to sensor mode
automatically.
Time setting
Factory setting: shortest time (1 minute)
The period of time you want the light to stay
'ON' for after last detecting movement can be
set from between 5 min., 15 min., 30 min. and
1 h by pressing these buttons.
Setting the light to stay ON for a time of your
own choice. Each press of the button incre-
ments the chosen time setting by 1 minute.
Install mode. The light switches ON for 3 sec.
as soon as movement is detected.
This avoids unnecessary waiting times when
making settings. Install mode ends automatic-
ally after 10 min.
Attention: Teach mode and Install mode can-
not be used at one and the same time.
Reset
Resets all settings to the values selected on
the light manually or to the factory settings.
LED basic brightness
Pressing the button selects basic brightness all
night long or switches basic brightness OFF
Pressing the button selects basic brightness
for 10 min.
GB
* only applies to RS PRO DL LED Sensor
1
3
4
2
5
6
7
Functions / Remote control
Installation
Installation
Connecting the mains power supply lead (see Fig.).
The mains lead consists of a 3 phase cable.
L = phase conductor (usually black or brown)
N = neutral conductor (usually blue)
PE = protective-earth conductor (green/yellow)
If you are in any doubt, identify the conductors using
a voltage tester; then switch OFF the power again.
Connect the phase conductor (L) and neutral con-
ductor (N) to the terminal block. The protective earth
conductor may be sealed off with insulation tape.
Technical specifications
RS PRO DL LED 15W/22W (sensor/slave)
Dimensions (Ø x H): RS PRO DL LED 15W: Ø 142.5 x 94.5
RS PRO DL LED 22W: Ø 168 x 94.5
Output: RS PRO DL LED 15W: 925 lm / 61.7 lm/W
RS PRO DL LED 22W: 1400 lm / 63.6 lm/W
Colour temperature: 4000 K (cool white) / 3000 K (warm white) / SDCM 3
Colour rendering index: RA ≥ 80% (WW) and RA ≥ 70% (CW)
LED life expectancy: 50,000 H (L70B10 to LM80)
LED cooling system: Passive Thermo Control
Power supply: 100-240 V, 50/60 Hz, cos ϕ >0.9
HF system *: 5.8 GHz (responds to the tiniest movement regardless of temperature)
Coverage *: 360° with 160° angle of aperture
Transmitter power *: approx. 1 mW
Reach *: 2–8 m all round, infinitely variable
Max. area covered: approx. 50 m²
Time setting *: 1 min. – 1 h
Twilight setting *: 2-2000 lux, teach mode
Basic brightness: dimmed to 10%
a) all night long b) 10 min. after the selected time elapses
IP rating: IP 20
Protection class: II
Temperature range: -10 °C to +40 °C
Interconnection: max. of 10 master units or 10 slave units
Accessory: remote control RC 2 (EAN 4007841737818)
Important: Reversing the connections will result in a
short-circuit in the light unit or in your fuse box later
on. In this case, you must identify the individual con-
ductors once again and re-connect them. A mains
switch for switching the unit ON and OFF may of
course be installed in the mains power supply lead.
Important: Make sure the installation site is
not
subject to
vibration.
Connection to a dimmer will result in damage to
the SensorLight and the SlaveLight.
Connection of an additional load
An additional load can be connected to the
SensorLight. The RS PRO DL LED SLAVE model,
which provides a matching look and offers additional
functions, was developed for this purpose. The slave
light is connected to the power supply in the normal
way by phase and neutral conductor. To interconnect
lights you must connect the master light’s NET termi-
nal to the slave light’s NET terminal. First remove the
protective cap with a pair of pliers. Additional loads
(e.g. fan) can be activated by an electronic relay, e.g.
eltako ER12DX-UC. Please observe the connection
diagrams for other connection options.
* only applies to RS PRO DL LED Sensor
Safety warnings
n Disconnect the power supply before attempting
any work on the unit.
n During installation, the electrical wiring being con-
nected must be dead. Therefore, switch off the
power first and use a voltage tester to make sure
the wiring is off circuit.
n Installing the SensorLight involves work on the
mains voltage supply. This work must therefore
be carried out professionally in accordance with
applicable national wiring regulations and electrical
operating conditions. (
D
-VDE 0100,
A
- ÖVE /
ÖNORM E8001-1,
- SEV 1000)
n Only use genuine replacement parts.
n Repairs must only be made by specialist workshops.
n Disconnect the light from the power supply before
changing the lamp.
The SensorLight can be put into service after mount-
ing the enclosure
and connecting to the mains
power supply. When the light is turned ON manually
at the light switch, it switches OFF after 10 secs.
for the calibration phase and is then activated for
operation in the sensor mode. It is not necessary
to operate the light switch a second time.
Functions Functions
Basic brightness 10 %
Basic brightness provides illumination at approx.
10 % of full light output. The light only switches to
maximum output (100 %) in response to movement
in the detection zone (for the time selected, see
Switch-OFF delay
). The light then switches to
basic brightness.
8
9
1
3
2
5
6
7
4
9
8