The removable sensor unit accommodates dials for
selecting the time, twilight and programme settings.
After pressing the engagement lug
with a flat-bladed
Functions
,,
- 13 -
screwdriver, the sensor unit can be removed for ease of
setting. When the sensor is removed, the light automati-
cally switches to constant output.
Switch-off delay
(time setting)
(factory setting: 5 sec.)
Light ON time can be adjusted continuously from
5 sec. to 15 min.
Control dial set to – = shortest time (5 sec.)
Control dial set to + = longest time (15 min.)
To set the detection zone,
it is recommended to select the shortest time –.
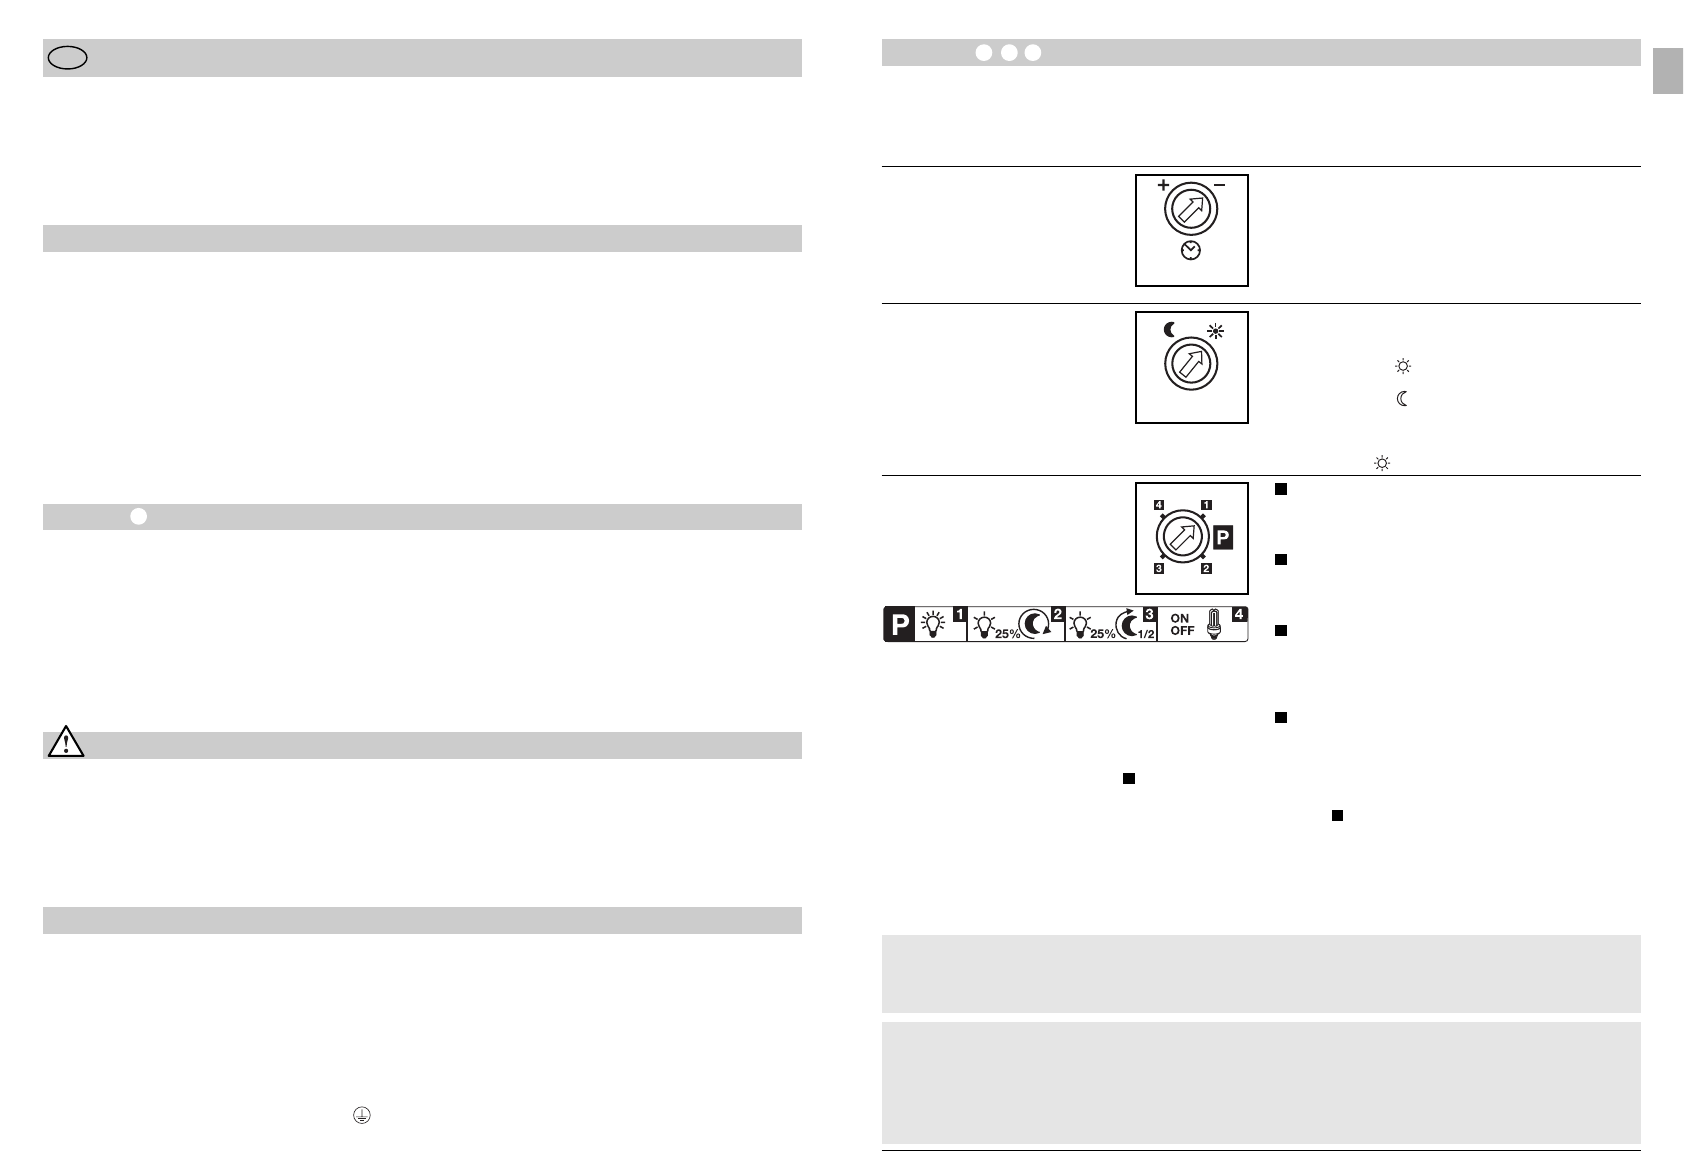
Programme setting
(factory setting: programme 1)
What is soft light start?
The SensorLight comes with a soft light start function.
This means that when the light is switched ON, it does
not go directly to maximum output but gradually
increases brightness to 100 % over the space of one
second. Brightness is also gradually reduced when the
light is switched OFF.
* Note comfort economy programme :
The sensor light does not have any integrated clock. The
middle of the night is only determined on the basis of
the length of darkness phases. To work perfectly, there-
fore, it is important for the SensorLight to be permanent-
ly connected to the power supply during this period.
During the first night (calibration phase) basic lighting
level remains activated throughout the night. Values
remain saved even in the event of mains power failure.
We recommend not to interrupt the power supply in pro-
gramme . As the values are determined over several
nights, the SensorLight should, in the event of any fault,
be observed over several nights to ascertain whether the
switch-off time moves towards midnight.
What is basic lighting level?
Basic lighting level provides continuous night-time
illumination at approx. 25 % light output. The light only
switches to maximum output of 100 % (for the time
selected, see Switch-off delay ) in response to move-
ment in the detection zone. The light then returns to
basic lighting level (approx. 25 %).
Note: Depending on the local power grid, the LED's
may flicker slightly when dimmed. This is not a product
defect and no reason for complaint.
Standard programme:
●
Soft light start / no basic lighting level
●
LED illuminated panel ON when ambient light level
reaches twilight setting (L 665 LED)
Comfort programme:
●
Soft light start + basic lighting level
●
LED illuminated panel ON when ambient light level
reaches twilight setting (L 665 LED)
LED comfort economy programme:
●
Soft light start + basic lighting level
to middle of the night *
●
LED illuminated panel ON from twilight
setting to middle of the night (L 665 LED)
Normal programme:
●
No soft light start / no basic lighting level
●
LED illuminated panel ON only in response to
movement (L 665 LED)
Twilight setting
(response threshold)
(factory setting:
daylight operation 2000 lux)
The sensor's response threshold can be infinitely varied
from 2 – 2000 lux.
Control dial set to = daylight operation
approx. 2000 lux.
Control dial set to = night-time operation
approx. 2 lux.
To adjust the detection zone in daylight, the control dial
must be set to (daylight operation).
5 sec. – 15 min.
2 - 2000 lux
1
2
3
3
4
3
Installation
The site of installation should be at least 50 cm away
from another light because heat radiated from it may
activate the system. To obtain the specified reach of
8 m, the sensor should be installed at a height of
approx. 1.8 – 2.8 m.
Connecting the mains supply lead (see illustration)
The mains lead consists of a 3 phase cable.
L = phase conductor (usually black or brown)
N = neutral conductor (usually blue)
PE = protective earth conductor (green/yellow)
System components
Glass shade
Glass shade locking screw
Light housing
Wall mount
Mains power supply lead, concealed
Mains power supply lead, surface-mounted
L 665 LED only:
LED illuminated panel, turns through 180° for installing
on the right or on the left of the front door
Movable holder for LED illuminated panel permitting
adjustment for 3-digit numbers.
Installation instructions
Dear Customer,
Congratulations on purchasing your new STEINEL
SensorLight and thank you for the confidence you have
shown in us. You have chosen a high-quality product
that has been manufactured, tested and packed with the
greatest care.
GB
Safety warnings
■
Disconnect the power supply before attempting any
work on the unit
.
■
During installation, the electrical wiring you are con-
necting must be dead. Therefore, switch off
the power first and use a voltage tester to make sure
the wiring is off circuit.
Please familiarise yourself with these instructions before
attempting to install the SensorLight because prolonged
reliable and trouble-free operation will only be ensured if
it is fitted properly.
We hope your new STEINEL SensorLight will bring you
lasting pleasure.
■
Installing the SensorLight involves work on the mains
voltage supply. This work must therefore be carried
out professionally in accordance with the applicable
national wiring regulations and electrical operating
conditions.
(
D
-VDE 0100,
A
-ÖVE/ÖNORM E8001-1,
-SEV 1000)
LED illuminated panel plugs into light housing
Sealing plug
Sensor unit (removes for ease of setting functions)
Engagement lug for removing sensor unit
Time setting
Twilight setting
Programme setting
Principle
Adjusting the detection zone
Manual override
with an aperture angle of 90°. A sneak-by guard ensures
coverage below the sensor.
Important: The most reliable way of detecting motion is to
install the SensorLight with the sensor aimed across the
direction in which a person would walk and by ensuring
that no obstacles (such as trees and walls, for example)
obstruct the line of sensor vision.
Reach is limited when walking directly towards the light.
If you are in any doubt, identify the conductors using a
voltage tester; then switch off the power again. Connect
phase (L), neutral (N) and protective earth conductor
(PE) to the terminal block.
Note: A mains switch for switching the unit ON and OFF
may of course be installed in the mains supply lead. A
mains switch is required for the manual override function
(see Manual override function)
.
Important: To ensure that all metal parts are earthed,
the light must only be connected to the mains power
supply once it is fully assembled.
- 12 -
GB
Principle
The integrated high-performance infrared sensor is
equipped with a double 360° sensor that detects the
invisible heat emitted by moving objects (persons,
animals etc.).
The heat detected in this way is converted electronically
into a signal that switches the light ON automatically. Heat
is not detected through obstacles, such as walls or panes
of glass. Heat radiation of this type will, therefore, not trig-
ger the sensor. The unit achieves a coverage angle of 360°