748102
181
Zoom out
Zoom in
Previous page
1/231
Next page
i
Dopo 10 secondi di inattività, l’apparecchio passa
direttamente alla modalità Standby, senza salvare
le impostazioni.
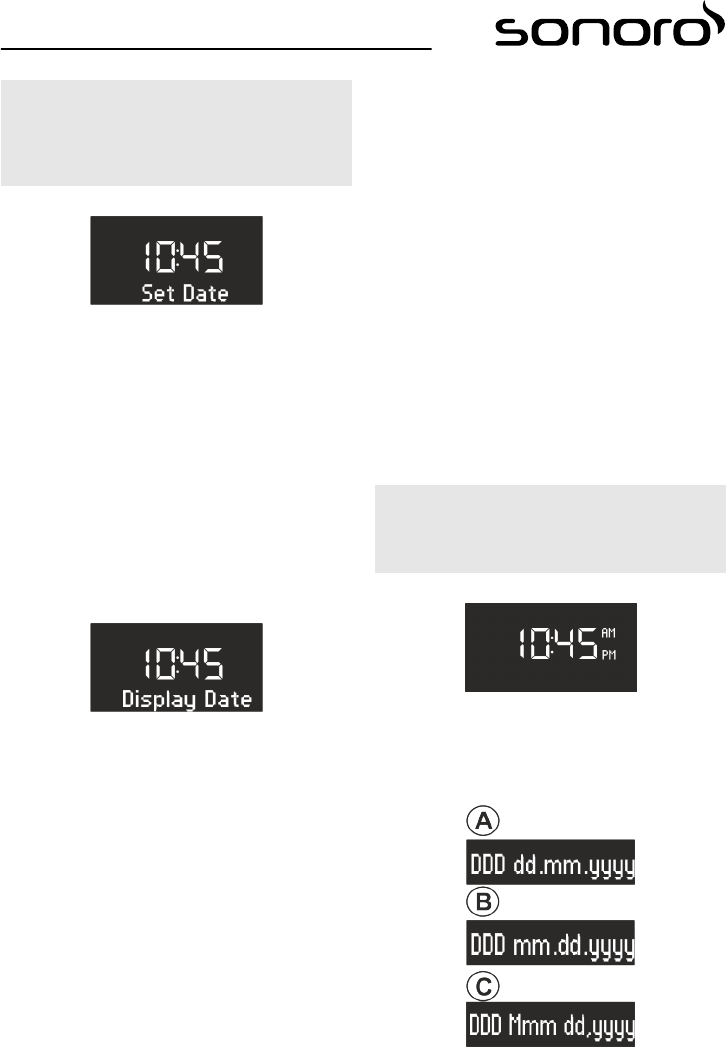
Impostazione manuale della data
Fig. 11: Impostazione della data
1. Nella modalità Standby premere il tasto [MENU]
dell’apparecchio o del telecomando.
ð
Sul display appare il menu [Set Time]
(Fig. 10).
2. Premere il tasto [Avanti].
ð
Sul display appare il menu [Set Date]
(Fig. 11).
3. Premere la manopola.
ð
È ora possibile impostare la data seguendo lo
stesso procedimento indicato in
Ä
»Impo‐
stazione manuale dell’ora« a pag. 180.
Attivazione/disattivazione della data
Fig. 12: Attivazione/disattivazione della data
1. Nella modalità Standby premere il tasto [MENU]
dell’apparecchio o del telecomando.
ð
Sul display appare il menu [Set Time]
(Fig. 10).
2. Premere 2 volte il pulsante [Avanti].
ð
Sul display appare il menu [Display Date]
(Fig. 12).
3. Premere la manopola.
ð
È ora possibile attivare o disattivare la data.
8.3 Menu impostazioni
Durante il funzionamento, nel menu [Settings] è pos-
sibile effettuare le seguenti configurazioni:
n Impostazione del formato dell’ora.
n Impostazione del formato della data.
n Impostazione dell’aggiornamento automatico di
ora e data.
n Impostazione della lingua del display.
n Attivazione/disattivazione della musica demo.
n Ripristinare le impostazioni di fabbrica dell’appa-
recchio.
Per eseguire le impostazioni, procedere come segue:
1. Premere il tasto [MENU] sul lato anteriore
dell’apparecchio o sul telecomando per acce-
dere ai singoli sottomenu.
2. Premere il tasto [Avanti] o [Indietro] oppure ruo-
tare la manopola per passare tra le singole voci
di menu.
3. Per aprire la voce di menu selezionata, premere
brevemente la manopola o il tasto [OK] sul tele-
comando.
4. Per uscire dal menu, premere brevemente il
tasto [MENU] sull’apparecchio o sul teleco-
mando.
i
Se non si eseguono altre immissioni, il menu si
chiude e il display torna alla modalità iniziale.
Impostazione del formato dell’ora
Fig. 13: Impostazione del formato dell’ora
È possibile scegliere il formato 24 ore o il formato 12
ore. Nel formato 12 ore la parte del giorno viene indi-
cata da [AM] e [PM].
Impostazione del formato della data
Fig. 14: Impostazione del formato della data
181
181


Need help? Post your question in this forum.

Forumrules
1

Forum

sonoro-cd-so-210

Reset search

  • Sonorous Bluetooth does not connect with earbuds. Tv iPhone connect to earbuds in 5 seconds.Tv,iPhone and Sonoro cd so-210 all the same age. 2016 Submitted on 17-4-2022 at 11:12

    Reply Report abuse


Report abuse

Libble takes abuse of its services very seriously. We're committed to dealing with such abuse according to the laws in your country of residence. When you submit a report, we'll investigate it and take the appropriate action. We'll get back to you only if we require additional details or have more information to share.

Product:

For example, Anti-Semitic content, racist content, or material that could result in a violent physical act.

For example, a credit card number, a personal identification number, or an unlisted home address. Note that email addresses and full names are not considered private information.

Forumrules

To achieve meaningful questions, we apply the following rules:

Register

Register getting emails for Sonoro CD SO-210 at:


You will receive an email to register for one or both of the options.


Get your user manual by e-mail

Enter your email address to receive the manual of Sonoro CD SO-210 in the language / languages: English, German, Dutch, Danish, French, Italian, Spanish as an attachment in your email.

The manual is 3,94 mb in size.


You will receive the manual in your email within minutes. If you have not received an email, then probably have entered the wrong email address or your mailbox is too full. In addition, it may be that your ISP may have a maximum size for emails to receive.

The manual is sent by email. Check your email

If you have not received an email with the manual within fifteen minutes, it may be that you have a entered a wrong email address or that your ISP has set a maximum size to receive email that is smaller than the size of the manual.

The email address you have provided is not correct.

Please check the email address and correct it.

Your question is posted on this page

Would you like to receive an email when new answers and questions are posted? Please enter your email address.


Info