Montage duo
Monteren
Als de afstand tussen het plafond en de onderkant van de C-rail
groter is dan 245 mm, dient de plafondbevestiging (met bestu-
ringsbandstaal) verlengd te worden.
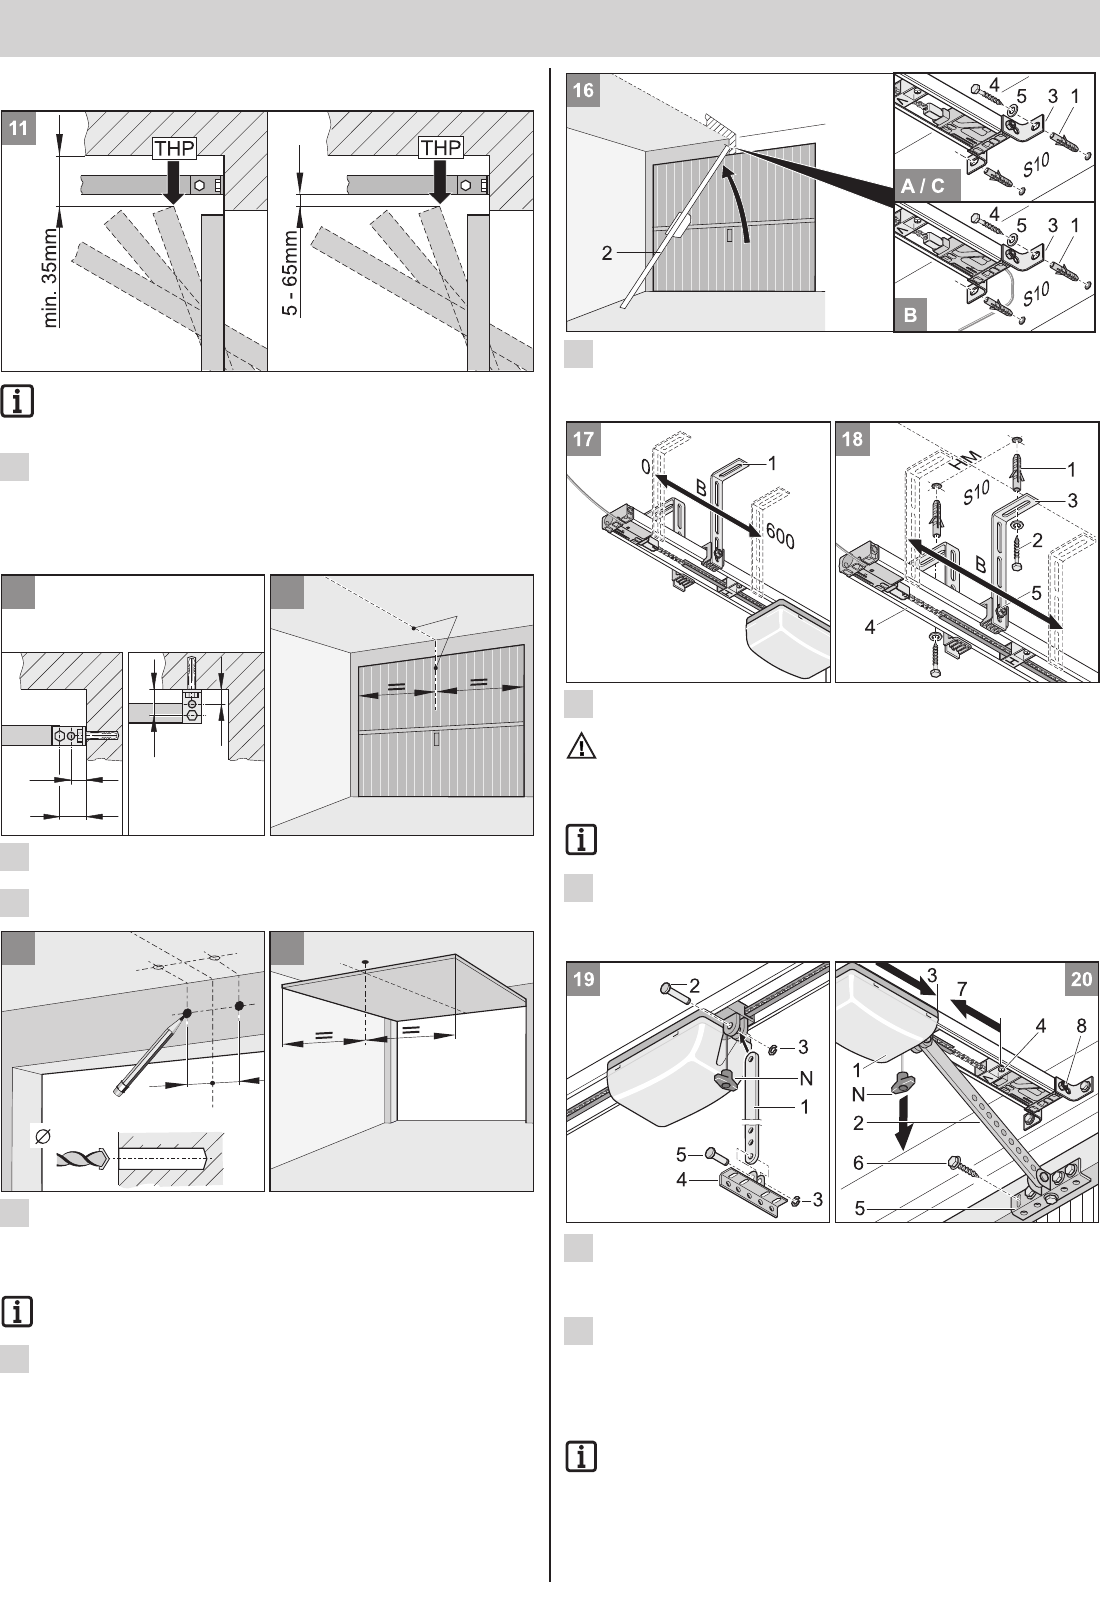
• Nakijken waar het hoogste looppunt van de garagedeur is:
Open de deur en meet de kleinste afstand (minimaal 35 mm) tussen
de bovenkant van de deur en het plafond. De afstand tussen het
bovenste zwenkpunt (THP) en de onderzijde van de C-rails moet
minimaal 5 mm en mag maximaal 65 mm zijn, waarbij de aandrijfarm
in een hoek van maximaal 30° mag staan. (in afbeelding 20)
• De garagedeuraandrijving kan aan de draagbalk (S) of aan het
plafond (D) gemonteerd worden.
• Het midden van de garagedeur vooraan (VM) meten en op de poort
en de draagbalk of het plafond markeren.
• Markering 74 mm rechts en links van het midden van de deur (VM)
op dezelfde hoogte aan de draagbalk of het plafond aanbrengen
(zoals op afbeelding 11).
• Twee gaten (Ø 10 x 65 mm diep) boren.
Draag bij het boren altijd een veiligheidsbril!
Let op de dikte van het plafond, met name bij prefab garages!
• Garagedeur openen. Markering van het midden van de deur op het
plafond overnemen (HM). Garagedeur sluiten.
15
14
11
12
• Plaats de pluggen (1) en til de aandrijving (2) aan de voorzijde op.
Zet het lateibeslag (3) voor met twee schroeven (4) en sluitringen (5)
vast.
• Aandrijving (2) optillen.
• Plafondhouder (1) positioneren. De positie dient binnen het gebied
(B = 0-600 mm) te liggen.
Gebruik altijd een stevige en stabiele ladder!
• Lijn de aandrijving horizontaal uit op het midden van de achterzijde
van de deur (HM). Teken de boorgaten af. Boor twee gaten
(Ø 10 x 65 mm diep).
Draag bij het boren altijd een veiligheidsbril!
Let op de dikte van het plafond, met name bij prefab garages!
• Plaats de pluggen (1). Draai de twee schroeven (2) met sluitringen
(3) vast. Draai de schroeven stevig vast.
• Zet de C-rail (4) op de juiste hoogte vast. Verplaats daarvoor, indien
nodig, de schroeven (5). Draai de schroeven (5) stevig vast.
• Monteer de schuifstang (1):
Plaats de pen (2) en schuif de borgring (3) erop.
• Bevestig de deurbeslaghoek (4) voorlopig op de aandrijfarm (1) met
de pen (5). Schuif de borgring (3) op de pen.
• Trek eenmaal aan de noodontgrendeling (N). De loopwagen (1) is nu
ontgrendeld. Draai de bout (8) op het draagbalkbeslag vast.
• Schuif de loopwagen (1) met de schuifstang (2) helemaal naar voren
(3). Maak zonodig de schakelschuif (4) los.
• Deurbeslaghoek (5) op het midden (VM) van de garagedeur
positioneren en 5 boorgaten markeren. 5 gaten boren (Ø 5 mm).
Gebruik schroeven die passen bij het materiaal van de deur.
Draag bij het boren altijd een veiligheidsbril!
• Monteer de 5 zeskantbouten (6) en draai deze stevig vast.
• Maak de schakelschuif (4) los en schuif deze helemaal tegen de
loopwagen (7).
• Draai de schroef op de schakelschuif (4) vast.
20
19
18
17
16