680841
8
Zoom out
Zoom in
Previous page
1/40
Next page
7
Demonteer de twee stalen hoeken met sleufgaten (1) en bevestig
deze aan de plafondophanging (2) zoals weergegeven is in de
afbeelding.
Demonteer de schuifstang (1):
Klembeveiliging (2) uittrekken en de bout (3) verwijderen.
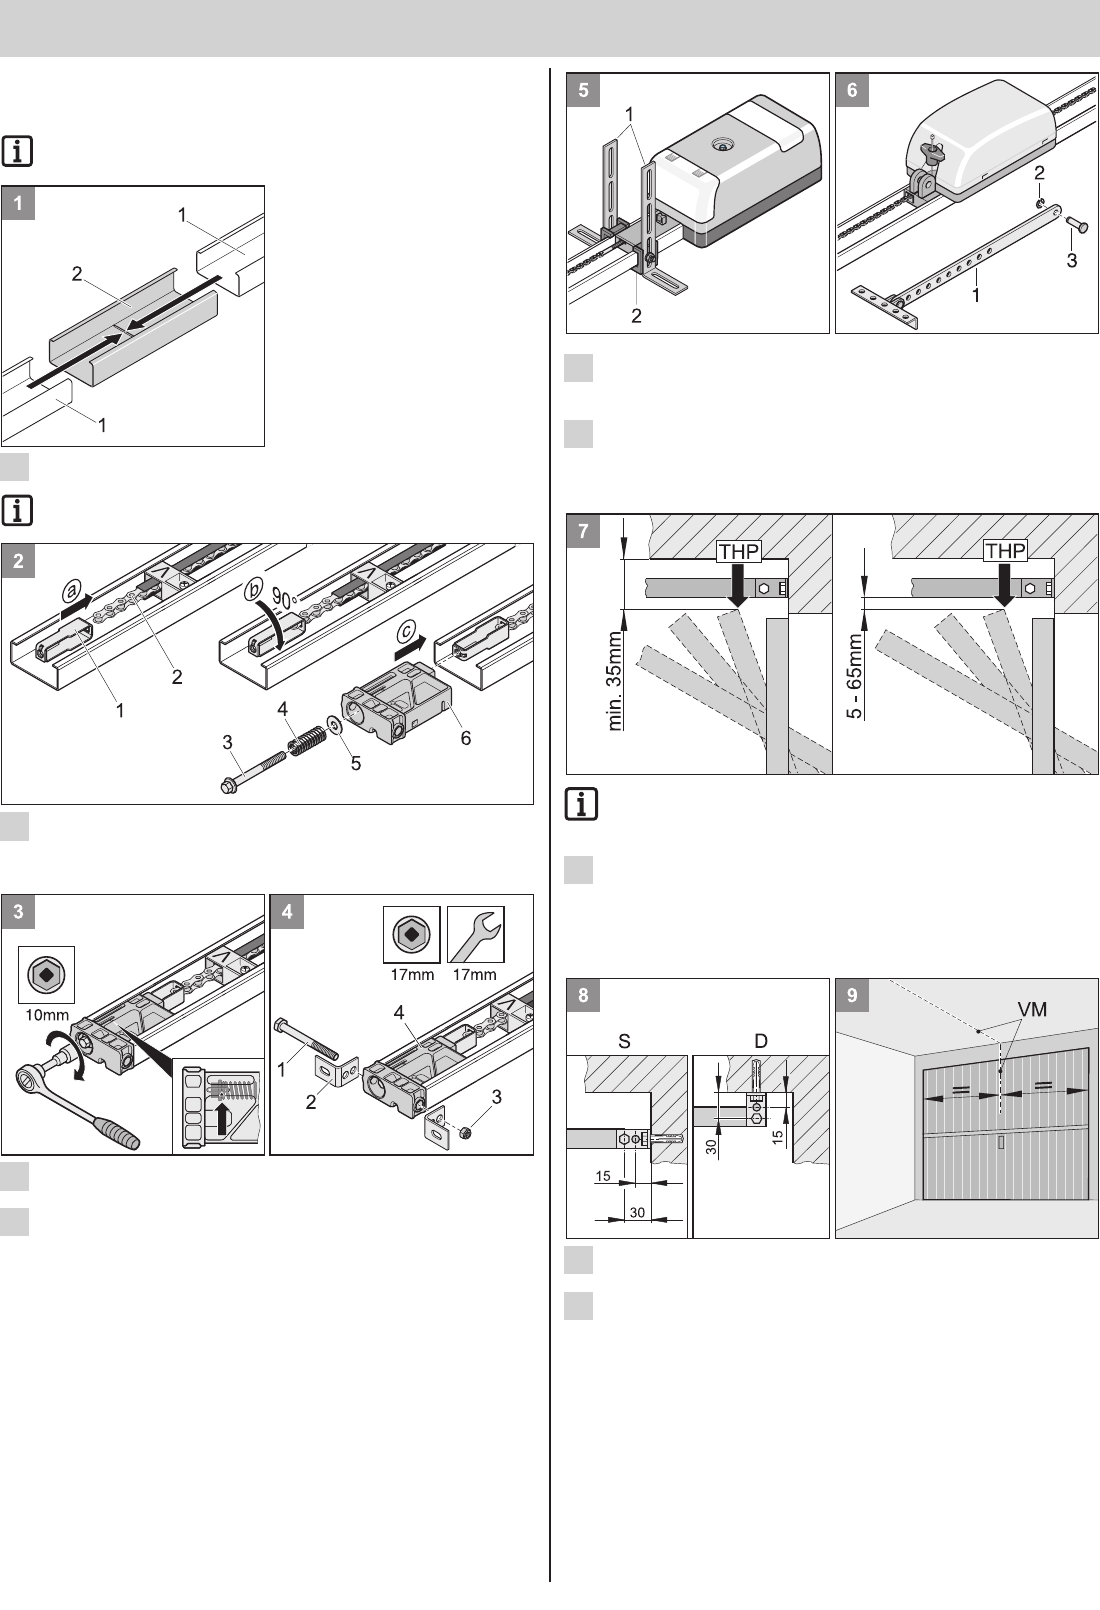
Monteren
Als de afstand tussen het plafond en de onderkant van de C- rail
groter is dan 245 mm, dient de plafondbevestiging (met
besturingsbandstaal) verlengd te worden.
Bepaal het hoogste looppunt van de garagedeur (THP):
Open de deur en meet de kleinste afstand (minimaal 35 mm) tussen
de bovenkant van de deur en het plafond. Deze afstand tussen het
bovenste looppunt (THP) en de onderzijde van de C-rails moet
minimaal 5 mm en mag maximaal 65 mm zijn, waarbij de schuifstang
in een hoek van maximaal 30° (zie afb. 21) mag staan!
De aandrijving kan gemonteerd worden aan de draagbalk (S) of aan
het plafond (D).
Bepaal het midden van de deur voor (VM) en teken deze maat af op
de deur en de draagbalk resp. het plafond
9
8
7
6
5
Voormonteren
Neem de aandrijving uit de verpakking,
Verwijder de verpakking volgens de ter plaatse geldige
voorschriften
Steek de twee C-rails (1) in het overschuifgedeelte in elkaar tot de
aanslag (2).
Bij marathon op de ongecoate kanten letten
Spanelement (1) aan ketting (2) hangen en 90° draaien.
Inschuifgedeelte (6) inschuiven en spanelement (1) doorheen steken.
sluitring (5) en veer (4) op spanbout (3) schuiven en spanbout (3) in
spanelement (1) schroeven.
Ketting spannen tot aan de markering (pijl).
Valhoek (2) met schroef (1) en moer (3) aan het inschuifgedeelte (4)
bevestigen.
4
3
2
1
Montage sprint/marathon
8


Need help? Post your question in this forum.

Forumrules


Report abuse

Libble takes abuse of its services very seriously. We're committed to dealing with such abuse according to the laws in your country of residence. When you submit a report, we'll investigate it and take the appropriate action. We'll get back to you only if we require additional details or have more information to share.

Product:

For example, Anti-Semitic content, racist content, or material that could result in a violent physical act.

For example, a credit card number, a personal identification number, or an unlisted home address. Note that email addresses and full names are not considered private information.

Forumrules

To achieve meaningful questions, we apply the following rules:

Register

Register getting emails for Sommer Duo 500SL at:


You will receive an email to register for one or both of the options.


Get your user manual by e-mail

Enter your email address to receive the manual of Sommer Duo 500SL in the language / languages: Dutch as an attachment in your email.

The manual is 5,17 mb in size.


You will receive the manual in your email within minutes. If you have not received an email, then probably have entered the wrong email address or your mailbox is too full. In addition, it may be that your ISP may have a maximum size for emails to receive.

Others manual(s) of Sommer Duo 500SL

Sommer Duo 500SL User Manual - English - 36 pages

Sommer Duo 500SL User Manual - German - 37 pages


The manual is sent by email. Check your email

If you have not received an email with the manual within fifteen minutes, it may be that you have a entered a wrong email address or that your ISP has set a maximum size to receive email that is smaller than the size of the manual.

The email address you have provided is not correct.

Please check the email address and correct it.

Your question is posted on this page

Would you like to receive an email when new answers and questions are posted? Please enter your email address.


Info