1. PRECAUTIONS FOR USE.................................................................................................................................. 26
4. INTENDED USE OF THE APPLIANCE .............................................................................................................. 30
4.1 Examples of outdoor use...................................................................................................................................................30
5. GETTING TO KNOW YOUR APPLIANCE.......................................................................................................... 31
6. BEFORE INSTALLATION................................................................................................................................... 32
7.3 Connecting the gas cylinder to the appliance....................................................................................................................34
7.4 Burner, Nozzle and Gas Consumption Data Tables ..........................................................................................................35
7.5 Check for any gas leaks....................................................................................................................................................35
8. THE CONTROL PANEL...................................................................................................................................... 36
9. USING THE BARBECUE.................................................................................................................................... 38
9.1 Fitting and changing the battery ........................................................................................................................................38
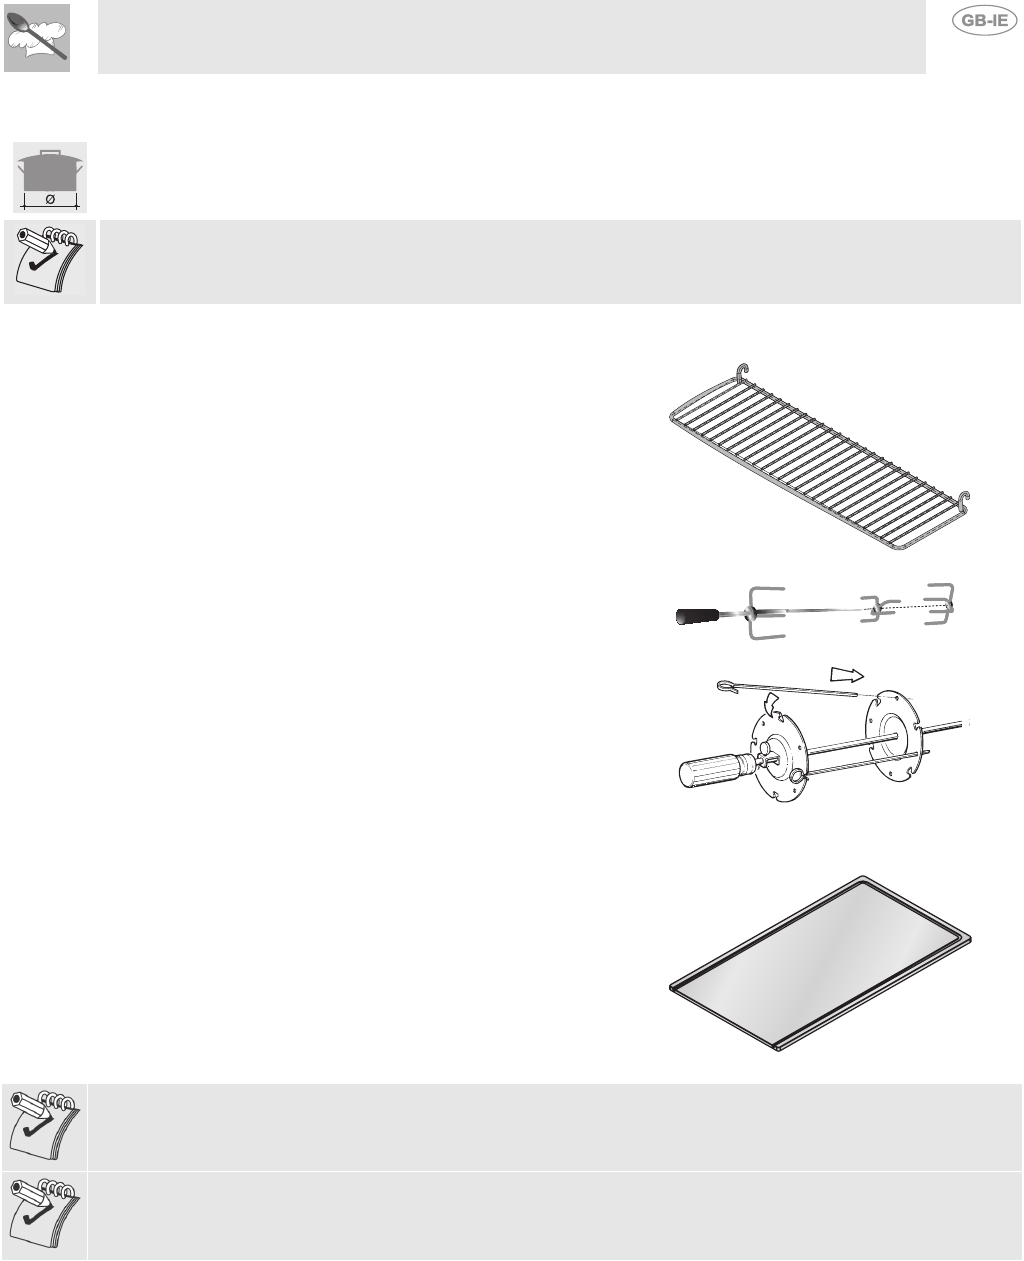
9.2 Fitting and using the rotisserie motor.................................................................................................................................38
9.3 Grid and plate positions.....................................................................................................................................................39
9.5 Using the SMOKER tray....................................................................................................................................................40
10. STANDARD ACCESSORIES............................................................................................................................ 41
9.6 Pan diameters....................................................................................................................................................................41
12. CLEANING AND MAINTENANCE.................................................................................................................... 45
12.1 Cleaning the exterior (stainless steel)..............................................................................................................................45
12.2 Cleaning the internal barbecue components...................................................................................................................45
12.3 Cleaning the dripping pans..............................................................................................................................................46
12.4 Cleaning the glass of the lid.............................................................................................................................................46
INSTRUCTIONS FOR THE USER: these provide recommendations for use, a description of the controls
and the correct procedures for cleaning and maintaining the appliance
INSTRUCTIONS FOR THE INSTALLER: these are intended for the qualified engineer who is to
install, commission and test the appliance
25
Precautions for Use
26
1.PRECAUTIONS FOR USE
THIS MANUAL CONSTITUTES AN INTEGRAL PART OF THE APPLIANCE: TAKE GOOD CARE OF IT
AND KEEP IT TO HAND THROUGHOUT ITS LIFE CYCLE
WE URGE YOU TO READ THIS MANUAL AND ALL THE INFORMATION IT CONTAINS CAREFULLY
BEFORE USING THE PRODUCT. INSTALLATION MUST BE CARRIED OUT BY QUALIFIED STAFF
IN COMPLIANCE WITH THE RELEVANT REGULATIONS. THIS APPLIANCE IS INTENDED FOR
HOUSEHOLD USE OUTDOORS, AND COMPLIES WITH THE EEC DIRECTIVES CURRENTLY IN
FORCE. THE APPLIANCE IS BUILT TO PROVIDE THE FOLLOWING FUNCTION: COOKING AND
HEATING FOODS; ALL OTHER USES ARE TO BE CONSIDERED IMPROPER.
THE MANUFACTURER DECLINES ALL LIABILITY FOR USES OTHER THAN THOSE STATED
ABOVE.
NEVER USE THIS APPLIANCE FOR HEATING ROOMS.
NEVER LEAVE PACKAGING RESIDUES UNATTENDED IN THE HOME. SEPARATE THE VARIOUS
PACKAGING MATERIALS BY TYPE AND CONSIGN THEM TO THE NEAREST SEPARATE
DISPOSAL CENTRE.
NEVER OBSTRUCT THE OPENINGS AND SLITS PROVIDED FOR VENTILATION AND HEAT
DISPERSAL ON THE SIDES AND REAR OF THE APPLIANCE.
THE NAMEPLATE WITH THE TECHNICAL DATA, SERIAL NUMBER AND MARK IS IN A VISIBLE
POSITION ON THE REAR OF THE APPLIANCE.
THE NAMEPLATE MUST NEVER BE REMOVED.
NEVER LEAVE THE APPLIANCE UNATTENDED DURING USE.
THE INTERNAL BURNERS AND RADIATING GRILL BURNER MUST NEVER BE USED
SIMULTANEOUSLY.
NEVER USE METAL SCOURING PADS OR SHARP SCRAPERS ON THE OUTSIDE
SURFACES; THEY WILL DAMAGE THEM.
USE ORDINARY NON-ABRASIVE PRODUCTS WITH THE AID OF WOODEN OR
PLASTIC UTENSILS IF NECESSARY. RINSE THOROUGHLY AND DRY WITH A SOFT
CLOTH OR CHAMOIS LEATHER.
NEVER USE HIGH-PRESSURE JET CLEANERS TO CLEAN THE APPLIANCE; THE POWER OF THE
WATER JET MIGHT DAMAGE THE APPLIANCE, REDUCING ITS SAFETY LEVEL AND CAUSING
UNSIGHTLY FLAWS.
IF THE KNOB BECOMES STIFF TO TURN, HAVE THE VALVES CHECKED BY AN AUTHORISED
SERVICE CENTRE.
IF THE APPLIANCE IS TO BE OUT OF USE FOR SOME TIME, CLOSE THE GAS SUPPLY VALVE. IN
THE EVENT OF A FAULT ON THE APPLIANCE OR A MALFUNCTION, CONTACT THE AFTER-
SALES SERVICE.
ALL REPAIR OPERATIONS MUST BE PERFORMED BY AN AUTHORISED SERVICE CENTRE.
The manufacturer declines all responsibility for injury or damage caused by failure to comply
with the above regulations or deriving from tampering with even just one part of the appliance
and the use of non-original spare parts.
Disposal instructions
27
2.DISPOSAL INSTRUCTIONS - OUR ENVIRONMENT POLICY
Our products are only packaged using non-pollutant, environment-friendly, recyclable materials. We urge
you to cooperate by disposing of the packaging properly. Contact your local dealer or the competent
local organisations for the addresses of collection, recycling and disposal facilities.
Never leave all or part of the packaging lying around. Packaging parts, and especially plastic bags, may
represent a suffocation hazard for children.
Your old appliance must also be disposed of properly.
Important: deliver the appliance to your local organisation authorised to collect scrapped appliances.
Proper disposal allows the intelligent recovery of valuable materials.
Safety precautions
28
3.SAFETY PRECAUTIONS
REFER TO THE INSTALLATION INSTRUCTIONS FOR THE SAFETY REGULATIONS FOR ELECTRIC
OR GAS APPLIANCES AND VENTILATION FUNCTIONS.
IN YOUR INTEREST AND TO ENSURE YOUR SAFETY, BY LAW ALL ELECTRIC APPLIANCES MUST
ONLY BE INSTALLED AND SERVICED BY QUALIFIED STAFF, IN ACCORDANCE WITH THE
RELEVANT REGULATIONS.
OUR APPROVED INSTALLATION ENGINEERS GUARANTEE YOU A JOB WELL DONE.
GAS OR ELECTRIC APPLIANCES MUST ALWAYS BE DISCONNECTED BY SUITABLY SKILLED
PEOPLE.
BEFORE THE APPLIANCE IS PUT INTO OPERATION, THE PROTECTIVE FILMS APPLIED INSIDE
OR OUTSIDE MUST BE REMOVED.
IMMEDIATELY AFTER INSTALLATION, CARRY OUT A QUICK TEST ON THE APPLIANCE
FOLLOWING THE INSTRUCTIONS PROVIDED LATER IN THIS MANUAL. IF THE APPLIANCE FAILS
TO OPERATE, CONTACT YOUR NEAREST SERVICE CENTRE. NEVER ATTEMPT TO REPAIR THE
APPLIANCE.
THIS PRODUCT IS SET IN THE FACTORY TO USE LPG GAS SOLD IN SUITABLE CYLINDERS BY
AUTHORISED CENTRES. IF USE OF ANOTHER TYPE OF GAS SHOULD BECOME NECESSARY,
CONTACT YOUR NEAREST AUTHORISED SERVICE CENTRE.
EVEN IF APPARENTLY EMPTY, GAS CYLINDERS MUST ALWAYS BE HANDLED WITH CARE IN
ACCORDANCE WITH THE SAFETY REGULATIONS SUPPLIED WITH THE INSTRUCTIONS.
NEVER USE ANY GAS CYLINDER IF DENTED OR RUSTY.
NEVER USE A NAKED LIGHT TO CHECK THAT GAS IS FLOWING FROM THE BURNERS
PROPERLY, OR TO LOOK FOR GAS LEAKS IN THE APPLIANCE.
NEVER STORE A SPARE GAS CYLINDER CLOSE TO THE APPLIANCE.
NEVER DISCONNECT THE GAS CYLINDER FROM THE APPLIANCE WHILE IT IS IN OPERATION
AND ALWAYS PERFORM ANY PROCEDURE ON THE GAS CYLINDER WELL AWAY FROM THE
APPLIANCE.
NEVER PLACE PANS WITH BOTTOMS WHICH ARE NOT PERFECTLY FLAT AND SMOOTH ON THE
BARBECUE GRIDS.
DURING USE, THE APPLIANCE BECOMES VERY HOT; PROTECTIVE GLOVES SHOULD BE
WORN TO PREVENT THE RISK OF BURNS.
NEVER USE PANS OR GRIDDLE PLATES WHICH PROJECT BEYOND THE OUTSIDE EDGE OF
THE BARBECUE.
NEVER PLACE FLAMMABLE OBJECTS OR MATERIALS ON THE APPLIANCE: IF IT SHOULD
ACCIDENTALLY BE SWITCHED ON, THIS MIGHT CAUSE A FIRE.
THE APPLIANCE BECOMES VERY HOT DURING USE. TAKE CARE NEVER TO TOUCH THE
HEATING ELEMENTS INSIDE THE APPLIANCE.
ALWAYS KEEP HOLD OF THE LID WHEN LOWERING IT.
OBSERVE THE THERMOMETER PROVIDED ON THE LID: WHEN THE READING EXCEEDS 300°C
(RED ZONE) THE LID MUST BE RAISED TO PREVENT DANGEROUS OVERHEATING.
THE APPLIANCE IS INTENDED FOR USE BY ADULTS. KEEP CHILDREN AT A SAFE DISTANCE
AND NEVER ALLOW THEM TO PLAY WITH IT.
WHEN THE APPLIANCE IS IN OPERATION, ACCESSIBLE PARTS MAY BECOME VERY HOT: KEEP
CHILDREN AT A SAFE DISTANCE.
Safety precautions
29
AFTER EACH USE, ALWAYS CHECK THAT THE CONTROL KNOBS ARE TURNED TO THE (OFF)
POSITION.
NEVER USE THIS APPLIANCE INDOORS OR INSIDE CARS, TRAILERS, CAMPING VANS OR
CARAVANS.
WHEN HOOKING UP THE APPLIANCE TO THE CYLINDER, USE ONLY THE FITTINGS AND
REGULATORS SUPPLIED WITH THE APPLIANCE. THESE PRODUCTS ARE ALSO AVAILABLE
FROM OUR AUTHORISED SERVICE CENTRES. USING ANY OTHER PRODUCTS CAN
SERIOUSLY COMPROMISE THE SAFETY OF THE APPLIANCE.
IF THE BARBECUE HAS BEEN OUT OF USE FOR SOME TIME, BEFORE REUSING IT CHECK THAT
THE GAS OUTLET HOLES ARE NOT CLOGGED WITH DUST OR SPIDER'S WEBS.
FOR THE CORRECT PROCEDURE, SEE POINT “12.2.3 THE BURNERS”
THIS APPLIANCE MAY ONLY BE USED OUTDOORS WITH NATURAL VENTILATION, OUTSIDE
ENCLOSED AREAS, WHERE ANY GAS LEAKS AND COMBUSTION PRODUCTS CAN BE RAPIDLY
DISPERSED BY THE WIND AND NATURAL AIR CONVECTION.
NEVER USE THE APPLIANCE OUTDOORS IN CASE OF BAD WEATHER. ANY CONTACT WITH
WATER MIGHT SERIOUSLY DAMAGE THE APPLIANCE AND PUT ITS SAFETY AT RISK.
TAKE CARE NOT TO ALLOW THE GLASS OF THE BARBECUE LID TO COME INTO CONTACT WITH
WATER WHILE IT IS STILL HOT.
CAUTION: DO NOT EXPOSE THE ROTISSERIE MOTOR TO BAD WEATHER AS THIS MIGHT
DAMAGE THE DEVICE AND REDUCE ITS SAFETY LEVEL.
ONLY LIGHT THE BURNERS WITH THE LID RAISED.
DURING COOKING, TAKE CARE NOT TO OBSTRUCT THE FAT DRAINAGE HOLE IN THE FRONT
OF THE APPLIANCE. IF NECESSARY, CLEAN IT THOROUGHLY WITH THE AID OF A WOODEN
OR PLASTIC UTENSIL.
THESE INSTRUCTIONS ONLY APPLY TO THE COUNTRIES OF DESTINATION WHOSE
IDENTIFICATION SYMBOLS ARE LISTED ON THE COVER OF THIS MANUAL.
The manufacturer declines all responsibility for injury or damage caused by failure to comply with the
above regulations or deriving from tampering with even just one part of the appliance and the use of
non-original spare parts.
Instructions for the User
39
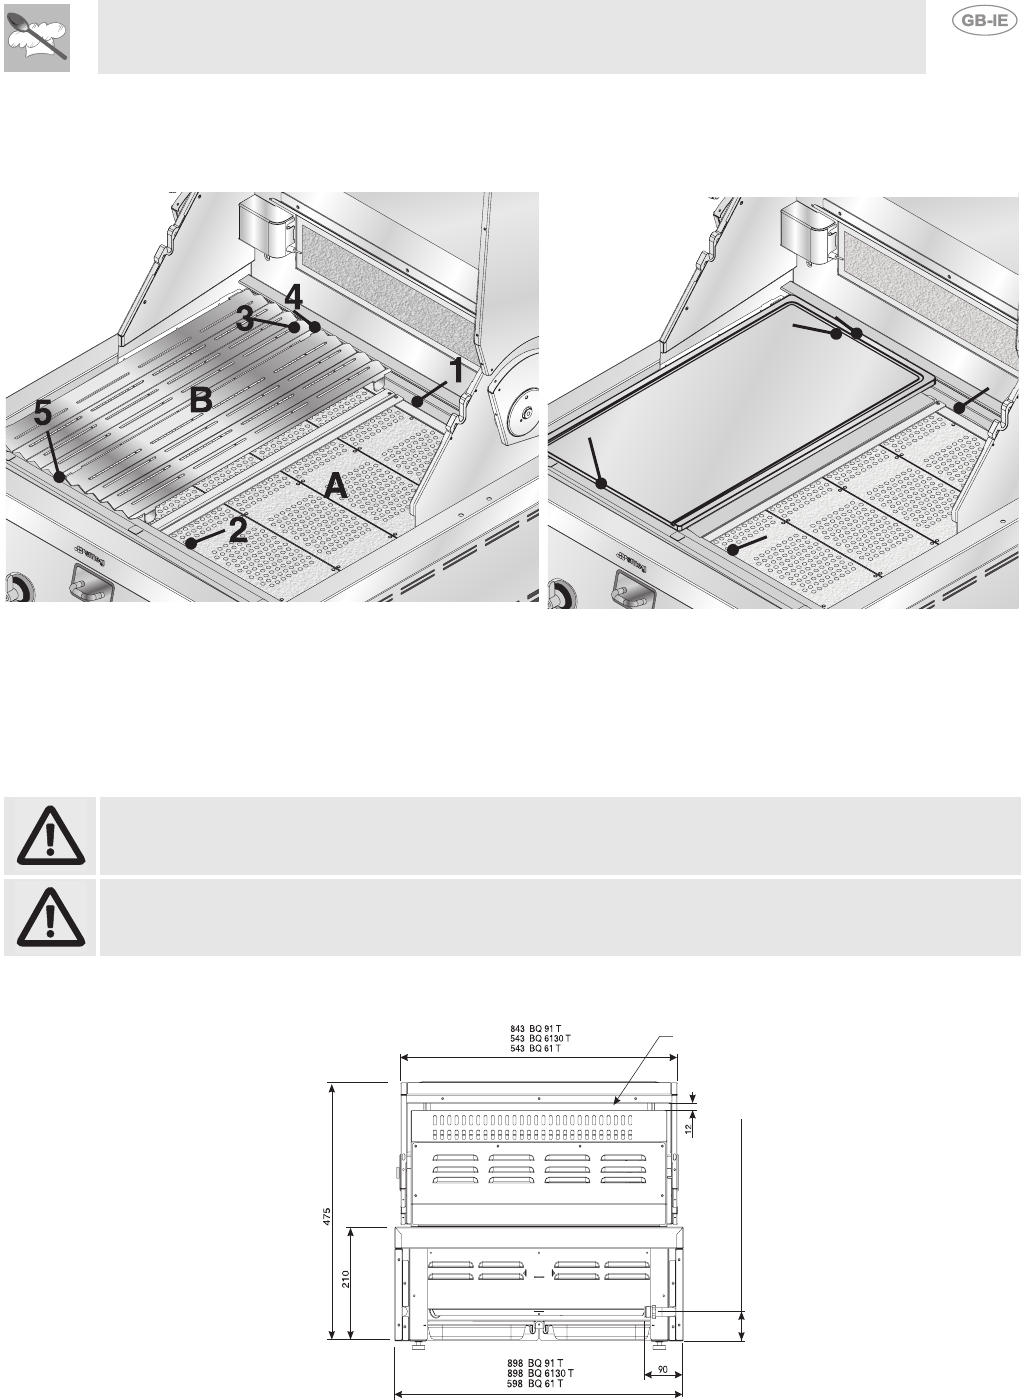
9.3Grid and plate positions
Before starting to cook, always check that the grids, refractory plates and stainless steel / cast iron plate
are correctly positioned. The diagram illustrates the correct positions for the plates A and grids B.
The self-cleaning refractory plates (A) must be fitted on the rests 1 and 2 shown below.
The grids (B) or the stainless steel / cast iron plate (C) have two rests of different heights at the rear (3
and 4) on which they can be placed. This means they can be moved closer to or further from the
refractory plates (A) depending on the heat level required, and also to use the fat for cooking by tilting
them if so desired.
Only in the configuration shown in the figure, with all the plates and grids correctly installed, can the
barbecues be used for cooking: any other configuration is a source of hazard to the user and can
compromise the operation of the appliance as well as damaging its exterior.
The refractory plates (A) must only be fitted underneath the grids (B) and not underneath the
stainless steel/cast iron plate (C).
Take care not to obstruct the combustion gas outlet flue in the back of the lid.
A
4
1
2
5
C
3
GAS OUTLET FLUE
55 BQ ON TROLLEY
75 BQ FREE-STANDING
Instructions for the User
40
9.4Switching on
To check that the burners inside the barbecue have ignited, hold one of your hands about 10 cm above
the grids: you should feel a gradually increasing amount of heat.
When lighting the radiant grill, rapid or auxiliary burners, keep the knob pressed down for about 5
seconds to allow the thermocouple to heat up. The burner may go out when the knob is released: this
means that the thermocouple has not warmed up enough. Repeat the operation, keeping the knob
pressed down for longer.
If the burners have not ignited after several attempts, wait 5 minutes before attempting to light the
appliance again. This pause is necessary to allow any gas which has built up inside the appliance to
disperse. If no flame is obtained even after numerous attempts, contact your nearest authorised service
centre.
9.4.1Electronic burner ignition
The burner it controls is shown next to each knob (see “The control panel” on page 36). To light the
flame, simply press the knob and turn it anti-clockwise to the minimum flame symbol . To adjust the
flame, turn the knob to the zone between the maximum () and the minimum () settings. To turn off
the burner, turn the knob back to the OFF position.
Libble takes abuse of its services very seriously. We're committed to dealing with such abuse according to the laws in your country of residence. When you submit a report, we'll investigate it and take the appropriate action. We'll get back to you only if we require additional details or have more information to share.
Product:
Forumrules
To achieve meaningful questions, we apply the following rules:
First, read the manual;
Check if your question has been asked previously;
Try to ask your question as clearly as possible;
Did you already try to solve the problem? Please mention this;
Is your problem solved by a visitor then let him/her know in this forum;
To give a response to a question or answer, do not use this form but click on the button 'reply to this question';
Your question will be posted here and emailed to our subscribers. Therefore, avoid filling in personal details.
Register
Register getting emails for Smeg bq61t at:
new questions and answers
new manuals
You will receive an email to register for one or both of the options.
Get your user manual by e-mail
Enter your email address to receive the manual of Smeg bq61t in the language / languages: English as an attachment in your email.
The manual is 4,13 mb in size.
You will receive the manual in your email within minutes. If you have not received an email, then probably have entered the wrong email address or your mailbox is too full. In addition, it may be that your ISP may have a maximum size for emails to receive.
If you have not received an email with the manual within fifteen minutes, it may be that you have a entered a wrong email address or that your ISP has set a maximum size to receive email that is smaller than the size of the manual.
The email address you have provided is not correct.
Please check the email address and correct it.
Your question is posted on this page
Would you like to receive an email when new answers and questions are posted? Please enter your email address.