ing on availability, album covers are displayed from the respective me-
dia or from the Gracenote
®
database
a)
.
Function not supported
a)
Gracenote
®
is a database stored in the unit containing information and album covers. For more information on updating the data, please visit the ŠKODA website or contact a ŠKODA Partner.
After connecting the source, the unit will automatically start to play the files stor-
ed on the source. The order of the played back files is determined by the alpha-
betical order of the file names.
Prerequisites and restrictions:
›
Stored additional information (e.g., artists, track names, album covers) is auto-
matically displayed for the audio files during playback.
›
The unit has been tested with most products and media available in the various
markets. However, it is possible that some units, media or files will be unreada-
ble or unplayable.
›
Audio and video files are subject to copyright. Files that are protected by Digital
Rights Management (DRM) technology cannot be played back by the media
drive.
›
The more files, folders and playlists on a storage medium, the longer it will take
to save the audio and video files. It is advantageous to create subfolders with
files (e.g., by artist or album names) to save time when storing the data. During
the import, it will take more time to store the data.
›
The name of the artist, the album and the title of the played file can be dis-
played if such information is available as so-called ID3 tags. If no ID3 tag is avail-
able, only the folder name is displayed.
›
WMA files (Windows Media Audio) can only be played if the copyright is not ad-
ditionally protected by the DRM procedure (Digital Rights Management). Such
WMA files are not supported by the unit.
›
The media drive does not support the Windows Media Audio 9 Voice format.
›
A compression rate of at least 160 kbit/s is recommended for MP3 files. The re-
maining playing time information for audio files with variable bit rates is not re-
liable.
›
The display of country-specific characters (e.g., for ID3 tag information) depends
on the system language and cannot always be guaranteed.
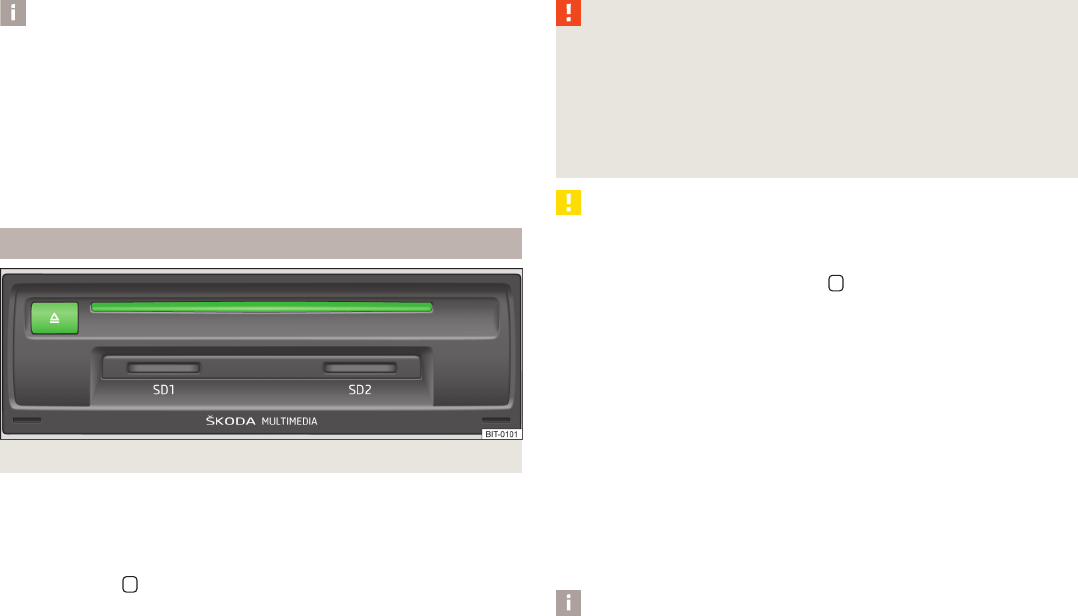
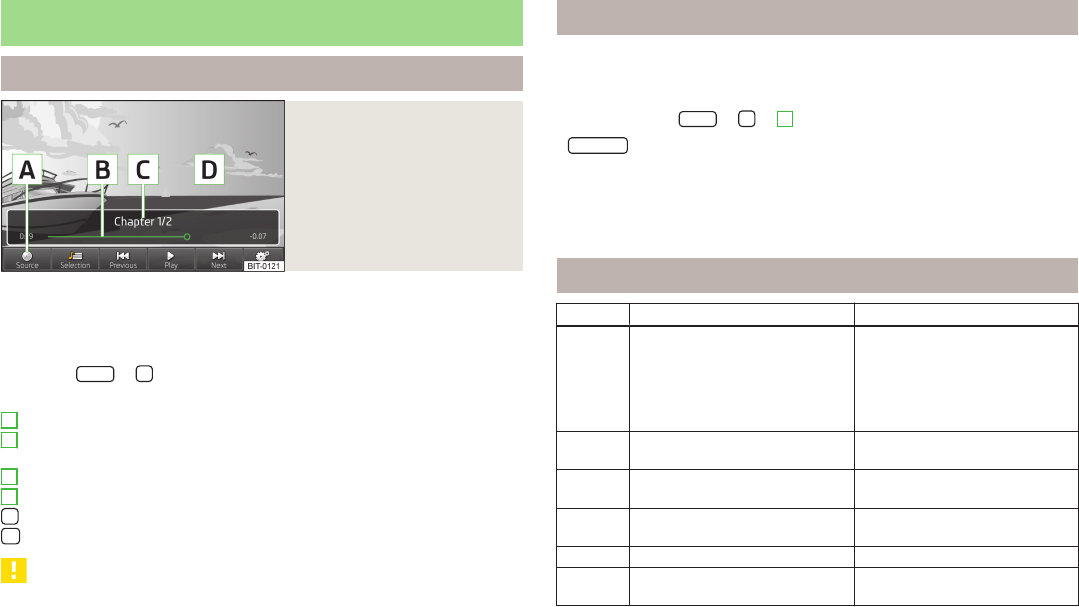
Jukebox
Fig. 15 Jukebox
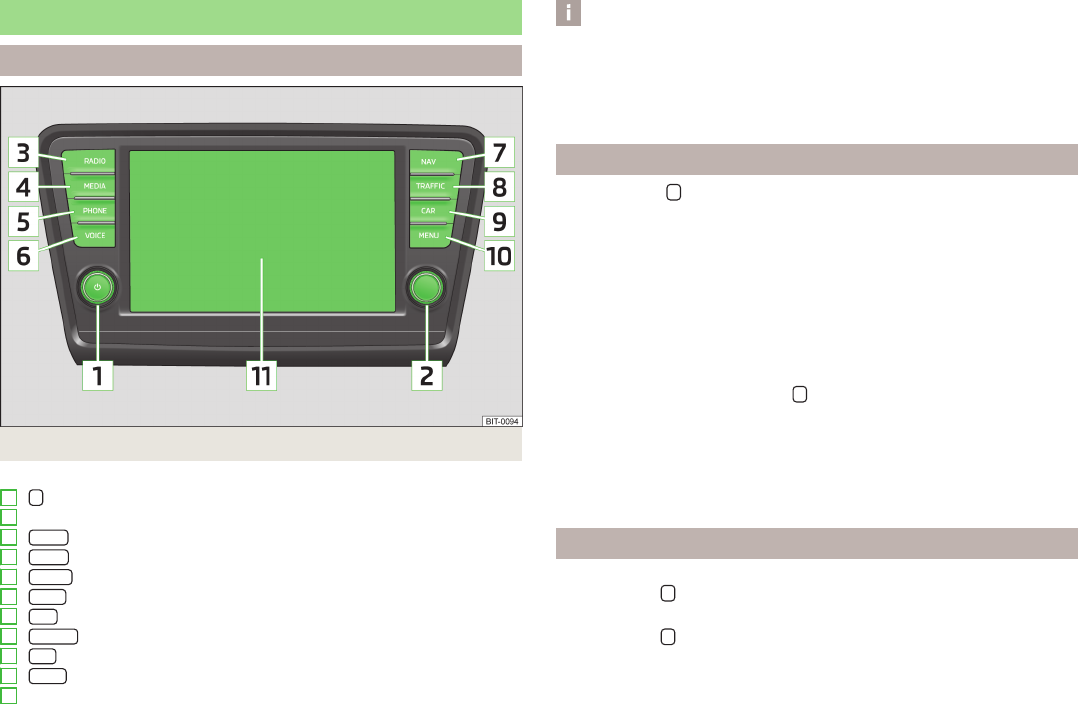
First and foremost, pay attention to the safety instructions» page 4.
24
Entertainment
Select and confirm all functions as described at the beginning of this man-
ual» page 6.
You can use the Jukebox menu to load music and videos to the unit memory from
the supported media.
There is approximately 10 GB free memory available and you can save 3 000 files.
Explanation of graphic
Display the folder structure
Folder
File
Function key to import files to the Jukebox
Function keys for higher-level folders
Import files
Press
MEDIA
→
→
Manage Jukebox
→
Import
.
A menu with available media is displayed.
Select the desired media from the list of available media.
Press the folders
B
or files
C
.
Press the button
D
.
The message
Import ended. (X of Y files imported)
Import completed successfully
.
Press the button
OK
.
Delete files
The function is available if there are audio or video files in the Jukebox.
Press
MEDIA
→
→
Manage Jukebox
→
Delete
.
A menu with available media is displayed.
Select the desired media from the list of available media.
Press the folders
B
or files
C
.
Press the button
.
Press the button
Delete
.
The message
Files have been deleted
will appear.
Press the button
OK
.
A
B
C
D
E
Display memory capacity:
When importing or deleting files, the current memory capacity is displayed on the
screen.
■
Free: - Size of used memory
■
In use: - Size of free memory
■
Free files: - Number of files that can be imported (max. 3 000)
File list
The files stored in the internal memory of the Jukebox are sorted and ordered into
the following categories as per the ID3 tag file properties. Playback starts when a
category and a position within a category are chosen.
Playlist
Artist
Album
Genre
Title
Video
Note
■
It is not possible to copy the contents of copyrighted CDs and DVDs to the Juke-
box.
■
The files that have already been copied are automatically recognized and can-
not be copied again (shown in grey).
■
It is not possible to copy files while simultaneously playing back audio or video
files in the CD/DVD drive.
■
The names of the artists, the album and the title of the played file are displayed
automatically if this information is available as so-called ID3 tags. If no ID3 tag is
available, only the folder name is displayed.
Bluetooth
®
player
›
The pairing process of the Bluetooth
®
player with the unit» page 34.
›
A fast pairing process is possible if the Bluetooth
®
player supports it. If a PIN
code is displayed on the screen of the Bluetooth
®
player or unit, confirm this
code.
›
The media is started and operated via the portable player or via the unit, de-
pending on the device used.
F
G
H
I
J
K
25
Media
Note
■
Note any pairing requests shown in the Bluetooth
®
player.
■
You only need to enter the PIN code once. Bluetooth devices that have already
been paired are connected to the unit automatically when they are in range.
■
It is possible to pair several Bluetooth
®
players with the unit. However, only one
player can be active at the same time.
■
The unit supports Bluetooth A2DP and AVRCP (1.0 - 1.3) protocols.
■
It is recommended to adjust the volume on the portable player to the maximum
level.
■
The supported media functions are dependent on the type of Bluetooth
®
player
used.
CD/DVD
Fig. 16
CD/DVD case
The CD/DVD slot is located in the storage compartment on the front passenger
side.
Inserting/ejecting a CD/DVD
›
Insert a CD/DVD, with the labelled side facing up, into the slot until it is auto-
matically drawn in. The play function will start automatically.
›
Press the button
– die CD/DVD is ejected.
If the ejected medium is not taken out within 10 seconds, it will be retracted
again for safety reasons. However, the unit will not change to the CD/DVD source.
WARNING
On the manufacturing date, this unit was classified as a class 1 laser product in
accordance with the national/international standards DIN EN 60825-1:
2008/05 and DHHS Rules 21 CFR Subchapter J. The laser used in this class 1
laser product is so weak that there is no risk of danger when operated cor-
rectly. This product is designed such that the laser is restricted to the inside of
the unit. However, the installed laser could be classified in a higher class were
the housing to be removed. For this reason, never remove the housing of the
unit.
CAUTION
■
Never insert CDs with the designation “Do not insert in drives without a drawer”
or “Eco Disc” into the internal drive.
■
Inserting a second CD/DVD while a medium is being ejected can damage the
drive in the unit. After pressing the button
, there is a delay of a few seconds
before the CD/DVD is ejected. During this time the lock in front of the CD/DVD
case is open. Be sure to wait until the medium has been fully ejected before you
try to insert a new CD/DVD.
■
If the CD has mechanical damage, is not readable or was inserted incorrectly,
the following message is displayed Error: CD, or Error: DVD. Check the CD/DVD
and insert it properly into the drive. If the message is displayed again, try using
another CD/DVD or visit a ŠKODA specialist garage, if necessary.
■
Outside temperatures that are either too high or too low might cause the unit
to be temporarily unavailable. The changer is equipped with a temperature switch
to protect the inserted CD/DVD and the laser.
■
If the inside temperature of the unit is too high, no CDs/DVDs will be accepted.
The unit switches into the last active operating mode.
■
Never use liquids such as benzine, paint thinner or record cleaner, otherwise
the surface of the CD/DVD may be damaged!
■
Never expose the CD/DVD to direct sun light!
■
Only write on the CD/DVD with appropriate writing tools.
■
Do not affix anything to the CD/DVD!
Note
■
Uneven road surfaces and strong vibrations may cause the CD to jump.
■
In cold weather or after rain showers, moisture (condensate) may deposit in the
unit. This can lead to playback jumps or impair the play function. In such cases,
wait until the moisture has dissipated.
26
Entertainment
■
If a CD/DVD is soiled, never clean it with circular movements but rather from the
inside to the outside with a soft lint-free cloth. For heavy stains, we recommend
that you clean the CD/DVD with a commercially available medium cleaner and al-
low it to dry.
■
CDs/DVDs protected by DRM and self-made media might not play at all, or play
only with restrictions.
■
The national copyright laws that apply in your country must be observed.
■
The CD/DVD player contains no parts that need servicing or that can be re-
paired. If your CD/DVD player is defective, visit a ŠKODA specialist garage.
SD memory card
Fig. 17
SD slot
The SD memory card slots are located in the storage compartment on the front
passenger side.
Inserting an SD memory card
›
Push the SD memory card into the memory card slot with the trimmed edge to
the front right until it “locks into place”. The play function will start automatical-
ly.
Removing an SD memory card
Depending on equipment fitted:
›
Press the button
MENU
→
→
Remove SD card 1 safely
or
›
Press
Remove SD card 2 safely
.
›
Press the inserted SD memory card. The SD memory card “jumps” into the eject
position.
SD memory card empty or data not readable
If an SD memory card is inserted and no data or no legible data has been stored
on the card, the unit will not be switched to the SD memory card mode after the
loading procedure.
Due to differing quality requirements from different card manufacturers, it is not
possible to always guarantee the playback of SD memory cards. Some or all files
on the SD memory card cannot be played or their playback is limited.
Only use one-part SD cards. When using an SD card with an adapter (multi-part
SD cards), vehicle vibrations might cause the card to fall out of the adapter. Parts
of the card could jam in the unit, impairing the function of your unit.
We recommend that you use class 4 SD memory cards and higher. This guaran-
tees the fastest possible access to the audio files.
Always store the SD cards in suitable cases to protect them from dirt, dust and
damage.
AUX input
External audio sources connected to the AUX input cannot be operated from your
unit.
Use the standard 3.5 mm jack plug for the AUX input. If the external audio source
does not have this jack plug, you must use an adapter.
CAUTION
The AUX input must only be used for audio sources!
Note
If an external audio source is connected to the AUX input, which is equipped with
an adapter for external power supply, the sound may be impaired. This depends
on the quality of the adapter which is used.
USB input
External sources connected to the USB input can be operated from your unit.
Before removing the USB device, proceed as follows:
›
Press the button
MENU
→
→
Remove USB device safely
.
27
Media
It is only possible to connect specification 1.x and 2.x or higher specification devi-
ces. USB 2.x devices are supported and the data transfer speed is then the maxi-
mum USB 2.x speed.
The unit supports USB devices up to speeds of 480 MBit/s.
Some options provided by the MTP player (Media Transfer Protocol), such as the
ability to rate tracks, and video playback, are not supported.
Do not use USB extension cables or adapters. These can impair the function of
the unit.
USB hubs are not supported.
MEDIA IN input
External sources such as iPod
®
, iPad
®
or iPhone
®
, connected to the MEDIA IN in-
put, can be operated via your unit.
Extension cables to connect external sources are available from ŠKODA original
accessories.
The unit starts charging the battery of the iPod
®
, iPhone
®
or iPad
®
device once
the device is connected using the extension cable and provided that the ignition
is switched on.
Sort tracks from a connected device (iPod
®
, iPad
®
or iPhone
®
)
›
Video (only available if a red adapter is used) - Video playlists, films, music vid-
eos, TV shows, video podcasts, rented films.
›
Music - Playlists, artists, albums, tracks, podcasts, genres, composers, audio
books.
Video setup
›
Press the button
MEDIA
→
→
Video (iPod)
.
■
Screen
– Adjust the brightness, contrast, and colour of the video (during play-
back in NTSC standard - option for colour adjustment)
■
Format:
- Set the screen width/height ratio
■
AV standard:
1)
- Set the TV standard
■
Automatic
- Automatic selection of standard
■
PAL
- Select the coding standard for the PAL colour signal (phase alternating
line)
■
NTSC
- Select the coding standard for the NTSC colour signal (National Televi-
sion System(s) Committee)
Note
■
Some options provided by iPod
®
, iPhone
®
or iPad
®
devices, such as the ability to
rate tracks or add them to an “on-the-go” playlist, are not supported.
■
Some options provided by the iPod
®
, such as Cover Flow
®
or video playback, are
only available when a red extension cable is used.
■
Consult the operating instructions for your iPod
®
, iPhone
®
or iPad
®
device for
important information concerning its operation. We recommend that you regularly
update the software of external sources.
1)
The same standard must be selected in the external source. An incorrectly adjusted AV standard can
result in inadequate video quality. The unit outputs no picture at all, or only renders it in black and
white.
28
Entertainment
DVD video
Main menu
Fig. 18
DVD video: Main menu
First and foremost, pay attention to the safety instructions» page 4.
Select and confirm all functions as described at the beginning of this man-
ual» page 6.
Call up the main menu
›
Press the
MENU
→
button.
Explanation of graphic
Select the video source
Displays the playing time and the remaining time. Use your finger to adjust
the position within the file
Information for the selected video file (e.g., video title, chapter)
Video displayed here
Open the DVD menu
Video settings
CAUTION
■
For safety reasons, the video display is switched off at speeds over 5 km/h and
the following message is displayed: The vehicle is in motion. The display has
been switched off for your safety. The unit continues to play the soundtrack.
■
The regional code of the player corresponds to the location of sale. If the unit
displays the following message: The country code of the DVD does not match
the country code of the device. Playback not possible. In this case, visit a ŠKODA
retailer.
A
B
C
D
Start and playback video
›
Video playback starts automatically once the medium is inserted in the CD/DVD
slot.
or
›
Press the button
MENU
→
→
A
» Fig. 18 on page 29.
■
CD/DVD
- Select the inserted DVD
Supported media and formats
›
DVD video
›
DVD audio
›
DVD A/V
Operating video playback
ButtonActionOperation
/Press
Play/Pause: The play function is
stopped at the current position
and the symbol changes to - af-
ter pressing again, the play func-
tion will continue from this posi-
tion
Press briefly (within 3 seconds of
the start of the video playback)
Play the previous video
Press briefly (3 seconds after the
start of the video playback)
Play the current video from the
start
Press button for a long period of
time
a)
Fast-reverse of the video
Press brieflyPlay the next video
Press button for a long period of
time
a)
Fast-forward of the video
a)
The longer the button is pressed, the faster the fast forward/reverse.
29
DVD video
Operating the DVD menu
Fig. 19
DVD menu
The DVD menu is displayed after the inserted DVD video medium has been read
or
›
Automatically after pressing
during playback.
Explanation of graphic
Function keys for the DVD menu
The displayed DVD menu
Video setup
›
Press the button
MENU
→
→
.
■
Sound
- Sound setup
■
Format:
- Set the video playback size
■
Automatic
- Automatic adjustment of the screen size
■
16:9
- 16:9 format
■
4:3
- 4:3 format
■
14:9
- 14:9 format
■
47:20
- 47:20 format
■
Audio channel:
- Select the audio channel from the menu
■
Subtitles:
- Select the subtitles from the menu
■
No selection
- No subtitles
■
- Select the subtitles from the DVD menu
A
B
30
Entertainment
Images
Main menu
Fig. 20
Images: Main menu
First and foremost, pay attention to the safety instructions» page 4.
Select and confirm all functions as described at the beginning of this man-
ual» page 6.
Call up the main menu
›
Press the
MENU
→
button.
Explanation of graphic
Select the image source
Select the images or folder from the list
Image settings
You can adjust the size of the image by touching the screen with two fingers and
pulling the fingers together or apart. You can move the image in the desired di-
rection by touching and dragging it with your finger.
Supported file types
File type
Supported formats
Imagesjpg, jpeg, png, bmp, gif
A
Operation
Displaying images
ButtonActionOperation
PressDisplay the previous image
/
PressSwitching on/off the slideshow
PressDisplay the next image
Press
Rotate the image 90° anticlock-
wise
PressRotate the image 90° clockwise
Press
Display the maximum image size
while retaining the aspect ratio
2
» Fig. 1
on page 6
Rotate the image clockwise or
anticlockwise
Enlarge/reduce the size of an im-
age
Select image source
›
Press the button
MENU
→
→
A
» Fig. 20 on page 31.
■
CD/DVD
- switches to an inserted CD/DVD
■
USB
- switches to a data medium connected to the USB input
■
SD card 1
- Changes to an inserted memory card SD 1
■
SD card 2
- Changes to an inserted memory card SD 2
Adjust image display
›
Press the button
MENU
→
→
.
■
Image view
- Adjust the display of the image
■
Full
- Display the maximum image size while retaining the aspect ratio
■
Automatic
- Full screen display
■
Display time
- Set the display time for the slideshow
■
5 s
■
10 s
31
Images
■
15 s
■
30 s
■
Repeat slide show
- Switch on/off the slideshow repeat function. (After the last
image is displayed, the slideshow starts from the beginning.)
32
Entertainment
Phone
Phone
Introductory information
The phone menu is only available when the ignition is on and the Bluetooth
®
function is activated.
To connect a mobile phone with the hands-free system, the two devices must be
paired » page 34.
After switching on the unit, the system attempts to connect
1)
to the last connec-
ted mobile phone
2)
. Further information » page 34.
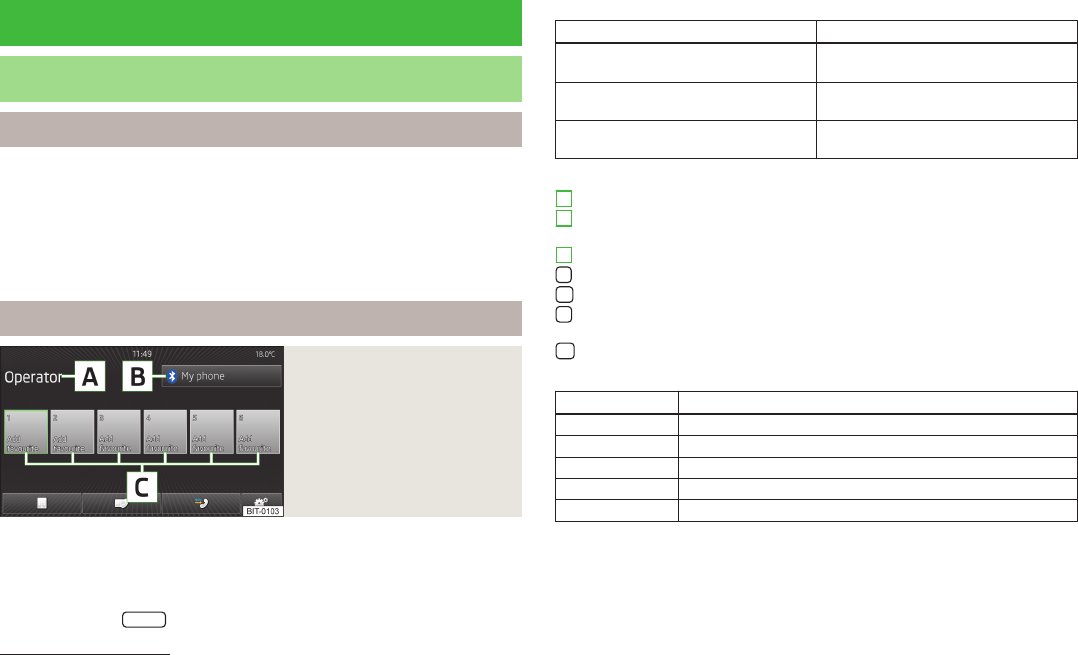
Main menu
Fig. 21
Phone: Main menu
First and foremost, pay attention to the safety instructions» page 4.
Select and confirm all functions as described at the beginning of this man-
ual» page 6.
Call up the main menu
›
Press the button
PHONE
.
Possible error messages
MessageAction
To use the Bluetooth function, please
switch the ignition on.
Switch on the ignition.
Please switch on Bluetooth.
Switch on the Bluetooth
®
func-
tion » page 13.
No Bluetooth devices paired.
Pair the mobile phone with the hands-
free system » page 34.
Explanation of graphic
Name of the mobile network provider
Name of the connected mobile phone/function key used to search for a
mobile phone or list of paired mobile phones
Speed dial favourite telephone numbers » page 35
Direct entry of a phone number » page 36
Display the phonebook » page 36
Display the call list (if there are missed calls, the number of missed calls is
shown next to the symbol
) » page 37
Settings in telephone mode » page 37
Symbols in the display
SymbolDescription
Charge status of the phone battery
a)
Signal strength
a)
Roaming (before the name of the mobile network provider)
a)
Missed call
Current call
a)
This function is only supported by some mobile phones.
A
B
C
1)
Provided that the ignition and the Bluetooth
®
function are switched on.
2)
With some phones, it is necessary to set the connection to the device as "authorised" in order for the
automatic connection to be successful. If this is not set, the system will prompt you for a confirma-
tion each time you attempt a connection with the phone.
33
Phone
Connecting mobile phone with hands-free system
Introductory information
The hands-free system is indicated as SKODA_BT_wxyz in the Bluetooth
®
device
to be paired. wxyz is replaced with the last four symbols of the VIN code of your
vehicle. You can change the name of the hands-free system » page 13.
Prerequisites for successful pairing
›
Ignition is switched on.
›
Both the Bluetooth
®
function and the visibility of the hands-free sys-
tem » page 13 and mobile phone must be switched on » See the owner's man-
ual of the mobile phone.
Automatic connection
After switching on the unit, the system attempts to connect
1)
to the last connec-
ted mobile phone
2)
. If the connection cannot be established, the system will at-
tempt to connect to other previously connected phones, one by one.
During the automatic connection process, the system displays a list of function
keys:
■
- Display a list containing mobile phones which the system automatically at-
tempts to connect to; here, it is possible to specify that the system should con-
nect to one of the listed phones
■
Find telephone
- Search for a mobile phone » page 34
Disconnect the connection
›
By removing the ignition key (or turning off the ignition and opening the driver's
door in the case of vehicles with the KESSY system).
›
By disconnecting the hands-free system or switching off the Bluetooth
®
func-
tion in the mobile phone.
›
By switching off the Bluetooth
®
function in the unit » page 13.
›
By disconnecting or deleting the paired device from the list of paired devi-
ces » page 13.
Possible symbols in the list of found or paired devices
SymbolDescription
Devices that support the functionality of the hands-free sys-
tem (Bluetooth
®
profile HFP)
a)
Devices that are connected to the hands-free system via
Bluetooth
®
profile HFP
a)
Bluetooth
®
players (Bluetooth
®
profiles A2DP and AVRCP)
b)
Bluetooth
®
player connected to the unit via Bluetooth
®
pro-
files A2DP and AVRCP
b)
a)
HFP is a Bluetooth
®
profile that supports the functionality of the hands-free system.
b)
A2DP and AVRCP are Bluetooth
®
profiles that support multimedia functions.
Note
You can pair a maximum of 20 devices. If this maximum number is reached, pair-
ing a new device will cause the device not used for the longest time to be deleted
automatically.
Pairing from the hands-free system
›
Press the button
PHONE
.
Where the mobile phone has been paired but the automatic connection is unsuc-
cessful, check that the mobile phone's Bluetooth
®
function is switched on and
that the device is visible.
Press the function key
B
» Fig. 21 on page 33 to check whether the Bluetooth
®
device is included in the list of paired devices.
If no mobile phone is connected to the hands-free system, the message Please
find and connect a mobile telephone is displayed.
If a mobile phone is connected to the hands-free system, press the button
B
» Fig. 21 on page 33.
›
Press
Find telephone
.
At the end of the search, the display shows the message Device search finished.
1)
Provided that the ignition and the Bluetooth
®
function are switched on.
2)
With some phones, it is necessary to set the connection to the device as "authorised" in order for the
automatic connection to be successful. If this is not set, the system will prompt you for a confirma-
tion each time you attempt a connection with the phone.
34
Phone
›
At the end of the search, or even during the search, press the button
Results
.
The system displays a list of found Bluetooth
®
devices. (If you do not press the
button
Results
, the system displays the list after 25 seconds).
›
Select the mobile phone that you want to pair.
›
Confirm the pairing request on the mobile phone.
Next, depending on the type of the mobile phone:
›
Enter the PIN code shown on the unit display into the mobile phone with-
in 30 seconds
or
›
Confirm the PIN code shown on the display of the mobile phone in the unit and
the mobile phone, within 30 seconds.
If the mobile phone supports the Bluetooth
®
profile A2DP or AVRCP, your mobile
phone might prompt you to pair the phone as a Bluetooth
®
player.
If the search fails, check that the conditions for successful pairing are
met » page 34 and repeat the whole process.
During the search, the system displays a list of function keys:
Interrupting the search
Help
Viewing help
Results
Display the search results as they become available, with the op-
tion to select one of the Bluetooth
®
device that are already found
Pairing from the mobile phone
When pairing from the mobile phone, follow the instructions in the owner's man-
ual of the mobile phone.
›
Have the mobile phone search for available Bluetooth
®
devices.
›
Select the hands-free system in the list of Bluetooth
®
devices.
Depending on the type of the mobile phone:
›
Enter a minimum 4 digit PIN code and confirm it;
›
Within 30 seconds, enter the same PIN code on the screen of the unit
or
›
Confirm the PIN code shown on the unit screen in the mobile phone and the
unit within 30 seconds.
You can cancel the pairing at any time by pressing
Cancel
.
Connecting to another paired mobile phone
›
In the PHONE main menu, press the function key
B
» Fig. 21 on page 33.
›
Select the paired mobile phone to be connected with the hands-free system.
›
Confirm the connection by pressing
Replace
.
Speed dialling a telephone number
You can use the speed dial function keys
C
» Fig. 21 on page 33 to dial previously
assigned telephone numbers instantly.
There are six function keys available.
Assigning a phone number
›
Press a function key for the speed dial
C
» Fig. 21 on page 33 that is not as-
signed.
The unit displays the phone book.
›
If necessary, enter one of the contact numbers for the desired telephone con-
tact.
You can also assign the contact number in the phone mode settings » page 37.
Selecting a stored speed dial
›
Press the desired function key for the speed dial
C
» Fig. 21 on page 33.
Changing a stored speed dial
›
Press the desired function key for the speed dial
C
» Fig. 21 on page 33 for lon-
ger.
The unit displays the phone book.
›
If necessary, enter one of the contact numbers for the desired telephone con-
tact.
You can also make the change in the phone mode settings » page 37.
Removing a phone number
›
Press the button
→
User profile
→
Manage favourites
.
›
Press the function key for the speed dial.
35
Phone
Direct entry of a phone number
Fig. 22
Direct entry of a phone number
›
Press the button
PHONE
→
.
A screen appears to enter the phone number » Fig. 22.
Delete the digit
Dial the entered number
1)
- Add a prefix
2)
if this option has been set in the phone settings » page 37
The input screen also functions as an alphanumeric keypad that you can use to
search for contacts in the phonebook.
For example, if you enter 32, the unit will display contacts with the letter se-
quence DA, FA, EB, etc.
Select the desired contact by pressing the corresponding function key.
Phone book
›
Press the button
PHONE
→
.
The internal phonebook provides 2 000 free memory locations. Each contact can
contain up to 5 telephone numbers.
Downloading and updating the phone book
Upon the first connection of the mobile phone with the hands-free system, the
system begins to download the phone book from the phone and from the SIM
card
3)
into the memory of the control unit.
If the phonebook downloaded from the mobile phone contains more than
2 000 contacts, loading is stopped and the message Contacts not completely im-
ported appears on the screen. Only the already downloaded contacts will be
available.
Each time the mobile phone has established a new connection with the hands-
free system, the relevant phone book will be updated.
During the update, the phone book which was stored after the last completed up-
date will be available. Newly stored telephone numbers are only shown after the
updating has ended.
If an error occurs while loading the phone book, the message Import failed.
Please try again and check whether the BT device allows connections.
You can start the update manually with a function in the phone mode set-
tings.» page 37
Find contact
Press the button
Find
to open the input screen with keypad to search in the pho-
nebook » page 8.
Select contact
Press the function key for the desired contact to dial the telephone number.
Where a contact contains several telephone numbers, the system displays a
menu containing the telephone numbers for the contact.
Contact details
Press
to display the contact details.
1)
If no number is entered, the last dialled number will be displayed after you press the button
.
2)
If the addition of a prefix option is switched on, but the prefix is not entered in the phone settings,
the last dialled number will be displayed in the input field after you press the button
. If the prefix
has been defined and a number has been entered in the input line, the prefix will be added before
the telephone number and the system will attempt to establish a connection when you press the
button
.
3)
Some mobile phones do not support downloading of contacts from the SIM card.
36
Phone
Call lists
Fig. 23
Call lists
›
Press the button
PHONE
→
.
The system displays a call list » Fig. 23.
Function key used to select the display
›
All
- List of all calls
›
Missed calls
- list of missed calls
›
Dialled Nos.
- List of dialled numbers
›
Received calls
- list of received calls
Dial a number with a defined prefix » page 37, Settings in telephone mode
Display the screen to input and adjust the telephone number before dialling
Display the contact details
Press the function key for a desired contact or telephone number to start dialling.
Settings in telephone mode
›
Press the button
PHONE
→
.
Menu with settings in telephone mode
■
Select telephone
- Search for available telephones/list of paired telephones/select
telephone
■
Find telephone
- Search for a mobile phone
■
Bluetooth
- Bluetooth
®
settings » page 13
A
B
C
D
■
User profile
- User profile settings
1)
■
Manage favourites
- Assign function keys to allow speed dialling of contacts; you
can also add and delete contacts here
■
Mailbox number:
- Enter the mailbox number
■
Enter here
- Enter the phone number of the mailbox
■
Prefix:
- Switch on/off the option to assign a prefix to a telephone number.
Once this function is activated, the button for adding a prefix
will be shown
in some menus
■
Enter here
- Enter the prefix of a phone number
■
Sort by:
- Sort the order of the phonebook
■
Surname
- Sort by contact name
■
Forename
- Sort by contact's first name
■
Import contacts
- Start the update of the phone book; the number of imported
contacts and number of contacts stored in the phone is displayed
■
Delete other user profiles
- Delete other user profiles (contacts, order of calls, call
lists, speed dial buttons assigned to contacts)
■
Forward calls
- Changes the order of calls in the call list from the oldest to the
most recent calls, and vice versa
■
Reminder: remember your mobile phone
- Switch on/off the reminder for a connected
telephone; the reminder is output when the ignition is switched off and the ig-
nition key is removed (or the ignition is turned off and the driver's door opened
in the case of vehicles with the KESSY system)
■
Select ring tone
- Selects the ring tone if the connected mobile phone does not
support the in-band ringing function
2)
■
Show pictures for contacts
- Switch on/off the display of the image assigned to the
contact in the mobile phone
3)
Telephone conversation
Telephone conversation
Outgoing call
While connecting, the screen displays the phone number or contact name.
Press
to cancel the connecting process.
1)
User profiles of the four most recently used mobile phones are stored in the system memory.
2)
The in-band ringing function makes it possible to use the ring tone of your phone as the ring tone.
3)
This function is only supported by some mobile phones.
37
Phone
Incoming call
During the ring tone of the incoming call, the screen displays the phone number
or contact name.
You can select the following functions:
■
- Answer the incoming call
■
- Mute the ring tone
■
- Reject the incoming call
■
Caller picture - Display caller details
Current call
During a current call, the screen displays the phone number or contact name and
the call duration.
Depending on the context, you can select the following functions:
■
- Hold the call
■
- Switch off the microphone
■
- Switch on the microphone
■
- End the call
■
Picture of caller or called party - Display caller details or details of the called par-
ty
Conference
The conference is a shared call with between three and six participants.
Start a conference/invite additional participants
›
During a call or conference, make the next call.
›
During the new call, press
.
During a conference
Depending on the context, you can select the following functions:
■
- Hold the conference - leave the conference temporarily (the conference
continues in your absence)
■
- Return to the held conference
■
- Switch off the microphone
■
- Switch on the microphone
■
- End the conference
■
Conference symbol - Display conference details
Conference details
During a conference, press the conference symbol to display a list of other confer-
ence participants.
Depending on your type of mobile phone, you can perform the following func-
tions:
■
Participants - Display details of participants
■
- Talk to a participant separately of the conference
■
- End the call to a conference participant
Information display
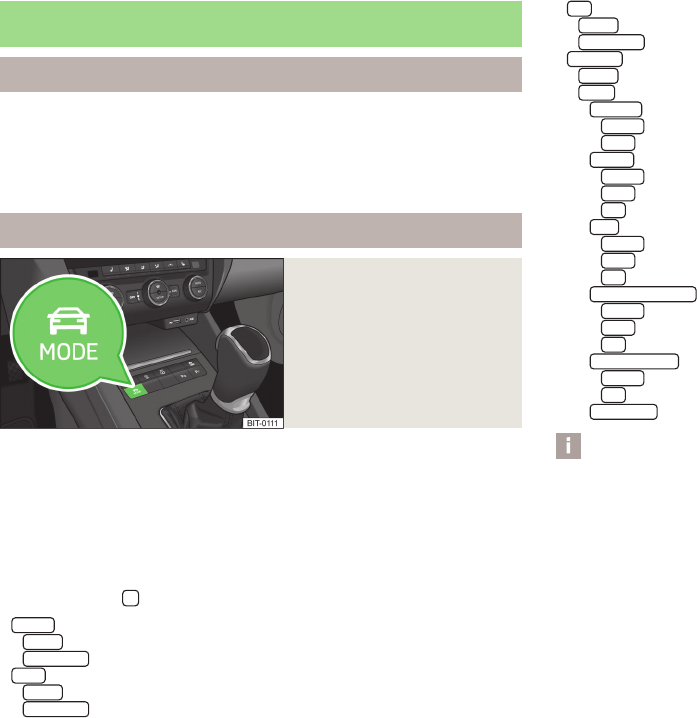
Multifunction steering wheel
Fig. 24 Multifunction steering wheel: Control buttons and dials
The basic functions of the telephone can be operated easily using the buttons
and dials on the steering wheel. In this way, the driver can concentrate on the
traffic situation and not become distracted.
The buttons and dials only control the functions that appear in the information
display of the instrument cluster.
The buttons and dials operate the functions for the current operating mode of
the telephone.
If the side lights are switched on, the buttons and dials on the multifunction
steering wheel are also illuminated.
Control dial
1
ActionOperation
Press brieflyMUTE
Turn upwardsIncrease volume
Turn downwardsDecrease volume
38
Phone
Button
2
ActionOperation
Press briefly
Switch on voice control, cancel acoustic message, new voice
command possible
Press briefly twiceSwitching off voice control
Press button for a
long period of
time
Switching off voice control
Button
3
ActionOperation
Press briefly
Accept call, end call, entry in the main menu of the tele-
phone, call list, call the dialled contact
Press button for a
long period of
time
Reject call, redial last call (redial)
Control dial
4
ActionOperation
Press brieflyConfirm selected menu item
Turn upwardsDisplay call list, previous menu item
Turn downwardsDisplay call list, next menu item
Button
5
ActionOperation
Press brieflyLeave telephone menu
Telephone calls in the information display
The following functions in the information display can be executed depending on
the context.
Incoming call
■
Answer - Answer a call
■
Reject - Reject a call
■
Ignore - Mute the ring tone
Outgoing call
■
Hang up - End a call
Current call
■
Hang up - End a call
■
Hold - Hold the call
■
Answer - Return to the held call
■
Mic. off - Microphone off
■
Mic. on - Microphone on
■
Switch - Switch between two active calls
Conference
■
Hold - Hold the conference
■
Answer - Return to the held call
■
Mic. off - Microphone off
■
Mic. on - Microphone on
■
Hang up - End a call
■
Switch - Switch between two active calls
■
Conference - Add a participant to the conference
Symbols in the information display
SymbolDescription
Charge status of the phone battery
a)
Signal strength
a)
Missed calls (if there are several missed calls, the number of
calls is shown next to the symbol)
The system is expecting a voice command
Voice command entry was stopped
The system plays a voice command
Roaming (before the name of the mobile network provider)
a)
a)
This function is only supported by some mobile phones.
Call list
In the information display, only the call list can be displayed and used.
If the call list includes no entries, the following message appears in the informa-
tion display No entries available.
The following symbols are displayed next to each entry in the call list.
39
Phone
SymbolDescription
Incoming call
Outgoing call
Missed call
40
Phone
Navigation
Navigation
Preface to navigation
Preface
First and foremost, pay attention to the safety instructions» page 4.
Select and confirm all functions as described at the beginning of this man-
ual» page 6.
The unit uses the GPS (Global Positioning System) satellite system for navigation.
The satellite signal allows you to determine your current vehicle position.
If the unit is outside the range of the GPS satellite signal (e.g. in dense vegeta-
tion, in tunnels, parking garages, etc.), the unit navigates only with restrictions
using on-vehicle sensors.
Navigation is done:
›
by graphical instructions on the screen of the device and in the information dis-
play;
›
by voice announcements.
The navigation unit can be operated:
›
using the buttons on the unit » page 42;
›
using the function keys in the unit screen » page 42;
›
using voice control » page 41.
›
using the information display » page 42.
WARNING
■
Information about traffic lights, stop and right of way signs, parking and
stopping restrictions as well as lane constrictions and speed restrictions is not
taken into account for navigation by the unit.
■
Always adjust the driving speed to the road, traffic and weather conditions.
WARNING (Continued)
■
The driving recommendations provided may vary from current situations,
e.g. due to road works or out-of-date navigation data.
■
The volume should be adjusted to ensure that acoustic signals from outside,
e.g. sirens from vehicles which have the right of way, such as police, ambu-
lance and fire brigade vehicles, can be heard at all time.
CAUTION
In some countries, some unit features can no longer be selected when the vehicle
is running faster than a certain speed. This is not a malfunction, but complies with
the national legal regulations.
Navigation data
Navigation data source
Along with the navigation unit, you received navigation data that is stored in the
internal unit memory.
Data update
The navigation data should be updated at regular intervals.
Navigation data is subject to constant changes (such as new streets, changes of
street names and house numbers), and this can become out of date over time. For
this reason, the guidance may be inaccurate or incorrect.
For more information on updating the data, please visit the ŠKODA website or
contact a ŠKODA Partner.
The version of the navigation data for maps can be found in the navigation set-
tings
NAV
→
→
Version information
.
Operation
Voice control
Description of voice control » page 14.
This section covers only those voice commands which are not included in the help
topics or are not of the “Say what you see” type.
41
Navigation
You can define the target address in one step by speaking the city, the street and
the house number. You do not have to speak this information step by step. The
navigation data must contain the house number. House numbers made up of dif-
ferent parts are not recognized.
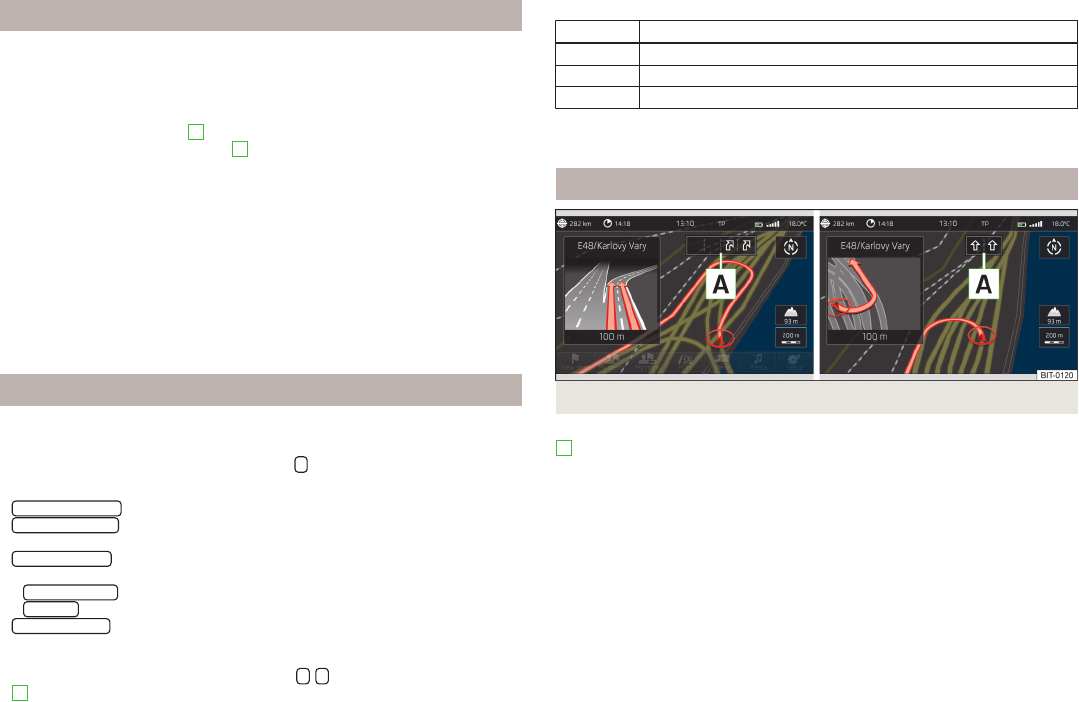
Functional description of the symbols below » page 46.
Voice commands for functions in the
menu in the settings of the map display
›
- 2 D map
›
- 3 D map
›
- Topographic map
›
- destination map
›
- overview map
›
automatic day and night - Day and night
Detailed functional description » page 46.
Voice commands for the symbols to operate the map display
›
- orientation zoom
›
- position map
›
- autozoom
›
- map scale - By saying the voice command and the numeric value, the map
is shown in the desired scale (you can say only values that are available for
manually changing the scale, e.g. Scale five kilometres)
Voice commands without symbols
›
zoom in or zoom out - Increase or decrease the screen scale
›
show traffic signs on map or hide traffic signs on map - Show or hide traffic
signs in the unit screen » page 47
›
show lane guidance or hide lane guidance - Show or hide the lane guidance in
the unit screen » page 58
›
show favourites or hide favourites - Show or hide favourite icons in the map
›
switch on dynamic guidance to destination or switch off dynamic guidance to
destination - Switch on/off the navigation process by means of TMC traffic re-
ports
›
switch on navigation announcements or switch off navigation announcements
- Switch on/off of navigation announcements for the manoeuvre
›
distance to destination - Voice information about the distance to the destina-
tion
›
Time of arrival - Voice information about the arrival time at the destination
›
Travelling time - Voice information about the travelling time to the destination
Information display
›
Select the menu item Navigation in the information display of the information
cluster.
Navigation is in progress
Graphical navigation instructions and other route and destination information are
displayed.
Navigation is not in progress
A compass/vehicle icon is shown to display the current vehicle position in relation
to the compass.
Rotate the adjustment wheel
4
» Fig. 24 on page 38 on the multifunction steer-
ing wheel to display the menu Last dests..
The menu Recent destinations includes the menu item Home address and a list
of recent destinations.
When you select one of the menu items, the destination name and the following
items are displayed:
■
OK - Start navigation
■
Cancel - Return to the Navigation menu – the compass/vehicle symbol will be
displayed
If the home address is not defined when the menu item Home address is selec-
ted, the following message appears: Please enter the home address on the info-
tainment system..
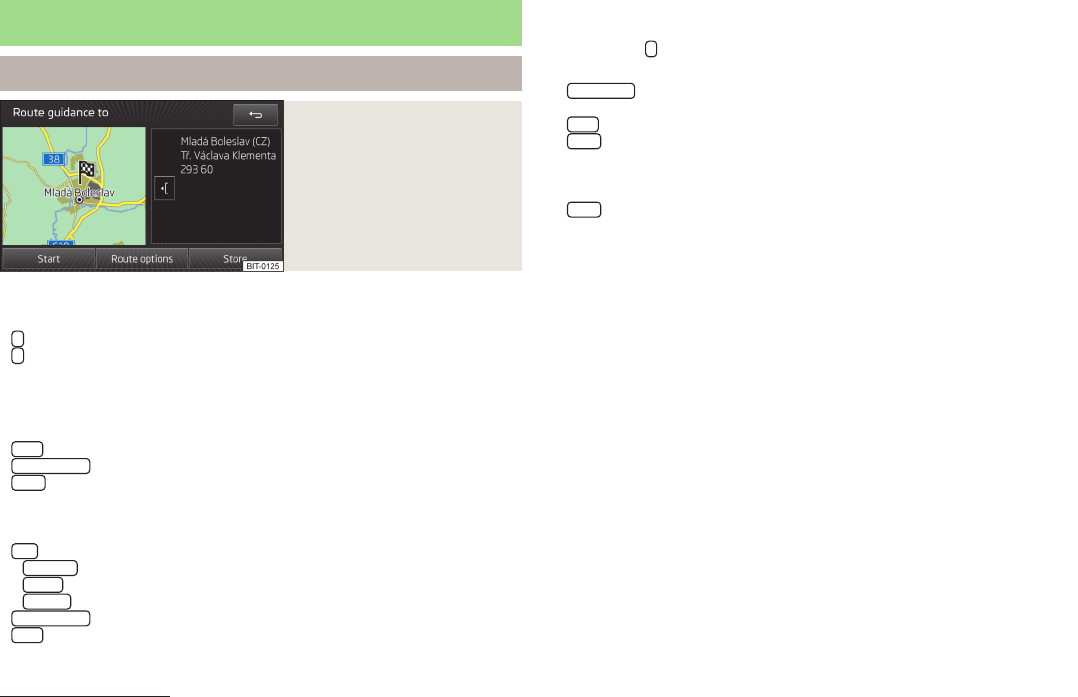
Main menu
Fig. 25
Main menu navigation mode
›
Press
NAV
.
42
Navigation
The last opened menu opens in navigation mode.
If a menu other than the main menu » Fig. 26 on page 46 is opened, the main
menu can be opened by pressing
NAV
again.
Function keys for navigation mode:
ButtonDescription
Enter a new destination » page 51 or display the Route
menu » page 58
Display the menu My destinations» page 52
Display the menu My tours» page 60
Enter/search for a POI » page 53
Set up map and additional window display » page 46
/
Media/radio playback » page 21
Set up navigation mode » page 44
43
Navigation
Set-up
Navigation settings
Main menu
First and foremost, pay attention to the safety instructions» page 4.
Select and confirm all functions as described at the beginning of this man-
ual» page 6.
Call up the main menu
›
In the main menu of navigation mode, press
.
Setting:
■
Route options
- Set the parameters for route calculation » page 44
Libble takes abuse of its services very seriously. We're committed to dealing with such abuse according to the laws in your country of residence. When you submit a report, we'll investigate it and take the appropriate action. We'll get back to you only if we require additional details or have more information to share.
Product:
Forumrules
To achieve meaningful questions, we apply the following rules:
First, read the manual;
Check if your question has been asked previously;
Try to ask your question as clearly as possible;
Did you already try to solve the problem? Please mention this;
Is your problem solved by a visitor then let him/her know in this forum;
To give a response to a question or answer, do not use this form but click on the button 'reply to this question';
Your question will be posted here and emailed to our subscribers. Therefore, avoid filling in personal details.
Register
Register getting emails for Skoda Octavia - 2013 Navigation at:
new questions and answers
new manuals
You will receive an email to register for one or both of the options.
Get your user manual by e-mail
Enter your email address to receive the manual of Skoda Octavia - 2013 Navigation in the language / languages: English as an attachment in your email.
The manual is 4,67 mb in size.
You will receive the manual in your email within minutes. If you have not received an email, then probably have entered the wrong email address or your mailbox is too full. In addition, it may be that your ISP may have a maximum size for emails to receive.
Others manual(s) of Skoda Octavia - 2013 Navigation
If you have not received an email with the manual within fifteen minutes, it may be that you have a entered a wrong email address or that your ISP has set a maximum size to receive email that is smaller than the size of the manual.
The email address you have provided is not correct.
Please check the email address and correct it.
Your question is posted on this page
Would you like to receive an email when new answers and questions are posted? Please enter your email address.