7. Anschlüsse und Bedienelemente ........................................................................................... 6
7.1 Die Fernbedienung .......................................................................................................................................................... 7
8. Vor der Inbetriebnahme ....................................................................................................... 7
8.1 Der Aufstellort .................................................................................................................................................................. 7
8.1.1 Wandmontage (Abbildung C) ................................................................................................................................ 7
8.2 Batterien in die Fernbedienung einlegen ....................................................................................................................... 8
9.4.2 Ton stummschalten .................................................................................................................................................. 11
9.4.3 Höhen und Bässe einstellen ................................................................................................................................... 11
14. Hinweise zu Garantie und Serviceabwicklung .................................................................. 14
SSB 70 C3
Deutsch - 3
Herzlichen Glückwunsch!
Mit dem Kauf der SilverCrest Soundbar haben Sie sich für ein hochwertiges Produkt entschieden.
Machen Sie sich vor der ersten Inbetriebnahme mit der Soundbar vertraut und lesen Sie diese Bedienungsanleitung aufmerksam durch. Beachten Sie vor allem die
Sicherheitshinweise und benutzen Sie die Soundbar nur, wie in dieser Bedienungsanleitung beschrieben und für die angegebenen Einsatzbereiche.
Bewahren Sie diese Bedienungsanleitung gut auf. Händigen Sie alle Unterlagen bei Weitergabe der Soundbar an Dritte ebenfalls mit aus.
Die Soundbar erfüllt alle in der EU-Konformitätserklärung genannten Normen und Richtlinien. Bei eigenmächtigen Umbauten des Gerätes und hieraus resultierenden
Schäden oder Störungen ist jegliche Haftung seitens des Herstellers ausgeschlossen. Benutzen Sie nur das vom Hersteller angegebene Zubehör. Bitte beachten
Sie die Landesvorschriften bzw. Gesetze des Einsatzlandes.
1.Warenzeichen
Die Bluetooth® Wortmarke und Logos sind eingetragene Warenzeichen von Bluetooth SIG, Inc. (Special Interest Group). Jegliche Verwendung dieser
Kennzeichnungen durch TARGA GmbH erfolgt unter Lizenz.
Das SilverCrest Warenzeichen und die SilverCrest Handelsmarke sind Eigentum ihrer jeweiligen Rechteinhaber.
Die HDMI® Wortmarke ist eingetragenes Warenzeichen der HDMI Licensing LLC.
USB ist ein eingetragenes Warenzeichen.
Weitere Namen und Produkte können die Warenzeichen bzw. eingetragene Warenzeichen der jeweiligen Eigentümer sein.
2.Bestimmungsgemäße Verwendung
Diese SilverCrest Soundbar SSB 70 C3 mit Bluetooth® ist ein Gerät der Informationstechnik und dient zur Tonwiedergabe von Audiogeräten. Die Soundbar
darf nur zu privaten und nicht zu industriellen und kommerziellen Zwecken verwendet werden. Außerdem darf das Gerät nicht in tropischen Klimaregionen und
außerhalb von geschlossenen Räumen betrieben werden.
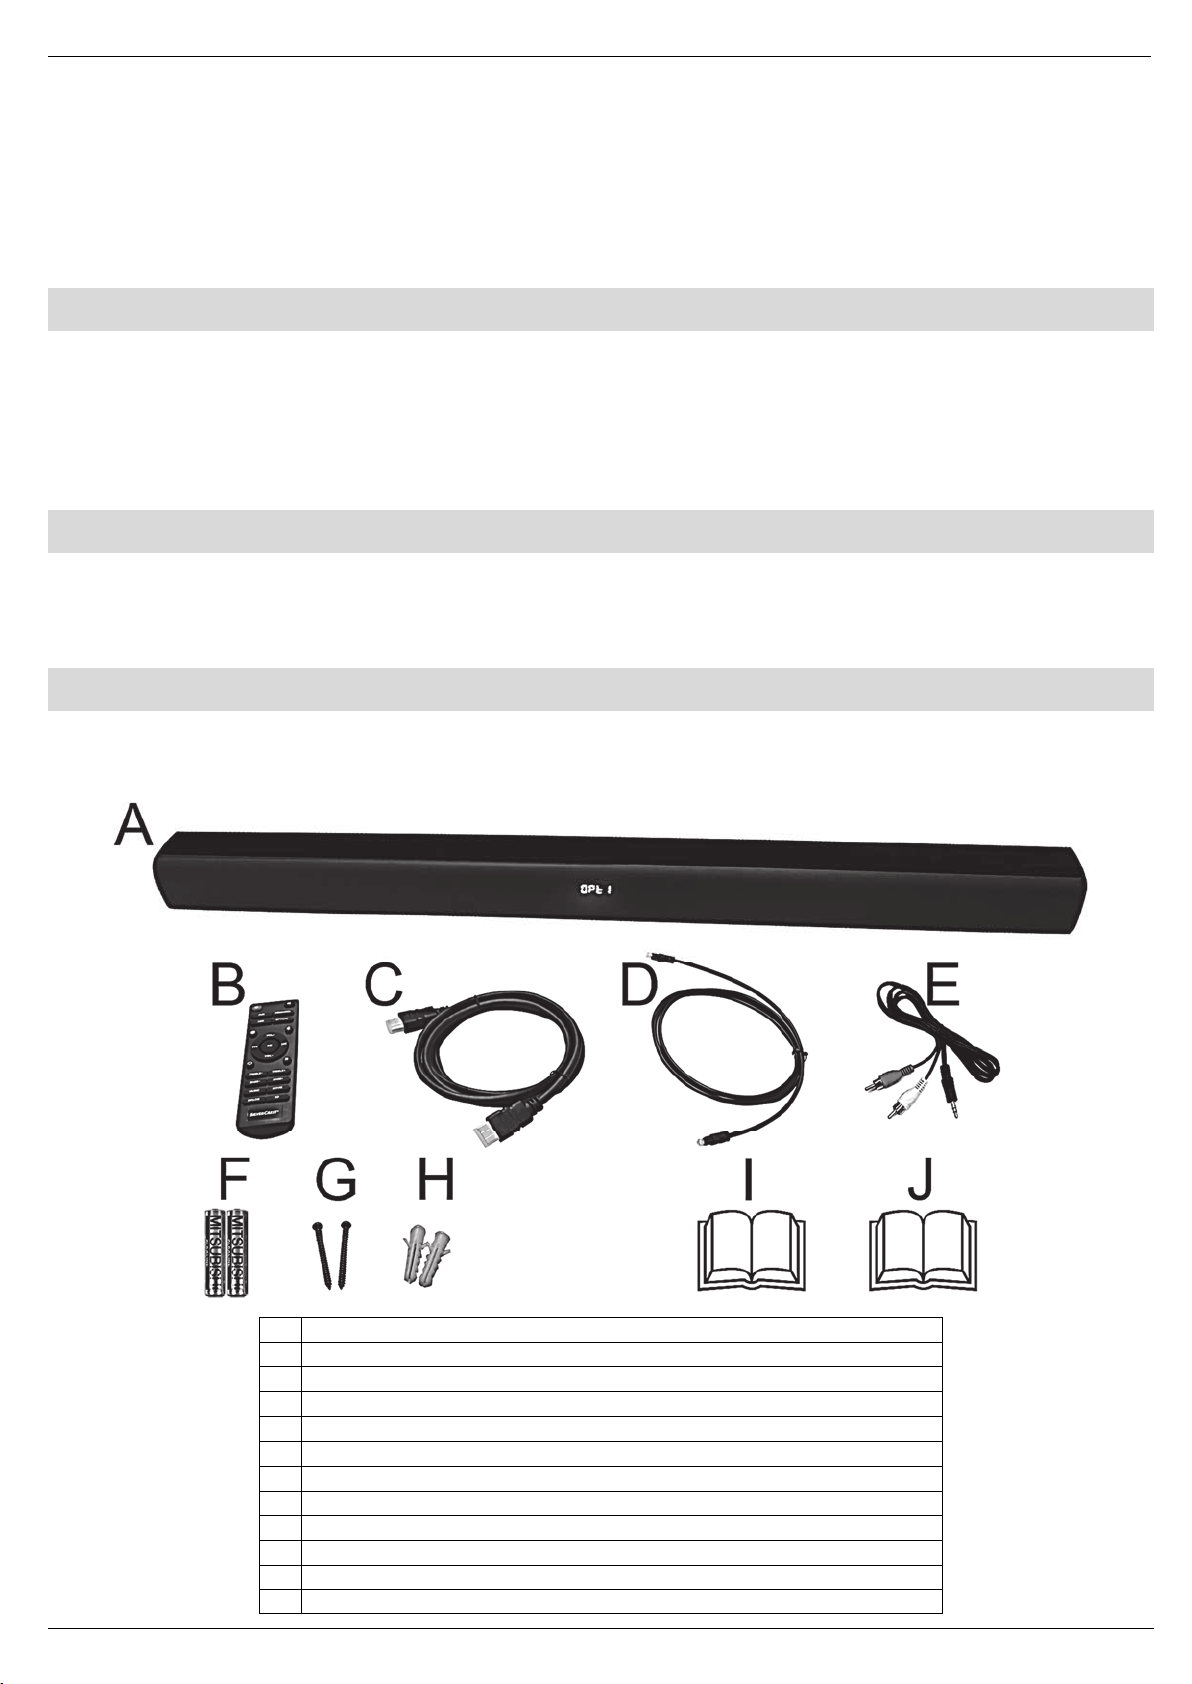
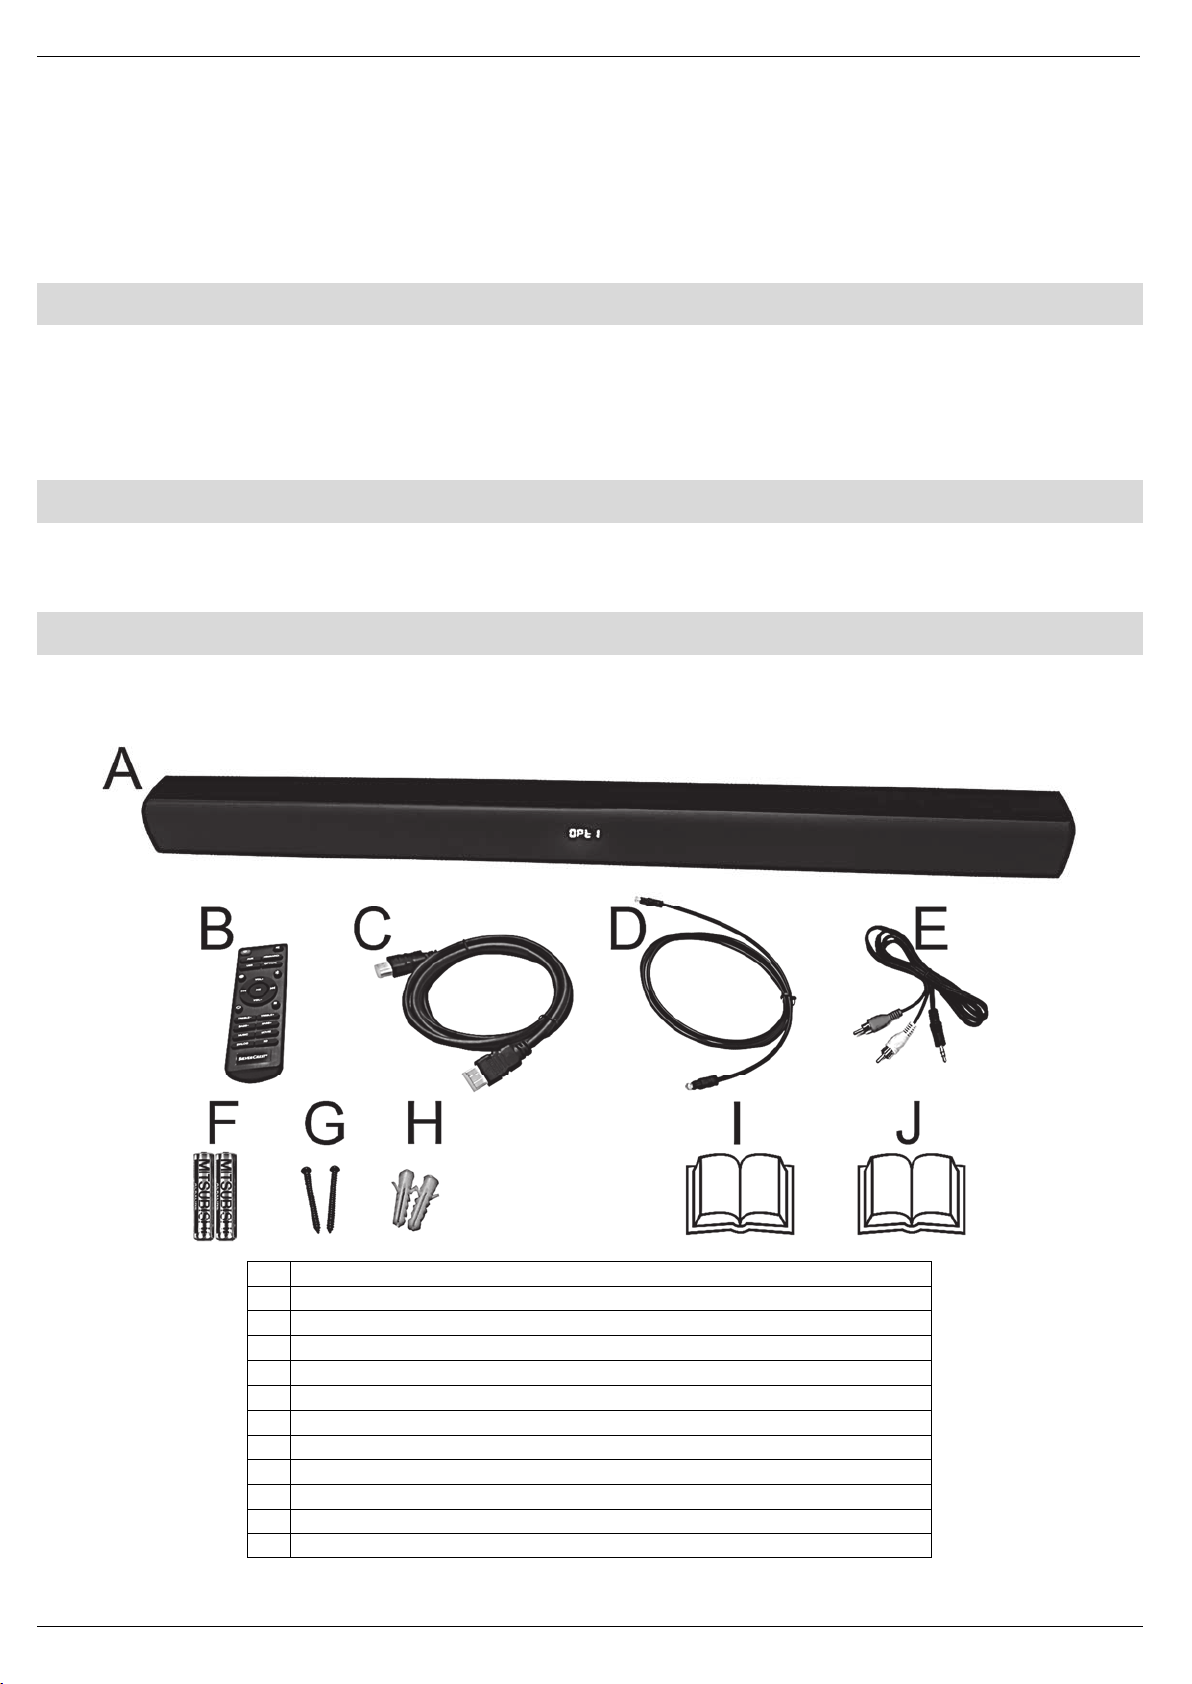
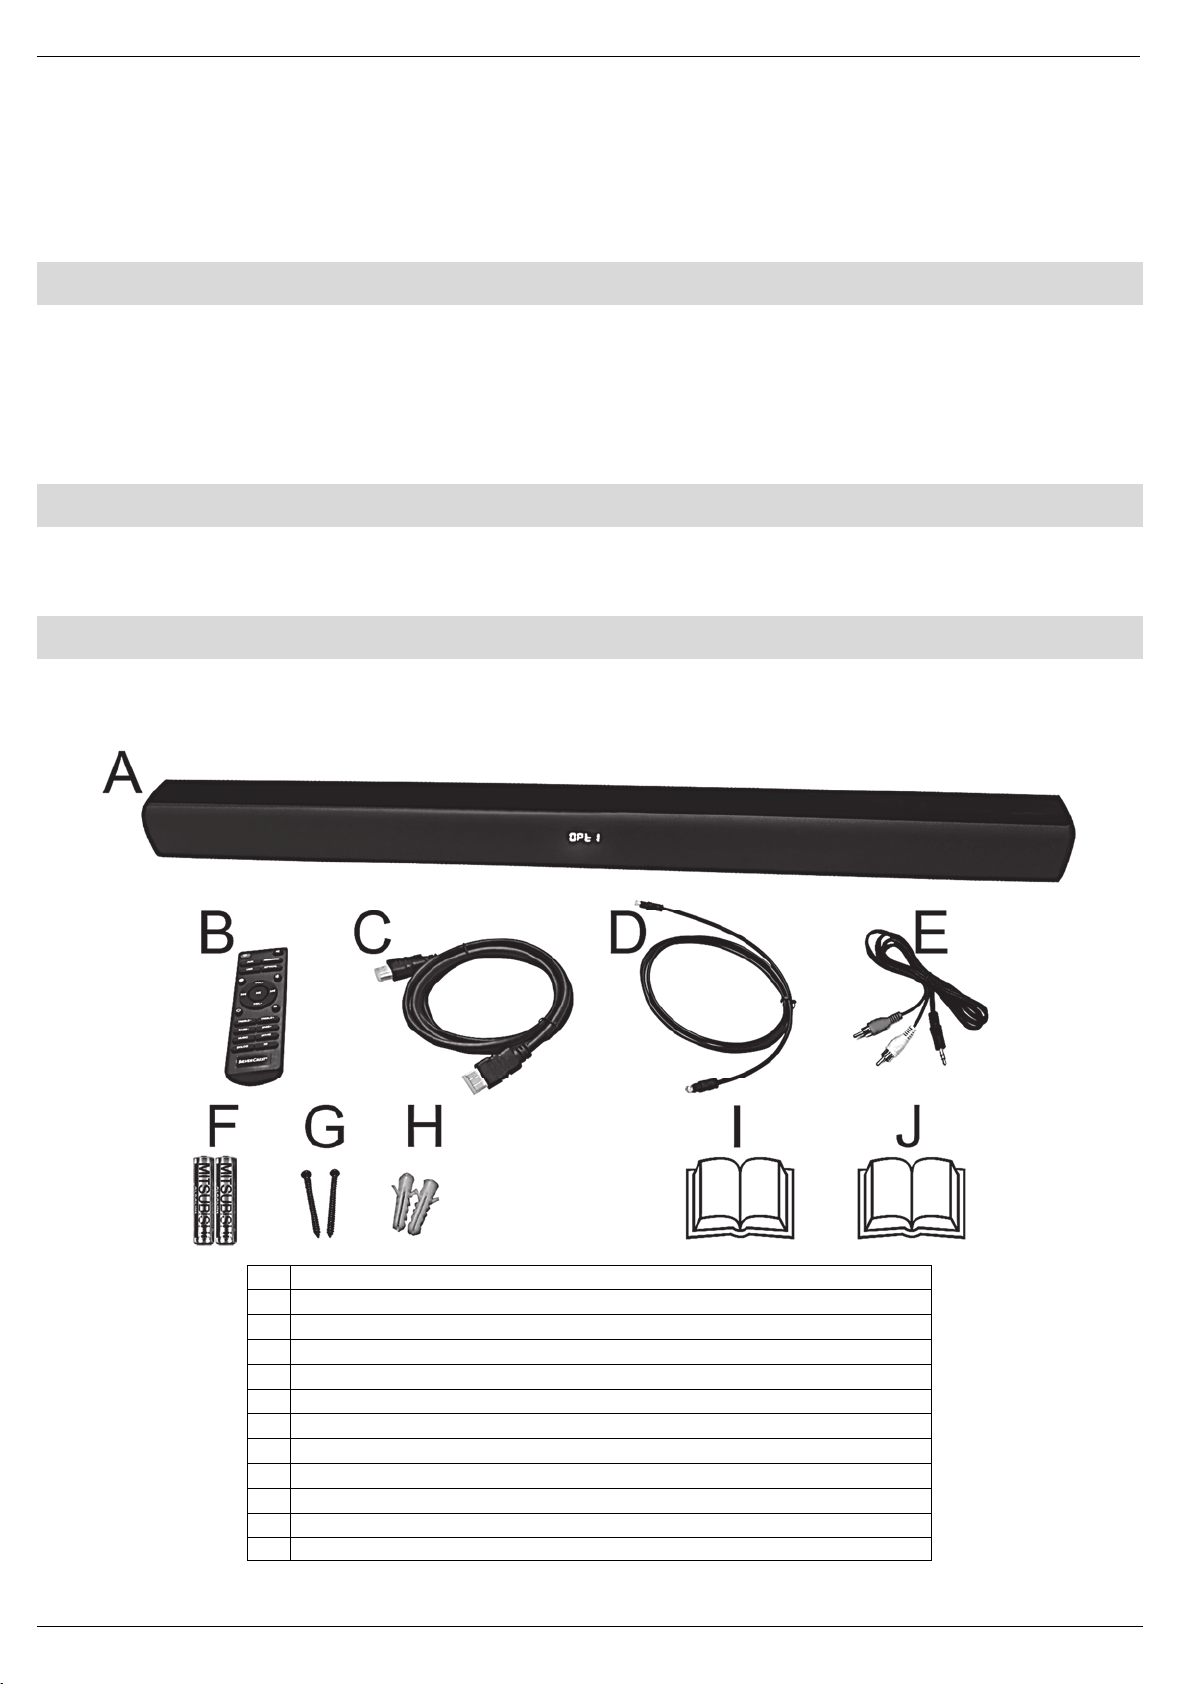
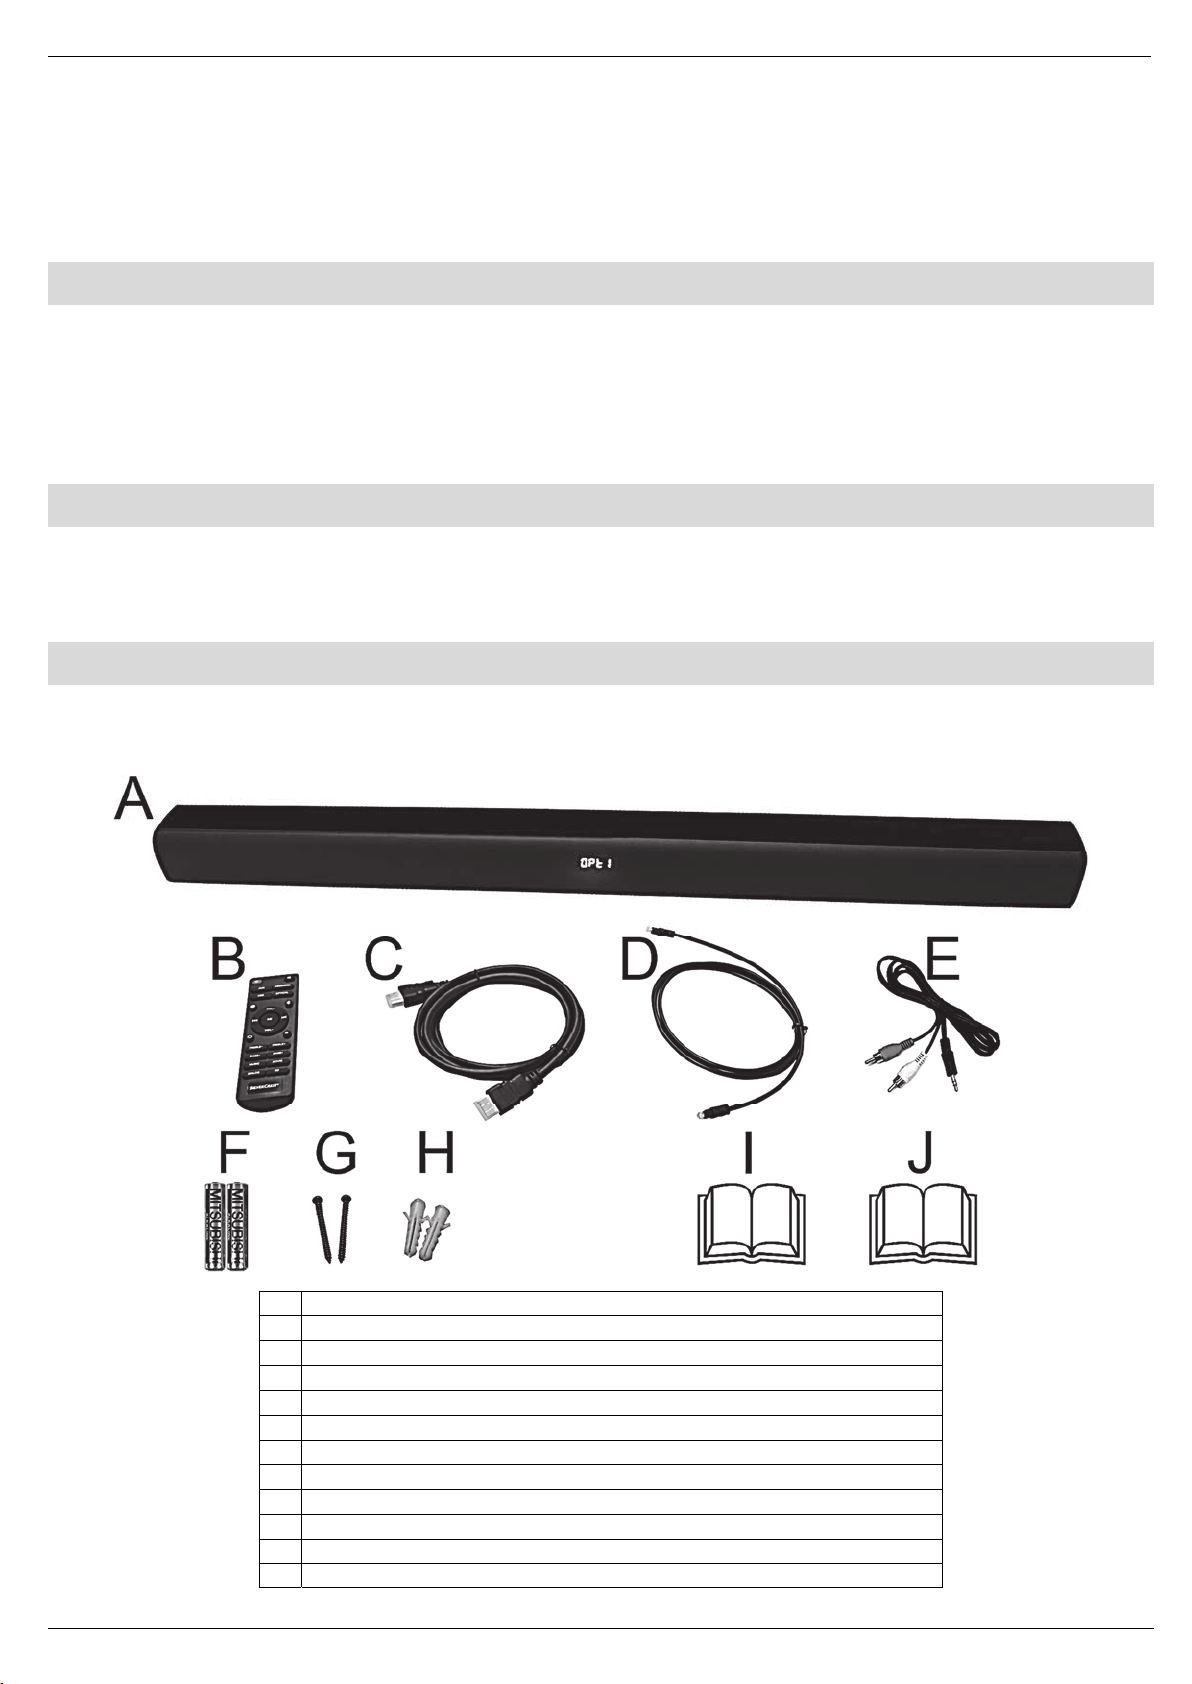
3.Lieferumfang
Nehmen Sie das Gerät und alle Zubehörteile aus der Verpackung. Entfernen Sie alle Verpackungsmaterialien und überprüfen Sie, ob alle Komponenten vollständig
und unbeschädigt sind. Im Falle einer unvollständigen oder beschädigten Lieferung wenden Sie sich bitte an den Hersteller.
A SilverCrest Soundbar SSB 70 C3
B Fernbedienung
C HDMI(ARC)-Kabel
D Optisches Kabel (Toslink)
E Adapterkabel 3,5 mm Klinke auf Cinch
F 2 Batterien 1,5V, AAA/LR03
G 2 Schrauben (zur Wandmontage)
H 2 Dübel (zur Wandmontage)
I Diese Bedienungsanleitung (Symbolbild)
J Schnellstartanleitung (Symbolbild)
Beileger HDMI ARC (ohne Abbildung)
Bohrschablone (ohne Abbildung)
SSB 70 C3
4 - Deutsch
4.Technische Daten
SSB 70 C3
Eingangsspannung / -frequenz 110 – 240 V , 50/60 Hz
Leistungsaufnahme im Betrieb / im Standby max. 80W / < 0,5W
zulässige Lagerbedingungen 0°C bis 40°C, max. 85% rel. Feuchte
Änderungen der technischen Daten sowie des Designs können ohne Ankündigung erfolgen.
5.Sicherheitshinweise
Vor der ersten Verwendung des Gerätes lesen Sie die folgenden Anweisungen genau durch und beachten Sie alle Warnhinweise, selbst wenn Ihnen der Umgang
mit elektronischen Geräten vertraut ist. Bewahren Sie diese Bedienungsanleitung sorgfältig als zukünftige Referenz auf. Wenn Sie das Gerät verkaufen oder
weitergeben, händigen Sie unbedingt auch diese Bedienungsanleitung aus. Sie ist Bestandteil des Produktes.
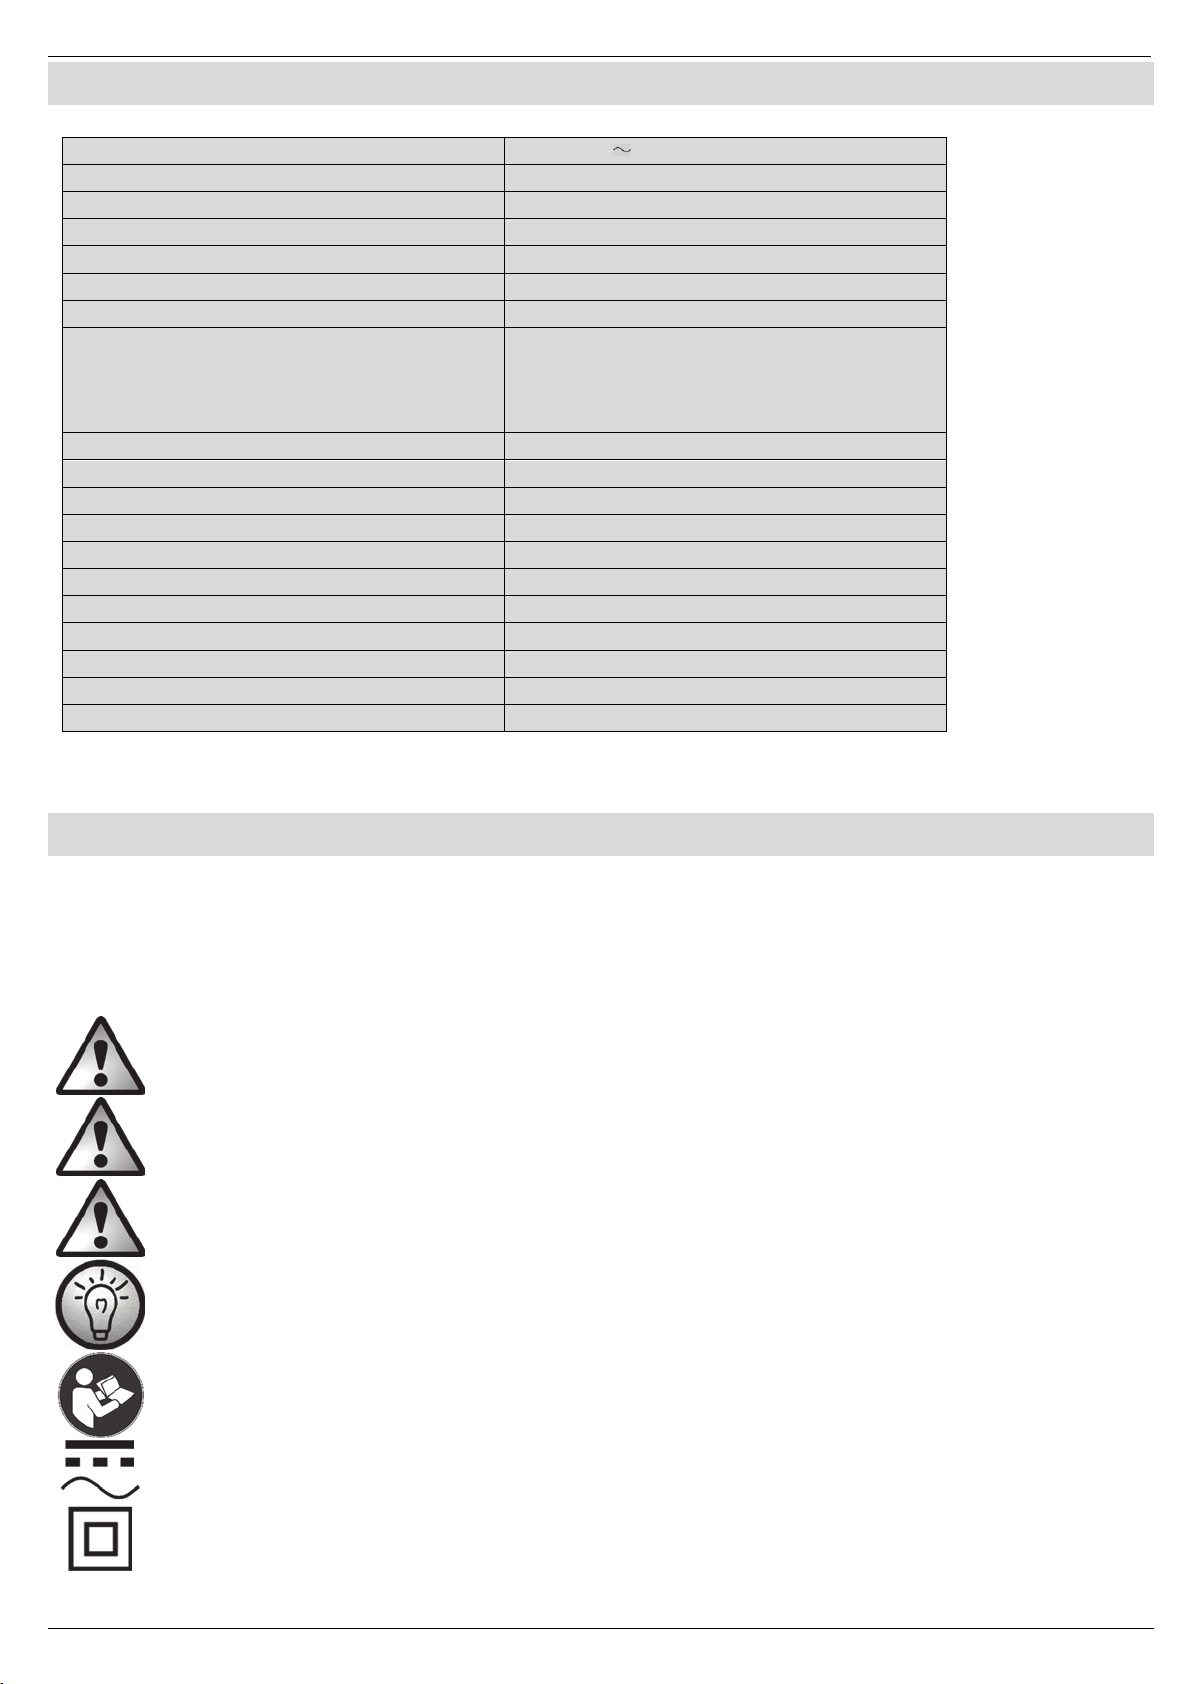
Verwendete Symbole und ihre Bedeutung
GEFAHR! Dieses Symbol, mit dem Hinweis „GEFAHR“, kennzeichnet eine drohende gefährliche Situation, die, wenn Sie nicht verhindert
wird, zu schweren Verletzungen oder sogar zum Tod führen kann.
WARNUNG! Dieses Symbol, mit dem Hinweis „WARNUNG“, kennzeichnet wichtige Hinweise für den sicheren Betrieb des Gerätes
und zum Schutz des Anwenders.
ACHTUNG! Dieses Symbol, mit dem Hinweis „Achtung“, kennzeichnet wichtige Hinweise zum Schutz vor Sachschäden.
Dieses Symbol kennzeichnet weitere informative Hinweise zum Thema.
Bedienungsanleitung lesen!
Gleichspannung
Wechselspannung
Schutzklasse II, Schutzisolierung
SSB 70 C3
Deutsch - 5
WARNUNG! Achten Sie darauf, dass
•der Kontakt mit Spritz- und Tropfwasser und aggressiven Flüssigkeiten vermieden wird und das Gerät nicht in der Nähe von Wasser
betrieben wird, insbesondere darf das Gerät niemals untergetaucht werden (stellen Sie auch keine mit Flüssigkeiten gefüllten Gegenstände,
z.B. Vasen oder Getränke auf oder neben das Gerät).
•keine offenen Brandquellen (z.B. brennende Kerzen) auf oder neben dem Gerät stehen.
•keine Fremdkörper eindringen.
•das Gerät keinen starken Temperaturschwankungen ausgesetzt wird, da sonst Luftfeuchtigkeit kondensieren und zu elektrischen
Kurzschlüssen führen kann. Wurde das Gerät jedoch starken Temperaturschwankungen ausgesetzt, warten Sie (ca. 2 Stunden) mit der
Inbetriebnahme, bis das Gerät die Umgebungstemperatur angenommen hat.
•das Gerät nicht abgedeckt wird. Bei abgedeckten Geräten kann es zu einem Wärmestau kommen und es besteht Brandgefahr.
•das Gehäuse nicht geöffnet werden darf. Es besteht Stromschlaggefahr.
•der Netzstecker nicht mit nassen Händen angefasst werden darf. Es besteht Stromschlaggefahr.
•die verwendete Steckdose immer leicht erreichbar bleiben muss, da der Netzstecker als Trennvorrichtung verwendet wird.
•den Netzstecker bei Unwetter mit Blitzschlag aus der Steckdose zu entfernen. Es besteht Brandgefahr und Gefahr von Sachschäden.
Bei Nichtbeachtung der zuvor genannten Hinweise besteht Gefahr für Ihre Gesundheit.
ACHTUNG! Achten Sie darauf, dass
•keine direkten Wärmequellen (z.B. Heizungen) auf das Gerät wirken.
•kein direktes Sonnenlicht oder starkes Kunstlicht auf das Gerät trifft.
•mindestens ein Meter Abstand zu hochfrequenten und magnetischen Störquellen (z.B. Lautsprecherboxen, Mobiltelefonen etc.) gehalten
wird, um Funktionsstörungen zu vermeiden. Sollten Funktionsstörungen auftreten, stellen Sie das Gerät an einem anderen Ort auf.
•das Gerät keinen übermäßigen Erschütterungen und Vibrationen ausgesetzt wird.
•dass die USB-Buchse (4) nicht als Ladebuchse für externe Geräte verwendet werden darf.
Bei Nichtbeachtung der zuvor genannten Hinweise kann das Gerät beschädigt werden.
GEFAHR!Batterien
Legen Sie die Batterien stets polrichtig ein. Beachten Sie dazu die Kennzeichnung im Batteriefach. Versuchen Sie nicht, Batterien wieder aufzuladen und werfen
Sie diese unter keinen Umständen ins Feuer. Verwenden Sie keine unterschiedlichen Batterien (alte und neue, Alkali und Kohle, usw.) gleichzeitig. Entnehmen Sie
die Batterien, wenn Sie das Gerät über einen längeren Zeitraum nicht verwenden. Bei unsachgemäßem Gebrauch besteht Explosions- und Auslaufgefahr. Batterien
sind kein Kinderspielzeug. Wenn Batterien verschluckt werden, muss sofort ein Arzt konsultiert werden. Batterien dürfen nicht geöffnet oder verformt werden, da
auslaufende Chemikalien Verletzungen verursachen können. Bei Haut- oder Augenkontakt muss sofort mit viel Wasser ab- bzw. ausgespült werden und ein Arzt
aufgesucht werden.
GEFAHR!Personensicherheit
Elektrische Geräte gehören nicht in Kinderhände. Auch Personen mit geistigen, sensorischen oder motorischen Einschränkungen dürfen elektrische Geräte nur im
Rahmen ihrer Möglichkeiten verwenden. Lassen Sie Kinder und Personen mit geistigen, sensorischen oder motorischen Einschränkungen niemals unbeaufsichtigt
elektrische Geräte benutzen. Es sei denn, sie wurden entsprechend eingewiesen oder werden durch eine für Ihre Sicherheit zuständige Person beaufsichtigt. Kinder
sollten grundsätzlich beaufsichtigt werden, damit sichergestellt werden kann, dass sie mit diesem Gerät nicht spielen. Kleinteile können bei Verschlucken
lebensgefährlich sein. Halten Sie auch die Verpackungsfolien fern.Verpackungsmaterial ist kein Spielzeug.
Es besteht Erstickungsgefahr.
WARNUNG! Kabel
Fassen Sie alle Kabel immer am Stecker an und ziehen Sie nicht am Kabel selbst. Stellen Sie keine Möbelstücke oder andere schweren Gegenstände auf Kabel
und achten Sie darauf, dass diese nicht geknickt werden, insbesondere am Stecker und an den Anschlussbuchsen. Führen Sie Kabel nicht über heiße oder scharfe
Stellen und Kanten, um Beschädigungen zu vermeiden. Machen Sie niemals einen Knoten in ein Kabel, und binden Sie es nicht mit anderen Kabeln zusammen.
Alle Kabel sollten so gelegt werden, dass niemand darauf tritt oder behindert wird.
SSB 70 C3
6 - Deutsch
GEFAHR!Funkschnittstelle
Schalten Sie das Gerät aus, wenn Sie sich in einem Flugzeug, in einem Krankenhaus, einem Operationssaal oder in der Nähe eines medizinischen Elektroniksystems
befinden. Die übertragenen Funkwellen können empfindliche Geräte in ihrer Funktion beeinträchtigen. Halten Sie das Gerät mindestens 20cm von einem
Herzschrittmacher fern, da sonst die ordnungsgemäßen Funktionen des Herzschrittmachers durch Funkwellen beeinträchtigt werden können. Die übertragenen
Funkwellen können Störgeräusche in Hörgeräten verursachen. Bringen Sie das Gerät nicht mit eingeschalteter Funkkomponente in die Nähe entflammbarer Gase
oder in eine explosionsgefährdete Umgebung (z.B. Lackiererei), da die übertragenen Funkwellen eine Explosion oder ein Feuer auslösen können. Die Reichweite
der Funkwellen ist abhängig von Umwelt- und Umgebungsbedingungen. Bei Datenverkehr über eine drahtlose Verbindung ist es auch unberechtigten Dritten
möglich, Daten zu empfangen. Die Targa GmbH ist nicht für Funk- oder Fernsehstörungen verantwortlich, die durch unerlaubte Änderungen an diesem Gerät
verursacht wurden. Targa übernimmt ferner keine Verantwortung für den Ersatz bzw. den Austausch von Anschlussleitungen und Geräten, die nicht von der Targa
GmbH angegeben wurden. Für die Behebung von Störungen, die durch eine derartige unerlaubte Änderung hervorgerufen wurden, und für den Ersatz bzw. den
Austausch der Geräte ist allein der Benutzer verantwortlich.
Wartung / Reparatur
Reparaturarbeiten sind erforderlich, wenn das Gerät beschädigt wurde, z.B. wenn das Gerätegehäuse beschädigt sind, Flüssigkeit oder Gegenstände ins Innere
des Gerätes gelangt sind oder wenn es Regen oder Feuchtigkeit ausgesetzt wird. Reparaturarbeiten sind auch erforderlich, wenn es nicht einwandfrei funktioniert
oder heruntergefallen ist. Wenn Rauchentwicklung, ungewöhnliche Geräusche oder Gerüche festgestellt werden, muss das Gerät sofort abgeschaltet und das
Netzkabel aus der Steckdose gezogen werden. In diesen Fällen darf das Gerät nicht weiterverwendet werden, bevor eine Überprüfung durch einen Fachmann
durchgeführt wurde. Lassen Sie alle Reparaturarbeiten nur von qualifiziertem Fachpersonal durchführen.
Betriebsumgebung
Das Gerät ist nicht für den Betrieb in Räumen mit hoher Luftfeuchtigkeit (z.B. Badezimmer) oder übermäßigem Staubaufkommen ausgelegt. Betriebstemperatur und
Betriebsluftfeuchtigkeit: 0 °C bis 35 °C, max. 85 % rel. Feuchte. Beachten Sie, dass Möbeloberflächen ggf. mit Pflegestoffen behandelt wurden, welche die
Gummifüße der Soundbar angreifen können.
Hinweis zur Netztrennung
Beachten Sie, dass das eingebaute Netzteil auch im Standby eine geringe Menge Strom verbraucht, solange der Netzstecker in der Netzsteckdose steckt. Ziehen
Sie zur vollständigen Netztrennung den Netzstecker aus der Netzsteckdose.
6.Urheberrecht
Alle Inhalte dieser Anleitung unterliegen dem Urheberrecht und werden dem Leser ausschließlich als Informationsquelle bereitgestellt. Jegliches Kopieren oder
Vervielfältigen von Daten und Informationen ist ohne ausdrückliche und schriftliche Genehmigung durch den Autor verboten. Dies betrifft auch die gewerbliche
Nutzung der Inhalte und Daten. Text und Abbildungen entsprechen dem technischen Stand bei Drucklegung. Änderungen vorbehalten.
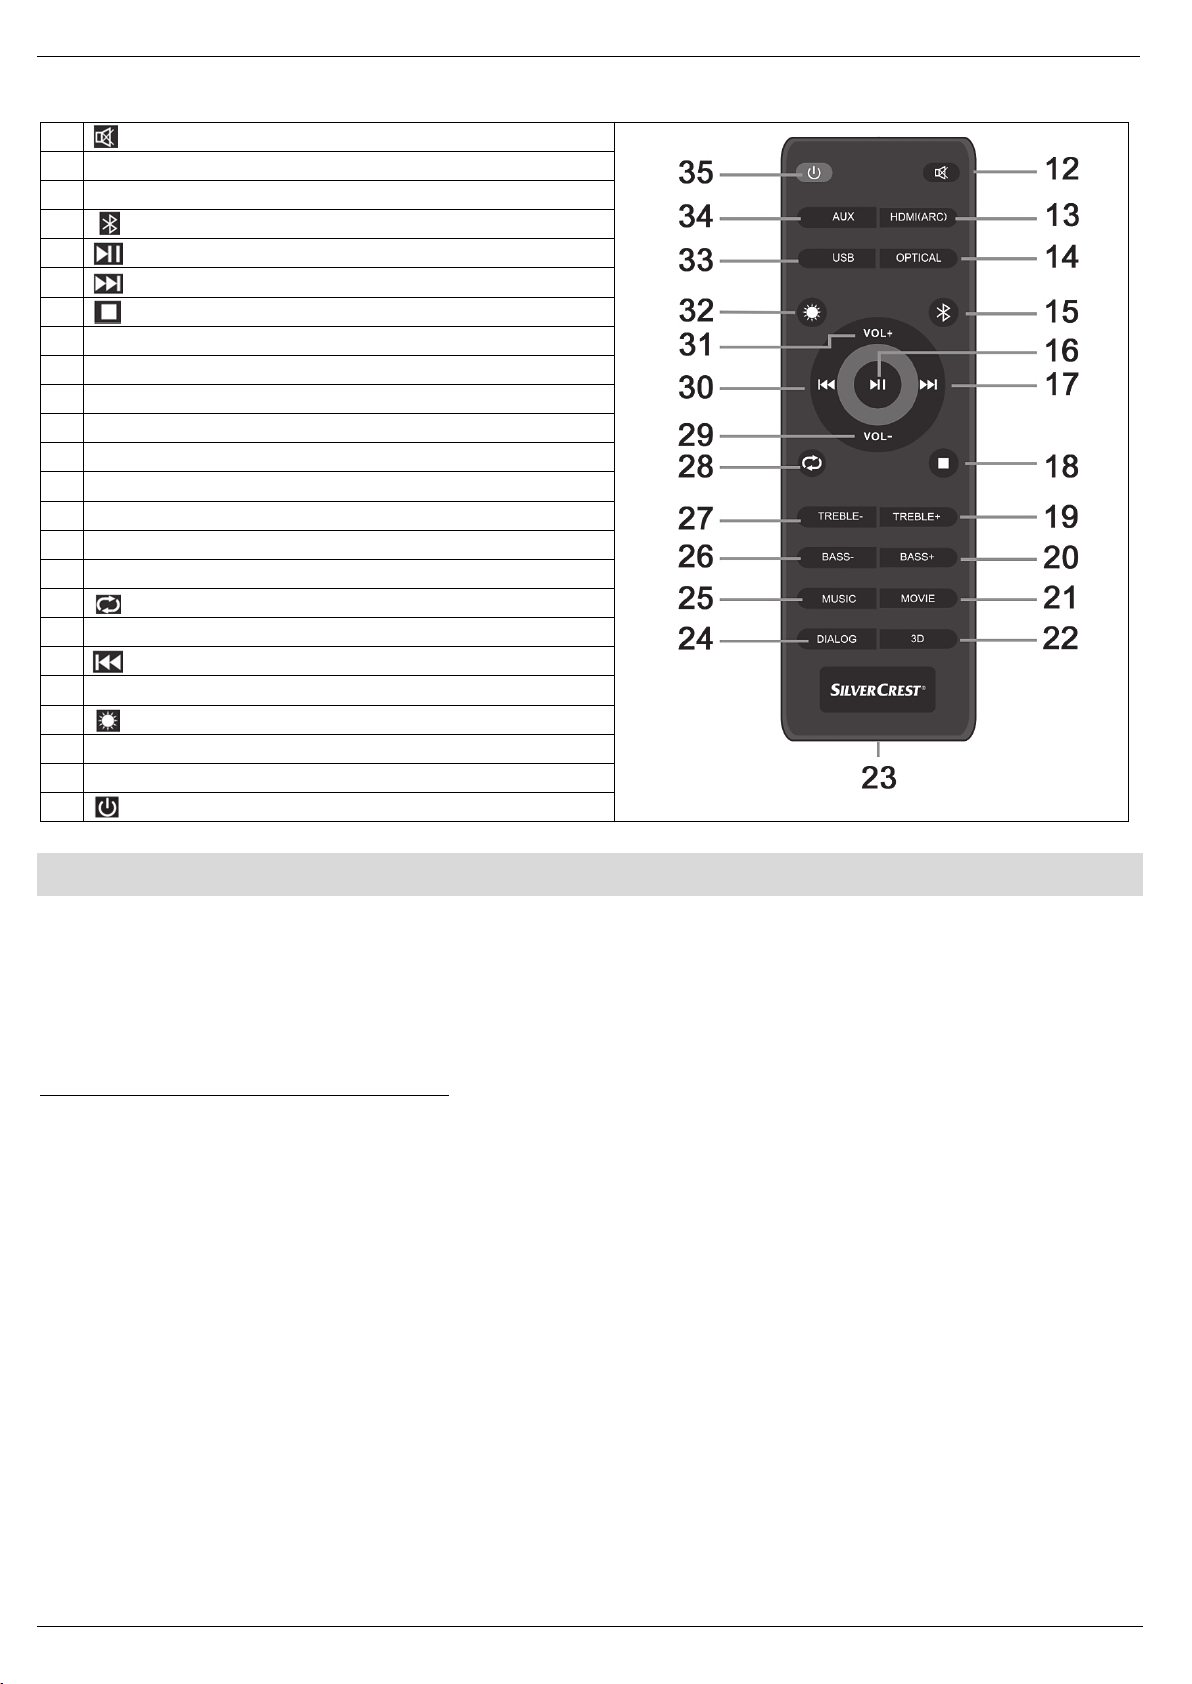
7.Anschlüsse und Bedienelemente
Eine Abbildung der Bedienelemente mit den verwendeten Bezugsnummern finden Sie auf der ausklappbaren Innenseite dieser Bedienungsanleitung. Sie können
diese Umschlagseite ausgeklappt lassen, während Sie weitere Kapitel der Bedienungsanleitung lesen. So haben Sie immer eine Referenz zum betreffenden
Bedienelement vor Augen.
1 LED-Display
2 Doppelfunktionstaste: 1. Ein / Standby 2. Source (Quellenwahl)
3 Taste + (Lautstärke erhöhen)
4 USB-Buchse (nicht als Ladebuchse zu verwenden)
5 Taste - (Lautstärke verringern)
6 Gerätefüße
7 Wandhalterungen
8 Netzkabel
9 HDMI-ARC-Buchse
10 optischer Digitaleingang (Toslink)
11 3,5mm AUX-IN-Buchse
SSB 70 C3
Deutsch - 7
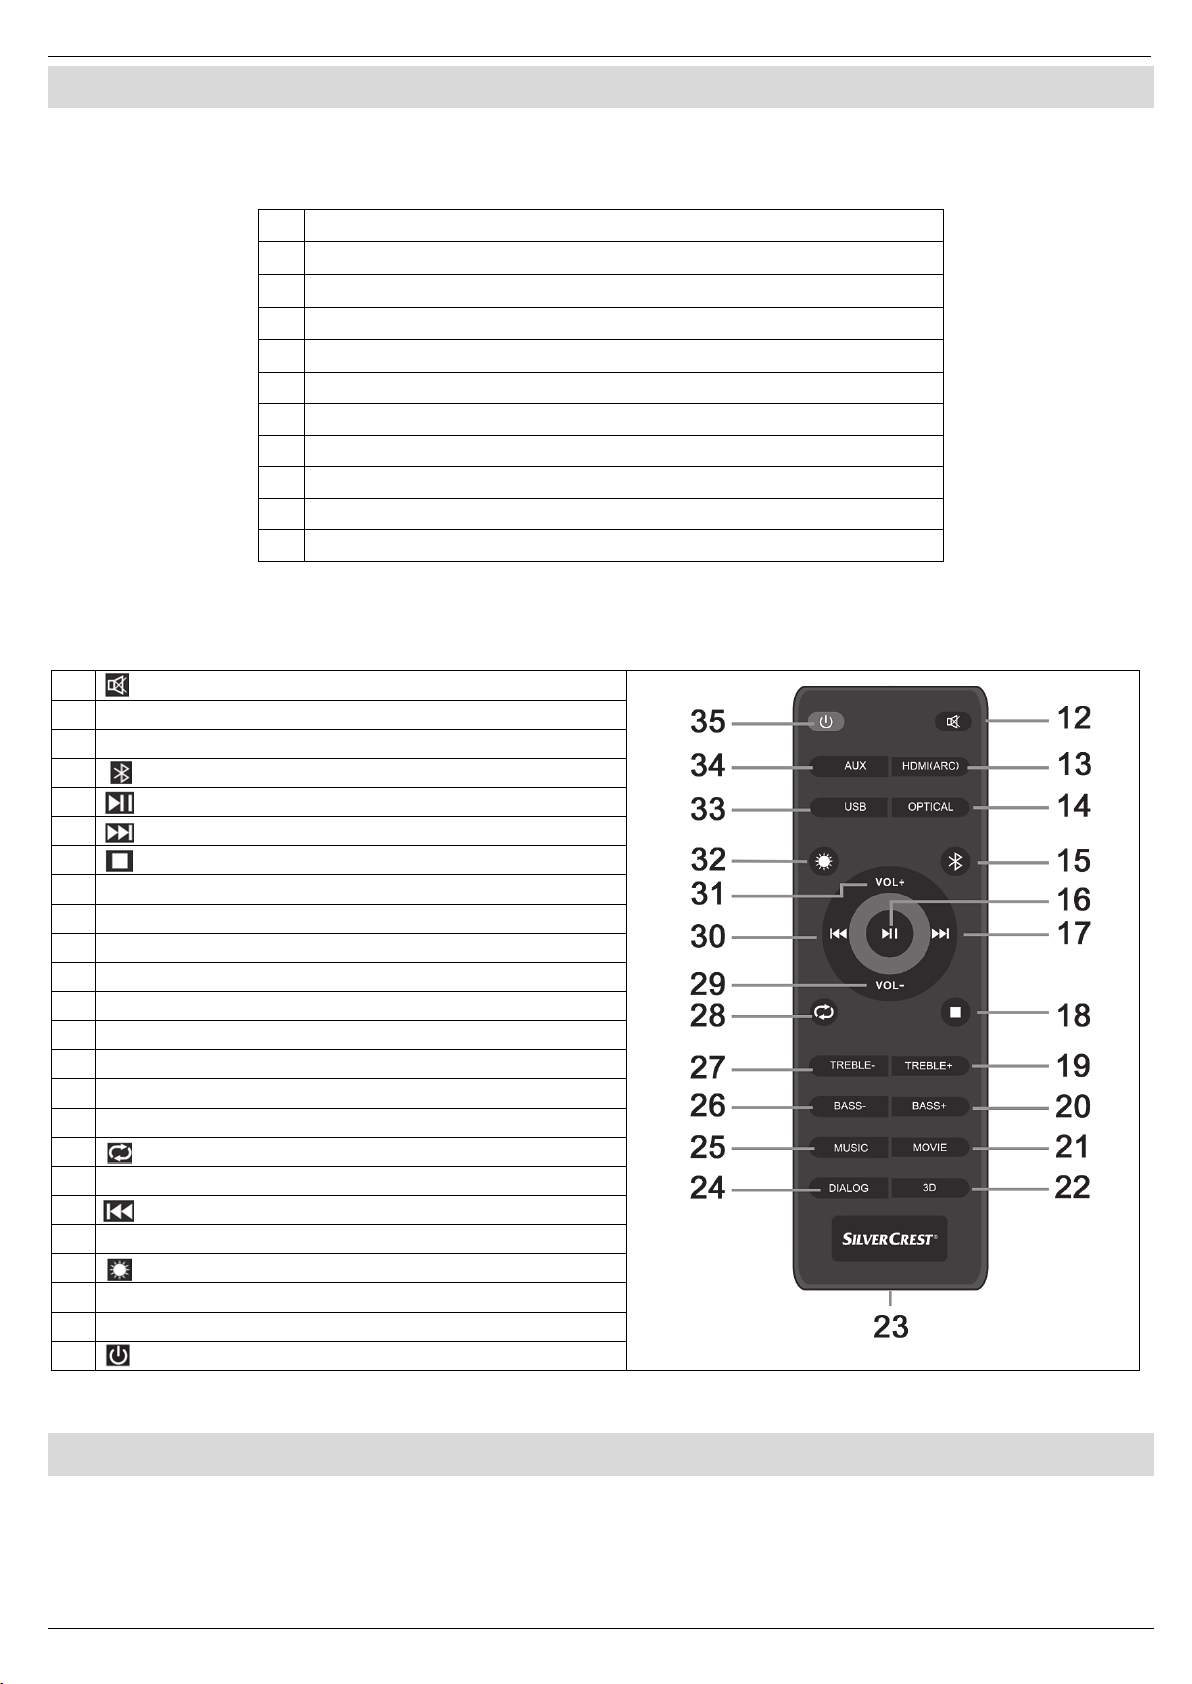
7.1 Die Fernbedienung
Die mitgelieferte Fernbedienung gibt Ihnen die Möglichkeit, die Funktionen der Soundbar zu steuern. Entnehmen Sie die Tastenfunktionen der nachstehenden
Tabelle.
12 Ton aus
13 HDMI (ARC) Umschalten auf HDMI ARC-Eingang
14 OPTICAL Umschalten auf optischen Digitaleingang SPDIF
15 Umschalten auf Bluetooth®
16 Play/Pause
17 nächster Titel
18 STOP
19 TREBLE+ Höhen anheben
20 BASS+ Bass verstärken
21 MOVIE Aktivierung des Equalizers für Spielfilme
22 3D Aktivierung des Equalizers „simulierter Raumklang“
23 Batteriefach (auf der Rückseite)
24 DIALOG Aktivierung des Equalizers für Sprachwiedergabe
25 MUSIC Aktivierung des Equalizers für Musik
26 BASS- Bass reduzieren
27 TREBLE- Höhen absenken
28 Wiederholung
29 VOL- Lautstärke verringern
30 vorheriger Titel
31 VOL+ Lautstärke erhöhen
32 Display Ein- bzw. ausschalten
33 USB Umschalten auf USB-Eingang
34 AUX Umschalten auf AUX-Eingang
35 Ein/Standby
8. Vor der Inbetriebnahme
Entnehmen Sie die Soundbar und alle Zubehörteile der Verpackung und entfernen Sie alle Verpackungsfolien. Überprüfen Sie die Vollständigkeit.
8.1 Der Aufstellort
Idealerweise platzieren Sie die Soundbar mittig direkt unterhalb Ihres TV-Gerätes. Sie haben die Möglichkeit, die Soundbar auf ein vorhandenes Möbelstück zu
stellen oder sie an der Wand zu montieren.
8.1.1 Wandmontage (Abbildung C)
Beachten Sie, dass Sie geeignetes Montagematerial für Ihre Wand verwenden.
Benötigtes Werkzeug/ Montagematerial (nicht im Lieferumfang enthalten):
•Bohrmaschine (je nach Wandbeschaffenheit)
•2 Schrauben und ggf. 2 Dübel (je nach Wandbeschaffenheit) zum Einschrauben in die Wand. Beachten Sie, dass die verwendeten Schrauben dem Gewicht
der Soundbar angemessen sein müssen. Falls die beiliegenden Schrauben und Dübel für Ihre örtlichen Gegebenheiten ungeeignet sind, achten Sie darauf,
dass die Dimensionen von Schraubenkopf und Schraubenschaft den beiliegenden Schrauben entsprechen müssen, um eine sichere Aufhängung zu
gewährleisten.
•Kreuzschlitzschraubendreher, ggf. weitere geeignete Schraubendreher, Wasserwaage, Bleistift
Vergewissern Sie sich vor dem Bohren, dass sich in der Wand keine Wasser-, Strom- oder Gasleitungen befinden. Lassen Sie eine Wandmontage ggf. von einem
Fachmann ausführen.
•Bohren Sie 2 Löcher im Abstand von 739 mm. Zur einfacheren Montage verwenden Sie die beiliegende Bohrschablone.
•Wenn Sie die mitgelieferten Dübel verwenden, benutzen Sie einen Bohrer mit 8 mm Durchmesser.
•Stecken Sie die Dübel in die Bohrlöcher.
•Schrauben Sie die Schrauben so weit ein, bis der Schraubenkopf noch ca. 3 mm herausschaut.
•Stecken Sie alle verwendeten Kabel in die Anschlüsse der Soundbar.
•Setzen Sie das Gerät mit den Wandhalterungen nun von oben so auf die Schrauben, dass diese in die senkrechten Aufnahmen der Wandhalterungen
greifen und durch die Schraubenköpfe gesichert werden.
•Prüfen Sie abschließend, ob die Soundbar auf beiden Seiten fest auf den Schrauben sitzt. Wiederholen Sie ggf. das Aufsetzen. Um einen festen Sitz zu
erreichen, kann es notwendig sein, die zwei Wandschrauben etwas heraus- bzw. hineinzudrehen.
SSB 70 C3
8 - Deutsch
8.2 Batterien in die Fernbedienung einlegen
Öffnen Sie das Batteriefach (23) an der Rückseite der Fernbedienung, indem Sie den Batteriefachdeckel in Pfeilrichtung schieben und entnehmen. Legen Sie die
Batterien (2 Batterien Typ AAA) polrichtig ein (+ und - beachten). Die Polung ist an den Batterien und im Batteriefach (23) skizzenhaft abgebildet. Setzen Sie nun
den Batteriefachdeckel wieder auf das Batteriefach (23) und schieben Sie ihn entgegen der Pfeilrichtung, bis er einrastet. Beachten Sie dazu auch Abbildung B
auf der Umschlagseite.
8.3 Anschlussmöglichkeiten/ Betriebsarten
ACHTUNG! Achten Sie darauf, dass die Soundbar und die anzuschließenden Geräte beim Anschluss ausgeschaltet sind. Beachten Sie
die Bedienungsanleitung des anzuschließenden Gerätes.
Der HDMI(ARC)-Anschluss funktioniert nur, wenn alle verbundenen Komponenten ARC-fähig sind. Verwenden Sie das im Lieferumfang
enthaltenen HDMI(ARC)-Kabel (C). Beachten Sie auch die Bedienungsanleitung des angeschlossenen Gerätes.
Die zur Wiedergabe verwendeten Kabel dürfen eine maximale Länge von 3 Metern nicht überschreiten.
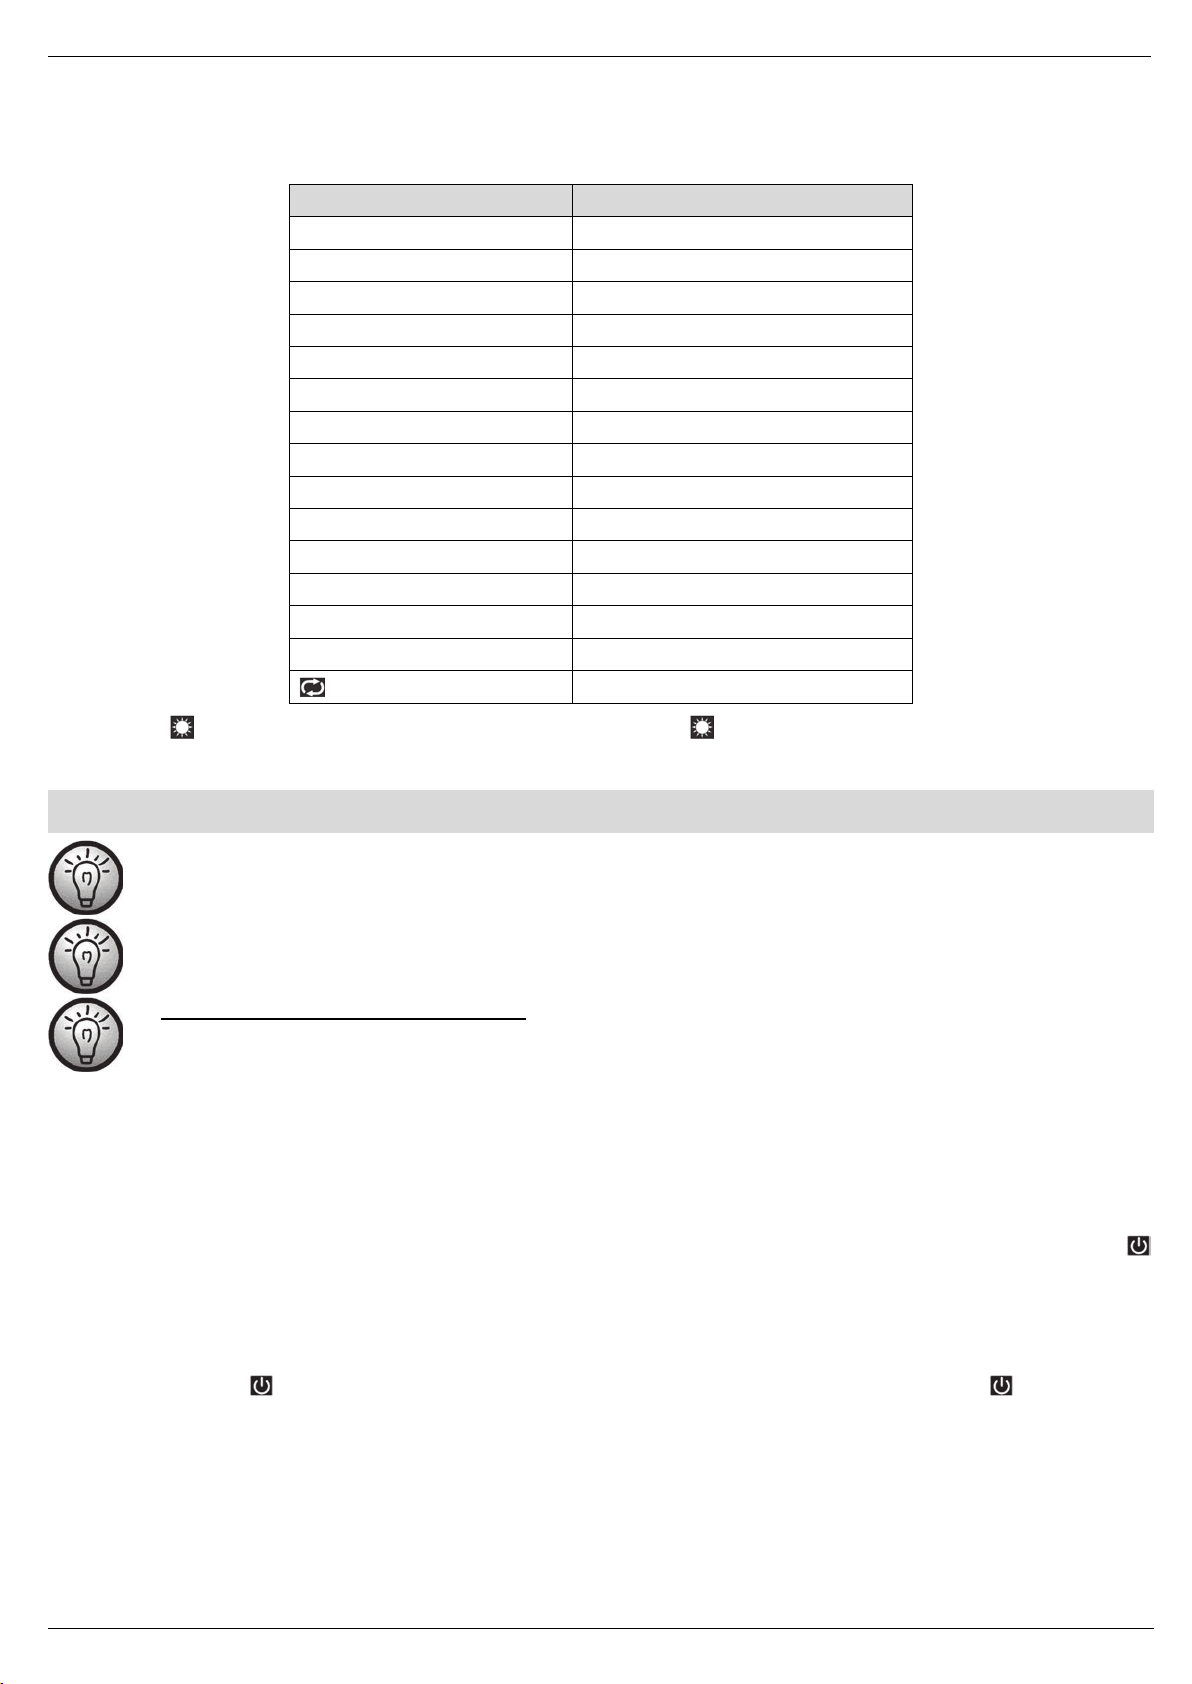
Mit der Soundbar SSB 70 C3 kann Ton bzw. Musik verschiedener Quellen wiedergegeben werden:
Die Steuerung erfolgt über die Gerätetasten oder die Fernbedienung.
Sie können über die Taste Quellenwahl (2) an der Soundbar oder über die Fernbedienung die gewünschte Betriebsart auswählen. Die Betriebsarten und die
korrespondierenden Displayanzeigen finden Sie in folgender Tabelle:
Betriebsart/
Quelle
Eingang Verwendung Taste auf
Fernbedienung
Anzeige
Display
HDMI ARC HDMI(ARC) (9) Anschluss per HDMI(ARC)-Kabel an HDMI(ARC)-Anschluss, z.B. von
TV oder DVD-Player
HDMI(ARC) (13)Hd
OPTICALOPTICAL (10)Anschluss per Toslink-Kabel, z.B. an TV oder Digital-Receiver OPTICAL (14)OPtI
BLUETOOTH®---- Per Funkverbindung, z.B. mit Smartphone Taste (15)bt
USBUSB (4)Anschluss von USB-Datenträgern, z.B. USB-Stick zur Wiedergabe
von Audiodateien (unterstützte Audioformate: MP3 und WAV)
USB (33)USB
AUXAUX (11)Anschluss per Adapterkabel (Stereo-Klinke/Cinch), z.B. an DVD-
Player oder Sat-Receiver
AUX (34)AUX
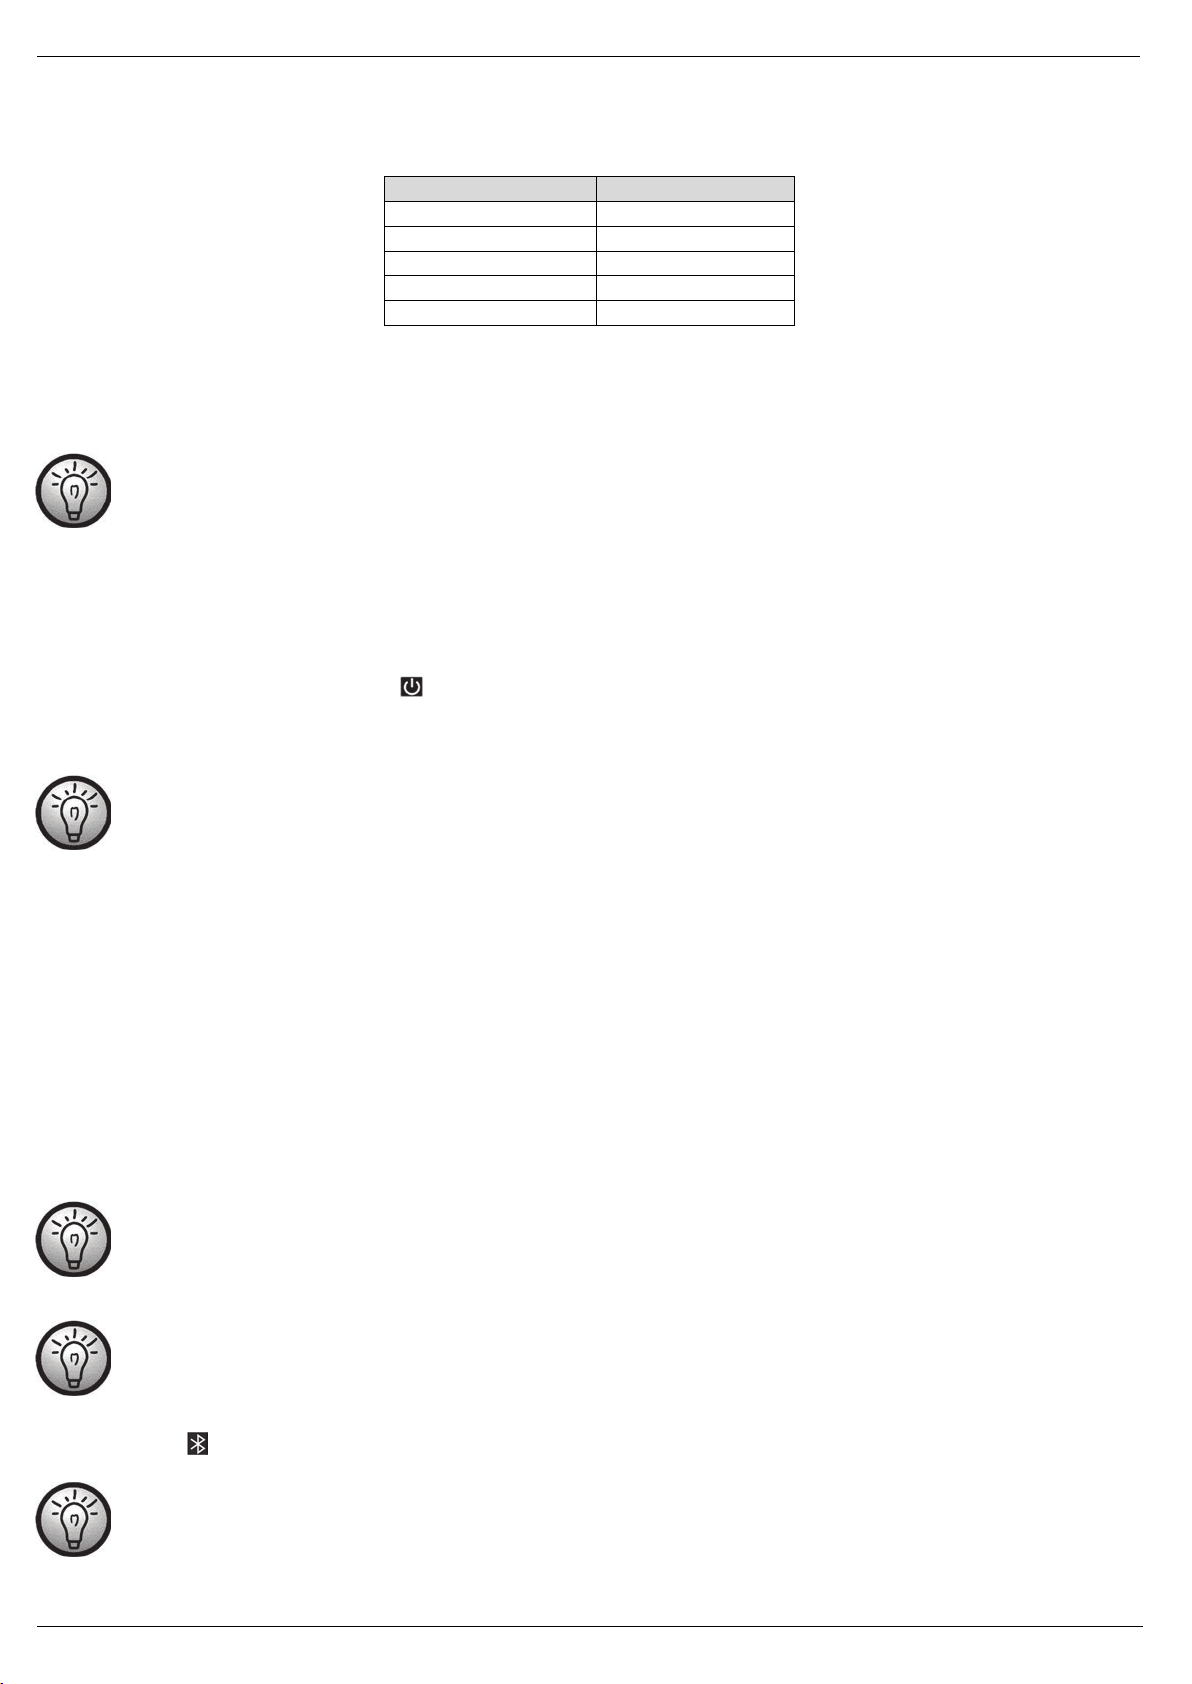
8.4 Display-Anzeigen
Bei jeder Einstellungsänderung der Soundbar leuchtet das LED-Display (1) der Soundbar für ca. 8 Sekunden auf heller Stufe, um anschließend dauerhaft auf
dunkler Stufe zu leuchten.
Einstellung LED-Display
„Standby“--
Betriebsart „HDMI(ARC)“ Hd
Betriebsart „BLUETOOTH®“ bt
Betriebsart „OPTICAL“ OPtI
Betriebsart „USB“ USB
Betriebsart „AUX“ AUX
Klangeinstellung „MOVIE“ CINE
Klangeinstellung „DIALOG“ dIA
Klangeinstellung „MUSIC“ SONG
Klangeinstellung „3D“ 3d
„VOL-“ / „VOL+„ V 00 bis V 40
„TREBLE“ t -5 bis t 5
„BASS“ b -5 bis b 5
bei USB-Wiedergabe Titellaufzeit im Format mm:ss
“ON” bzw. “AL”
Drücken Sie die Taste (32), um das LED-Display (1) auszuschalten. Bei erneutem Drücken der Taste (32)oder einer beliebigen anderen Taste wird das
LED-Display (1) wieder eingeschaltet.
SSB 70 C3
Deutsch - 9
9.Inbetriebnahme
In dieser Bedienungsanleitung wird in der Regel die Bedienung mit der Fernbedienung beschrieben.
Einige Grundfunktionen (Ein/Standby, Quellenwahl und Lautstärkeeinstellung) können Sie auch direkt an der Soundbar einstellen.
Die Soundbar schaltet nach ca. 10 Minuten in den Standby-Betrieb, wenn…
…keine Bluetooth-Verbindung aufgebaut wird.
…kein oder nur sehr schwaches Tonsignal empfangen wird und keine Bedienung stattfindet.
Bitte beachten Sie bei den Betriebsarten HDMI(ARC) und OPTICAL:
Falls Ihre Tonquelle die Möglichkeit einer Mehrkanaltonwiedergabe hat, müssen Sie diese vor Inbetriebnahme auf „PCM Stereo“
umstellen, da ansonsten keine Tonausgabe über die Soundbar erfolgt. Bitte beachten Sie die Bedienungsanleitung Ihrer Tonquelle.
9.1 Soundbar einschalten
Verbinden Sie den Netzstecker der Soundbar mit einer immer leicht zugänglichen Netzsteckdose. Die Soundbar hat keinen separaten Hauptschalter, sie befindet
sich nach dem Einstecken des Netzsteckers direkt im Standby-Modus. Im LED-Display (1) wird „- -“ angezeigt. Drücken Sie die Standby-Taste (2, 35), um die
Soundbar aus dem Standby-Modus einzuschalten.
9.2 Soundbar ausschalten
Drücken Sie die Standby-Taste (35), um die Soundbar in den Standby-Modus zu schalten. Alternativ können Sie die Standby-Taste (2) an der Soundbar
für ca. 1 Sekunde drücken. Die Soundbar hat keinen separaten Hauptschalter. Beachten Sie, dass das eingebaute Netzteil auch im Standby eine geringe Menge
Strom verbraucht, solange der Netzstecker in der Netzsteckdose steckt. Ziehen Sie zur vollständigen Netztrennung den Netzstecker aus der Netzsteckdose.
9.3 Betriebsart wählen
Drücken Sie die entsprechende Taste (13, 14, 15, 33, 34), um die gewünschte Betriebsart zu wählen. Alternativ können Sie die Betriebsarten durch wiederholtes
kurzes Drücken der Taste (2) an der Soundbar durchschalten. Im LED-Display (1) wird die ausgewählte Betriebsart folgendermaßen angezeigt:
BetriebsartDisplay
HDMI ARC Hd
OPTICALOPtI
BLUETOOTH®bt
USBUSB
AUXAUX
Starten Sie nun am Abspielgerät die Wiedergabe und steuern Sie diese mit der Fernbedienung. Beachten Sie die Bedienungsanleitung des Abspielgerätes.
9.3.1 Betriebsart „HDMI ARC“
Bei HDMI(ARC- Audio Return Channel-) handelt es sich um eine Erweiterung des gängigen HDMI-Anschlusses, bei dem über den ARC-Kanal
Audiosignale in beide Richtungen übertragen werden können. Um diese Funktionalität zu nutzen, müssen alle verwendeten Komponenten ARC-
fähig sein.
Moderne Fernseher, Spielekonsolen und Digitalreceiver verfügen in der Regel über einen ARC-Ausgang. Bitte beachten Sie die
Bedienungsanleitung Ihres anzuschließenden Gerätes.
Sollte die Tonübertragung nicht funktionieren, prüfen Sie, ob das verwendete HDMI-Kabel und der verwendete Anschluss des tongebenden
Gerätes ARC-fähig sind. Es ist durchaus möglich, dass nur bestimmte Anschlüsse des tongebenden Gerätes ARC-fähig sind.
Im Folgenden wird der Anschluss der Soundbar an ein TV-Gerät beschrieben:
•Verbinden Sie die HDMI(ARC)-Buchse (9) der Soundbar unter Verwendung eines HDMI(ARC)-fähigen HDMI-Kabels (C, im Lieferumfang enthalten) mit
einem HDMI(ARC)-Ausgang des TV-Gerätes. Stellen Sie am angeschlossenen Gerät „PCM Stereo“ bzw. „Stereo 2.0“ ein.
•Schalten Sie die Soundbar mit der Standby-Taste (2, 35) ein.
•Drücken Sie die Taste „HDMI (ARC)“ (13), um den HDMI(ARC)-Eingang der Soundbar zu wählen.
•Schalten Sie das TV-Gerät ein, nach einigen Sekunden startet die Tonausgabe.
Sofern Ihr TV-Gerät das CEC-Protokoll unterstützt, wird die Soundbar über die Fernbedienung des TV-Gerätes ein- und ausgeschaltet. In diesem
Fall kann auch die Lautstärkeregelung über die Fernbedienung des TV-Gerätes erfolgen. Beachten Sie die Bedienungsanleitung des TV-Gerätes.
9.3.2 Betriebsart „OPTICAL“
Wählen Sie diesen Modus, um über den optischen Digitaleingang (10) den Ton z.B. eines TV-Gerätes auf der Soundbar (A) wiederzugeben. Das TV-Gerät muss
über einen optischen Digitalausgang verfügen. Zur Verbindung verwenden Sie das im Lieferumfang enthaltene optische Kabel (Toslink-Kabel). Gehen Sie dazu
wie folgt vor:
•Schließen Sie an den optischen Digitalausgang Ihres TV-Gerätes das Toslink-Kabel (D) an.
SSB 70 C3
10 - Deutsch
•Verbinden Sie anschließend das Toslink-Kabel (D) mit dem optischen Digitaleingang (10) der Soundbar.
•Schalten Sie TV-Gerät und Soundbar ein. Stellen Sie am angeschlossenen TV-Gerät „PCM Stereo“ bzw. „Stereo 2.0“ ein.
•Starten Sie die Wiedergabe am TV-Gerät.
•Drücken Sie die Taste „OPTICAL“ (14) der Fernbedienung, um diese Betriebsart zu wählen.
•Sie können die Lautstärke mit den Lautstärketasten (29, 31), Ihren Bedürfnissen anpassen.
•
Ändern Sie bei Bedarf die Klangeinstellungen mit den entsprechenden Tasten der Fernbedienung.
Beachten Sie die Bedienungsanleitung des TV-Gerätes.
9.3.3 Betriebsart „BLUETOOTH“
Der Bluetooth-Gerätename der Soundbar lautetSSB70 C3.
Sollten Sie während des Pairing-Vorganges nacheiner PIN gefragt werden, gebenSie „0000“ ein.
Je nach verwendetem Gerät kanndie Verbindungsherstellung unterschiedlich lange dauern.
Verbindung herstellen
•
Drücken Sie die Taste (15), um in den Bluetooth-Modus zu wechseln.
Die Soundbar verbindet sich nach dem Wechseln in den Bluetooth-Modus automatisch mit einem verbundenen Gerät (im LED-Display (1) leuchtet
„bt“ durchgehend) oder wechselt, sofern kein verbundenes Gerät gefunden wird, automatisch in den Bluetooth Pairing Modus (im LED-Display
(1)blinkt „bt“). Nach Verbindungsverlust mit einem gekoppelten Gerät schaltet sich das Gerät nach ca. 10 min aus.
•Sollte Ihr Abspielgerät noch nicht mit der Soundbargekoppelt worden sein, blinkt im Display „bt“.
•Starten Sie den Bluetooth-Suchmodus IhresAbspielgerätes (z.B.Smartphone). Dieses sollte nun die Kennung der Soundbar „SSB 70 C3“ empfangen.
•Stellen Sie nun an Ihrem Abspielgerät die Bluetooth-Verbindung mit der Soundbar her.
•Nach erfolgter Verbindungsherstellung leuchtet im LED-Display (1) „bt“ durchgehend und es ertönt ein Bestätigungston.
In der Regel ist dieser Koppelvorgang nur einmal nötig, da das Abspielgerät die Kennung der Soundbar speichert. Daher entfällt bei einem
erneuten Verbindungsaufbau die manuelle Verbindungsherstellung.
Sollten Sie die bestehende Bluetooth-Verbindung trennen oder in den Pairing-Modus wechseln wollen, halten Sie die Taste (15)auf der
Fernbedienung für ca. 1 Sekunde gedrückt.
•Starten Sie nun an Ihrem Abspielgerät die Musikwiedergabe. Der Ton wird über die Soundbar wiedergegeben.
•Steuern Sie die Musiktitel mit den Tasten (16), (17)und(30)der Fernbedienung oder über Ihr Abspielgerät.
•Sie können die Lautstärke mit den Lautstärketasten (29, 31), Ihren Bedürfnissen anpassen.
Verbindung trennen
Die Bluetooth-Verbindung wird getrennt, wenn…
•…eines der Geräte ausgeschaltet wird. Es ertönt ein Bestätigungston.
•…die Bluetooth-Funktion ausgeschaltet wird. Es ertönt ein Bestätigungston.
•…Soundbar und Abspielgerät sich außerhalb der Bluetooth-Reichweite (ca. 10 Meter) befinden.
9.3.4 Betriebsart „USB“
Die Reihenfolge der abgespielten Titel/Ordner wird festgelegt durch die Reihenfolge, in der sie auf den USB Stick kopiert werden.
In dieser Betriebsart können Sie Audiodateien, die auf einem USB-Datenträger, z.B. USB-Stick abgespeichert sind, über die Soundbar wiedergeben. Bitte
beachten Sie beim Anschluss einer USB-Festplatte, dass der maximale Strom am USB-Anschluss der Soundbar 500 mA beträgt. Beachten Sie die
Bedienungsanleitung der USB-Festplatte.
Wollen Sie eine Festplatte als USB-Abspielgerät nutzen, verwenden Sie zum Anschluss ein Y-Kabel mit separater Stromversorgung.
Bitte beachten Sie, dass es in seltenen Fällen zu Inkompatibilitäten zwischen USB-Datenträger und Soundbar kommen kann und dadurch die
Funktion nur eingeschränkt bzw. gar nicht vorhanden ist. Versuchen Sie in diesen Fällen einen anderen USB-Datenträger.
•Verbinden Sie den USB-Datenträger mit der USB-Buchse (4) der Soundbar.
•Drücken Sie die Taste „USB“ (33) der Fernbedienung, um diese Betriebsart zu wählen.
SSB 70 C3
Deutsch - 11
•Steuern Sie die Musiktitel mit den Tasten (16), (18), (17)und(30)der Fernbedienung.
•
Sie können die Lautstärke mit den Lautstärketasten (29, 31) Ihren Bedürfnissen anpassen.
•
Ändern Sie bei Bedarf die Klangeinstellungen mit den entsprechenden Tasten der Fernbedienung.
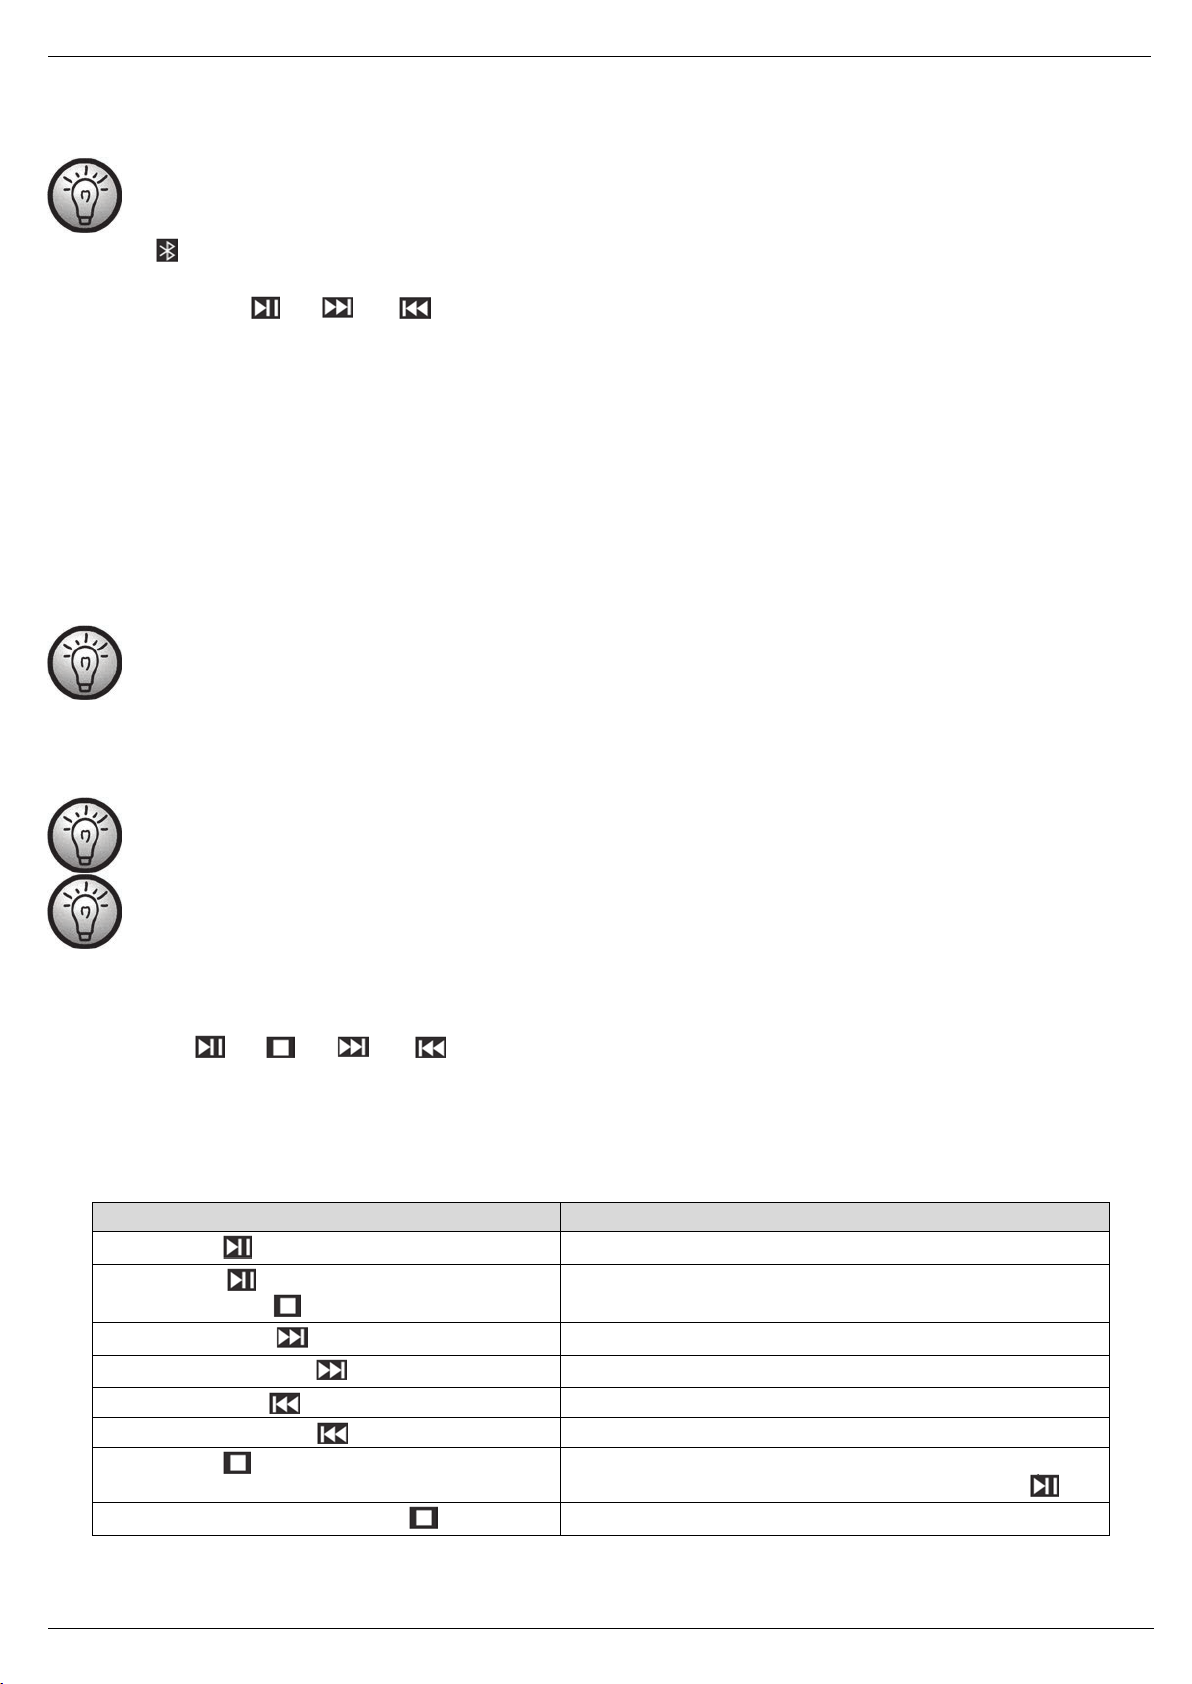
Die verfügbaren Steuerfunktionen bei Betriebsart „USB“ im Einzelnen:
Aktion Funktion
Taste (16)drückenAktuellen Titel anhalten /aktuellen Titel fortsetzen.
Taste (16)drücken, wenn zuvor die Wiedergabe mit Taste
(18)angehalten wurde.
Wiedergabe am Anfang des zuletzt gespielten Ordners fortsetzen.
Taste (17)kurz drückenTitelsprung zum nächsten Titel.
Taste (17)lange drückenTitelsprung zum 1. Titel des nachfolgenden Ordners.
Taste (30)kurz drückenTitelsprung zum vorherigen Titel.
Taste (30)lange drückenTitelsprung zum 1. Titel des vorherigen Ordners.
Taste (18)drückenWiedergabe anhalten, Fortsetzung der Wiedergabe erfolgt über Taste
(16)mit dem ersten Titel des zuletzt gespielten Ordners.
Taste (18)zweimal schnell nacheinander drückenTitelsprung zum 1. Titel des 1. Ordners.
Durch Drücken der Taste (28) bewirken Sie die Wiederholung des gerade gespielten Titels (Displayanzeige „ON“) bzw. die Wiederholung aller auf dem
Datenträger gespeicherten Titel (Displayanzeige „AL“).
LED-Display Funktion
ON Aktueller Titel wird wiederholt
AL Alle Titel werden wiederholt
ACHTUNG! Die USB-Buchse (4) darf nicht als Ladebuchse für externe Geräte verwendet werden.
9.3.5 Betriebsart „AUX“
Nutzen Sie diese Betriebsart, wenn Sie ein Abspielgerät anschließen wollen, welches über einen Cinch-Ausgang verfügt, z.B. DVD-Player, Sat-Receiver. Nutzen
Sie das beiliegende Adapterkabel (E).
•Verbinden den Cinch-Ausgang Ihres Abspielgerätes mit der AUX-Buchse (11) der Soundbar.
•Schalten Sie die Soundbar mit der Standby-Taste (2, 35) ein.
•Drücken Sie die Taste „AUX“ (34) der Fernbedienung, um diese Betriebsart zu wählen.
•
Sie können die Lautstärke mit den Lautstärketasten (29, 31), Ihren Bedürfnissen anpassen.
•
Ändern Sie bei Bedarf die Klangeinstellungen mit den entsprechenden Tasten der Fernbedienung.
9.4 Lautstärke- und Klangeinstellungen
Alle Änderungen der Lautstärke- und Klangeinstellungen werden im LED-Display (1) für ca. 2 Sekunden angezeigt. Danach wechselt Die
Displayanzeige wieder zur Standardanzeige der jeweiligen Betriebsart.
9.4.1 Lautstärke einstellen
Stellen Sie die Lautstärke während der Wiedergabe mit den Lautstärketasten (29, 31) der Fernbedienung ein. Alternativ nutzen Sie die Lautstärketasten (3, 5) an
der Soundbar. Um eine schnelle Änderung der Einstellung zu bewirken, können Sie die Tasten auch gedrückt halten. Die gewählte Lautstärkestufe wird für ca. 2
Sekunden im LED-Display (1) angezeigt. Falls Sie die Lautstärke auf die niedrigste Stufe „V 00“ einstellen, wird dieses im LED-Display (1) durchgängig blinkend
dargestellt.
9.4.2 Ton stummschalten
Drücken Sie die Taste (12), um den Ton vorübergehend stumm zu schalten.
9.4.3 Höhen und Bässe einstellen
Durch Drücken der Tasten TREBLE+(19) und TREBLE- (27) können Sie die Höhen entsprechend Ihren Wünschen regeln.
Wollen Sie die Bässe regeln, drücken Sie dazu die Tasten BASS+(20) und BASS- (26)
SSB 70 C3
12 - Deutsch
9.4.4 Klangeinstellung auswählen
Die Soundbar verfügt über 4 voreingestellte Klangeinstellungen. Drücken Sie die entsprechende Taste (21, 22, 24 ,25), um die gewünschte Klangeinstellung zu
wählen. Im LED-Display (1) wird die ausgewählte Klangeinstellung folgendermaßen angezeigt:
KlangeinstellungLED-Display
MOVIECINE
3D 3d
DIALOGdIA
MUSICSONG
9.4.5 Klangeinstellung „MOVIE“
Wählen Sie diese Klangeinstellung, um die Toneinstellungen für die Wiedergabe z. B. von Spielfilmen oder Dokumentationen zu wählen.
9.4.6 Klangeinstellung „3D“
Wählen Sie diese Klangeinstellung, um der aktuellen Wiedergabe einen virtuellen 3D-Raumklang zu verleihen.
9.4.7 Klangeinstellung „DIALOG“
Wählen Sie diese Klangeinstellung, um die Toneinstellungen für Sprachwiedergabe zu wählen. Diese Einstellung ist u.a. empfehlenswert für Nachrichtensendungen.
9.4.8 Klangeinstellung „MUSIC“
Optimierte Toneinstellungen für Musikwiedergabe werden bei Auswahl dieser Klangeinstellung eingestellt.
SSB 70 C3
Deutsch - 13
10.Reinigung
Schalten Sie das Gerät aus und trennen Sie es vom Stromnetz. Verwenden Sie zur Reinigung nur ein weiches, trockenes Tuch und keinesfalls scharfe oder
lösungsmittelhaltige Reiniger oder kratzende Schwämme. Dadurch könnte die Oberfläche der Soundbar beschädigt werden.
10.1 Lagerung bei Nichtbenutzung
Wenn Sie die Soundbar für längere Zeit nicht benutzen wollen, bewahren Sie sie an einem sauberen, trockenen und kühlen Ort auf. Entnehmen
Sie die Batterien aus der Fernbedienung, um einem Auslaufen vorzubeugen.
11.Fehlerbehebung
Die Soundbar zeigt keine Funktion
•Prüfen Sie, ob der Netzstecker korrekt in eine Netzsteckdose eingesteckt ist. Stecken Sie ihn gegebenenfalls korrekt ein.
•Prüfen Sie, ob die verwendete Netzsteckdose Strom führt. Versuchen Sie gegebenenfalls eine andere Steckdose, von der Sie sicher wissen, dass diese in
Ordnung ist.
Kein Ton
•Prüfen Sie, ob die korrekte Betriebsart eingestellt ist. Stellen Sie die korrekte Betriebsart ein.
•Überprüfen Sie die Laustärkeeinstellung an der Soundbar und an dem angeschlossenen Wiedergabegerät.
•Im Modus HDMI ARC und OPTICAL: Falls Ihre Tonquelle die Möglichkeit einer Mehrkanaltonwiedergabe hat, müssen Sie diese vor Inbetriebnahme auf
„PCM Stereo“ umstellen, da ansonsten keine Tonausgabe über die Soundbar erfolgt. Bitte beachten Sie die Bedienungsanleitung Ihrer Tonquelle.
•Im Modus „HDMI ARC“: Überprüfen Sie, ob das HDMI(ARC)-Kabel (C) korrekt in der HDMI ARC-Buchse (9) der Soundbar und in den entsprechenden
HDMI ARC-Anschluss der externen Tonquelle, z. B. TV eingesteckt ist. An einem „normalen“ HDMI-Anschluss kann das TV nur Bild und Ton empfangen, aber
nicht ausgeben.
•Im Modus „AUX IN“: Überprüfen Sie, ob das Adapterkabel (E) korrekt in die AUX IN-Buchse (11) der Soundbar und in den Cinch-Ausgang des externen
Wiedergabegerätes eingesteckt ist. Prüfen Sie auch die Lautstärkeeinstellung eines über das Adapterkabel (E) angeschlossenen Wiedergabegerätes.
•Im Modus „Optical“: Überprüfen Sie, ob das Toslink-Kabel (D) korrekt in den optischen Digitaleingang (10) der Soundbar und in den entsprechenden
Anschluss des externen Wiedergabegerätes eingesteckt ist.
•Im Modus „USB“: Überprüfen Sie, ob Ihr USB-Wiedergabegerät FAT32-formattiert und korrekt verbunden ist und ob sich geeignete Wiedergabedateien
darauf befinden. Geeignete Dateiformate sind: MP3 und WAV.
Die Soundbar lässt sich nicht mit der Fernbedienung steuern
•Die Batterien der Fernbedienung sind schwach oder leer. Ersetzen Sie diese durch Batterien des gleichen Typs.
•Der Abstand zwischen Soundbar und Fernbedienung ist zu groß. Verringern Sie den Abstand.
Wiedergabe über Bluetooth® funktioniert nicht
•Prüfen Sie an Ihrem Smartphone / Tablet PC, ob eine Bluetooth®-Verbindung mit der Soundbar SSB 70 C3 besteht. Führen Sie ggf. eine erneute
Verbindungsherstellung durch.
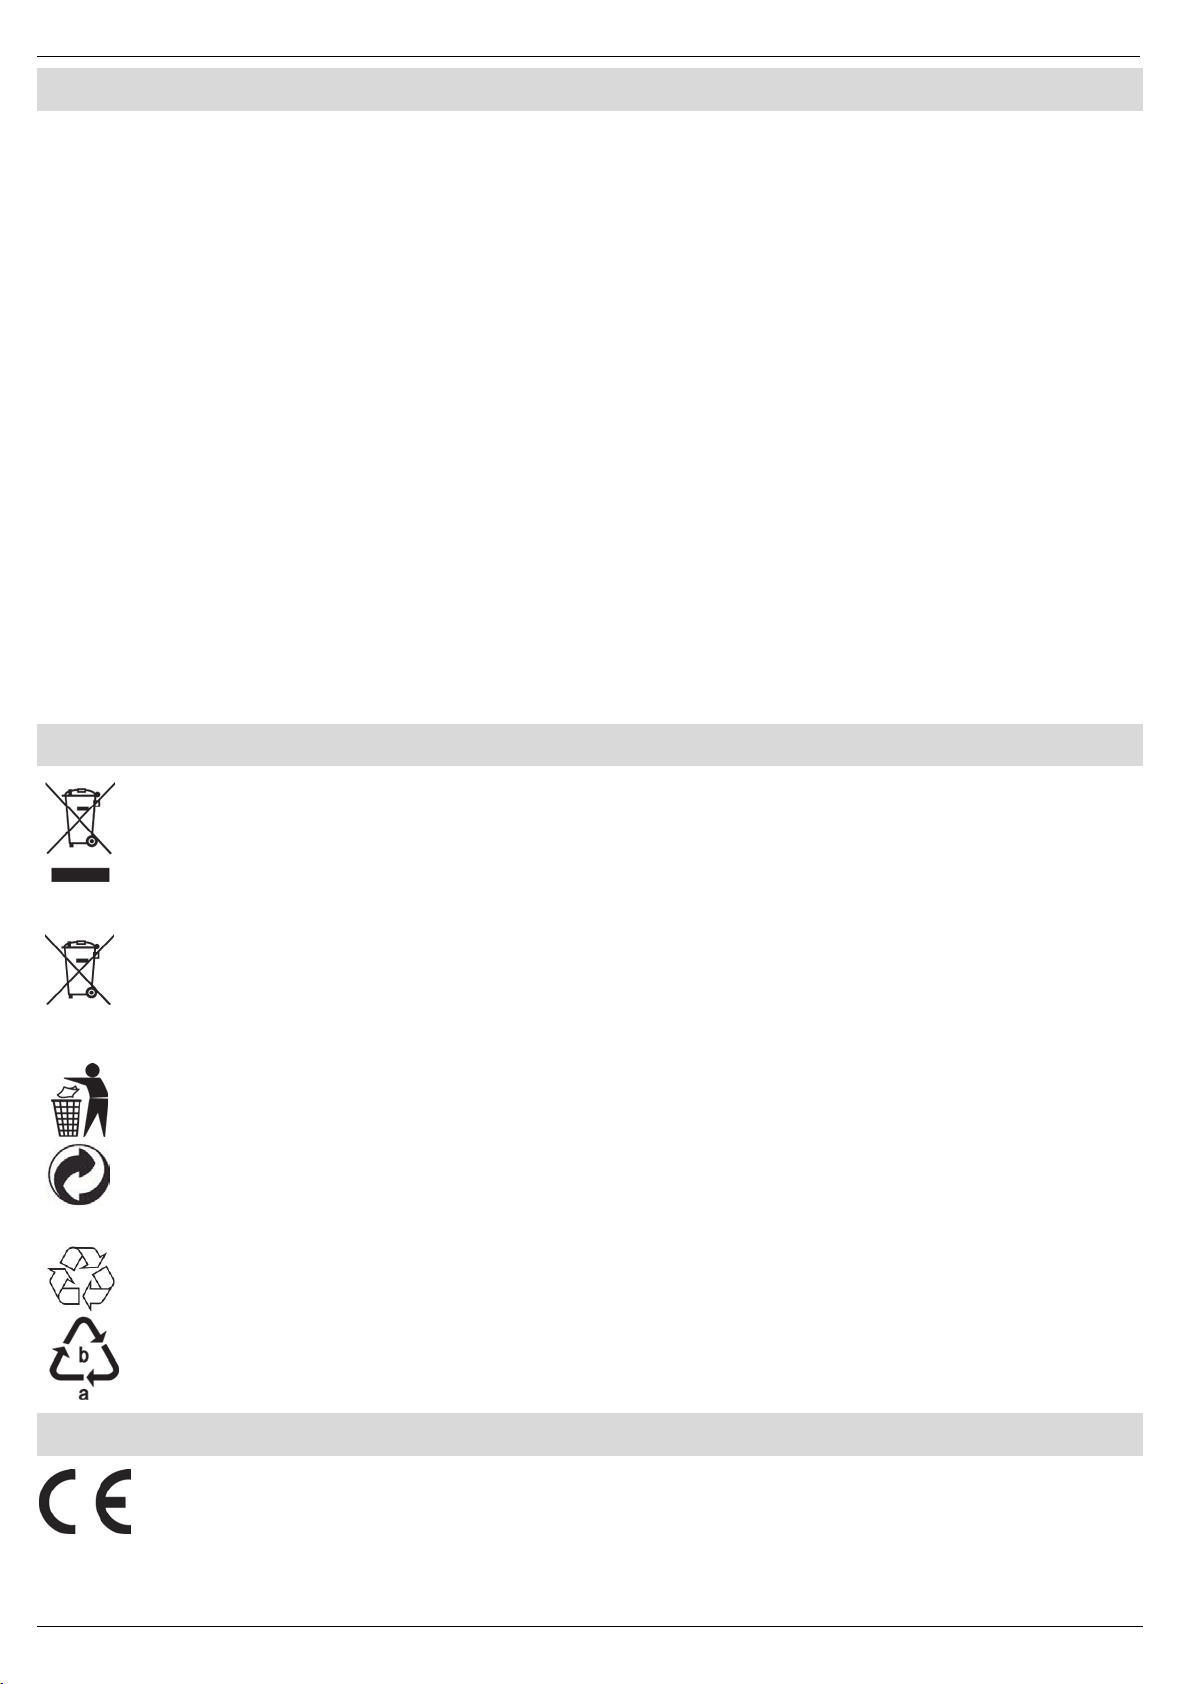
12.Umwelthinweise und Entsorgungsangaben
Die mit diesem Symbol gekennzeichneten Geräte unterliegen der europäischen Richtlinie 2012/19/EU. Alle Elektro- und Elektronik-Altgeräte
müssen getrennt vom Hausmüll über dafür staatlich vorgesehene Stellen entsorgt werden. Mit der ordnungsgemäßen Entsorgung des alten Geräts
vermeiden Sie Umweltschäden und eine Gefährdung Ihrer persönlichen Gesundheit. Weitere Informationen zur vorschriftsgemäßen Entsorgung
des alten Geräts erhalten Sie bei der Stadtverwaltung, beim Entsorgungsamt oder in dem Geschäft, wo Sie das Gerät erworben haben.
Denken Sie an den Umweltschutz. Verbrauchte Batterien gehören nicht in den Hausmüll. Sie müssen bei einer Sammelstelle für Altbatterien
abgegeben werden. Bitte beachten Sie, dass Batterien nur im entladenen Zustand in die Sammelbehälter für Geräte-Altbatterien gegeben werden
dürfen, bzw. bei nicht vollständig entladenen Batterien, Vorsorge gegen Kurzschlüsse getroffen werden muss.
Führen Sie auch die Verpackung einer umweltgerechten Entsorgung zu. Kartonagen können bei Altpapiersammlungen oder an öffentlichen
Sammelplätzen zur Wiederverwertung abgegeben werden. Folien und Kunststoffe des Lieferumfangs werden über Ihr örtliches
Entsorgungsunternehmen eingesammelt und umweltgerecht entsorgt.
Beachten Sie die Kennzeichnung der Verpackungsmaterialien bei der Abfalltrennung, diese sind gekennzeichnet mit Abkürzungen (a) und
Nummern (b) mit folgender Bedeutung:
1–7: Kunststoffe / 20–22: Papier und Pappe / 80–98: Verbundstoffe.
SSB 70 C3
14 - Deutsch
13.Konformität
Dieses Gerät entspricht den grundlegenden Anforderungen und den anderen relevanten Vorschriften der RE-Richtlinie 2014/53/EU, der ErP-
Richtlinie 2009/125/EG sowie der RoHS Richtlinie 2011/65/EU.
Die vollständige EU-Konformitätserklärung kann unter folgendem Link heruntergeladen werden:
Sie erhalten auf dieses Gerät 3 Jahre Garantie ab Kaufdatum. Im Falle von Mängeln dieses Produkts stehen Ihnen gegen den Verkäufer des Produkts gesetzliche
Rechte zu. Diese gesetzlichen Rechte werden durch unsere im Folgenden dargestellte Garantie nicht eingeschränkt.
Garantiebedingungen
Die Garantiefrist beginnt mit dem Kaufdatum. Bitte bewahren Sie den originalen Kassenbon gut auf. Diese Unterlage wird als Nachweis für den Kauf benötigt. Tritt
innerhalb von drei Jahren ab dem Kaufdatum dieses Produkts ein Material- oder Fabrikationsfehler auf, wird das Produkt von uns – nach unserer Wahl – für Sie
kostenlos repariert oder ersetzt.
Garantiezeit und gesetzliche Mängelansprüche
Die Garantiezeit wird durch die Gewährleistung nicht verlängert. Dies gilt auch für ersetzte und reparierte Teile. Eventuell schon beim Kauf vorhandene Schäden
und Mängel müssen sofort nach dem Auspacken gemeldet werden. Nach Ablauf der Garantiezeit anfallende Reparaturen sind kostenpflichtig.
Garantieumfang
Das Gerät wurde nach strengen Qualitätsrichtlinien sorgfältig produziert und vor Auslieferung gewissenhaft geprüft. Die Garantieleistung gilt für Material- oder
Fabrikationsfehler. Diese Garantie erstreckt sich nicht auf Produktteile, die normaler Abnutzung ausgesetzt sind und daher als Verschleißteile angesehen werden
können oder für Beschädigungen an zerbrechlichen Teilen, z. B. Schalter, Akkus oder die aus Glas gefertigt sind. Diese Garantie verfällt, wenn das Produkt
beschädigt, nicht sachgemäß benutzt oder gewartet wurde. Für eine sachgemäße Benutzung des Produkts sind alle in der Bedienungsanleitung aufgeführten
Anweisungen genau einzuhalten. Verwendungszwecke und Handlungen, von denen in der Bedienungsanleitung abgeraten oder vor denen gewarnt wird, sind
unbedingt zu vermeiden. Das Produkt ist nur für den privaten und nicht für den gewerblichen Gebrauch bestimmt. Bei missbräuchlicher und unsachgemäßer
Behandlung, Gewaltanwendung und bei Eingriffen, die nicht von unserer autorisierten Service-Niederlassung vorgenommen wurden, erlischt die Garantie. Mit
Reparatur oder Austausch des Produkts beginnt kein neuer Garantiezeitraum.
Abwicklung im Garantiefall
Um eine schnelle Bearbeitung Ihres Anliegens zu gewährleisten, folgen Sie bitte den folgenden Hinweisen:
-Bitte lesen Sie vor Inbetriebnahme Ihres Produktes sorgfältig die beigefügte Dokumentation. Sollte es mal zu einem Problem kommen,
welches auf diese Weise nicht gelöst werden kann, wenden Sie sich bitte an unsere Hotline.
-Bitte halten Sie für alle Anfragen den Kassenbon und die Artikelnummer bzw. wenn vorhanden die Seriennummer als Nachweis für den
Kauf bereit.
-Für den Fall, dass eine telefonische Lösung nicht möglich ist, wird durch unsere Hotline in Abhängigkeit der Fehlerursache ein
weiterführender Service veranlasst.
Service
Telefon: 0800 5435111
E-Mail: targa@lidl.de
Telefon: 0820 201222
E-Mail: targa@lidl.at
Telefon: 0842 665 566
E-Mail: targa@lidl.ch
IAN: 315507
Hersteller
Bitte beachten Sie, dass die folgende Anschrift keine Serviceanschrift ist. Kontaktieren Sie zunächst die oben benannte Servicestelle.
7. Connections and controls ..................................................................................................... 19
7.1 Remote control ............................................................................................................................................................... 20
8. Before you start .................................................................................................................. 20
8.1.1 Wall-mounting (Figure C) ....................................................................................................................................... 20
8.2 Fitting the batteries into the remote control ................................................................................................................. 21
8.4 Display information ....................................................................................................................................................... 21
9. Getting started .................................................................................................................... 22
9.1 Switching on the sound bar .......................................................................................................................................... 22
9.2 Switching the sound bar off .......................................................................................................................................... 22
9.3 Selecting a mode .......................................................................................................................................................... 22
9.4 Volume and audio settings ........................................................................................................................................... 24
9.4.1 Adjusting the volume .............................................................................................................................................. 24
9.4.2 Muting the sound .................................................................................................................................................... 24
9.4.3 Adjusting the treble and bass ................................................................................................................................ 24
9.4.4 Selecting the audio settings ................................................................................................................................... 25
10.1 Storage when not in use............................................................................................................................................. 25
14. Warranty and service information .................................................................................... 27
SSB 70 C3
16 - English
Congratulations!
By purchasing the SilverCrest sound bar you have opted for a quality product.
Before first using it, familiarise yourself with the way the sound bar works and read these operating instructions through carefully. Be careful to follow the safety
instructions and only use the sound bar as described in the operating instructions and for the applications given.
Keep these operating instructions in a safe place. If you pass the sound bar on to someone else, make sure to give them all the relevant documents with it.
This sound bar fulfils all the standards and directives listed in the EU Declaration of Conformity. The manufacturer is not liable for any damage or problems caused
by unauthorised modifications. Only use accessories recommended by the manufacturer. Observe the regulations and laws in the country of use.
1.Trademarks
The Bluetooth® wording and its logo are registered trademarks of Bluetooth SIG, Inc. (Special Interest Group). TARGA GmbH is using these marks under license.
The SilverCrest trademark and the SilverCrest brand are the property of their respective owners.
The HDMI® wording is a registered trademark of HDMI Licensing LLC.
USB is a registered trademark.
Other names and products may be the trademarks or registered trademarks of their respective owners.
2.Intended use
The SilverCrest SSB 70 C3 sound bar with Bluetooth®is an information technology device whichis used toplayback sound from audio devices. The sound bar
may be used only for private purposes, and not forindustrial or commercial purposes. The devicemay not beused outdoors or in tropical climates.
3.Package contents
Remove the device and all the accessories from the packaging. Remove the packaging material and check that all components are complete and undamaged. If
you find anything missing or damaged, please contact the manufacturer.
A SilverCrest SSB 70 C3 sound bar
B Remote control
C HDMI (ARC) cable
D Optical cable (Toslink)
E Adapter cable with 3.5 mm jack to Cinch
F 2 batteries of type AAA/LR03, 1.5 V
G 2 screws (for wall-mounting)
H 2 rawlplugs (for wall-mounting)
I These operating instructions (line-art illustration)
J Quick start guide (line-art illustrations)
HDMI ARC flyer (not illustrated)
Drilling template (not illustrated)
SSB 70 C3
English - 17
4. Technical specifications
SSB 70 C3
Input voltage / frequency 110 – 240 V , 50/60 Hz
Power consumption when on / in standby mode max. 80 W / < 0.5 W
Speaker 2 x 17 W RMS plus 1 x 35 W RMS sub-woofer
Audio format at inputs Stereo PCM
AUX IN jack 3.5 mm jack
Digital input (SPDIF) Optical (Toslink)
HDMI (ARC) cable HDMI ARC jack
USB input
Output current
Format structure
Playable audio formats
USB port, type A
Max. 500 mA
FAT 32, exFAT
MP3, WAV
Bluetooth® specification: V 5.0
Supported profiles: A2DP, AVRCP
Bluetooth® transmission power: max. 10 dBm
Bluetooth® frequency band: 2402 - 2480 GHz
Bluetooth® range: Approx. 10m (30 feet)
Remote control power supply 2 batteries of type AAA/LR03, 1.5 V
Dimensions (W x D x H) approx. 90.2 x 8.2 x 7.0 cm
Weight without accessories approx. 1980 g
Operating temperature 0°C to 35°C
Operating humidity 85 % rel. humidity
Permissible storage conditions 0°C to 40°C, max. 85% rel. humidity
The technical data and design may be changed without prior notice.
5. Safety instructions
Before you use this device for the first time, please read the following notes and heed all warnings, even if you are familiar with handling electronic devices. Keep
this user manual in a safe place for future reference. If you sell the device or give it away, pass on the user manual at the same time. The operating instructions are
part of the product.
Explanation of used symbols
DANGER! This icon and the word “DANGER” alert you to a potentially dangerous situation. Ignoring it can lead to severe injury or even
death.
WARNING! This symbol and the word “WARNING” denote important information required for the safe operation of the product and
for the safety of its users.
CAUTION! This symbol and the word “Caution” indicates important instructions to protect against damage to property.
This symbol denotes further information on the topic.
Read the user manual!
Direct current
Alternating current
Safety Class II, protective insulation
SSB 70 C3
18 - English
WARNING! Always make sure that
•contact with water sprays or drops and corrosive liquids is avoided and the device is never operated near water; in particular the device may
never be immersed in liquids (also, do not place any objects containing liquids, such as vases or drinks, on or near the device).
•no naked flames (e.g. burning candles) are placed on or near the device;
•there is no penetration by foreign bodies.
•the device is not exposed to any extreme temperature fluctuations as this can cause moisture through condensation and short circuits. If the
device has been exposed to extreme temperature fluctuations, wait for it to reach the ambient temperature before switching it on (about 2
hours).
•the device is not covered. Heat can accumulate when the device is covered, therefore there is a risk of fire.
•the housing is not opened. This could cause an electric shock.
•the mains plug is not touched with wet hands. This could cause an electric shock.
•the socket outlet used must always remain easily accessible, as the mains plug is used as a disconnecting device.
•the mains plug is disconnected from the mains socket in the event of lightning. There is a risk of fire or damage to property.
Failure to heed the warnings above may cause injury.
CAUTION! Always make sure that
•the device is not exposed to direct heat sources (e.g. radiators);
•no direct sunlight or bright artificial light reaches the device;
•you keep at least 1 m of space to radio frequency and magnetic sources (e.g. speakers, mobile phones, etc.) to avoid any malfunction. In
case of malfunction, install the device at a different place.
•the device is not subjected to excessive shocks or vibrations;
•the USB port (4) may not be used to charge external devices.
Failure to heed the warnings above could result in damage to the device.
DANGER!Batteries
Insert the batteries with the correct polarity. Refer to the diagram inside the battery compartment. Do not attempt to recharge the batteries and never throw the
batteries into a fire. Do not mix battery types (old and new or carbon and alkaline, etc.). Remove the batteries when the device is not to be used for an extended
period. Improper use could cause explosions or leaks. Batteries are not toys! If a battery is swallowed, seek medical help immediately. Batteries must never be
opened or deformed, as this could result in chemicals leaking out which could cause injuries. If the battery fluid comes into contact with the skin or eyes,
rinse immediately with plenty of water and seek medical aid.
DANGER!Personal safety
Electrical devices are not suitable for children. Persons with physical, sensory or mental impairments may also only use electrical devices within the limits of their
abilities. Do not allow children or persons with reduced physical, sensory or mental capabilities to use electrical devices unsupervised unless they are instructed
accordingly and supervised by a competent person responsible for their safety. Children should always be supervised to ensure that they do not play with the
product. Small parts can represent choking hazards. Keep the packaging out of the reach of these people.Packaging material is not a toy.
There is a risk of suffocation.
WARNING! Cables
Unplug all cables by holding the plugs and never pull on the cables themselves. Never place pieces of furniture or other heavy objects on the cables and take
care that they do not become damaged, especially at the plugs and sockets. Never install the cables around hot or sharp objects to avoid damaging them. Never
tie knots in cables and do not tie them to other cables. All cables should be positioned so that nobody can trip over them or be obstructed by them.
DANGER!RF interface
Turn the device off when on board an aircraft, in a hospital, in an operating theatre or in the vicinity of electronic medical equipment. The RF signals may interfere
with the functionality of sensitive devices. Keep the device at least 20 cm (8 inches) away from pacemakers, as the RF signals could interfere with the functionality
SSB 70 C3
English - 19
of the pacemaker. The RF signals transmitted can interfere with hearing aids. If wireless mode is switched on, do not place the device near flammable gases or in
a potentially explosive area (e.g. a paint shop), as the RF signals transmitted could cause explosions or fire. The range of the radio frequency signals depends on
environmental conditions. If data is transmitted via a wireless connection, it can also be received by unauthorised parties. Targa GmbH is not liable for any
interference caused to RF or TV signals through unauthorised modification to this device. Furthermore, Targa accepts no liability for replacing any cables or devices
that have not been specifically approved by Targa GmbH. The user is solely responsible and liable for remedying any interference caused by such unauthorised
modification of this device or for replacing the device.
Servicing / Repair
Repairs are required when this device has been damaged in any way, for example, when the device housing is damaged, when liquids or objects have entered
the device or when the product has been exposed to rain or moisture. Repairs are also necessary if the product is not working properly or has been dropped. If
you notice any smoke, unusual noise or strange smells, switch off the device immediately and pull the power cable out of the socket. If this occurs, the device should
not be used before it has been inspected by authorised service personnel. All repairs must be carried out by qualified service personnel.
Operating environment
The device is not designed for use in environments with high humidity (e.g. bathrooms) or excessive levels of dust. Operating temperature and operating humidity:
0 °C to 35 °C, max. 85 % rel. humidity. Please note that caring products for furniture surfaces may contain substances that can damage the rubber feet of the
sound bar, so be careful if you have been using this type of products.
Note on mains disconnection
Please remember that the built-in power adapter consumes a small amount of electricity when the mains plug is connected to the mains socket, even in standby
mode. To disconnect it completely, unplug the mains plug from the mains socket.
6.Copyright
All the contents of this user manual are protected by copyright and provided to the reader for information only. Copying data and information without the prior
explicit written consent of the author is strictly forbidden. This also applies to any commercial use of the contents and information. All texts and diagrams are up-to-
date as of the date of printing. Subject to change without notice.
7.Connections and controls
An illustration of the items and controls and their corresponding numbers can be found on the inside page of the fold-out cover of this user manual. You can keep
this page folded out whilst reading the different chapters of these operating instructions. This allows you to refer to the relevant controls at any time.
1 LED display
2 Dual-function button: 1. On / Standby 2. Source
3 +button (increase volume)
4 USB port (not to be used for charging)
5 -button (reduce volume)
6 Device feet
7 Wall-mounting holes
8 Power cable
9 HDMI ARC jack
10 Optical digital input (Toslink)
11 3.5mm AUX-IN socket
SSB 70 C3
20 - English
7.1 Remote control
You can use the remote control supplied to control the sound bar functions. Please see the chart below for the button functions.
12 Mute
13 HDMI (ARC) Switch to HDMI ARC input
14 OPTICAL Switch to optical digital input SPDIF
15 Switch to Bluetooth®
16 Play / Pause
17 Next track
18 STOP
19 TREBLE+ Amplify treble
20 BASS+ Increase bass
21 MOVIE Enables the equalizer for movies
22 3D Enables the equalizer with simulated surround sound
23 Battery compartment (on the back)
24 DIALOG Enables the equalizer for voice playback
25 MUSIC Enables the equalizer for music
26 BASS- Reduce bass
27 TREBLE- Attenuate treble
28 Repeat
29 VOL- Reduce volume
30 Previous title
31 VOL+ Increase volume
32 Toggle display on/off
33 USB Switch to USB input
34 AUX Switch to AUX input
35 On/Standby
8.Before you start
Remove the sound bar and all accessories from the package and remove the plastic films. Verify that you have received all items listed.
8.1 Positioning
The ideal position for your sound bar is centrally under your TV set. You can place the sound bar on a piece of furniture or mount it to the wall.
8.1.1 Wall-mounting (Figure C)
Make sure that you use suitable wall-mounting material.
Tools/mounting material needed (not included in the package):
•Drill (depending on the wall)
•2 screws and possibly 2 rawlplugs (depending on the wall) to fix to the wall. Please note that the screws must be suitable for the weight of the sound bar. If
the screws and rawlplugs provided are not suitable for your specific circumstances, make sure that the dimensions of the screw head and shaft correspond to
those provided in order to guarantee safe mounting.
•Phillips screwdriver and possibly other screwdrivers, spirit level, pencil
Before drilling, make sure there are no water or gas pipes or electricity cables in the wall. If necessary, get an expert to mount the device on the wall.
•Drill two holes 739 mm apart. Use the drilling template supplied to make mounting easier.
•If you are using the rawlplugs supplied, use an 8 mm drill bit.
•Insert the rawlplugs into the drilled holes.
•Push the screws in until the screw head projects by about 3 mm.
•Connect all the cables you are using to the connections on the sound bar.
•Position the device with the wall mounting holes down onto the screws so that they engage with the vertical holders on the wall mounting system, then secure
by tightening the screws.
•Finally, check that the sound bar is firmly fitted to both screws. If necessary, repeat the process. It may be necessary to rotate the screws clockwise or
counterclockwise a little.
SSB 70 C3
English - 21
8.2 Fitting the batteries into the remote control
Open the battery compartment (23) on the back of the remote control by sliding the battery compartment cover in the direction of the arrow and removing it. Insert
the batteries (2 AAA-type batteries) with the correct polarity (+ and -). The correct polarity is labelled on the batteries and inside the battery compartment (23). Re-
insert the cover of the battery compartment (23) and slide it in the opposite direction of the arrow until it locks in place. Please also refer to Figure B on the fold-
out cover page.
8.3 Connection options / Operating modes
CAUTION! Make sure that the sound bar and the devices to be connected are switched off when you connect them. Please also read the
user manual for the device to be connected.
The HDMI (ARC) connection only works if all the components connected are ARC-compliant. Use the HDMI (ARC) cable (C) supplied.
See also the user manual for the connected device.
The cable used for playback must not exceed a length of 3 metres.
The SSB 70 C3 sound bar lets you play sound and/or music from various sources:
Playback can be controlled using the buttons on the device or the remote control.
You can use the Source button (2) or the remote control to select the operating mode you want. The operating modes and corresponding display information can
be found in the table below:
Operating mode /
Source
Input Use Button on remote
control
Display
HDMI ARC HDMI(ARC) (9) Connection via HDMI (ARC) cable to the HDMI (ARC) jack, e.g. TV
or DVD player
HDMI(ARC) (13) Hd
OPTICAL OPTICAL (10)Connection via Toslink cable, e.g. TV or digital receiver OPTICAL (14) OPtI
BLUETOOTH®----- Via wireless connection, e.g. from smartphone button (15) bt
USB USB (4)Connection of USB media, e.g. USB stick to play back audio files
(audio formats supported: MP3 and WAV)
USB (33) USB
AUX USB (11)Connection via adapter cable (stereo jack/Cinch), e.g. DVD player
or satellite receiver
AUX (34) AUX
8.4 Display information
Every time a setting is changed on the sound bar, the LED display (1) lights up on full brightness for around 8 seconds before reverting back to the lower brightness
level.
Setting LED display
“Standby” - -
“HDMI(ARC)” mode Hd
“BLUETOOTH®” mode bt
“OPTICAL” mode OPtI
“USB” mode USB
“AUX” mode AUX
“MOVIE” audio settings CINE
“DIALOG” audio settings dIA
“MUSIC” audio settings SONG
“3D” audio settings 3d
“VOL-“ / „VOL+” V 00 to V 40
“TREBLE” t -5 to t 5
“BASS” b -5 to b 5
For USB playback Track runtime in mm:ss format
“ON” or “AL”
Press the button (32) to switch off the LED display (1). Pressing the button (32) again or any other button switches the LED display (1) back on again.
SSB 70 C3
22 - English
9.Getting started
This user manual generally describes using the remote control.
Some basic functions (on/standby, source selection and volume setting) can also be adjusted directly from the sound bar.
The sound bar switches into standby mode after approx. 10 minutes if ...
... no Bluetooth connection is established.
... no audio signal or only a very weak audio signal is received and no buttons are pressed.
In HDMI(ARC) and OPTICAL modes, please note:
If your audio source supports multi-channel playback, you need to switch it to “PCM Stereo” before getting started, as the sound bar will
otherwise be unable to output sound. Please refer to the user manual for your audio source.
9.1 Switching on the sound bar
Plug the mains plug of the sound bar into an easily accessible mains socket. The sound bar has no separate main switch, it goes straight into standby mode
immediately it is plugged in. The LED display (1) shows “- -”. Press the Standby button (2, 35) to wake the sound bar up from standby mode.
9.2 Switching the sound bar off
Press the Standby button (35) to switch the sound bar into standby mode. Alternatively, you can press the Standby button (2) on the sound bar for about
1 second. The sound bar has no separate main switch. Please remember that the power adapter consumes a small amount of electricity when the mains plug is
connected to the mains socket, even in standby mode. To disconnect it completely, unplug the mains plug from the mains socket.
9.3 Selecting a mode
Press the relevant button (13, 14, 15, 33, 34) to select the mode you want. Alternatively, you can toggle through the modes by briefly pressing the (2) button on
the sound bar several times. The mode selected is shown as follows on the LED display (1):
ModeDisplay
HDMI ARC Hd
OPTICALOPtI
BLUETOOTH®bt
USBUSB
AUXAUX
Now start playback on the connected device and control using the remote control. See the user manual for the playback device.
9.3.1 “HDMI ARC” mode
HDMI (ARC Audio Return Channel) is an extension to the conventional HDMI connection which allows ARC channel audio signals to be
transmitted in both directions. In order to use this functionality, all the components used must be ARC-compliant.
Most modern TV sets, games consoles and digital receivers have an ARC output. Please refer to the user manual for the device to be connected.
If the audio transmission does not work, make sure that the HDMI cable and the connection on the source device are ARC-compliant. It is
possible that only specific connections on the source device are ARC-compliant.
How to connect the sound bar to a TV set is described below:
•Using an HDMI(ARC)-compliant cable (C, supplied), connect the HDMI(ARC) jack (9) on the sound bar to an HDMI(ARC) output on the TV set. Set the
connected device to “PCM Stereo” or “Stereo 2.0”.
•Switch the sound bar on using the Standby button (2, 35).
•Press the “HDMI (ARC)” button (13) to select the HDMI(ARC) input on the sound bar.
•Switch the TV set on, the sound playback will start within a few seconds.
If your TV set supports the CEC protocol, the sound bar can be switched on and off using the TV remote control. If this is the case, the volume
can also be controlled via the TV remote control. See the user manual for the TV set.
9.3.2 “OPTICAL” mode
Use this operating mode to play music from the optical digital input (10) for example from a TV on your sound bar (A). The TV must have an optical digital output.
Use the optical cable supplied (Toslink cable) to make the connection. Proceed as follows:
•Connect the Toslink cable (D) to the optical digital output of your TV.
•Then connect the Toslink cable (D) to the optical digital input (10) of your sound bar.
•Switch the TV set and sound bar on. Set the connected TV to “PCM Stereo” or “Stereo 2.0”.
•Start playing on the TV.
•Press the “OPTICAL” button (14) on the remote control to select this mode.
SSB 70 C3
English - 23
•You can use the volume buttons (29, 31) to adjust the volume to your requirements.
•
If you wish, you can change the audio settings using the relevant buttons on the remote control.
See the user manual for the TV set.
9.3.3 “BLUETOOTH” mode
The Bluetooth device name ofthe sound bar isSSB 70 C3.
If you are prompted for a PIN during the pairing process, enter "0000".
It can take a variable amount of time to establish the connection, depending onthe device.
Establishing a connection
•
Press the button (15) to switch to Bluetooth mode.
After switching to Bluetooth mode, the sound bar automatically connects to a paired devices (a steady “bt” is shown on the LED display (1)) or,
if no paired device is found, automatically switches to Bluetooth pairing mode (the LED display (1) shows a flashing “bt”). If the connection to a
paired devices is lost, the device switches off after approx. 10 minutes.
•If your playbackdevice has not yet been pairedwith the sound bar, the display flashes “bt”.
•Start Bluetooth scanning mode onyour playback device(e.g. smartphone). Itshould then find thesound bar under the name “SSB 70 C3”.
•Now establish aBluetooth connection betweenyour playback deviceand the sound bar.
•Once a connectionhas beenestablished, the LED display (1) shows “bt” anda confirmation beep sounds.
Generally, you should only have to pair once as the playback device saves the name of the sound bar. This means you do not need to pair the
devices manually when you establish the connection again.
If you wish to disconnect an existing Bluetooth pairing or switch to pairing mode, press and hold the button (15) on the remote control for
about 1 second.
•Now start music playback from the source device. The sound is played back via the sound bar.
•You can use the (16), (17)and(30)buttons on the remote control or your source device to control playback.
•You can use the volume buttons (29, 31) to adjust the volume to your requirements.
Disconnect
The Bluetooth pairing is disconnected if …
•... either of the devices is switched off. A confirmation beep will sound.
•... Bluetooth is switched off. A confirmation beep will sound.
•... the sound bar and source device are beyond the Bluetooth range (approx. 10 metres).
9.3.4 “USB” mode
The sequence of the tracks/folders played is determined by the order in which they are copied to the USB stick.
In this mode, you can use the sound bar to play back audio files stored on a USB storage device, e.g. a USB stick. If connecting a USB hard drive, please note
that the maximum current on the sound bar’s USB connection is 500 mA. Please also see the user manual for the USB hard drive.
If you want to use a hard drive as a USB playback device, use a Y-cable with a separate power supply to connect it.
Please note there can occasionally be compatibility issues between the USB storage device and the sound bar, meaning only limited functionality
is available or it may not function at all. If this happens, try a different USB storage device.
•Connect the USB storage device to the USB port (4) on the sound bar.
•Press the “USB” button (33) on the remote control to select this mode.
•Use the (16), (18), (17)and(30)buttons on the remote control to control the music tracks.
•
You can use the volume buttons (29, 31) to adjust the volume to your requirements.
•
If you wish, you can change the audio settings using the relevant buttons on the remote control.
SSB 70 C3
24 - English
Control functions available in “USB” mode:
Action Function
Press the button (16). Pause / Resume current track.
Press the button (16) if playback was previously paused with
the button (18).
Resume playback at beginning of last folder played.
Briefly press the button (17).Skip to next track.
Press and hold the button (17). Skip to 1st track of next folder.
Briefly press the button (30).Skip to previous track.
Press and hold the button (30). Skip to 1st track of previous folder.
Press the button (18). Pause playback, playback continues with the first track in the last folder
played when the button (16) is pressed.
Press the button (18) twice in quick succession. Skip to 1st track of 1st folder.
Pressing the button (28) repeats the track currently being played (display shows “ON”) or repeats all tracks stored on the storage device (display shows
“AL”).
LED display Function
ON Repeats the current track.
AL Repeats all tracks.
CAUTION! The USB port (4) must not be used to charge external devices.
9.3.5 “AUX” mode
Use this mode to connect a playback device with a Cinch output, e.g. a DVD player or satellite receiver. Use the adapter cable provided (E).
•Connect the Cinch output from your playback device to the AUX jack (11) on the sound bar.
•Switch the sound bar on using the standby button (2, 35).
•Press the “AUX” button (34) on the remote control to select this mode.
•
You can use the volume buttons (29, 31) to adjust the volume to your requirements.
•
If you wish, you can change the audio settings using the relevant buttons on the remote control.
9.4 Volume and audio settings
Any changes to the volume and audio settings are shown on the LED display (1) for approx. 2 seconds. The display then reverts back to
the standard display for the relevant mode.
9.4.1 Adjusting the volume
You can adjust the volume during playback using the volume buttons (29, 31) on the remote control. Alternatively, you can use the volume buttons (3, 5) on the
sound bar. You can also hold the buttons down the change the setting more quickly. The volume selected is shown on the LED display (1) for approx. 2 seconds.
If you set the volume to the lowest level, “V 00” flashes continuously on the LED display (1).
9.4.2 Muting the sound
Press the button (12) to mute the sound temporarily.
9.4.3 Adjusting the treble and bass
You can adjust the treble to your requirements using the TREBLE+ (19) and TREBLE- (27) buttons.
To adjust the bass, press the BASS+ (20) and BASS- (26) buttons.
SSB 70 C3
English - 25
9.4.4 Selecting the audio settings
The sound bar has 4 pre-set audio settings. Press the relevant button (21, 22, 24, 25) to select the audio settings you want. The audio settings selected are shown
as follows on the LED display (1):
Audio settingLED display
MOVIECINE
3D 3d
DIALOG dIA
MUSICSONG
9.4.5 “MOVIE” audio settings
Select these audio settings to select the sound settings to play back e.g. films or documentaries.
9.4.6 “3D” audio settings
Select these audio settings to give the current playback a virtual 3D surround sound.
9.4.7 “DIALOG” audio settings
Select these audio settings to select the sound settings for voice playback. This setting is recommended for news programmes, among others.
9.4.8 “MUSIC” audio settings
This setting optimises the sound settings for music playback.
10.Cleaning
Switch the device off and unplug it from the mains. To clean it, use a soft, dry cloth. Never use any solvents or cleaners and never an abrasive sponge. Otherwise
the sound bar housing can be damaged.
10.1 Storage when not in use
If the sound bar is not to be used for an extended period, store it in a clean, dry and cool place. Also remove the batteries from the remote
control to prevent any leaking.
11.Troubleshooting
The sound bar does not power on.
•Check that the mains plug is correctly inserted into a mains socket. Connect it properly if not.
•Check whether the used power socket is alive. If necessary, test the device in a different socket that you are certain is working.
No sound
•Check that the correct mode has been selected. Select the correct mode.
•Check the playback volume on the sound bar and the connected playback device.
•In HDMI ARC and OPTICAL mode: If your audio source supports multi-channel playback, you need to switch it to “PCM Stereo” before getting started, as
the sound bar will otherwise be unable to output sound. Please refer to the user manual for your audio source.
•In “HDMI ARC” mode: Check that the HDMI(ARC) cable (C) is correctly inserted into the HDMI ARC jack (9) on the sound bar and the corresponding HDMI
ARC connection on the external sound source, e.g. TV set. On a “normal” HDMI connection, the TV set can only receive video and audio signals, but not
transmit them.
•In “AUX IN" mode: Check that the adapter cable (E) is correctly inserted into the AUX IN jack (11) on the sound bar and the Cinch output on the external
playback device. Also check the volume setting of the external playback device connected via the adapter cable (E).
•In “Optical” mode: Check that the Toslink cable (D) is correctly inserted into the optical digital input (10) of the sound bar and the corresponding jack on the
external playback device.
•In “USB” mode: Check that your USB playback device is formatted with theFAT32 file system and correctly connected and that there are suitable playback
files on it. Suitable file formats: MP3 and WAV.
Cannot control the sound bar with the remote control
•The remote control batteries are low or empty. Replace them with new batteries of the same type.
•The distance between the sound bar and the remote control is too great. Move them closer together.
Playback via Bluetooth® does not work
•On your smartphone / tablet, check if there is a Bluetooth® connection established to the SSB 70 C3 sound bar. If necessary, repeat the pairing.
SSB 70 C3
26 - English
12.Environmental regulations and disposal information
Devices marked with this symbol are subject to the European Directive 2012/19/EU. All electrical and electronic devices must be disposed of
separately from household waste at official disposal centres. Avoid damage to the environment and risks to your personal health by disposing of
the device properly. For further information about proper disposal, contact your local council, disposal bodies or the shop where you bought the
device.
Respect the environment. Old batteries must not be disposed of with domestic waste. They must be handed in at a collection point for waste
batteries. Please note that batteries must be disposed of fully discharged at appropriate collection points for old batteries. If disposing of batteries
which are not fully discharged, take precautions to prevent short circuits.
Dispose of all packaging in an environmentally friendly manner. Cardboard packaging can be taken to paper recycling centres or public collection
points for recycling. Any film or plastic contained in the packaging should be taken to your public collection points for disposal.
Please note the markings on the packaging material when disposing of it, it is labelled with abbreviations (a) and numbers (b), the meanings of
which are as follows:
1–7: plastic / 20–22: paper and cardboard / 80-98: composite materials.
13.Conformity
This device has been approved for compliance with the basic and other relevant requirements of the RE Directive 2014/53/EU, the ErP Directive
2009/125/EG and the RoHS Directive 2011/65/EU.
The complete EU Declaration of Conformity is available for download from this link:
This device is sold with three years warranty from the date of purchase. In the event of product defects, you have legal rights towards the seller. These statutory
rights are not restricted by our warranty as described below.
Warranty conditions
The warranty period commences upon the date of purchase. Please keep the original receipt in a safe place as it is required as proof of purchase. If any material
or manufacturing faults occur within three years of purchase of this product, we will repair or replace the product free of charge as we deem appropriate.
Warranty period and legal warranty rights
The warranty period is not extended in the event of a warranty claim. This also applies to replaced and repaired parts. Any damage or defects discovered upon
purchase must be reported immediately when the product has been unpacked. Any repairs required after the warranty period will be subject to charge.
Scope of warranty
The device was carefully manufactured in compliance with stringent quality guidelines and subjected to thorough testing before it left the works. The warranty
applies to material and manufacturing faults. This warranty does not cover product components which are subject to normal wear and which can therefore be
regarded as wearing parts, or damage to fragile components such as switches, rechargeable batteries or components made of glass. This warranty is void if the
product is damaged, incorrectly used or serviced. To ensure correct use of the product, always comply fully with all instructions contained in the user manual. The
warnings and recommendations in the user manual regarding correct and incorrect use and handling of the product must always be observed and complied with.
The product is solely designed for private use and is not suitable for commercial applications. The warranty is rendered void in the event of incorrect handling and
misuse, if it is subjected to force, and also if any person other than our authorised service technicians interfere with the device. No new warranty period commences
if the product is repaired or replaced.
Submitting warranty claims
To ensure speedy handling of your complaint, please note the following:
-Before using your product for the first time, please read the enclosed documentation carefully. Should any problems arise which cannot be solved in this
way, please call our hotline.
-Always have your receipt, the product article number as well as the serial number (if available) to hand as proof of purchase.
-If it is not possible to solve the problem on the phone, our hotline support staff will initiate further servicing procedures depending on the fault.
Service
Phone: 0800 404 7657
E-Mail: targa@lidl.co.uk
Phone: 1890 930 034
E-Mail: targa@lidl.ie
Phone: 800 62230
E-Mail: targa@lidl.com.mt
Phone: 8009 4409
E-Mail: targa@lidl.com.cy
IAN: 315507
Manufacturer
Please note that the following address is not a service address. First contact the service point stated above.
8.1.1 Fixation murale (Figure C) ...................................................................................................................................... 33
8.2 Installation des piles dans la télécommande .............................................................................................................. 34
8.3 Options de connexion / Mode de fonctionnement ................................................................................................... 34
8.4. Informations affichées à l’écran .................................................................................................................................. 34
9. Mise en route ..................................................................................................................... 35
9.1 Allumage de la barre de son ....................................................................................................................................... 35
9.2 Extinction de la barre de son ....................................................................................................................................... 35
9.3 Sélection d’un mode ..................................................................................................................................................... 35
9.3.3 Mode « BLUETOOTH » .......................................................................................................................................... 36
9.3.4 Mode « USB » ......................................................................................................................................................... 36
9.3.5 Mode « AUX » ........................................................................................................................................................ 37
9.4 Volume et réglages audio ............................................................................................................................................ 37
9.4.1 Réglage du volume ................................................................................................................................................. 37
9.4.2 Coupure du son ...................................................................................................................................................... 37
9.4.3 Réglage des aigus et des graves ........................................................................................................................... 37
9.4.4 Sélection des réglages audio ................................................................................................................................ 38
10.1 Stockage en cas de non-utilisation ............................................................................................................................ 38
11. Résolution des problèmes ................................................................................................. 39
12. Réglementation environnementale et informations sur la mise au rebut ............................ 39
14. Informations relatives à la garantie et à l'assistance ......................................................... 40
SSB 70 C3
Français - 29
Félicitations !
En achetant cette barre de son SilverCrest, vous avez choisi un produit de qualité.
Avant de l’utiliser, veuillez vous familiariser avec le fonctionnement de la barre de son et lire ce manuel d’utilisation avec la plus grande attention. Veillez à respecter
les consignes de sécurité et n’utilisez la barre de son que de la manière décrite dans le manuel d’utilisation et pour les usages indiqués.
Conservez ce manuel d'utilisation dans un endroit sûr. Si vous cédez la barre de son à quelqu’un d’autre, veillez à lui remettre également tous les documents qui
s’y rapportent.
Cette barre de son est conforme à toutes les normes et directives répertoriées dans la Déclaration de Conformité UE. Le fabricant ne pourra pas être tenu
responsable de tout dommage ou problème résultant de modifications non autorisées de l'appareil. Utilisez uniquement les accessoires recommandés par le
fabricant. Veuillez respecter les réglementations et législations en vigueur dans le pays d’utilisation.
1.Marques commerciales
Le mot Bluetooth® et le logo correspondant sont des marques déposées de Bluetooth SIG, Inc. (Special Interest Group). TARGA GmbH utilise ces marques sous
licence.
La marque commerciale SilverCrest et la marque SilverCrest appartiennent à leurs propriétaires respectifs.
Le mot HDMI® est une marque déposée de HDMI Licensing LLC.
USB est une marque déposée.
Les autres noms et produits peuvent être les marques commerciales ou les marques déposées de leurs propriétaires respectifs.
2.Utilisation prévue
La barre de son avec Bluetooth® SilverCrest SSB 70 C3 est un appareil technologies de l'information utilisé pour diffuser le son d’appareils audio. La barre de
son est destinée à un usage exclusivement privé, et en aucun cas à un usage industriel ou commercial. L'appareil doit être utilisé en intérieur et dans des
climats tempérés.
3.Contenu de l'emballage
Sortez l’appareil et tous les accessoires de l’emballage. Retirez les matériaux d’emballage et vérifiez que tous les composants sont complets et intacts. Si un ou
plusieurs composants manquent ou sont endommagés, veuillez contacter le fabricant.
A Barre de son SilverCrest SSB 70 C3
B Télécommande
C Câble HDMI (ARC)
D Câble optique (Toslink)
E Câble adaptateur jack 3,5 mm vers Cinch
F 2 piles de type AAA/LR03, 1,5 V
G 2 vis (pour fixation murale)
H 2 chevilles (pour fixation murale)
I Ce mode d’emploi (représenté par un dessin)
J Guide de mise en route rapide (représenté par un dessin)
Brochure HDMI ARC (non illustrée)
Gabarit de perçage (non illustré)
SSB 70 C3
30 - Français
4.Spécifications techniques
SSB 70 C3
Tension d’entrée/fréquence 110 – 240 V , 50/60 Hz
Consommation d’électricité en marche/veille 80 W maxi/< 0,5 W
Haut
-
parleu
r
2 x 17 W RMS plus 1 x 35 W RMS (caisson de graves)
Format audio aux entrées Stéréo PCM
Prise AUX IN (entrée AUX) Jack de 3,5 mm
Entrée numérique (SPDIF) Optique (Toslink)
Câble HDMI (ARC) Prise HDMI ARC
Entrée USB
Courant de sortie
Système de fichiers
Formats audio pris en charge
Port USB, type A
500 mA maxi
FAT 32, exFAT
MP3, WAV
Spécification Bluetooth® : V 5.0
Profils pris en charge : A2DP, AVRCP
Puissance d’émission Bluetooth® : 10 dBm maxi
Bande de fréquence Bluetooth® : 2402 - 2480 GHz
Portée Bluetooth® : environ 10 m
Alimentation de la télécommande 2 piles de type AAA/LR03, 1,5 V
Dimensions (L x P x H) environ 90,2 x 8,2 x 7,0 cm
Poids sans accessoires environ 1980 g
Température de fonctionnement 0°C à 35°C
Humidité de fonctionnement 85 % d'humidité relative
Conditions de stockage autorisées 0°C à 40°C, 85 % d’humidité relative maximum
Les informations techniques et le design peuvent faire l’objet de modifications sans préavis.
5.Instructions de sécurité
Avant d’utiliser cet appareil pour la première fois, veuillez lire attentivement les remarques ci-dessous et tenir compte de tous les avertissements, même si vous avez
l’habitude de manipuler des appareils électroniques. Conservez ce manuel d’utilisation en lieu sûr afin de pouvoir vous y reporter ultérieurement. Si vous vendez
ou cédez cet appareil à une tierce personne, veillez à lui remettre également le manuel d'utilisation. Le mode d’emploi fait partie intégrante du produit.
Explication des symboles utilisés
DANGER ! Cette icône et le mot « DANGER » vous informent de la présence d’une situation potentiellement dangereuse. Si vous n'en
tenez pas compte, vous vous exposez à des blessures graves, voire mortelles.
AVERTISSEMENT ! Ce symbole et le mot « AVERTISSEMENT » signalent des informations importantes à respecter pour garantir une
utilisation sans risque de ce produit et la sécurité de l’utilisateur.
ATTENTION ! Ce symbole et le mot « Attention » indiquent des instructions importantes à respecter pour éviter les dommages matériels.
Ce symbole signale la présence d'informations supplémentaires sur le sujet.
Veuillez lire le manuel d’utilisation !
Courant continu
Courant alternatif
Classe de sécurité II, isolation protectrice
SSB 70 C3
Français - 31
AVERTISSEMENT ! Veillez à toujours prendre les précautions suivantes :
•Évitez d’éclabousser l’appareil avec de l’eau ou des liquides corrosifs. N’utilisez pas l’appareil à proximité de l’eau et, en particulier, ne le
plongez jamais dans un liquide. En outre, ne placez pas d’objets remplis de liquide, comme des vases ou des boissons, sur ou à proximité de
l’appareil.
•Ne placez pas de sources incandescentes (bougies, etc.) sur l'appareil ou à proximité.
•Ne laissez aucun corps étranger pénétrer à l’intérieur de l’appareil.
•Évitez d’exposer l’appareil à des fluctuations extrêmes de température qui risqueraient de créer de la condensation, et par voie de
conséquence, de l’humidité et des courts-circuits. Si l’appareil a tout de même été exposé à des variations extrêmes de température, attendez
avant de le rallumer (environ 2 heures), qu’il soit revenu à la température ambiante.
•Ne couvrez pas l'appareil. De la chaleur peut s'accumuler si l'appareil est couvert, avec pour conséquence un risque d'incendie.
•N’ouvrez pas le boîtier. Cela pourrait provoquer un choc électrique.
•Ne touchez pas la fiche d’alimentation avec les mains mouillées. Cela pourrait provoquer un choc électrique.
•La prise de courant utilisée doit toujours être facilement accessible, car la fiche secteur sert de dispositif de déconnexion.
•Débranchez la fiche d’alimentation de la prise de courant en cas d’orage. Dans le cas contraire, cela pourrait entraîner un incendie ou des
dommages matériels.
Le non-respect des avertissements ci-dessus peut être à l’origine de blessures.
ATTENTION ! Veillez à toujours prendre les précautions suivantes :
•L'appareil ne doit pas être exposé à une source de chaleur directe (ex : radiateurs).
•N'exposez pas l'appareil à la lumière directe du soleil ou à une lumière artificielle trop intense.
•Installez l’appareil à une distance d’au moins 1 m des sources de fréquences radio et de champs magnétiques (ex : enceintes, téléphones
portables, etc.) afin d’éviter tout dysfonctionnement. En cas de dysfonctionnement, installez l'appareil à un autre endroit.
•Évitez les vibrations ou les chocs excessifs.
•N’utilisez pas le port USB (4) pour recharger des appareils externes.
Le non-respect des avertissements ci-dessus pourrait être à l’origine de dommages pour l’appareil.
DANGER !Piles
Insérez les piles en respectant la polarité indiquée à l'intérieur du compartiment. N’essayez pas de recharger les piles et ne les jetez jamais au feu. Ne mélangez
pas différents types de piles (neuves et usées, alcalines et carbone, etc.). Retirez-les de l'appareil si vous ne comptez pas l'utiliser pendant une longue période.
Toute utilisation incorrecte présente un risque d'explosion et de fuite. Les piles ne sont pas des jouets ! En cas d'ingestion accidentelle, consultez rapidement un
médecin. Les piles ne doivent jamais être ouvertes ni déformées, car les produits chimiques qu'elles contiennent pourraient couler et occasionner des blessures. Si
le fluide de la pile entre en contact avec votre peau ou vos yeux, rincez-les abondamment à l'eau fraiche immédiatement et consultez un médecin.
DANGER !Sécurité des personnes
Les appareils électriques doivent être tenus hors de portée des enfants. Les personnes souffrant de handicaps physiques, sensoriels ou mentaux ne peuvent utiliser
les appareils électriques que dans la limite de leurs capacités. Ne laissez jamais les enfants ou les personnes dont les capacités physiques, sensorielles ou mentales
sont réduites utiliser les appareils électriques sans surveillance, à moins qu’ils aient reçu les instructions nécessaires et qu’ils soient supervisés par une personne
compétente veillant à leur sécurité. Vous devez veiller à ce que les enfants soient constamment surveillés afin qu’ils ne jouent pas avec l’appareil. Les petites pièces
impliquent un risque d'étouffement. Maintenez l'emballage hors de portée de ces personnes.L'emballage n’est pas un jouet.
Elles pourraient s'étouffer.
AVERTISSEMENT ! Câbles
Pour débrancher les câbles, tirez toujours sur leur fiche et non sur les câbles eux-mêmes. Ne placez pas de meubles ou d’autres objets lourds sur les câbles et
veillez à ce que les câbles ne soient pas endommagés, notamment au niveau des prises et des connecteurs. N’installez jamais les câbles autour d'un objet chaud
ou tranchant afin d’éviter de l’endommager. Ne faites jamais de nœuds avec les câbles et ne les raccordez à aucun autre câble. Tous les câbles doivent être
placés de façon à ne pas gêner le passage et à ce que l'on ne risque pas de trébucher dessus.
SSB 70 C3
32 - Français
DANGER !Interface RF (radiofréquence)
Éteignez l’appareil à bord des avions, dans les hôpitaux, les salles d’opération ou à proximité d’instruments médicaux électroniques. Les signaux de radiofréquence
peuvent nuire au bon fonctionnement des appareils les plus sensibles. Maintenez l’appareil à 20 cm au moins des stimulateurs cardiaques (pacemakers) afin
d’éviter que les signaux de radiofréquence ne fassent interférence et n’altèrent leur bon fonctionnement. Les signaux de radiofréquence émis peuvent produire des
interférences avec les prothèses auditives. Si le mode sans fil est activé, ne placez pas l'appareil à proximité de gaz inflammables ou dans des zones propices aux
explosions (ateliers de peinture, etc.), car les signaux de radiofréquence émis pourraient être à l’origine d’une explosion ou d’un incendie. La portée des signaux
de radiofréquence dépend de l’environnement ambiant. Lors de la transmission de données par le biais d’une connexion sans fil, les données peuvent également
être reçues par des individus non autorisés. Targa GmbH ne peut être tenu pour responsable des interférences pouvant affecter les signaux de radiofréquence ou
les signaux du téléviseur suite à une modification non autorisée de cet appareil. Par ailleurs, Targa n'est pas tenu de remplacer les câbles ou périphériques n'ayant
pas été spécifiquement approuvés par Targa GmbH. En cas d’interférences dues à la modification non autorisée de cet appareil, seul l’utilisateur sera responsable
d’y remédier ou de remplacer l’appareil.
Maintenance / réparation
L’appareil doit être réparé lorsqu’il a été endommagé, par exemple si le boîtier a été abîmé, si du liquide ou des objets ont pénétré à l’intérieur de l’appareil ou
s’il a été exposé à la pluie ou à l’humidité. Elle doit également être réparée en cas de dysfonctionnement ou de chute. En cas de fumée, odeur ou bruit inhabituel,
éteignez immédiatement l’appareil et débranchez le câble d’alimentation de la prise de courant. Si une telle situation se produit, cessez d’utiliser l’appareil jusqu’à
ce qu’il ait été inspecté par un service technique agréé. Toutes les réparations doivent exclusivement être réalisées par un personnel technique qualifié.
Conditions de fonctionnement
Cet appareil n’a pas été conçu pour être utilisé dans des environnements exposés à une humidité importante (salle de bains, par exemple) ou excessivement
poussiéreux. Température et humidité de fonctionnement : 0 °C à 35 °C, 85 % d’humidité relative maximum. Sachez que les produits d’entretien destinés aux
surfaces des meubles peuvent contenir des substances susceptibles d’endommager les pieds en caoutchouc de la barre de son. Soyez donc vigilant si vous utilisez
ce type de produit.
Remarque sur le débranchement
Souvenez-vous que l’adaptateur secteur intégré consomme un peu d’électricité lorsque la fiche d’alimentation est branchée sur la prise de courant, même en veille.
Pour déconnecter complètement l’appareil, débranchez la fiche d’alimentation de la prise de courant.
6.Droits d’auteur
L’ensemble du présent manuel d’utilisation est protégé par copyright et est fourni au lecteur uniquement à titre d’information. La copie des données et des
informations, sans l’autorisation écrite et explicite préalable de l’auteur, est strictement interdite. Cela s’applique également à toute utilisation commerciale du
contenu et des informations. Tous les textes et les illustrations sont à jour à la date d’impression. Ils peuvent faire l’objet de modifications sans préavis.
7.Connexions et commandes
Vous trouverez une illustration des éléments et commandes accompagnés de leurs numéros respectifs sur la page intérieure de la couverture dépliante de ce
manuel d’utilisation. Vous pouvez garder cette page dépliée pendant la lecture des différents chapitres de ce mode d’emploi. Cela vous permettra de vous référer
à tout moment aux différents éléments.
1 Affichage à LED
2 Touche à double fonction : 1. Marche-veille 2. Source
3 Touche + (augmentation du volume)
4 Port USB (ne doit pas être utilisé pour recharger des appareils)
5 Touche - (réduction du volume)
6 Pieds de l’appareil
7 Orifices de montage au mur
8 Cordon d’alimentation
9 Prise HDMI ARC
10 Entrée numérique optique (Toslink)
11 Fiche AUX-IN 3,5 mm
SSB 70 C3
Français - 33
7.1 Télécommande
Vous pouvez utiliser la télécommande fournie pour contrôler les fonctions de la barre de son. Veuillez consulter le tableau ci-dessous pour connaître les fonctions
des touches.
12 Coupure du son
13 HDMI (ARC) Commutation sur l’entrée HDMI ARC
14 OPTICAL Commutation sur l'entrée numérique optique SPDIF
15 Passage en mode Bluetooth®
16 Lecture / Pause
17 Piste suivante
18 STOP
19 TREBLE+ Amplification des aigus
20 BASS+ Augmentation des graves
21 MOVIE Activation de l'égaliseur pour les films
22 3D Activation de l’égaliseur avec simulation du son surround
23 Compartiment des piles (à l’arrière)
24 DIALOG Activation de l’égaliseur pour la voix
25 MUSIC Activation de l'égaliseur pour la musique
26 BASS- Diminution des graves
27 TREBLE- Atténuation des aigus
28 Répéter
29 VOL- Réduction du volume
30 Titre précédent
31 VOL+ Augmentation du volume
32 Activation/désactivation de l’affichage
33 USB Commutation sur l’entrée USB
34 AUX Commutation sur l'entrée AUX
35 Marche / veille
8.Avant de commencer
Retirez la barre de son et tous les accessoires de l'emballage et retirez les films en plastique. Vérifiez que vous avez bien reçu tous les éléments mentionnés.
8.1 Positionnement
L’endroit idéal où installer votre barre de son se situe en position centrale sous votre téléviseur. Vous pouvez placer la barre de son sur un meuble ou la fixer au
mur.
8.1.1 Fixation murale (Figure C)
Veillez à utiliser le matériel de fixation murale adéquat.
Outils/matériel de montage nécessaires (non inclus dans l’emballage) :
•Perceuse (en fonction du mur)
•2 vis et éventuellement 2 chevilles (en fonction du mur) pour la fixation au mur. Sachez que les vis doivent être adaptées au poids de la barre de son. Si les
vis et les chevilles fournies ne sont pas adaptées à votre situation, assurez-vous que les dimensions de la tête et de la tige des vis utilisées correspondent à
celles des vis fournies afin de garantir un montage sans danger.
•Tournevis cruciforme et éventuellement d’autres tournevis, niveau à bulle, crayon
Avant de percer, assurez-vous qu’il n’y a pas de tuyaux d’eau ou de gaz ou de câbles électriques qui passent dans le mur. Si nécessaire, confiez le montage de
l’appareil au mur à un expert.
•Percez deux trous espacés de 739 mm. Utilisez le gabarit de perçage fourni pour simplifier le montage.
•Si vous utilisez les chevilles fournies, utilisez une mèche de 8 mm pour percer les trous.
•Insérez les chevilles dans les trous percés.
•Serrez les vis jusqu’à ce que leur tête dépasse d’environ 3 mm.
•Branchez tous les câbles que vous utilisez aux connecteurs situés sur la barre de son.
•Positionnez l’appareil en faisant passer les vis dans les orifices de fixation murale de telle sorte qu’elles s’engagent dans les supports verticaux du système de
fixation, puis serrez les vis afin de fixer l’appareil.
•Enfin, vérifiez que la barre de son est solidement fixée au niveau des deux vis. Si nécessaire, répétez l'opération. Il peut s'avérer nécessaire de tourner
légèrement les vis dans le sens des aiguilles d'une montre ou dans le sens inverse.
SSB 70 C3
34 - Français
8.2 Installation des piles dans la télécommande
Ouvrez le compartiment des piles (23) situé à l’arrière de la télécommande en faisant glisser le cache dans la direction indiquée pour le retirer. Insérez les piles
(2 piles de type AAA) en respectant la polarité (+ et -). La polarité est indiquée sur les piles ainsi qu’à l’intérieur du compartiment des piles (23). Remettez le cache
du compartiment des piles (23) en place en le faisant coulisser dans le sens inverse de la flèche jusqu'à ce qu’il soit bien enclenché. Veuillez également consulter
la Figure B de la page de couverture dépliante.
8.3 Options de connexion / Mode de fonctionnement
ATTENTION ! Assurez-vous que la barre de son et les appareils à connecter sont éteints avant de les connecter. Veuillez également lire le
manuel d’utilisation de l’appareil à connecter.
La connexion HDMI (ARC) ne fonctionne que si tous les composants connectés sont compatibles avec la technologie ARC. Utilisez le
câble HDMI (ARC) (C) fourni. Consultez également le manuel d’utilisation de l’appareil connecté.
Le câble utilisé pour raccorder le périphérique de lecture ne doit pas dépasser 3 mètres de long.
La barre de son SSB 70 C3 permet de lire du son et/ou de la musique provenant de différentes sources :
La lecture peut être contrôlée en utilisant les touches se trouvant sur l’appareil ou sur la télécommande.
Vous pouvez utiliser la touche Source (2) ou la télécommande pour sélectionner le mode de fonctionnement de votre choix. Le tableau ci-dessous répertorie les
modes de fonctionnement et les informations correspondantes qui apparaissent à l’écran :
Mode de
fonctionnement /
Source
Entrée Utilisation Touche sur la
télécommande
Affichage
HDMI ARC HDMI(ARC) (9) Connexion par câble HDMI (ARC) à la prise HDMI (ARC), ex : télé
ou lecteur DVD
HDMI(ARC) (13)Hd
OPTIQUEOPTICAL (10)Connexion par câble Toslink, ex : télé ou récepteur numérique OPTICAL (14)OPtI
BLUETOOTH®----- Connexion sans fil, ex : smartphone Touche (15)bt
USBUSB(4)Connexion de support USB, ex : clé USB pour la lecture de fichiers
audio (format audio pris en charge : MP3 et WAV
USB (33)USB
AUXUSB (11)Connexion par câble adaptateur (jack stéréo/Cinch), ex : lecteur
DVD ou récepteur satellite
AUX (34)AUX
8.4. Informations affichées à l’écran
À chaque fois qu’un réglage est modifié sur la barre de son, l’affichage à LED (1) s’allume à la luminosité maximale pendant environ 8 secondes avant de revenir
au niveau de luminosité inférieur.
Paramètre Affichage à LED
« Veille » - -
Mode « HDMI(ARC) » Hd
Mode « BLUETOOTH® » bt
Mode « OPTIQUE » OPtI
Mode « USB » USB
Mode « AUX » AUX
Réglages audio « CINÉMA » CINE
Réglages audio « DIALOGUES » dIA
Réglages audio « MUSIQUE » SONG
Réglages audio « 3D » 3d
« VOL- » / « VOL+ » V 00 à V 40
« AIGUS » t -5 à t 5
« GRAVES » b -5 à b 5
Pour la lecture USBDurée écoulée de la piste au format mm:ss
« ON » ou « AL »
Appuyez sur la touche (32) pour éteindre l’affichage à LED (1). Si l’on appuie de nouveau sur la touche(32)ou sur n’importe quelle autre touche,
l’affichage à LED (1) se rallume.
SSB 70 C3
Français - 35
9.Mise en route
Ce manuel d’utilisation décrit généralement l’utilisation de la télécommande.
Certaines fonctions de base (marche/veille, sélection de la source et réglage du volume) peuvent également être ajustées directement sur
la barre de son.
La barre de son passe en mode veille au bout d’environ 10 minutes si ...
... aucune connexion Bluetooth n’est établie.
... aucun signal audio n’est reçu, seul un signal audio très faible est reçu ou si l’on n’appuie sur aucune touche.
Dans les modes HDMI(ARC) et OPTIQUE, veuillez remarquer ce qui suit :
Si votre source audio prend en charge la lecture multicanal, vous devez d’abord la régler sur « PCM Stéréo » avant de commencer, car la
barre de son ne pourra autrement pas générer de son. Veuillez consulter le manuel d’utilisation de votre source audio.
9.1 Allumage de la barre de son
Branchez la fiche d’alimentation de la barre de son sur une prise de courant facile d’accès. La barre de son ne possède pas d’interrupteur d’alimentation séparé,
elle passe directement en mode veille dès qu’elle est branchée. L’affichage à LED (1) affiche « - - ». Appuyez sur la touche Veille (2, 35) pour faire sortir la
barre de son du mode veille.
9.2 Extinction de la barre de son
Appuyez sur la touche Veille (35) pour remettre la barre de son en mode veille. Alternativement, vous pouvez appuyer sur la touche Veille (2) située sur
la barre de son pendant environ 1 seconde. La barre de son ne possède pas d’interrupteur d’alimentation séparé. Souvenez-vous que l’adaptateur secteur
consomme un peu d’électricité lorsque la fiche d’alimentation est branchée sur la prise de courant, même en veille. Pour déconnecter complètement l’appareil,
débranchez la fiche d’alimentation de la prise de courant.
9.3 Sélection d’un mode
Appuyez sur la touche correspondante (13, 14, 15, 33, 34) pour sélectionner le mode de votre choix. Alternativement, vous pouvez passer d’un mode à l’autre
en appuyant brièvement sur la touche (2) de la barre de son plusieurs fois de suite. Le mode sélectionné est affiché comme suit sur l’affichage à LED (1) :
ModeAffichage
HDMI ARC Hd
OPTIQUEOPtI
BLUETOOTH®bt
USBUSB
AUXAUX
Lancez désormais la lecture sur l’appareil connecté et contrôlez-la en utilisant la télécommande. Consultez le manuel d’utilisation du périphérique de lecture.
9.3.1 Mode « HDMI ARC »
HDMI (ARC Audio Return Channel) est une extension de la connexion HDMI traditionnelle qui permet aux signaux audio ARC d’être transmis
dans les deux sens. Pour utiliser cette fonctionnalité, tous les composants utilisés doivent être compatibles avec la technologie ARC.
La plupart des téléviseurs, consoles de jeu et récepteurs numériques modernes possèdent une sortie ARC. Veuillez consulter le manuel
d’utilisation de l’appareil à connecter.
Si la transmission audio ne fonctionne pas, assurez-vous que le câble HDMI et le connecteur de l’appareil source sont compatibles avec la
technologie ARC. Il est possible que seuls certains connecteurs spécifiques de l’appareil source soient compatibles ARC.
Voici comment connecter la barre de son à un téléviseur :
•À l’aide d’un câble compatible HDMI(ARC) (câble C fourni), connectez la prise HDMI(ARC) (9) de la barre de son à une sortie HDMI(ARC) du téléviseur.
Réglez l’appareil connecté sur « PCM Stéréo » ou « Stéréo 2.0 ».
•Allumez la barre de son à l’aide de la touche Veille (2, 35).
•Appuyez sur la touche « HDMI (ARC) » (13) pour sélectionner l’entrée HDMI(ARC) sur la barre de son.
•Allumez le téléviseur, la lecture du son commencera au bout de quelques secondes.
Si votre téléviseur prend en charge le protocole CEC, la barre de son peut être allumée et éteinte en utilisant la télécommande de ce dernier.
Si c’est le cas, le volume peut également être réglé par le biais de la télécommande du téléviseur. Consultez le manuel d’utilisation du téléviseur.
9.3.2 Mode « OPTIQUE »
Utilisez ce mode de fonctionnement pour lire sur votre barre de son (A) de la musique provenant de l’entrée numérique optique (10) par exemple, un téléviseur.
Le téléviseur doit être équipé d'une sortie numérique optique. Utilisez le câble optique fourni (câble Toslink) pour effectuer la connexion. Procédez comme suit :
•Connectez le câble Toslink (D) à la sortie numérique optique de votre téléviseur.
•Connectez ensuite le câble Toslink (D) à l’entrée numérique optique (10) de votre barre de son.
SSB 70 C3
36 - Français
•Allumez le téléviseur et la barre de son. Réglez le téléviseur connecté sur « PCM Stéréo » ou « Stéréo 2.0 ».
•Lancez la lecture sur le téléviseur.
•Appuyez sur la touche « OPTICAL » (14) de la télécommande pour sélectionner ce mode.
•Vous pouvez utiliser les touches de volume (29, 31) pour ajuster le volume en fonction de vos besoins.
•
Si vous le souhaitez, vous pouvez modifier les paramètres audio en utilisant les touches correspondantes de la télécommande.
Consultez le manuel d’utilisation du téléviseur.
9.3.3 Mode « BLUETOOTH »
Le nom de périphérique Bluetooth de la barre de son estSSB 70 C3.
Si vousêtes invitéà saisir un codePIN lorsde la procédure d’association, tapez « 0000 ».
Il peut falloir un certain temps avant quela connexion soit établie, selon l’appareil.
Établissement d'une connexion
•
Appuyez sur la touche (15) pour passer au mode Bluetooth.
Après le passage en mode Bluetooth, la barre de son se connecte automatiquement aux appareils associés (les lettres « bt » apparaissent fixes
sur l’affichage à LED (1)) ou, si aucun appareil associé n’est trouvé, elle passe automatiquement au mode d’association Bluetooth (sur l’affichage
à LED (1), les lettres « bt » clignotent). Si la connexion avec un appareil associé est perdue, l’appareil s’éteint au bout d’environ 10 minutes.
•Si votre périphérique de lecturen’a pas encore étéassocié avec la barre de son, les lettres «bt» clignotent.
•Lancez le mode de recherche Bluetooth sur votre périphérique de lecture (ex :smartphone). Ildevrait alors trouver la barre deson sous le nom «SSB 70
C3 ».
•Établissez maintenant une connexion Bluetooth entre votre périphérique de lecture et labarre de son.
•Une foisla connexion établie, l’affichage àLED (1) affiche« bt» et unbip de confirmation retentit.
En général, vous ne devriez effectuer l’association qu’une seule fois car le périphérique de lecture enregistre le nom de la barre de son. Cela
signifie que vous n’avez pas besoin d’associer les appareils manuellement lorsque vous établissez à nouveau la connexion.
Si vous souhaitez désactiver une association Bluetooth existante ou passer en mode association, appuyez sur la touche (15)de la
télécommande et maintenez-le enfoncé pendant 1 seconde.
•Lancez maintenant la lecture de la musique depuis le périphérique source. Le son est diffusé par la barre de son.
•Vous pouvez utiliser les touches (16), (17)et(30)de la télécommande ou votre périphérique source pour contrôler la lecture.
•Vous pouvez utiliser les touches de volume (29, 31) pour ajuster le volume en fonction de vos besoins.
Déconnexion
L’association Bluetooth est désactivée si…
•... l’un des appareils est éteint. Un bip de confirmation retentit.
•... la fonction Bluetooth est désactivée. Un bip de confirmation retentit.
•... La barre de son et le périphérique source sont en-dehors de la portée du Bluetooth (env. 10 mètres).
9.3.4 Mode « USB »
L’ordre de lecture des pistes/dossiers est déterminé par l’ordre dans lequel ils ont été copiés sur la clé USB.
Dans ce mode, vous pouvez utiliser la barre de son pour lire des fichiers audio enregistrés sur un périphérique de stockage USB, par exemple une clé USB. Si
vous connectez un disque dur USB, sachez que l’intensité maximale sur la prise USB de la barre de son est de 500 mA. Veuillez également vous reporter au
Manuel d’utilisation du disque dur USB.
Si vous voulez utiliser un disque dur en guise de périphérique de lecture USB, utilisez un câble Y avec une alimentation électrique séparée pour le
brancher.
Sachez qu’il peut occasionnellement y avoir des problèmes de compatibilité entre le périphérique de stockage USB et la barre de son, c’est à dire
que seules certaines fonctionnalités limitées peuvent être disponibles ou que cela peut ne pas fonctionner du tout. Si cela se produit, essayez
d’utiliser un périphérique de stockage USB différent.
•Connectez le périphérique de stockage USB au port USB (4) de votre barre de son.
•Appuyez sur la touche « USB » (33) de la télécommande pour sélectionner ce mode.
SSB 70 C3
Français - 37
•Utilisez les touches (16), (18), (17)et(30)de la télécommande pour contrôler les pistes musicales.
•
Vous pouvez utiliser les touches de volume (29, 31) pour ajuster le volume en fonction de vos besoins.
•
Si vous le souhaitez, vous pouvez modifier les paramètres audio en utilisant les touches correspondantes de la télécommande.
Fonctions de contrôle disponibles en mode « USB » :
Action Fonction
Appuyez sur la touche (16). Pause / Reprise de la lecture de la piste en cours.
Appuyez sur la touche (16)si la lecture a précédemment
suspendue avec la touche (18).
Reprise de la lecture au début du dernier dossier lu.
Appuyez brièvement sur la touche (17).Passage à la piste suivante.
Appuyez sur la touche (17)et maintenez-la enfoncée.Passage à la 1ère piste du dossier suivant.
Appuyez brièvement sur la touche (30).Passage à la piste précédente.
Appuyez sur la touche (30)et maintenez-la enfoncée.Passage à la 1ère piste du dossier précédent.
Appuyez sur la touche (18). Suspension de la lecture. La lecture se poursuit avec la première piste du
dernier dossier qui était lu lorsque l’on a appuyé sur la touche (16).
Appuyez rapidement deux fois de suite sur la touche (18). Passage à la 1ère piste du 1er dossier.
Lorsque l’on appuie sur la touche (28), la piste en cours de lecture est répétée (l’affichage indique « ON ») ou toutes les pistes stockées sur le périphérique
sont répétées (l’affichage indique « AL »).
Affichage à LED Fonction
ON Répétition de la piste en cours.
AL Répétition de toutes les pistes.
ATTENTION ! Le port USB (4) ne doit pas être utilisé pour recharger des appareils externes.
9.3.5 Mode « AUX »
Utilisez ce mode pour connecter un périphérique de lecture disposant d’une sortie Cinch, par exemple un lecteur DVD ou un récepteur satellite. Utilisez le câble
adaptateur (E) fourni.
•Connectez la sortie Cinch de votre périphérique de lecture à la prise AUX (11) de la barre de son.
•Allumez la barre de son à l’aide de la touche Veille (2, 35).
•Appuyez sur la touche « AUX » (34) de la télécommande pour sélectionner ce mode.
•
Vous pouvez utiliser les touches de volume (29, 31) pour ajuster le volume en fonction de vos besoins.
•
Si vous le souhaitez, vous pouvez modifier les paramètres audio en utilisant les touches correspondantes de la télécommande.
9.4 Volume et réglages audio
Toutes les modifications du volume et des réglages audio apparaissent sur l’affichage à LED (1) pendant environ 2 secondes. L’affichage
revient ensuite à l’affichage standard du mode correspondant.
9.4.1 Réglage du volume
Vous pouvez ajuster le volume pendant la lecture en utilisant les touches de volume (29, 31) de la télécommande. Alternativement, vous pouvez utiliser les touches
de volume (3, 5) de la barre de son. Vous pouvez également maintenir ces touches enfoncées pour changer le réglage plus rapidement. Le volume sélectionné
apparaît sur l’affichage à LED (1) pendant environ 2 secondes. Si vous réglez le volume au niveau le plus bas, « V 00 » clignote sur l’affichage à LED (1).
9.4.2 Coupure du son
Appuyez sur la touche (12)pour couper le son temporairement.
9.4.3 Réglage des aigus et des graves
Vous pouvez régler les aigus en fonction de vos besoins en utilisant les touches TREBLE+ (19) et TREBLE- (27).
Pour régler les graves, appuyez sur les touches BASS+ (20) et BASS- (26).
SSB 70 C3
38 - Français
9.4.4 Sélection des réglages audio
La barre de son présente 4 réglages audio prédéfinis. Appuyez sur la touche correspondante (21, 22, 24, 25) pour sélectionner les réglages audio de votre
choix. Les réglages audio sélectionnés apparaissent comme suit sur l’affichage à LED (1) :
Réglage audioAffichage à LED
CINÉMACINE
3D 3d
DIALOGUES dIA
MUSIQUESONG
9.4.5 Réglages audio « CINÉMA »
Sélectionnez ces réglages audio pour utiliser les paramètres audio adaptés pour les films ou les documentaires, par exemple.
9.4.6 Réglages audio « 3D »
Sélectionnez ces réglages audio pour donner à la lecture en cours un son surround 3D virtuel.
9.4.7 Réglages audio « DIALOGUES »
Sélectionnez ces réglages audio pour utiliser les paramètres audio adaptés à la voix. Ce réglage est recommandé, entre autres, pour les émissions d’actualités.
9.4.8 Réglages audio « MUSIQUE »
Ce réglage optimise les paramètres audio pour la lecture de musique.
10.Nettoyage
Éteignez l’appareil et débranchez-le de la prise de courant. Pour le nettoyer, utilisez un chiffon doux et sec. N’utilisez jamais de solvants ou de détergents ni
d'éponge abrasive. Vous risqueriez d’endommager le boîtier de la barre de son.
10.1 Stockage en cas de non-utilisation
Si la barre de son ne va pas être utilisée pendant une période prolongée, rangez-la dans un endroit propre, sec et frais. Retirez également la
pile de la télécommande pour éviter les fuites.
SSB 70 C3
Français - 39
11.Résolution des problèmes
La barre de son ne s'allume pas
•Vérifiez que la fiche d’alimentation est correctement insérée dans une prise de courant. Si ce n'est pas le cas, branchez-le correctement.
•Vérifiez que la prise de courant utilisée est bien alimentée. Si nécessaire, testez l’appareil sur une autre prise de courant dont vous êtes sûr qu’elle fonctionne
correctement.
Pas de son
•Vérifiez que le bon mode a été sélectionné. Sélectionnez le bon mode.
•Vérifiez le volume de lecture sur la barre de son et le périphérique de lecture.
•Dans les modes HDMIARC et OPTIQUE : si votre source audio prend en charge la lecture multicanal, vous devez d’abord la régler sur « PCM Stéréo »
avant de commencer, car la barre de son ne pourra autrement pas générer de son. Veuillez consulter le manuel d’utilisation de votre source audio.
•En mode « HDMI ARC » : Vérifiez que le câble HDMI(ARC) (C) est correctement branché sur la prise HDMI ARC (9) de la barre de son et la connexion
correspondante sur la source audio extérieure, par exemple le téléviseur. Sur une connexion « HDMI » normale, le téléviseur peut uniquement recevoir des
signaux vidéo et audio mais ne peut pas les transmettre.
•En mode « AUX » : vérifiez que le câble adaptateur (E) est correctement branché sur la prise AUX (11) de la barre de son et la sortie Cinch du périphérique
de lecture externe. Vérifiez également le réglage du volume du périphérique de lecture externe connecté par le biais du câble adaptateur (E).
•En mode « Optique » : vérifiez que le câble Toslink (D) est correctement branché sur l’entrée numérique optique (10) de la barre de son et la prise
correspondante du périphérique de lecture externe.
•En mode « USB » : vérifiez que votre périphérique de lecture USB est formaté avec le système de fichiers FAT32, qu’il est correctement connecté et que des
fichiers de lecture adaptés sont enregistrés dessus. Formats des fichiers adaptés : MP3 et WAV.
Impossible de commander la barre de son avec la télécommande
•Les piles de la télécommande sont faibles ou mortes. Remplacez les piles par des piles neuves du même type.
•La distance qui sépare la barre de son de la télécommande est trop grande. Rapprochez-les l'un de l'autre.
La lecture en Bluetooth® ne fonctionne pas
•Sur votre smartphone / tablette, vérifiez qu’il y a une connexion Bluetooth® établie avec la barre de son SSB 70 C3. Si nécessaire, répétez l'association.
12.Réglementation environnementale et informations sur la mise au rebut
Les appareils portant ce symbole sont soumis à la directive européenne 2012/19/EU. Les appareils électriques ou électroniques usagés ne
doivent en aucun cas être jetés avec les déchets ménagers, mais déposés dans des centres de collecte officiels. Protégez l'environnement et
préservez votre santé en recyclant correctement les appareils usagés. Pour plus d'informations sur les normes de mise au rebut et de recyclage en
vigueur, contactez votre mairie, vos services locaux de gestion des déchets ou le magasin où vous avez acheté l'appareil.
Respectez l’environnement. Les piles/batteries usagées ne doivent pas être jetées avec les déchets ménagers mais déposées dans des points de
collecte spécialement habilités à cet effet. Sachez que les piles/batteries doivent être complètement déchargées avant d'être mises au rebut dans
des points de collecte appropriés pour les piles/batteries usagées. Si vous jetez des piles/batteries qui ne sont pas complètement déchargées,
veillez à prendre les précautions nécessaires afin d’éviter les courts-circuits.
Les matériaux d’emballage doivent être mis au rebut de manière respectueuse de l'environnement. Les cartons d’emballage peuvent être déposés
dans des centres de recyclage du papier ou dans des points de collecte publics destinés au recyclage. Tous les films ou plastiques contenus dans
l’emballage doivent être déposés dans des points de collecte publics.
Veuillez tenir compte des marquages présents sur le matériau d'emballage lors de sa mise au rebut. Il comporte des abréviations (a) et des
14.Informations relatives à la garantie et à l'assistance
Garantie de TARGA GmbH
Cher client, chère cliente,
La garantie accordée sur ce produit est de trois ans à partir de la date d'achat. En cas de vice sur ce produit, vous disposez de droits que vous pouvez faire valoir
vis-à-vis du vendeur du produit. L’exercice de ces droits n’est pas limité par notre garantie exposée ci-après.
Conditions de garantie
La période de garantie commence à la date d’achat. Merci de conserver soigneusement le ticket de caisse d’origine. Il vous sera demandé comme preuve d’achat.
Si un vice matériel ou de fabrication survient dans les trois ans qui suivent la date d’achat de ce produit, le produit sera réparé ou remplacé gratuitement, le choix
restant à notre discrétion.
Période de garantie et droits résultant de vices
La période de garantie n’est pas prolongée en cas de son exercice. La même chose s’applique pour les pièces remplacées et réparées. Les dégâts et vices
éventuellement présents dès l’achat doivent être signalés immédiatement dès le déballage. Une fois la période de garantie écoulée, toute réparation est payante.
Prestations incluses dans la garantie
L’appareil a été fabriqué selon des directives qualité strictes et a été soigneusement contrôlé avant d’être livré. La garantie s’applique aux défauts matériels ou de
fabrication. Cette garantie ne s'étend pas aux pièces soumises à une usure normale et qui peuvent donc être considérées comme des pièces d’usure, ni aux dégâts
sur les pièces fragiles comme p. ex. les interrupteurs, les piles rechargeables ou les pièces en verre. Cette garantie est invalidée si le produit est endommagé, est
utilisé ou entretenu de manière inappropriée. Pour assurer une utilisation conforme du produit, toutes les instructions indiquées dans le mode d’emploi doivent être
soigneusement respectées. Les utilisations et manipulations non conseillées dans le mode d’emploi ou qui font l’objet d’un avertissement doivent impérativement
être évitées. Ce produit est destiné exclusivement à une utilisation privée et non commerciale. La garantie prend fin en cas de manipulation abusive et inappropriée,
de recours à la force et d'interventions qui ne sont pas effectuées par notre service technique autorisé. La réparation ou le remplacement du produit ne prolonge
pas d'autant la période de garantie.
Processus d’application de la garantie
Afin de permettre un traitement rapide de votre demande, nous vous prions de suivre les indications suivantes :
-Avant de mettre votre produit en service, merci de lire avec attention la documentation jointe. Si un problème survient qui ne peut être résolu de cette
manière, merci de vous adresser à notre assistance téléphonique.
-Pour toute demande, ayez la référence de l'article et si disponible, le numéro de série, à portée de main pour apporter la preuve de votre achat.
-S’il est impossible d’apporter une solution par téléphone, notre assistance téléphonique organisera une intervention technique en fonction de l’origine
de la panne.
Indépendamment de la garantie commerciale souscrite, le vendeur reste tenu des défauts de conformité du bien et des vices rédhibitoires dans les conditions
prévues aux articles L217-4 à L217-13 du Code de la consommation et aux articles 1641 à 1648 et 2232 du Code Civil.
Article L217-16 du Code de la consommation
Lorsque l‘acheteur demande au vendeur, pendant le cours de la garantie commerciale qui lui a été consentie lors de l‘acquisition ou de la réparation d‘un bien
meuble, une remise en état couverte par la garantie, toute période d‘immobilisation d‘au moins sept jours vient s‘ajouter à la durée de la garantie qui restait à
courir. Cette période court à compter de la demande d‘intervention de l‘acheteur ou de la mise à disposition pour réparation du bien en cause, si cette mise à
disposition est postérieure à la demande d‘intervention.
Article L217-4 du Code de la consommation
Le vendeur livre un bien conforme au contrat et répond des défauts de conformité existant lors de la délivrance.
Il répond également des défauts de conformité résultant de l‘emballage, des instructions de montage ou de l‘installation lorsque celle-ci a été mise à sa charge
par le contrat ou a été réalisée sous sa responsabilité.
Article L217-5 du Code de la consommation
SSB 70 C3
Français - 41
Le bien est conforme au contrat :
1° S´il est propre à l‘usage habituellement attendu d‘un bien semblable et, le cas échéant :
-s‘il correspond à la description donnée par le vendeur et posséder les qualités que celui-ci a présentées à l‘acheteur sous forme d‘échantillon ou de modèle ;
-s‘il présente les qualités qu‘un acheteur peut légitimement attendre eu égard aux déclarations publiques faites par le vendeur, par le producteur ou par son
représentant, notamment dans la publicité ou l‘étiquetage ;
2° Ou s‘il présente les caractéristiques définies d‘un commun accord par les parties ou être propre à tout usage spécial recherché par l‘acheteur, porté à la
connaissance du vendeur et que ce dernier a accepté.
Article L217-12 du Code de la consommation
L‘action résultant du défaut de conformité se prescrit par deux ans à compter de la délivrance du bien.
Article 1641 du Code civil
Le vendeur est tenu de la garantie à raison des défauts cachés de la chose vendue qui la rendent impropre à l‘usage auquel on la destine, ou qui diminuent
tellement cet usage que l‘acheteur ne l‘aurait pas acquise, ou n‘en aurait donné qu‘un moindre prix, s‘il les avait connus.
Article 1648 1er alinéa du Code civil
L‘action résultant des vices rédhibitoires doit être intentée par l‘acquéreur dans un délai de deux ans à compter de la découverte du vice.
Les pièces détachées indispensables à l’utilisation du produit sont disponibles
pendant la durée de la garantie du produit.
Service
Téléphone : 0800 919270
E-Mail: targa@lidl.fr
IAN: 315507
Fabricant
Important : l’adresse suivante n'est pas l’adresse de notre service technique. Contactez d’abord notre service technique aux coordonnées ci-dessus.
TARGA GmbH
Coesterweg 45
DE-59494 Soest
ALLEMAGNE
SSB 70 C3
42 - Français
Garantie de TARGA GmbH
Cher client, chère cliente,
La garantie accordée sur ce produit est de trois ans à partir de la date d'achat. En cas de vice sur ce produit, vous disposez de droits que vous pouvez faire valoir
vis-à-vis du vendeur du produit. L’exercice de ces droits n’est pas limité par notre garantie exposée ci-après.
Conditions de garantie
La période de garantie commence à la date d’achat. Merci de conserver soigneusement le ticket de caisse d’origine. Il vous sera demandé comme preuve d’achat.
Si un vice matériel ou de fabrication survient dans les trois ans qui suivent la date d’achat de ce produit, le produit sera réparé ou remplacé gratuitement, le choix
restant à notre discrétion.
Période de garantie et droits résultant de vices
La période de garantie n’est pas prolongée en cas de son exercice. La même chose s’applique pour les pièces remplacées et réparées. Les dégâts et vices
éventuellement présents dès l’achat doivent être signalés immédiatement dès le déballage. Une fois la période de garantie écoulée, toute réparation est payante.
Prestations incluses dans la garantie
L’appareil a été fabriqué selon des directives qualité strictes et a été soigneusement contrôlé avant d’être livré. La garantie s’applique aux défauts matériels ou de
fabrication. Cette garantie ne s'étend pas aux pièces soumises à une usure normale et qui peuvent donc être considérées comme des pièces d’usure, ni aux dégâts
sur les pièces fragiles comme p. ex. les interrupteurs, les piles rechargeables ou les pièces en verre. Cette garantie est invalidée si le produit est endommagé, est
utilisé ou entretenu de manière inappropriée. Pour assurer une utilisation conforme du produit, toutes les instructions indiquées dans le mode d’emploi doivent être
soigneusement respectées. Les utilisations et manipulations non conseillées dans le mode d’emploi ou qui font l’objet d’un avertissement doivent impérativement
être évitées. Ce produit est destiné exclusivement à une utilisation privée et non commerciale. La garantie prend fin en cas de manipulation abusive et inappropriée,
de recours à la force et d'interventions qui ne sont pas effectuées par notre service technique autorisé. La réparation ou le remplacement du produit ne prolonge
pas d'autant la période de garantie.
Processus d’application de la garantie
Afin de permettre un traitement rapide de votre demande, nous vous prions de suivre les indications suivantes :
-Avant de mettre votre produit en service, merci de lire avec attention la documentation jointe. Si un problème survient qui ne peut être résolu de cette
manière, merci de vous adresser à notre assistance téléphonique.
-Pour toute demande, ayez la référence de l'article et si disponible, le numéro de série, à portée de main pour apporter la preuve de votre achat.
-S’il est impossible d’apporter une solution par téléphone, notre assistance téléphonique organisera une intervention technique en fonction de l’origine
de la panne.
Service
Téléphone : 070 270 171
E-Mail: targa@lidl.be
Téléphone : +32 70 270 171
E-Mail:targa@lidl.be
Téléphone : 0842 665 566
E-Mail: targa@lidl.ch
IAN: 315507
Fabricant
Important : l’adresse suivante n'est pas l’adresse de notre service technique. Contactez d’abord notre service technique aux coordonnées ci-dessus.
8. Voordat u begint ................................................................................................................. 48
8.1 Plaatsen .......................................................................................................................................................................... 48
8.1.1 Wandmontage (afbeelding C) .............................................................................................................................. 48
8.2 De batterijen in de afstandsbediening plaatsen ......................................................................................................... 48
9. Aan de slag ......................................................................................................................... 50
9.1 De soundbar inschakelen ............................................................................................................................................. 50
9.2 De soundbar uitschakelen ............................................................................................................................................ 50
9.3 Een modus selecteren ................................................................................................................................................... 50
9.4 Volume- en audio-instellingen ....................................................................................................................................... 52
9.4.1 Het volume aanpassen ........................................................................................................................................... 52
9.4.2 Het geluid dempen ................................................................................................................................................. 52
9.4.3 De hoge en lage tonen aanpassen ....................................................................................................................... 52
9.4.4 De audio-instellingen selecteren ............................................................................................................................ 53
9.4.5 Audio-instellingen voor “MOVIE” .......................................................................................................................... 53
9.4.6 Audio-instellingen voor “3D” ................................................................................................................................. 53
9.4.7 Audio-instellingen voor “DIALOG”........................................................................................................................ 53
9.4.8 Audio-instellingen voor “MUSIC” .......................................................................................................................... 53
10.1 Opslag indien niet in gebruik .................................................................................................................................... 53
14. Garantie- en servicegegevens ........................................................................................... 55
SSB 70 C3
44 - Nederlands
Gefeliciteerd!
Met de aanschaf van deze SilverCrest-soundbar hebt u gekozen voor een kwaliteitsproduct.
Raak vóór het eerste gebruik vertrouwd met de manier waarop de soundbar werkt en lees deze gebruiksaanwijzing zorgvuldig door. Volg de veiligheidsinstructies
zorgvuldig op en gebruik de soundbar alleen zoals beschreven in de gebruiksaanwijzing en voor de aangegeven toepassingen.
Bewaar deze gebruiksaanwijzing op een veilige plaats. Als u de soundbar aan iemand anders overdraagt, geeft u er ook alle relevante documenten bij.
De soundbar voldoet aan alle normen en richtlijnen in de CE-markering van overeenstemming. De fabrikant is niet aansprakelijk voor schade of storing die wordt
veroorzaakt door ongeoorloofde wijzigingen. Gebruik enkel accessoires die worden aanbevolen door de fabrikant. Houd u aan de regelgeving en wetten in het
land van gebruik.
1.Handelsmerken
De formulering Bluetooth® en het logo zijn geregistreerde handelsmerken van Bluetooth SIG, Inc. (Special Interest Group). TARGA GmbH gebruikt deze merken
onder licentie.
Het handelsmerk SilverCrest en het merk SilverCrest zijn eigendom van hun respectievelijke eigenaars.
De formulering HDMI® is een geregistreerd handelsmerk van HDMI Licensing LLC.
USB is een gedeponeerd handelsmerk.
Andere namen en producten kunnen handelsmerken of gedeponeerde handelsmerken van hun respectievelijke eigenaars zijn.
2.Beoogd gebruik
Deze SilverCrest-soundbar SSB 70 C3 met Bluetooth® is een informatietechnologieapparaat voor het afspelen van audio van audioapparatuur. De soundbar
is uitsluitend bedoeld voor persoonlijk gebruik, niet voor industriële of commerciële doeleinden. Het apparaat mag niet buitenshuis of in tropische klimaten
worden gebruikt.
3.Inhoud van de verpakking
Haal het apparaat en alle accessoires uit de verpakking. Verwijder het verpakkingsmateriaal en controleer of alle onderdelen volledig en onbeschadigd zijn. Bel
de fabrikant als iets ontbreekt of beschadigd is.
A SilverCrest SSB 70 C3-soundbar
B Afstandsbediening
C HDMI (ARC)-kabel
D Optische kabel (Toslink)
E Adapterkabel met 3,5 mm aansluiting naar cinch
F 2 AAA-/LR03-batterijen, 1,5 V
G 2 schroeven (voor wandmontage)
H 2 pluggen (voor wandmontage)
I Deze bedieningsinstructies (lijntekening)
J Snelstartgids (lijntekeningen)
HDMI ARC
-
flyer (niet weergegeven)
Boormal (niet weergegeven)
SSB 70 C3
Nederlands - 45
4.Technische specificaties
SSB 70 C3
Ingangsspanning/-frequentie 110 - 240 V , 50/60 Hz
Elektriciteitsverbruik als ingeschakeld/in de stand-bymodus max. 80 W / < 0,5 W
Luidspreke
r
2 x 17 W RMS plus 1 x 35 W RMS subwoofe
r
Audio
-
indeling bij invoer Stereo
-
PCM
AUX IN
-
aansluiting 3,5 mm connecto
r
Digitale ingang (SPDIF) Optisch (Toslink)
HDMI (ARC)-kabel HDMI ARC-jackplug
USB-ingang
Uitgangsstroom
Systeemstructuur
Afspeelbare audio-indelingen
USB-poort, type A
max. 500 mA
FAT 32, exFAT
MP3, WAV
Bluetooth®
-
specificatie: V 5.0
Ondersteunde profielen: A2DP, AVRCP
Bluetooth®
-
transmissievermogen: max. 10 dBm
Bluetooth®-frequentieband: 2402 - 2480 GHz
Bluetooth®-bereik: Ca. 10 m (30 voet)
Voeding afstandsbediening 2 AA
A
-
/
LR03
-
batterijen, 1,5 V
Afmetingen (B x D x H) circa 90,2 x 8,2 x 7,0 cm
Gewicht zonder accessoires circa 1.980 g
Gebruikstemperatuur 0 °C tot 35 °C
Luchtvochtigheid tijdens gebrui
k
85% rel. luchtvochtigheid
Toegestane opslagcondities 0 °C tot 40 °C, max. 85% relatieve luchtvochtigheid
De technische data en het ontwerp kunnen zonder voorafgaande kennisgeving worden gewijzigd.
5.Veiligheidsinstructies
Voordat u dit apparaat voor het eerst gebruikt, dient u de onderstaande opmerkingen te lezen en alle waarschuwingen op te volgen, zelfs als u bekend bent met
de bediening van elektronische apparatuur. Bewaar deze gebruiksaanwijzing op een veilige plaats, zodat u deze later kunt raadplegen. Als u het apparaat
verkoopt of weggeeft, geeft u ook de gebruiksaanwijzing door. Deze bedieningsinstructies maken deel uit van het apparaat.
Verklaring van de gebruikte symbolen
GEVAAR! Dit symbool en het woord 'GEVAAR' maken u attent op een potentieel gevaarlijke situatie. Negeren kan leiden tot ernstig
letsel of zelfs de dood.
WAARSCHUWING! Dit symbool en het woord 'WAARSCHUWING' staan bij belangrijke informatie voor een veilig gebruik van het
product en de veiligheid van de gebruikers.
LET OP! Dit symbool en het woord 'Let op!' staan bij belangrijke instructies ter bescherming tegen schade aan eigendommen.
Dit symbool staat bij nadere informatie over het onderwerp.
Lees de gebruiksaanwijzing!
Gelijkstroom
Wisselstroom
Veiligheidsklasse II, beschermende isolatie
SSB 70 C3
46 - Nederlands
WAARSCHUWING! Controleer altijd het volgende:
•Vermijd contact met waternevel, waterdruppels en bijtende vloeistoffen. Gebruik het apparaat nooit in de buurt van water en dompel het
beslist niet onder in een vloeistof. Plaats geen met vloeistoffen gevulde voorwerpen, zoals vazen of glazen, in de buurt van het apparaat.
•Plaats geen brandende voorwerpen (zoals kaarsen) op of in de buurt van het apparaat.
•Steek geen voorwerpen in het apparaat.
•Stel het apparaat niet bloot aan extreme temperatuurschommelingen, aangezien dit kan leiden tot vocht door condensvorming en
kortsluiting. Als het apparaat toch is blootgesteld aan extreme temperatuurschommelingen, wacht u totdat dit de omgevingstemperatuur heeft
aangenomen voordat u het inschakelt (ongeveer 2 uur).
•Bedek het apparaat niet. Warmte kan zich ophopen als het apparaat wordt bedekt, wat kan leiden tot brandgevaar.
•Open de behuizing niet. Dit kan een elektrische schok veroorzaken.
•Steek de stekker niet in het stopcontact met natte handen. Dit kan een elektrische schok veroorzaken.
•De gebruikte wandcontactdoos moet altijd gemakkelijk toegankelijk zijn, omdat de netstekker als loskoppelapparaat wordt gebruikt.
•Trek de stekker uit het stopcontact bij bliksem. Er bestaat een kans op brand of schade aan eigendommen.
Het niet in acht nemen van bovenstaande waarschuwingen kan letsel veroorzaken.
LET OP! Controleer altijd het volgende:
•Stel het apparaat niet bloot aan directe warmtebronnen (zoals radiatoren).
•Stel het apparaat niet bloot aan direct zonlicht of fel kunstlicht.
•Houd ten minste 1 m afstand van radiofrequente en magnetische bronnen (bijv. luidsprekers, mobiele telefoons, enz.) om eventuele storingen
te voorkomen. Bij storing installeert u het apparaat op een andere plaats.
•Stel het apparaat niet bloot aan hevige schokken of trillingen.
•Gebruik de USB-poort (4) niet om externe apparaten op te laden.
Als u zich niet aan de bovenstaande waarschuwingen houdt, kan dit leiden tot schade aan het apparaat.
GEVAAR!Batterijen
Plaats de batterijen met de juiste polariteit. Let hierbij op de aanduidingen in het batterijvak. Probeer de batterijen niet op te laden en gooi ze nooit in het vuur.
Combineer geen verschillende soorten batterijen (zoals oude en nieuwe of koolstof- en alkalinebatterijen). Verwijder de batterijen als het apparaat gedurende
langere tijd niet wordt gebruikt. Onjuist gebruik kan leiden tot ontploffingen of lekken. Batterijen zijn geen speelgoed! Als een batterij wordt ingeslikt, raadpleegt
u direct een arts. U mag batterijen nooit openen of vervormen, aangezien dit ertoe kan leiden dat er chemicaliën lekken die verwondingen kunnen veroorzaken.
Als de batterijvloeistof in contact komt met uw huid of ogen, spoelt u deze direct met veel water en raadpleegt u een arts.
GEVAAR!Persoonlijke veiligheid
Elektrische apparaten zijn niet geschikt voor kinderen. Personen met beperkte fysieke, zintuiglijke of verstandelijke vermogens mogen enkel binnen de grenzen van
hun kunnen gebruik maken van elektrische apparaten. Laat kinderen of personen met beperkte fysieke, zintuiglijke of verstandelijke vermogens niet zonder toezicht
elektrische apparaten gebruiken, tenzij ze hiervoor instructies krijgen en onder toezicht staan van een competente persoon die verantwoordelijk is voor hun
veiligheid. Er moet altijd toezicht worden gehouden op kinderen om te voorkomen dat ze met het product spelen. Kleine onderdelen kunnen leiden tot
verstikkingsgevaar. Houd de verpakking buiten het bereik van deze mensen.Verpakkingsmateriaal is geen speelgoed.
Er bestaat gevaar voor verstikking.
WAARSCHUWING! Kabels
Trek alle kabels los aan de stekker en trek nooit aan de kabels zelf. Plaats geen meubels of andere zware voorwerpen op de kabels en zorg ervoor dat de kabels
niet beschadigd raken, vooral bij de stekkers en de aansluitingen. Plaats de kabels nooit rond hete of scherpe voorwerpen om ze niet te beschadigen. Leg nooit
een knoop in kabels en bind ze niet samen met andere kabels. Leg alle kabels zo neer dat niemand erover kan struikelen of erdoor wordt gehinderd.
SSB 70 C3
Nederlands - 47
GEVAAR!RF-interface
Schakel het apparaat uit aan boord van een vliegtuig, in een ziekenhuis, in een operatiezaal of in de buurt van elektronische medische apparatuur. De RF-signalen
kunnen de werking van gevoelige apparatuur verstoren. Houd het apparaat ten minste 20 cm (8 inch) van een pacemaker, aangezien RF-signalen de werking
van de pacemaker kunnen verstoren. De verzonden RF-signalen kunnen storing in gehoorapparaten veroorzaken. Plaats het apparaat met ingeschakelde
draadloze modus niet in de buurt van ontvlambare gassen of in een ruimte met explosiegevaar (zoals een verfwinkel), aangezien de verzonden RF-signalen
explosies of brand kunnen veroorzaken. Het bereik van de RF-signalen hangt af van de omgeving. Als gegevens worden verzonden via een draadloze verbinding
kunnen deze mogelijk ook worden ontvangen door onbevoegden. Targa GmbH is niet aansprakelijk voor enige storing van RF- of tv-signalen die het gevolg is van
ongeoorloofde wijzigingen in dit apparaat. Bovendien accepteert Targa geen aansprakelijkheid voor het vervangen van kabels of apparaten die niet uitdrukkelijk
zijn goedgekeurd door Targa GmbH. De gebruiker is als enige verantwoordelijk en aansprakelijk voor het verhelpen van eventuele interferentie die wordt
veroorzaakt door een dergelijke ongeoorloofde wijziging van dit apparaat of voor het vervangen van het apparaat.
Onderhoud/reparatie
Reparatie is vereist als het apparaat op welke wijze dan ook is beschadigd, bijvoorbeeld als de behuizing is beschadigd, als er vloeistof of voorwerpen in het
apparaat zijn terechtgekomen of als het apparaat is blootgesteld aan regen of vocht. Reparatie is ook vereist als het product niet correct werkt of als het is gevallen.
Als u merkt dat het apparaat rook, een vreemde geur of rare geluiden produceert, schakelt u het apparaat onmiddellijk uit en trekt u de netvoedingskabel uit het
stopcontact. In dat geval mag u de soundbar pas gebruiken nadat deze is nagekeken door een bevoegd onderhoudstechnicus. Elke reparatie moet worden
uitgevoerd door een bevoegd onderhoudstechnicus.
Gebruiksomgeving
Het apparaat is niet ontworpen voor gebruik in omgevingen met een hoge luchtvochtigheid (zoals een badkamer) of veel stof. Gebruikstemperatuur en
luchtvochtigheid: 0 °C tot 35 °C, max. 85 % relatieve luchtvochtigheid. Houd er rekening mee dat onderhoudsproducten voor meubeloppervlakken stoffen kunnen
bevatten die de rubberen voetjes van de soundbar kunnen beschadigen, dus wees voorzichtig als u dit type producten gebruikt.
Opmerking over loskoppeling van het elektriciteitsnet
Houd er rekening mee dat de ingebouwde voedingsadapter een klein beetje stroom verbruikt als de stekker in het stopcontact is gestoken, zelfs in de stand-
bymodus. Trek de stekker van het netsnoer uit het stopcontact om de adapter volledig los te koppelen.
6.Copyright
De volledige inhoud van deze gebruiksaanwijzing wordt beschermd door het auteursrecht en wordt uitsluitend ter informatie aan de lezer verstrekt. Het is strikt
verboden om gegevens en informatie te kopiëren zonder voorafgaande uitdrukkelijke schriftelijke toestemming van de auteur. Dit geldt ook voor commercieel
gebruik van de inhoud en informatie. Alle teksten en afbeeldingen waren actueel op het moment dat deze handleiding werd gedrukt. De inhoud kan zonder
kennisgeving worden gewijzigd.
7.Aansluitingen en bedieningsonderdelen
Een afbeelding van alle onderdelen en knoppen en de bijbehorende nummers vindt u op de binnenpagina van de uitvouwbare omslag van deze handleiding. U
kunt deze pagina uitvouwen laten terwijl u de verschillende hoofdstukken van deze bedieningsinstructies leest. Zo kunt u op elk gewenst moment de desbetreffende
knoppen bekijken.
1 Led-display
2 Knop met twee functies: 1. Aan/stand-by 2. Bron
3 -knop + (volume verhogen)
4 USB-poort (niet gebruiken voor opladen)
5 -knop - (volume verlagen)
6 Apparaatvoetjes
7 Gaten voor wandmontage
8 Netsnoer
9 HDMI ARC-aansluiting
10 Optische digitale ingang (Toslink)
11 3,5 mm AUX-IN-aansluiting
SSB 70 C3
48 - Nederlands
7.1 Afstandsbediening
Met de meegeleverde afstandsbediening kunt u de functies van de soundbar bedienen. De knopfuncties worden toegelicht in de onderstaande tabel.
12 Het geluid dempen
13 HDMI (ARC) Schakelen naar HDMI ARC-invoer
14 OPTICAL Schakelen naar optische digitale invoer SPDIF
15 Schakelen naar Bluetooth®
16 Afspelen/pauze
17 Volgende nummer
18 STOP
19 TREBLE+ Treble versterken
20 BASS+ Bas versterken
21 MOVIE De equalizer voor films inschakelen
22 3D De equalizer inschakelen met gesimuleerde surround sound
23 Batterijvak (aan de achterzijde)
24 DIALOG De equalizer voor spraak
25 MUSIC De equalizer voor muziek
26 BASS- Bas afzwakken
27 TREBLE- Treble afzwakken
28 Herhalen
29 VOL- Volume verlagen
30 Vorige nummer
31 VOL+ Volume verlagen
32 Display in-/uitschakelen
33 USB Schakelen naar USB-invoer
34 AUX Schakelen naar AUX-invoer
35 Aan/stand-by
8. Voordat u begint
Haal de soundbar en de accessoires uit de verpakking en verwijder het plasticfolie. Controleer of u alle vermelde items hebt ontvangen.
8.1 Plaatsen
De ideale locatie voor uw soundbar is in het midden onder het tv-toestel. U kunt de soundbar plaatsen op een meubel of monteren op de wand.
8.1.1 Wandmontage (afbeelding C)
Zorg ervoor dat u geschikt wandmontagemateriaal gebruikt.
Benodigd gereedschap/montagemateriaal (niet inbegrepen in het pakket):
•Boor (afhankelijk van de wand)
•2 schroeven en mogelijk 2 pluggen (afhankelijk van de wand) voor bevestiging op de wand. Houdt u er rekening mee dat de schroeven geschikt moeten
zijn voor het gewicht van de soundbar. Als de meegeleverde schroeven en pluggen niet geschikt zijn voor uw specifieke omstandigheden, zorgt u ervoor dat
de afmetingen van de schroefkop en as overeenkomen met die van de meegeleverde schroefkop en as om een veilige montage te garanderen.
•Kruiskopschroevendraaier en eventueel andere schroevendraaiers, waterpas, potlood
Controleer, voordat u gaat boren, of er zich geen water- of gasleidingen of elektriciteitskabels in de muur bevinden. Laat het apparaat zo nodig door een vakman
op de muur monteren.
•Boor twee gaten met een onderlinge afstand van 739 mm. Gebruik de meegeleverde boormal om de montage te vergemakkelijken.
•Als u de meegeleverde pluggen gebruikt, gebruikt u een 8mm-boorbit.
•Plaats de pluggen in de geboorde gaten.
•Duw de schroeven er zover in tot de schroefkop ca. 3 mm uitsteekt.
•Verbind alle kabels die u gebruikt met de aansluitingen op de soundbar.
•Plaats het apparaat met de wandmontagegaten naar beneden op de schroeven, zodat deze met de verticale houders op het wandmontagesysteem
vastklikken en zet deze vervolgens vast door de schroeven aan te draaien.
•Controleer tot slot of de soundbar goed is bevestigd op beide schroeven. Herhaal de procedure, indien nodig. Het kan nodig zijn de schroeven enigszins
rechtsom of linksom te draaien.
8.2 De batterijen in de afstandsbediening plaatsen
Open het batterijvak (23) aan de achterkant van de afstandsbediening door het klepje van het batterijvak in de aangegeven richting te schuiven en dit te
verwijderen. Plaats de batterijen (2 AAA-batterijen) met de juiste polariteit (+ en -). De juiste polariteit staat aangegeven op de batterijen en in het batterijvak (23).
SSB 70 C3
Nederlands - 49
Plaats het klepje van het batterijvak (23) terug en schuif het in de tegengestelde richting van de pijl, totdat dit op zijn plaats vastklikt. Zie ook afbeelding B op de
uitvouwbare omslag.
8.3 Aansluitopties/gebruiksmodi
LET OP! Zorg ervoor dat de soundbar en de aan te sluiten apparaten zijn uitgeschakeld als u ze aansluit. Lees ook de gebruiksaanwijzing
van het aan te sluiten apparaat.
De HDMI (ARC)-aansluiting werkt alleen als alle aangesloten componenten ARC-conform zijn. Gebruik de meegeleverde HDMI (ARC)-
kabel (C). Zie ook de gebruiksaanwijzing van het aangesloten apparaat.
De kabel die gebruikt wordt voor het afspelen mag niet langer zijn dan 3 meter.
Met de SSB 70 C3-soundbar kunt u geluid en/of muziek van verschillende bronnen afspelen:
Het afspelen regelt u met de knoppen op het apparaat of de afstandsbediening.
Met de knop Bron (2) of de afstandsbediening selecteert u de gewenste bedrijfsmodus. De gebruiksmodi en de bijbehorende informatie op het display vindt u in
de onderstaande tabel:
Gebruiksmodus/
bron
Invoer Gebruik Knop op
afstandsbediening
Display
HDMI ARC HDMI (ARC) (9) Aansluiting via HDMI (ARC)-kabel op de HDMI (ARC)-aansluiting,
bijv. tv of dvd-speler
HDMI(ARC) (13) Hd
OPTICAL OPTICAL (10)Aansluiting via Toslink-kabel, bijv. op tv of digitale ontvanger OPTICAL (14) OPtI
BLUETOOTH®----- Via een draadloze verbinding, bijv. vanaf een smartphone -knop (15) bt
USB USB (4)Aansluiting van USB-media, bijv. USB-stick om audiobestanden af
te spelen (ondersteunde audio-indelingen: MP3 en WAV)
USB (33) USB
AUX USB (11)Aansluiting via een adapterkabel (stereo-aansluiting/cinch), bijv.
dvd-speler of satellietontvanger
AUX (34) AUX
8.4 Informatie display
Telkens wanneer een instelling op de soundbar wordt gewijzigd, brandt het led-display (1) gedurende ongeveer 8 seconden op volle lichtsterkte alvorens terug te
keren naar het lagere helderheidsniveau.
Instelling Led-display
“Standby” - -
“HDMI (ARC)”-modus Hd
“BLUETOOTH®”-modus bt
“OPTICAL”-modus OPtI
“USB”-modus USB
“AUX”-modus AUX
“MOVIE”-audio-instellingen CINE
“DIALOG”-audio-instellingen dIA
“MUSIC”-audio-instellingen SONG
“3D”-audio-instellingen 3d
“VOL-“ / „VOL+” V 00 t/m V 40
“TREBLE” t -5 t/m t 5
“BASS” b -5 t/m b 5
Voor afspelen USBAfspeeltijd nummer in notatie mm:ss
“ON” of “AL”
Druk op de knop (32) om het led-display (1) uit te schakelen. Als u nogmaals op (32) of een andere knop drukt, wordt het led-display (1) weer
ingeschakeld.
SSB 70 C3
50 - Nederlands
9.Aan de slag
In deze gebruiksaanwijzing wordt het gebruik van de afstandsbediening algemeen beschreven.
Sommige basisfuncties (aan/stand-by, bronkeuze en volume-instelling) kunnen ook direct op de soundbar worden aangepast.
De soundbar schakelt na ca. 10 minuten naar de stand-bymodus als...
... er geen Bluetooth-verbinding tot stand is gebracht.
... er geen audiosignaal of alleen een zeer zwak audiosignaal wordt ontvangen en er worden geen knoppen ingedrukt.
Let op bij de modi HDMI (ARC) en OPTICAL op het volgende:
Als uw audiobron meerkanaalsgeluid ondersteunt, moet u deze overschakelen naar "PCM Stereo" voordat u begint, omdat er anders
geen geluid uit de soundbar komt. Raadpleeg de gebruiksaanwijzing van uw audiobron.
9.1 De soundbar inschakelen
Steek de stekker van de soundbar in een gemakkelijk toegankelijk stopcontact. De soundbar heeft geen aparte hoofdschakelaar, maar gaat direct in de stand-
bymodus zodra de stekker in het stopcontact is gestoken. Op het led-display (1) verschijnt “- -”. Druk op de stand-byknop (2, 35) om de soundbar uit de stand-
bymodus te halen.
9.2 De soundbar uitschakelen
Druk op de stand-byknop (35) om de soundbar in de stand-bymodus te zetten. U kunt ook de stand-byknop (2) op de soundbar ongeveer 1 seconde lang
indrukken. De soundbar heeft geen aparte hoofdschakelaar. Houd er rekening mee dat de voedingsadapter een klein beetje stroom verbruikt als de stekker in het
stopcontact is gestoken, zelfs in de stand-bymodus. Trek de stekker van het netsnoer uit het stopcontact om de adapter volledig los te koppelen.
9.3 Een modus selecteren
Druk op de betreffende knop (13, 14, 15, 33, 34) om de gewenste modus te selecteren. U kunt ook tussen de modi schakelen door kort op de knop (2) op de
soundbar te drukken. De gekozen modus wordt op het led-display (1) als volgt weergegeven:
ModusDisplay
HDMI ARC Hd
OPTICALOPtI
BLUETOOTH®bt
USBUSB
AUXAUX
Start nu het afspelen op het aangesloten apparaat en gebruik de afstandsbediening. Zie de gebruiksaanwijzing van het afspeelapparaat.
9.3.1 “HDMI ARC”-modus
HDMI (ARC Audio Return Channel) is een uitbreiding op de conventionele HDMI-aansluiting waarmee audiosignalen van het ARC-kanaal in
beide richtingen kunnen worden verzonden. Als u deze functionaliteit wilt kunnen gebruiken, moeten alle gebruikte componenten ARC-conform
zijn.
De meeste moderne televisietoestellen, spelconsoles en digitale ontvangers hebben een ARC-uitgang. Lees ook de gebruiksaanwijzing van het
aan te sluiten apparaat.
Als de audio-overdracht niet werkt, controleert u of de HDMI-kabel en de aansluiting op het bronapparaat ARC-conform zijn. Het is mogelijk
dat alleen specifieke aansluitingen op het bronapparaat ARC-conform zijn.
Hoe u de soundbar op een tv aansluit, wordt hieronder beschreven:
•Sluit met behulp van een HDMI (ARC)-conforme kabel (C, meegeleverd) de HDMI (ARC)-aansluiting (9) op de soundbar aan op een HDMI (ARC)-uitgang
op de tv. Stel het aangesloten apparaat in op “PCM Stereo” of “Stereo 2.0”.
•Schakel de soundbar in met de Stand-byknop (2, 35).
•Druk op de knop “HDMI (ARC)” (13) om de HDMI (ARC)-invoer op de soundbar te selecteren.
•Zet de tv aan; het afspelen van het geluid start binnen enkele seconden.
Als op uw tv het protocol CEC wordt ondersteund, kan de soundbar worden in- en uitgeschakeld met de afstandsbediening van de tv. Als dit
het geval is, kan het volume ook via de afstandsbediening van de tv worden geregeld. Raadpleeg de gebruiksaanwijzing van de tv.
9.3.2 “OPTICAL”-modus
Gebruik deze modus om muziek af te spelen vanaf de optische digitale ingang (10) bijvoorbeeld van een tv op uw soundbar (A). De tv moet een optische digitale
uitgang hebben. Gebruik de bijgeleverde optische kabel (Toslink-kabel) voor het maken van de aansluiting. Ga hiervoor als volgt te werk:
•Sluit de Toslink-kabel (D) aan op de optische digitale uitgang van uw tv.
•Sluit vervolgens de Toslink-kabel (D) aan op de optische digitale ingang (10) van uw soundbar.
SSB 70 C3
Nederlands - 51
•Zet de tv en de soundbar aan. Stel de aangesloten tv in op “PCM Stereo” of “Stereo 2.0”.
•Start het afspelen op de tv.
•Druk op de knop “OPTICAL” (14) op de afstandsbediening om deze modus te selecteren.
•Met de volumeknoppen (29, 31) kunt u het volume naar wens instellen.
•
Indien u dit wenst, kunt u de audio-instellingen wijzigen met behulp van de betreffende knoppen op de afstandsbediening.
Raadpleeg de gebruikershandleiding van de tv.
9.3.3 “BLUETOOTH”-modus
De naam van het Bluetooth-apparaat van de soundbar is SSB 70 C3.
Als u wordt gevraagd een pincode in te voeren tijdens de koppelingsprocedure (pairing), typt u "0000".
Het tot stand brengen van de verbinding duurt,afhankelijk van het apparaat, korter of langer.
Verbinding maken
•
Druk op de knop (15) om over te schakelen naar de Bluetooth-modus.
Na het overschakelen naar de Bluetooth-modus maakt de soundbar automatisch verbinding met een gekoppeld apparaat (op het led-display (1)
brandt “bt” constant) of, als er geen gekoppeld apparaat wordt gevonden, wordt automatisch overgeschakeld naar de Bluetooth-
koppelingsmodus (op het led-display (1) knippert “bt”). Als de verbinding met een gekoppeld apparaat verloren gaat, wordt het apparaat na
ca. 10 minuten uitgeschakeld.
•Als uw afspeelapparaat nog niet met de soundbar isgekoppeld, knippert “bt” op het display.
•Start de Bluetooth-scanmodus op uw afspeelapparaat (bijv. smartphone). Vervolgens vindt u de soundbar onder de naam “SSB 70 C3”.
•Maak nu een Bluetooth-verbinding tussen uw afspeelapparaat en de soundbar.
•Zodra een verbinding tot stand is gebracht, verschijnt “bt”op het led-display (1) en klinkt er een bevestigingstoon.
Over het algemeen hoeft u slechts één keer te koppelen, omdat de naam van de soundbar op het afspeelapparaat wordt opgeslagen. Dit betekent
dat u de apparaten niet handmatig hoeft te koppelen wanneer u de verbinding weer tot stand brengt.
Als u een bestaande Bluetooth-verbinding wilt verbreken of naar de koppelingsmodus wilt overschakelen, houdt u de toets (15)op de
afstandsbediening ongeveer 1 seconde lang ingedrukt.
•Start nu de muziek vanaf het bronapparaat. Het geluid wordt afgespeeld via de soundbar.
•Met de knoppen (16), (17)en(30)op de afstandsbediening of uw bronapparaat regelt u het afspelen.
•Met de volumeknoppen (29, 31) kunt u het volume naar wens instellen.
Verbinding verbreken
De Bluetooth-koppeling wordt verbroken als …
•... een van de apparaten wordt uitgeschakeld. Er klinkt een toon ter bevestiging.
•... Bluetooth wordt uitgeschakeld. Er klinkt een toon ter bevestiging.
•... de soundbar en het bronapparaat zich buiten het Bluetooth-bereik bevinden (ca. 10 meter).
9.3.4 “USB”-modus
De volgorde van de afgespeelde nummers/mappen wordt bepaald door de volgorde waarin ze naar de USB-stick worden gekopieerd.
In deze modus kunt u audiobestanden op de soundbar afspelen die zijn opgeslagen op een USB-opslagapparaat, bijv. een USB-stick. Bij het aansluiten van een
USB-harde schijf moet u er rekening mee houden dat de maximale stroom op de USB-aansluiting van de soundbar 500 mA bedraagt. Zie ook de
gebruiksaanwijzing van de USB-harde schijf.
Als u een harde schijf als USB-afspeelapparaat wilt gebruiken, sluit u deze aan via een Y-kabel met een aparte voeding.
Houd er rekening mee dat er soms compatibiliteitsproblemen kunnen optreden tussen het USB-opslagapparaat en de soundbar, wat betekent dat
er slechts beperkte functionaliteit beschikbaar is of dat het mogelijk helemaal niet werkt. Als dit gebeurt, probeert u een ander USB-opslagapparaat.
•Sluit het USB-opslagapparaat aan op de USB-poort (4) van de soundbar.
•Druk op de knop “USB” (33) op de afstandsbediening om deze modus te selecteren.
•Met de knoppen (16), (18), (17)en(30)op de afstandsbediening speelt u de muzieknummers af.
SSB 70 C3
52 - Nederlands
•
Met de volumeknoppen (29, 31) kunt u het volume naar wens instellen.
•
Indien u dit wenst, kunt u de audio-instellingen wijzigen met behulp van de betreffende knoppen op de afstandsbediening.
Bedieningsfuncties in de “USB”-modus:
Actie Functie
Op de knop (16)drukken.Het huidige nummer pauze/hervatten.
Op de knop (16)drukken als het afspelen eerder met de
knop (18)werd gepauzeerd.
Afspelen hervatten aan het begin van de laatst afgespeelde map.
Kort op de knop (17)drukken.Naar volgend nummer.
Op de knop (17)drukken en ingedrukt houden.Naar het eerste nummer van de volgende map.
Kort op de knop (30)drukken.Naar vorig nummer.
Op de knop (30)drukken en ingedrukt houden.Naar het eerste nummer van de vorige map.
Op de knop (18)drukken.Afspelen pauzeren; het afspelen wordt hervat met het eerste nummer in de
laatst afgespeelde map als knop (16) wordt ingedrukt.
Twee keer snel achter elkaar op knop (18)drukken.Naar het eerste nummer van de eerste map.
Als u knop (28) indrukt, wordt het nummer dat momenteel wordt afgespeeld, herhaald (op het display verschijnt “ON”) of worden alle nummers die op het
opslagapparaat zijn opgeslagen herhaald (op het display staat “AL”).
Led-display Functie
ON Het huidige nummer wordt herhaald.
AL Alle nummers worden herhaald.
LET OP! Gebruik de USB-poort (4) niet om externe apparaten op te laden.
9.3.5 “AUX”-modus
In deze modus sluit u een afspeelapparaat aan op een cinch-uitgang, bijv. een dvd-speler of een satellietontvanger. Gebruik de bijgeleverde adapterkabel (E).
•Sluit de cinch-uitgang van uw afspeelapparaat aan op de AUX-aansluiting (11) van de soundbar.
•Schakel de soundbar in met de Stand-byknop (2, 35).
•Druk op de knop “AUX” (34) op de afstandsbediening om deze modus te selecteren.
•
Met de volumeknoppen (29, 31) kunt u het volume naar wens instellen.
•
Indien u dit wenst, kunt u de audio-instellingen wijzigen met behulp van de betreffende knoppen op de afstandsbediening.
9.4 Volume- en audio-instellingen
Eventuele wijzigingen in het volume en de audio-instellingen worden gedurende ca. 2 seconden op het led-display (1) weergegeven.
Daarna verschijnt de standaardweergave voor de betreffende modus weer.
9.4.1 Het volume aanpassen
U past het volume tijdens het afspelen aan met de volumeknoppen (29, 31) op de afstandsbediening. U kunt ook de volumeknoppen (3, 5) op de soundbar
gebruiken. U kunt de betreffende knoppen ingedrukt houden om de instellingen sneller te veranderen. Het gekozen volume wordt gedurende ca. 2 seconden op
het led-display (1) weergegeven. Als u het volume op het laagste niveau instelt, knippert “V 00” continu op het led-display (1).
9.4.2 Het geluid dempen
Druk op de knop (12)om het geluid tijdelijk te dempen.
9.4.3 De hoge en lage tonen aanpassen
U past de hoge tonen aan uw wensen aan met de knoppen TREBLE+ (19) en TREBLE- (27).
Voor het aanpassen van de lage tonen drukt u op de knoppen BASS+ (20) en BASS- (26).
SSB 70 C3
Nederlands - 53
9.4.4 De audio-instellingen selecteren
De soundbar heeft 4 vooraf ingestelde audio-instellingen. Druk op de betreffende knop (21, 22, 24, 25) om de gewenste audio-instellingen te selecteren. De
gekozen audio-instellingen worden op het led-display (1) als volgt weergegeven:
Audio-instellingLed-display
MOVIECINE
3D 3d
DIALOG dIA
MUSICSONG
9.4.5 Audio-instellingen voor “MOVIE”
Selecteer deze audio-instellingen voor het afspelen van bijvoorbeeld films of documentaires.
9.4.6 Audio-instellingen voor “3D”
Selecteer deze audio-instellingen om het huidige geluid een virtuele 3D-surround sound te geven.
9.4.7 Audio-instellingen voor “DIALOG”
Selecteer deze audio-instellingen voor spraak. Deze instelling wordt onder andere aanbevolen voor nieuwsprogramma's.
9.4.8 Audio-instellingen voor “MUSIC”
Met deze instelling optimaliseert u de geluidsinstellingen voor het afspelen van muziek.
10.Reinigen
Schakel het apparaat uit en trek de stekker uit het stopcontact. Reinig het apparaat met een zachte droge doek. Gebruik nooit oplos- of schoonmaakmiddelen of
een schuursponsje. Doet u dat wel, dan kan de soundbarbehuizing beschadigd raken.
10.1 Opslag indien niet in gebruik
Als u de soundbar gedurende een langere periode niet gebruikt, bewaart u deze op een schone en droge plaats. Verwijder ook de batterijen
uit de afstandsbediening om lekkage te voorkomen.
SSB 70 C3
54 - Nederlands
11.Problemen oplossen
De soundbar gaat niet aan
•Controleer of de stekker goed in het stopcontact zit. Steek deze zo nodig goed in het stopcontact.
•Controleer of het stopcontact werkt. Test het apparaat op een ander stopcontact waarvan u zeker weet dat het werkt.
Geen geluid
•Controleer of de juiste gebruiksmodus is geselecteerd. Selecteer de juiste modus.
•Controleer het afspeelvolume op de soundbar en het aangesloten afspeelapparaat.
•In de modi HDMI (ARC) en OPTICAL: Als uw audiobron meerkanaalsgeluid ondersteunt, moet u deze overschakelen naar "PCM Stereo" voordat u begint,
omdat er anders geen geluid uit de soundbar komt. Raadpleeg de gebruiksaanwijzing van uw audiobron.
•In de modus “HDMI (ARC)”: Controleer of de HDMI (ARC)-kabel (C) correct is aangesloten op de HDMI ARC-aansluiting (9) op de soundbar en de
bijbehorende HDMI ARC-aansluiting op de externe geluidsbron, bijv. de tv. Bij een ‘normale’ HDMI-aansluiting kan de tv alleen video- en audiosignalen
ontvangen, maar niet verzenden.
•In de modus “AUX IN”: Controleer of de adapterkabel (E) correct is aangesloten op de AUX IN-aansluiting (11) op de soundbar en de Cinch-uitgang op
het externe afspeelapparaat. Controleer ook de volume-instelling van het externe afspeelapparaat dat is aangesloten via de adapterkabel (E).
•In de modus “OPTICAL”: Controleer of de Toslink-kabel (D) correct is aangesloten op de optische digitale aansluiting (10) op de soundbar en de betreffende
aansluiting op het externe afspeelapparaat.
•In de modus “USB”: Controleer of uw USB-afspeelapparaat is geformatteerd met het FAT32-bestandssysteem, correct is aangesloten en of er geschikte
afspeelbestanden op staan. Geschikte bestandsindelingen: MP3 en WAV.
Kan de soundbar niet bedienen met de afstandsbediening
•De batterijen van de afstandsbediening zijn (bijna) leeg. Vervang de batterijen door nieuwe batterijen van hetzelfde type.
•De afstand tussen de soundbar en uw apparaat is te groot. Zet ze dichter bij elkaar.
Afspelen via Bluetooth® werkt niet
•Controleer of op uw smartphone/tablet een Bluetooth®-verbinding tot stand is gebracht met de SSB 70 C3-soundbar. Herstel de koppeling, indien nodig.
12.Milieuregelgeving en informatie over afvalverwerking
Apparaten met dit symbool zijn onderworpen aan de Europese richtlijn 2012/19/EU. Alle elektrische en elektronische apparaten moeten worden
gescheiden van huishoudelijk afval en bij een officiële afvalverwerkingsinstantie worden ingeleverd. Voorkom schade aan het milieu en risico's
voor uw eigen gezondheid door het apparaat op de juiste manier als afval te verwerken. Voor meer informatie over een juiste afvalverwerking
neemt u contact op met de gemeente, de afvalverwerkingsinstantie of de winkel waar u het apparaat hebt gekocht.
Respecteer het milieu. Oude batterijen/accu's mogen niet bij het huishoudelijk afval worden weggegooid. Deze moeten worden ingeleverd bij
een inzamelpunt voor lege batterijen/accu's. Zorg dat accu's/batterijen helemaal leeg zijn voordat u ze inlevert bij een verzamelpunt voor oude
batterijen/accu's. Als u accu's/batterijen inlevert die niet helemaal leeg zijn, moet u voorzorgsmaatregelen treffen om kortsluiting te voorkomen.
Gooi al het verpakkingsmateriaal weg op een milieuvriendelijke manier. De kartonnen verpakking kan voor recycling naar de oudpapierbak of
een openbaar inzamelpunt worden gebracht. Folie of plastic in de verpakking moet worden ingeleverd via een daarvoor bestemde
inzamelmethode.
Let bij het verwijderen van het verpakkingsmateriaal op de aangebrachte merktekens; op het etiket staan de afkortingen (a) en (b) met de volgende
U krijgt op dit apparaat 3 jaar garantie vanaf de datum van aankoop. In het geval van gebreken aan dit product heeft u ten opzichte van de verkoper van het
product bepaalde wettelijke rechten. Deze wettelijke rechten worden door onze hierna volgende garantie niet beperkt.
Garantievoorwaarden
De garantietermijn begint op de datum van aankoop. Bewaart u de originele kassabon goed. Deze bon is nodig als bewijs van aankoop. Indien er binnen drie
jaar vanaf de datum van aankoop van dit product een materiaal- of fabricagefout optreedt, wordt het product door ons – naar ons goeddunken – gratis
gerepareerd of vervangen.
Garantietermijn en wettelijke aanspraak bij gebreken
De garantietermijn wordt door de wettelijke aanspraak bij gebreken niet verlengd. Dit geldt ook voor vervangen en gerepareerde onderdelen. Eventueel reeds bij
aankoop aanwezige schade en gebreken dienen onmiddellijk na het uitpakken te worden gemeld. Na afloop van de garantietermijn benodigde reparaties worden
alleen tegen betaling uitgevoerd.
Garantiedekking
Het apparaat is zorgvuldig gefabriceerd volgens strenge kwaliteitsrichtlijnen en voor de levering nauwgezet onderzocht. De garantie dekt materiaal- en
fabricagefouten. Deze garantie dekt geen onderdelen van het product die onderhevig zijn aan normale slijtage en daardoor kunnen worden beschouwd als
slijtbare onderdelen of beschadigingen aan breekbare onderdelen zoals schakelaars, batterijen of onderdelen gemaakt van glas. De garantie vervalt als het
product beschadigd, niet doelmatig gebruikt of onderhouden is. Voor een doelmatig gebruik van het product dienen alle in de meegeleverde handleiding
opgenomen aanwijzingen strikt te worden nageleefd . Gebruiksdoeleinden en handelingen die in de handleiding worden afgeraden of waarvoor wordt
gewaarschuwd, dienen in elk geval te worden vermeden. Het product is uitsluitend bestemd voor privégebruik en niet voor commercieel gebruik. In geval van
misbruik of niet doelmatig gebruik, gebruik van geweld of ingrepen die niet zijn uitgevoerd door onze geautoriseerde service-afdeling, komt de garantie te vervallen.
Met de reparatie of vervanging van het product begint geen nieuwe garantietermijn.
Afwikkeling van een garantieclaim
Gelieve voor een snelle verwerking van uw probleem de volgende aanwijzingen in acht te nemen:
-Lees voordat u het product in gebruik neemt de bijbehorende documentatie aandachtig door. Mocht er een probleem optreden dat op deze manier
niet kan worden opgelost, neem dan contact op met onze hotline.
-Houdt u bij elke navraag de kassabon en het artikelnummer of indien beschikbaar het serienummer als bewijs van aankoop bij de hand.
-In het geval dat een oplossing per telefoon niet mogelijk is, zal onze hotline er afhankelijk van de oorzaak van het probleem voor zorgen dat het
probleem op andere wijze wordt opgelost.
Service
Telefoon: 0900 0400 223
E-Mail: targa@lidl.nl
Telefoon: 070 270 171
E-Mail: targa@lidl.be
Telefoon: +32 70 270 171
E-Mail: targa@lidl.be
IAN: 315507
Fabrikant
Merk op dat het volgende adres geen service-adres is. Neem eerst contact op met de bovenvermelde service-afdeling.
8.1.1 Montaż na ścianie (rys. C) ..................................................................................................................................... 62
8.2 Wkładanie baterii do pilota zdalnego sterowania .................................................................................................... 62
8.3 Opcje połączeń / tryby pracy ..................................................................................................................................... 62
8.4 Informacje na wyświetlaczu ......................................................................................................................................... 63
9.3.1 Tryb “HDMI ARC” .................................................................................................................................................. 64
9.3.2 Tryb “OPTICAL” ...................................................................................................................................................... 64
9.3.3 Tryb “BLUETOOTH” ............................................................................................................................................... 64
9.3.4 Tryb “USB” .............................................................................................................................................................. 65
9.3.5 Tryb “AUX” .............................................................................................................................................................. 66
9.4 Ustawienia głośności i dźwięku ................................................................................................................................... 66
9.4.3 Regulacja wysokich i niskich tonów ...................................................................................................................... 66
12. Przepisy dotyczące ochrony środowiska oraz informacje o utylizacji produktu ................ 67
13. Zgodność z dyrektywami ................................................................................................. 68
14. Informacje dotyczące gwarancji i serwisu ......................................................................... 68
SSB 70 C3
Polski - 57
Gratulacje!
Dokonując zakupu soundbara Silver Crest, wybrali Państwo produkt wysokiej jakości.
Przed pierwszym użyciem urządzenia prosimy o zapoznanie się ze sposobem działania soundbara i uważne przeczytanie niniejszej instrukcji obsługi. Prosimy o
przestrzeganie wskazówek dotyczących bezpieczeństwa i używanie soundbara wyłącznie w sposób opisany w instrukcji obsługi i zgodnie z przeznaczeniem.
Niniejszą instrukcję obsługi należy przechowywać w bezpiecznym miejscu. W przypadku przekazania urządzenia innej osobie, należy dołączyć również
wszystkie istotne dokumenty.
Ten soundbar spełnia wymagania wszystkich norm i dyrektyw wymienionych w deklaracji zgodności UE. Producent nie ponosi odpowiedzialności za jakiekolwiek
szkody lub problemy spowodowane nieautoryzowanymi modyfikacjami. Należy stosować wyłącznie akcesoria zalecane przez producenta. Należy przestrzegać
przepisów obowiązujących w kraju, w którym urządzenie jest użytkowane.
1.Znaki towarowe
Wyrażenie Bluetooth® oraz jego logo są zarejestrowanymi znakami towarowymi firmy Bluetooth SIG, Inc. (Special Interest Group). Firma TARGA GmbH używa
tych znaków na mocy licencji.
Znaki towarowe SilverCrest i marka SilverCrest są własnością ich odnośnych właścicieli.
Wyrażenie HDMI® jest zarejestrowanym znakiem towarowym HDMI Licensing LLC.
USB jest zarejestrowanym znakiem towarowym.
Inne nazwy i produkty mogą być znakami towarowymi lub zarejestrowanymi znakami towarowymi należącymi do ich właścicieli.
2.Użytkowanie zgodne z przeznaczeniem
Soundbar SilverCrest SSB 70 C3 z techniką Bluetooth®jest urządzeniem technologia informacyjna i służy do odtwarzania dźwięku z urządzeń audio.
Soundbar może służyć wyłącznie do celów prywatnych, a nie przemysłowych czy komercyjnych. Z urządzenia nie wolno korzystać na zewnątrz pomieszczeń
ani w klimacie tropikalnym.
3.Zawartość opakowania
Wyjąć urządzenie i wszystkie akcesoria z opakowania. Usunąć materiał opakowaniowy i sprawdzić, czy wszystkie elementy są kompletne i nieuszkodzone. W
przypadku stwierdzenia braku lub uszkodzenia jakiejś części należy skontaktować się z producentem.
A Soundbar SilverCrest SSB 70 C3
B Pilot zdalnego sterowania
C Przewód HDMI (ARC)
D Przewód optyczny (Toslink)
E Przewód adapterowy mini-jack 3,5 mm na Cinch
F 2 baterie typu AAA, LR03; 1,5 V
G 2 śruby (do mocowania na ścianie)
H 2 kołki rozporowe (do mocowania na ścianie)
I Niniejsza instrukcja obsługi (ilustracje wykonane w trybie „line art”)
J Instrukcja szybkiego uruchomienia (ilustracje wykonane w trybie „line art”)
Pobór mocy podczas pracy / w trybie oczekiwania maks. 80 W / < 0,5 W
Głośni
k
2 x 17 W RMS plus 1 x subwoofer 35 W RMS
Wejściowe formaty audio Stereo PCM
Gniazdo AUX IN Gniazdo mini
-
jack 3,5 mm typu
Wejście cyfrowe (SPDIF) Wejście optyczne (Toslink)
Przewód HDMI (ARC) Gniazdo HDMI ARC
Wejście USB
Prąd wyjściowy
Typ formatowania
Obsługiwane formaty audio
Port USB, typ A
maks. 500 mA
FAT 32, exFAT
MP3, WAV
Bluetooth®, specyfikacja: Wersja 5.0
Obsługiwane profile: A2DP, AVRCP
Moc nadawcza Bluetooth®: maks. 10 dBm
Pasmo częstotliwości Bluetooth®: 2402 – 2480 GHz
Zasięg Bluetooth®: ok. 10 m (30 stóp)
Zasilanie pilota 2 baterie typu AAA, LR03; 1,5 V
Wymiary (szer. x gł. x wys.) ok. 90,2 x 8,2 x 7,0 cm
Masa bez akcesoriów ok. 1980 g
Temperatura podczas pracy 0°C do 35°C
Dopuszczalna wilgotność podczas pracy 85 % wilgotności wzgl.
Dopuszczalne warunki przechowywania 0°C do 40°C, maks. 85% wilgotności wzgl.
Dane techniczne i konstrukcja mogą ulegać zmianom bez wcześniejszego powiadomienia.
5.Wskazówki bezpieczeństwa
Przed pierwszym użyciem urządzenia należy przeczytać poniższe wskazówki i zastosować się do ostrzeżeń. Dotyczy to również osób, które mają duże
doświadczenie w korzystaniu z urządzeń elektronicznych. Niniejszą instrukcję obsługi należy przechowywać w bezpiecznym miejscu do wykorzystania w
przyszłości. W przypadku sprzedaży lub odstąpienia urządzenia należy również przekazać instrukcję obsługi. Instrukcja obsługi stanowi część produktu.
Objaśnienie użytych symboli
NIEBEZPIECZEŃSTWO!Ten symbol oraz słowo „NIEBEZPIECZEŃSTWO” ostrzegają użytkownika przed potencjalnie niebezpieczną
sytuacją. Jej zignorowanie może doprowadzić do poważnych obrażeń, a nawet śmierci.
OSTRZEŻENIE! Tym symbolem oraz słowem „OSTRZEŻENIE” oznaczono ważne informacje dotyczące bezpiecznej obsługi produktu
oraz bezpieczeństwa jego użytkowników.
UWAGA! Tym symbolem oraz słowem „Uwaga” oznaczono ważne wskazówki dotyczące ochrony przed szkodami materialnymi.
Tym symbolem oznaczono dodatkowe informacje związane z omawianym tematem.
Zapoznać się z podręcznikiem użytkownika!
Prąd stały
Prąd przemienny
Klasa bezpieczeństwa II, izolacja ochronna
SSB 70 C3
Polski - 59
OSTRZEŻENIE! Zawsze należy zadbać o to, aby
•urządzenie nie było narażone na działanie rozpylonej lub rozpryśniętej wody oraz środków o działaniu korozyjnym, a ponadto nie należy
używać urządzenia w pobliżu wody, w szczególności zaś nigdy nie zanurzać go w płynach (tak więc, nie należy umieszczać na
urządzeniu , lub w jego pobliżu naczyń z płynami, np. wazonów czy kubków z napojami).
•nie umieszczać na urządzeniu lub w pobliżu urządzenia źródeł otwartego ognia (np. płonących świec);
•nie występuje penetracja przez ciała obce.
•urządzenie nie było narażone na skrajne zmiany temperatury, ponieważ może to doprowadzić do kondensacji wilgoci i wystąpienia
zwarcia. Jeśli urządzenie zostało narażone na skrajne wahania temperatury, należy przed jego włączeniem poczekać, aż osiągnie
temperaturę otoczenia (po około 2 godzinach).
•urządzenie nie było przykryte. Jeżeli urządzenie zostanie przykryte, może dojść do jego przegrzania, a tym samym powstanie ryzyko
pożaru.
•obudowa nie jest otwarta. mogłoby to spowodować porażenie prądem elektrycznym.
•użytkownik nie dotyka wtyku sieciowego wilgotnymi dłońmi. Mogłoby to spowodować porażenie prądem elektrycznym.
•używane gniazdo musi być zawsze łatwo dostępne, ponieważ wtyczka sieciowa jest używana jako urządzenie rozłączające.
•w przypadku wyładowań atmosferycznych wtyk przewodu zasilającego należy odłączyć od gniazda elektrycznego. Niebezpieczeństwo
pożaru lub szkód materialnych.
Nieprzestrzeganie powyższych ostrzeżeń może spowodować obrażenia ciała.
UWAGA! Zawsze należy zadbać o to, aby
•nie umieszczać urządzenia w bezpośrednim sąsiedztwie źródeł wysokiej temperatury (np. grzejników);
•na urządzenie nie padały bezpośrednio promienie światła słonecznego ani silne światło sztuczne;
•należy zachować odstęp co najmniej 1 metra od źródeł sygnałów o częstotliwości radiowej i źródeł pola magnetycznego (np. głośników,
telefonów komórkowych itp.), aby uniknąć nieprawidłowego działania. W przypadku nieprawidłowego działania urządzenie należy
ustawić w innym miejscu.
•nie narażać urządzenia na nadmierne wstrząsy lub drgania;
•portu USB (4) nie wolno używać do ładowania zewnętrznych urządzeń.
Nieprzestrzeganie powyższych ostrzeżeń może spowodować uszkodzenie urządzenia .
NIEBEZPIECZEŃSTWO!Baterie
Podczas wkładania baterii należy przestrzegać właściwej biegunowości. Sprawdzić oznaczenia biegunowości wewnątrz wnęki baterii. Nie próbować ładować
baterii, ani nie wrzucać baterii do ognia. Nie należy mieszać ze sobą różnych rodzajów baterii (starych i nowych, węglowych i alkalicznych itp.). W przypadku
dłuższego nieużywania urządzenia należy wyjąć baterie. Niewłaściwe użytkowanie może spowodować eksplozję lub wyciek. Baterie nie służą do zabawy! W
przypadku połknięcia baterii należy natychmiast skontaktować się z lekarzem. Baterii nie wolno w żadnym wypadku otwierać ani deformować, gdyż mogłoby to
spowodować wyciek substancji chemicznych grożących obrażeniami ciała. W przypadku kontaktu elektrolitu baterii ze skórą lub oczami należy bezzwłocznie
przepłukać skórę lub oczy dużą ilością wody i skorzystać z pomocy medycznej.
NIEBEZPIECZEŃSTWO!Osobiste bezpieczeństwo
Urządzenia elektryczne nie są odpowiednie dla dzieci. Osoby o ograniczonych możliwościach fizycznych, sensorycznych lub mentalnych powinny używać
urządzeń elektrycznych wyłącznie w granicach swoich możliwości. Nie wolno pozwalać dzieciom ani osobom o ograniczonych możliwościach fizycznych,
sensorycznych lub mentalnych na korzystanie z urządzeń elektrycznych bez nadzoru, chyba że osoby te zostaną odpowiednio poinstruowane i będą znajdowały
się pod nadzorem kompetentnej osoby odpowiedzialnej za ich bezpieczeństwo. Dzieci powinny zawsze pozostawać pod nadzorem, aby uniemożliwić im
zabawę produktem. Małe części mogą stwarzać niebezpieczeństwo zadławienia. Opakowanie należy przechowywać w miejscu niedostępnym
dla dzieci.Materiał opakowaniowy to nie zabawka.
Występuje ryzyko uduszenia.
SSB 70 C3
60 - Polski
OSTRZEŻENIE! Przewody
Wszystkie przewody należy odłączać chwytając za wtyk, nigdy nie ciągnąć za same przewody. W żadnym wypadku nie należy stawiać na przewodach mebli
ani innych ciężkich przedmiotów i uważać, aby przewody nie zostały uszkodzone, w szczególności przy wtykach gniazdach. Nigdy nie należy umieszczać
przewodów w pobliżu gorących lub ostrych przedmiotów, aby nie dopuścić do ich uszkodzenia. Nigdy nie należy wiązać pętli na przewodach, ani nie wiązać
ich z innymi przewodami. Wszystkie przewody należy umieszczać w taki sposób, aby nie groziły potknięciem i nie utrudniały przejścia.
NIEBEZPIECZEŃSTWO!Zakłócenia radiowe
Urządzenie należy wyłączyć na pokładach samolotów, w szpitalach, w blokach operacyjnych oraz w pobliżu elektronicznego sprzętu medycznego. Sygnały o
częstotliwości radiowej mogą zakłócać funkcjonowanie czułych urządzeń. Urządzenie należy umieszczać przynajmniej 20 cm (8 cali) od rozrusznika serca,
ponieważ sygnały o częstotliwości radiowej mogą zakłócać działanie tego urządzenia. Transmitowane sygnały o częstotliwości radiowej mogą zakłócać
działanie aparatów słuchowych. Po włączeniu trybu bezprzewodowego nie należy umieszczać urządzenia w pobliżu palnych gazów ani w obszarze
zagrożonym wybuchem (np. w lakierni), gdyż transmitowane sygnały o częstotliwości radiowej mogą spowodować wybuch lub pożar. Zasięg sygnałów o
częstotliwości radiowej zależy od warunków propagacji w danym środowisku. Jeśli dane są transmitowane za pośrednictwem połączenia bezprzewodowego,
mogą być również odbierane przez osoby nieupoważnione. Firma Targa GmbH nie ponosi odpowiedzialności za jakiejkolwiek zakłócenia spowodowane przez
sygnały o częstotliwości radiowej lub telewizyjnej, powstałe na skutek nieuprawnionej modyfikacji niniejszego urządzenia. Ponadto, firma Targa nie ponosi
odpowiedzialności za wymianę przewodów lub urządzeń, które nie zostały wyraźnie zatwierdzone przez firmę Targa GmbH. Użytkownik ponosi wyłączną
odpowiedzialność za wyeliminowanie wszelkich zakłóceń spowodowanych nieuprawnionymi modyfikacjami niniejszego urządzenia lub za wymianę sprzętu.
Serwisowanie / naprawy
W przypadku jakiegokolwiek uszkodzenia tego urządzenia należy je oddać do naprawy. Dotyczy to m. in. uszkodzenia obudowy urządzenia, przedostania się
płynów lub obiektów do wnętrza obudowy lub wystawienia produktu na działanie deszczu lub wilgoci. Naprawy są konieczne także w przypadku, gdy produkt
nie działa w normalny sposób lub gdy został upuszczony. Jeśli zauważysz dym, dziwne dźwięki lub dziwny zapach, natychmiast wyłącz urządzenie i odłącz
kabel zasilający od gniazda zasilania. W takim przypadku nie wolno dalej używać urządzenia, lecz należy je przekazać do autoryzowanego punktu
serwisowego w celu kontroli. Wszelkie naprawy muszą być wykonywane przez wykwalifikowany personel serwisowy.
Środowisko użytkowania
Urządzenia nie jest przeznaczone do użytku w środowiskach o wysokiej wilgotności (np. w łazienkach) ani w miejscach o nadmiernych poziomach zapylenia.
Temperatura otoczenia i wilgotność podczas użytkowania: Od 0°C do 35°C, maks. 85% wilgotności względnej. Należy pamiętać, że produkty do pielęgnacji
powierzchni meblowych mogą zawierać substancje, które mogą uszkodzić gumowe stopki soundbaru, dlatego należy zachować ostrożność, jeśli używano tego
typu produktów.
Uwaga dotycząca odłączenia od sieci elektrycznej
Należy pamiętać, że wbudowany zasilacz pobiera niewielką ilość energii elektrycznej, gdy wtyk sieciowy jest podłączony do gniazda elektrycznego, nawet w
trybie gotowości. Aby całkowicie odłączyć urządzenie, należy wyjąć wtyk przewodu zasilającego z gniazda elektrycznego.
6.Prawa autorskie
Cała zawartość niniejszej instrukcji obsługi jest chroniona prawami autorskimi i przekazywana czytelnikowi wyłącznie w celach informacyjnych. Kopiowanie
danych i informacji bez wcześniejszego uzyskania wyraźnej pisemnej zgody autora jest surowo zabronione. Dotyczy to również komercyjnego wykorzystywania
treści i informacji. Wszystkie teksty i ilustracje są aktualne na dzień przekazania do druku. Zastrzega się prawo do wprowadzania zmian bez powiadomienia.
SSB 70 C3
Polski - 61
7.Złącza i elementy sterowania
Ilustracja przedstawiająca elementy sterowania i przyciski wraz z odpowiadającymi im numerami znajduje się na wewnętrznej stronie składanej okładki niniejszej
instrukcji obsługi. Okładkę z tą stroną można rozłożyć podczas czytania poszczególnych rozdziałów niniejszej instrukcji obsługi. Umożliwi to odniesienie się w
dowolnej chwili do odpowiednich elementów sterowania.
1 Wyświetlacz LED
2 Przycisk dwufunkcyjny: 1. Wł. / gotowość 2. Źródło
3 Przycisk + (zwiększanie głośności)
4 Port USB (nie do ładowania urządzeń)
5 Przycisk - (zmniejszanie głośności)
6 Nóżki urządzenia
7 Otwory do montażu urządzenia na ścianie
8 Przewód zasilający
9 Gniazdo HDMI ARC
10 Optyczne wejście cyfrowe (Toslink)
11 Gniazdo 3,5 mm AUX-IN
7.1 Pilot zdalnego sterowania
Za pomocą dostarczonego pilota zdalnego sterowania można sterować funkcjami soundbaru. Zapoznaj się z opisem funkcji przycisków poniżej.
12 Wyciszenie
13 HDMI (ARC) Przełącza na wejście HDMI ARC
14 OPTICAL Przełącza na optyczne wejście cyfrowe SPDIF
15 Przełącza na Bluetooth®
16 Odtwarzanie/Pauza
17 Następny utwór
18 STOP
19 TREBLE+ Wzmocnienie wysokich tonów
20 BASS+ Wzmocnienie niskich tonów
21 MOVIE Włącza korektor graficzny dźwięku w filmach
22 3D Włącza korektor graficzny z symulowanym dźwiękiem przestrzennym
23 Zasobnik baterii (tył)
24 DIALOG Włącza korektor graficzny dźwięku do odtwarzania głosu
25 MUSIC Włącza korektor graficzny dźwięku do odtwarzania muzyki
26 BASS- Redukcja niskich tonów
27 TREBLE- Redukcja wysokich tonów
28 Powtarzanie
29 VOL- Zmniejszenie głośności
30 Poprzedni tytuł
31 VOL+ Zwiększenie głośności
32 Włącza / wyłącza wyświetlacz
33 USB Przełącza na wejście USB
34 AUX Przełącza na wejście AUX
35 Włączanie / tryb gotowości
8.Czynności przygotowawcze
Wyjmij z opakowania soundbar i wszystkie akcesoria, po czym usuń folie ochronne. Sprawdź, czy są wszystkie elementy wymienione na liście.
8.1 Ustawienie
Idealna pozycja dla soundbaru znajduje się centralnie pod telewizorem. Soundbar można ustawić na meblu lub przymocować do ściany.
SSB 70 C3
62 - Polski
8.1.1 Montaż na ścianie (rys. C)
Upewnij się, że używasz odpowiedniego materiału do montażu ściennego.
Niezbędne narzędzia/materiały montażowe (nie zawarte w opakowaniu):
•Wiertło (zależnie od ściany)
•2 wkręty i być może 2 kołki rozporowe (zależnie od ściany) do zamocowania do ściany. Należy pamiętać, że wkręty muszą być odpowiednie do ciężaru
soundbaru. Jeśli dostarczone śruby i kołki rozporowe nie są odpowiednie do Twoich specyficznych warunków, należy upewnić się, że wymiary łba i
trzpienia wkrętów odpowiadają wymiarom tych dostarczonych w celu zagwarantowania bezpiecznego montażu.
•Wkrętak krzyżakowy i ew. inne wkrętaki, poziomnica, ołówek
Przed wierceniem należy upewnić się, że w ścianie nie ma przewodów wodnych, gazowych lub elektrycznych. W razie potrzeby poproś fachowca, aby
zamontował urządzenie na ścianie.
•Wywierć dwa otwory w odległości 739 mm. Użyj dostarczonego szablonu dla ułatwienia montażu.
•Jeżeli użyjesz dostarczonych kołków rozporowych, użyj wiertła 8 mm.
•Wsuń kołki rozporowe w wywiercone otwory.
•Wkręć wkręty tak, by łeb wkręta wystawał na ok. 3 mm od powierzchni ściany.
•Podłącz wszystkie niezbędne przewody soundbaru.
•Umieść urządzenie otworami do montażu na ścianie w dół na wkrętach tak, by wkręty weszły w pionowe rowki uchwytów do montażu na ścianie i dokręć
wkręty.
•Na koniec sprawdź, czy soundbar jest pewnie zamocowany na obu wkrętach. W razie konieczności, powtórz proces. Może być potrzebny lekki obrót
wkrętów w prawo lub w lewo.
8.2 Wkładanie baterii do pilota zdalnego sterowania
Otwórz komorę baterii (23) z tyłu pilota, zdejmując pokrywkę komory baterii w kierunku pokazanym strzałką. Włóż baterie (2 baterie typu AAA), zwracając
uwagę na prawidłową biegunowość (+ i -). Prawidłowa biegunowość jest oznaczona na bateriach i wewnątrz komory baterii (23). Ponownie załóż pokrywkę
komory baterii (23) i przesuń ją w kierunku odwrotnym do strzałki, aż zatrzaśnie się na miejscu. Zapoznaj się też z rysunkiem B na rozkładanej stronie okładki.
8.3 Opcje połączeń / tryby pracy
UWAGA! Upewnij się, że soundbar i urządzenia, które mają być podłączone, są wyłączone podczas ich podłączania. Zapoznaj się
również z instrukcją obsługi podłączanego urządzenia.
Połączenie HDMI (ARC) działa tylko wtedy, gdy wszystkie podłączone komponenty są zgodne z ARC. Użyj dostarczonego przewodu
HDMI (ARC) (C). Patrz również instrukcja obsługi podłączanego urządzenia.
Długość kabla używanego do odtwarzania nie może przekraczać 3 metrów.
Soundbar SSB 70 C3 umożliwia odtwarzanie dźwięku i/lub muzyki z różnych źródeł.
Odtwarzaniem można sterować za pomocą przycisków na urządzeniu lub na pilocie.
Za pomocą przycisku Źródło (2) lub pilota zdalnego sterowania można wybrać żądany tryb pracy. Tryby pracy i odpowiednie informacje na wyświetlaczu można
znaleźć w poniższej tabeli:
Tryb pracy /
źródło
Wejście Przeznaczenie Przycisk na pilocie Wyświetl
acz
HDMI ARC HDMI(ARC) (9) Połączenie przez przewód HDMI (ARC) do wtyku HDMI (ARC), np.
TV lub odtwarzacz DVD
HDMI(ARC) (13)Hd
OPTICALOPTICAL (10)Połączenie przez przewód Toslink, np.. TV lub odbiornik cyfrowy OPTICAL (14)OPtI
BLUETOOTH®----- Przez połączenie bezprzewodowe, np. ze smartfona przycisk (15)bt
USBUSB (4)Podłączanie mediów USB, np. pamięci USB do odtwarzania plików
audio (obsługiwane formaty audio: MP3 i WAV)
USB (33)USB
AUXUSB (11)Podłączanie przez przewód adapterowy (mini-jack stereo - Cinch),
np. odtwarzacz DVD lub odbiornik satelitarny
AUX (34)AUX
SSB 70 C3
Polski - 63
8.4 Informacje na wyświetlaczu
Za każdym razem, gdy ustawienie jest zmieniane na soundbarze, wyświetlacz LED (1) zwiększa na około 8 sekund jasność do maksymalnego poziomu, a
następnie powraca do niższego poziomu jasności.
Ustawienie Wyświetlacz LED
„Tryb gotowości” - -
Tryb “HDMI(ARC)” Hd
Tryb “BLUETOOTH®” bt
Tryb “OPTICAL” OPtI
Tryb “USB” USB
Tryb “AUX” AUX
Ustawienia audio “MOVIE” CINE
Ustawienia audio “DIALOG” dIA
Ustawienia audio “MUSIC” SONG
Ustawienia audio “3D” 3d
“VOL-“ / „VOL+” V 00 do V 40
“TREBLE” t -5 do t 5
“BASS” b -5 do b 5
Do playbacku USBCzas odtwarzania ścieżki w formacie mm:ss
“ON” lub “AL”
Naciśnij przycisk (32), by wyłączyć wyświetlacz LED (1). Ponowne naciśnięcie przycisku (32)lub dowolnego innego przycisku ponownie włącza
wyświetlacz LED (1).
9.Rozpoczęcie użytkowania
Niniejsza instrukcja obsługi ogólnie opisuje sposób korzystania z pilota zdalnego sterowania.
Niektóre podstawowe funkcje (włączanie/gotowość, wybór źródła i ustawienie głośności) mogą być również regulowane bezpośrednio
z soundbaru.
Soundbar przełącza się w tryb gotowości po ok. 10 minutach, jeśli ...
nie nawiązano połączenia Bluetooth.
.... nie jest odbierany żaden sygnał audio lub jest odbierany tylko bardzo słaby sygnał audio i nie został naciśnięty żaden przycisk.
W trybie HDMI(ARC) i OPTICAL należy pamiętać:
jeśli źródło dźwięku obsługuje odtwarzanie wielokanałowe, przed rozpoczęciem odtwarzania należy przełączyć je na "PCM Stereo",
ponieważ w przeciwnym razie soundbar nie będzie w stanie odtworzyć dźwięku. Proszę zapoznać się z instrukcją obsługi źródła
dźwięku.
9.1 Podłączanie soundbaru
Włóż wtyk sieciowy przewodu zasilającego soundbaru do łatwo dostępnego gniazda sieciowego. Soundbar nie ma oddzielnego głównego wyłącznika,
przechodzi bezpośrednio do trybu gotowości, gdy tylko zostanie podłączony do zasilania. Wyświetlacz LED (1) pokazuje “- -”. Naciśnij przycisk gotowości
(2, 35), by wybudzić soundbar ze stanu gotowości.
9.2 Wyłączanie soundbaru
Naciśnij przycisk gotowości ( 35), by przełączyć soundbar do stanu gotowości. Alternatywnie można nacisnąć przycisk Standby (2) na soundbarze
przez około 1 sekundę. Soundbar nie ma oddzielnego głównego wyłącznika. Należy pamiętać, że zasilacz sieciowy pobiera niewielką ilość energii elektrycznej,
gdy wtyk sieciowy jest podłączony do gniazda elektrycznego, nawet w trybie gotowości. Aby całkowicie odłączyć urządzenie, należy wyjąć wtyk przewodu
zasilającego z gniazda elektrycznego.
SSB 70 C3
64 - Polski
9.3 Wybór trybu pracy
Nacisnąć odpowiedni przycisk (13, 14, 15, 33, 34), by wybrać żądany tryb pracy. Alternatywnie, można przełączać się między trybami, naciskając krótko
przycisk (2) na soundbarze kilka razy. Wybrany tryb wyświetlany jest na wyświetlaczu LED (1) w następujący sposób:
Tryb pracyWyświetlacz
HDMI ARC Hd
OPTICALOPtI
BLUETOOTH®bt
USBUSB
AUXAUX
Teraz można rozpocząć odtwarzanie na podłączonym urządzeniu i sterować nim za pomocą pilota zdalnego sterowania. Patrz instrukcja obsługi podłączonego
urządzenia do odtwarzania.
9.3.1 Tryb “HDMI ARC”
HDMI (ARC Audio Return Channel) jest rozszerzeniem konwencjonalnego połączenia HDMI, które umożliwia przesyłanie sygnałów audio
kanału ARC w obu kierunkach. Aby móc korzystać z tej funkcjonalności, wszystkie użyte komponenty muszą być zgodne z ARC.
Większość nowoczesnych telewizorów, konsol do gier i odbiorników cyfrowych ma wyjście ARC. Zapoznaj się z instrukcją obsługi
podłączanego urządzenia.
Jeśli transmisja audio nie działa, upewnij się, że kabel HDMI i połączenie w urządzeniu źródłowym są zgodne z ARC. Możliwe, że tylko
określone połączenia w urządzeniu źródłowym są zgodne z ARC.
Sposób podłączenia soundbaru do telewizora opisano poniżej:
•Za pomocą przewodu zgodnego ze standardem HDMI(ARC) (C, dostarczony) podłącz gniazdo HDMI(ARC) (9) w soundbarze do wyjścia HDMI(ARC) w
telewizorze. Ustaw podłączone urządzenie na "PCM Stereo" lub "Stereo 2.0".
•Włącz soundbar za pomocą przycisku Standby (2, 35).
•Naciśnij przycisk “HDMI (ARC)” (13), by wybrać wejście HDMI(ARC) w soundbarze.
•Włącz telewizor, odtwarzanie dźwięku rozpocznie się w ciągu kilku sekund.
Jeżeli telewizor obsługuje protokół CEC, soundbar można włączać i wyłączać pilotem zdalnego sterowania telewizora. W takim przypadku
głośność można regulować również za pomocą pilota telewizora. Informacji na ten temat należy szukać w instrukcji obsługi telewizora.
9.3.2 Tryb “OPTICAL”
Ten tryb pracy służy do odtwarzania przez soundbar (A) muzyki z optycznego wejścia cyfrowego (10), na przykład z telewizora. Telewizor musi mieć optyczne
wyjście cyfrowe. Do wykonania połączenia należy użyć dostarczonego kabla optycznego (Toslink). Sposób postępowania:
•Podłącz kabel Toslink (D) do optycznego wyjścia cyfrowego telewizora.
•Podłącz kabel Toslink (D) do optycznego wejścia cyfrowego (10) soundbaru.
•Włącz telewizor i soundbar. Ustaw podłączony telewizor na "PCM Stereo" lub "Stereo 2.0".
•Rozpocznij odtwarzanie na telewizorze.
•Naciśnij przycisk “OPTICAL” (14) na pilocie zdalnego sterowania, by wybrać ten tryb pracy.
•Za pomocą przycisków głośności (29, 31) można dostosować głośność do własnych potrzeb.
•
Jeśli chcesz, możesz zmienić ustawienia audio za pomocą odpowiednich przycisków na pilocie zdalnego sterowania.
Informacji na ten temat należy szukać w instrukcji obsługi telewizora.
9.3.3 Tryb “BLUETOOTH”
Nazwa urządzenia Bluetooth soundbaru toSSB70 C3.
W przypadku wyświetlenia monitu o wprowadzenie koduPIN podczas parowania, należy wprowadzić„0000”.
Ustanowienie połączenia może zająćzmienną ilośćczasu,w zależności od urządzenia.
Nawiązywanie połączenia
•
Naciśnij przycisk (15), by przejść do trybu Bluetooth.
Po przełączeniu w tryb Bluetooth, soundbar automatycznie łączy się ze sparowanymi urządzeniami (na wyświetlaczu LED (1) jest wyświetlana
stała wartość „bt") lub, jeśli nie znaleziono sparowanego urządzenia, automatycznie przełącza się w tryb parowania Bluetooth (na wyświetlaczu
LED (1) jest wyświetlana migająca wartość „bt"). W przypadku utraty połączenia ze sparowanymi urządzeniami, urządzenie wyłącza się po ok.
10 minutach.
•Jeśli urządzenie odtwarzające nie zostało jeszcze sparowane z soundbarem, na wyświetlaczu miga “bt”.
SSB 70 C3
Polski - 65
•Uruchom tryb skanowania Bluetooth w urządzeniu odtwarzającym (np. smartfonie). Powinien on znaleźć soundbar pod nazwą “SSB 70C3”.
•Teraz nawiąż połączenie Bluetooth pomiędzy urządzeniem odtwarzającym a soundbarem.
•Po nawiązaniu połączenia na wyświetlaczu LED (1) pojawi się napis „bt" izostanie odtworzony sygnałdźwiękowy potwierdzenia.
Ogólnie rzecz biorąc, należy sparować urządzenia tylko raz, ponieważ urządzenie odtwarzające zapisuje nazwę soundbaru. Oznacza to, że
nie ma potrzeby ręcznego parowania urządzeń podczas ponownego nawiązywania połączenia.
Jeśli chcesz usunąć istniejące parowanie Bluetooth lub przełączyć się na tryb parowania, naciśnij i przytrzymaj przez około 1 sekundę przycisk
(15)na pilocie zdalnego sterowania.
•Teraz można rozpocząć odtwarzanie muzyki z urządzenia źródłowego. Dźwięk jest odtwarzany przez soundbar.
•Można użyć przycisków (16), (17)i(30)na pilocie zdalnego sterowania lub w urządzeniu źródłowym do sterowania odtwarzaniem.
•Za pomocą przycisków głośności (29, 31) można dostosować głośność do własnych potrzeb.
Rozłączanie
Parowanie Bluetooth jest rozłączane, gdy ...
•… jedno z urządzeń zostanie wyłączone. Rozlegnie się sygnał dźwiękowy potwierdzenia.
•... Bluetooth zostanie wyłączony. Rozlegnie się sygnał dźwiękowy potwierdzenia.
•... soundbar i urządzenie źródłowe znajdują się poza zasięgiem Bluetooth (ok. 10 metrów).
9.3.4 Tryb “USB”
Kolejność odtwarzanych ścieżek/folderów zależy od kolejności ich kopiowania do pamięci USB.
W tym trybie można użyć soundbaru do odtwarzania plików audio zapisanych na nośniku USB, np. w pamięci USB. W przypadku podłączania dysku
twardego USB należy pamiętać, że maksymalny prąd na złączu USB soundbaru wynosi 500 mA. Patrz również instrukcja obsługi dysku twardego USB.
Jeśli chcesz użyć dysku twardego jako urządzenia do odtwarzania przez USB, użyj kabla Y z oddzielnym zasilaniem do podłączenia dysku.
Należy pamiętać, że czasami mogą wystąpić problemy z kompatybilnością urządzenia pamięci masowej USB i soundbaru, co oznacza, że
dostępna jest tylko ograniczona funkcjonalność lub może ono w ogóle nie działać. Jeśli tak się stanie, wypróbuj inne urządzenie pamięci masowej
USB.
•Podłącz urządzenie pamięci masowej USB do portu USB (4) soundbaru.
•Naciśnij przycisk “USB” (33) na pilocie zdalnego sterowania, by wybrać ten tryb pracy.
Naciśnij przycisk (16), jeśli odtwarzanie zostało wcześniej
wstrzymane przyciskiem (18).
Wznów odtwarzanie na początku ostatnio odtwarzanego folderu.
Krótko nacisnąć przycisk (17). Przeskocz do następnej ścieżki.
Naciśnij i przytrzymaj przycisk (17). Przeskocz do 1. ścieżki następnego folderu.
Krótko naciśnij przycisk (30). Przeskocz do poprzedniej ścieżki.
Naciśnij i przytrzymaj przycisk (30). Przeskocz do 1. ścieżki poprzedniego folderu.
Naciśnij przycisk (18). Wstrzymaj odtwarzanie, odtwarzanie będzie kontynuowane z pierwszą
ścieżką w ostatnio odtwarzanym folderze po naciśnięciu przycisku (16).
Naciśnij dwa razy szybko po sobie przycisk (18). Przeskocz do 1. ścieżki 1. folderu.
SSB 70 C3
66 - Polski
Naciśnięcie przycisku (28) powtarza odtwarzanie bieżącej ścieżki (wyświetlacz pokazuje „ON”) lub powtarza wszystkie ścieżki zapisane na urządzeniu
pamięci masowej (wyświetlacz pokazuje „AL”).
Wyświetlacz LED Funkcja
ON Powtarza bieżącą ścieżkę.
AL Powtarza wszystkie ścieżki.
UWAGA! Portu USB (4) nie wolno używać do ładowania zewnętrznych urządzeń.
9.3.5 Tryb “AUX”
Ten tryb służy do podłączenia urządzenia odtwarzającego z wyjściem Cinch, np. odtwarzacza DVD lub odbiornika satelitarnego. Użyj dostarczonego przewodu
adapterowego (E).
•Podłącz wyjście Cinch odtwarzacza do gniazda AUX (11) soundbaru.
•Włącz soundbar za pomocą przycisku Standby (2, 35).
•Naciśnij przycisk “AUX” (34) na pilocie zdalnego sterowania, by wybrać ten tryb pracy.
•
Za pomocą przycisków głośności (29, 31) można dostosować głośność do własnych potrzeb.
•
Jeśli chcesz, możesz zmienić ustawienia audio za pomocą odpowiednich przycisków na pilocie zdalnego sterowania.
9.4 Ustawienia głośności i dźwięku
Wszystkie zmiany głośności i ustawień dźwięku są wyświetlane na wyświetlaczu LED (1) przez ok. 2 sekundy. Następnie wyświetlacz
powraca do odpowiedniego trybu wyświetlania.
9.4.1 Regulacja głośności
Głośność podczas odtwarzania można regulować za pomocą przycisków głośności (29, 31) na pilocie zdalnego sterowania. Alternatywnie można użyć
przycisków głośności (3, 5) na soundbarze. Możesz również przytrzymać przyciski, aby szybciej zmienić ustawienie. Wybrana głośność jest wyświetlana na
wyświetlaczu LED (1) przez ok. 2 sekundy. Jeżeli ustawisz głośność na najniższym poziomie, na wyświetlaczu LED (1) będzie ciągle migać „V 00”.
9.4.2 Wyciszanie dźwięku
Aby czasowo wyciszyć dźwięk, naciśnij przycisk (12).
9.4.3 Regulacja wysokich i niskich tonów
Można regulować wysokie tony zgodnie ze swoimi wymaganiami, korzystając z przycisków TREBLE+ (19) i TREBLE- (27).
Aby wyregulować niskie tony, naciśnij przyciski BASS+ (20) i BASS- (26).
Niniejszy produkt jest objęty trzyletnią gwarancją od daty zakupu. W przypadku stwierdzenia wad tego produktu przysługują Państwu ustawowe uprawnienia w
stosunku do sprzedawcy tego produktu. Nasza przedstawiona poniżej gwarancja w niczym nie ogranicza tych praw.
Warunki gwarancji
Bieg gwarancji rozpoczyna się od daty zakupu. Prosimy zachować oryginalny dowód zakupu. Ten dokument będzie potrzebny jako dowód zakupu. Jeżeli w
ciągu trzech lat od daty zakupu tego produktu wystąpi w nim wada materiałowa lub produkcyjna, naprawimy go bezpłatnie lub wymienimy na nowy – wedle
naszego swobodnego uznania.
Czas gwarancji i ustawowe roszczenia z tytułu wad
Świadczenie gwarancyjne nie powoduje przedłużenia gwarancji. Dotyczy to także wymienionych i naprawionych części. Szkody i wady istniejące już w chwili
zakupu należy zgłosić niezwłocznie po rozpakowaniu. Po upływie gwarancji wszelkie naprawy są płatne.
Zakres gwarancji
Urządzenie zostało wyprodukowane z zachowaniem surowych norm jakościowych i przed dostawą zostało dokładnie sprawdzone. Gwarancja obejmuje wady
materiałowe lub produkcyjne. Gwarancja nie obejmuje tych części produktu, które ulegają normalnemu zużyciu i dlatego należy je traktować jako części normalnie
zużywające się i nie obejmuje uszkodzeń części łamliwych, jak np. wyłączniki, akumulatory lub części wykonane ze szkła. Gwarancja traci ważność w razie
uszkodzenia produktu, niewłaściwego użytkowania lub naprawy produktu. Prawidłowe użytkowanie produktu wymaga dokładnego przestrzegania wszystkich
wskazówek wymienionych w instrukcji obsługi. Należy bezwzględnie unikać przeznaczeń i sposobów użytkowania, które nie są zalecane lub przed którymi
ostrzega instrukcja obsługi. Produkt jest przeznaczony wyłącznie do użytku domowego i nie jest przeznaczony do użytku komercyjnego. W przypadku
nieprawidłowej obsługi, aktów przemocy lub ingerencji, które nie zostały wykonane przez autoryzowaną filię serwisu, gwarancja wygasa. Naprawa lub wymiana
produktu nie powoduje rozpoczęcia nowego okresu gwarancyjnego.
Postępowanie w przypadku objętym gwarancją
Aby umożliwić szybkie załatwienie reklamacji, prosimy przestrzegać następujących wskazówek:
-Przed uruchomieniem produktu prosimy dokładnie zapoznać się z załączoną dokumentacją. W razie wystąpienia problemu, którego nie można
rozwiązać w ten sposób, prosimy skontaktować się z naszą infolinią pomocy technicznej.
-Przy każdym kontakcie z infolinią pomocy technicznej należy mieć pod ręką dowód zakupu i numer artykułu lub numer seryjny, jeśli jest dostępny, jako
dowód zakupu.
-W przypadku, gdy rozwiązanie problemu przez telefon nie będzie możliwe, w zależności od przyczyny usterki nasza infolinia pomocy technicznej
zorganizuje inną formę serwisowania.
Serwis
Telefon: 22 397 4996
E-Mail: targa@lidl.pl
IAN: 315507
Producent
Należy pamiętać, że poniższy adres nie jest adresem serwisu. Najpierw należy skontaktować się z podanym powyżej punktem serwisowym.
8. Dříve než začnete ................................................................................................................ 74
8.1 Umístění .......................................................................................................................................................................... 74
8.1.1 Montáž na stěnu (Obrázek C) .............................................................................................................................. 74
8.2 Vkládání baterií do dálkového ovladače .................................................................................................................... 75
8.3 Možnosti připojení / Provozní režimy ......................................................................................................................... 75
8.4 Údaje na displeji ........................................................................................................................................................... 75
9.3 Volba režimu ................................................................................................................................................................. 76
10.1 Skladování, pokud se zařízení nepoužívá ................................................................................................................ 79
11. Odstraňování problémů .................................................................................................... 80
12. Předpisy na ochranu životního prostředí a informace o likvidaci ....................................... 80
13. Prohlášení o shodě ............................................................................................................ 80
14. Informace o záruce a servisu ............................................................................................. 81
SSB 70 C3
70 - Čeština
Blahopřejeme!
Zakoupením reprosystému soundbar SilverCrest jste si vybrali jakostní výrobek.
Před prvním použitím se seznamte s principem, na němž soundbar pracuje, a pozorně si přečtěte tyto provozní pokyny. Dbejte na dodržování bezpečnostních
pokynů a soundbar používejte v souladu s provozními pokyny a podle doporučovaného využití.
Tyto provozní pokyny si uložte na bezpečném místě. Pokud soundbar předáte někomu dalšímu, nezapomeňte mu s ním předat i všechny související dokumenty.
Tento soundbar splňuje všechny normy a nařízení uvedené v Prohlášení o shodě pro EU. Výrobce není odpovědný za jakékoli škody nebo problémy způsobené
neautorizovanými úpravami. Používejte pouze příslušenství doporučené výrobcem. Dodržujte předpisy a zákony platné v zemi použití.
1.Ochranné známky
Výraz Bluetooth® a logo jsou registrovanými ochrannými známkami společnosti Bluetooth SIG, Inc. (Special Interest Group). Společnost TARGA GmbH používá
tyto známky na základě licence.
Obchodní známka SilverCrest a značka SilverCrest jsou majetkem příslušných vlastníků.
HDMI® je registrovaná ochranná známka společnosti HDMI Licensing LLC.
USB je registrovaná ochranná známka.
Ostatní názvy a výrobky mohou být ochrannými známkami nebo registrovanými ochrannými známkami příslušných vlastníků.
2.Určené použití
Tento SilverCrest Soundbar SSB 70 C3 s technologií Bluetooth® je zařízení pro informační technologie a slouží k reprodukci zvuku audio zařízení. Soundbarlze
používatpouze k soukromým účelům, nikoli k průmyslovému nebo komerčnímu využití. Zařízení se nesmí používat v exteriéru a v tropickém podnebí.
3.Obsah balení
Přístroj a veškeré příslušenství vyndejte z obalu. Odstraňte obalový materiál a zkontrolujte, zda jsou všechny součástí kompletní a nepoškozené. Pokud zjistíte
jakoukoli chybějící nebo poškozenou položku, kontaktujte výrobce.
A Soundbar SilverCrest SSB 70 C3
B Dálkový ovladač
C Kabel HDMI (ARC)
D Optický kabel (Toslink)
E Kabelový adaptér, jack 3,5 mm na konektor typu Cinch
F 2 baterie typu AAA/LR03, 1,5 V
G 2 šrouby (pro montáž na stěnu)
H 2 hmoždinky (pro montáž na stěnu)
I Tento uživatelský návod (s vyobrazeními)
J Stručný průvodce instalací (s nákresy)
Leták HDMI ARC (není vyobrazen)
Vrtací šablona (bez vyobrazení)
SSB 70 C3
Čeština - 71
4.Technické údaje
SSB 70 C3
Vstupní napětí / frekvence 110 – 240 V , 50/60 Hz
Příkon při zapnutí / v pohotovostním režimu max. 80 W / < 0,5 W
Reprodukto
r
Výkon 2 x 17 W RMS plus subwoofer 1 x 35 W RMS
Vstupní zvukový formá
t
Stereo PCM
Vstup AUX IN Zdířka jack 3,5 mm
Digitální vstup (SPDIF) Optický vstup (Toslink)
Kabel HDMI (ARC) Konektor HDMI ARC
Vstup USB
Výstupní proud
Struktura formátu
Přehrávatelné zvukové formáty
Port USB, typ A
Max. 500 mA
FAT 32, exFAT
MP3, WAV
Specifikace Bluetooth®: V 5.0
Podporované profily: A2DP, AVRCP
Bluetooth® vysílací výkon: max. 10 dBm
Bluetooth® kmitočtové pásmo: 2402 - 2480 GHz
Bluetooth® rozsah: cca 10 m
Napájení dálkového ovladače 2 baterie typu AAA/LR03, 1,5 V
Rozměry (Š x H x V) cca 90,2 x 8,2 x 7,0 cm
Hmotnost bez příslušenství cca 1 980 g
Provozní teplota 0 °C až 35 °C
Provozní vlhkost 85 % rel. vlhkosti
Skladovací podmínky 0 °C až 40 °C, max. rel. vlhkost 85 %
Technické údaje a vzhled mohou být předmětem změny bez předchozího upozornění.
5.Bezpečnostní pokyny
Před prvním použitím tohoto zařízení si přečtěte níže uvedené poznámky a dbejte na všechna upozornění, a to i v případě, že máte s používáním elektronických
zařízení zkušenosti. Tuto příručku uchovejte na bezpečném místě, abyste se k ní mohli v budoucnu vracet. Pokud zařízení prodáte nebo ho předáte dál, předejte
současně i tuto příručku. Uživatelská příručka je součástí dodávky zařízení.
Popis použitých symbolů
POZOR! Tato ikona a výstražný nápis „POZOR“ vás upozorní na potencionálně nebezpečnou situaci. Pokud ho budete ignorovat, může
dojít k vážnému poranění či dokonce úmrtí.
VAROVÁNÍ! Tento symbol a nápis „VAROVÁNÍ“ označuje důležité informace pro bezpečné používání výrobku a bezpečnost
uživatele.
VÝSTRAHA! Tento symbol a nápis „Výstraha“ znázorňuje důležité pokyny týkající se ochrany před poškozením majetku.
Tento symbol označuje další informace na dané téma.
Čtěte uživatelskou příručku!
Stejnosměrný proud
Střídavý proud
Bezpečnostní třída II, ochranná izolace
SSB 70 C3
72 - Čeština
VAROVÁNÍ! Vždy se ujistěte, že
•přístroj není vystaven působení stříkající nebo kapající vody či agresivních kapalin a nesmí se používat v blízkosti vody; především se nikdy
nesmí ponořit do kapaliny (do blízkosti zařízení také neumisťujte předměty naplněné vodou, například vázy nebo skleničky).
•na přístroj nebo do jeho blízkosti nestavte zdroje otevřeného ohně (např. zapálené svíčky);
•nedošlo k průniku cizích předmětů.
•přístroj není vystaven větším teplotním rozdílům, které by mohly způsobit vznik kondenzace a zkrat. Pokud byl přístroj vystaven extrémním
rozdílům teplot, před jeho zapnutím vyčkejte, dokud nedosáhne teploty prostředí (asi 2 hodiny).
•přístroj není zakrytý. Pokud je přístroj zakrytý, může dojít k akumulaci tepla, a proto existuje nebezpečí požáru.
•kryt není otevřený. Může dojít k úrazu elektrickým proudem.
•síťové vidlice se nesmíte dotýkat mokrýma rukama. Může dojít k úrazu elektrickým proudem.
•použitá zásuvka musí být vždy snadno přístupná, protože síťová zástrčka je používána jako odpojovací zařízení.
•během bouřky je síťová vidlice odpojena od zásuvky. Hrozí nebezpečí požáru nebo poškození majetku.
Pokud výše uvedené pokyny nedodržíte, může dojít ke zranění.
VÝSTRAHA! Vždy se ujistěte, že
•přístroj není vystaven přímým zdrojům tepla (např. radiátory);
•na přístroj nepůsobí žádné přímé sluneční záření ani jasné umělé světlo;
•ponecháte alespoň 1 m prostoru od vysokofrekvenčních a magnetických zdrojů (např. reproduktory, mobilní telefony, atd.), aby nedošlo
k žádné poruše. V případě rušení nainstalujte přístroj na jiné místo.
•přístroj není vystaven nadměrným otřesům a vibracím;
•USB port (4) se nesmí používat k nabíjení externích zařízení.
Pokud výše uvedené pokyny nedodržíte, může dojít k poškození přístroje nebo ke zranění.
POZOR!Baterie
Při vkládání baterií dbejte na dodržení správné polarity. Postupujte dle nákresu, který se nachází uvnitř prostoru pro baterie. Baterie se nepokoušejte nabíjet a
nikdy je nevyhazujte do ohně. Nepoužívejte současně různé typy baterií (staré a nové nebo uhlíkové a alkalické a podobně). Pokud nebudete zařízení delší dobu
používat, baterie vyjměte. Nevhodné použití může způsobit výbuch nebo únik elektrolytu. Baterie nejsou určeny na hraní! V případě spolknutí baterie okamžitě
vyhledejte lékařskou pomoc. Baterie se nesmí otevírat ani deformovat, protože by mohlo dojít k úniku chemických látek a poranění. V případě kontaktu elektrolytu
z baterie s vaší pokožkou nebo očima si je okamžitě vypláchněte velkým množstvím vody a vyhledejte lékařskou pomoc.
POZOR!Osobní bezpečnost
Elektrická zařízení nejsou vhodná pro děti. Osoby s fyzickými, smyslovými nebo duševními poruchami smí používat elektrická zařízení pouze v mezích svých
možností. Nedovolte dětem nebo postiženým osobám se sníženými fyzickými, smyslovými nebo duševními schopnostmi, aby používaly elektrická zařízení bez
dozoru, kromě případů, kdy jsou náležitě poučeny a dohlíží na ně kompetentní osoba odpovědná za jejich bezpečnost. Děti musí být vždy pod dohledem, aby
bylo jisté, že si s výrobkem nehrají. Malé součásti mohou způsobit udušení. Obalový materiál uchovávejte mimo dosah těchto osob.Obalový
materiál není určen ke hraní.
Hrozí nebezpečí udušení.
VAROVÁNÍ! Kabely
Při odpojování od zásuvky držte kabel za vidlici, nikdy netahejte za samotný kabel. Na kabely nikdy nepokládejte kusy nábytku ani jiné těžké předměty a dejte
pozor, aby nedošlo k uvíznutí kabelů, zejména u vidlic a zásuvek. Kabely nikdy neinstalujte okolo horkých nebo ostrých předmětů, aby nedošlo k jejich poškození.
Na kabelech nikdy nedělejte uzly a nesvazujte je spolu s jinými kabely. Všechny kabely umístěte tak, aby nepřekážely a nehrozilo nebezpečí zakopnutí.
SSB 70 C3
Čeština - 73
POZOR!Rádiové rozhraní
Pokud jste na palubě letadla, v nemocnici, na operačním sále nebo v blízkosti lékařských elektronických přístrojů, přístroj vypněte. Vysokofrekvenční signály by
mohly rušit citlivá zařízení. Zařízení umístěte nejméně 20 cm od kardiostimulátorů, protože elektromagnetické vlny by mohly rušit jeho činnost. Vysílané
elektromagnetické signály mohou rušit činnost naslouchacích přístrojů. Zařízení s aktivovaným bezdrátovým režimem neumísťujte do blízkosti hořlavých plynů nebo
do prostředí, kde hrozí nebezpečí výbuchu (např. lakýrnické dílny), protože vyzařující vysokofrekvenční signály mohou vyvolat výbuch nebo požár. Dosah
vysokofrekvenčního signálu je ovlivněn okolními podmínkami. Při bezdrátovém přenosu dat se může stát, že tato data budou přijata neautorizovanými stranami.
Společnost Targa GmbH není odpovědná za problémy s rádiovými nebo televizními signály způsobenými neautorizovanými úpravami tohoto zařízení. Společnost
Targa GmbH dále nepřijímá žádnou odpovědnost za výměnu jakýchkoli kabelů či zařízení, které nebyly schváleny přímo společností Targa GmbH. Za řešení
veškerých problémů s rušením způsobených neoprávněnými úpravami tohoto přístroje a za jeho výměnu je plně odpovědný uživatel.
Servis / Opravy
V případě jakéhokoli poškození přístroje je nutná oprava - např. když dojde k poškození jeho krytu, vniknutí tekutiny nebo předmětů nebo pokud byl přístroj
vystaven dešti či vlhkosti. Oprava je nutná také v případě, kdy přístroj nefunguje správně nebo došlo k jeho pádu. Pokud si všimnete kouře, neobvyklého zvuku
nebo podivného zápachu, přístroj okamžitě vypněte a odpojte napájecí kabel ze zásuvky. Přístroj se v takovém případě nesmí dále používat, dokud nebude
prověřen pracovníkem autorizovaného servisu. Všechny opravy musí provádět kvalifikovaný servisní technik.
Provozní podmínky
Přístroj není určen k provozu v prostředí s vysokou vlhkostí (např. koupelny) nebo nadměrným množstvím prachu. Provozní teplota a provozní vlhkost: 0 °C až
35 °C, relativní vlhkost max. 85 %. Pamatujte si, že prostředky pro ošetřování povrchu nábytku mohou obsahovat látky, které mohou poškodit gumové nožičky
soundbar systému. Proto buďte při používání výrobků tohoto typu opatrní.
Poznámka týkající se odpojení od elektrické sítě
Mějte na paměti, že vestavěný napájecí adaptér spotřebovává při připojení k síti malé množství elektrického proudu i v pohotovostním režimu. Chcete-li jej od sítě
zcela odpojit, vytáhněte vidlici napájecího kabelu ze zásuvky.
6.Ochrana autorských práv
Veškerý obsah tohoto uživatelského návodu je chráněn autorským právem a čtenáři slouží pouze k informačním účelům. Kopírování dat a informací bez předešlého
výslovného písemného schválení autora je přísně zakázáno. To se týká i komerčního využití tohoto obsahu a informací. Všechny texty a obrázky jsou aktuální
k datu vytištění. Údaje podléhají změnám bez předchozího upozornění.
7.Připojení a ovládací prvky
Vyobrazení položek a ovládacích prvků a jejich příslušná čísla naleznete na vnitřní straně rozkládací obálky této uživatelské příručky. Tuto stranu můžete při čtení
různých kapitol příručky ponechat rozevřenou. Tak si můžete příslušné prvky kdykoli prohlédnout.
K ovládání funkcí soundbaru lze použít dodávaný dálkový ovladač. Funkce tlačítek naleznete v následujícím seznamu.
12 Vypnutí zvuku
13 HDMI (ARC) Přepnutí na vstup HDMI ARC
14 OPTICAL Přepíná na optický digitální vstup SPDIF
15 Aktivace Bluetooth®
16 Přehrát/Pauza
17 Další skladba
18 STOP
19 TREBLE+ Zdůraznění výšek
20 BASS+ Zdůraznění hloubek
21 MOVIE Ekvalizér s nastavením pro sledování filmů
22 3D Ekvalizér se simulací prostorového zvuku
23 Přihrádka na baterie (na zadní straně)
24 DIALOG Ekvalizér s nastavením pro mluvené slovo
25 MUSIC Ekvalizér s nastavením pro poslech hudby
26 BASS- Potlačení hloubek
27 TREBLE– Potlačení výšek
28 Opakovat
29 VOL- Snížení hlasitosti
30 Předchozí skladba
31 VOL+ Zvýšení hlasitosti
32 Zobrazení na displeji zapnuto/vypnuto
33 USB Přepnutí na vstup USB
34 AUX Přepíná na vstup AUX
35 Tlačítko Zapnutí/Pohotovostní režim
8.Dříve než začnete
Soundbar systém a veškeré příslušenství vyjměte z obalu a odstraňte z něj plastovou fólii. Ověřte si, zda jste obdrželi všechny uvedené položky.
8.1 Umístění
Ideální umístění pro soundbar je ve středu pod televizorem. Soundbar lze položit na kus nábytku nebo připevnit na stěnu.
8.1.1 Montáž na stěnu (Obrázek C)
Ujistěte se, že používáte materiál vhodný k montáži na stěnu.
Nástroje/potřebný montážní materiál (není součástí balení):
•Vrtačka (závisí na typu stěny)
•2 šrouby a možná 2 hmoždinky k připevnění na stěnu (závisí na typu stěny). Mějte na paměti, že šrouby musí odpovídat hmotnosti soundbaru. Pokud nejsou
dodané šrouby a hmoždinky vhodné pro vaše konkrétní podmínky, ověřte si, zda rozměry hlavy a dříku šroubu odpovídají dodávaným, aby byla zaručena
bezpečná montáž.
•Křížový šroubovák a možná jiné šroubováky, vodováha, tužka
Před vrtáním se ujistěte, že ve zdi není žádné vodovodní nebo plynové potrubí nebo elektrické rozvody. V případě potřeby si k montáži na stěnu sjednejte
odborníka.
•Vyvrtejte dva otvory ve vzdálenosti 739 mm. K usnadnění použijte vrtací šablonu.
•Pokud používáte dodávané hmoždinky, použijte vrták o průměru 8 mm.
•Do vyvrtaných otvorů vložte hmoždinky.
•Do nich vložte šrouby tak, aby jejich hlavy vyčnívaly asi 3 mm.
•Do soundbaru zapojte všechny kabely, které používáte k připojení.
•Zařízení umístěte vzhledem k otvorům ve stěně na šrouby tak, aby zapadly do svislých držáků systému k připevnění na stěnu, poté jej zajistěte utažením
šroubů.
•Na závěr si ověřte, že je soundbar důkladně připevněn na obou šroubech. V případě potřeby proces zopakujte. Může se stát, že šrouby se budou muset
trochu pootočit - ve směru hodinových ručiček nebo proti směru hodinových ručiček.
SSB 70 C3
Čeština - 75
8.2 Vkládání baterií do dálkového ovladače
Lehkým potažením a odebráním víčka ve směru šipky otevřete přihrádku pro baterie (23) na zadní straně dálkového ovladače. Vložte 2 baterie typu AAA se
správnou polaritou (+ a –). Správná polarita je vyznačena na bateriích a uvnitř přihrádky (23). Znovu nasaďte víčko na přihrádku pro baterie (23) a zasuňte ho
proti směru šipky, dokud nezaklapne na místo. Řiďte se rovněž vyobrazením B na rozkládací obálce.
8.3 Možnosti připojení / Provozní režimy
VÝSTRAHA! Ověřte si, zda je soundbar a zařízení, která se mají připojit, před připojováním vypnutý. Přečtěte si také uživatelskou příručku
k připojovanému zařízení.
Připojení HDMI (ARC) pracuje pouze tehdy, pokud jsou všechny připojované komponenty kompatibilní s formátem ARC. Použijte
přiložený kabel HDMI (ARC) (C) . Podrobnosti vyhledejte v dokumentaci k připojovanému zařízení.
Délka kabelů používaných při přehrávání nesmí přesáhnout 3 metry.
Soundbar SSB 70 C3 umožňuje přehrávání zvuků anebo hudby z nejrůznějších zdrojů:
Přehrávání lze kontrolovat tlačítky na přístroji nebo na dálkovém ovladači.
K volbě požadovaného provozního režimu lze použít tlačítko Source (2) nebo dálkový ovladač. Provozní režimy a odpovídající zobrazované údaje naleznete
v níže uvedené tabulce:
Provozní režim /
Zdroj
Vstup Použití Tlačítko na
dálkovém ovladači
Displej
HDMI ARC HDMI(ARC) (9) Připojení kabelem HDMI (ARC) do konektoru HDMI (ARC), např. TV
nebo DVD přehrávač
HDMI(ARC) (13)Hd
OPTICALOPTICAL (10)Připojení kabelem Toslink, např. TV nebo digitální přijímač OPTICAL (14)OPtI
BLUETOOTH®----- Bezdrátové připojení, např. ze smartphonu (15)bt
USBUSB(4)Připojení USB médií, např. paměťového modulu USB k přehrávání
audiosouborů (podporované audioformáty: MP3 a WAV)
USB (33)USB
AUXUSB (11)Připojení přes kabelový adaptér (stereo jack/Cinch), např. DVD
přehrávač nebo satelitní přijímač
AUX (34)AUX
8.4 Údaje na displeji
Při každé změně nastavení soundbaru se LED displej (1) asi na 8 sekund rozsvítí naplno a poté se vrátí na nižší úroveň jasu.
Nastavení LED displej
„Pohotovostní režim“ - -
Režim „HDMI(ARC)“ Hd
Režim „BLUETOOTH®“ bt
Režim „OPTICAL“ OPtI
Režim „USB“ USB
Režim „AUX“ AUX
Zvukové nastavení „MOVIE“ CINE
Zvukové nastavení „DIALOG“ dIA
Zvukové nastavení „MUSIC“ SONG
Zvukové nastavení „3D“ 3d
„VOL-“ / „VOL+“ V 00 až V 40
„TREBLE“ t -5 až t 5
„BASS“ b -5 až b 5
Pro přehrávání USBHrací doba ve formátu mm:ss
„ON“ nebo „AL“
Chcete-li vypnout displej (1), stiskněte tlačítko (32). Při dalším stisku tlačítka (32)nebo jakéhokoli jiného tlačítka se LED displej (1) rozsvítí znovu.
SSB 70 C3
76 - Čeština
9.Začínáme
Tato příručka obecně popisuje použití dálkového ovladače.
Některé základní funkce (zapnutí/pohotovostní režim, výběr zdroje a nastavení hlasitosti) lze nastavit přímo na soundbaru.
Soundbar se přibližně po 10 minutách přepne do pohotovostního režimu, pokud ...
... nepodařilo se navázat připojení Bluetooth.
... není k dispozici audiosignál nebo je jeho příjem příliš slabý a nebylo stisknuto žádné tlačítko.
V režimech HDMI(ARC) a OPTICAL si zapamatujte:
Pokud váš zdroj audiosignálu podporuje vícekanálové přehrávání, musíte před spuštěním přepnout do režimu „PCM Stereo“, jinak
soundbar nebude schopen zvuk reprodukovat. Podrobnosti vyhledejte v dokumentaci ke zdroji audiosignálu.
9.1 Zapnutí soundbaru
Síťovou vidlici soundbaru zapojte do snadno přístupné zásuvky. Soundbar nemá samostatný vypínač a po připojení k síti se přímo přepne do pohotovostního
režimu. Na displeji (1) se zobrazuje „- -“. Stiskem tlačítka Pohotovostní režim (2, 35) se soundbar probudí z pohotovostního režimu.
9.2 Vypnutí soundbaru
Stiskem tlačítka Pohotovostní režim (35) se soundbar přepne do pohotovostního režimu. Případně můžete asi na 1 sekundu stisknout tlačítko (2) na
soundbaru. Soundbar nemá samostatný vypínač. Mějte na paměti, že napájecí adaptér spotřebovává při připojení k síti malé množství elektrického proudu i
v pohotovostním režimu. Chcete-li jej od sítě zcela odpojit, vytáhněte vidlici napájecího kabelu ze zásuvky.
9.3 Volba režimu
Stiskem odpovídajícího tlačítka (13, 14, 15, 33, 34) vyberte požadovaný režim. Jinak lze mezi jednotlivými režimy přepínat také krátkým stiskem tlačítka (2) na
soundbaru. Vybraný režim je na displeji (1) znázorněn takto:
RežimDisplej
HDMI ARC Hd
OPTICALOPtI
BLUETOOTH®bt
USBUSB
AUXAUX
Nyní spusťte na připojeném zařízení přehrávání a ovládaní pomocí dálkového ovladače. Podrobnosti vyhledejte v dokumentaci k zařízení k přehrávání.
9.3.1 Režim „HDMI ARC“
HDMI (ARC Audio Return Channel - zpětný audiokanál) je rozšíření klasického připojení HDMI, které umožňuje přenos audiosignálů na
kanálu ARC oběma směry. Podmínkou použití této funkce je kompatibilita s formátem ARC u všech komponentů.
Výstup ARC má většina moderních televizorů, herních konzolí a digitálních přijímačů. Podrobnosti naleznete v uživatelské příručce
k připojovanému zařízení.
Pokud audiopřenosy nefungují, ujistěte se, zda je kabel HDMI a připojení zdrojového zařízení je kompatibilní s formátem ARC. Je možné, že
je s formátem ARC kompatibilní pouze specifické připojení na zdrojovém zařízení.
Postup připojení soundbaru k televiznímu přijímači:
•Pomocí kompatibilního kabelu HDMI(ARC) (C, součást dodávky) propojte konektor HDMI(ARC) (9) na soundbaru s výstupem HDMI(ARC) na televizoru.
Připojené zařízení přepněte do režimu „PCM Stereo“ nebo „Stereo 2.0“.
•Soundbar zapněte tlačítkem (2, 35).
•Tlačítkem „HDMI (ARC)“ (13) vyberte na soundbaru vstup HDMI(ARC).
•Zapněte televizor, přehrávání zvuku se spustí během několika sekund.
Pokud váš televizor podporuje protokol CEC, soundbar lze zapínat a vypínat dálkovým ovladačem televizoru. V tomto případě lze dálkovým
ovladačem od televizoru ovládat také hlasitost. Viz uživatelská příručka k vašemu televizoru.
9.3.2 Režim „OPTICAL“
Tento provozní režim použijte na svém soundbaru (A) k přehrávání hudby z optického digitálního vstupu (10), například z televizoru. Televizor musí být vybaven
optickým digitálním výstupem. K připojení použijte přiložený optický kabel (Toslink). Postupujte následujícím způsobem:
K nastavení požadované hlasitosti můžete použít tlačítka hlasitosti (29, 31).
•
Pokud budete chtít, předvolbu nastavení zvuku můžete změnit příslušnými tlačítky na dálkovém ovladači.
SSB 70 C3
78 - Čeština
Ovládání funkcí dostupných v režimu „USB“:
Postup Funkce
Stiskněte tlačítko (16). Pozastavit / Pokračovat s aktuální skladbou.
Pokud bylo přehrávání tlačítkem (18)pozastaveno, obnovte
ho stiskem tlačítka (16).
Pokračovat v přehrávání od počátku naposledy přehrávaného adresáře.
Krátce stiskněte tlačítko (17).Přechod na další skladbu.
Stiskněte a přidržte tlačítko (17). Přechod na 1. skladbu další složky.
Krátce stiskněte tlačítko (30).Přechod na předchozí skladbu.
Stiskněte a přidržte tlačítko (30). Přechod na 1. skladbu předchozí složky.
Stiskněte tlačítko (18). Pozastavit přehrávání, které bude pokračovat první skladbou v poslední
složce přehrávané při stisku tlačítka (16).
Dvakrát za sebou stiskněte tlačítko (18). Přechod na 1. skladbu 1. složky.
Stiskem tlačítka (28) se zopakuje aktuálně přehrávaná skladba (na displeji se zobrazí „ON“) nebo se zopakují všechny skladby uložené na paměťovém
modulu (na displeji se zobrazí „AL“).
LED displej Funkce
ON Opakování aktuální skladby.
AL Opakování všech skladeb.
VÝSTRAHA! USB port (4) se nesmí používat k nabíjení externích zařízení.
9.3.5 Režim „AUX“
Tento režim použijte k připojení přehrávacího zařízení s výstupem Cinch (např. DVD přehrávač nebo satelitní přijímač). Použijte dodávaný kabelový adaptér (E).
•Výstup Cinch z přehrávacího zařízení připojte do konektoru AUS na soundbaru (11).
•Soundbar zapněte tlačítkem (2, 35).
•Tento režim vyberte tlačítkem „AUX“ (34) na dálkovém ovladači.
•
K nastavení požadované hlasitosti můžete použít tlačítka hlasitosti (29, 31).
•
Pokud budete chtít, předvolbu nastavení zvuku můžete změnit příslušnými tlačítky na dálkovém ovladači.
9.4 Nastavení zvuku a hlasitosti
Všechny změny uskutečněné v nastavení hlasitosti a zvuku se zobrazují na displeji (1) přibližně po dobu 2 sekund. Displej se poté vrátí ke
standardnímu zobrazení pro příslušný režim.
9.4.1 Nastavení hlasitosti
Během přehrávání lze upravit hlasitost tlačítky hlasitosti (29, 31) na dálkovém ovladači. Lze použít i tlačítka hlasitosti (3, 5) na soundbaru. Chcete-li průběh změny
zrychlit, můžete tlačítka přidržet. Nastavená úroveň se zobrazuje na displeji (1) přibližně po dobu 2 sekund. Pokud nastavíte nejnižší úroveň hlasitosti, na displeji
Vybraná předvolba je na displeji (1) znázorněna takto:
Nastavení zvukuLED displej
MOVIECINE
3D 3d
DIALOG dIA
MUSICSONG
SSB 70 C3
Čeština - 79
9.4.5 Zvukové nastavení „MOVIE“
Toto nastavení vyberte při přehrávání např. filmů či dokumentů.
9.4.6 Zvukové nastavení „3D“
Toto nastavení doplní momentální přehrávání virtuálním prostorovým zvukem 3D.
9.4.7 Zvukové nastavení „DIALOG“
Toto nastavení vyberte při přehrávání mluveného slova. Toto nastavení je doporučeno mimo jiné například pro zprávy.
9.4.8 Zvukové nastavení „MUSIC“
Toto nastavení je určeno k optimalizaci při poslechu hudby.
10. Čištění
Zařízení vypněte a odpojte od zásuvky. K čištění použijte měkkou suchou tkaninu. Nikdy nepoužívejte rozpouštědla ani čisticí prostředky nebo dokonce brusnou
houbu. Mohlo by dojít k poškození povrchu soundbaru.
10.1 Skladování, pokud se zařízení nepoužívá
Pokud se soundbar nebude delší dobu používat, uložte ho na čistém, suchém a chladném místě. Vyjměte také baterie z dálkového ovladače,
aby nedošlo k úniku elektrolytu.
SSB 70 C3
80 - Čeština
11.Odstraňování problémů
Soundbar nelze zapnout.
•Ověřte si, zda je síťová vidlice správně zasunuta do zásuvky. Pokud tomu tak není, připojte ji správně.
•Ujistěte se, že je zásuvka pod napětím. V případě potřeby vyzkoušejte přístroj v jiné zásuvce, u níž jste si jisti, že funguje.
Není slyšet zvuk
•Ověřte si, zda byl vybrán správný režim. Vyberte správný režim.
•Zkontrolujte nastavení hlasitosti přehrávání na soundbaru a na připojeném zařízení pro přehrávání.
•V režimech HDMI ARC a OPTICAL: Pokud váš zdroj audiosignálu podporuje vícekanálové přehrávání, musíte před spuštěním přepnout do režimu „PCM
Stereo“, jinak soundbar nebude schopen zvuk reprodukovat. Podrobnosti vyhledejte v dokumentaci ke zdroji audiosignálu.
•V režimu „HDMI ARC“: Zkontrolujte, zda je kabel HDMI(ARC) (C) správně zapojen do konektoru HDMI ARC (9) a odpovídající připojení HDMI ARC na
externím zdroji signálu, např. na televizoru. Při „běžném“ připojení HDMI může televizor video a audiosignály pouze přijímat, ale ne vysílat.
•V režimu „AUX IN“: Zkontrolujte, zda je kabelový adaptér (E) správně zapojen do konektoru AUX IN (11) na soundbaru a do výstupu Cinch na externím
zdroji signálu. Zkontrolujte také nastavení hlasitosti na externím zařízení k přehrávání připojeném kabelovým adaptérem (E).
•V režimu „Optical“: Zkontrolujte, zda je kabel Toslink (D) správně zapojen do optického digitálního vstupu (10) na soundbaru a do odpovídajícího konektoru
na externím zařízení.
•V režimu „USB“: Zkontrolujte, zda je vaše USB zařízení k přehrávání naformátováno v souborovém systémuFAT32 a správně připojeno a zda jsou na něm
vhodné soubory k přehrávání. Vhodné formáty souborů: MP3 a WAV.
Soundbar nelze ovládat dálkovým ovladačem
•Baterie v dálkovém ovladači jsou slabé nebo vybité. Nahraďte je novými bateriemi stejného typu.
•Vzdálenost mezi soundbarem a dálkovým ovladačem je příliš velká. Přemístěte je blíž.
Přehrávání prostřednictvím Bluetooth® nefunguje
•Na svém smartphonu / tabletu si ověřte, zda je se soundbarem SSB 70 C3 navázáno připojení Bluetooth® . V případě potřeby zopakujte párování.
12.Předpisy na ochranu životního prostředí a informace o likvidaci
Přístroje označené tímto symbolem podléhají evropské směrnici 2012/19/EU. Veškeré elektrické a elektronické přístroje musí být likvidovány
odděleně od domácího odpadu v oficiálních likvidačních střediscích. Chraňte životní prostředí a zdraví osob správnou likvidací přístroje. Bližší
informace o správném způsobu likvidace získáte od místních úřadů, sběren odpadů nebo v obchodě, ve kterém jste zařízení zakoupili.
Chraňte životní prostředí. Staré baterie se nesmí likvidovat jako běžný domovní odpad. Odevzdejte je na sběrném místě pro použité baterie.
Pamatujte si, že baterie musí být na příslušném sběrném místě pro použité baterie odevzdány ve stavu úplného vybití. V případě likvidace baterií,
které nejsou zcela vybité, je třeba přijmout opatření proti vzniku zkratů.
Veškerý obalový materiál likvidujte s ohledem na životní prostředí. Lepenkové obaly lze vložit do kontejnerů pro recyklaci papíru nebo odevzdat
k recyklaci ve veřejných sběrnách. Veškeré fólie nebo plasty, které obal obsahuje, je třeba odevzdat k likvidaci ve veřejné sběrně.
Při likvidaci obalového materiálu mějte prosím na paměti jeho označení. Je opatřen zkratkami (a) a číslicemi (b) s následujícími významy:
Na přístroj obdržíte záruku 3 roky od data nákupu. V případě závad na tomto produktu můžete vůči prodávajícímu uplatnit svá zákonná práva. Tato zákonná
práva nejsou omezena naší níže uvedenou zárukou.
Záruční podmínky
Záruční lhůta začíná datem zakoupení. Dobře si prosím uschovejte originál pokladního dokladu. Tento doklad potřebujete k prokázání nákupu. Dojde-li do tří let
od data zakoupení tohoto výrobku k materiálové či výrobní vadě, pak výrobek - dle naší volby - bezplatně opravíme nebo vyměníme.
Záruční lhůta a zákonné nároky z vad
Záruční lhůta se plněním neprodlužuje. To platí i pro vyměněné a opravené součásti. Poškození a závady, které se vyskytují již při zakoupení, musí být nahlášeny
ihned po vybalení. Opravy po uplynutí záruční doby jsou zpoplatněny.
Rozsah záruky
Přístroj byl pečlivě vyroben dle nejpřísnějších kvalitativních směrnic a před dodáním svědomitě zkontrolován. Záruční plnění platí pro materiálové a výrobní vady.
tato záruka se nevztahuje na součásti výrobku, které jsou vystaveny normálnímu užívání a mohou být roto považovány za opotřebované součástky, nebo jsou
zhotoveny pro poškození na rozbitných částech, např. spínačích, akumulátorech nebo ze skla. Záruku není možno uplatnit, je-li výrobek poškozen, neodborně
používán nebo udržován. Pro řádné užívání výrobku musí být přesně dodrženy všechny pokyny uvedené v návodech. Účelům použití a postupům, které návod k
použití nedoporučuje nebo před nimiž varuje, je třeba se vyhnout. Výrobek je určen pouze pro soukromé a ne pro průmyslové využití. Záruční plnění zaniká při
zneužití nebo neodborném použití, použití síly při zásahu, který nebyl proveden naším autorizovaným servisem. Opravou nebo výměnou výrobku nezačíná nová
záruční doba.
Vyřizování záručního plnění
Abychom zajistili rychlé zpracování vaší záležitosti, postupujte dle následujících pokynů:
-Před uvedením Vašeho výrobku do provozu si prosím přečtěte přiloženou dokumentaci. Pokud by došlo k problému, který není tímto způsobem možno
vyřešit, obraťte se prosím na naši zákaznickou linku.
-Pro veškeré požadavky z vaší strany si připravte pokladní doklad a číslo výrobku popř., je-li k dispozici, i sériové číslo jako doklad o koupi.
-Pro případ, že není možné telefonické řešení, zahájí naše zákaznická linka v závislosti na příčině chyby další servisní postup.
Servis
Telefon: 800 143 873
E-mailový: targa@lidl.cz
IAN: 315507
Výrobce:
Uvědomte si, prosím, že následující adresa není adresou servisu. Nejprve kontaktujte výše uvedené servisní místo.
8.1.1 Montáž na stenu (obrázok C) ............................................................................................................................... 87
8.2 Vloženie batérií do diaľkového ovládača ................................................................................................................... 88
8.3 Možnosti pripojenia/režimy činností ........................................................................................................................... 88
8.4 Zobrazené informácie ................................................................................................................................................... 88
9.3 Výber režimu .................................................................................................................................................................. 89
9.3.3 Režim BLUETOOTH ................................................................................................................................................ 90
9.3.4 Režim USB ............................................................................................................................................................... 90
9.3.5 Režim AUX ............................................................................................................................................................... 91
9.4 Nastavenia hlasitosti a zvuku ....................................................................................................................................... 91
14. Informácie o záruke a servise ........................................................................................... 94
SSB 70 C3
Slovensky - 83
Gratulujeme!
Kúpou zvukového panela SilverCrest ste si vybrali kvalitný produkt.
Pred prvým použitím sa oboznámte s používaním zvukového panela a pozorne si prečítajte tento návod na obsluhu. Dodržujte bezpečnostné pokyny a používajte
zvukový panel len tak, ako je uvedené v návode na obsluhu a pre dané aplikácie.
Návod na obsluhu uložte na bezpečnom mieste. Ak predáte zvukový panel niekomu inému, odovzdajte s ním aj všetky príslušné dokumenty.
Tento zvukový panel spĺňa všetky normy a smernice uvedené vo Vyhlásení o zhode EÚ. Výrobca nenesie žiadnu zodpovednosť za škody alebo problémy v
dôsledku neoprávnených úprav. Používajte iba príslušenstvo odporúčané výrobcom. Dodržujte predpisy a zákony platné v krajine použitia.
1.Ochranné známky
Slovo Bluetooth® a logo sú registrované ochranné známky spoločnosti Bluetooth SIG, Inc. (Special Interest Group). TARGA GmbH používa tieto známky na
základe licencie.
Ochranná známka a značka SilverCrest sú vlastníctvom príslušných vlastníkov.
HDMI® je registrovaná ochranná známka spoločnosti HDMI Licensing LLC.
USB je registrovaná ochranná známka.
Ostatné názvy a výrobky môžu byť ochrannými známkami alebo registrovanými ochrannými známkami príslušných vlastníkov.
zariadení. Zvukový panel sa môže používať iba na súkromné účely, nie pre potreby priemyslu alebo obchodu. Toto zariadenie nesmie byť používané v exteriéri
alebo v tropických klimatických podmienkach.
3.Obsah balenia
Vyberte zariadenie a všetko príslušenstvo z obalu. Odstráňte obalový materiál a skontrolujte, či sú všetky súčasti celé a nepoškodené. Ak zistíte, že niečo chýba,
alebo je poškodené, obráťte sa na výrobcu.
A Zvukový panel SilverCrest SSB 70 C3
B Diaľkový ovládač
C HDMI (ARC) kábel
D Optický kábel (Toslink)
E Kábel adaptéra s 3,5 mm konektorom typu Cinch
F 2 batérie typu AAA/LR03, 1,5 V
G 2 skrutky (pre montáž na stenu)
H 2 hmoždinky (pre montáž na stenu)
I Táto používateľská príručka (grafická ilustrácia)
J Príručka so stručným návodom (grafické ilustrácie)
Leták HDMI ARC (nie je zobrazený)
Šablóna na vŕtanie (nie je zobrazená)
SSB 70 C3
84 - Slovensky
4.Technické parametre
SSB 70 C3
Vstupné napätie/frekvencia 110 – 240 V , 50/60 Hz
Spotreba energie pri zapnutí/v pohotovostnom režime max. 80 W / < 0,5 W
Reprodukto
r
2 x 17 W RMS plus 1 x 35 W RMS sub
-
woofe
r
Audio formáty na vstupoch Stereo PCM
Zdierka AUX IN Konektor 3,5 mm
Digitálny vstup (SPDIF) Optický (Toslink)
HDMI (ARC) kábel HDMI ARC konektor
USB vstup
Výstupný prúd
Štruktúra formátu
Prehrávateľné audio formáty
USB port, typ A
Max. 500 mA
FAT 32, exFAT
MP3, WAV
Bluetooth® špecifikácia: V 5.0
Podporované profily: A2DP, AVRCP
Výkon pri vysielaní Bluetooth®: max. 10 dBm
Frekvenčné pásmo Bluetooth®: 2402 – 2480 GHz
Dosah Bluetooth®: Pribl. 10 m (30 stôp)
Zdroj napájania diaľkového ovládania 2 batérie typu AAA/LR03, 1,5 V
Rozmery (Š x H x V) pribl. 90,2 x 8,2 x 7,0 cm
Hmotnosť bez príslušenstva pribl. 1980 g
Prevádzková teplota 0°C až 35°C
Prevádzková vlhkos
ť
85 % rel. vlhkosti
Dovolené skladovacie podmienky 0°C až 40°C, max. 85% rel. vlhkosti
Technické údaje a dizajn sa môžu zmeniť bez predchádzajúceho upozornenia.
5.Bezpečnostné pokyny
Ak zariadenie používate po prvýkrát, prečítajte si príslušné pokyny a rešpektujte všetky varovania, aj keď ste sa už zoznámili s používaním rôznych elektronických
zariadení. Túto používateľskú príručku uložte na bezpečnom mieste na neskoršie použitie. Ak toto zariadenie predáte alebo ho darujete inej osobe, predajte so
zariadením aj túto Používateľskú príručku. Návod na obsluhu je súčasťou produktu.
Vysvetlenie použitých symbolov
NEBEZPEČENSTVO! Táto ikona a slovo NEBEZPEČENSTVO upozorňujú na možnú nebezpečnú situáciu. Ignorovanie upozornenia
môže viesť k vážnemu až smrteľnému zraneniu.
VAROVANIE! Tento symbol a slovo VAROVANIE upozorňujú na dôležitú informáciu potrebnú pre bezpečné používanie výrobku a pre
zaistenie bezpečnosti používateľov.
UPOZORNENIE! Tento symbol a slovo „Upozornenie“ naznačujú dôležité pokyny na ochranu proti poškodeniu majetku.
Tento symbol označuje ďalšie informácie o téme.
Prečítajte si používateľskú príručku!
Jednosmerný prúd
Striedavý prúd
Bezpečnostná trieda I, ochranná izolácia
SSB 70 C3
Slovensky - 85
VAROVANIE! Zakaždým skontrolujte nasledovné:
•je zabránené styku s aerosólmi, kvapkajúcou vodou a korozívnymi tekutinami, a že zariadenie nikdy nepracuje v blízkosti vody; zariadenie
nesmie byť nikdy ponorené do tekutín (neklaďte žiadne predmety obsahujúce tekutiny, ako sú vázy alebo nápoje, do blízkosti zariadenia).
•na zariadenie alebo do jeho blízkosti nebudú umiestnené otvorené plamene (napr. horiace sviečky);
•nedochádza k prenikaniu cudzími predmetmi.
•zariadenie nie je vystavené veľkým zmenám teplôt, čo by mohlo spôsobiť kondenzovanie vlhkosti a následný skrat. Ak bol ovládač
vystavený silným zmenám teplôt, počkajte pred jeho zapnutím, kým dosiahne okolitú teplotu (asi 2 hodiny).
•zariadenie nie je prikryté. Ak sa zariadenie zakryje, môže sa akumulovať teplo a môže dôjsť k požiaru.
•kryt nie je otvorený. Mohlo by dôjsť k zraneniu elektrickým prúdom.
•nedotýkate sa sieťovej zástrčky mokrými rukami. Mohlo by dôjsť k zraneniu elektrickým prúdom.
•použitá zásuvka musí byť vždy ľahko prístupná, pretože sieťová zástrčka sa používa ako odpojovacie zariadenie.
•sieťová zástrčka musí byť odpojená zo zásuvky v prípade búrky s bleskami. Je tu riziko požiaru alebo poškodenia majetku.
Nedodržanie vyššie uvedených varovaní môže viesť k zraneniu.
UPOZORNENIE! Zakaždým skontrolujte nasledovné:
•zariadenie nie je vystavené priamym zdrojom tepla (napr. radiátorom);
•na zariadenie nesvieti priame slnko alebo jasné umelé osvetlenie,
•dodržujete odstup minimálne 1 m od rádiofrekvenčných a magnetických zdrojov (napr. reproduktorov, mobilných telefónov a pod.), aby
nedošlo k žiadnej poruche. V prípade poruchy namontujte zariadenie na inom mieste.
•zariadenie nie je vystavené prudkým nárazom ani vibráciám;
•USB port (4) sa nesmie používať na nabíjanie externých zariadení.
Nedodržanie vyššie uvedených varovaní môže viesť k poškodeniu zariadenia.
NEBEZPEČENSTVO!Batérie
Vložte batérie, pričom dodržte správnu polaritu. Orientujte sa podľa schémy vo vnútri priestoru pre batérie. Nesnažte sa nabíjať batérie a nikdy neodhadzujte
batérie do ohňa. Batérie vzájomne nemiešajte (staré s novými alebo uhlíkové s alkalickými, atď.). Keď zariadenie dlhšie nepoužívate, batérie z neho vyberte.
Nesprávne použitie môže spôsobiť výbuch alebo vytečenie batérií. Batérie nie sú hračky! Pri prehltnutí batérie okamžite vyhľadajte lekársku pomoc. Batérie sa
nesmú nikdy otvoriť ani deformovať, pretože by mohlo dôjsť k úniku chemických látok, ktoré môžu zapríčiniť zranenia. Ak prídu chemické látky z kvapaliny batérie
do kontaktu s pokožkou alebo očami, okamžite ich vypláchnite s veľkým množstvom pitnej vody a vyhľadajte lekársku pomoc.
NEBEZPEČENSTVO!Osobná bezpečnosť
Elektrické zariadenia nie sú vhodné pre deti. Osoby so zníženými fyzickými, zmyslovými alebo mentálnymi schopnosťami môžu používať elektrické zariadenia len
v rámci obmedzení svojich schopností. Nedovoľte deťom ani osobám so zníženými fyzickými, zmyslovými alebo mentálnymi schopnosťami, aby používali elektrické
zariadenia bez dozoru, pokým nemajú pokyny a nie sú pod dozorom kompetentnej osoby zodpovednej za ich bezpečnosť. Deti by mali byť vždy pod dozorom,
aby sa nehrali s ovládačom. Deti by mohli prehltnúť malé súčiastky. Držte obal mimo dosahu týchto ľudí.Baliaci materiál nie je hračka.
Je tu riziko udusenia.
VAROVANIE! Káble
Odpojte všetky káble podržaním za zástrčky a nikdy neťahajte za samotné káble. Na káble nikdy neklaďte kusy nábytku ani iné ťažké predmety a dávajte pozor,
aby sa káble nepoškodili, predovšetkým v mieste zástrčky a konektorov. Nikdy neklaďte káble okolo horúcich alebo ostrých predmetov, aby ste ich nepoškodili.
Na kábloch nikdy nerobte uzly a nezväzujte ich s inými káblami. Všetky káble musia byť umiestnené tak, aby do nich nikto nemohol zakopnúť a aby nikomu
neprekážali.
NEBEZPEČENSTVO!Rádiové rozhranie
Vypnite zariadenie, ak ste v lietadle, nemocnici, v operačnej sále alebo v blízkosti elektronických medicínskych zariadení. Signály RF môžu narúšať funkčnosť
citlivých zariadení. Zariadenie umiestnite do vzdialenosti minimálne 20 cm (8 palcov) od kardiostimulátora, pretože RF signály môžu negatívne ovplyvniť jeho
činnosť. Vysielané signály RF môžu rušiť načúvacie prístroje. Ak je zapnutý bezdrôtový režim, neukladajte zariadenie do blízkosti horľavých plynov alebo na
SSB 70 C3
86 - Slovensky
potenciálne výbušné miesta (napr. obchod s farbami), pretože vysielané signály RF môžu spôsobiť výbuch alebo požiar. Dosah signálov RF závisí od podmienok
prostredia. Ak sa údaje prenášajú bezdrôtovo, môžu ich získať aj neoprávnené strany. Spoločnosť Targa GmbH nie je zodpovedná za rušenie RF alebo TV
signálov, spôsobené neautorizovanými zmenami tohto zariadenia. Spoločnosť Targa ďalej neprijíma žiadnu zodpovednosť za náhradu alebo výmenu káblov
alebo zariadení, ktoré nie sú špecificky schválené spoločnosťou Targa GmbH. Používateľ je úplne zodpovedný za opravenie každého rušenia spôsobeného
takouto neoprávnenou úpravou tohto zariadenia a za výmenu zariadenia.
Servis/oprava
V prípade, že spozorujete akýkoľvek druh poškodenia, napr. poškodený kryt zariadenia, vniknutie tekutiny alebo predmetov do zariadenia, alebo ak bolo
zariadenie vystavené účinkom dažďa alebo vlhkosti, je potrebná jeho oprava. Oprava je potrebná aj v prípade, že výrobok nefunguje normálne alebo spadol.
Ak si všimnete dym, nezvyčajné zvuky alebo zápach, ihneď zariadenie vypnite a odpojte napájací kábel zo sieťovej zásuvky. V takom prípade sa zariadenie
nemôže používať a musí byť skontrolovaná autorizovaným servisným personálom. Všetky servisné práce musí vykonať kvalifikovaný servisný pracovník.
Prevádzkové podmienky
Zariadenie nie je určené na použitie v prostredí s vysokou vlhkosťou (napr. v kúpeľniach) ani v prostredí s nadmernou prašnosťou. Prevádzková teplota
a prevádzková vlhkosť: 0 °C až 35 °C, max. 85 % rel. vlhkosti. Upozorňujeme, že výrobky starostlivosti o povrchy nábytkov obsahujú látky, ktoré môžu poškodiť
gumené nôžky zvukového panela, preto buďte opatrní pri používaní takýchto výrobkov.
Poznámka o odpojení sieťového napájania
Nezabudnite, že zabudovaný napájací adaptér spotrebováva malé množstvo elektrickej energie, keď je sieťová zástrčka pripojená k sieťovej zásuvke, aj v
pohotovostnom režime. Ak ho chcete úplne odpojiť, odpojte sieťovú zástrčku zo zásuvky.
6.Autorské práva
Celý obsah tejto Používateľskej príručky je chránený autorským právom a je poskytnutý čitateľovi iba na informačné účely. Kopírovanie dát a informácií bez
predošlého písomného a explicitne vyjadreného súhlasu od autora je prísne zakázané. Platí to aj pre akékoľvek obchodné použitie obsahu a uvedených informácií.
Všetky texty a obrázky sú aktualizované k dátumu tlače. Podliehajú zmene bez upozornenia.
7.Pripojenia a ovládacie prvky
Na vnútornej strane otváracieho obalu tejto používateľskej príručky nájdete obrázok s položkami a ovládacími prvkami a ich príslušnými číslami. Pri čítaní rôznych
kapitol tejto príručky môžete nechať túto stranu otvorenú. Tak sa môžete kedykoľvek pozrieť na príslušné ovládacie prvky.
1 LED displej
2 Tlačidlo s dvojitou funkciou: 1. Zapnutie/pohotovostný režim 2. Zdroj
3 Tlačidlo + (zvýšenie hlasitosti)
4 USB port (nepoužívať na nabíjanie)
5 Tlačidlo - (zníženie hlasitosti)
6 Nôžky zariadenia
7 Diery pre montáž na stenu
8 Napájací kábel
9 HDMI ARC konektor
10 Optický digitálny vstup (Toslink)
11 3,5 mm zásuvka AUX-IN
SSB 70 C3
Slovensky - 87
7.1 Diaľkový ovládač
Funkcie zvukového panela môžete ovládať pomocou dodávaného diaľkového ovládača. V tabuľke nižšie nájdete funkcie tlačidiel.
12 Vypnutie zvuku
13 HDMI (ARC) Prepnutie na vstup HDMI ARC
14 OPTICAL Prepnutie na digitálny optický vstup SPDIF
15 Prepnutie na Bluetooth®
16 Prehrávať/pozastaviť
17 Nasledujúca skladba
18 ZASTAVIŤ
19 TREBLE+ Zvýšiť výšky
20 BASS+ Zvýšiť basy
21 MOVIE Zapnutie ekvalizéra pre filmy
22 3D Zapnutie ekvalizéra so simulovaným priestorovým zvukom
23 Priestor na batériu (na zadnej strane)
24 DIALOG Zapnutie ekvalizéra na prehrávanie hlasu
25 MUSIC Zapnutie ekvalizéra na hudbu
26 BASS- Znížiť basy
27 TREBLE- Znížiť výšky
28 Opakovať
29 VOL- Znížiť hlasitosť
30 Predchádzajúca skladba
31 VOL+ Zvýšiť hlasitosť
32 Zapnutie/vypnutie displeja
33 USB Prepnutie na vstup USB
34 AUX Prepnutie na vstup AUX
35 Zapnutie/pohotovostný režim
8.Než začnete
Vyberte zvukový panel a jeho príslušenstvo z balenia a odstráňte plastové fólie. Skontrolujte, či sa dostali všetky uvedené položky.
8.1 Umiestnenie
Ideálna poloha pre zvukový panel je v strede pod televízorom. Zvukový panel môžete položiť na nábytok alebo upevniť na stenu.
8.1.1 Montáž na stenu (obrázok C)
Uistite sa, že používate vhodný materiál pre montáž na stenu.
Potrebné nástroje/montážny materiál (ktoré nie sú súčasťou balenia):
•Vŕtačka (v závislosti od druhu steny)
•2 skrutky a 2 hmoždinky (v závislosti od druhu steny) na upevnenie na stenu. Upozorňujeme, že skrutky musia byť vhodné pre hmotnosť zvukového panela.
Ak dodávané skrutky a hmoždinky nie sú vhodné pre vašu konkrétnu situáciu, uistite sa, že rozmery hlavy a drieku skrutky zodpovedajú rozmerom
dodávaných skrutiek, aby sa zaistila bezpečná montáž.
•Krížový skrutkovač a možno iné skrutkovače, vodováha, ceruzka
Pred vŕtaním sa uistite, že v stene nevedú žiadne vodovodné, plynové ani elektrické vedenia. V prípade potreby nechajte odborníka namontovať zariadenie na
stenu.
•Vyvŕtajte dve diery 739 mm od seba. Pre jednoduchšiu montáž použite dodávanú šablónu na vŕtanie.
•Ak použijete dodávané hmoždinky, použite 8 mm vrták.
•Do vyvŕtaných dier vložte hmoždinky.
•Zaskrutkuje do nich skrutky tak, aby im hlavy vyčnievali von približne 3 mm.
•Pripojte všetky káble, ktoré používate na pripojenie, k zvukovému panelu.
•Nasaďte zariadenie s dierami pre montáž na stenu na skrutky, aby sa zaistili vo vertikálnych držiakoch nástenného systému a dotiahnite skrutky.
•Nakoniec skontrolujte, či je zvukový panel pevne uchytený na obidvoch skrutkách. V prípade potreby zopakujte postup. Možno bude potrebné trochu otočiť
skrutky v smere alebo proti smeru hodinových ručičiek.
SSB 70 C3
88 - Slovensky
8.2 Vloženie batérií do diaľkového ovládača
Otvorte priečinok na batérie (23) v zadnej časti diaľkového ovládača vysunutím krytu priečinku v zobrazenom smere. Vložte 2 batérie typu AAA so správnou
polaritou (+ a -). Správna polarita je označená na batériách a vnútri priestoru na batérie (23). Znova založte kryt priestoru na batérie (23) a zasuňte ho v opačnom
smere šípky, kým nezapadne na miesto. Pozrite si tiež obrázok B na rozloženej stránky obalu.
8.3 Možnosti pripojenia/režimy činností
UPOZORNENIE! Zvukový panel a zariadenia, ktoré pripájate, musia byť vypnuté pri pripájaní. Prečítajte si tiež používateľskú príručku k
zariadeniu, ktoré pripájate.
Pripojenie HDMI (ARC) funguje len vtedy, keď všetky pripojené komponenty sú kompatibilné s ARC. Použite dodávaný kábel HDMI
(ARC) (C). Pozrite si tiež používateľskú príručku pre pripojené zariadenie.
Kábel na prehrávanie nesmie byť dlhší než 3 metre.
Zvukový panel SSB 70 C3 umožňuje prehrávanie zvuku alebo hudby z rôznych zdrojov:
Prehrávanie môžete ovládať pomocou tlačidiel na zariadení alebo diaľkovom ovládači.
Na výber režimu činnosti môžete použiť tlačidlo zdroja (2) alebo diaľkový ovládač. Režimy činností a príslušné zobrazené informácie nájdete v tabuľke nižšie:
Režim činnosti/
zdroj
Vstup Použitie Tlačidlo na
diaľkovom ovládači
Displej
HDMI ARC HDMI(ARC) (9) Pripojenie pomocou kábla HDMI (ARC) ku konektoru HDMI
(ARC), napr. televízor alebo DVD prehrávač
HDMI(ARC) (13)Hd
OPTICALOPTICAL (10)Pripojenie cez kábel Toslink, napr. televízor alebo digitálny
prijímač
OPTICAL (14)OPtI
BLUETOOTH®----- Cez bezdrôtové pripojenie, napr. zo smartfónu tlačidlo (15)bt
USBUSB(4)Pripojenie USB média, napr. USB kľúča na prehrávanie zvukových
súborov (podporované zvukové formáty: MP3 a WAV)
USB (33)USB
AUXUSB (11)Pripojenie cez kábel adaptéra (stereo konektor/Cinch), napr. DVD
prehrávač alebo satelitný prijímač
AUX (34)AUX
8.4 Zobrazené informácie
Pri každej zmene nastavenia na zvukovom paneli sa plným jasom na 8 sekúnd rozsvieti LED displej (1) a následne sa vráti späť na nižšiu úroveň jasu.
Nastavenie LED displej
Pohotovostný režim - -
Režim HDMI(ARC)Hd
Režim BLUETOOTH®bt
Režim OPTICALOPtI
Režim USBUSB
Režim AUXAUX
Nastavenia zvuku MOVIECINE
Nastavenia zvuku DIALOGdIA
Nastavenia zvuku MUSICSONG
Nastavenia zvuku 3D3d
VOL-/VOL+ (Hlasitosť -/+) V 00 až V 40
TREBLE (Výšky) t -5 až t 5
BASS (Basy) b -5 až b 5
Na prehrávanie USBČas skladby vo formáte mm:ss
ON alebo AL
Stlačením tlačidla (32)vypnete LED displej (1). Opätovným stlačením tlačidla(32)alebo akýmkoľvek iným tlačidlom znova zapnete LED displej (1).
SSB 70 C3
Slovensky - 89
9.Začíname
Táto používateľská príručka vo všeobecnosti opisuje používanie diaľkového ovládača.
Priamo zo zvukového panela je tiež možné nastaviť niektoré základné funkcie (zapnutie/pohotovostný režim, výber zdroja a nastavenie
hlasitosti).
Zvukový panel sa prepne do pohotovostného režimu po približne 10 minútach, ak...
...sa nenadviaže pripojenie cez Bluetooth.
... sa neprijme žiadny alebo veľmi slabý audio signál a nestlačia sa žiadne tlačidlá.
Poznámka pre režimy HDMI(ARC) a OPTICAL:
Ak audio zdroj podporuje viackanálové prehrávanie, musíte pred začatím prepnúť na „PCM Stereo“, pretože zvukový panel nebude
môcť inak prehrať zvuk. Pozrite si používateľskú príručku svojho audio zdroja.
9.1 Zapnutie zvukového panela
Zapojte sieťovú zástrčku zvukového panela do ľahko prístupnej sieťovej zásuvky. Zvukový panel nemá samostatný hlavný spínač, po zapojení ihneď prejde do
pohotovostného režimu. Na LED displeji (1) sa zobrazí - -. Stlačením tlačidla pohotovostného režimu (2, 35) zobudíte zvukový panel z pohotovostného režimu.
9.2 Vypnutie zvukového panela
Stlačením tlačidla pohotovostného režimu (35) prepnete zvukový panel do pohotovostného režimu. Prípadne môžete na 1 sekundu stlačiť tlačidlo
pohotovostného režimu (2) na zvukovom paneli. Zvukový panel nemá samostatný hlavný spínač. Nezabudnite, že napájací adaptér spotrebováva malé
množstvo elektrickej energie, keď je sieťová zástrčka pripojená k sieťovej zásuvke, aj v pohotovostnom režime. Ak ho chcete úplne odpojiť, odpojte sieťovú zástrčku
zo zásuvky.
9.3 Výber režimu
Stlačením príslušného tlačidla (13, 14, 15, 33, 34) vyberiete požadovaný režim. Prípadne môžete prepínať medzi režimami niekoľkými krátkymi stlačeniami
tlačidla (2) na zvukovom paneli. Vybraný režim sa na LED displeji (1) zobrazí nasledovne:
RežimDisplej
HDMI ARC Hd
OPTICALOPtI
BLUETOOTH®bt
USBUSB
AUXAUX
Spustite teraz prehrávanie na pripojenom zariadení a ovládajte panel pomocou diaľkového ovládača. Pozrite si používateľskú príručku pre prehrávacie zariadenie.
9.3.1 Režim HDMI ARC
HDMI (ARC Audio Return Channel) je rozšírením bežného pripojenia HDMI, ktoré umožňuje prenos zvukových signálov kanála ARC
obidvoma smermi. Ak chcete túto funkciu používať, všetky používané komponenty musia byť kompatibilné s ARC.
Najmodernejšie televízne prijímače, herné konzoly a digitálne prijímače majú výstup ARC. Prečítajte si používateľskú príručku k zariadeniu,
ktoré pripájate.
Ak prenos zvukového signálu nefunguje, skontrolujte, či sú kábel HDMI a pripojenie na zdrojovom zariadení kompatibilné s ARC. Je možné,
že iba konkrétne pripojenia na zdrojovom zariadení sú kompatibilné s ARC.
Pripojenie zvukového panela k televízoru je opísané nižšie:
•Pomocou kábla kompatibilného s HDMI(ARC) (C, dodávaný), pripojte konektor HDMI(ARC) (9) na zvukovom paneli k výstupu HDMI(ARC) na televízore.
Nastavte pripojené zariadenie na „PCM Stereo“ alebo „Stereo 2.0“.
•Zapnite zvukový panel pomocou tlačidla pohotovostného režimu (2, 35).
•Stlačením tlačidla „HDMI (ARC)“ (13) vyberte vstup HDMI(ARC) na zvukovom paneli.
•Zapnite televízor, prehrávanie zvuku sa spustí behom pár sekúnd.
Ak televízor podporuje protokol CEC, zvukový panel je možné zapínať a vypínať pomocou diaľkového ovládača k televízoru. Ak je toto ten
prípad, diaľkovým ovládačom k televízoru môžete ovládať aj hlasitosť. Pozrite si používateľskú príručku k televíznemu prijímaču.
9.3.2 Režim OPTICAL
Pomocou tohto režimu činnosti môžete prehrať hudbu z optického digitálneho vstupu (10), napr. televízora, na zvukovom paneli (A). Televízor musí byť vybavený
Stlačte tlačidlo (16), ak bolo prehrávanie predtým
pozastavené tlačidlom (18).
Obnovenie prehrávania na začiatku naposledy prehrávaného priečinka.
Krátko stlačte tlačidlo (17).Preskočenie na ďalšiu skladbu.
Stlačte a podržte tlačidlo (17). Preskočenie na 1. skladbu ďalšieho priečinka.
Krátko stlačte tlačidlo (30).Preskočenie na predchádzajúcu skladbu.
Stlačte a podržte tlačidlo (30). Preskočenie na 1. skladbu predchádzajúceho priečinka.
Stlačte tlačidlo (18). Pozastavenie prehrávania, prehrávanie pokračuje prvou skladbou
naposledy prehrávaného priečinka pri stlačení tlačidla (16).
Tlačidlo (18)stlačte dvakrát rýchlo za sebou.Preskočenie na 1. skladbu 1. priečinka.
Stlačením tlačidla (28) sa zopakuje aktuálne prehrávaná skladba (na displeji sa zobrazí ON) alebo sa zopakujú všetky skladby uložené na úložnom zariadení
USB (na displeji sa zobrazí AL).
LED displej Funkcia
ON Opakovanie aktuálnej skladby.
AL Opakovanie všetkých skladieb.
UPOZORNENIE! USB port (4) sa nesmie používať na nabíjanie externých zariadení.
9.3.5 Režim AUX
Pomocou tohto režimu môžete prepojiť prehrávacie zariadenia s výstupom Cinch, napr. DVD prehrávačom alebo satelitným prijímačom. Použite dodávaný kábel
adaptéra (E).
•Pripojte výstup Cinch z prehrávacieho zariadenia ku konektoru AUX (11) na zvukovom paneli.
•Zapnite zvukový panel pomocou tlačidla pohotovostného režimu (2, 35).
•Stlačením tlačidla AUX (34) na diaľkovom ovládači vyberte tento režim.
•
Hlasitosť si môžete nastaviť podľa svojich požiadaviek pomocou tlačidiel hlasitosti (29, 31).
•
Ak chcete, môžete si zmeniť zvukové nastavenia pomocou príslušných tlačidiel na diaľkovom ovládači.
9.4 Nastavenia hlasitosti a zvuku
Všetky zmeny v nastaveniach hlasitosti a zvuku sa zobrazia na pribl. 2 sekundy na LED displeji (1). Displej sa potom vráti do
štandardného zobrazenia príslušného režimu.
9.4.1 Nastavenie hlasitosti
Počas prehrávania môžete hlasitosť nastaviť tlačidlami hlasitosti (29, 31) na diaľkovom ovládači. Prípadne môžete použiť tlačidlá hlasitosti (3, 5) na zvukovom
paneli. Podržaním stlačených tlačidiel môžete meniť nastavenie rýchlejšie. Vybraná hlasitosť sa zobrazí na pribl. 2 sekundy na LED displeji (1). Ak nastavíte
hlasitosť na najnižšiu úroveň, na LED displeji (1) bude nepretržite blikať V 00.
9.4.2 Stlmenie zvuku
Stlačením tlačidla (12)dočasne stlmíte zvuk.
9.4.3 Nastavenie výšok a basov
Výšky môžete nastaviť podľa svojich požiadaviek pomocou tlačidiel TREBLE+ (19) a TREBLE- (27).
Ak chcete nastaviť basy, stlačte tlačidlá BASS+ (20) a BASS- (26).
nastavenia sa na LED displeji (1) zobrazia nasledovne:
Zvukové nastavenieLED displej
FILMCINE
3D 3d
DIALOG dIA
MUSICSONG
9.4.5 Zvukové nastavenia MOVIE
Výberom týchto nastavení vyberiete zvukové nastavenia na prehrávanie napr. filmov alebo dokumentárnych programov.
9.4.6 Zvukové nastavenia 3D
Výberom týchto nastavení pridáte k aktuálnemu prehrávaniu virtuálny 3D priestorový zvuk.
9.4.7 Zvukové nastavenia DIALOG
Výberom týchto nastavení vyberiete zvukové nastavenia na prehrávanie hlasu. Toto nastavenie sa odporúča, medzi inými, aj spravodajské programy.
9.4.8 Zvukové nastavenia MUSIC
Toto nastavenie optimalizuje zvukové nastavenia pri prehrávaní hudby.
10. Čistenie
Vypnite zariadenie a odpojte ho od elektrickej siete. Vyčistite ho mäkkou suchou handričkou. Nikdy nepoužívajte žiadne rozpúšťadlá, čistiace prostriedky ani
drsnú špongiu. Inak môžete poškodiť kryt zvukového panela.
10.1 Skladovanie pri nepoužívaní
Ak nebudete zvukový panel používať dlhšiu dobu, uskladnite ju na čistom, suchom a chladnom mieste. Vyberte aj batérie z diaľkového
ovládača, aby nedošlo k ich vytečeniu.
SSB 70 C3
Slovensky - 93
11. Odstraňovanie problémov
Zvukový panel sa nezapína.
•Skontrolujte, či je zástrčka správne zasunutá do sieťovej zásuvky. Pripojte ju správne, ak nie je.
•Skontrolujte, či je použitá sieťová zásuvka pod prúdom. V prípade potreby odskúšajte zariadenie v inej sieťovej zásuvke, o ktorej viete, že určite funguje.
Nepočuť žiaden zvuk
•Skontrolujte, či je vybraný správny režim. Vyberte správny režim.
•Skontrolujte hlasitosť prehrávania na zvukovom paneli aj pripojenom prehrávacom zariadení.
•V režime HDMI ARC a OPTICAL: Ak audio zdroj podporuje viackanálové prehrávanie, musíte pred začatím prepnúť na „PCM Stereo“, pretože zvukový
panel nebude môcť inak prehrať zvuk. Pozrite si používateľskú príručku svojho audio zdroja.
•V režime HDMI ARC: Skontrolujte, či je kábel HDMI(ARC) (C) správne vložený do konektora HDMI ARC (9) v zvukovom paneli a v príslušnom konektore
HDMI ARC na externom zvukovom zdroji, napr. televízore. Pri „normálnom“ pripojení HDMI môže televízor len prijímať video a audio signály, ale nemôže
ich prenášať.
•V režime AUX IN: Skontrolujte, či je kábel adaptéra (E) správne vložený do konektora AUX IN (11) v zvukovom paneli a vo výstupe Cinch externého
zvukového zariadenia. Skontrolujte tiež nastavenie hlasitosti externého prehrávacieho zariadenia pripojeného cez kábel adaptéra (E).
•V režime Optical: Skontrolujte, či je kábel Toslink (D) správne vložený do optického digitálneho vstupu (10) v zvukovom paneli a v príslušnom konektore
externého zvukového zariadenia.
•V režime USB: Skontrolujte, či je prehrávacie zariadenie USB formátované súborovým systémomFAT32 a správne pripojené a či sú v ňom vhodné súbory na
prehrávanie. Vhodné súborové formáty: MP3 a WAV.
Zvukový panel sa nedá ovládať diaľkovým ovládačom
•Batérie diaľkového ovládača sú takmer alebo úplne vybité. Vymeňte batérie za nové, rovnakého typu.
•Vzdialenosť medzi zvukovým panelom a diaľkovým ovládačom je príliš veľká. Posuňte ich bližšie k sebe.
Prehrávanie cez Bluetooth® nefunguje
•Vo svojom smartfóne/tablete skontrolujte, či je nadviazané spojenie Bluetooth® so zvukovým panelom SSB 70 C3. V prípade potreby zopakujte párovanie.
12. Informácie o environmentálnych nariadeniach a likvidácii
Zariadenia označené týmto symbolom podliehajú európskej smernici 2012/19/EU. Všetky elektrické a elektronické zariadenia je potrebné
likvidovať oddelene od domáceho odpadu, na oficiálnych zberných miestach. Zabráňte znečisteniu životného prostredia a ohrozeniu vášho
zdravia správnou likvidáciou zariadenia. Podrobnejšie informácie o správnom spôsobe likvidácie získate, keď sa obrátite na miestnu
administratívu, na organizácie zaoberajúce sa likvidáciou alebo na predajcu, od ktorého ste zariadenie zakúpili.
Chráňte životné prostredie. Staré batérie nepatria do domového odpadu. Musia byť odovzdané do zberného strediska pre staré batérie. Batérie
musia byť zlikvidované v stave úplného vybitia, v jednom zo zberných miest pre použité batérie. V prípade likvidácie batérií, ktoré nie sú úplne
vybité, je potrebné prijať opatrenia na predchádzanie skratom.
Všetky obalové materiály zlikvidujte s ohľadom na životné prostredie. Obalové kartóny je možné vyhodiť do odpadových kontajnerov na
recykláciu papiera alebo odovzdať na recykláciu na verejných zberných miestach. Akékoľvek fólie alebo plasty obsiahnuté v obale by sa mali
kvôli likvidácii vrátiť na verejné zberné miesta.
Pri likvidácia obalového materiálu si na ňom všimnite označenia. Na štítku sú označené skratky (a) a čísla (b), a ich význam je nasledovný:
Na tento prístroj máte trojročnú záruku od dátumu nákupu. V prípade nedostatkov tohto výrobku máte voči jeho predajcovi zákonné práva. Tieto zákonné práva
nie sú obmedzené našou zárukou, ktorá je uvedená ďalej.
Záručné podmienky
Záručná doba začína dňom kúpy. Dobre si uschovajte originál pokladničného bloku. Tento doklad je potrebný ako potvrdenie o kúpe. Ak sa v priebehu troch
rokov od kúpy tohto výrobku prejaví materiálová alebo výrobná chyba, tento výrobok vám podľa našej úvahy bezplatne buď vymeníme alebo opravíme.
Záručná doba a zákonné nároky z titulu chyby
Záruka sa nepredlžuje o dobu trvania záručných opráv. To platí aj na vymenené alebo opravené diely. Prípadné už pri kúpe zistené chyby a nedostatky musíte
ohlásiť ihneď po vybalení výrobku. Opravy, ktoré spadajú do obdobia po skončení záruky, si musíte zaplatiť.
Rozsah záruky
Prístroj bol podľa prísnych kvalitatívnych predpisov starostlivo vyrobený a pred expedíciou dôkladne vyskúšaný. Záruka platí na materiálové a výrobné chyby.
Táto záruka neplatí na také súčasti výrobku, ktoré sú vystavené normálnemu opotrebeniu, takže sa na ne hľadí ako na opotrebené diely, ani na poškodenia
krehkých dielov, ako sú spínače, akumulátory alebo diely zo skla. Táto záruka stráca platnosť, ak bol výrobok poškodený, nesprávne používaný alebo udržiavaný.
Pre správne používanie tohto výrobku treba presne dodržiavať všetky pokyny uvedené v návode na používanie. Bezpodmienečne sa treba vyhnúť takému účelu
používania a takej manipulácii, pred akými sú v návode na používanie uvedené výstrahy. Výrobok je určený len na súkromné používanie a nie na podnikateľské
účely. Záruka stráca platnosť pri zaobchádzaní nezodpovedajúcemu účelu a pri neprimeranom zaobchádzaní, pri použití násilia a pri zásahoch, ktoré neurobil
náš autorizovaný servis. Opravou ani výmenou výrobku nezačína plynúť nová záručná doba.
Postup pri uplatňovaní záruky
Ak chcete zabezpečiť rýchle vybavenie vašej požiadavky, riaďte sa týmito pokynmi:
-Pred uvedením výrobku do prevádzky si pozorne prečítajte priloženú dokumentáciu. Ak by sa vyskytol problém, ktorý sa takýmto spôsobom nedá
vyriešiť, obráťte sa na našu zákaznícku linku.
-Pri každej požiadavke majte poruke účtenku a číslo výrobku príp. jeho výrobné číslo ako doklad o kúpe.
-V prípade, že telefonické vyriešenie nie je možné, v závislosti od príčiny chyby zákaznícky servis zariadi ďalšie služby.
Servis
Telefón: 0850 232001
E-mailový: targa@lidl.sk
IAN: 315507
Výrobca
Majte na pamäti, že táto adresa nie je adresou servisu. Najprv sa obráťte na vyššie uvedenú opravovňu.
Libble takes abuse of its services very seriously. We're committed to dealing with such abuse according to the laws in your country of residence. When you submit a report, we'll investigate it and take the appropriate action. We'll get back to you only if we require additional details or have more information to share.
Product:
Forumrules
To achieve meaningful questions, we apply the following rules:
First, read the manual;
Check if your question has been asked previously;
Try to ask your question as clearly as possible;
Did you already try to solve the problem? Please mention this;
Is your problem solved by a visitor then let him/her know in this forum;
To give a response to a question or answer, do not use this form but click on the button 'reply to this question';
Your question will be posted here and emailed to our subscribers. Therefore, avoid filling in personal details.
Register
Register getting emails for Silvercrest IAN 315507 SSB 70 C3 at:
new questions and answers
new manuals
You will receive an email to register for one or both of the options.
Get your user manual by e-mail
Enter your email address to receive the manual of Silvercrest IAN 315507 SSB 70 C3 in the language / languages: English, German, Dutch, French, Polish, Swedish as an attachment in your email.
The manual is 2,47 mb in size.
You will receive the manual in your email within minutes. If you have not received an email, then probably have entered the wrong email address or your mailbox is too full. In addition, it may be that your ISP may have a maximum size for emails to receive.
The manual is sent by email. Check your email
If you have not received an email with the manual within fifteen minutes, it may be that you have a entered a wrong email address or that your ISP has set a maximum size to receive email that is smaller than the size of the manual.
The email address you have provided is not correct.
Please check the email address and correct it.
Your question is posted on this page
Would you like to receive an email when new answers and questions are posted? Please enter your email address.