63087
37
Zoom out
Zoom in
Previous page
1/69
Next page
s
Gigaset
Gigaset S680
-
S685
Issued by
Gigaset Communications GmbH
Schlavenhorst 66, D-46395 Bocholt
Gigaset Communications GmbH is a trademark licensee of Siemens AG
© Gigaset Communications GmbH 2008
All rights reserved.
Subject to availability. Rights of modifications reserved.
www.gigaset.com
1
Handset at a glance
Gigaset S680 / IM-NORD EN / A31008-M1901-R201-1-SM19 / overview.fm / 1.10.08
Version 4, 16.09.2005
Handset at a glance
The base station at a glance
1 Display (screen) in idle status
2 Charge status of the batteries
= e V U (flat to full)
= flashes: batteries almost flat
e V U flashes: batteries charging
3 Display keys (page 10)
4 Message key
Access to calls and message lists;
Flashes: new message or new call
5 End call key, On/Off key
End call, cancel function, go back one menu
level (press briefly), back to idle status
(press and hold), activate/deactivate hand-
set (press and hold in idle status)
6 Hash key
Keypad lock on/off (press and hold in
idle status),
Toggle between upper/lower case and digits
(press and hold)
7 Call-by-call list key
Open call-by-call list
8 Microphone
9 Recall key
- Confer (flash)
- Insert a dialling pause (press and hold)
10 Star key
Ringer tones on/off (press and hold);
With an open connection: switch between
dial pulsing/touch tone dialling
(press briefly)
Open special characters table
11 Key 1
Dial network mailbox (press and hold)
12 Connection socket for headset
13 Talk key
Answer a call, open last number redial list
(press briefly), start dialling (press and hold)
When writing an SMS: send SMS
14 Handsfree key
Switch between earpiece and handsfree
mode;
Lights up: handsfree activated;
Flashes: incoming call
15 Control key (page 10)
16 Bluetooth activated (page 47)
17 Eco mode activated (page 12)
18 Signal strength
Ð i Ñ Ò (high to low)
| flashes: no reception
2
3
5
4
6
7
15
14
11
9
10
8
1
13
Ð
½
òV
INT 1
15.11.07 09:45
?SMS
12
18
Registration/paging key (page 35)
17
16
2
Contents
Gigaset S680 / IM-NORD EN / A31008-M1901-R201-1-SM19 / S680IVZ.fm / 1.10.08
Version 4, 16.09.2005
Contents
Handset at a glance . . . . . . . . . . . 1
The base station at a glance . . . . 1
Safety precautions . . . . . . . . . . . . 4
Gigaset S680 –
More than just a telephone . . . . . 6
First steps . . . . . . . . . . . . . . . . . . . . 6
Pack contents . . . . . . . . . . . . . . . . . . . . 6
Installing the base station and
charging cradle . . . . . . . . . . . . . . . . . . . 6
Setting up the handset for use . . . . . . . 7
Operating the handset . . . . . . . . 10
Control key . . . . . . . . . . . . . . . . . . . . . 10
Display keys . . . . . . . . . . . . . . . . . . . . 10
Reverting to idle status . . . . . . . . . . . . 11
Menu guidance . . . . . . . . . . . . . . . . . 11
Correcting incorrect entries . . . . . . . . 12
ECO DECT . . . . . . . . . . . . . . . . . . . 12
Menu tree . . . . . . . . . . . . . . . . . . 13
Making calls . . . . . . . . . . . . . . . . . 15
Making an external call . . . . . . . . . . . 15
Ending a call . . . . . . . . . . . . . . . . . . . . 15
Accepting a call . . . . . . . . . . . . . . . . . 15
Calling Line Identification . . . . . . . . . 15
Handsfree talking . . . . . . . . . . . . . . . . 16
Muting . . . . . . . . . . . . . . . . . . . . . . . . 16
Making calls easily using
network services . . . . . . . . . . . . . 17
Setting functions for all
subsequent calls . . . . . . . . . . . . . . . . . 17
Functions during a call . . . . . . . . . . . . 17
Functions after a call . . . . . . . . . . . . . 18
Using the directory and lists . . 19
Directory/call-by-call list . . . . . . . . . . . 19
Last number redial list . . . . . . . . . . . . 22
Opening lists with the message key . . 23
Making cost-effective calls . . . . 24
Linking call-by-call numbers
with one number . . . . . . . . . . . . . . . . 24
Automatic network provider
preselection (Preselection) . . . . . . . . . 25
SMS (text messages) . . . . . . . . . 26
Writing/sending an SMS . . . . . . . . . . . 26
Receiving an SMS . . . . . . . . . . . . . . . . 28
Notification by SMS . . . . . . . . . . . . . . . 30
SMS mailboxes . . . . . . . . . . . . . . . . . . 30
Setting SMS centres . . . . . . . . . . . . . . 31
SMS info services . . . . . . . . . . . . . . . . 32
SMS on a PABX . . . . . . . . . . . . . . . . . . 32
Activating/deactivating the
SMS function . . . . . . . . . . . . . . . . . . . . 32
SMS troubleshooting . . . . . . . . . . . . . 33
Using the network mailbox . . . 34
Configuring fast access for the
network mailbox . . . . . . . . . . . . . . . . . 34
Viewing the network mailbox
report . . . . . . . . . . . . . . . . . . . . . . . . . 34
Using several handsets . . . . . . . 35
Registering handsets . . . . . . . . . . . . . . 35
Deregistering handsets . . . . . . . . . . . . 36
Locating a handset ("paging") . . . . . . 36
Changing the base station . . . . . . . . . 36
Making internal calls . . . . . . . . . . . . . . 36
Listening in to an external call . . . . . . 37
Changing the name of a handset . . . . 38
Changing a handset's internal
number . . . . . . . . . . . . . . . . . . . . . . . . 38
Using a handset as a
room monitor . . . . . . . . . . . . . . . . . . . 38
3
Contents
Gigaset S680 / IM-NORD EN / A31008-M1901-R201-1-SM19 / S680IVZ.fm / 1.10.08
Version 4, 16.09.2005
Handset settings . . . . . . . . . . . . . 39
Shortcuts for functions
and numbers . . . . . . . . . . . . . . . . . . . 39
Changing the display language . . . . . 40
Setting the display . . . . . . . . . . . . . . . 40
Setting the screensaver . . . . . . . . . . . 41
Setting the display backlight . . . . . . . 41
Activating/deactivating
auto answer . . . . . . . . . . . . . . . . . . . . 41
Changing the handsfree/
earpiece volume . . . . . . . . . . . . . . . . . 42
Changing ringer tones . . . . . . . . . . . . 42
My stuff . . . . . . . . . . . . . . . . . . . . . . . 43
Activating/deactivating
advisory tones . . . . . . . . . . . . . . . . . . 44
Setting the alarm clock . . . . . . . . . . . . 45
Setting an appointment
(calendar) . . . . . . . . . . . . . . . . . . . . . . 45
Displaying missed appointments
and anniversaries . . . . . . . . . . . . . . . . 46
Using Bluetooth devices . . . . . . . . . . . 47
Setting your own area code . . . . . . . . 49
Restoring the handset to the
factory settings . . . . . . . . . . . . . . . . . . 49
Base station settings . . . . . . . . . . 49
Protecting against unauthorised
access . . . . . . . . . . . . . . . . . . . . . . . . . 49
Activating/deactivating
music on hold . . . . . . . . . . . . . . . . . . . 50
Repeater support . . . . . . . . . . . . . . . . 50
Restoring the base station to
the factory settings . . . . . . . . . . . . . . 50
Connecting the base station
to PABX . . . . . . . . . . . . . . . . . . . . . 51
Recall . . . . . . . . . . . . . . . . . . . . . . . . . 51
Saving an access code
(outside line code) . . . . . . . . . . . . . . . 51
Setting pauses . . . . . . . . . . . . . . . . . . 51
Switching temporarily to touch
tone dialling (DTMF) . . . . . . . . . . . . . . 52
Appendix . . . . . . . . . . . . . . . . . . 53
Care . . . . . . . . . . . . . . . . . . . . . . . . . . . 53
Contact with liquid . . . . . . . . . . . . . . . 53
Questions and answers . . . . . . . . . . . . 53
Service (Customer Care) . . . . . . . . . . . 55
Authorisation . . . . . . . . . . . . . . . . . . . 56
Specifications . . . . . . . . . . . . . . . . . . . 56
Notes on the user guide . . . . . . 57
Example of a menu input . . . . . . . . . . 57
Example of multiple line input . . . . . . 58
Writing and editing text . . . . . . . . . . . 58
Additional functions via the
PC interface . . . . . . . . . . . . . . . . 59
Accessories . . . . . . . . . . . . . . . . . 60
Index . . . . . . . . . . . . . . . . . . . . . . 63
4
Safety precautions
Gigaset S680 / IM-NORD EN / A31008-M1901-R201-1-SM19 / security.fm / 1.10.08
Version 4, 16.09.2005
Safety precautions
Warning:
Read the safety precautions and the user guide before use.
Explain their contents and the potential hazards associated with using the telephone to your children.
Only use the mains adapter supplied, as indicated on the underside of the base
station or charging cradle.
Fit only the recommended, rechargeable batteries (page 56), i.e. never use a
conventional (non-rechargeable) battery or other battery types as this could
result in significant health risks and personal injury.
Batteries should not be disposed of in general household waste. Observe the
local waste disposal regulations, which you can find out about by contacting
your local authority or the dealer you purchased the product from.
The operation of medical appliances may be affected. Be aware of the technical
conditions in your particular environment, e.g. doctor's surgery.
Do not hold the rear of the handset to your ear when it is ringing or when the
handsfree function is activated. Otherwise you risk serious and permanent dam-
age to your hearing.
The handset may cause an unpleasant humming noise in hearing aids.
Do not install the base station or charging cradle in bathrooms or shower rooms.
The base station and charging cradle are not splashproof (page 53).
Do not use your phone in environments with a potential explosion hazard
(e.g. paint shops).
If you give your Gigaset to someone else, make sure you also give them the user
guide.
Please remove faulty base stations from use or have them repaired by our
Service, as they could interfere with other wireless services.
$
ƒ
5
Safety precautions
Gigaset S680 / IM-NORD EN / A31008-M1901-R201-1-SM19 / security.fm / 1.10.08
Version 4, 16.09.2005
All electrical and electronic equipment must be disposed of separately from gen-
eral household waste using the sites designated by local authorities.
If a product displays this symbol of a crossed-out rubbish bin, the product is sub-
ject to European Directive 2002/96/EC.
The appropriate disposal and separate collection of used equipment serve to
prevent potential harm to the environment and to health. They are a precondi-
tion for the re-use and recycling of used electrical and electronic equipment.
For further information on disposing of your used equipment, please contact
your local authority, your refuse collection service or the dealer you purchased
the product from.
Please note:
Not all of the functions described in this manual are available in all countries.
6
Gigaset S680 – More than just a telephone
Gigaset S680 / IM-NORD EN / A31008-M1901-R201-1-SM19 / starting.fm / 1.10.08
Version 4, 16.09.2005
Gigaset S680 –
More than just a telephone
Your phone, which has a clearly laid out
colour display (65K colours) doesn't just
offer you the option of sending and receiv-
ing SMS messages via the fixed network
and of saving up to 250 phone numbers
and e-mail addresses (page 19) – it can do
much more besides:
u You can reduce the transmission power
by activating the eco mode (page 12).
u You can programme the keys of your
phone with important numbers or fre-
quently used functions. The number is
then dialled or the function started by
simply pressing a key (page 39).
u You can easily make calls using network
services (page 17).
u You can designate important people as
VIPs so you can tell important calls from
the ringer tone (page 20).
u You can assign pictures to your con-
tacts. You can then tell who is calling
you from the picture on your handset's
display.
Precondition: Calling Line Identification
(CLIP, page 15).
u You can save appointments (page 45)
and anniversaries (page 22) in your
phone and it will remind you of them in
advance.
u You can use Bluetooth™ for wireless
communication with other devices that
also use this technology (see page 47)..
Bluetooth™ can be used for
headsets (page 9)
exchanging directory entries with
your mobile phone
(page 21)
downloading photos (.bmp) to visu-
alise the caller (page 59)
exchanging directories with Outlook
using Gigaset QuickSync (page 59)
u Enjoy using your new telephone!
First steps
Pack contents
u one Gigaset S680 base station with
mains adapter,
u one Gigaset S68H handset,
u one phone cord,
u two batteries,
u one battery cover,
u one belt clip,
u one user guide.
Installing the base station and
charging cradle
The base station and charging cradle are
designed for use in enclosed dry rooms
with a temperature range of +5 °C to
+45 °C.
Set up the base station at a central point in
the apartment or house.
You can find instructions on how to mount
the base station on the wall at the end of
this user guide.
Please note:
u Never expose the telephone to heat
sources, direct sunlight or other electri-
cal appliances.
u Protect your Gigaset from moisture,
dust, corrosive liquids and vapours.
7
First steps
Gigaset S680 / IM-NORD EN / A31008-M1901-R201-1-SM19 / starting.fm / 1.10.08
Version 4, 16.09.2005
Range and reception strength
Range:
u Outdoors: up to 300 m
u Indoors: up to 50 m
The range is reduced when eco mode is
activated (see page 12).
Reception strength:
The display shows the quality of the radio
range between the base station and hand-
set:
u Good to poor: ÐiÑÒ
u No reception: | flashes
Connecting the base station
¤ First connect the power supply unit
and then the phone jack as shown
below and place the cables in the cable
recesses.
1 Mains adapter 230 V
2 Phone jack with phone cord
Please note:
u The mains adapter must always be
connected, as the phone will not oper-
ate without mains connection.
u Only use the mains adapter and phone
cord supplied.
u If you buy a replacement phone cord,
make sure that the phone jack has the
correct type of wiring.
Setting up the handset for use
The display is protected
by a plastic film.
Please remove the
protective film!
Inserting the batteries
¤ Insert the batteries the right way round
(see figure).
The polarity is indicated in/on the battery
compartment.
2
1
1
Correct phone jack assignment
1unused
2unused
3a
4b
5unused
6unused
Warning:
Use only the rechargeable batteries recom-
mended by Gigaset Communications GmbH *
(page 56). Never use a conventional (non-
rechargeable) battery or other battery types as
this could result in significant health risks and
personal injury. For example, the batteries
could explode. The phone could also malfunc-
tion or be damaged as a result of using batter-
ies that are not of the recommended type.
* Gigaset Communications GmbH is a trademark
licensee of Siemens AG.
3
2
1
4
5
6
8
First steps
Gigaset S680 / IM-NORD EN / A31008-M1901-R201-1-SM19 / starting.fm / 1.10.08
Version 4, 16.09.2005
Closing the battery cover
¤ First, align the notches on the side of
the battery cover with the protrusions
on the inside of the housing.
¤ Then press the cover until it clicks into
place.
Attaching the belt clip
There are notches for attaching the belt
clip on the side of the handset at the same
height as the display.
¤ Press the belt clip onto the back of the
handset so that the protrusions on the
belt clip engage with the notches.
Opening the battery cover
¤ If fitted, remove the belt clip.
¤ Place your fingertip in the cavity in the
casing and lift the battery cover
upwards.
Placing the handset in the base station
and registering
¤ Place the handset in the base station
with its display facing upwards.
The handset registers automatically. Reg-
istration can take up to 5 minutes. During
this time Regstr.Procedure appears in the
display and the name of the base station
flashes, e.g. Base 1. The handset will be
assigned the lowest unassigned internal
number (1–6).
This will appear in the display when regis-
tration is complete, e.g. INT 1. This means
that the number 1 has been assigned. If
the internal numbers 1–6 are already
assigned to other devices, the number 6 is
overwritten.
To charge the batteries, leave the handset
in the base station.
For questions and problems see page 53.
Please note:
Automatic registration is only possible
while no one is making calls using the base
station.
Each key press interrupts the automatic
registration.
If automatic registration does not work the
handset will have to be registered manually
(page 35).
You can change the name of the handset
(page 38).
Please note:
If the handset has turned itself off because
the batteries are flat and if it is then placed
in the charging cradle, it will turn itself on
automatically.
Only place the handset in the base station
or charging cradle that is intended for it.
9
First steps
Gigaset S680 / IM-NORD EN / A31008-M1901-R201-1-SM19 / starting.fm / 1.10.08
Version 4, 16.09.2005
Headset socket
You can connect various headset types
(with 2.5 mm jack connector), including:
HAMA Plantronics M40, MX100 and
MX150.
You can access a list of headsets that
have been tested for compatibility on
the Internet at
www.plantronics.com/productfinder
.
Initial charging and discharging of
batteries
If the handset is activated, the flashing
battery icon e in the top right of the dis-
play indicates that the batteries are being
charged.
During handset operation, the battery
icon indicates the charge status of the bat-
teries (page 1). The correct charge level
can only be displayed if the batteries are
first fully charged and discharged.
¤ To do this, leave the handset in the
base station or charging cradle contin-
uously for seven hours. Your handset
need not be turned on for it to charge.
¤ Afterwards, remove the handset from
the base station and do not put it back
again until the batteries are fully dis-
charged.
Please note:
u Always repeat the charging and dis-
charging procedure if you remove the
batteries from the handset and reinsert
them.
u The batteries may warm up during
charging. This is not dangerous.
u After a while the charge capacity of the
batteries will decrease for technical rea-
sons.
Setting the date and time
The date and time must be set in order to,
for example, have the correct time for
incoming calls and be able to use the
alarm clock and calendar.
¤ If you have not yet set the date and
time, press the display key
§Time§ to open
the input field.
To change the time, open the input field
with:
v
¢ Ð ¢ Date/Time
¤ Change multiple line input:
Date:
Enter the day, month and year in 8-digit
format.
Time:
Enter hours and minutes as 4 digits,
e.g. Q M 5 for 07:15 a.m.
§Save§ Press the display key
Display in idle status
Once the phone is registered and the time
set, the idle display is as shown here
(example)
Your phone is now ready for use.
If you have any queries about using your
phone, please read the tips on trouble-
shooting ("Questions and Answers",
page 53) or contact our customer service
department (Customer Care, page 55).
Please note:
After the first battery charge and discharge
you may replace your handset in its base sta-
tion after every call.
ÐV
INT 1
15.11.07 07:15
?SMS
10
Operating the handset
Gigaset S680 / IM-NORD EN / A31008-M1901-R201-1-SM19 / starting.fm / 1.10.08
Version 4, 16.09.2005
Operating the handset
Activating/deactivating the handset
a In idle status, press and hold
the end call key (confirma-
tion tone).
Activating/deactivating the keypad
lock
# Press and hold the hash key.
You will hear the confirmation tone. The
Ø icon appears in the display when the
keypad lock is activated.
The keypad lock is deactivated automati-
cally if someone calls you. It is re-activated
when the call is finished.
Control key
In the description below, the side of the
control key (up, down, right, left) that you
have to press in the different operating sit-
uations is marked in black, e.g. v for
"press right on the control key".
The control key has a number of different
functions:
When the handset is in idle status
s Open the directory.
v Open the main menu.
u Open the list of handsets.
t Call up the menu to set the call
volume (page 42), ringer
tones (page 42) and advisory
tones (page 44) for the hand-
set.
In the main menu and in input fields
You can use the control key to move the
cursor up t, down s, right v or left
u.
In lists and submenus
t / s Scroll up/down line by line.
v Open submenu or confirm
selection.
u Go back one menu level or
cancel.
During an external call
s Open the directory.
u Initiate internal consultation
call and mute
t Adjust the loudspeaker vol-
ume for earpiece and hands-
free mode.
Display keys
The function of the display keys changes
depending on the particular operating sit-
uation. Example:
1 Current display key functions are shown in
the bottom display line.
2 Display keys
The most important display icons are:
} Left display key, as long as it
has not been assigned a func-
tion (page 39).
¨ Open the main menu.
§Options§ Open a context-dependent
menu.
W Delete key: deletes one char-
acter at a time from right to
left.
2
1
? SMS
11
Operating the handset
Gigaset S680 / IM-NORD EN / A31008-M1901-R201-1-SM19 / starting.fm / 1.10.08
Version 4, 16.09.2005
Î Go back one menu level or
cancel operation.
Œ Fetch e-mail address from the
directory.
Ó Copy number into directory.
Open the last number redial
list.
Reverting to idle status
You can revert to idle status from any-
where in the menu as follows:
¤ Press and hold the end call key a.
Or:
¤ Do not press any key: after 2 minutes
the display will automatically revert to
idle status.
Changes that you have not confirmed or
saved by pressing
§OK§, §Yes§, §Save§, §Send§ or
Save Entry
§OK§ will be lost.
An example of the display in idle status is
shown on page 1.
Menu guidance
Your telephone's functions are accessed
using a menu that has a number of levels.
Main menu (first menu level)
¤ Press v with the handset in idle status
to open the main menu.
The main menu functions are shown in
the display with colour icons and names.
To access a function, i.e. to open the cor-
responding submenu (next menu level):
¤ Navigate to the function using the con-
trol key q/r. The name of the func-
tion is displayed in the display header.
Press the display key
§OK§.
Submenus
The functions in the submenus are dis-
played as lists.
To access a function:
¤ Scroll to the function with the control
key q and press
§OK§.
Or:
¤ Enter the corresponding digit combina-
tion (page 13).
Briefly press the end call key a once to
return to the previous menu level/cancel
the operation.
Illustration in the user guide
The operating steps are shown in abbrevi-
ated form.
Example
The illustration:
v ¢ Ð ¢ Date/Time
means:
v Press the key to display the
main menu.
Ð Use the control key q to
scroll through submenu
Settings and press
§OK§.
Date/Time Scroll to the function with the
control key q and press
§OK§.
Other types of illustrations:
c / Q / * etc.
Press the matching key on the
handset.
~ Enter digits or letters.
You will find detailed examples of menu
entries and multiple line input in the
appendix to this user guide, page 57.
12
ECO DECT
Gigaset S680 / IM-NORD EN / A31008-M1901-R201-1-SM19 / starting.fm / 1.10.08
Version 4, 16.09.2005
Correcting incorrect entries
You can correct incorrect characters in the
text by navigating to the incorrect entry
using the control key. You can then:
u press X to delete the character to the
left of the cursor
u insert characters to the left of the cur-
sor
u overwrite the character (flashing)
when entering the time and date etc.
ECO DECT
ECO DECT reduces power consumption by
using a power supply with low power con-
sumption and also reduces the transmis-
sion power of the base station.
If only one handset is registered and it is in
the base station, eco mode is always acti-
vated automatically. In this case, the
transmission power of the base station is
reduced to the minimum.
You can use your handset to reduce the
transmission power on the base station
manually even when the handset is not in
the base station.
By doing so, you will reduce the transmis-
sion power even if you have several hand-
sets registered.
Your handset also reduces the transmis-
sion power depending on the distance to
the base station.
Activating/deactivating eco mode:
v ¢ Ð ¢ Base ¢ Add. Features
¢ Eco Mode
§OK§ Press the display key
(=on).
If eco mode is activated manually, the
½
icon is displayed at the top of the screen.
If eco mode is activated automatically
(only one handset is registered and it is on
the base station) and eco mode has not
been activated via the menu, then the
icon is not displayed.
Please note:
Activating eco mode reduces the range of
the base station.
Eco mode and any repeater support (see
page 50) cancel each other out, i.e. both
functions cannot be used at the same time.
If external handsets (GAP) and handsets
from earlier Gigasets versions are used,
your handset will not automatically reduce
the transmission power to the base station.
13
Menu tree
Gigaset S680 / IM-NORD EN / A31008-M1901-R201-1-SM19 / menuetree.fm / 1.10.08
Version 4, 16.09.2005
Menu tree
Instead of scrolling to locate a menu function, you can select a function more quickly by
opening the menu and keying in a digit combination (or shortcut).
Example: vN22 for "Set ringer tone for external calls".
With the telephone in idle status, press v (open main menu):
1 SMS î
You have activated an SMS mailbox (general or private) without a PIN
1-1 New SMS (page 26)
1-2 Incoming 0 (page 29)
1-3 Outgoing 0 (page 27)
You have activated an SMS mailbox with a PIN or 2-3 mailboxes
1-1 Mailbox 1-1-1 New SMS (page 26)
1-1-2 Incoming 0 (page 29)
1-1-3 Outgoing 0 (page 27)
1-2
to
1-4
Mailbox 1
Mailbox 2
Mailbox 3
1-2-1
to
1-4-1
New SMS (page 26)
1-2-2
to
1-4-2
Incoming 0 (page 29)
1-2-3
to
1-4-3
Outgoing 0 (page 27)
1-5 SMS Service (page 32)
1-6 Settings 1-6-1 Service Centres (page 31)
1-6-2 SMS Mailboxes (page 30)
1-6-3 Notify Number (page 30)
1-6-4 Notify Type (page 30)
1-6-5 Status Report (page 27)
2 Sel. Services
ê
2-6 All Calls 2-6-1 Call Divert (page 17)
2-6-3 Call Waiting (page 17)
2-7 Ringback Off (page 18)
3 Calls List
Ì (page 24)
14
Menu tree
Gigaset S680 / IM-NORD EN / A31008-M1901-R201-1-SM19 / menuetree.fm / 1.10.08
Version 4, 16.09.2005
4 Add. Features í
4-3 Room Monitor (page 38)
4-4 Data Transfer 4-4-2 Bluetooth (page 47)
4-4-3 Directory (page 21)
4-6 Missed Alarms (page 46)
5Alarm Clock
ì (page 45)
6 Calendar
ç (page 45)
7 Resource Dir.
Ï
7-1 Screensavers (page 43)
7-2 Caller Pictures (page 43)
7-3 Sounds (page 43)
7-4 Capacity (page 44)
8 Settings
Ð
8-1 Date/Time (page 9)
8-2 Audio Settings 8-2-1 Handset Volume (page 42)
8-2-2 Ringer Settings (page 42)
8-2-3 Advisory Tones (page 44)
8-3 Display 8-3-1 Screen Saver (page 41)
8-3-2 Colour Scheme (page 40)
8-3-3 Contrast (page 40)
8-3-4 Backlight (page 41)
8-4 Handset 8-4-1 Language (page 40)
8-4-2 Auto Answer (page 41)
8-4-3 Register H/Set (page 35)
8-4-4 Select Base (page 36)
8-4-5 Area Codes (page 49)
8-4-6 Reset Handset (page 49)
8-5 Base 8-5-2 Music on hold (page 50)
8-5-3 System PIN (page 49)
8-5-4 Base Reset (page 50)
8-5-5 Add. Features (page 12, page 37, page 51)
8-5-6 Preselection (page 25)
8-5-7 Calls List Type (page 24)
8-6 Voice Mail 8-6-1 Set Key 1 (page 34)
15
Making calls
Gigaset S680 / IM-NORD EN / A31008-M1901-R201-1-SM19 / telefony.fm / 1.10.08
Version 4, 16.09.2005
Making calls
Making an external call
External calls are calls using the public tel-
ephone network.
~c Enter the number and press
the talk key.
Or:
c~ Press and hold the talk key
c and then enter the
number.
You can cancel the dialling operation with
the end call key a.
You are shown the duration of the call
while the call is in progress.
Continuing a call on a Bluetooth headset
Precondition: Bluetooth is activated; a
connection has been established between
the Bluetooth headset and the handset
(see page 47).
Press the talk key on the Bluetooth head-
set; it may take up to 5 seconds to estab-
lish a connection to the handset.
For further details on your headset, see
the user guide issued with it.
Ending a call
a Press the end call key.
Accepting a call
The handset indicates an incoming call in
three ways: by ringing, by a display on the
screen and by the flashing handsfree key
d.
You can accept the call by:
¤ Pressing the talk key c.
¤ Pressing the handsfree key d.
¤ Press the display key §Accept§.
If the handset is in the charging cradle and
the Auto Answer function is activated
(page 41), the handset will take a call
automatically when you lift it out of the
cradle.
If the ringer tone is intrusive, press the dis-
play key
§Silence§. You can take the call as
long as it is displayed on the screen.
Accepting a call on a Bluetooth headset
Precondition: Bluetooth is activated; a
connection has been established between
the Bluetooth headset and the handset
(see page 47).
Only press the talk key on the headset
when the headset itself rings (this may
take up to 5 seconds).
For further details on your headset, see
the user guide issued with it.
Calling Line Identification
When you receive a call, the caller's
number is displayed on the screen if the
following conditions are met:
u Your network provider supports CLIP,
CLI.
CLI (Calling Line Identification): the
caller's number is transmitted.
CLIP (Calling Line Identification Pres-
entation): the caller's number is dis-
played.
u You have arranged CLIP with your net-
work provider.
u The caller has arranged CLI with the
network provider.
Please note:
Dialling using the directory, the call-by-call list
(page 1, page 19) or the calls and last number
redial list (page 24/page 22) saves you from
having to re-enter numbers and network pro-
vider prefixes ("call-by-call numbers").
16
Making calls
Gigaset S680 / IM-NORD EN / A31008-M1901-R201-1-SM19 / telefony.fm / 1.10.08
Version 4, 16.09.2005
Call display with CLIP/CLI
If the number of the caller is saved in your
directory, you will see their name, and if
you have assigned a CLIP picture to that
caller, this will also be displayed.
1 Ringer tone icon
2 Number or name of caller
The following is displayed in place of the
number:
u External, if no number is transmitted.
u Withheld, if the caller has withheld Call-
ing Line Identification.
u Unavailable, if the caller has not
arranged Calling Line Identification.
Handsfree talking
In handsfree mode, instead of holding the
handset to your ear you can put it down,
for example on the table in front of you.
This allows others to participate in the call.
Activating/deactivating handsfree
mode
Activating while dialling
~d Enter the number and press
the handsfree key.
¤ You should inform your caller before
you use the handsfree function so that
they know someone else is listening.
Switching between earpiece and
handsfree mode
d Press the handsfree key.
During a call, activate or deactivate hands-
free.
If you wish to place the handset in the
charging cradle during a call:
¤ Press and hold the handsfree key d
while placing the handset in the base
station. If the handsfree key d does
not light up, press the key again.
For how to adjust the loudspeaker vol-
ume, see page 42.
Muting
You can deactivate the microphone in
your handset during an external call.
The other party hears hold music.
u Press the control key on the
left to mute the handset.
Press the display key to reacti-
vate the microphone.
You can turn the hold music on and off
(page 50).
1
2
Å
1234567890
Accept Silence
17
Making calls easily using network services
Gigaset S680 / IM-NORD EN / A31008-M1901-R201-1-SM19 / TNet_Features_SAG.fm / 1.10.08
Version 4, 16.09.2005
Making calls easily using
network services
Network services are functions that your
network provider makes available to you.
You have to request these services from
your network provider.
¤ If you require assistance, please
contact your network provider.
Setting functions for all
subsequent calls
If you have completed one of the follow-
ing procedures, a code is sent.
¤ After confirmation from the telephone
network, press the end call key a.
You can set the following features:
General call diversion
v ¢ ê ¢ All Calls ¢ Call Divert
¤ Change multiple line input:
When:
All Calls / No Answer / When Busy.
Call No.:
Press the display key
§Edit§. Enter the
number to which the call is to be
diverted
Or:
Press s. Select number from the
directory and press
§OK§.
Press
§Save§ to save.
Status:
Activate/deactivate call diversion
¤ Press the display key §Send§.
a After the announcement,
press the end call key.
Status:
Activating/deactivating parallel ring-
ing.
¤ Press the display key §Send§.
Activating/deactivating call waiting
v ¢ ê ¢ All Calls ¢ Call Waiting
Status: Activate/deactivate.
§Send§ Press the display key.
Functions during a call
Initiating ringback
You hear the busy tone.
§Options§ ¢ Ringback
a Press the end call key.
Consultation
During a call:
§Ext.Call§ Press the display key.
~ Enter the number.
You have the following options:
u Toggling:
¤ Use q to toggle between the
participants.
End the call with one participant:
¤ Use q to switch to the participant.
Then:
§Options§ End Active Call.
u Conference call:
¤ Press the display key §Conf.§.
End the conference call (toggle):
¤ Press §EndConf§.
u End call with both participants:
¤ Press the end call key a.
Accepting a waiting call
§Accept§ Press the display key.
You have the option of toggling or holding
a conference call.
Please note:
Without CLIP a waiting call is only announced
with a beep.
18
Making calls easily using network services
Gigaset S680 / IM-NORD EN / A31008-M1901-R201-1-SM19 / TNet_Features_SAG.fm / 1.10.08
Version 4, 16.09.2005
Accepting a waiting call
§Options§ ¢ Accept waiting call
Rejecting a waiting call
§Options§ ¢ Reject waiting call
Functions after a call
Cancelling ringback
v ¢ ê ¢ Ringback Off
19
Using the directory and lists
Gigaset S680 / IM-NORD EN / A31008-M1901-R201-1-SM19 / direct_charges.fm / 1.10.08
Version 4, 16.09.2005
Using the directory and lists
The options are:
u Directory
u Call-by-call list
u Last number redial list
u SMS list
u Call history
u List of missed calls
You can save a total of 250 entries in the
directory and call-by-call list.
You create the directory and call-by-call
list for your own individual handset. You
can also send lists/entries to other hand-
sets (page 21).
Directory/call-by-call list
Directory
In the directory you can save
u Up to three numbers and associated
first names and surnames
u VIP designation and VIP ringer tone
(optional)
u E-mail address (optional)
u CLIP pictures (optional)
u Anniversaries with reminder
¤ With the handset in idle status, open
the directory by pressing the s key.
Length of the entries (directory)
3 numbers:
each max. 32 digits
First name and surname:
each max. 16 characters
E-mail address:
max. 60 characters
Call-by-call list
The call-by-call list is used to store the
access codes for network providers
("call-by-call numbers").
¤ Open the call-by-call list in idle status
by pressing the C key.
Length of entries
Number: max. 32 digits
Name: max. 16 characters
Saving a number in the directory
s ¢ New Entry
¤ Change multiple line input:
First Name / Surname:
Enter a name in at least one of the
fields.
Phone (Home) / Phone (Office) / Phone (Mobile)
Enter a number in at least one of the
fields.
E-mail
Enter e-mail address.
Annivers.:
Select On or Off.
With setting On:
Enter Anniversary (Date) and Annivers.
(Time) (page 22) and select reminder
type: Annivers. (Signal).
Caller Picture
If required, select a picture to be
displayed when the caller calls
(see My stuff, page 43).
Precondition: Calling Line Identification
(CLIP).
¤ Save changes: (page 58).
Saving a number in the call-by-call list
C ¢ New Entry
¤ Change multiple line input:
Name:
Enter name.
Number:
Enter number.
Please note:
For quick access to a number from the direc-
tory or the call-by-call list (quick dial), you can
assign the number to a key.
20
Using the directory and lists
Gigaset S680 / IM-NORD EN / A31008-M1901-R201-1-SM19 / direct_charges.fm / 1.10.08
Version 4, 16.09.2005
Order of directory entries
Directory entries are generally sorted
alphabetically by surname. Spaces and
digits take first priority. If only the first
name was entered in the directory, this is
incorporated into the sort order instead of
the surname.
The sort order is as follows:
1. Space
2. Digits (0–9)
3. Letters (alphabetical)
4. Other characters
To get round the alphabetical order of the
entries, insert a space or a digit in front of
the first letter of the surname. These
entries will then move to the beginning of
the directory.
Selecting entries in the directory and
call-by-call list
s / C Open directory or call-by-call
list.
You have the following options:
u Use s to scroll through the entries
until the required name is selected.
u Enter the first character of the name (in
the directory: first character of the sur-
name or of the first name if only the
first name has been entered), or scroll
to the entry using s.
Dialling with the directory/call-by-call
list
s / C ¢ s (select entry)
c Press the talk key. The number
is dialled.
Managing entries in the directory/
call-by-call lists
s / C ¢ s (select entry)
Viewing entries
§View§ Press the display key. The
entry is displayed.
Back with
§OK§.
Editing entries
§View§ §Edit§ Press display keys one after the
other.
¤ Carry out changes and save.
Using other functions
s / C ¢ s (select entry)
¢ §Options§ (open menu)
The following functions can be selected
with q:
Display Number
To edit or add to a saved number, or to
save it as a new entry, press Ó
after the number is displayed.
Edit Entry
Edit selected entry.
Delete Entry
Delete selected entry.
VIP Entry (directory only)
Mark a directory entry as a VIP (Very
Important Person) and assign a specific
ringer tone to it. You can then recog-
nise important calls from the ringer
tone.
Precondition: Calling Line Identifica-
tion (page 15).
Copy Entry
Send a single entry to a handset
(page 21).
Delete List
Delete all entries in the directory/call-
by-call list.
Copy List
Send complete list to a handset
(page 21).
Available Memory
Display the available entries in the
directory and call-by-call list (page 19).
21
Using the directory and lists
Gigaset S680 / IM-NORD EN / A31008-M1901-R201-1-SM19 / direct_charges.fm / 1.10.08
Version 4, 16.09.2005
Using quick dial keys
¤ Press and hold the required quick dial
key (page 39).
Sending the directory/call-by-call list
to another handset
Preconditions:
u The sending and receiving handsets
must both be registered on the same
base station.
u The other handset and the base station
can send and receive directory entries.
s / C
¢ s (select entry)
¢ §Options§ (open menu) ¢ Copy Entry /
Copy List
¢ to Internal
s Select the internal number of
the receiving handset and
press
§OK§.
You can transfer several individual entries
one after the other by responding
§Yes§ to
the Copy next entry? prompt.
A successful transfer is confirmed by a
message and confirmation tone on the
receiving handset.
Please note:
u Entries with identical numbers are not
overwritten on the receiving handset.
u The transfer is cancelled if the phone
rings or if the memory of the receiving
handset is full.
Transferring the directory as a vCard
with Bluetooth
In Bluetooth mode (see page 47) you can
transfer directory entries in vCard format,
e.g. to exchange entries with your mobile.
s
¢ s (select entry) ¢ §Options§ (open
menu)
¢ Copy Entry / Copy List
¢ vCard via Bluetooth
The list of "Known Devices" (see page 48)
is displayed.
s Select device and press
§OK§.
Receiving a vCard with Bluetooth
If a device from the "Known Devices" list
(see page 48) sends a vCard to your hand-
set, this occurs automatically and you are
informed about it via the display.
If the sending device does not appear in
the list, you will be asked on the display to
enter the device PIN for the sending
device:
~ Enter the PIN for the sending
Bluetooth device and press
§OK§.
The transferred vCard is available as a
directory entry.
Copying a displayed number to the
directory
You can copy numbers displayed in a list,
e.g. the call history or the last number
redial list, in an SMS or during a call to the
directory.
A number is displayed:
§Options§ ¢ Copy to Directory
¤ Complete the entry, see page 19.
Please note:
You can also send the complete directory via
data transfer, without opening the directory:
v ¢ í ¢ Data Transfer ¢ Directory
22
Using the directory and lists
Gigaset S680 / IM-NORD EN / A31008-M1901-R201-1-SM19 / direct_charges.fm / 1.10.08
Version 4, 16.09.2005
Copying a number or e-mail address
from the directory
In many operating situations, you can
open the directory to copy a number or e-
mail address, for example. Your handset
need not be in idle status.
¤ Depending on the operating situation,
open the directory with s or Ò
or ¨ Directory.
q Select an entry (page 20).
Saving an anniversary in the directory
For each number in the directory, you can
save an anniversary and specify a time at
which a reminder call should be made on
the anniversary (delivery status: Annivers.:
Off).
Anniversaries are automatically recorded
in the calendar (page 45).
s
¢ s (select entry; page 20)
§View§ §Edit§ Press display keys one after the
other.
s Scroll to the Annivers.: line.
v Select On.
¤ Change multiple line input:
Anniversary (Date)
Enter day/month/year in 8-digit format.
Annivers. (Time)
Enter the hour/minute for the reminder
call in 4-digit format.
Annivers. (Signal)
Select the type of signal for the
reminder.
¤ Save changes: (page 58).
Deactivating anniversaries
s ¢ s (select entry; page 20)
§View§ §Edit§ Press display keys one after the
other.
s Scroll to the Annivers.: line.
v Select Off.
§Save§ Press the display key.
Reminder call on an anniversary
A reminder call is signalled on the handset
using the selected ringer tone.
You now have the following options:
SMS Write an SMS
§OFF§ Press the display key to
acknowledge and end the
reminder call.
Viewing missed anniversaries
In idle status, you are reminded of an
elapsed and unacknowledged anniversary
by the one-off display of
§Appoint.§.
¤ View appointment:
§Appoint.§ Press the display key.
You now have the following options:
SMS Write an SMS
§Delete§ Delete the reminder.
After deleting, press the or
§Go Back§ display key:
Back in idle status,
§Appoint.§ is
no longer displayed.
You can also view missed anniversaries
afterwards (see page 46).
Last number redial list
The last number redial list contains the
twenty numbers last dialled with the
handset (max. 32 digits). If a number is in
the phone book or the call-by-call list,
then the appropriate name will be dis-
played.
Please note:
A time must be specified for reminder calls.
If you select a visual signal, a time is not
required and is automatically set to 00.00.
23
Using the directory and lists
Gigaset S680 / IM-NORD EN / A31008-M1901-R201-1-SM19 / direct_charges.fm / 1.10.08
Version 4, 16.09.2005
Manual last number redial
c Press the key briefly.
s Select entry.
c Press the talk key again.
The number is dialled.
When a name is displayed, you can display
the corresponding phone number by
pressing the display key
§View§.
Managing entries in the last number
redial list
c Press the key briefly.
s Select entry.
§Options§ Open menu.
The following functions can be selected
with q:
Copy to Directory
Copy an entry to the directory
(page 19).
Automatic Redial
The selected number is automatically
dialled at fixed intervals (at least every
20 seconds). The handsfree key flashes
and "open listening" is activated.
Called party answers: press the talk
key c. The function is ended.
Called party does not answer: the
call is terminated after approx.
30 seconds. The function is ended
after pressing any key or after ten
unsuccessful attempts.
Display Number (as in the directory,
page 20)
Delete Entry (as in the directory, page 20)
Delete List (as in the directory, page 20)
Opening lists with the
message key
You can use the message key f to open
the following list selection:
u SMS list
If several mailboxes are set up
(page 30), several lists are displayed.
u network mailbox, if your network pro-
vider supports this function and the
fast access is set for the network mail-
box (page 34).
u Call history
An advisory tone sounds as soon as a new
message arrives in a list. The f key
flashes (it goes off when the key is
pressed). In idle status, the display shows
an icon for the new message:
The number of new entries is shown
beneath the corresponding icon.
List selection
If you press the message key f, only the
lists that contain messages are shown
(exception: network mailbox). Lists with
new messages are identified in bold:
Select a list with q. To open, press v
or
§OK§.
If only one list contains entries, no list
selection is offered and the relevant list is
displayed immediately.
Icon New message...
Ã
...on the network mailbox
Á
... in the call history
À
... in SMS list
Messages & Calls
Mailbox (2)
SMS: (1)
Calls List: (4)
OK
24
Making cost-effective calls
Gigaset S680 / IM-NORD EN / A31008-M1901-R201-1-SM19 / direct_charges.fm / 1.10.08
Version 4, 16.09.2005
Incoming SMS message list
All received SMS messages are saved in
the incoming message list, page 28.
Call history
Precondition: Calling Line Identification
(CLIP, page 15)
Depending on the type of list set, the call
history contains
u accepted calls ( )
u missed calls
Depending on the type of list set, all num-
bers of the last 30 incoming calls are saved
or just the missed calls are saved. The list
of missed calls does not contain calls that
were answered.
You can also call up the call history via the
menu:
v
¢ Calls List
Setting the calls list type
v ¢ Ð ¢ Base ¢ Calls List Type
Missed Calls / All Calls
Select and press
§OK§ (=on).
a Press and hold (idle status).
The calls list entries are retained when you
change the list type.
List entry
New messages are displayed at the top.
Example of list entries:
u List type (in header)
u Status of entry
Bold: new entry
u Number or name of caller
You can add the caller's number to the
directory (page 21).
u Date and time of call (if set, page 9)
u Type of entry:
accepted calls ( )
missed calls
Pressing the display key §Delete§ deletes the
marked entry.
After pressing the display key
§Options§ you
can select more functions with q:
Copy to Directory
Copy number to the directory.
Delete List
Delete complete list.
When you quit the call history, all entries
are set to the status "old", i.e. the next
time you call the list up they will no longer
be shown in bold.
Making cost-effective calls
Sign up with a network provider who
offers particularly low-cost call rates (call-
by-call). You can manage the numbers in
the call-by-call list.
Linking call-by-call numbers
with one number
You can insert the dialling code of a
network provider ahead of the number
("linking").
C Open call-by-call list.
s Select entry (call-by-call
number).
§Options§ Press the display key.
Display Number
Select and press
§OK§.
~ Enter number or select
number from the directory
(page 22).
c Press the talk key. Both num-
bers are dialled.
All Calls
Susi Sorglos
29/11/07 12:20
Louise Miller
29.11.07 11:15
Delete Options
25
Making cost-effective calls
Gigaset S680 / IM-NORD EN / A31008-M1901-R201-1-SM19 / direct_charges.fm / 1.10.08
Version 4, 16.09.2005
Automatic network provider
preselection (Preselection)
You can specify a call-by-call number
(preselection number) which is automati-
cally placed in front of numbers when you
dial them.
u The "with preselection" list contains
the "rule" for dialling code numbers or
the first digits of dialling code numbers
with which you wish the preselection
number to be used.
u The "without preselection" list con-
tains the "exception to the rule".
Example:
You have entered 08 for "with preselec-
tion". Consequently, all numbers that
start with 08 are dialled with preselec-
tion.
If, for example, you want 081 to still be
dialled without preselection, enter 081
for "without preselection".
When dialling, the first digits of the
selected numbers are compared with both
lists after the talk/handsfree key is
pressed:
u The preselection number is not pre-
fixed if the dialled number
does not match any entries in the
two lists
matches an entry in the "without
preselection" list
u The preselection number is prefixed if
the first digits of the dialled number
match with only one entry in the list
"with preselection".
Saving preselection numbers
v ¢ Ð ¢ Base ¢ Preselection
¢ Preselect No.
~ Enter or change the preselec-
tion number (call-by-call
number).
§Save§ Press the display key.
a Press and hold (idle status).
Save or change entries in the
preselection lists
Each of the two lists can contain
20 entries, each with 6 digits.
Numbers may be prefixed according to the
country in the "with preselection" list.
This means e.g. that all national calls or
calls to the mobile network are automati-
cally linked to the preselection number
you have saved previously.
v
¢ Ð ¢ Base ¢ Preselection
¢ With Preselect / Without Presel.
s Select entry.
§Edit§ Press the display key.
~ Enter or edit first digits of
number.
§Save§ Press the display key.
a Press and hold (idle status).
Temporarily cancelling preselection
c (press and hold) ¢ §Options§
¢ Aut Preselct off
Permanently deactivating preselection
¤ Delete the preselection number
(page 25).
26
SMS (text messages)
Gigaset S680 / IM-NORD EN / A31008-M1901-R201-1-SM19 / sms_BRD_neutral.fm / 1.10.08
Version 4, 16.09.2005
SMS (text messages)
Your unit is supplied ready for sending
SMS messages immediately.
Preconditions:
u Calling Line Identification is enabled for
your phone line.
u Your network provider supports SMS in
the fixed network (information on this
can be obtained from your network
provider).
u You are registered with your service
provider to send and receive SMS.
SMS messages are exchanged between
SMS centres operated by service provid-
ers. You must enter the SMS centre
through which you wish to send and
receive SMS messages into your phone.
You can receive SMS messages from every
SMS centre that is entered, provided you
have registered with your service provider.
Your SMS messages are sent through the
SMS centre that is entered as the active
send service centre (page 31). Only one
SMS centre can be the active send service
centre at any one time.
If no SMS Service Centre is entered, the
SMS menu only contains the entry
Settings. Enter an SMS Service Centre
(page 31).
Information on writing an SMS can be
found in the appendix:
u For how to enter text, see page 58.
u Writing using the predictive text tool
EATONI, see page 59.
Rules
u An SMS can be up to 612 characters.
u If there are more than 160 characters,
the SMS is sent as a linked SMS (up to
4 SMS messages with 153 characters
each).
Please note:
u If your phone is connected to a PABX,
please read page 32.
u To receive SMS messages you must be
registered with your service provider.
Writing/sending an SMS
Writing an SMS
v ¢ î
Mailbox 2 Select mailbox if necessary
and press
§OK§.
~ Enter mailbox PIN if necessary
and press
§OK§.
New SMS Select and press §OK§.
~ Write an SMS.
Sending an SMS
c Press the talk key
Or:
§Options§ Press the display key.
Send Select and press §OK§.
SMS Select and press §OK§.
~ / s / C
Select number with area code
(even if you are in that area)
from the directory or call-by-
call list, or enter number
directly. For SMS to an SMS
mailbox: add the mailbox ID to
the end of the number.
§Send§ Press the display key. The SMS
is sent.
Please note:
Instructions on entering text can be found
at page 58 and on writing with EATONI pre-
dictive text at page 59.
EATONI is activated as a default setting.
Activating/deactivating EATONI see
page 59.
27
SMS (text messages)
Gigaset S680 / IM-NORD EN / A31008-M1901-R201-1-SM19 / sms_BRD_neutral.fm / 1.10.08
Version 4, 16.09.2005
Setting input language
¤ You are writing an SMS (page 26).
§Options§ Press the display key.
Select Language
Select and press
§OK§.
s Select input language and
press
§OK§.
a Press the end call key briefly
twice to return to the text
panel.
The input language setting only applies to
the current SMS.
SMS status report
Precondition: Your network provider sup-
ports this feature.
If you have activated the status report, you
will receive an SMS with a confirmation
message after sending.
Activating/deactivating a status report
v ¢ î ¢ Settings
Status Report
Select and press
§OK§ (=on).
Reading/deleting status report/saving
number to directory
¤ Open the incoming message list
(page 28) and then:
q Select SMS with the State OK or
State not OK status.
§Read§ Press the display key.
u Delete:
§Options§ Delete Entry §OK§.
u Save to directory:
§Options§ Copy to Directory §OK§.
u Delete entire list:
§Options§ Delete List §OK§.
Draft message list
You can save an SMS in the draft message
list and edit and send it later.
Saving an SMS in the draft message list
¤ You are writing an SMS (page 26).
§Options§ Press the display key.
Save Entry Select and press §OK§.
Opening the draft message list
v ¢ î ¢ (mailbox, mailbox PIN)
¢ Outgoing (3)
The first list entry is displayed, e.g.:
Reading or deleting individual
SMS messages
¤ Open the draft message list and then:
q Select SMS.
§Read§ Press the display key. The
entry will be displayed. Scroll
line by line using q.
Or delete the SMS with
§Options§ Delete Entry §OK§.
Writing/changing an SMS
¤ You are reading an SMS in the draft
message list.
§Options§ Open menu.
You have the following options:
New SMS
Write a new SMS and then send
(page 26) or save it.
Edit
Edit the text of the saved SMS and then
send (page 26).
Character Set
Text is shown in the selected character
set.
Please note:
If you are interrupted by an external call
while writing an SMS, the text is automati-
cally saved in the draft message list.
If the memory is full, or if the SMS function
on the base station is being used by
another handset, the operation is can-
celled. An appropriate message appears in
the display. Delete SMS messages you no
longer require or send the SMS later.
1234567890
21.11.07 09:45
28
SMS (text messages)
Gigaset S680 / IM-NORD EN / A31008-M1901-R201-1-SM19 / sms_BRD_neutral.fm / 1.10.08
Version 4, 16.09.2005
Deleting draft message list
¤ Open the draft message list and then:
§Options§ Open menu.
Delete all Select, press §OK§ and confirm
with
§Yes§. The list is cleared.
a Press and hold (idle status).
Sending SMS messages to an e-mail
address
If your service provider supports the SMS
as e-mail feature, you can also send your
SMS messages to e-mail addresses.
The e-mail address must be at the begin-
ning of the text. You must send the SMS to
the e-mail service of your SMS send cen-
tre.
v
¢ î ¢ (mailbox, mailbox PIN)
¢ New SMS
Œ / ~
Load the e-mail address from
the directory or enter it
directly. End the entry with a
space or colon (depending on
the service provider).
~ Enter the SMS text.
§Options§ Press the display key.
Send Select and press §OK§.
E-mail Select and press §OK§. If the
number of the e-mail service is
not entered (page 31), enter
the number of the e-mail serv-
ice.
Send Press the display key.
Receiving an SMS
All received SMS messages are saved in
the incoming message list. Linked SMS
messages are displayed as one message. If
this is too long or is not transferred com-
pletely, it is split into individual messages.
Since an SMS remains in the list even after
it has been read, you should regularly
delete SMS messages from the list.
The display tells you if the SMS memory is
full.
¤ Deleting SMS messages you no longer
require (page 29).
Incoming message list
The incoming message list contains:
u All received SMS messages, starting
with the most recent.
u SMS messages that could not be sent
due to an error.
New SMS messages are signalled on all
Gigaset S68H handsets by the À icon in
the display, the flashing message key f
and an advisory tone.
Opening the incoming message list with
the
f key
f Press.
Select mailbox if necessary and enter mail-
box PIN.
The incoming message list is displayed as
follows (example):
1 bold: number of new entries
regular: number of read entries
2 Name of mailbox, here: general mailbox
Open list with §OK§.
An entry in the list is displayed as in the
following example:
SMS: (2)
1
2
1234567890
21.11.07 09:45
29
SMS (text messages)
Gigaset S680 / IM-NORD EN / A31008-M1901-R201-1-SM19 / sms_BRD_neutral.fm / 1.10.08
Version 4, 16.09.2005
Opening the incoming message list via the
SMS menu
v ¢ î ¢ (mailbox, mailbox PIN)
¢ Incoming (2)
Reading or deleting individual SMS
messages
¤ Open the incoming message list.
¤ Continue as described in "Reading or
deleting individual SMS messages",
page 27.
After you have read a new SMS, it is given
the status "Old" (is no longer shown in
bold).
Deleting the incoming message list
All new and old SMS messages in the list
are deleted.
¤ Open the incoming message list.
§Options§ Open menu.
¤ To continue, see "Deleting draft mes-
sage list", page 28.
Replying to or forwarding SMS
messages
¤ Read the SMS (page 29):
§Options§ Press the display key.
You have the following options:
Reply
Write and send a reply SMS directly
(page 26).
Edit
Edit the text in the SMS and then send
it (page 26).
Forwarding an SMS
¤ You are reading an SMS (page 29):
§Options§ Press the display key.
Forward Select and press §OK§. For fur-
ther information, see page 26.
Adding numbers to the directory
Adding the sender's number
¤ Open incoming message list and select
entry (page 28).
§Options§ Press the display key. For fur-
ther information, see page 21.
Copying/dialling numbers from an
SMS text
¤ Read the SMS (page 29) and scroll to
the telephone number.
The digits are reverse-highlighted.
Ó Press the display key. For fur-
ther information, see page 21.
Or:
c Press the talk key to dial the
number.
If you wish to use the number to send an
SMS:
¤ Save the number with the local area
code (dialling code) in the directory.
Changing the character set
¤ Read the SMS (page 29):
§Options§ Press the display key.
Character Set
Text is shown in the selected character
set.
Please note:
You can create a special directory for SMS
messages within your main directory by
putting a star (*) before the names.
An attached mail box identifier is added to
the directory.
30
SMS (text messages)
Gigaset S680 / IM-NORD EN / A31008-M1901-R201-1-SM19 / sms_BRD_neutral.fm / 1.10.08
Version 4, 16.09.2005
Notification by SMS
You can be notified about missed calls.
Precondition: For missed calls, the caller's
number (CLI) must have been transmit-
ted.
Notification is sent to your mobile phone
or another phone with SMS functionality.
You only need to set the phone number to
which notification should be sent (notifi-
cation number) and the notification type.
Saving the notification number
v ¢ î ¢ Settings ¢ Notify Number
~ Enter the number to which the
SMS should be sent.
§Save§ Press the display key.
a Press and hold (idle status).
Setting the notification type
v ¢ î ¢ Settings ¢ Notify Type
¤ Change multiple line input if necessary:
Missed Calls:
Set On if you require SMS notification.
¤ Save changes (page 58).
SMS mailboxes
The general mailbox is the default set-
ting. Anyone can access this mailbox and
it cannot be protected by a PIN. You can
additionally set up three personal mail-
boxes and protect these with a PIN. Each
mailbox is identified by a name and a
"mailbox ID" (a kind of extension number).
Please note:
u If you operate a number of devices
(base stations) with SMS functionality
on a single phone line, then each SMS
mailbox ID may only occur once. In this
case you must also change the preset
ID of the general mailbox ("0").
u You can only use personal mailboxes if
your service provider supports this
function. You can tell whether this is
the case by the addition of a star (*) to
the number of a (preset) SMS centre.
u If you have forgotten your mailbox PIN,
you can reset it by restoring the base
station's default settings. This will
delete all SMS messages from all
mailboxes.
Setting up and changing a personal
mailbox
Setting up a personal mailbox
v ¢ î ¢ Settings ¢ SMS Mailboxes
s Select mailbox, e.g. Mailbox 2
and press
§OK§.
¤ Change multiple line input:
On/Off:
Activate or deactivate mailbox.
ID:
Select mailbox ID (0–9). You can only
select the available numbers.
Protection:
Activate/deactivate PIN protection.
PIN
If necessary, enter 4-digit PIN.
¤ Save changes (page 58).
Warning:
Do not enter your own fixed network number
for the notification of missed calls. This can
lead to chargeable endless looping.
31
SMS (text messages)
Gigaset S680 / IM-NORD EN / A31008-M1901-R201-1-SM19 / sms_BRD_neutral.fm / 1.10.08
Version 4, 16.09.2005
Active mailboxes are marked with in
the mailbox list. They are shown in the
SMS list and can, if necessary, be displayed
by pressing the message key f.
Deactivating a mailbox
¤ Set On/Off: to Off. Confirm message with
§Yes§ if necessary.
All SMS messages saved in this mailbox
will be deleted.
Deactivating PIN protection
¤ Set Protection: to Off.
The mailbox PIN is reset to "0000".
Changing the name of a mailbox
v ¢ î ¢ Settings ¢ SMS Mailboxes
¢ s (Select mailbox)
§Edit§ Press the display key.
~ Enter new name.
§Save§ Press the display key.
a Press and hold (idle status).
Changing a mailbox's PIN and ID
v ¢ î ¢ Settings ¢ SMS Mailboxes
¢ s (Select mailbox)
~ Enter mailbox PIN if necessary
and press
§OK§.
¤ Set ID:, Protection: and PIN (page 30).
Sending an SMS to a personal mailbox
To send an SMS to a personal mailbox, the
sender must know your ID and enter it
after your number.
¤ You can send your SMS contact an SMS
via your personal mailbox.
Your SMS contact will receive your SMS
number with current ID and can save it in
their directory. If the ID is invalid, the SMS
will not be delivered.
Setting SMS centres
Entering/changing SMS centres
¤ You should find out about the services
and special functions offered by your
service provider before you make a
new application and/or before you
delete pre-configured call numbers.
v
¢ î ¢ Settings ¢ Service Centres
s Select SMS centre (e.g. Service
Centr. 1) and press
§OK§.
¤ Change multiple line input:
Active Send:
Select Yes if SMS messages are to be
sent via the SMS centre.
SMS:
Press the display key
§Edit§. Enter the
number of the SMS service and insert a
star if your service provider supports
personal mailboxes.
E-mail:
Press the display key
§Edit§. Enter the
number of the e-mail service.
¤ Save changes (page 58).
Sending an SMS through another SMS
centre
¤ Activate the SMS centre (2 to 4) as the
active send service centre.
¤ Send the SMS.
Please note:
Ask your service provider for details on how to
enter service numbers if you wish to use per-
sonal mailboxes (precondition: your service
provider supports this function).
32
SMS (text messages)
Gigaset S680 / IM-NORD EN / A31008-M1901-R201-1-SM19 / sms_BRD_neutral.fm / 1.10.08
Version 4, 16.09.2005
SMS info services
You can have your service provider send
you specific information by SMS (e.g.
weather forecast or the lottery numbers).
A total of up to 10 info services can be
saved. You can obtain information about
the info services available and their costs
from your service provider.
Setting up/ordering an info service
Ordering an info service
v ¢ î ¢ SMS Service
s Select info service.
§Send§ Press the display key.
Setting up an info service
¤ Select an empty entry, delete before-
hand if necessary. Then:
§Edit§ Press the display key.
~ If necessary, enter code, desig-
nation and destination
number.
§Save§ Press the display key.
Editing the entry of an info service
¤ Select the info service (see above).
Then:
§Options§ Open menu.
Edit Entry Select and press §OK§.
~ If necessary, change the code,
designation, or destination
number.
§Save§ Press the display key.
Deleting an info service
¤ Select the info service (see above).
Then:
§Options§ Open menu.
Delete Entry
Select and press
§OK§.
SMS on a PABX
u You can only receive an SMS when the
Calling Line Identification is for-
warded to the extension of the PABX
(CLIP).The CLIP evaluation of the
number of the SMS centre happens in
your Gigaset.
u If required, you must prefix the number
for the SMS centre with the access code
(depending on your PABX).
If in doubt, test your PABX, e.g. by
sending an SMS to your own number:
once with and once without the access
code.
u When you send SMS messages, your
sender number may be sent without
your extension number. In this case the
recipient cannot reply to you directly.
Sending and receiving SMS messages on
ISDN PABXs is only possible via the MSN
number assigned to your base station.
Activating/deactivating the
SMS function
If you deactivate the SMS function, you
cannot send or receive any SMS messages
with your phone.
The settings which you have made for
sending and receiving SMS messages
(e.g. the call numbers of the SMS centres)
and the entries in the incoming and draft
message lists are saved even after you
turn off your phone.
v Open menu.
N5O2L
Enter the digits.
Q
§OK§ Deactivate SMS function.
Or:
§OK§ Activate SMS function (default
setting).
33
SMS (text messages)
Gigaset S680 / IM-NORD EN / A31008-M1901-R201-1-SM19 / sms_BRD_neutral.fm / 1.10.08
Version 4, 16.09.2005
SMS troubleshooting
Error codes when sending
Self-help with errors
The following table lists error situations
and possible causes and provides notes on
troubleshooting.
E0 Calling Line Identification permanently
withheld (CLIR) or Calling Line Identifica-
tion not activated.
FE Error occurred during SMS transfer.
FD Connection to SMS centre failed, see self-
help.
You cannot send messages.
1. You have not requested the CLIP service
(Calling Line Identification Presentation).
¥ Ask your service provider to enable this
service.
2. SMS transmission has been interrupted
(e.g. by a call).
¥ Re-send the SMS.
3. Network provider does not support this
feature.
4. No number or an invalid number is entered
for the SMS centre set as the active send
service centre.
¥ Enter the number (page 31).
You receive an incomplete SMS.
1. Your phone's memory is full.
¥ Delete old SMS messages (page 29).
2. The service provider has not yet sent the
rest of the SMS.
You have stopped receiving SMS messages.
1. You have changed the ID of your mailbox.
¥ Give your SMS contacts your new ID or
undo the change (page 31).
2. You have not activated your mailbox.
¥ Activate your mailbox (page 31).
3. Call diversion is activated with When: All Calls
or the All Calls call diversion is activated for
the network mailbox.
¥ Change the call diversion
The message is played back.
1. The "display call number" service is not acti-
vated.
¥ Ask your service provider to activate this
function (chargeable).
2. Your mobile phone operator and your fixed
network SMS service provider have not
agreed on a co-operation.
¥ Obtain information from your fixed net-
work SMS service provider.
3. Your terminal is recorded by your SMS pro-
vider as having no fixed network SMS func-
tionality, i.e. you are no longer registered
with the provider.
¥ Have the device (re-)registered to
receive SMS messages.
Messages are only received during the day.
The terminal is recorded in your SMS pro-
vider's database as having no fixed network
SMS functionality, i.e. you are no longer
registered with the provider.
¥ Obtain information from your fixed net-
work SMS service provider.
¥ Have the device (re-)registered to
receive SMS messages.
34
Using the network mailbox
Gigaset S680 / IM-NORD EN / A31008-M1901-R201-1-SM19 / T-NetBox_SAG.fm / 1.10.08
Version 4, 16.09.2005
Using the network mailbox
The network mailbox is your network pro-
vider's answer machine within the net-
work. You cannot use the network mail-
box unless you have requested it from
your network provider.
Configuring fast access for the
network mailbox
With fast access, you can dial the network
mailbox directly.
Fast access is set for the network mailbox.
You only need to enter the number of the
network mailbox.
Configuring fast access for the network
mailbox and entering the network mailbox
number
v ¢ Ð ¢ Voice Mail ¢ Set Key 1
Network Mailb.
Select and press
§OK§ (=on).
~ Enter the number for the net-
work mailbox.
§Save§ Press the display key.
a Press and hold (idle status).
The setting for fast access applies to all
Gigaset S68H handsets.
Calling the network mailbox
Press and hold. You are con-
nected straight to the network
mailbox.
d Press handsfree key d if
required. You will hear the net-
work mailbox announcement.
Viewing the network mailbox
report
When a message is recorded, you receive
a call from the network mailbox. If you
have requested Calling Line Identification,
the network mailbox number will be dis-
played. If you take the call, the new mes-
sages are played back. If you do not take
the call, the network mailbox number will
be saved in the missed calls list and the
message key flashes (page 23).
35
Using several handsets
Gigaset S680 / IM-NORD EN / A31008-M1901-R201-1-SM19 / registr_sett.fm / 1.10.08
Version 4, 16.09.2005
Using several handsets
Registering handsets
You can register up to six handsets to your
base station.
A Gigaset S68H handset can be registered
to up to four base stations.
Automatic registration of Gigaset
S68H to Gigaset S680
Precondition: The handset must not
already be registered to a base station.
Registering the handset to the base sta-
tion occurs automatically.
¤ Place the handset in the base station
with its display facing forward.
Registration can take up to 5 minutes.
During this process, the registration pro-
cedure appears in the display and the
name of the base station flashes, e.g. base
station 1. When the handset has regis-
tered successfully, its screen displays its
internal number, e.g. INT 2 for internal
number 2. The handset is assigned the
lowest available internal number (1–6).
If all internal numbers 1–6 have been
assigned, number 6 is overwritten, pro-
vided the handset with the internal
number 6 is in idle status.
Manual registration of Gigaset S68H to
Gigaset S680
You must activate manual registration of
the handset on both the handset and the
base station.
Once it has been registered, the handset
returns to idle status. The handset's inter-
nal number is shown in the display e.g.
INT 1. If not, repeat the procedure.
On the handset
v ¢ Ð ¢ Handset ¢ Register H/Set
s Select base station, e.g. Base 1
and press
§OK§.
~ Enter the system PIN of the
base station (the default is
0000) and press
§OK§. You will
see flashing on the display
e.g. Base 1.
On the base station
Within 60 sec. press and hold the registra-
tion/paging key on the base station
(page 1) (approx. 3 sec.).
Registering other handsets
You can register other Gigaset handsets
and handsets for other devices with GAP
functionality as follows.
On the handset
¤ Start to register the handset as
described in its user guide.
On the base station
Press and hold the registration/paging key
on the base station (page 1) (approx. 3
sec.).
Please note:
Automatic registration is not possible when
the base station to which you wish to regis-
ter the handset is being used to make a call.
Each key press interrupts the automatic
registration.
If automatic registration does not work,
you will have to register the handset manu-
ally.
You can change the name of the handset
(see page 38).
36
Using several handsets
Gigaset S680 / IM-NORD EN / A31008-M1901-R201-1-SM19 / registr_sett.fm / 1.10.08
Version 4, 16.09.2005
Deregistering handsets
You can deregister any other registered
handset from any registered Gigaset S68H
handset.
u Open list of internal parties.
The handset you are currently
using is indicated by < .
s Select the internal party you
wish to deregister.
§Options§ Open menu.
De-reg. H/Set No.
Select and press
§OK§.
~ Enter the current system PIN
and press
§OK§.
§Yes§ Press the display key.
Locating a handset ("paging")
You can locate your handset using the
base station.
¤ Briefly press the registration/paging
key on the base station (page 1).
¤ All handsets will ring simultaneously
("paging"), even if the ringer tones are
switched off.
Ending paging
¤ Briefly press the registration/paging
key on the base station or press the talk
key c on the handset.
Changing the base station
If your handset is registered to more than
one base station, you can set it to a partic-
ular base station or to the base station
that has the best reception (Best Base).
v
¢ Ð ¢ Handset ¢ Select Base
s Select one of the registered
base stations or Best Base and
press
§OK§.
Making internal calls
Internal calls to other handsets registered
on the same base station are free.
Calling a specific handset
u Initiate internal call.
~ Enter the number of the hand-
set.
Or:
u Initiate internal call.
s Select handset.
c Press the talk key.
Calling all handsets ("group call")
u Initiate internal call.
* Press the star key. All handsets
are called.
Ending a call
a Press the end call key.
Transferring a call to another handset
You can transfer an external call to
another handset (connect).
u Open list of handsets.
The external participant hears
hold music if activated (see
page 50).
s Select a handset or Call All and
press
§OK§.
When the internal participant answers:
¤ If necessary announce the external call.
a Press the end call key.
The external call is transferred to the other
handset.
If the internal participant does not answer
or the line is busy, press the display key
§End§, to return to the external call.
When transferring a call you can also press
the end call key a before the internal
participant answers.
37
Using several handsets
Gigaset S680 / IM-NORD EN / A31008-M1901-R201-1-SM19 / registr_sett.fm / 1.10.08
Version 4, 16.09.2005
Then, if the internal participant does not
answer or the line is busy, the call will
automatically return to you (the display
will show Recall).
Internal consultation calls
When you are speaking to an external
participant you can call an internal partic-
ipant at the same time for consultation.
u Open list of handsets.
The external participant hears
hold music if activated (see
page 50).
s Select handset and press
§OK§.
Ending a consultation call
§End§ Press the display key.
You are reconnected with the external
participant.
Accepting/rejecting call waiting
If you receive an external call during an
internal call, you will hear the call waiting
tone (short tone). The caller's number will
appear in the display if Calling Line Identi-
fication is enabled.
Ending an internal call, accepting an
external call
§Accept§ Press the display key.
The internal call is ended. You are con-
nected to the external caller.
Rejecting the external call
§Reject§ Press the display key.
The call waiting tone is turned off.
You remain connected with the internal
participant. The ringer tone can still be
heard on other registered handsets.
Listening in to an external call
Precondition: The Listening In function
must be activated.
You are conducting an external call.
An internal participant can listen in on
this call and take part in the conversation.
All the participants are made aware of the
"listening in" by a signal tone.
Activating/deactivating internal
listening-in
v ¢ Ð ¢ Base ¢ Add. Features
¢ Listening In
Press §OK§ to activate/deactivate the func-
tion ( = on).
a Press and hold (idle status).
Internal listening in
The line is engaged with an external call.
Your screen will display information to
that effect. You want to listen in to the
external call.
c Press and hold the talk key.
You are linked into the call. All participants
hear a signal tone. During this time, this
handset displays the Conference message
and it is not possible to dial another
number from this handset.
Ending listening in
a Press the end call key.
All participants hear a signal tone.
If the first internal participant presses the
end call key a, the handset that has
"listened in" remains connected to the
external participant.
38
Using several handsets
Gigaset S680 / IM-NORD EN / A31008-M1901-R201-1-SM19 / registr_sett.fm / 1.10.08
Version 4, 16.09.2005
Changing the name of a handset
The names "INT 1", "INT 2" etc. are
assigned automatically at registration.
You can change these names. The name
must be no more than 10 characters. The
changed name is displayed in every hand-
set's list.
u Open list of handsets. Your
own handset is indicated by <.
s Select handset.
§Edit§ Press the display key.
~ Enter name.
§Save§ Press the display key.
Changing a handset's internal
number
A handset is automatically assigned the
lowest free number on registration. If all
slots are occupied, number 6 is overwrit-
ten if this handset is in idle status. You can
change the internal number of all regis-
tered handsets (1–6).
u Open list of handsets. Your
own handset is indicated by <.
Options Open menu.
Edit H/Set No.
Select and press
§OK§. The list of
handsets is displayed.
s The current number flashes.
Select a handset.
~ Enter the new internal number
(1–6). The handset's old
number is overwritten.
§Save§ Press the display key to save
the input.
a Press and hold (idle status).
You will hear the error tone (descending
tone sequence) if you assign an internal
number twice.
¤ Repeat the procedure with a free
number.
Using a handset as a
room monitor
If the room monitor is activated, a previ-
ously saved destination number is called
as soon as a set noise level is reached. You
can save an internal or external number in
your handset as the destination number.
The room monitor call to an external
number stops after around 90 seconds.
The room monitor call to an internal
number (handset) stops after approx.
3 minutes (depending on the base sta-
tion). When the room monitor is activated,
all keys are locked except the end call key.
The handset's speaker is muted.
When the room monitor is activated,
incoming calls to the handset are indi-
cated without a ringer tone and are only
shown on the screen. The display and key-
pad are not illuminated and advisory
tones are also turned off.
If you accept an incoming call, the room
monitor mode is suspended for the dura-
tion of the call, but the function remains
activated.
The room monitor mode is retained if you
turn the handset off and on again.
Caution!
You should always check the operation
of the room monitor before use. For
example, test its sensitivity. Check the
connection if you are diverting the room
monitor to an outside number.
When the function is activated the hand-
set's operating time is severely reduced.
If necessary, place the handset in the
charging cradle. This ensures that the
batteries do not run down.
Ideally the handset should be positioned 1
to 2 metres away from the baby. The micro-
phone must be directed towards the baby.
The connection to which the room monitor
is diverted must not be blocked by an acti-
vated answer machine.
39
Handset settings
Gigaset S680 / IM-NORD EN / A31008-M1901-R201-1-SM19 / registr_sett.fm / 1.10.08
Version 4, 16.09.2005
Activating the room monitor and
entering the destination number
v ¢ í ¢ Room Monitor
¤ Change multiple line input:
Room M.:
Select On to activate.
Call to:
External number: Select the number
from the directory (press display key
Ò) or enter it directly. Only the
last 4 digits are displayed.
Internal number: §Options§ ¢ INT
¢ §OK§ ¢ s (select handset or Call
All, if all registered handsets are to be
called)
¢ §OK§.
Level:
Set noise level sensitivity (Low or High).
¤ Press §Save§ to save the settings.
Changing set destination numbers
v ¢ í ¢ Room Monitor
s Scroll to the Call to: line.
X or §Delete§
Delete existing number.
¤ Enter number as described in "Activat-
ing the room monitor and entering the
destination number" (page 39).
Deactivating the room monitor
remotely
Preconditions: The phone must support
touch tone dialling and the room monitor
should be set for an external destination
number.
¤ Accept the call from the room monitor
and press keys 9 ;.
The room monitor function will deactivate
after the call ends. There will be no further
room monitor calls. The other room moni-
tor settings (e.g. no ringer tone) on the
handset will remain activated until you
press the display key
§OFF§ on the handset.
To reactivate the room function with the
same phone number:
¤ Turn on the activation again and save
with
§Save§ (page 39).
Handset settings
Your handset is preconfigured, but you
can change the settings to suit your indi-
vidual requirements.
Shortcuts for functions
and numbers
You can assign the left display key and
each of the digit keys Q and 2 to
O a number or a function. The right-
hand display key has already been
assigned a function. You can change the
assignment.
The number is then dialled or the function
started by simply pressing a key.
Assigning a digit key/left display key
Precondition: The digit key or the left dis-
play key has not yet been assigned a
number or a function.
¤ Press the display key } or press
and hold the digit key.
The list of possible key assignments is
opened. The following can be selected:
Quick Dial / Call-by-Call
Assign key to a number from the direc-
tory or call-by-call list.
The directory or call-by-call list is
opened.
¤ Select an entry and press §OK§.
If you delete or edit an entry in the
directory or call-by-call list, this has no
effect on the assignment to the digit/
display key.
Room Monitor
Assign key to the menu for setting and
activating the room monitor (see
page 38).
40
Handset settings
Gigaset S680 / IM-NORD EN / A31008-M1901-R201-1-SM19 / registr_sett.fm / 1.10.08
Version 4, 16.09.2005
Alarm Clock
Assign key to the menu for setting and
activating the alarm clock (see
page 45).
Calendar
Open calendar/enter new appoint-
ment.
Bluetooth
Assign key to the Bluetooth menu.
More Features...
More functions are available:
INT
Internal calls (see page 36).
SMS
Assign the menu for SMS functions
to a key (see page 26).
SMS Service
Assign key with the menu for order-
ing info services (page 32).
SMS Notific.
Assign key with the menu for acti-
vating SMS notification (page 30).
If the left display key has been assigned a
shortcut, the selected function or name of
the phone number in the directory or call-
by-call list is displayed (abbreviated if nec-
essary) in the bottom display line via the
display key.
Starting the function, dialling the
number
If the handset is in idle status, press and
hold the digit key or press the display key
briefly.
Depending on the key assignment:
u Numbers are dialled directly.
u The function menu is opened.
Changing key assignments
Display key
¤ Press and hold the left or right display
key.
The list of possible key assignments is
opened.
¤ Proceed as is described when first
assigning the key with a shortcut
(page 39).
Digit key
¤ Press the digit key briefly.
§Change§ Press the display key. The list
of possible key assignments is
displayed.
¤ Proceed as is described when first
assigning the key with a shortcut
(page 39).
Changing the display language
You can view the display texts in different
languages.
v
¢ Ð ¢ Handset ¢ Language
The current language is indicated by .
s Select a language and press
§OK§.
a Press and hold (idle status).
If you accidentally choose a language you
do not understand:
v N 4
Press keys in sequence.
s Select the correct language
and press
§OK§.
Setting the display
You have a choice of four colour schemes
and several different contrasts.
v
¢ Ð ¢ Display
Colour Scheme
Select and press
§OK§.
s Select a colour scheme and
press
§OK§ ( = current col-
our).
a Press briefly.
Contrast Select and press
§OK§.
r Select contrast.
§Save§ Press the display key.
a Press and hold (idle status).
41
Handset settings
Gigaset S680 / IM-NORD EN / A31008-M1901-R201-1-SM19 / registr_sett.fm / 1.10.08
Version 4, 16.09.2005
Setting the screensaver
You can set a picture from the Resource
Dir. (page 43) to be displayed as a screen-
saver when the handset is in idle status.
This will replace the idle status display.
It may conceal the date, time and name.
The screensaver is not displayed in certain
situations, e.g. during a call or if the hand-
set is deregistered.
If a screensaver is activated, the Screen
Saver menu option is marked with .
v
¢ Ð ¢ Display ¢ Screen Saver
The current setting is displayed.
¤ Change multiple line input:
Activation:
Select On (screensaver is displayed) or
Off (no screensaver).
Selection:
If required, change the screensaver
(see below).
¤ Save changes: (page 58).
If the screensaver conceals the display,
briefly press a to show the idle display
with time and date.
Changing the screensaver
v ¢ Ð ¢ Display ¢ Screen Saver
s Scroll to the Selection line.
§View§ Press the display key. The
active screensaver is dis-
played.
s Select screensaver and press
§Change§.
¤ Save changes: (page 58).
Setting the display backlight
Depending on whether or not the handset
is in the charging cradle, you can activate
or deactivate the backlight. If the base sta-
tion is turned on, the display is perma-
nently dimmed.
v
¢ Ð ¢ Display ¢ Backlight
The current setting is displayed.
¤ Change multiple line input:
In Charger
Select On or Off.
Without Charger
Select On or Off.
§Save§ Press the display key.
a Press and hold (idle status).
Activating/deactivating
auto answer
If you activate this function, when you
receive a call you can simply lift the hand-
set out of the charging cradle without hav-
ing to press the talk key c.
v
¢ Ð ¢ Handset
Auto Answer
Select and press
§OK§ (=on).
a Press and hold (idle status).
Please note:
With the On setting, the standby time of the
handset can be significantly reduced.
42
Handset settings
Gigaset S680 / IM-NORD EN / A31008-M1901-R201-1-SM19 / registr_sett.fm / 1.10.08
Version 4, 16.09.2005
Changing the handsfree/
earpiece volume
You can set the loudspeaker volume for
handsfree talking to five different levels
and the earpiece volume to three different
levels.
In idle status:
t
¢ Handset Volume
r Set the earpiece volume.
s Scroll to the Speaker: line.
r Set the handsfree volume.
§Save§ Press display key if necessary
to save the setting perma-
nently.
Setting the volume during a call:
t Press the control key.
r Select volume.
§Save§ Press display key if necessary
to save the setting perma-
nently.
The setting will automatically be saved
after approx. 3 seconds, if not then press
the display key
§Save§.
If t is assigned to another function,
e.g. toggling (page 17):
§Options§ Open menu.
Volume Select and press §OK§.
Configure setting (see above).
Changing ringer tones
u Volume:
You can choose between five volumes
(1–5; e.g. volume 2 = ˆ) and
the "crescendo" ring (6; volume
increases with each ring =
).
u Ringer tones:
You can select various ringer tones,
melodies or any sound from My stuff
(page 43).
You can set different ringer tones for the
following functions:
u Ext. Calls: for external calls
u Internal Calls: for internal calls
u Appointments: for set appointments
(page 45)
u All: the same ringer tone for all func-
tions
Settings for individual functions
Set the volume and melody depending on
the type of signalling required.
In idle status:
t
¢ Ringer Settings
q Select setting, e.g.
Ext. Calls and press
§OK§.
r Set volume (1–6).
s Scroll to the next line.
r Select melody.
§Save§ Press the display key to save
the setting.
Please note:
You can also set the call volume, the ringer
tones and the advisory tones via the menu
(see page 14).
43
Handset settings
Gigaset S680 / IM-NORD EN / A31008-M1901-R201-1-SM19 / registr_sett.fm / 1.10.08
Version 4, 16.09.2005
Same settings for all functions
In idle status:
t ¢ Ringer Settings ¢ All
¤ Set volume and ringer tone (see
"Settings for individual functions").
§Save§ Press the display key to con-
firm the prompt.
a Press and hold (idle status).
Activating/deactivating the ringer tone
You can deactivate the ringer tone on your
handset before you answer a call or when
the handset is in idle status; the ringer
tone can be deactivated permanently or
just for the current call. The ringer tone
cannot be re-activated while an external
call is in progress.
Deactivating the ringer tone permanently
* Press and hold the star key.
The Ú icon appears in the display.
Re-activating the ringer tone
* Press and hold the star key.
Deactivating the ringer tone for the current
call
§Silence§ Press the display key.
Activating/deactivating the alert tone
In place of the ringer tone you can activate
an alert tone. When you get a call, you will
hear a short tone ("Beep") instead of the
ringer tone.
* Press and hold the star key
and within 3 seconds:
§Beep§§ Press the display key. A call will
now be signalled by one short
alert tone. You will now see
º
in the display.
My stuff
My stuff on the handset manages sounds,
which you can use as ringer tones, and
pictures (CLIP pictures and screensavers),
which you can use as caller pictures or as
screensavers. Precondition: Calling line
identification (CLIP). My stuff can manage
the following media types:
The icon is displayed in front of the name
in My stuff. Various mono- and polyphonic
sounds and pictures are preconfigured on
your handset.
You can listen to the available sounds and
view the pictures.
You can download pictures from a PC (see
page 59). If too little memory is available,
then you will have to delete one or more
pictures first. The pre-configured pictures
are labelled with è. You cannot rename or
delete them.
Playing back sounds/viewing CLIP
pictures
v ¢ Ï ¢ Screensavers / Caller Pictures
/ Sounds (select entry)
§Play§ / §View§ Press the display key. Sounds
are played back or pictures are
displayed. Press the q key to
switch between entries.
§End§ / Press the display key. Playback
of the sound or display of the
picture ends.
While you are playing back
sounds, you can also interrupt
playback with the u key.
a Press and hold (idle status).
Please note:
You can also set the call volume, the ringer
tones and the advisory tones via the menu
(see page 14).
Icon Sound Format
Ù Ringer tones Standard
Picture
(CLIP picture, screen-
saver)
BMP
(128 x 100
or
128 x 160
pixels)
44
Handset settings
Gigaset S680 / IM-NORD EN / A31008-M1901-R201-1-SM19 / registr_sett.fm / 1.10.08
Version 4, 16.09.2005
If you have saved a picture in an invalid
data format, you will see an error message
after selecting the entry. Cancel the oper-
ation with Î. Use
§Delete§ to delete
the picture.
Sounds: setting the volume
During playback:
§Volume§ Press the display key.
r Set volume.
§Save§ Press the display key.
Renaming/deleting a picture
You have selected an entry.
§Options§ Open menu.
If a picture cannot be deleted (è), these
options are not available. Depending on
the situation, you can select the following
functions:
Delete Entry
The selected entry is deleted.
Delete List
All entries in the list that can be deleted
are deleted.
Rename
Change the name (max. 16 characters)
and press
§Save§. The entry is saved with
the new name.
Checking memory
You can display the capacity available for
screensavers and CLIP pictures.
v
¢ Ï ¢ Capacity
Back: press the display key.
Activating/deactivating
advisory tones
Your handset uses "advisory tones" to tell
you about different activities and statuses.
The following advisory tones can be acti-
vated and deactivated independently of
each other:
u Key click: Every key press is confirmed.
u Acknowledge tones:
Confirmation tone (ascending tone
sequence): at the end of an entry/
setting and when an SMS or a new
entry arrives in or call history
Error tone (descending tone
sequence): when you make an
incorrect entry
Menu end tone: when scrolling at
the end of a menu
u Battery tone: The batteries need to be
charged.
In idle status:
t
¢ Advisory Tones
¤ Change multiple line input:
Key Tones:
Select On or Off.
Confirm.:
Select On or Off.
Battery:
Select On, Off or In Call. The battery
warning tone is only activated/deacti-
vated and only sounds during a call.
¤ Save changes: (page 58).
You cannot deactivate the confirmation
tone for placing the handset in the base
station.
Please note:
You can also set the call volume, the ringer
tones and the advisory tones via the menu
(see page 14).
45
Handset settings
Gigaset S680 / IM-NORD EN / A31008-M1901-R201-1-SM19 / registr_sett.fm / 1.10.08
Version 4, 16.09.2005
Setting the alarm clock
Precondition: The date and time have
already been set (page 9).
Activating/deactivating the alarm
clock and setting the wake-up time
v ¢ ì
¤ Change multiple line input:
Activation:
Select On or Off.
Time:
Enter the wake-up time in 4-digit for-
mat.
Occurance:
Select Daily or Monday-Friday.
Volume:
Set the volume (1–6).
Melody:
Select melody.
¤ Save changes: (page 58).
The ì icon is shown in the display.
A wake-up call with selected ringer tone
(page 42) is signalled on the handset.
The wake-up call sounds for 60 seconds.
ì is shown in the display. If no key is
pressed, the wake-up call is repeated
twice at five minute intervals and then
turned off.
During a call, the wake-up call is signalled
by a short tone.
Deactivating the wake-up call/
repeating after a pause (snooze mode)
Precondition: A wake-up call is sounding.
§OFF§ Press the display key. The
wake-up call is deactivated.
or
§Snooze§ Press the display key or any
key. The wake-up call is deacti-
vated and then repeated after
5 minutes. After the second
repetition the wake-up call is
deactivated completely.
Setting an appointment
(calendar)
You can have your handset remind you of
up to 30 appointments (volume and mel-
ody, see page 42).
Saving an appointment
Precondition: The date and time have
already been set (page 9).
v
¢ ç
r/q Select the day in the graphical
calendar and press
§OK§.
(Days on which appointments
have already been saved are
highlighted in black.)
The list of saved appointments for the day
is displayed. If you have already saved
30 appointments, you must first delete an
existing appointment.
<New Entry>
Select and press
§OK§.
¤ Change multiple line input:
Appoint.:
Select On or Off.
Date:
Enter day/month/year in 8-digit format.
Time:
Enter hours/minutes in 4-digits format.
Notes:
Enter text (max. of 16 characters). The
text appears as the appointment name
in the list and will be displayed on the
screen during the appointment
reminder. If you do not enter any text,
only the date and time of the appoint-
ment are displayed.
§Save§ Press the display key.
a Press and hold (idle status).
The appointment is marked with in the
appointments list. The list of appoint-
ments is sorted by date.
46
Handset settings
Gigaset S680 / IM-NORD EN / A31008-M1901-R201-1-SM19 / registr_sett.fm / 1.10.08
Version 4, 16.09.2005
An appointment reminder is signalled
with the selected ringer tone (page 42).
The appointment reminder sounds for
60 seconds. The entered text, date and
time are displayed.
During a call, the appointment reminder is
signalled by a short tone.
Managing appointments
v ¢ ç
r/q Select the day in the graphical
calendar and press
§OK§.
(Days on which appointments
have already been saved are
highlighted in black in the cal-
endar.)
q Select appointment for the
day.
§Options§ Open menu
Back with
§.
You have the following options:
View Entry
View selected appointment,
open the
§Options§ menu for editing,
deleting and activating/ deactivating.
Edit Entry
Edit selected appointment.
Delete Entry
Delete selected appointment.
Activate / Deactivate
Activate/deactivate the selected
appointment.
Delete List
Delete all appointments.
Deactivating or accepting an
appointment reminder
Precondition: An appointment reminder
is sounding.
§§OFF§§ Press the display key to deacti-
vate the appointment
reminder.
Or:
§SMS§ Press display key to accept the
appointment reminder with
an SMS.
Displaying missed appointments
and anniversaries
Missed appointments/anniversaries
(page 22) are displayed in the Missed
Alarms list if:
u You do not accept an appointment/
anniversary.
u The appointment/anniversary was sig-
nalled during a phone call.
u The handset is deactivated at the time
of the appointment/anniversary.
u Automatic redial was activated at the
time of an appointment/anniversary
(page 23).
The most recent entry is at the head of the
list.
If there is a new appointment/anniversary
in the list, the display shows
§Appoint.§.
Pressing the display key will also open the
Missed Alarms list.
To open the list from the menu:
v
¢ í ¢ Missed Alarms
Select appointment/anniver-
sary.
Information about the
appointment/anniversary is
displayed. A missed appoint-
ment is displayed with the
appointment name and a
missed anniversary is dis-
played with the last name and
first name. The date and time
will also be given.
§Delete§ Delete appointment
SMS Write an SMS.
a Press and hold (idle status).
If 10 entries are already stored in the list,
the next appointment reminder will delete
the oldest entry.
47
Handset settings
Gigaset S680 / IM-NORD EN / A31008-M1901-R201-1-SM19 / registr_sett.fm / 1.10.08
Version 4, 16.09.2005
Using Bluetooth devices
Your Gigaset S68H handset can communi-
cate wirelessly via Bluetooth™ with other
devices using this technology.
Before you can use your Bluetooth
devices, you must first activate Bluetooth
and then register the devices to the hand-
set.
You can register 1 Bluetooth headset to
the handset. You can also register up to 5
data devices (PC, PDA) to send and receive
directory entries as vCards or to exchange
data with the computer (page 59).
In order to transfer phone numbers via
Bluetooth connections, it is essential that
area codes (international and local area
codes) are saved on the phone (see
page 49).
You will find a description of how to oper-
ate your Bluetooth devices in the user
guides for these devices.
Activating/deactivating Bluetooth
mode
v ¢ í ¢ Data Transfer ¢ Bluetooth
¢ Activation
Press §OK§ to activate or deactivate Blue-
tooth mode ( = activated).
In idle status, the ò icon on the handset
shows that Bluetooth mode is activated:
Registering Bluetooth devices
The distance between the handset in Blue-
tooth mode and the activated Bluetooth
device (headset or data device) should be
no more than 10 m.
v
¢ í ¢ Data Transfer ¢ Bluetooth
¢ Search Headset / Search Data Device
The search can take up to 30 seconds.
Once the device has been found, its name
will be shown on the display.
§Options§ Press the display key.
Trust DeviceSelect and press §OK§.
~ Enter the PIN for the Bluetooth
device you want to register
and press
§OK§.
The device is saved in the list of known
devices.
Cancelling/repeating current search
To cancel search:
§Cancel§ Press the display key.
Repeat search if necessary:
§Options§ Select and press §OK§.
Repeat Search
Select and press
§OK§.
Please note:
You can only operate headsets on your
handset that have the headset profile.
It can take up to 5 seconds to create a con-
nection between your handset and a Blue-
tooth headset. This applies both when a call
is accepted using the headset or transferred
to the headset, and when a number is
dialled from the headset.
ÐòV
INT 1
Please note:
If you register a headset, any headset that is
already registered will be overwritten.
If you would like to use a headset with your
handset that is already registered to
another device (e.g. to a mobile phone),
please deactivate this connection before
you start the registration process to the
Gigaset.
48
Handset settings
Gigaset S680 / IM-NORD EN / A31008-M1901-R201-1-SM19 / registr_sett.fm / 1.10.08
Version 4, 16.09.2005
Editing the list of known (trusted)
devices
Open list
v ¢ í ¢ Data Transfer ¢ Bluetooth
¢ Known Devices
A corresponding icon appears next to each
device name in the list displayed:
Viewing entries
Open list ¢ s (select entry)
§Options§ Press the display key.
View Entry Select and press §OK§.
Device name and address are
displayed.
Back with
§OK§.
Deregistering Bluetooth devices
Open list ¢ s (select entry)
§Options§ Press the display key.
Delete Entry Select and press §OK§.
a Back: press and hold key.
Changing the name of a Bluetooth device
Open list ¢ s (select entry)
§Options§ Press the display key.
Rename Select and press §OK§.
~ Change name
§Save§ Press the display key
a Back: Press and hold key.
Rejecting/accepting an unregistered
Bluetooth device
If a Bluetooth device that is not registered
in the list of known devices tries to con-
nect with the handset, you will be
prompted on the display to enter the PIN
for the Bluetooth device (bonding).
u Reject
§Go Back§ Press the display key.
u Accept
~ Enter the PIN for the Bluetooth
device you want to accept and
press
§OK§.
If you have accepted the device, you
can use it temporarily (i.e. as long as it
is within receiving range or until you
deactivate the handset) or save it to the
list of known devices.
Once the PIN has been confirmed, save
to the list of known devices:
§Yes§ Press the display key
§No§ Press the display key:
use temporarily.
Changing the Bluetooth name of the
handset
You can change the handset name used to
identify it on the display of another Blue-
tooth device.
v
¢ í ¢ Data Transfer ¢ Bluetooth
¢ Own Device Name
§Change§ Press the display key
~ Change name
§Save§ Press the display key
a Back: Press and hold key.
Icon Meaning
ô
Bluetooth headset
õ
Bluetooth data device
Please note:
If you deregister an activated Bluetooth device,
it may try to reconnect as an "unregistered
device".
49
Base station settings
Gigaset S680 / IM-NORD EN / A31008-M1901-R201-1-SM19 / registr_sett.fm / 1.10.08
Version 4, 16.09.2005
Setting your own area code
In order to transfer phone numbers
(for example vCard), it is essential that
your area code (international and local
area code) is saved on the phone.
Some of these numbers are already pre-
set.
v
¢ Ð ¢ Handset ¢ Area Codes
Check that the (pre)set area code is cor-
rect.
¤ Change multiple line input:
q Select/change input field.
r Navigate in the input field.
X If necessary, delete number:
press the display key.
~ Enter number.
§Save§ Press the display key.
Example:
Restoring the handset to the
factory settings
You can reset any individual settings and
changes that you have made. Entries in
the directory, the call-by-call list, the call
history, the SMS lists and the handset's
registration to the base station as well as
the content of My stuff are retained.
v
¢ Ð ¢ Handset ¢ Reset Handset
§Yes§ Press the display key.
a Press and hold (idle status).
Base station settings
The base station settings are carried out
using a registered Gigaset S68H handset.
Protecting against unauthorised
access
Protect the system settings of the base
station with a PIN known only by you.
The system PIN must be entered when,
for example, registering/deregistering a
handset to/from the base station or when
restoring the default settings.
Changing the system PIN
You can change the 4-digit system PIN set
on the base station (default setting: 0000)
to a 4-digit PIN known only by you.
v
¢ Ð ¢ Base ¢ System PIN
~ Enter the current system PIN
and press
§OK§.
~ Enter new system PIN. For
security the PIN is shown as
four stars (
****
).
s~ Jump to the next line, re-enter
new system PIN and press
§OK§.
a Press and hold (idle status).
Resetting the system PIN
If you have forgotten your system PIN you
can reset the base station to the original
code 0000:
Disconnect the power cord from the base
station. Hold down the registration/pag-
ing key on the base station while recon-
necting the power cable to the base sta-
tion. Release the key after a while.
The base has now been reset and the sys-
tem PIN 0000 set.
Area Codes
International code:
00 - 35
Local area code:
0 - [ 814 ]
X
Save
Please note:
All handsets are deregistered and must be re-
registered.
50
Base station settings
Gigaset S680 / IM-NORD EN / A31008-M1901-R201-1-SM19 / registr_sett.fm / 1.10.08
Version 4, 16.09.2005
Activating/deactivating
music on hold
v ¢ Ð ¢ Base ¢ Music on hold
Press §OK§ to activate or deactivate music
on hold ( = on).
Repeater support
With a repeater you can increase the range
and reception strength of your base sta-
tion. You will need to activate repeater
mode. This will terminate any calls that
are in progress at the time.
Precondition: A repeater is registered.
Eco mode is disabled.
v
¢ Ð ¢ Base ¢ Add. Features
¢ Repeater Mode
§Yes§ Press the display key.
When repeater mode is active, the menu
item is marked with .
Restoring the base station to
the factory settings
When the settings are restored
u eco mode is disabled,
u handsets are still registered,
u the system PIN is not reset,
u the SMS information services are not
reset.
v
¢ Ð ¢ Base ¢ Base Reset
~ Enter the system PIN and press
§OK§.
§Yes§ Press the display key.
Cancel the restoring process by pressing
a or the display key
§No§.
a Press and hold (idle status)
Please note:
Repeater support and eco mode (see page 12)
rule each other out, i.e. both functions cannot
be used at the same time.
51
Connecting the base station to PABX
Gigaset S680 / IM-NORD EN / A31008-M1901-R201-1-SM19 / pabx.fm / 1.10.08
Version 4, 16.09.2005
Connecting the base station
to PABX
The following settings are only necessary
when your PABX requires them; see the
PABX user guide.
You cannot send or receive SMS messages
on PABXs that do not support Calling Line
Identification.
Recall
The current setting is indicated by .
Setting recall
v ¢ Ð ¢ Base ¢ Add. Features
¢ Recall
s Select flashing time ( = on)
and press
§OK§.
a Press and hold (idle status).
Saving an access code
(outside line code)
Precondition: You may have to enter an
access code for external calls in your PABX,
e.g. "0".
v
¢ Ð ¢ Base ¢ Add. Features
¢ Access Code
~ Enter or change access code,
max. 3 digits.
¤ Save changes: (page 58).
If an access code has been saved,
u The access code is prefixed automati-
cally when you select from the follow-
ing lists: numbers of the SMS centres,
call history or answer machine list.
u The access code must be entered when
dialling manually and when manually
entering directory, emergency/quick
dial numbers and SMS centre numbers.
u If you copy the recipient's number from
the directory when sending an SMS,
you have to delete the access code.
u An existing access code is deleted using
X.
Setting pauses
Changing pause after line seizure
You can change the length of pause that is
inserted between pressing the talk key
c and sending the number.
v Open menu.
N 5 O L
Press keys.
~ Enter digit for the pause
length (1 = 1 sec.; 2 =3sec.;
3 = 7 sec.) and press
§OK§.
Changing the pause after the recall key
You can change the length of the pause if
your PABX requires this (refer to the user
guide for your PABX).
v Open menu.
N 5 O 2
Press keys.
~ Enter a digit for the length of
the pause (1 =800ms;
2 =1600ms; 3 =3200ms)
and press
§OK§.
52
Connecting the base station to PABX
Gigaset S680 / IM-NORD EN / A31008-M1901-R201-1-SM19 / pabx.fm / 1.10.08
Version 4, 16.09.2005
Changing a dialling pause (pause after
access code)
Precondition: You have saved an access
code (page 51).
v Open menu.
N 5 O
Press keys.
~ Enter a digit for the length of
the pause (1 = 1 sec.;
2 =2sec.; 3 = 3 sec.;
4 = 6 sec.) and press
§OK§.
To insert a dialling pause: press S for
2seconds. A P appears in the display.
Switching temporarily to touch
tone dialling (DTMF)
If your PABX still operates with pulse dial-
ling (DP), but you need touch tone dialling
(DTMF) for a connection (e.g. to listen to
the network mailbox) you must switch to
touch tone dialling for the call.
Precondition: You are conducting a call or
have already dialled an external number.
* Press the star key.
After the call is ended, pulse dialling is
automatically activated again.
53
Appendix
Gigaset S680 / IM-NORD EN / A31008-M1901-R201-1-SM19 / appendix.fm / 1.10.08
Version 4, 16.09.2005
Appendix
Care
Wipe the base station, charging cradle and
handset with a damp cloth (do not use
solvent) or an antistatic cloth.
Never use a dry cloth. This can cause
static.
Contact with liquid
If the handset has come into contact with
liquid:
1. Switch off the handset and remove
the battery pack immediately.
2. Allow the liquid to drain from the hand-
set.
3. Pat all parts dry, then place the handset
with the battery compartment open
and the keypad facing down in a dry,
warm place for at least 72 hours (not
in a microwave, oven etc.).
4. Do not switch on the handset again
until it is completely dry.
When it has fully dried out, you will nor-
mally be able to use it again.
Questions and answers
If you have any questions about using
your phone, visit us at
www.gigaset.com/customercare
at any time. The table below contains a list
of common problems and possible solu-
tions.
!
Registration or connection problems with a
Bluetooth headset.
¥ Reset the Bluetooth headset (see the user
guide for your headset).
¥ Delete registration data from the handset
when deregistering the device
(see page 48).
¥ Repeat the registration process
(see page 47).
The display is blank.
1. The handset is not turned on.
¥ Press and hold the end call key a.
2. The battery is almost flat.
¥ Charge or replace the batteries (page 7).
The keys of a handset do not respond when
pressed.
The keypad lock is activated.
¥ Press and hold the hash key
#
(page 10).
"Base station x" flashes on the display.
1. The handset is outside the range of the base
station.
¥ Move the handset closer to the base sta-
tion.
2. The base station's range is reduced because
eco mode is activated.
¥ Deactivate eco mode (page 12) or
reduce the distance between the hand-
set and the base station.
3. The handset has been deregistered.
¥ Register the handset (page 35).
4. The base station is not turned on.
¥ Check the base station's mains adapter
(page 7).
54
Appendix
Gigaset S680 / IM-NORD EN / A31008-M1901-R201-1-SM19 / appendix.fm / 1.10.08
Version 4, 16.09.2005
Base Search flashes in the display.
The handset is set to Best Base and no base sta-
tion is turned on or within range.
¥ Move the handset closer to the base station.
¥ Check the base station's mains adapter
(page 7).
Handset does not ring.
1. The ringer tone is deactivated.
¥ Activate the ringer tone (page 43).
2. Call diversion set to All Calls.
¥ Deactivate call diversion (page 17).
You cannot hear a ringer/dialling tone from
the fixed network.
The phone cord supplied has not been used or
has been replaced by a new cord with the
wrong jack connections.
¥ Please always use the phone cord supplied
or ensure that the jack connections are cor-
rect when purchasing from a retailer
(page 7).
Error tone sounds after system PIN prompt.
You have entered the wrong system PIN.
¥ Reset the system PIN to 0000 (page 49).
Forgetting the system PIN.
¥ Reset the system PIN to 0000 (page 49).
Call charges are not displayed.
1. Your network provider does not support this
feature.
2. There are no metering pulses.
¥ Ask your network provider to transmit
the metering pulses.
The other party cannot hear you.
You have pressed the
u (INT) key. The hand-
set is "muted".
¥ Activate the microphone again (page 16).
The number of the caller is not displayed
despite CLIP.
Calling Line Identification is not enabled.
¥ The caller should ask the network provider
to release Calling Line Identification (CLI).
You hear an error tone when keying an input
(a descending tone sequence).
Action has failed/invalid input.
¥ Repeat the operation.
Watch the display and refer to the user
guide if necessary.
You cannot listen to messages on the net-
work mailbox.
Your phone system is set for pulse dialling.
¥ Set your phone system to touch tone dial-
ling.
55
Appendix
Gigaset S680 / IM-NORD EN / A31008-M1901-R201-1-SM19 / appendix.fm / 1.10.08
Version 4, 16.09.2005
Service (Customer Care)
You can get assistance easily when you have technical questions or questions about how to use your
device by using our online support service on the Internet at:
www.gigaset.com/customercare
This site can be accessed at any time wherever you are. It will give you 24/7 support for all our prod-
ucts. It also a list of FAQs and answers plus user guides for you to download. You will also find fre-
quently asked questions and answers in the Questions and Answers section of this user guide in the
appendix.
If the device needs to be repaired, please contact one of our Customer Care Centers:
Please have your record of purchase ready when calling.
Replacement or repair services are not offered in countries where our product is not sold by
authorised dealers.
Abu Dhabi. . . . . . . . . . . . .97 12 62 23 800
Argentina . . . . . . . . . . . . . 0800-888-9878
Australia . . . . . . . . . . . . . . . .1300 665 366
Austria .05 17 07 50 04 (0,065 Euro/Min.)
Bahrain . . . . . . . . . . . . . . .97 31 73 11 173
Belgium . . . . . . . . . . . . . . . . 0 78 15 66 79
Bosnia Herzegovina . . . . . . . .033 276 649
Brazil . . . . . . . . . . . . . . . . . . . . . . . . . . . . . .
Grande Capitais e Regiões Metropolitanas:
. . . . . . . . . . . . . . . . . . . . . . . . . 4003 3020
. . . . . . . . . . . . . . . . . .R$ 0,14 (US$ 0,069)
Demais localidades: . . . . . 0800 888 3020
. . . . . . . . . . . . . . . . . .R$ 0,20 (US$ 0,098)
Bulgaria. . . . . . . . . . . . . . . . . 02 873 94 88
Canada . . . . . . . . . . . . . . . . .866 247 8758
China . . . . 0 21 400 670 6007 (RMB 0.11)
Croatia . . . . . . . . 01 / 2456 555 (0,23 Kn)
Czech Republic . . . . . . . . . . . . 233 032 727
Denmark . . . . . . . . . . . . . . . . . 35 25 86 00
Dubai . . . . . . . . . . . . . . . .97 14 39 69 944
Egypt. . . . . . . . . . . . . . . . . . . 202 7623441
Finland . . . . . . . . . . . . . . . .09 23 11 34 25
France. . . 01 56 38 42 00 (Appel national)
Germany. . . . . . . . . . . . . . .01805 333 222
(0,14 Euro/Min. aus dem Festnetz der Deut-
schen Telekom.
Für Anrufe aus den Mobilfunknetzen können
abweichende Preise gelten)
Greece . . . . . . 801 1000 500 (0,026 Euro)
Hong Kong . . . . . . . . . . . . . . . . 2763 0203
. . . . . . . . . . . . . . . . . . . . . . . . . 2389 7285
Hungary . . . . . . . . . 06 14 71 24 44 (27 Ft)
India . . . . . . . . . . . . . . .Please refer to your
. . . . . . . . . . . . . . . . . . . local warranty card
Ireland . . . . . . . . . . . . . . . .18 50 77 72 77
Israel . . . . . . . . . . . . . . . . . . 1 700 700 727
Italy. . . . . . . . . . . . . . . . . . . . 199.15.11.15
Jordan . . . . . . . . . . . 00962 6 5625460/1/2
Kuwait . . . . . . . . . . . . . . . 00965-2464993
Latvia . . . . . . . . . . . . . . . . . . . . . 7 50 11 18
Lebanon. . . . . . . . . . . . . . 00961-1236110
Luxembourg . . . . . . . . . . . 40 66 61 56 40
Malaysia. . . . . . . . . . . . . . . .603 77124304
Malta . . . . . . . . . . . . . . +353 21 4940 632
Mexico. .01800 999 4442738 (01800 999
Gigaset)
Netherlands
. . . . . . . . .0900-3333102 (0,25 Euro/min.)
New Zealand . . . . . . . . . . . 08 00 27 43 63
Norway . . . . . . . . . . . . . . . . . . 22 70 84 00
Oman. . . . . . . . . . . . . . . . 96 82 47 09 281
Poland . . . . . . . . . . . . . . . . .0 801 140 160
Portugal. . . . . . . . . . . . (351) 808 781 223
Romania . . . . . . . . . . . . +4.021.529.7114.
Russia. . . . . . . . . . . . . . . 8 (495) 228 1312
Serbia. . . . . . . . . . . . . . . . . . 0800 222 111
Singapore . . . . . . . . . . . . . . . . . 6735 9100
Slovak Republic
. . . . . . . . . . . . . 02 59 68 22 66 (4,428 sk)
Slovenija . . . . . . . . . . . . . . . 0 14 74 63 36
South Africa. . . . . . . . . . . . 08 60 10 11 57
Spain . . . . . . . . . . . . . . . . . . . .902 103935
Sweden . . . . . . . . . . . . . . . . . 08 750 99 11
Switzerland
. . . . . . . . . . 0848 212 000 (0,08 SFr./Min.)
Taiwan . . . . . . . . . . . . . . . . . 02 266 24343
Thailand. . . . . . . . . . . . . . . . . 02 722 1118
Turkey . . . . . . . . . . . . . . . .0216 459 98 59
Ukraine . . . . . . . . . . . .+380-44-451-71-72
United Arab Emirates . . . . . 0 43 66 03 86
United Kingdom . . . . . . . 0 84 53 67 08 12
USA . . . . . . . . . . . . . . . . . 1-866 247-8758
. . . . . . . . . . . . . . . . . . . . . . . . . . . (toll free)
56
Appendix
Gigaset S680 / IM-NORD EN / A31008-M1901-R201-1-SM19 / appendix.fm / 1.10.08
Version 4, 16.09.2005
Authorisation
This device is intended for analogue
phone lines in your network.
Country-specific requirements have been
taken into consideration.
We, Gigaset Communications GmbH,
declare that this device meets the
essential requirements and other relevant
regulations laid down in Directive 1999/5/
EC.
A copy of the 1999/5/EC Declaration of
Conformity is available at this Internet
address:
www.gigaset.com/docs
.
Bluetooth
ò
Qualified Design Identity
The Bluetooth QD ID for your Gigaset S68H
is: B012741.
Specifications
Recommended batteries
Technology:
Nickel-metal-hydride (NiMH)
Size: AAA (Micro, HR03)
Voltage: 1.2 V
Capacity: 600 – 1200 mAh
We recommend the following battery
types, because these are the only ones
that guarantee the specified operating
times, full functionality and long service
life:
u Sanyo NiMH 800
u GP 850 mAh
u Yuasa Technologies AAA 800
The device is supplied with two recom-
mended batteries.
Handset operating times/charging
times
The operating time of your Gigaset
depends on the age of the batteries and
the way they are used. (All times are max-
imum possible times and apply only when
the display backlight is deactivated.)
At the time of going to print, batteries up
to 900 mAh were available and had been
tested in the system. Due to the constant
progression in battery development, the
list of recommended batteries in the FAQ
section of the Gigaset Customer Care
pages is regularly updated:
www.gigaset.com/customercare
Base station power consumption
In standby mode: approx. 1.2 watt
During a call: approx. 1 watt
Capacity (mAh) approx.
600 800 1000 1200
Standby time
(hours)
130 180 220 265
Talktime
(hours)
7 101214
Operating time for
1.5 hour call each
day (hours)
70 90 115 135
Charging time,
charging cradle
(hours)
6 9 11 13
Charging time,
base station
(hours)
57810
57
Notes on the user guide
Gigaset S680 / IM-NORD EN / A31008-M1901-R201-1-SM19 / appendix.fm / 1.10.08
Version 4, 16.09.2005
General specifications
Notes on the user guide
This section explains the meaning of cer-
tain typographical conventions that are
used in this user guide.
Example of a menu input
The steps you need to perform are shown
in abbreviated form in the user guide.
This is illustrated below using the example
of "Setting the contrast for the display".
The things you have to do are explained in
the boxes.
DECT standard is supported
GAP standard is supported
No. of channels 60 duplex channels
Radio frequency
range 1880–1900 MHz
Duplex method Time multiplex,
10 ms frame length
Channel grid 1728 kHz
Bit rate 1152 kbit/s
Modulation GFSK
Language code 32 kbit/s
Transmission
power
10 mW, average power per
channel
Range up to 300 m outdoors,
up to 50 m indoors
Base station
power supply
230 V ~/50 Hz
Environmental
conditions in
operation
+5 °C to +45 °C;
20% to 75% humidity
v ¢ Ð ¢ Display
¤ With the handset in idle status, press
on the right of the control key (v) to
open the main menu.
¤ With the q/r control key, select the
Ð icon.
Settings appears in the display header.
¤ Press the display key §OK§ to confirm the
Settings function.
The Settings submenu is displayed.
¤ Press on the bottom of control key q
repeatedly until the Display menu func-
tion is selected.
¤ Press v or press the display key §OK§ to
confirm the selection.
Contrast Select and press
§OK§.
¤ Press on the bottom of control key q
repeatedly until the Contrast menu
function is selected.
¤ Press v or press the display key §OK§ to
confirm the selection.
r Select contrast and press the
display key
§Save§.
¤ Press on the right or left of the control
key to set the contrast.
¤ Press the display key §Save§ to confirm
the selection.
a Press and hold (idle status).
¤ Press and hold the end call key until the
handset returns to idle status.
58
Notes on the user guide
Gigaset S680 / IM-NORD EN / A31008-M1901-R201-1-SM19 / appendix.fm / 1.10.08
Version 4, 16.09.2005
Example of multiple line input
In many situations you can change set-
tings or enter data in several lines of a dis-
play.
In this user guide icons are used to guide
you step by step through multiple line
input. This is illustrated below using the
example of "Setting the date and time".
The things you have to do are explained in
the boxes.
You will see the following display (exam-
ple):
Writing and editing text
The following rules apply when writing a
text:
u Control the cursor with u v t s.
u Characters are inserted on the left of
the cursor.
u Press the star key
*
to show the
table of special characters. Select the
required character, press the display
key
§Insert§ to insert the character at the
cursor position.
u The first letter of the name of directory
entries is automatically capitalised, fol-
lowed by lower case letters.
Writing an SMS/name
(without predictive text)
Press the relevant key several times to
enter letters/characters.
Standard characters
1) Space
2) Line break
When you press and hold a key, the char-
acters of that key appear in the display and
are highlighted one after the other. When
you release the key, the highlighted char-
acter is inserted into the input field.
Date:
Enter the day, month and year in
8-digit format.
The second line is marked with [ ] to
show it is active.
¤ Enter the date using the digit keys.
Time:
Enter hours/minutes in 4-digit format.
¤ Press the s key.
The fourth line is marked with [ ] to show
it is active.
¤ Enter the date using the digit keys.
¤ Save the changes.
¤ Press the display key §Save§.
¤ Then press and hold the a key.
The handset switches to idle status.
Date/Time
Date:
[15.11.2007]
Time:
11:11
Ý Save
1x 2x 3x 4x 5x 6x 7x 8x 9x 10x
1
2 abc2äáàâãç
3 def3ëéèê
4 gh i4ïíìî
5 jkl5
L mno6öñóòôõ
M pqr s
N tuv8üúùû
O wx y z 9ÿ ýæøå
Q .,?!0
1)
2)
59
Additional functions via the PC interface
Gigaset S680 / IM-NORD EN / A31008-M1901-R201-1-SM19 / appendix.fm / 1.10.08
Version 4, 16.09.2005
Setting upper/lower case or digits
Press the hash key # briefly to switch
from "Abc" mode to "123" and from "123"
to "abc" and from "abc" to "Abc" (upper
case: 1st letter upper case, all others lower
case). Press the hash key # before
entering the letter.
You can see in the display whether upper
case, lower case or digits is selected.
Writing SMS (with predictive text)
EATONI predictive text helps you when
you are writing SMS messages.
Each key between Q and O is
assigned several letters and characters.
These appear in a selection line immedi-
ately under the text panel (over the dis-
play keys) as soon as you press a key.
The letter you are most likely looking for is
shown in reversed highlights and is at the
beginning of the selection line. It is copied
into the text panel.
1 Remaining number of characters, in brack-
ets: SMS part 1-n
2SMS text
3Selection line
4 EATONI is activated
5 Upper/lower case or digits
If this letter is the one you want, confirm it
by pressing the next key. If it does not
match the one you want, press the hash
key # briefly until the letter you are
looking for is reverse highlighted in the
display line and then transferred to the
text field.
If you press and hold the hash key #
you switch from "Abc" mode to "123" and
from "123" to "abc" and from "abc" to
"Abc".
Deactivating/activating predictive text
Precondition: You are writing an SMS.
Options Press the display key.
Predictive Text
Select and press
§OK§ (=on).
a Press the end call key briefly
to return to the text field.
Enter the text.
Additional functions via the
PC interface
You can connect the handset to your
computer using Bluetooth (page 47).
The computer must be equipped with a
suitable dongle.
Your handset can communicate with the
computer via the "Gigaset QuickSync"
program (free download at
www.gigaset.com/gigasetS680
).
You can
u synchronise your handset's directory
with Outlook,
u download photos (.bmp) from the
computer to the handset,
u download pictures (.bmp) as screen-
saver from the computer to the hand-
set.
During the transfer of data between hand-
set and PC, you will see
ß on the dis-
play. During this time the keypad is disa-
bled, and incoming calls will be ignored.
2
1
3
SMS 572(1)
Hello Peter, I cannot come
today. W
hgi
X Options
Ç
Abc
5
4
60
Accessories
Gigaset S680 / IM-NORD EN / A31008-M1901-R201-1-SM19 / accessories_SAG.fm / 1.10.08
Version 4, 16.09.2005
Accessories
Gigaset Handsets
Upgrade your Gigaset to a cordless PABX:
Gigaset handset S68H
u Illuminated graphical colour display (65 k colours)
u Illuminated keypad
u Handsfree talking
u Polyphonic ringer tones
u Directory for around 250 entries
u Picture CLIP
u SMS (precondition: CLIP must be enabled)
u Headset socket
u Bluetooth
u Room monitor
www.gigaset.com/gigasetS68H
Gigaset Handset SL37H
u Illuminated graphical colour display (65 k colours)
u Illuminated keypad
u Handsfree talking
u Polyphonic ringer tones
u Directory for around 250 entries
u Picture CLIP
u SMS (precondition: CLIP must be enabled)
u PC interface, e.g. for managing directory entries,
ringer tones and screensavers
u Headset socket
u Bluetooth
u Room monitor
u Walky-talky function
www.gigaset.com/gigasetSL37H
61
Accessories
Gigaset S680 / IM-NORD EN / A31008-M1901-R201-1-SM19 / accessories_SAG.fm / 1.10.08
Version 4, 16.09.2005
Gigaset Handset SL56
u Illuminated graphical colour display (65 k colours)
u Illuminated keypad
u Handsfree talking
u Polyphonic ringer tones
u Directory for around 250 entries
u Picture CLIP
u SMS (precondition: CLIP must be enabled)
u Voice dialling
u PC interface, e.g. for managing directory entries,
ringer tones and screensavers
u Headset socket
u Bluetooth
www.gigaset.com/gigasetSL56
Gigaset C47H handset
u Illuminated graphical colour display (4096 colours)
u Illuminated keypad
u Handsfree talking
u Polyphonic ringer tones
u Directory for around 150 entries
u SMS (precondition: CLIP must be enabled)
u Headset socket
u Room monitor
www.gigaset.com/gigasetC47H
Gigaset Handset E45
u Dust and splashproof casing
u Illuminated colour display (4096 colours)
u Illuminated keypad
u Handsfree talking
u Polyphonic ringer tones
u Directory for around 150 entries
u SMS (precondition: CLIP must be enabled)
u Headset socket
u Room monitor
www.gigaset.com/gigasete45
62
Accessories
Gigaset S680 / IM-NORD EN / A31008-M1901-R201-1-SM19 / accessories_SAG.fm / 1.10.08
Version 4, 16.09.2005
Gigaset repeater
The Gigaset repeater can be used to increase the reception
range of your Gigaset handset to the base station.
www.gigaset.com/gigasetrepeater
Gigaset HC450 – door intercom for cordless phones
u Use the intercom from your cordless phone – no need
for a fixed home phone
u Intuitive user functions using the softkeys
(open door, switch on entry light)
u Simple to configure using the handset menu
u Divert to outside phone numbers (intercom feature)
u Simple to install and register with the Gigaset system
u Replaces existing call button – no further cable is needed
u Supports the existing doorbell and standard door opener
u Configuration options for the second ringer key
(separate intercom call, activating interior lighting,
or function such as first ringer key)
www.gigaset.com/GigasetHC450
All accessories and batteries are available from your phone retailer.
Only use original accessories. This will avoid possible health risks and damage
to property, and also ensure that all the relevant regulations are complied with.
63
Index
Gigaset S680 / IM-NORD EN / A31008-M1901-R201-1-SM19 / S680SIX.fm / 1.10.08
Version 4, 16.09.2005
Index
A
Access code
for a PABX
. . . . . . . . . . . . . . . . . . .51
Access protection
. . . . . . . . . . . . . . . .49
Accessories
. . . . . . . . . . . . . . . . . . . .60
Acknowledge tones
. . . . . . . . . . . . . .44
Activating
advisory tones
. . . . . . . . . . . . . . . .44
appointment
. . . . . . . . . . . . . . . . .45
Bluetooth mode
. . . . . . . . . . . . . . .47
call acceptance
. . . . . . . . . . . . . . . .41
handset
. . . . . . . . . . . . . . . . . . . . .10
internal listening in
. . . . . . . . . . . . .37
keypad lock
. . . . . . . . . . . . . . . . . .10
room monitor
. . . . . . . . . . . . . . . . .39
Advisory tones
. . . . . . . . . . . . . . . . . .44
Alarm clock
. . . . . . . . . . . . . . . . . . . .45
Alert tone
. . . . . . . . . . . . . . . . . . . . .43
Anniversary
. . . . . . . . . . . . . . . . . . . .22
deactivating
. . . . . . . . . . . . . . . . . .22
missed
. . . . . . . . . . . . . . . . . . .22, 46
saving in directory
. . . . . . . . . . . . .22
Appointment
. . . . . . . . . . . . . . . .45, 46
Appointment/anniversary
display missed
. . . . . . . . . . . . . . . .46
Appointments
activating/deactivating
. . . . . . . . . .46
deleting
. . . . . . . . . . . . . . . . . . . . .46
managing
. . . . . . . . . . . . . . . . . . . .46
Area code
setting own dialling code
. . . . . . . .49
Assigning a key
. . . . . . . . . . . . . . . . .39
Assigning numerical keys
. . . . . . . . . .39
Authorisation
. . . . . . . . . . . . . . . . . . .56
Automatic
call acceptance
. . . . . . . . . . . . .15, 41
last number redial
. . . . . . . . . . . . . .23
network provider preselection
. . . . .25
B
Base station
changing
. . . . . . . . . . . . . . . . . . . .36
connecting
. . . . . . . . . . . . . . . . . . . .7
connecting and installing
. . . . . . . . .6
connecting to PABX
. . . . . . . . . . . . .51
range
. . . . . . . . . . . . . . . . . . . . . . . .7
restoring to factory settings
. . . . . . 50
setting
. . . . . . . . . . . . . . . . . . . . . 49
system PIN
. . . . . . . . . . . . . . . . . . 49
Battery
charging
. . . . . . . . . . . . . . . . . . . 1, 9
display
. . . . . . . . . . . . . . . . . . . . 1, 9
fitting
. . . . . . . . . . . . . . . . . . . . . . . 7
icon
. . . . . . . . . . . . . . . . . . . . . . 1, 9
recommended batteries
. . . . . . . . . 56
tone
. . . . . . . . . . . . . . . . . . . . . . . 44
Beep, see Advisory tones
Best base station
. . . . . . . . . . . . . . . . 36
Birthday, see Anniversary
Bluetooth
accepting a call
. . . . . . . . . . . . . . . 15
changing device name
. . . . . . . . . . 48
deregistering devices
. . . . . . . . . . . 48
list of known devices
. . . . . . . . . . . 48
registering devices
. . . . . . . . . . . . . 47
transferring directory (vCard)
. . . . . 21
Bluetooth connection
setting own area code
. . . . . . . . . . 49
C
Calendar. . . . . . . . . . . . . . . . . . . . . . 45
Call
accepting
. . . . . . . . . . . . . . . . . . . 15
accepting (Bluetooth)
. . . . . . . . . . . 15
disconnecting (toggling)
. . . . . . . . 17
ending
. . . . . . . . . . . . . . . . . . . . . 15
external
. . . . . . . . . . . . . . . . . . . . . 15
internal
. . . . . . . . . . . . . . . . . . . . . 36
party listening in
. . . . . . . . . . . . . . 37
transferring (connect)
. . . . . . . 36, 38
Call acceptance
. . . . . . . . . . . . . . . . . 41
Call diversion
. . . . . . . . . . . . . . . . . . 17
Call duration
. . . . . . . . . . . . . . . . . . . 15
Call history
. . . . . . . . . . . . . . . . . . . . 24
Call waiting
accepting/rejecting
. . . . . . . . . . . . 17
activating/deactivating
. . . . . . . . . . 17
internal call
. . . . . . . . . . . . . . . . . . 37
Call-by-call
. . . . . . . . . . . . . . . . . . . . 19
numbers
. . . . . . . . . . . . . . . . . 19, 24
Call-by-call list
key
. . . . . . . . . . . . . . . . . . . . . . . . . 1
Calling Line Identification
. . . . . . . . . 15
Care of the telephone
. . . . . . . . . . . . 53
64
Index
Gigaset S680 / IM-NORD EN / A31008-M1901-R201-1-SM19 / S680SIX.fm / 1.10.08
Version 4, 16.09.2005
Changing
destination number
. . . . . . . . . . . .39
device name (Bluetooth)
. . . . . . . . .48
dialling mode
. . . . . . . . . . . . . . . . .51
display language
. . . . . . . . . . . . . . .40
earpiece volume
. . . . . . . . . . . . . . .42
handsfree volume
. . . . . . . . . . . . . .42
internal number of a handset
. . . . .38
name of a handset
. . . . . . . . . . . . .38
pause time
. . . . . . . . . . . . . . . . . . .51
ringer tone
. . . . . . . . . . . . . . . . . . .42
system PIN
. . . . . . . . . . . . . . . . . . .49
Character set
. . . . . . . . . . . . . . . .27, 29
Charge status display
. . . . . . . . . . . . . .1
CLI, CLIP
. . . . . . . . . . . . . . . . . . . . . .15
CLIP picture
. . . . . . . . . . . . . . 16, 19, 43
Conference
. . . . . . . . . . . . . . . . . . . .17
Configuring the network mailbox
. . . .34
Confirmation tone
. . . . . . . . . . . . . . .44
Connecting, base station to PABX
. . . .51
Consultation
. . . . . . . . . . . . . . . . . . .17
Consultation call (internal)
. . . . . . . . .37
Control key
. . . . . . . . . . . . . . . . . .1, 10
Correcting incorrect entries
. . . . . . . .12
Customer Care
. . . . . . . . . . . . . . . . . .55
D
Deactivating
advisory tones
. . . . . . . . . . . . . . . .44
appointment
. . . . . . . . . . . . . . . . .45
appointment reminder
. . . . . . . . . .46
call acceptance
. . . . . . . . . . . . . . . .41
handset
. . . . . . . . . . . . . . . . . . . . .10
internal listening in
. . . . . . . . . . . . .37
keypad lock
. . . . . . . . . . . . . . . . . .10
preselection
. . . . . . . . . . . . . . . . . .25
room monitor
. . . . . . . . . . . . . . . . .39
Delete key
. . . . . . . . . . . . . . . . . . . . .10
Deleting
characters
. . . . . . . . . . . . . . . . . . .12
Deregistering (handset)
. . . . . . . . . . .36
Deregistering devices (Bluetooth)
. . . .48
Destination number (room monitor)
. .39
Dialling
call-by-call list
. . . . . . . . . . . . . . . . .20
directory
. . . . . . . . . . . . . . . . . . . .20
quick dial
. . . . . . . . . . . . . . . . . . . .39
with quick dial
. . . . . . . . . . . . . . . .21
Dialling pause
. . . . . . . . . . . . . . . . . .52
entering
. . . . . . . . . . . . . . . . . . . . . .1
Directory . . . . . . . . . . . . . . . . . . . . . 19
copying number from text
. . . . . . . 21
managing entries
. . . . . . . . . . . . . . 20
opening
. . . . . . . . . . . . . . . . . . . . 10
order of entries
. . . . . . . . . . . . . . . 20
saving anniversary
. . . . . . . . . . . . . 22
saving entry
. . . . . . . . . . . . . . . . . 19
saving the sender’s number
(SMS)
. . . . . . . . . . . . . . . . . . . 29
sending entry/list to handset
. . . . . 21
transferring a vCard (Bluetooth)
. . . 21
using to enter numbers
. . . . . . . . . 22
Disconnecting waiting caller
(toggle)
. . . . . . . . . . . . . . . . . . . 17
Display
backlight
. . . . . . . . . . . . . . . . . . . . 41
changing display language
. . . . . . . 40
contrast
. . . . . . . . . . . . . . . . . . . . . 40
in idle status
. . . . . . . . . . . . . . . . . 11
memory (directory/call-by-call)
. . . . 20
memory (My stuff)
. . . . . . . . . . . . 44
missed appointments/
anniversaries
. . . . . . . . . . . . . . 46
network mailbox report
. . . . . . . . . 34
number (CLI/CLIP)
. . . . . . . . . . . . . 15
screensaver
. . . . . . . . . . . . . . . . . . 41
setting
. . . . . . . . . . . . . . . . . . . . . 40
wrong language
. . . . . . . . . . . . . . 40
Display keys
. . . . . . . . . . . . . . . . . 1, 10
assigning
. . . . . . . . . . . . . . . . . . . . 39
Draft message list (SMS)
. . . . . . . . . . 27
E
Earpiece mode . . . . . . . . . . . . . . . . . 16
Earpiece volume
. . . . . . . . . . . . . . . . 42
EATONI (predictive text)
. . . . . . . . . . 59
Eco mode
. . . . . . . . . . . . . . . . . . . . . 12
E-mail address
. . . . . . . . . . . . . . . . . . 28
copying from the directory
. . . . . . . 22
End call key
. . . . . . . . . . . . . . . . . . 1, 15
Ending, call
. . . . . . . . . . . . . . . . . . . . 15
Ending, see deactivate
Entry
saving (network mailbox)
. . . . . . . . 34
saving, changing (preselection)
. . . 25
selecting (menu)
. . . . . . . . . . . . . . 57
selecting from directory
. . . . . . . . . 20
Error tone
. . . . . . . . . . . . . . . . . . . . . 44
65
Index
Gigaset S680 / IM-NORD EN / A31008-M1901-R201-1-SM19 / S680SIX.fm / 1.10.08
Version 4, 16.09.2005
Example
menu input
. . . . . . . . . . . . . . . . . .57
multiple line input
. . . . . . . . . . . . .58
F
Fast access
network mailbox
. . . . . . . . . . . . . . .34
G
Group call . . . . . . . . . . . . . . . . . . . . .36
H
Handset
activating/deactivating
. . . . . . . . . .10
advisory tones
. . . . . . . . . . . . . . . .44
changing internal number
. . . . . . . .38
changing name
. . . . . . . . . . . . . . .38
changing the number
. . . . . . . . . . .38
changing to a different base
station. . . . . . . . . . . . . . . . . . .36
changing to best reception
. . . . . . .36
contact with liquid
. . . . . . . . . . . . .53
deregistering
. . . . . . . . . . . . . .35, 36
display backlight
. . . . . . . . . . . . . . .41
display language
. . . . . . . . . . . . . . .40
earpiece volume
. . . . . . . . . . . . . . .42
handsfree volume
. . . . . . . . . . . . . .42
idle status
. . . . . . . . . . . . . . . . . . .11
list
. . . . . . . . . . . . . . . . . . . . . . . . .10
locating
. . . . . . . . . . . . . . . . . . . . .36
muting
. . . . . . . . . . . . . . . . . . . . . .16
paging
. . . . . . . . . . . . . . . . . . . . . .36
registering
. . . . . . . . . . . . . . . . . . .35
registering to a different base
station
. . . . . . . . . . . . . . . . . . .36
restoring to factory settings
. . . . . . .49
screensaver
. . . . . . . . . . . . . . . . . .41
setting
. . . . . . . . . . . . . . . . . . . . . .39
setting up
. . . . . . . . . . . . . . . . . . . . .7
signal strength
. . . . . . . . . . . . . . . . .7
transferring a call
. . . . . . . . . . . . . .36
using room monitor
. . . . . . . . . . . .38
using several
. . . . . . . . . . . . . . . . .35
Handset operating time
in room monitor mode
. . . . . . . . . .38
Handsfree key
. . . . . . . . . . . . . . . . . . .1
Handsfree talking
. . . . . . . . . . . . . . . .16
Hash key
. . . . . . . . . . . . . . . . . . . .1, 10
Headset socket
. . . . . . . . . . . . . . . . . . .9
Hearing aids
. . . . . . . . . . . . . . . . . . . . 4
Hold music
. . . . . . . . . . . . . . . . . 16, 50
setting
. . . . . . . . . . . . . . . . . . . . . 50
I
Icon
alarm clock
. . . . . . . . . . . . . . . . . . 45
battery
. . . . . . . . . . . . . . . . . . . . . . 9
display
. . . . . . . . . . . . . . . . . . . . . 10
for new messages
. . . . . . . . . . . . . 23
keypad lock
. . . . . . . . . . . . . . . . . . 10
new SMS
. . . . . . . . . . . . . . . . . . . . 28
ringer tone
. . . . . . . . . . . . . . . . . . 43
Idle status (display)
. . . . . . . . . . . . . . 11
Idle status, returning to
. . . . . . . . . . . 11
Incoming message list (SMS)
. . . . . . . 28
Incorrect input (correction)
. . . . . . . . 12
Information services (SMS)
. . . . . . . . 32
Input language (SMS)
. . . . . . . . . . . . 27
Installation, base station
. . . . . . . . . . . 6
Internal
consulting
. . . . . . . . . . . . . . . . . . . 37
listening in
. . . . . . . . . . . . . . . . . . 37
making calls
. . . . . . . . . . . . . . . . . 36
Internal call
. . . . . . . . . . . . . . . . . . . . 36
call waiting
. . . . . . . . . . . . . . . . . . 37
K
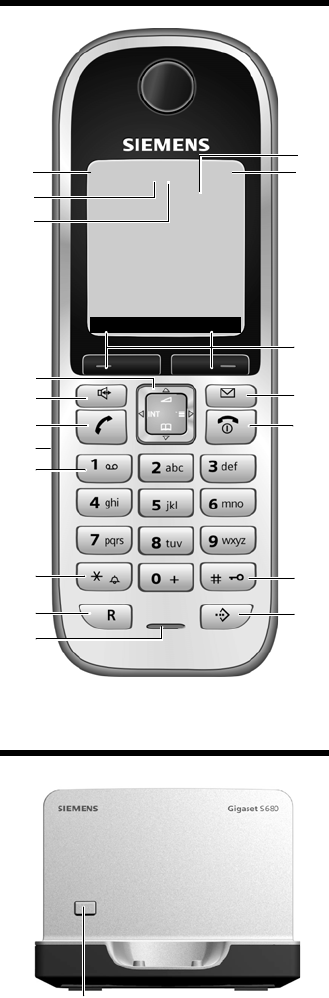
Key 1 (fast access). . . . . . . . . . . . . . . . 1
Keypad lock
. . . . . . . . . . . . . . . . . . . 10
Keys
call-by-call list
. . . . . . . . . . . . . . . . . 1
control key
. . . . . . . . . . . . . . . . 1, 10
delete key
. . . . . . . . . . . . . . . . . . . 10
display keys
. . . . . . . . . . . . . . . . 1, 10
end call key
. . . . . . . . . . . . . . . . 1, 15
fast access
. . . . . . . . . . . . . . . . . . . . 1
handsfree key
. . . . . . . . . . . . . . . . . 1
hash key
. . . . . . . . . . . . . . . . . . 1, 10
message key
. . . . . . . . . . . . . . . . . . 1
on/off key
. . . . . . . . . . . . . . . . . . . . 1
quick dial
. . . . . . . . . . . . . . . . . . . . 21
recall key
. . . . . . . . . . . . . . . . . . . . . 1
star key
. . . . . . . . . . . . . . . . . . . . . . 1
talk key
. . . . . . . . . . . . . . . . . . . 1, 15
L
Language, display . . . . . . . . . . . . . . . 40
Last number redial
. . . . . . . . . . . . . . 22
66
Index
Gigaset S680 / IM-NORD EN / A31008-M1901-R201-1-SM19 / S680SIX.fm / 1.10.08
Version 4, 16.09.2005
Linking, see SMS
Liquid
. . . . . . . . . . . . . . . . . . . . . . . .53
List
. . . . . . . . . . . . . . . . . . . . . . . . . .19
call history
. . . . . . . . . . . . . . . . . . .24
call-by-call list
. . . . . . . . . . . . . . . . .19
handsets
. . . . . . . . . . . . . . . . . . . .10
known devices (Bluetooth)
. . . . . . .48
missed calls
. . . . . . . . . . . . . . . . . .24
network mailbox
. . . . . . . . . . . . . . .24
SMS draft message list
. . . . . . . . . .27
SMS incoming message list
. . . . . . .28
SMS list
. . . . . . . . . . . . . . . . . . . . .24
Listening in to call
. . . . . . . . . . . . . . .37
Locating, handset
. . . . . . . . . . . . . . .36
Lock
activating/deactivating keypad
protection
. . . . . . . . . . . . . . . .10
M
Mailbox ID, see SMS
Mailboxes, see SMS
Mains adapter
. . . . . . . . . . . . . . . . . . .4
Making calls
accepting a call
. . . . . . . . . . . . . . . .15
external
. . . . . . . . . . . . . . . . . . . . .15
internal
. . . . . . . . . . . . . . . . . . . . .36
Making cost-effective calls
. . . . . . . . .24
Manual last number redial
. . . . . . . . .23
Medical appliances
. . . . . . . . . . . . . . . .4
Memory
directory/call-by-call
. . . . . . . . . . . .20
My stuff
. . . . . . . . . . . . . . . . . . . . .44
Menu
end tone
. . . . . . . . . . . . . . . . . . . .44
menu guidance
. . . . . . . . . . . . . . .11
menu input
. . . . . . . . . . . . . . . . . .57
opening
. . . . . . . . . . . . . . . . . . . . .10
overview
. . . . . . . . . . . . . . . . . . . .13
Message key
open list
. . . . . . . . . . . . . . . . . . . . .28
opening lists
. . . . . . . . . . . . . . . . . .23
Messages
key
. . . . . . . . . . . . . . . . . . . . . . . . . .1
Microphone
. . . . . . . . . . . . . . . . . . . . .1
Missed
anniversary
. . . . . . . . . . . . . . . . . .46
appointment
. . . . . . . . . . . . . . . . .46
calls
. . . . . . . . . . . . . . . . . . . . . . . .24
Multiple line input
. . . . . . . . . . . . . . .58
Muting
handset
. . . . . . . . . . . . . . . . . . . . . 16
My stuff
. . . . . . . . . . . . . . . . . . . . . . 43
N
Name
of a handset
. . . . . . . . . . . . . . . . . 38
Network provider (numbers list)
. . . . 19
Network provider preselection,
automatic
. . . . . . . . . . . . . . . . . 25
Network services
. . . . . . . . . . . . . . . . 17
Notification by SMS
. . . . . . . . . . . . . . 30
Number
as destination for room monitor
. . . 39
copying from an SMS text
. . . . . . . 29
copying from directory
. . . . . . . . . . 22
copying to directory
. . . . . . . . . . . . 21
displaying caller's number (CLIP)
. . . 15
entering network mailbox number
. 34
entering with directory
. . . . . . . . . . 22
saving in the directory
. . . . . . . . . . 19
Numbers list
network provider
. . . . . . . . . . . . . . 19
O
On/Off key . . . . . . . . . . . . . . . . . . . . . 1
Order in directory
. . . . . . . . . . . . . . . 20
Outside line code
. . . . . . . . . . . . . . . 51
P
PABX
connecting base station
. . . . . . . . . 51
pauses
. . . . . . . . . . . . . . . . . . . . . 51
saving access code
. . . . . . . . . . . . . 51
setting dialling mode
. . . . . . . . . . . 51
setting recall
. . . . . . . . . . . . . . . . . 51
SMS
. . . . . . . . . . . . . . . . . . . . . . . 32
switch to touch tone dialling
. . . . . 52
Pack contents
. . . . . . . . . . . . . . . . . . . 6
Paging
. . . . . . . . . . . . . . . . . . . . . . . 36
Paging key
. . . . . . . . . . . . . . . . . . . . . 1
Pause
. . . . . . . . . . . . . . . . . . . . . 51, 52
PC interface
. . . . . . . . . . . . . . . . . . . 59
Phone jack assignment
. . . . . . . . . . . . 7
Picture
deleting
. . . . . . . . . . . . . . . . . . . . . 44
renaming
. . . . . . . . . . . . . . . . . . . 44
Picture CLIP
. . . . . . . . . . . . . . . . . 19, 43
PIN change
system PIN
. . . . . . . . . . . . . . . . . . 49
67
Index
Gigaset S680 / IM-NORD EN / A31008-M1901-R201-1-SM19 / S680SIX.fm / 1.10.08
Version 4, 16.09.2005
Power consumption . . . . . . . . . . . . . .56
Predictive text
. . . . . . . . . . . . . . . . . .59
Preselection
. . . . . . . . . . . . . . . . . . . .25
deactivating
. . . . . . . . . . . . . . . . . .25
Protecting the phone against
access
. . . . . . . . . . . . . . . . . . . . .49
Q
Questions and answers . . . . . . . . . . .53
Quick dial
. . . . . . . . . . . . . . . . . .19, 39
R
Range . . . . . . . . . . . . . . . . . . . . . . . . .7
Recall
. . . . . . . . . . . . . . . . . . . . . . . .51
Recall key
. . . . . . . . . . . . . . . . . . . . . .1
pause after
. . . . . . . . . . . . . . . . . . .51
Reception booster, see Repeater
Registering (handset)
. . . . . . . . . . . . .35
Registering devices (Bluetooth)
. . . . . .47
Registration key
. . . . . . . . . . . . . . . . . .1
Reminder call
. . . . . . . . . . . . . . . . . . .22
Repeater
. . . . . . . . . . . . . . . . . . . . . .50
Ringback
. . . . . . . . . . . . . . . . . . . . . .17
Ringer tone
changing
. . . . . . . . . . . . . . . . . . . .42
setting volume
. . . . . . . . . . . . . . . .42
Room monitor
. . . . . . . . . . . . . . . . . .38
S
Saving (access code) . . . . . . . . . . . . .51
Screensaver
. . . . . . . . . . . . . . . . . . . .41
Searching in directory
. . . . . . . . . . . .20
Sending
directory entry to handset
. . . . . . . .21
Sensitivity (room monitor)
. . . . . . . . .39
Service
. . . . . . . . . . . . . . . . . . . . . . .55
Setting
date
. . . . . . . . . . . . . . . . . . . . . . . . .9
screensaver
. . . . . . . . . . . . . . . . . .41
time
. . . . . . . . . . . . . . . . . . . . . . . . .9
Setting up
handset
. . . . . . . . . . . . . . . . . . . . . .7
Shortcut
. . . . . . . . . . . . . . . . . . . . . .13
Signal strength
. . . . . . . . . . . . . . . . . .7
SMS
. . . . . . . . . . . . . . . . . . . . . . . . .26
active send service centre
. . . . . . . .26
changing mailbox
. . . . . . . . . . . . . .31
deleting
. . . . . . . . . . . . . . . . . . . . .27
draft message list
. . . . . . . . . . . . . .27
forwarding
. . . . . . . . . . . . . . . . . . .29
incoming message list
. . . . . . . . . . 28
information services
. . . . . . . . . . . 32
input language
. . . . . . . . . . . . . . . 27
linked
. . . . . . . . . . . . . . . . . . . . . . 26
mailbox ID
. . . . . . . . . . . . . . . . . . . 30
mailboxes
. . . . . . . . . . . . . . . . . . . 30
notification by SMS
. . . . . . . . . . . . 30
notification number
. . . . . . . . . . . . 30
notification type
. . . . . . . . . . . . . . 30
PIN protection
. . . . . . . . . . . . . . . . 30
reading
. . . . . . . . . . . . . . . . . . . . . 27
receiving
. . . . . . . . . . . . . . . . . . . . 28
replying to and forwarding
. . . . . . . 29
rules
. . . . . . . . . . . . . . . . . . . . . . . 26
saving number
. . . . . . . . . . . . . . . . 29
self help with error messages
. . . . . 33
sending to a personal mailbox
. . . . 31
sending to an e-mail address
. . . . . 28
status report
. . . . . . . . . . . . . . . . . 27
to a PABX
. . . . . . . . . . . . . . . . . . . . 32
troubleshooting
. . . . . . . . . . . . . . . 33
writing
. . . . . . . . . . . . . . . . . . 26, 58
SMS centre
changing number
. . . . . . . . . . . . . 31
setting
. . . . . . . . . . . . . . . . . . . . . 31
SMS list
. . . . . . . . . . . . . . . . . . . . . . 24
Snooze mode
. . . . . . . . . . . . . . . . . . 45
Sound, see Ringer tone
Special functions
. . . . . . . . . . . . . . . . 51
Specifications
. . . . . . . . . . . . . . . . . . 56
Star key
. . . . . . . . . . . . . . . . . . . . . . . 1
System settings
. . . . . . . . . . . . . . . . . 49
T
Talk key . . . . . . . . . . . . . . . . . . . . 1, 15
Text message, see SMS
Toggling
. . . . . . . . . . . . . . . . . . . . . . 17
Touch tone dialling
. . . . . . . . . . . . . . 52
Troubleshooting
. . . . . . . . . . . . . . . . 53
Troubleshooting (SMS)
. . . . . . . . . . . 33
U
Unknown . . . . . . . . . . . . . . . . . . . . . 16
Unknown caller
. . . . . . . . . . . . . . . . . 16
V
Viewing the network mailbox report . 34
VIP (directory entry)
. . . . . . . . . . . . . 20
68
Index
Gigaset S680 / IM-NORD EN / A31008-M1901-R201-1-SM19 / S680SIX.fm / 1.10.08
Version 4, 16.09.2005
Volume
earpiece
. . . . . . . . . . . . . . . . . . . . .42
earpiece volume
. . . . . . . . . . . . . . .42
handset handsfree volume
. . . . . . .42
loudspeaker
. . . . . . . . . . . . . . . . . .42
ringer tone
. . . . . . . . . . . . . . . . . . .42
setting
. . . . . . . . . . . . . . . . . . . . . .42
W
Warning tone, see Advisory tones
Writing (SMS)
. . . . . . . . . . . . . . . . . .26
Writing, editing text
. . . . . . . . . . . . . .58
37


Need help? Post your question in this forum.

Forumrules


Report abuse

Libble takes abuse of its services very seriously. We're committed to dealing with such abuse according to the laws in your country of residence. When you submit a report, we'll investigate it and take the appropriate action. We'll get back to you only if we require additional details or have more information to share.

Product:

For example, Anti-Semitic content, racist content, or material that could result in a violent physical act.

For example, a credit card number, a personal identification number, or an unlisted home address. Note that email addresses and full names are not considered private information.

Forumrules

To achieve meaningful questions, we apply the following rules:

Register

Register getting emails for Siemens S680 at:


You will receive an email to register for one or both of the options.


Get your user manual by e-mail

Enter your email address to receive the manual of Siemens S680 in the language / languages: English as an attachment in your email.

The manual is 1,16 mb in size.


You will receive the manual in your email within minutes. If you have not received an email, then probably have entered the wrong email address or your mailbox is too full. In addition, it may be that your ISP may have a maximum size for emails to receive.

Others manual(s) of Siemens S680

Siemens S680 User Manual - Dutch - 80 pages


The manual is sent by email. Check your email

If you have not received an email with the manual within fifteen minutes, it may be that you have a entered a wrong email address or that your ISP has set a maximum size to receive email that is smaller than the size of the manual.

The email address you have provided is not correct.

Please check the email address and correct it.

Your question is posted on this page

Would you like to receive an email when new answers and questions are posted? Please enter your email address.


Info