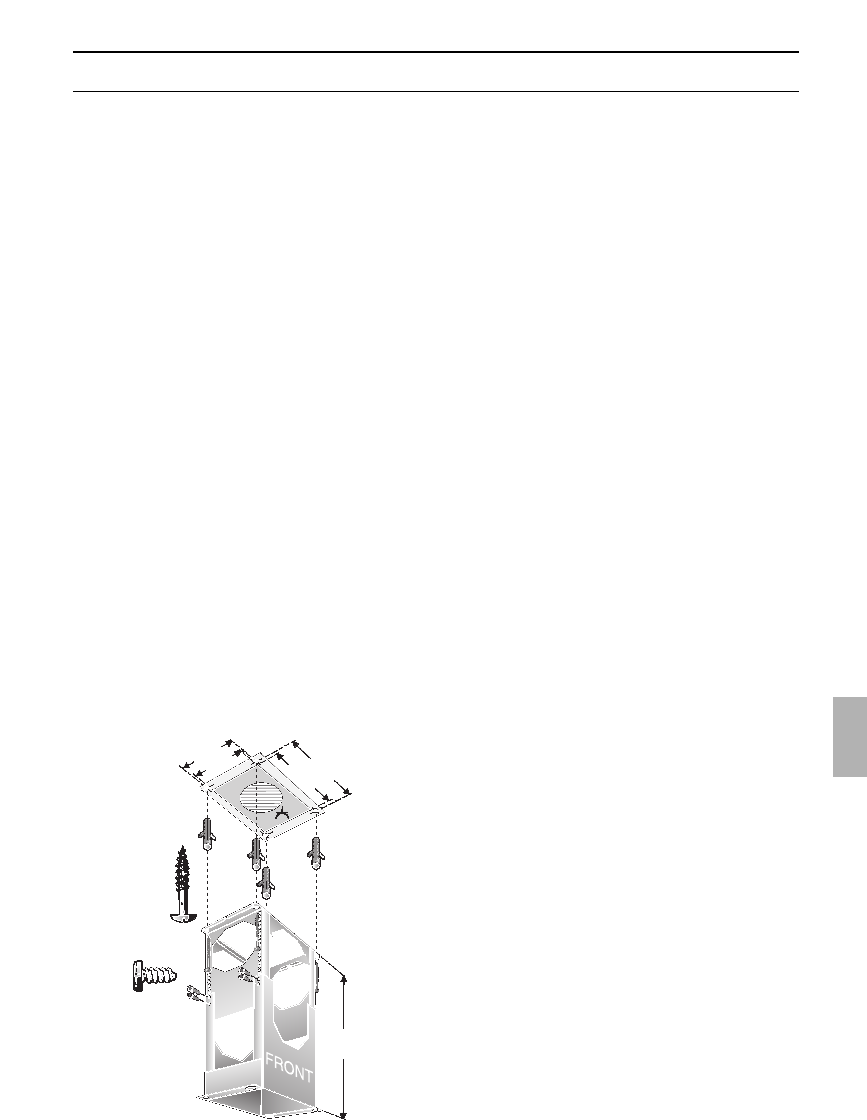
128902
93
Zoom out
Zoom in
Previous page
1/100
Next page
93
Montagem
O suporte está assinalado com
„FRONT“ (= frente) numa das faces.
Neste face ficarão, depois, os
interruptores, após montagem do
exaustor.
6. Aparafusar, completamente, de baixo
para cima, os dois parafusos sextavados
nos furos roscados do exaustor.
Aparafusar, de cima para baixo, as
porcas até cerca de 4mm.
07. Levantar o exaustor, prendê-lo com as
duas porcas nos furos de fechadura e,
para sua segurança, introduzir dois
parafusos sextavados nos furos
redondos, de cima para baixo, nos
cantos opostos.
565
3
1
0
200
346,4
175
O exaustor foi concebido para ser
montado no tecto da cozinha ou sob um
tecto falso com boa estabilidade.
Peso do exaustor:
Consulte os dados técnicos.
Respeitar a distância mínima de
550 mm entre a placa de cozinhar e o
exaustor, no caso de placas eléctricas e, de
650 mm, no caso de placas a gás.
1. Assinalar no tecto o centro do exaustor.
2. Com a ajuda de um escantilhão, assinalar
as posições dos parafusos no tecto.
3. Fazer 4 furos de 8mm l e aplicar as
buchas respectivas, deixando-as à face
do tecto.
4. Aparafusar o suporte com 8 parafusos.
Comprimento total da armação de
suporte para os revestimentos das
chaminés de série anexas: 565 mm.
No caso de comprimentos especiais dos
revestimentos das chaminés, o comprimen-
to da armação de suporte pode ser alterado
em fases de 20 mm. ( mínimo de 425 mm
até ao máximo de 725 mm para o modelo
de exaustão de ar e o mínimo de 505 mm
até 725 mm para o modelo de circulação de
ar.).
5. Aparafusar o suporte no tecto.
93


Need help? Post your question in this forum.

Forumrules


Report abuse

Libble takes abuse of its services very seriously. We're committed to dealing with such abuse according to the laws in your country of residence. When you submit a report, we'll investigate it and take the appropriate action. We'll get back to you only if we require additional details or have more information to share.

Product:

For example, Anti-Semitic content, racist content, or material that could result in a violent physical act.

For example, a credit card number, a personal identification number, or an unlisted home address. Note that email addresses and full names are not considered private information.

Forumrules

To achieve meaningful questions, we apply the following rules:

Register

Register getting emails for Siemens lc90150 at:


You will receive an email to register for one or both of the options.


Get your user manual by e-mail

Enter your email address to receive the manual of Siemens lc90150 in the language / languages: English, German, Dutch, French, Italian, Portuguese, Spanish as an attachment in your email.

The manual is 3,12 mb in size.


You will receive the manual in your email within minutes. If you have not received an email, then probably have entered the wrong email address or your mailbox is too full. In addition, it may be that your ISP may have a maximum size for emails to receive.

The manual is sent by email. Check your email

If you have not received an email with the manual within fifteen minutes, it may be that you have a entered a wrong email address or that your ISP has set a maximum size to receive email that is smaller than the size of the manual.

The email address you have provided is not correct.

Please check the email address and correct it.

Your question is posted on this page

Would you like to receive an email when new answers and questions are posted? Please enter your email address.


Info