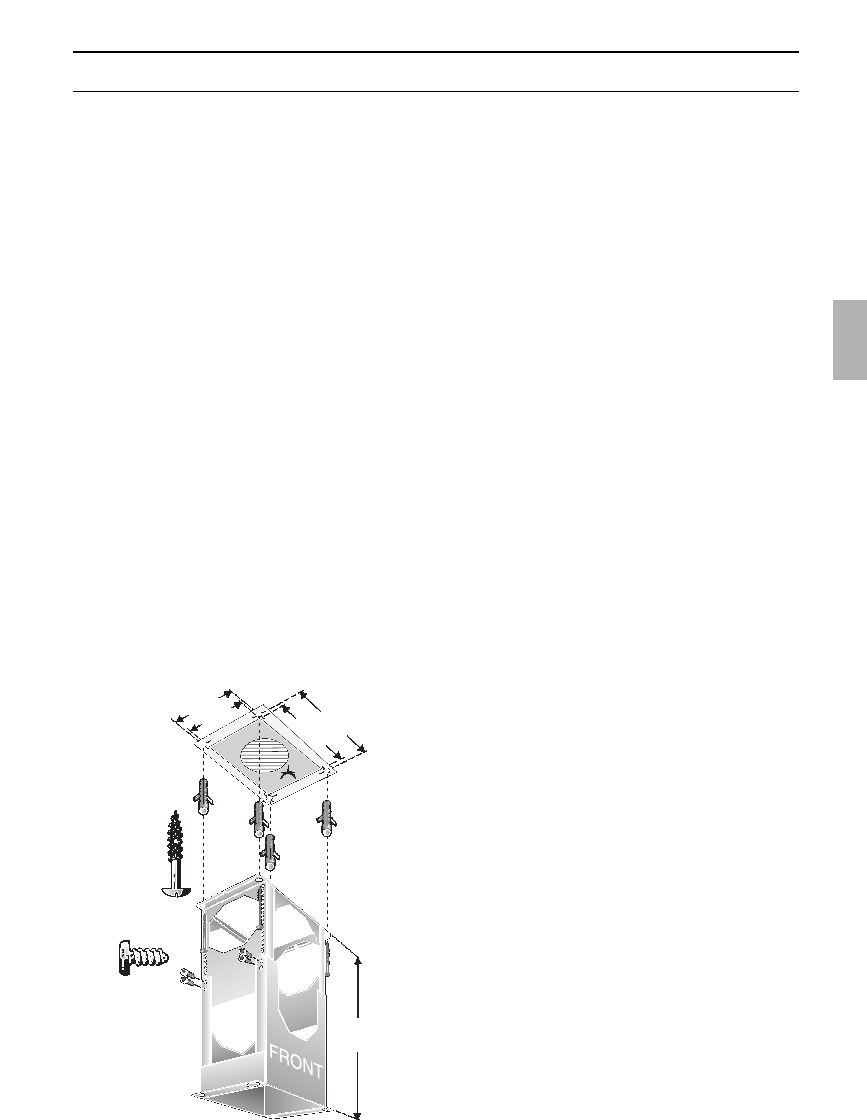
128902
27
Zoom out
Zoom in
Previous page
1/100
Next page
27
Installation
The support frame is marked with
"FRONT" on one side. This is side
where the switches for the extractor
hood will be after installation has
been completed.
6. Screw two hex bolts from underneath all
the way into the threaded holes in the
extractor hood.
Screw nuts onto the bolts, leaving a gap
of approx. 4 mm.
7. Lift up the extractor hood and hook the
protruding nuts into the key-hole slots
and secure the hood in place with 2 hex
bolts inserted from above into the holes
at the corners on the opposite side.
565
310
200
3
4
6
,4
175
This extractor hood is intended to be
mounted either directly onto the kitchen
ceiling or onto a stable, suspended ceiling
structure.
See Technical Data for weight of the
extractor hood.
Ensure that the minimum distance
between the hob and the extractor hood is
maintained – 550 mm for an electric hob and
650 mm for a gas hob.
1. Mark the centre of the position on the cei-
ling at which the hood will be mounted.
2. Use the template to mark the position of
the holes for the mounting screws.
3. Drill 4 x l 8 mm holes and insert plugs
into the holes so that they are flush with
the ceiling.
4. Assemble the support frame (8 screws).
The overall length of the support frame
for the standard chimney panelling
enclosed with the hood is 565 mm. In the
case of longer cover panels, the length of
the support frame can be adjusted in steps
of 20 mm (from at least 425 mm up to max.
of 725 mm for the exhaust-air version and
from at least 505 mm up to max. of 725 mm
for the recirculating version).
5. Mount the support frame onto the ceiling.
27


Need help? Post your question in this forum.

Forumrules


Report abuse

Libble takes abuse of its services very seriously. We're committed to dealing with such abuse according to the laws in your country of residence. When you submit a report, we'll investigate it and take the appropriate action. We'll get back to you only if we require additional details or have more information to share.

Product:

For example, Anti-Semitic content, racist content, or material that could result in a violent physical act.

For example, a credit card number, a personal identification number, or an unlisted home address. Note that email addresses and full names are not considered private information.

Forumrules

To achieve meaningful questions, we apply the following rules:

Register

Register getting emails for Siemens lc90150 at:


You will receive an email to register for one or both of the options.


Get your user manual by e-mail

Enter your email address to receive the manual of Siemens lc90150 in the language / languages: English, German, Dutch, French, Italian, Portuguese, Spanish as an attachment in your email.

The manual is 3,12 mb in size.


You will receive the manual in your email within minutes. If you have not received an email, then probably have entered the wrong email address or your mailbox is too full. In addition, it may be that your ISP may have a maximum size for emails to receive.

The manual is sent by email. Check your email

If you have not received an email with the manual within fifteen minutes, it may be that you have a entered a wrong email address or that your ISP has set a maximum size to receive email that is smaller than the size of the manual.

The email address you have provided is not correct.

Please check the email address and correct it.

Your question is posted on this page

Would you like to receive an email when new answers and questions are posted? Please enter your email address.


Info