15
Cancelling the timer time
Press the
0 button to open the menu. Turn the timer time back
to
‹:‹‹. Press the 0 button repeatedly until the Î rotary
symbol disappears from the clock display.
Changing the timer time
Open the menu with the
0 button and use the rotary selector
to change the time. Press the
0 button repeatedly until the Î
rotary symbol disappears from the clock display. The menu is
exited. The new time counts down.
Setting the cooking time
If you set the cooking time for your dish, operation stops
automatically once this time has elapsed. The oven stops
heating.
Prerequisite: The type of heating and temperature must be set.
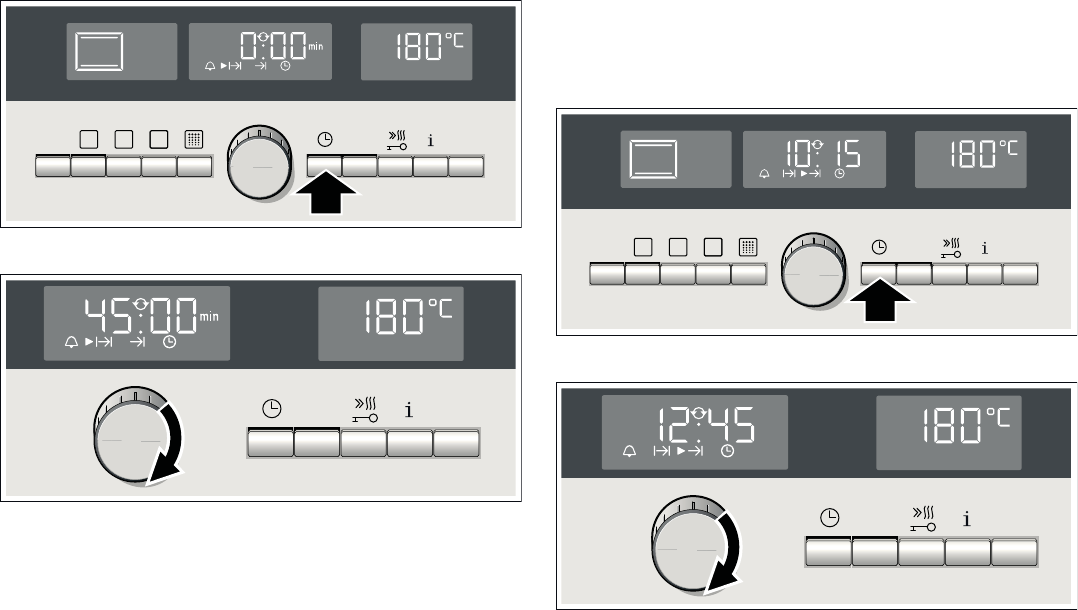
Example in the picture: setting for
% top/bottom heating,
180 °C, cooking time of 45 minutes.
1. Press the
0 button twice.
The arrow is next to the
Nx symbol for the cooking time.
The
Î rotary symbol above the two dots indicates that the
cooking time can be set using the rotary selector
2. Set the cooking time using the rotary selector.
3. Press the
0 button repeatedly until the Î rotary symbol
disappears from the clock display.
The setting is adopted.
4. If the operation has not yet started, press the
† button.
You will see the cooking time counting down on the clock
display.
The cooking time has elapsed
A signal sounds. The oven stops heating.
‹:‹‹ is shown on
the clock display. You can cancel the audible signal earlier by
pressing the
0 button.
Cancelling the cooking time
Use the
0 button to select the Nx cooking time. Use the
rotary selector to reset the cooking time to
‹:‹‹. Press the 0
button repeatedly until the
Î rotary symbol disappears from
the clock display.
Changing the cooking time
Use the
0 button to select the Nx cooking time. Change the
cooking time using the rotary selector. Press the
0 button
repeatedly until the
Î rotary symbol disappears from the
clock display. The modified cooking time can be seen counting
down.
Calling up the clock, cooking time and end time
You can call up all the functions with the
0 clock button.
Setting a later end time
A later end time can be set for
■ all types of heating
■ a variety of programmes
■ and for self-cleaning
Example: you put the dish in the cooking compartment at 9.30.
It takes 45 minutes to cook and will be ready at 10.15, but you
would like it to be ready at 12.45 instead.
Change the end time from 10.15 to 12.45. The oven goes into
standby. Cooking starts at 12.00 and finishes at 12.45.
This function is also available for self-cleaning. You can shift the
time of the cleaning operation so it is carried out at night, which
means that the oven is available at all times during the day.
Please remember that easily spoiled foods must not be allowed
to remain in the cooking compartment for too long.
Setting a later end time
Prerequisite: a cooking time must be set. Operation must not
have started.
1. Use the
0 button to select the Ny end time.
The end time appears. This is the time at which the meal will
be ready
2. Using the rotary selector, set a later end time.
3. Press the
0 button repeatedly until the Î rotary symbol
disappears from the clock display.
4. Press the
† button.
The oven goes into standby. The
† button lights up. The end
time that has been set is shown on the clock display. As soon
as operation starts, you will see the cooking time counting
down.
The cooking time has elapsed
A signal sounds. The oven stops heating.
‹:‹‹ is shown on the
clock display. You can stop the audible signal by pressing
the
0 button.
Correcting the end time
This is only possible as long as the oven is in standby. Use
the
0 button to select the Ny end time. Adjust the end time
using the rotary selector. Press the
0 button repeatedly until
the
Î rotary symbol disappears from the clock display. The
new end time is applied.