15
Schutzanode überprüfen Checking the protective anode
Проверка защитного анода
Zum Überprüfen muss die Schutzanode
ausgebaut werden.
Sie befindet sich neben dem Warmwasserauslauf,
abgedeckt durch die Wärmedämmung (erkennbar
durch eine deutliche Erhöhung), siehe Seite 13.
■ Schutzhülle mit dem Reißverschluss öffnen.
Wärmedämmung mit einem Messer
ausschneiden.
■ Schutzanode ausschrauben und prüfen.
Ist die Schutzanode verbraucht, muss sie durch
eine neue ersetzt werden.
Ist der Einbau einer Stabanode aus Platzgründen
nicht möglich, installieren Sie eine Ketten-Schutz-
anode.
Sie muss guten metallisch leitenden Kontakt mit
dem Speicher haben. Anodenverschraubung mit
herausgeschnittenem Wärmedämm-Material
oder einer entsprechenden Wärmedämmung
abdecken.
■ Schutzhülle verschließen.
Sicherheitsventil
■ Das Sicherheitsventil anlüften, bis der volle
Wasserstrahl ausläuft.
■ Nach der Kontrolle Sicherheitsventil schließen.
Sicherheitseinrichtung
Temperaturregler und Sicherheits-Temperatur-
begrenzer sind zusammen im Heizflansch
eingebaut. Schaltet der Sicherheits-Temperatur-
begrenzer bei einer Störung das Gerät ab, so
muss grundsätzlich die komplette Einheit
ausgetauscht werden. Die Fehlerursache muss
von einem Fachmann beseitigt werden.
Der Heizflansch ist über den Korrosionsschutz-
Widerstand mit dem Behälter verbunden. Der
Korrosionsschutz-Widerstand dient als
Potenzialabgleich und verhindert Stromaustritts-
Korrosion an den Heizkörpern. Der Widerstand
darf bei Servicearbeiten nicht beschädigt oder
entfernt werden (Einbaulage siehe Abbildung).
The protective anode must be removed prior to
checking.
It is situated next to the hot-water outlet nozzle
and is covered by the thermal insulation
(recognizable by a protrusion); see page 13.
■ Unzip the protective jacket. Cut out the
thermal insulation with a knife.
■ Screw out the protective anode and check.
If the protective anode is used up, it must be
replaced with a new one.
If there is insufficient space to install a pole
anode, install a chain anode.
The protective anode must have a good metallic
conduction with the water storage tank. Cover
the screwed connection of the anode with the
piece of thermal insulation material which was
previously cut out.
■ Zip up the protective jacket.
Safety valve
■ Vent the safety valve until the full water jet is
flowing out.
■ Close the safety valve after carrying out the
check.
Safety equipment
The thermostat and thermal cut-out are located
together in the heating flange. If the thermal cut-
out disconnects the appliance due to a mal-
function, the whole unit must always be
replaced. The cause of the malfunction must be
eliminated by an engineer.
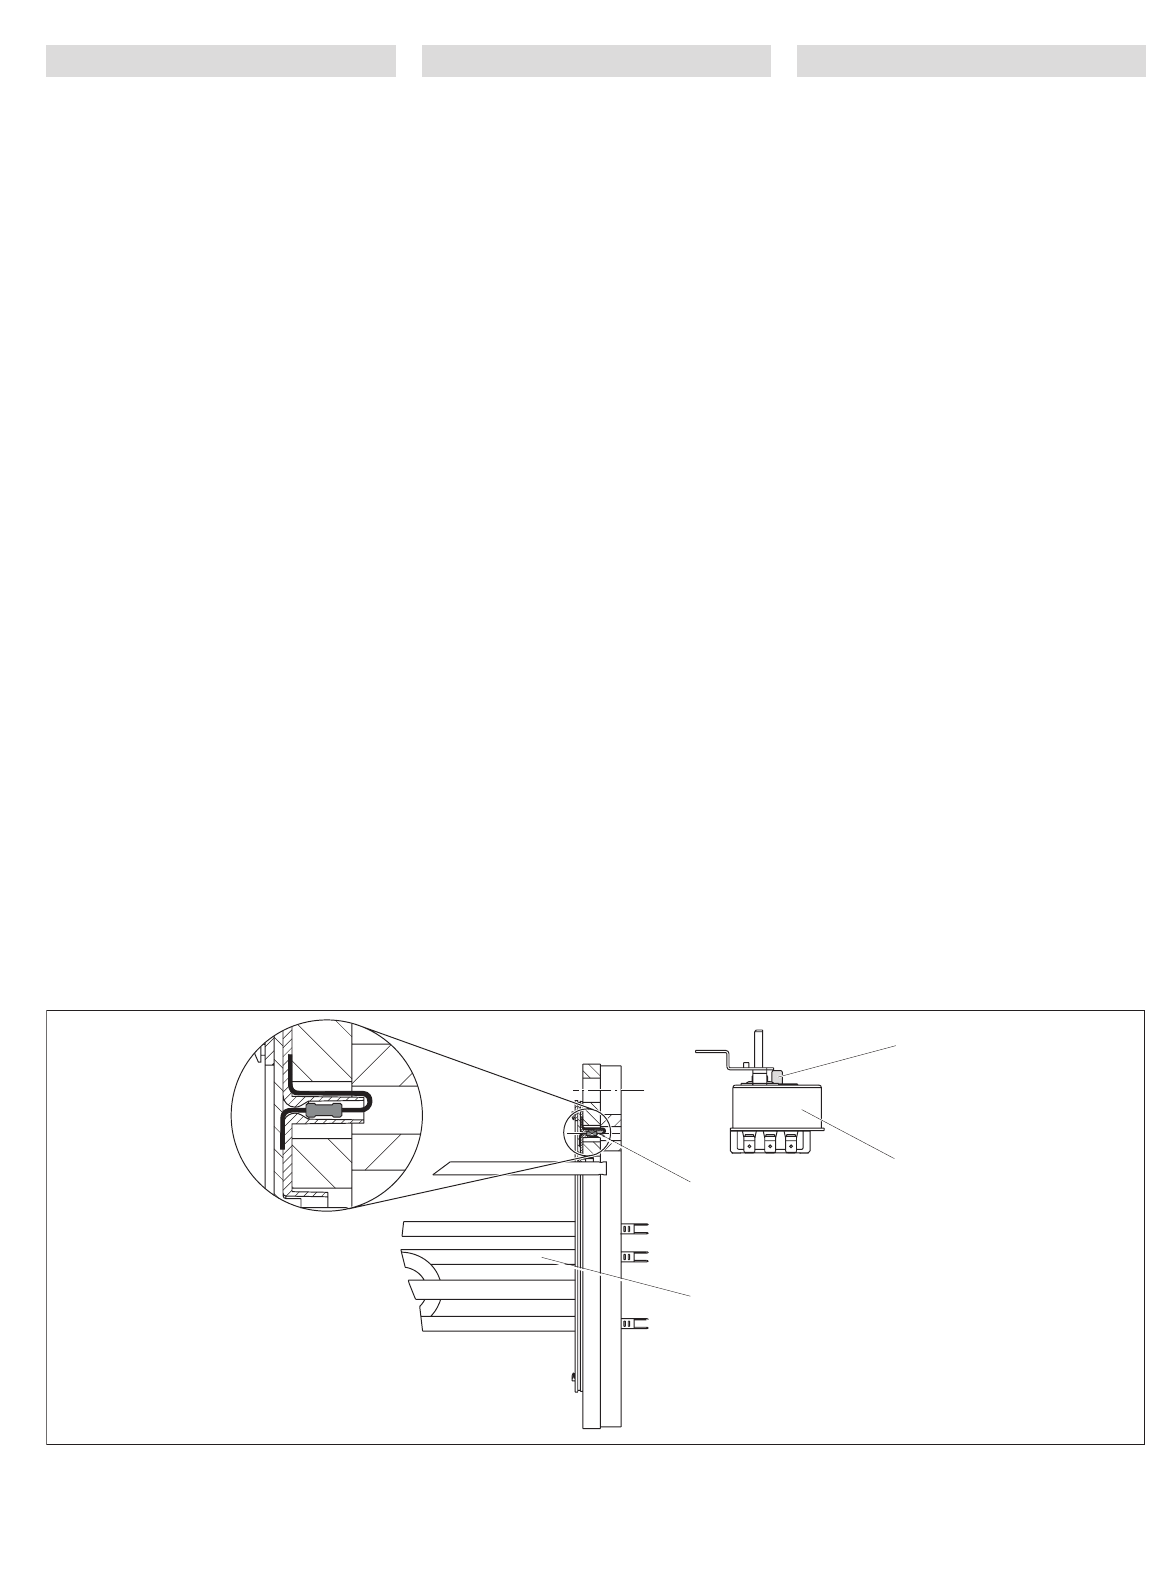
The heating flange is connected with the tank via
the corrosion protection anode resistor. The
corrosion protection anode resistor serves to
equalise electrical potential differences and
prevents current-related corrosion to the heating
elements. The anode resistor is not to be
damaged or removed during servicing (for
mounting position, refer to figure).
1 Sicherheits-Temperaturbegrenzer
2 Korrosionsschutz-Widerstand
3 Heizflansch
4 Rückstelltaste
1 Thermal cut-out
2 Corrosion protection anode resistor
3 Heating flange
4 Reset button
1 предохранительный ограничитель
температуры
2 Антикоррозийное сопротивление
3 Нагревательный фланец
4
Клавиша сброса
Для проверки защитный анод необходимо
демонтировать.
Он находится рядом с изливом горячей воды,
покрыт теплоизоляцией (заметно из-за
отчетливого повышения), см. страницу 13.
■ открыть молнию защитного кожуха.
Вырезать ножом теплоизоляцию.
■ вывинтить и проверить защитный анод.
Если защитный анод изношен, он должен
заменяться новым.
Если монтаж стержневого анода не
возможен по причине его расположения,
установите цепной защитный анод.
Он должен иметь хороший металлически
ведущий контакт с накопительным
водонагревателем. Накрыть винтовые
соединения анода вырезанным
теплоизоляционным материалом или
соответствующей теплоизоляцией.
■ закрыть защитный кожух.
Предохранительный клапан
■ Предохранительный клапан должен
находиться в открытом положении до тех
пор, пока не стечёт полная струя воды.
■ После контроля закрыть
предохранительный клапан.
Предохранительное устройство
Регулятор температуры и предохранительный
ограничитель температуры установлены
вместе в нагревательном фланце. Если
предохранительный ограничитель
температуры при неполадке отключает
устройство, то принципиально необходимо
заменить весь блок. Причина неполадки
должна устраняться специалистом.
Нагревательный фланец связан через
антикоррозийное сопротивление с емкостью.
Антикоррозийное сопротивление служит как
потенциальная регулировка и предотвращает
коррозию электрического выхода в
нагревателях. Сопротивление не должно
быть повреждено или удалено при сервисным
работах (монтажное положение, см. рисунок).