817470
269
Zoom out
Zoom in
Previous page
1/313
Next page
267Selbsthilfe
stabile Unterlage. Bei glattem Untergrund, wie z.B. Fliesenboden, sollten
Sie eine nicht rutschende Unterlage (z.B. eine Gummimatte) verwenden.
ACHTUNG
Ergreifen Sie alle erforderlichen Maßnahmen, damit der Wagenheber
nicht abrutschen kann. Andernfalls besteht Unfallgefahr!
Wenn Sie den Wagenheber nicht an den vorgesehenen Stellen anset-
zen, kann dies zu Schäden am Fahrzeug führen. Außerdem kann der Wa-
genheber bei nicht ausreichendem Halt am Fahrzeug abrutschen – Verlet-
zungsgefahr!
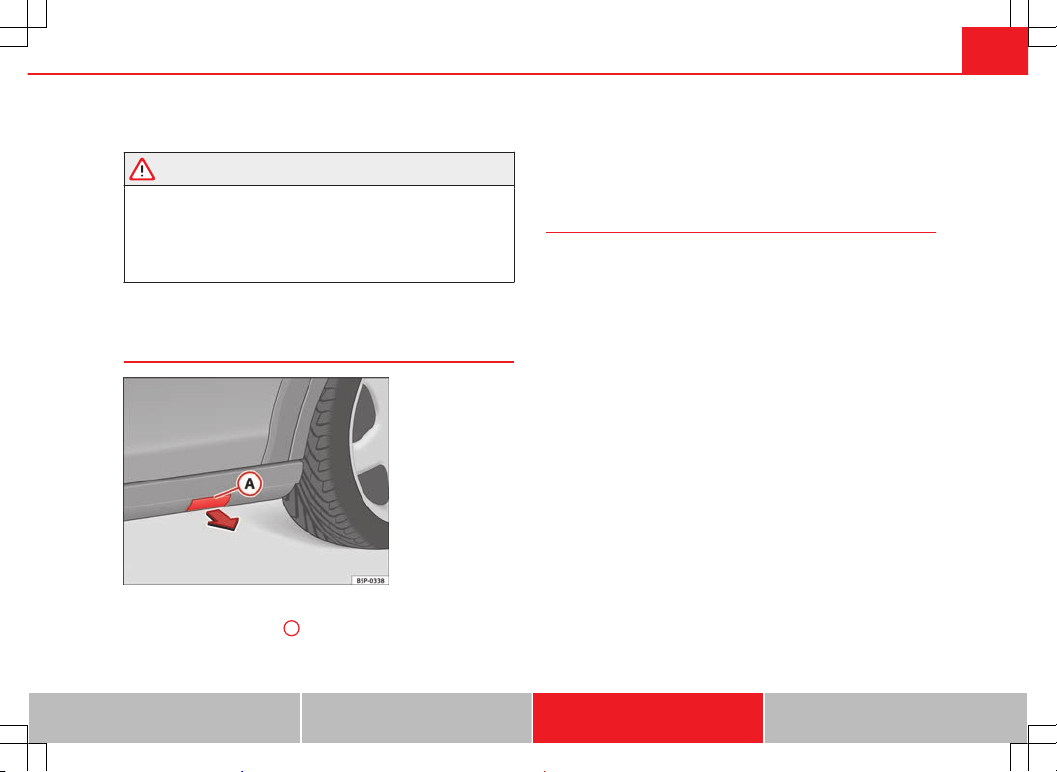
Ansatzpunkte für Wagenheber bei Fahrzeugen mit
Trittleiste*
Abb. 173 Kunststoff-
Trittleiste mit Deckel zur
Aufnahme des Wagenhe-
bers
Fahrzeuge mit Kunststoff-Trittleiste, mit Deckel*
Nehmen Sie den Deckel A ab, damit die Aufnahmepunkte für
den Wagenheber des Fahrzeugs frei sind ⇒ Abb. 173.
Dazu ziehen Sie den Deckel in Pfeilrichtung ab ⇒ Abb. 173.
Der Deckel bleibt nach dem Abziehen an einem Bügel hängen,
damit der nicht verloren geht.
Das Rad abnehmen und anbringen
Zum Ab- bzw. Anbauen des Rades sind die folgenden Schrit-
te durchzuführen.
Nachdem Sie die Radschrauben gelockert und das Fahrzeug mit
dem Wagenheber angehoben haben, tauschen Sie das Rad wie
folgt aus:
Rad abnehmen
Drehen Sie die Radschrauben mit dem Radschraubenschlüssel
heraus und legen Sie sie auf einen sauberen Untergrund.
Rad anbauen
Schrauben Sie die Radschrauben ein und ziehen Sie sie mit
dem Radschraubenschlüssel leicht fest.
Die Radschrauben müssen sauber und leichtgängig sein. Kontrollieren Sie
die Auflageflächen von Rad und Nabe. Verunreinigungen auf diesen Flächen
sind vor der Radmontage zu entfernen.
Bei der Montage von laufrichtungsgebundenen Reifen beachten Sie bitte
die Laufrichtung.
Sicher ist sicher Hinweise zur Bedienung Rat und Tat Technische Daten
269


Need help? Post your question in this forum.

Forumrules


Report abuse

Libble takes abuse of its services very seriously. We're committed to dealing with such abuse according to the laws in your country of residence. When you submit a report, we'll investigate it and take the appropriate action. We'll get back to you only if we require additional details or have more information to share.

Product:

For example, Anti-Semitic content, racist content, or material that could result in a violent physical act.

For example, a credit card number, a personal identification number, or an unlisted home address. Note that email addresses and full names are not considered private information.

Forumrules

To achieve meaningful questions, we apply the following rules:

Register

Register getting emails for Seat Altea Freetrack 2012 at:


You will receive an email to register for one or both of the options.


Get your user manual by e-mail

Enter your email address to receive the manual of Seat Altea Freetrack 2012 in the language / languages: German as an attachment in your email.

The manual is 4.99 mb in size.


You will receive the manual in your email within minutes. If you have not received an email, then probably have entered the wrong email address or your mailbox is too full. In addition, it may be that your ISP may have a maximum size for emails to receive.

The manual is sent by email. Check your email

If you have not received an email with the manual within fifteen minutes, it may be that you have a entered a wrong email address or that your ISP has set a maximum size to receive email that is smaller than the size of the manual.

The email address you have provided is not correct.

Please check the email address and correct it.

Your question is posted on this page

Would you like to receive an email when new answers and questions are posted? Please enter your email address.


Info