MOUNTAIN BIKE AND MOUNTAIN BIKE-PEDELEC | ORIGINAL OPERATING INSTRUCTIONS 2017ORIGINAL OPERATING INSTRUCTIONS 2017 | MOUNTAIN BIKE AND MOUNTAIN BIKE-PEDELEC
| 36
bcaefd
CAUTION!
A
If your SCOTT bike is equipped with quick-releases, be sure to lock the
frame to an immovable object together with the wheels when you leave it
outside. Anti-theft protection!
NOTE!
I
To be on the safe side you can replace the quick-releases by special locks.
They can only be opened and closed with a special, coded key or an Allen
key. If you are in doubt or if you have any questions, contact your SCOTT dealer.
DANGER!
g
After wheel mounting test the brakes in stationary. You should reach the
pressure point of the brake before the brake lever reaches the handlebars.
In the case of hydraulic brakes pump them, if necessary, until you reach a pre-
cise pressure point.
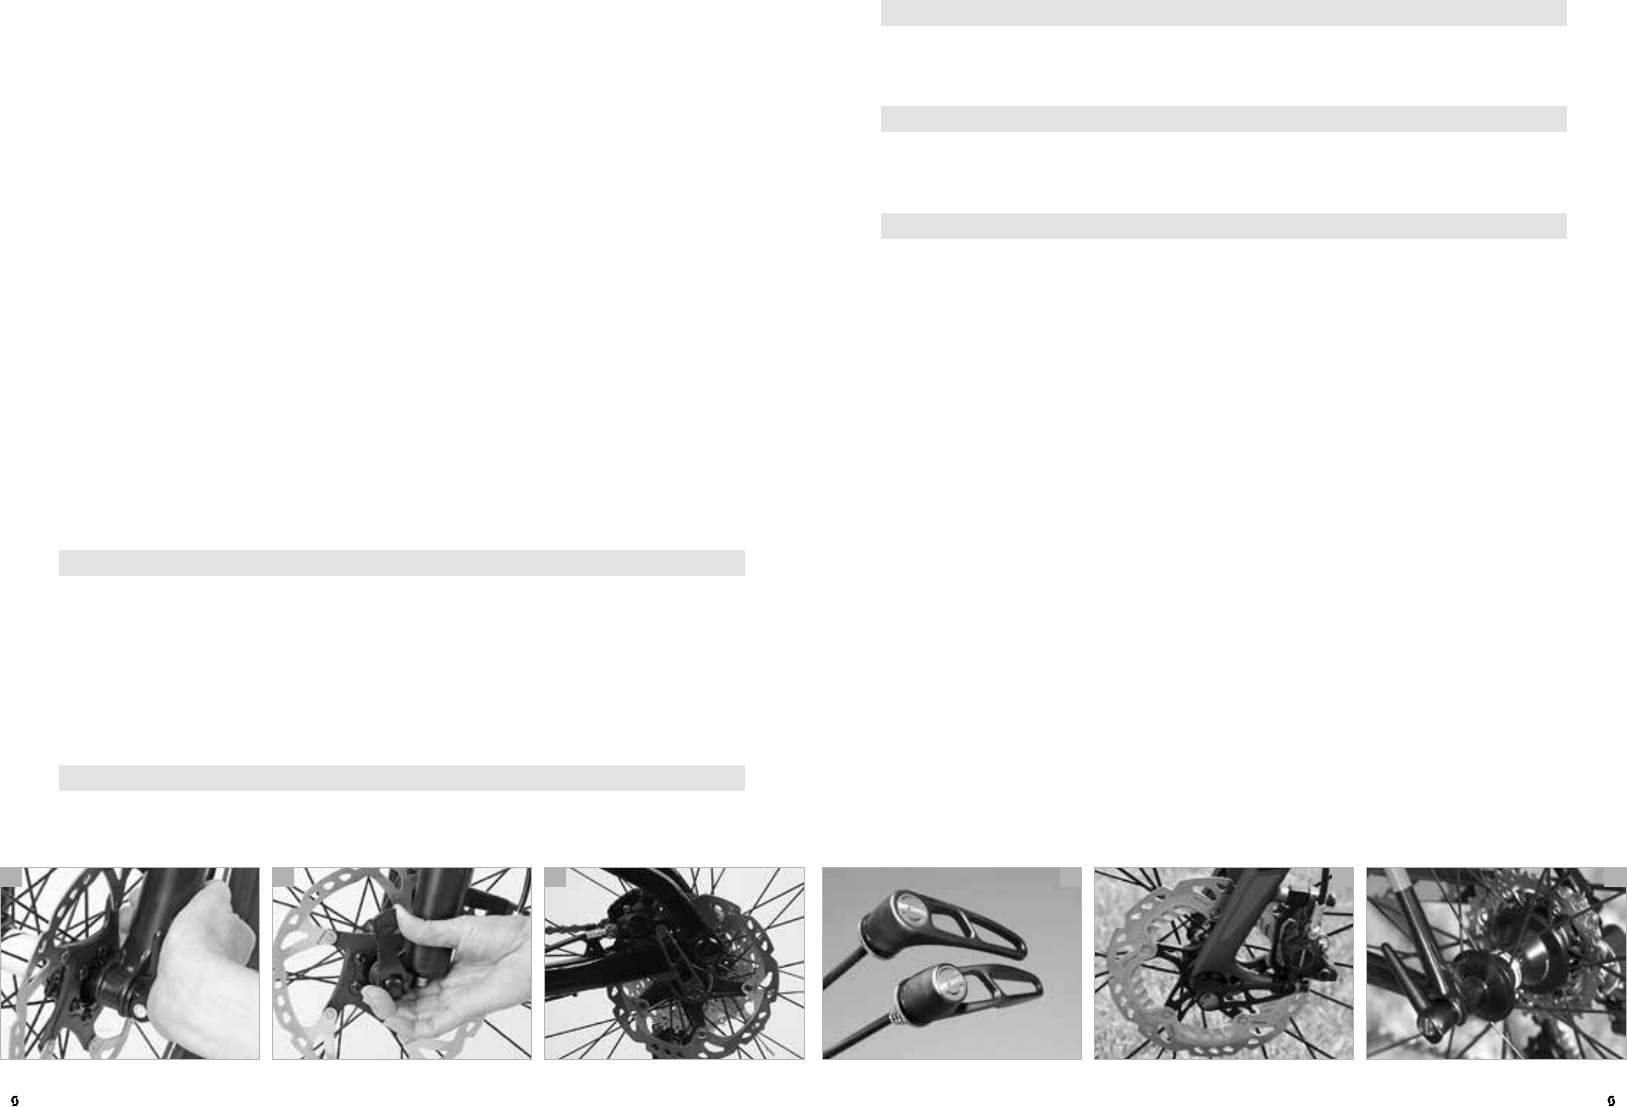
DT Swiss RWS quick-release system
The RWS system from DT Swiss (d-f) is a special type of quick-release for front
and rear wheels. The RWS system is compatible with all standard drop-outs.
Make sure during the assembly that the axles, the hubs, the drop-outs of the
fork and the rear frame are clean. Clean the components with an absorbent
cloth, if necessary, by using water and a little detergent.
In case you do not succeed in adjusting and fixing the wheel, as described, con-
tact your SCOTT dealer.
Wheel mounting
Put the wheel into the fork or the rear frame and mount the rotor simultaneous-
ly, if necessary, in the brake calliper. Make sure that in the area of the rear wheel
the chain runs over the sprockets and over both pulleys of the rear derailleur.
Bring the front or the rear wheel into the correct position between the drop-
outs and the fork or rear frame and slide the RWS quick-release axle from the
left side through the drop-outs and the hub. Mount the lock nut on the right
side.
When continuing to close the lever the resistance you feel should increase sig-
nificantly and towards the end even more strength is required to close the lever.
Use the ball of your thumb while your fingers pull on an immovable part, such
as the fork (a) or a rear stay, but not on a brake disc or spoke, to push it in all the
way.
In its end position, the lever should be at a right angle to the quick-release axle,
i.e. it should not stand out. The lever should lie close to the frame or the fork so
that it cannot be opened accidentally. Make sure, however, that the lever is easy
to handle for actual quick use.
To check whether the lever is securely locked apply pressure to the end of
the hand lever and try to turn it while it is closed (b). If you can turn the lever
around, open it and increase the preload. Screw the tightening nut on the op-
posite side clockwise by half a turn. Close the quick-release lever and check it
again for tightness.
Finally lift the bike a few centimetres, so that the wheel no longer touches the
ground and hit the tyre from above. If it is properly fastened, the wheel will
remain firmly fixed in the drop-outs of the frame or fork without producing any
rattling.
If your seat post is equipped with a quick-release mechanism, check whether
the saddle is firmly fixed by trying to twist it relative to the frame.
DANGER!
G
Make sure the levers of both wheel quick-releases are always on the side
opposite to the chain (c). This will help you to avoid mounting the front
wheel accidentally the wrong way round. In the case of SCOTT bikes with disc
brakes and quick-releases having a 5-mm-axle, it may be reasonable to mount
both quick-releases with the lever on the side of the chain drive. This helps you
not to come into contact with the hot brake disc and prevents you from having
your fingers burnt. If you are in doubt or if you have any questions, contact your
SCOTT dealer.
DANGER!
G
Never ride your SCOTT bike without having checked first, whether the
wheels are securely fastened. With an insufficiently closed quick-release
the wheel can come loose, thus creating a serious risk of accident!
Libble takes abuse of its services very seriously. We're committed to dealing with such abuse according to the laws in your country of residence. When you submit a report, we'll investigate it and take the appropriate action. We'll get back to you only if we require additional details or have more information to share.
Product:
Forumrules
To achieve meaningful questions, we apply the following rules:
First, read the manual;
Check if your question has been asked previously;
Try to ask your question as clearly as possible;
Did you already try to solve the problem? Please mention this;
Is your problem solved by a visitor then let him/her know in this forum;
To give a response to a question or answer, do not use this form but click on the button 'reply to this question';
Your question will be posted here and emailed to our subscribers. Therefore, avoid filling in personal details.
Register
Register getting emails for Scott MTB - 2016 at:
new questions and answers
new manuals
You will receive an email to register for one or both of the options.
Get your user manual by e-mail
Enter your email address to receive the manual of Scott MTB - 2016 in the language / languages: English as an attachment in your email.
The manual is 4,7 mb in size.
You will receive the manual in your email within minutes. If you have not received an email, then probably have entered the wrong email address or your mailbox is too full. In addition, it may be that your ISP may have a maximum size for emails to receive.
If you have not received an email with the manual within fifteen minutes, it may be that you have a entered a wrong email address or that your ISP has set a maximum size to receive email that is smaller than the size of the manual.
The email address you have provided is not correct.
Please check the email address and correct it.
Your question is posted on this page
Would you like to receive an email when new answers and questions are posted? Please enter your email address.