569928
17
Zoom out
Zoom in
Previous page
1/56
Next page
Installation
Anschluss von einem Computer
ONON
COMPUTER IN 1
DVI - I
MONITOR OUT
S-VIDEO
COMPUTER IN 2 /
COMPONENT IN /
COMPUTER /
COMPONENT
AUDIO IN
AUDIO IN
R VIDEOL
USB
SERVICE PORT
RESET
MCI
(MONO)
(VARIABLE)
AUDIO OUT
ON
1
DIP
ON
OFF
2 3 4 5 6
OFF
ON
ON
OFF OFF OFF
OFF OFF OFF
OFF OFF OFF
34 56
OFF OFFON ON
ON ON
ON
ON
OFF
OFF
12
ON ON
13”-Bildschirm (640 x 480)
16”-Bildschirm (832 x 624)
19”-Bildschirm (1024 x 768)
21”-Bildschirm (1152 x 870)
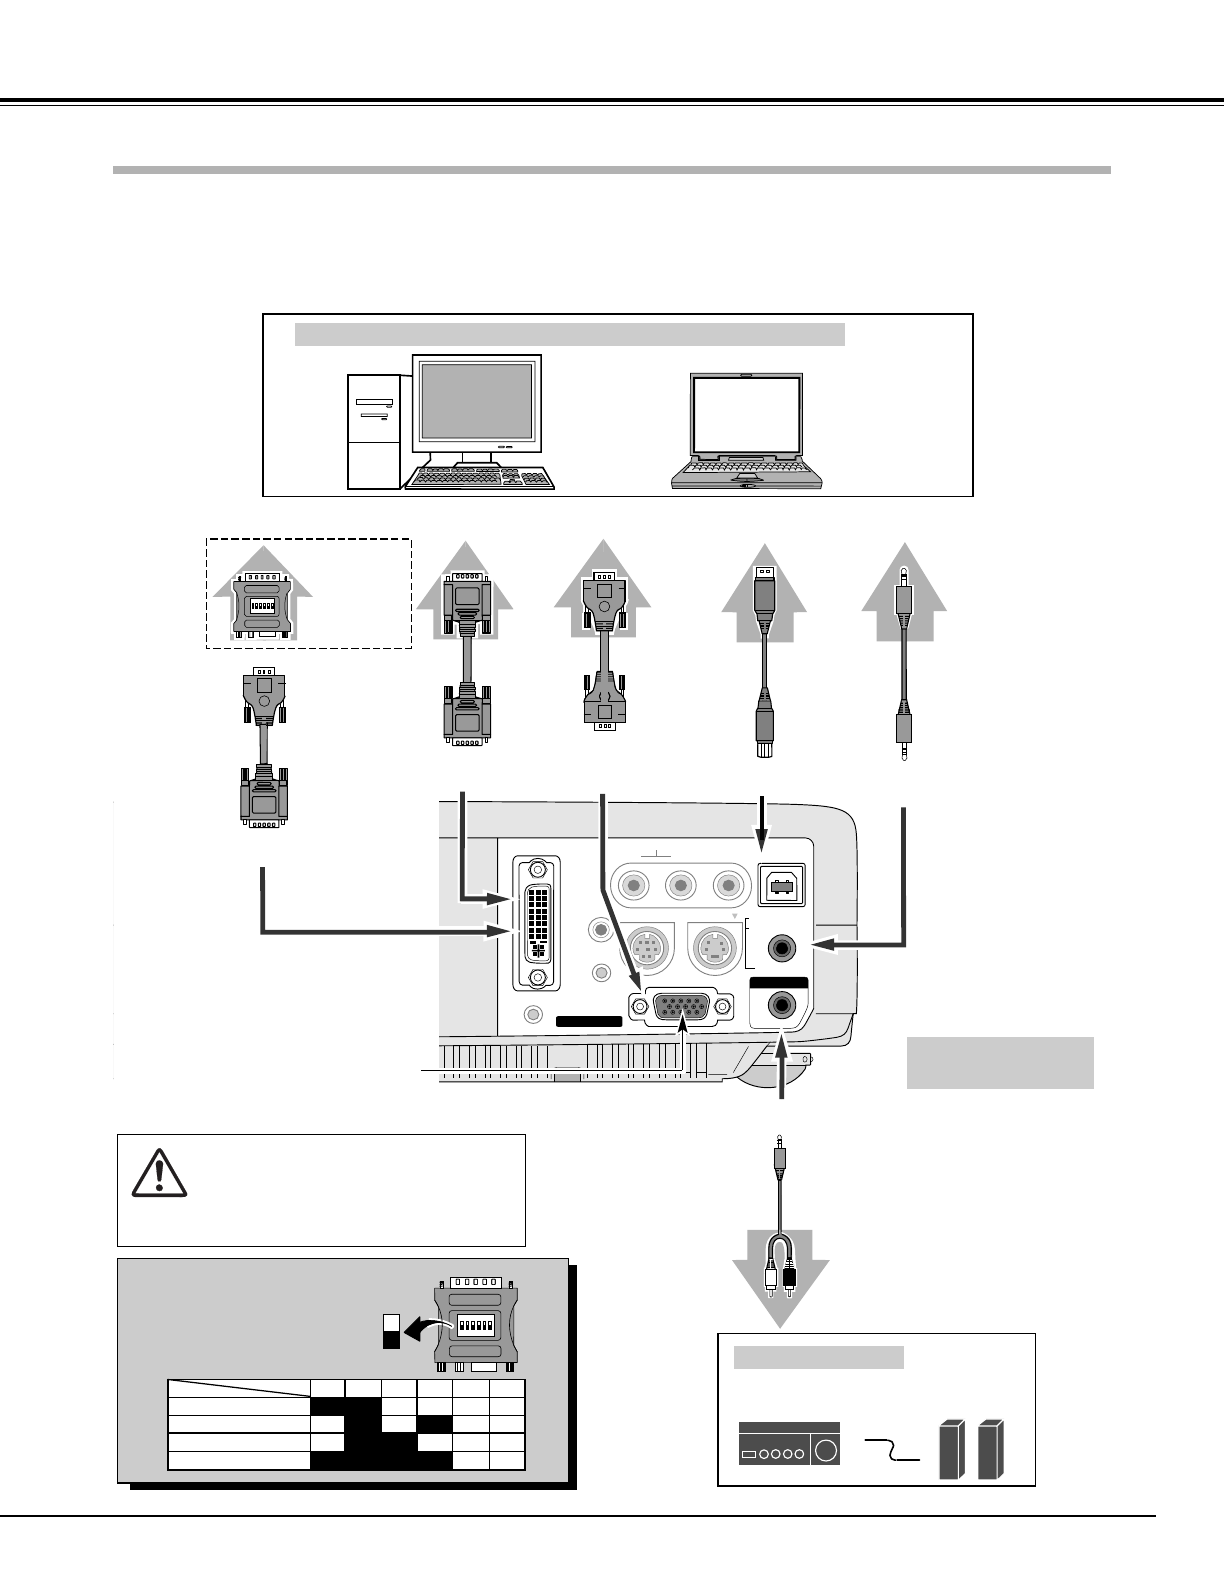
IBM-kompatible oder Macintosh Computer (VGA/SVGA/XGA/SXGA)
DVI-VGA-Kabel
Monitorausgang
Desktop Laptop
Audiolautsprecher
(stereo)
Verstärker
Audiokabel
(stereo)
Audioausgang
Audioeingang
AUDIO OUT
COMPUTER/COMPONENT
AUDIO IN
Anschlußkabel (= Diese Teile werden nicht mit dem Projektor mitgeliefert.)
Audiokabel
(stereo)
HINWEIS :
Für das Anschließen von Kabeln müssen
die Netzkabel des Projektors und der
externen Geräte aus den Steckdosen
gezogen werden.
USB-Anschlusß
MAC-Adapter
Stellen Sie die
Schalter wie in der
nachstehenden
Tabelle gezeigt ein.
• VGA-Kabel (HDB 15-polig)
• DVI-VGA-Kabel (HDB 15-polig)
• DVI-Digitalkabel (für Single Link T.M.D.S.)
• USB-Kabel
• MAC-Adapter (für den Anschluß eines Macintosh-Computers)
• Audiokabel (Ministecker (stereo) x 2)
externe Audiogeräte
Anschlußbuchsen
des Projektors
VGA-
Kabel
Monitorausgang
oder
Monitoreingang
USB
COMPUTER IN 2 /
COMPONENT IN/
MONITOR OUT
Stellen Sie die Schalter entsprechend
der zu verwendenden Bildauflösung
wie in der nachstehenden Tabelle
gezeigt ein, bevor Sie den Projektor
und den Computer einschalten.
MAC-Adapter (nicht mitgeliefert)
USB-
Kabel
COMPUTER IN 1 DVI-I
DVI-Kabel
Monitorausgang
COMPUTER IN 1 DVI-I
HINWEIS
Diese Buchse ist umschaltbar. Stellen Sie
vor der Verwendung entsprechend dem
Verwendungszweck entweder
Computereingang oder Monitorausgang ein.
(Seite 39)
17
17


Need help? Post your question in this forum.

Forumrules


Report abuse

Libble takes abuse of its services very seriously. We're committed to dealing with such abuse according to the laws in your country of residence. When you submit a report, we'll investigate it and take the appropriate action. We'll get back to you only if we require additional details or have more information to share.

Product:

For example, Anti-Semitic content, racist content, or material that could result in a violent physical act.

For example, a credit card number, a personal identification number, or an unlisted home address. Note that email addresses and full names are not considered private information.

Forumrules

To achieve meaningful questions, we apply the following rules:

Register

Register getting emails for Sanyo PLC SL20 at:


You will receive an email to register for one or both of the options.


Get your user manual by e-mail

Enter your email address to receive the manual of Sanyo PLC SL20 in the language / languages: German as an attachment in your email.

The manual is 1,53 mb in size.


You will receive the manual in your email within minutes. If you have not received an email, then probably have entered the wrong email address or your mailbox is too full. In addition, it may be that your ISP may have a maximum size for emails to receive.

Others manual(s) of Sanyo PLC SL20

Sanyo PLC SL20 User Manual - English - 56 pages


The manual is sent by email. Check your email

If you have not received an email with the manual within fifteen minutes, it may be that you have a entered a wrong email address or that your ISP has set a maximum size to receive email that is smaller than the size of the manual.

The email address you have provided is not correct.

Please check the email address and correct it.

Your question is posted on this page

Would you like to receive an email when new answers and questions are posted? Please enter your email address.


Info