668727
36
Zoom out
Zoom in
Previous page
1/60
Next page
16
- Démontage de la porte
du congélateur
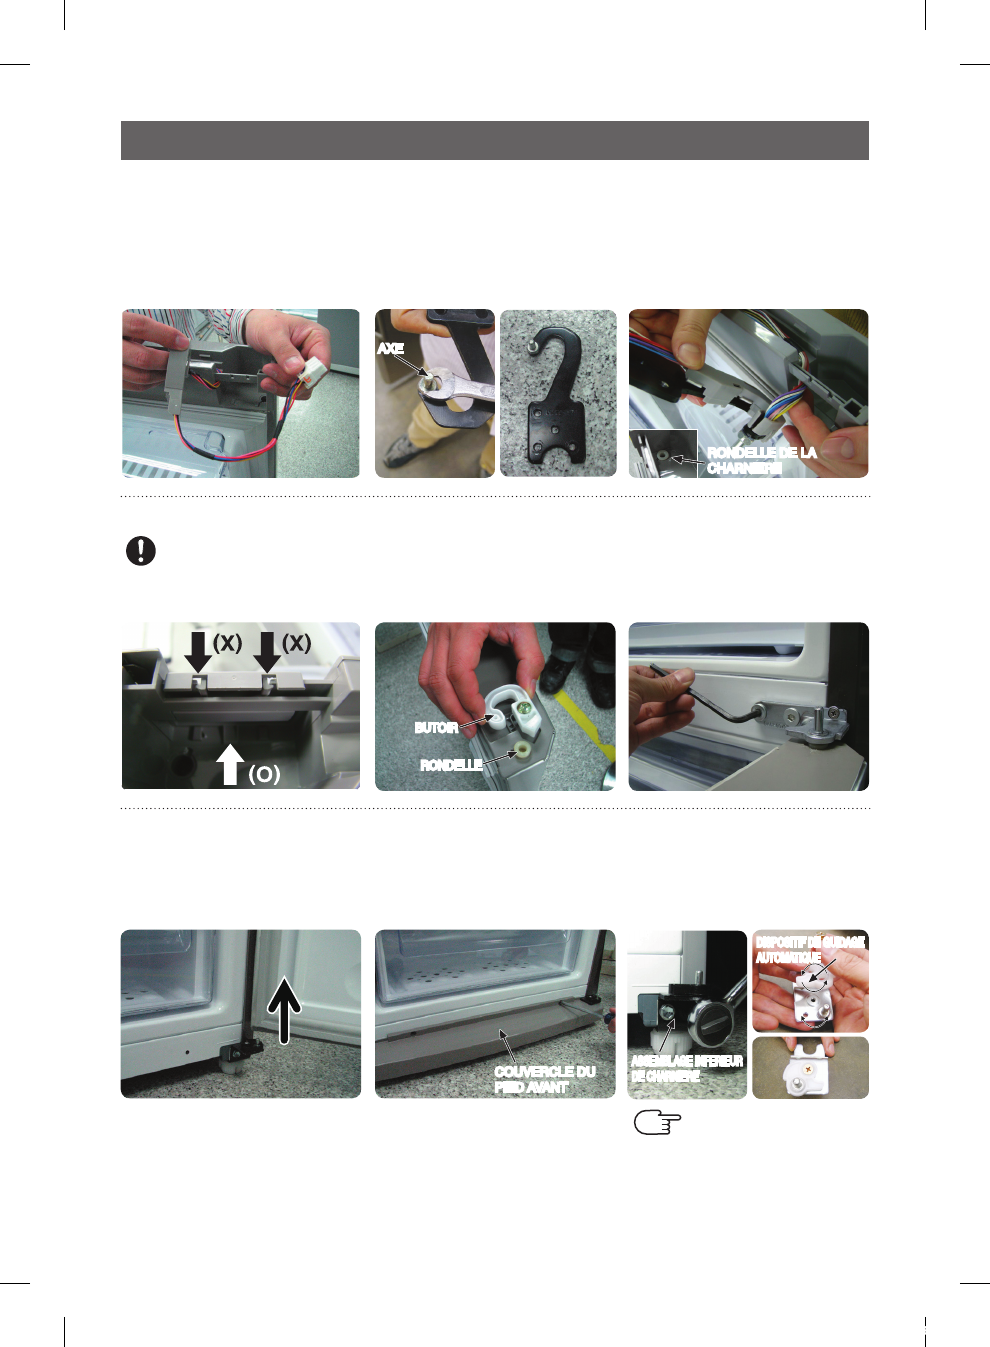
INVERSION DU SENS D’OUVERTURE DES PORTES
AXE
RONDELLE DE LA
CHARNIERE
8. A l’aide de la clé 11
mm, séparez l’AXE DE
LA CHARNIERE, faites
basculer la CHARNIERE
et fixez à nouveau l’AXE
DE LA CHARNIERE.
9-1. Après avoir joint la charnière (COVER
WIRE HINGE) gauche et l’ensemble
charnière supérieur (ASSY HINGE
UPP), basculez la position de la
charnière à œillet (GROMMET
HINGE) et le CAP SPACE DOOR.
10. Changez la position du
BUTOIR DE LA PORTE
et de la RONDELLE DE
LA CHARNIERE comme
indiqué.
11. Retirez les 2 boulons et la vis
pour démonter l’ASSEMBLAGE
CENTRAL DE CHARNIERE.
14. Démontez l’ASSEMBLAGE
INFERIEUR DE CHARNIERE comme
indiqué et retournez le DISPOSITIF
DE GUIDAGE AUTOMATIQUE,
changez la position de l’AXE.
12. Démontez la porte du
congélateur en la soulevant.
Veillez à ne pas laisser
tomber ni rayer la porte du
congélateur.
13. Démontez le COUVERCLE
DU PIED AVANT en
retirant les 2 vis.
ASSEMBLAGE INFERIEUR
DE CHARNIERE
DISPOSITIF DE GUIDAGE
AUTOMATIQUE
COUVERCLE DU
PIED AVANT
Lors de la fixation,
serrez la vis pour éviter
tout bruit imprévu.
BUTOIR
RONDELLE
7. Changez la direction du fil électrique
comme indiqué ci-dessous. Retirez
le CACHE-FILS DE LA CHARNIERE
GAUCHE de la partie inférieure du
CACHE DU COMPARTIMENT et
reliez-le au fil électrique.
9-2. Lors du démontage du CAP
SPACE, ne poussez pas
les deux tenons latéraux,
mais sur le tenons du
bas, comme illustré.
Note
DA99-01220E(1.4).indb 16 2010.6.21 1:21:49 PM
36


Need help? Post your question in this forum.

Forumrules


Report abuse

Libble takes abuse of its services very seriously. We're committed to dealing with such abuse according to the laws in your country of residence. When you submit a report, we'll investigate it and take the appropriate action. We'll get back to you only if we require additional details or have more information to share.

Product:

For example, Anti-Semitic content, racist content, or material that could result in a violent physical act.

For example, a credit card number, a personal identification number, or an unlisted home address. Note that email addresses and full names are not considered private information.

Forumrules

To achieve meaningful questions, we apply the following rules:

Register

Register getting emails for Samsung RL38 at:


You will receive an email to register for one or both of the options.


Get your user manual by e-mail

Enter your email address to receive the manual of Samsung RL38 in the language / languages: German, Dutch, French as an attachment in your email.

The manual is 8,54 mb in size.


You will receive the manual in your email within minutes. If you have not received an email, then probably have entered the wrong email address or your mailbox is too full. In addition, it may be that your ISP may have a maximum size for emails to receive.

The manual is sent by email. Check your email

If you have not received an email with the manual within fifteen minutes, it may be that you have a entered a wrong email address or that your ISP has set a maximum size to receive email that is smaller than the size of the manual.

The email address you have provided is not correct.

Please check the email address and correct it.

Your question is posted on this page

Would you like to receive an email when new answers and questions are posted? Please enter your email address.


Info