69272
16
Zoom out
Zoom in
Previous page
1/20
Next page
16
DE DRAAIRICHTING VAN DE DEUR WIJZIGINGEN
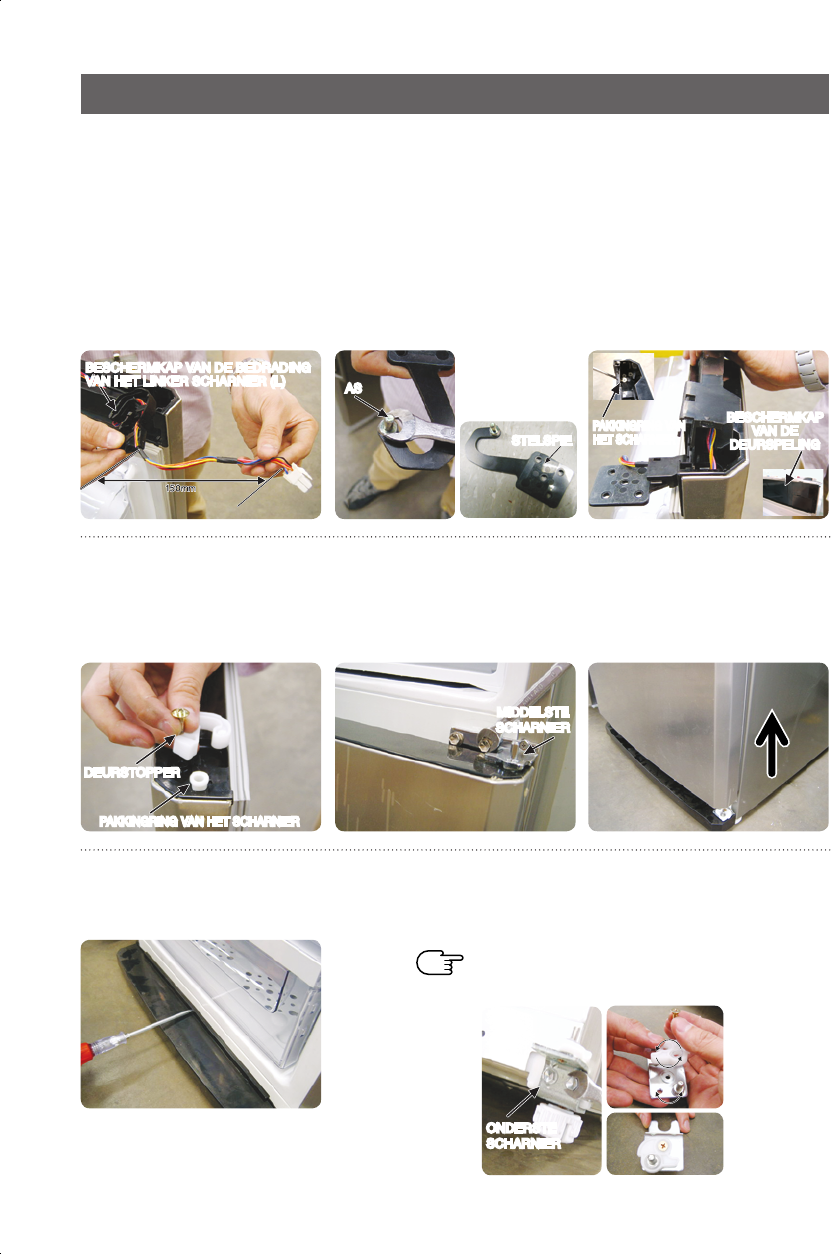
7. Verander de richting van de
elektriciteitsdraad zoals hierna
is afgebeeld. Verwijder de
BESCHERMKAP van de
BEDRADING van het linker
SCHARNIER (L) uit de
BESCHERMKAP van de
BEHUIZING, en sluit deze aan
op de elektriciteitsdraad. Zorg
ervoor dat de elektriciteitsdraad
langer is dan150 mm.
8. Plaats de AS ondersteboven
op de andere kant van het
BOVENSTE SCHARNIER.
Na de STELSPIE te hebben
losgemaakt, monteert u
hem opnieuw op de andere
kant van het BOVENSTE
SCHARNIER.
9. Na de BESCHERMKAP van de BEDRADING
van het linker SCHARNIER (L) opnieuw te
hebben gemonteerd op het BOVENSTE
SCHARNIER en de PAKKINGRING van het
SCHARNIER van positie te hebben gewijzigd
en de BESCHERMKAP van de DEURSPELING,
monteert u het BOVENSTE SCHARNIER
opnieuw en dekt u de BESCHERMKAP van
de BEDRADING in de DEUR af, zoals hierna
is afgebeeld. (De elektriciteitsdraad moet zich
in de BESCHERMKAP van de BEDRADING
in de DEUR bevinden.
- DEMONTAGE VAN DE DEUR VAN DE VRIEZER
BESCHERMKAP VAN DE BEDRADING
VAN HET LINKER SCHARNIER (L)
DEURSTOPPER
PAKKINGRING VAN HET SCHARNIER
AS
STELSPIE
PAKKINGRING VAN
HET SCHARNIER
BESCHERMKAP
VAN DE
DEURSPELING
MIDDELSTE
SCHARNIER
10. Draai de positie van de
DEURSTOPPER en de
PAKKINGRING van het
SCHARNIER om, zoals
hierna is afgebeeld.
11. Na de schroef en de bouten
losgeschroefd en verwijderd
te hebben, demonteert u het
MIDDELSTE SCHARNIER.
12. Verwijder de deur van de vriezer,
door deze omhoog te tillen. Zorg
ervoor dat u de deur van de
vriezer niet laat vallen of bekrast.
14.
Na de koelkast enigszins naar achteren te hebben gekanteld voor meer
werkcomfort, demonteert u het ONDERSTE SCHARNIER. Demonteer
het ONDERSTE SCHARNIER zoals hierna is afgebeeld, en keer de
AUTOGELEIDER ondersteboven, en draai de positie van de AS om.
ONDERSTE
SCHARNIER
Draai bij het koppelen de schroef goed aan zodat er
geen onverwacht lawaai geproduceerd zal worden.
Opmerking
13. Verwijder de BESCHERMKAP van
de STEUN aan de VOORKANT
door de schroeven te verwijderen.
DA99-01220E-NL-1 (CORE)-0.8.indd16 16 2008.5.21 8:34:28 PM
16


Need help? Post your question in this forum.

Forumrules
1

Forum

samsung-rl-38-hcsw

Reset search

  • Where can I obtain a digital display for Samsung rl38hcsw fridge?
    Kind regqards:Thorvald Jacobsen, Norway
    Submitted on 2-8-2020 at 11:32

    Reply Report abuse


Report abuse

Libble takes abuse of its services very seriously. We're committed to dealing with such abuse according to the laws in your country of residence. When you submit a report, we'll investigate it and take the appropriate action. We'll get back to you only if we require additional details or have more information to share.

Product:

For example, Anti-Semitic content, racist content, or material that could result in a violent physical act.

For example, a credit card number, a personal identification number, or an unlisted home address. Note that email addresses and full names are not considered private information.

Forumrules

To achieve meaningful questions, we apply the following rules:

Register

Register getting emails for Samsung RL 38 HCSW at:


You will receive an email to register for one or both of the options.


Get your user manual by e-mail

Enter your email address to receive the manual of Samsung RL 38 HCSW in the language / languages: Dutch as an attachment in your email.

The manual is 5,98 mb in size.


You will receive the manual in your email within minutes. If you have not received an email, then probably have entered the wrong email address or your mailbox is too full. In addition, it may be that your ISP may have a maximum size for emails to receive.

Others manual(s) of Samsung RL 38 HCSW

Samsung RL 38 HCSW User Manual - German, Dutch, French - 60 pages


The manual is sent by email. Check your email

If you have not received an email with the manual within fifteen minutes, it may be that you have a entered a wrong email address or that your ISP has set a maximum size to receive email that is smaller than the size of the manual.

The email address you have provided is not correct.

Please check the email address and correct it.

Your question is posted on this page

Would you like to receive an email when new answers and questions are posted? Please enter your email address.


Info