630018
78
Zoom out
Zoom in
Previous page
1/88
Next page
StudioDock 3i
StudioDock 4i
Copyright 2008, Samson Technologies Corp.
Printed May, 2008 v1.1
Samson Technologies Corp.
45 Gilpin Avenue
Hauppauge, New York 11788-8816
Phone: 1-800-3-SAMSON (1-800-372-6766)
Fax: 631-784-2201
www.samsontech.com
ENGLISH
Introduction. . . . . . . . . . . . . . . . . . . . . . . . . . 1
StudioDock 3i and 4i Features . . . . . . . . . . . . . . 2
Front View Layout . . . . . . . . . . . . . . . . . . . . . . 3
StudioDock 3i and 4i Layout . . . . . . . . . . . . . . . 3
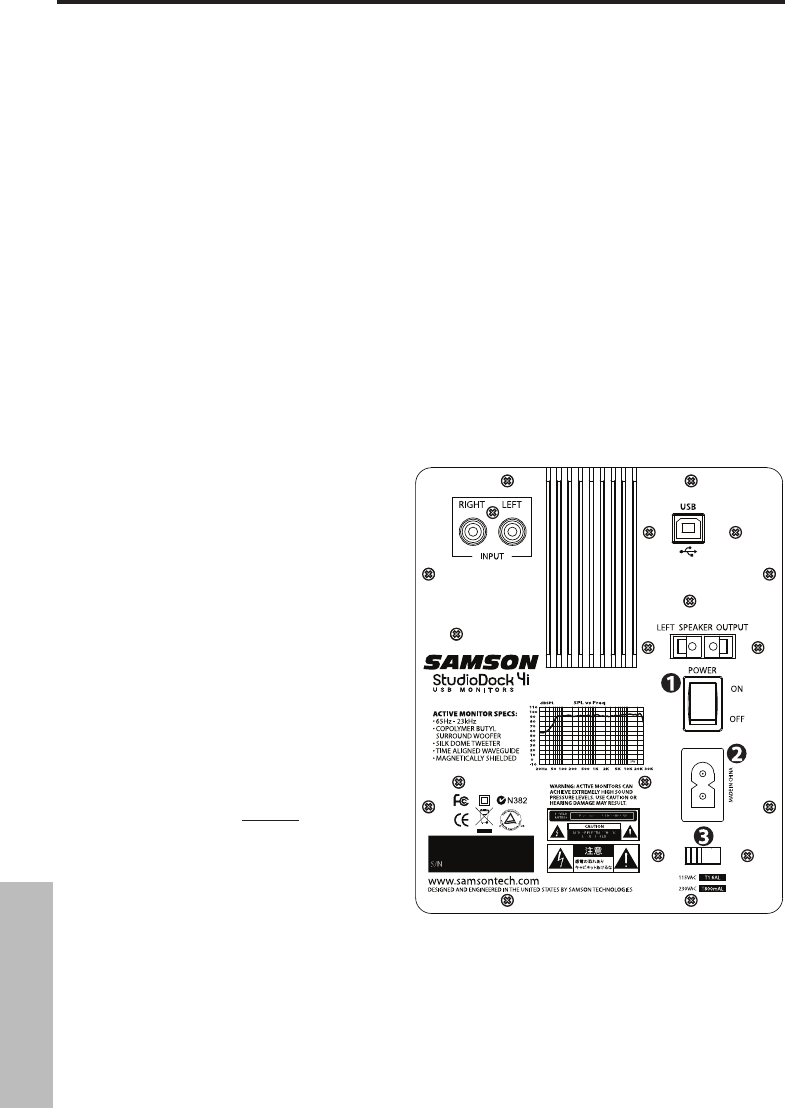
StudioDock 3i and 4i Rear Panel Layout . . . . . . . . 4
StudioDock 3i and 4i Quick Start. . . . . . . . . . . . . 5
Setting up the StudioDock 3i and 4i . . . . . . . . . . 6
Connecting the StudioDock 3i and 4i. . . . . . . . . . 8
Getting Started with MAC OS X . . . . . . . . . . . . . 9
Installing the StudioDock on Windows Vista . . . . .10
Installing the StudioDock on Windows XP. . . . . . .11
Operating the StudioDock 3i and 4i. . . . . . . . . . .12
StudioDock 3i and 4i Rear Control Panel . . . . . . . .12
Connecting to the Resolv120a Subwoofer. . . . . . .
14
StudioDock 3i and 4i Wiring Guide . . . . . . . . . . .15
Specifications. . . . . . . . . . . . . . . . . . . . . . . . .76
FRANÇAIS
Introduction. . . . . . . . . . . . . . . . . . . . . . . . . .16
StudioDock 3i et 4i - Caractéristiques. . . . . . . . . .17
Présentation des StudioDock 3i et 4i . . . . . . . . . .18
Face avant . . . . . . . . . . . . . . . . . . . . . . . . . . .18
Présentation des StudioDock 3i et 4i . . . . . . . . . .19
StudioDock 3i et 4i - Prise en main . . . . . . . . . . .20
Installation des StudioDock 3i et 4i . . . . . . . . . . .21
Connexion des moniteurs StudioDock 3i et 4i . . . .23
Prise en main avec MAC OS X . . . . . . . . . . . . . . .24
Installation des StudioDock sur Windows Vista. . . .25
Installation des StudioDock sur Windows XP . . . . .26
Utilisation des StudioDock 3i et 4i . . . . . . . . . . . .27
Face arrière des StudioDock 3i et 4i . . . . . . . . . . .27
Connexion au Subwoofer Resolv120a . . . . . . . . .29
StudioDock 3i et 4i - Guide de câblage . . . . . . . . .30
Caractéristiques techniques. . . . . . . . . . . . . . . .77
DEUTSCHE
Einleitung . . . . . . . . . . . . . . . . . . . . . . . . . . .31
Features der StudioDock 3i und 4i. . . . . . . . . . . .32
Vorderseite . . . . . . . . . . . . . . . . . . . . . . . . . .33
Aufbau der StudioDock 3i und 4i . . . . . . . . . . . .33
Rückseitiger Aufbau der StudioDock 3i und 4i . . . .34
StudioDock 3i und 4i Schnellstart . . . . . . . . . . . .35
StudioDock 3i und 4i einrichten . . . . . . . . . . . . .36
StudioDock 3i und 4i anschließen . . . . . . . . . . . .38
Erste Schritte mit MAC OS X. . . . . . . . . . . . . . . .39
StudioDock mit Windows Vista installieren . . . . . .40
StudioDock mit Windows XP installieren. . . . . . . .41
StudioDock 3i und 4i bedienen . . . . . . . . . . . . .42
Rückseitiges Bedienfeld des StudioDock 3i und 4i. .42
Resolv120a Subwoofer anschließen. . . . . . . . . . .44
StudioDock 3i und 4i Verdrahtungsanleitung. . . . .45
Technische Daten . . . . . . . . . . . . . . . . . . . . . .78
Table of Contents
ESPAÑOL
Introducción . . . . . . . . . . . . . . . . . . . . . . . . .46
Características del StudioDock 3i y 4i . . . . . . . . . .47
Distribución del StudioDock 3i y 4i . . . . . . . . . . .48
Panel frontal. . . . . . . . . . . . . . . . . . . . . . . . . .48
Distribución del StudioDock 3i y 4i . . . . . . . . . . .49
StudioDock 3i y 4i - Arranque rápido . . . . . . . . . .50
Configuración del StudioDock 3i y 4i . . . . . . . . . .51
Conexión del StudioDock 3i y 4i . . . . . . . . . . . . .53
Puesta en marcha con MAC OS X . . . . . . . . . . . .54
Instalación del StudioDock en Windows Vista . . . .55
Instalación del StudioDock en Windows Vista . . . .56
Manejo del StudioDock 3i y 4i . . . . . . . . . . . . . .57
Panel de control trasero del StudioDock 3i y 4i. . . .57
Conexión del subwoofer Resolv120a . . . . . . . . . .59
Guía de cableado del StudioDock 3i y 4i . . . . . . . .60
Especificaciones técnicas . . . . . . . . . . . . . . . . .79
ITALIANO
Introduzione . . . . . . . . . . . . . . . . . . . . . . . . .61
StudioDock 3i e 4i - Caratteristiche . . . . . . . . . . .62
I Componenti del Pannello Frontale. . . . . . . . . . .63
StudioDock 3i e 4i - Pannello Frontale . . . . . . . . .63
StudioDock 3i e 4i - Pannello Posteriore . . . . . . . .64
StudioDock 3i e 4i - Uso Immediato . . . . . . . . . . .65
La Configurazione degli StudioDock 3i e 4i . . . . . .66
Il Posizionamento degli StudioDock 3i e 4i . . . . . .66
La Configurazione degli StudioDock 3i e 4i . . . . . .67
I Collegamenti degli StudioDock 3i e 4i . . . . . . . .68
StudioDock - Installazione su Mac OS X . . . . . . . .69
StudioDock - Installazione su Windows Vista . . . . .70
StudioDock - Installazione su Windows XP . . . . . .71
L'Uso degli StudioDock 3i e 4i. . . . . . . . . . . . . . .72
Il Pannello di Controllo Posteriore . . . . . . . . . . . .72
L'Uso degli StudioDock 3i e 4i. . . . . . . . . . . . . . .73
Il Collegamento di un Subwoofer Resolv120a . . . .74
Guida al Cablaggio degli StudioDock 3i . . . . . . . .75
Specifiche . . . . . . . . . . . . . . . . . . . . . . . . . . .80
2
StudioDock 3i and 4i Features
The Samson StudioDock 3i and 4i studio monitor systems with integrated iPod dock provide
a smooth response that’s accurate, and at the same time pleasant to listen to. Here are some
of their main features:
Two-way, active studio reference monitor with ported tuned enclosure providing
extremely accurate monitoring for recording studio, post-production, video gaming
and multi-media applications.
Integrated iPod dock for direct music playback, charging and iTunes syncing.
Onboard high quality D-to-A (digital-to-analog) converters and USB interface for
digital audio playback.
For tight and controlled low frequency response, the StudioDock Series employ
custom designed, inverted cone, copolymer woofers with santoprene surrounds.
The StudioDock 3i features an 3-inch woofer and the StudioDock 4i features a 4-inch
woofer.
The StudioDock’s 25mm silk dome high frequency driver is set in a custom designed
wave guide producing a high frequency response that’s accurate and natural.
Convenient front panel, "pop-out" volume control allows you to easily set the level
and then lock it in place.
You can connect a second stereo input from a MP3 player, keyboard, sound card or
any other stereo line level signal to the StudioDock 3i and 4i’s front panel 3.5 mm
stereo Aux Input jack.
If you need to listen to your mix on headphones, simply plug in to the front panel 3.5
mm Headphones output jack. The speakers automatically turn off when you plug into
the Headphone output.
Stereo Class A/B internal power amplifier.
Passive crossovers utilizing a multi-pole design for linear response from bottom to
top.
Convenient RCA inputs accept standard -10 dBV line level input.
A/V shielded for multimedia applications providing clean operation near computer
monitors.
2 meter, 20-gauge speaker cable for Left-side Extension monitor included.
Solid MDF (Medium Density Fiberboard) construction, provides maximum SPL.
Precision tuned rear vented enclosure, attractively finished in black satin vinyl
covering.
Three-year extended warranty.
ENGLISH
72
Il Pannello di Controllo Posteriore degli StudioDock 3i e 4i
Il pannello di controllo posteriore degli StudioDock 3i e 4i è il punto dove si effettuano
i collegamenti per il monitor passivo di sinistra, i segnali in ingresso e l'alimentazione in
CA. I paragrafi che seguono descrivono appunto in dettaglio le connessioni del pan-
nello posteriore.
L'Alimentazione degli StudioDock 3i e 4i
Dato che gli StudioDock 3i e 4i sono monitor attivi dotati di amplificatore interno, è ne-
cessario collegare il monitor di sinistra all'alimentazione in CA. Accertatevi che l'inter-
ruttore “Power sia spento (“Off”) e collegate il cavo IEC di alimentazione in dotazione
alla presa in CA.
Possibili cause di ronzìo!
Nello stendere il percorso dei cavi, fate in modo che in cavi di alimentazione o eventuali
prolunghe in CA non scorrano in parallelo ai cavi di ingresso. Questo vi sarà d'aiuto nel
ridurre la presenza di ronzìo in CA. Se dovete incrociare una linea in CA con una linea
audio, fate in modo che l'incrocio sia a 90 gradi, per ottenere la quantità minima possi-
bile di ronzìo indotto.
1. InterruttorePower
- Serve per
accendere e spegnere l'elettroni-
ca attiva degli StudioDock 3i e 4i.
Quando lo si accende (“On”), si illu-
mina il LED blu del pannello fronta-
le, ad indicare che gli StudioDock 3i
e 4i sono attivi e pronti per l'uso.
2. Presa in CA
- È qui che va collegato
il cavo di alimentazione IEC in dota-
zione.
3. Selettore del Voltaggio
- È il com-
mutatore con cui si sceglie la ten-
sione operativa. NOTA: assicura-
tevi che sia regolato sulla tensione
corretta per la nazione in cui usate
gli StudioDock.
Gli Ingressi e le Uscite
Gli StudioDock 3i e 4i dispongono di una coppia di connettori in ingresso che ne per-
mette l'installazione immediata con molti apparecchi audio come consolle di registra-
zione, registratori a disco rigido, lettori CD e schede audio per computer, solo per citar-
ne alcuni. I paragrafi che seguono ne descrivono in dettaglio i connettori di ingresso e
di uscita. Trovate inoltre i diagrammi di cablaggio dettagliati a pagina 15.
L'Uso degli StudioDock 3i e 4i
ITALIANO
78


Need help? Post your question in this forum.

Forumrules


Report abuse

Libble takes abuse of its services very seriously. We're committed to dealing with such abuse according to the laws in your country of residence. When you submit a report, we'll investigate it and take the appropriate action. We'll get back to you only if we require additional details or have more information to share.

Product:

For example, Anti-Semitic content, racist content, or material that could result in a violent physical act.

For example, a credit card number, a personal identification number, or an unlisted home address. Note that email addresses and full names are not considered private information.

Forumrules

To achieve meaningful questions, we apply the following rules:

Register

Register getting emails for Samson StudioDock 3i at:


You will receive an email to register for one or both of the options.


Get your user manual by e-mail

Enter your email address to receive the manual of Samson StudioDock 3i in the language / languages: English, German, French, Italian, Spanish as an attachment in your email.

The manual is 8,27 mb in size.


You will receive the manual in your email within minutes. If you have not received an email, then probably have entered the wrong email address or your mailbox is too full. In addition, it may be that your ISP may have a maximum size for emails to receive.

The manual is sent by email. Check your email

If you have not received an email with the manual within fifteen minutes, it may be that you have a entered a wrong email address or that your ISP has set a maximum size to receive email that is smaller than the size of the manual.

The email address you have provided is not correct.

Please check the email address and correct it.

Your question is posted on this page

Would you like to receive an email when new answers and questions are posted? Please enter your email address.


Info