Paneel Resoluties15,6":1366 x768 / 19": 1440 x 900 /
22
":
1680 x 1050
STEREONICAM / A2
UitbreidingsfunctieIngebouwde DVD Video en Audio input connectie
DVD
Disc type
DVD VIDEO / MPEG4 / SVCD / VCD1.0, 1.1, 2.0 versie / CD-DA
8T10000844/72
LCD-TFT
MANUEL DE L’UTILISATEUR (FR)
A lire attentivement avant l’utilisation
LCD1521TNDVX
LCD1921TNDVX
LCD1922TNDVX
LCD2221TNDVX
CONSIGNES IMPORTANTES DE SÉCURITÉ
Ce symbole indique la présence dans le boîtier de l’appareil de tensions
dangereuses qui présentent des risques d’électrocution et de blessures
corporelles.
Ce symbole indique que d’importants conseils de fonctionnement sont
fournis dans la documentation de ce produit.
Veuillez lire attentivement ce manuel avant l’utilisation de ce produit.
•Avant de brancher le cordon de l'adaptateur CC, assurez-vous que la tension électrique
du secteur local correspond à celle indiquée sur la télé LCD. Si vous n'êtes pas certain,
demandez conseil auprès du distributeur d'électricité local.
•N'introduisez jamais d'objets métalliques dans les fentes de votre télé LCD (écran à
cristaux liquides) /Moniteur ; cela peut provoquer des risques de chocs électriques.
•Pour éviter les chocs électriques, ne toucher jamais l'intérieur de la télé LCD/Moniteur ou
l’adaptateur. Seul un technicien qualifié est habilité à ouvrir le boîtier de la télé
LCD/moniteur/adaptateur.
•N'utilisez jamais votre télé LCD /moniteur si le cordon d’alimentation a été endommagé.
Ne rien déposer sur le câble d'alimentation et mettez le loin des passages des gens afin
que personne ne marche dessus.
•Débranchez le câble et le tenant par la prise et non en tirant sur le câble.
•Les fentes du boîtier de la télé LCD/moniteur/adaptateur servent à la ventilation. Pour
éviter toute surchauffe, ces fentes ne doivent pas être obstruées ou couvertes. Evitez
d'utiliser la télé LCD/moniteur sur un lit, un sofa, une couverture et toute autre surface
moelleuse. Cela pourrait bloquer les fentes de ventilation du bas du boîtier. Si vous
placez la télé LCD/moniteur dans une bibliothèque ou tout autre espace fermé,
assurez-vous de fournir une ventilation adéquate.
•N’exposez pas la télé LCD/moniteur à des températures ou des conditions d’humidité
extrêmes.
•Cet appareil ne doit pas être exposé au ruissellement ni à la projection d'eau ; évitez de
poser des objets remplis de liquides, tels que des vases, au dessus de l'appareil.
CONSIGNES IMPORTANTES DE SÉCURITÉ
•Ne pas placer la télé LCD/moniteur sur un chariot, un support, un trépied, une table ou un
sol instables d’où elle risque de tomber. Si elle tombe elle sera endommagée, touchée ou
rayée. Ne nettoyez pas le panneau frontal avec un produit de type acétone, de l'alcool
éthylique, du toluène, de l'acide méthylique ou chlorhydrique car ils peuvent
l'endommager.
•Placez votre adaptateur CC près d'une prise électrique facilement accessible.
•Si votre la télé LCD/moniteur ne fonctionne pas normalement en particulier, en cas de
sons anormaux ou odeurs émanant de l'intérieur, débranchez-la immédiatement et
contacter un revendeur ou un centre de réparation autorisé.
•Les températures élevées peuvent engendrer des problèmes. N'exposez pas votre télé
LCD/moniteur directement aux rayons du soleil, évitez les chauffages, les fours, les
cheminées et toute autre source de chaleur.
•Débranchez l’adaptateur CC s'il ne va pas être utilisé pendant une longue période.
•Afin de limiter le risque d'incendie ou d'électrocution, et les interférences irritantes,
n'utilisez que les accessoires recommandés.
•N'essayez pas de réparer la télé LCD/moniteur par vous-même. Contactez un centre de
service qualifié.
•Débranchez l'adaptateur CC du secteur avant toute réparation.
•Assurez-vous que le centre de réparation n’utilise que des pièces de rechange agréées
ou équivalentes. L’utilisation de pièces non agréées pourrait causer un incendie, un choc
électrique ou d'autres risques.
•A la suite de tout entretien ou réparation, assurez-vous que le centre de réparation a
effectué les contrôles de sécurité nécessaires et certifie que la télé LCD TFT/moniteur est
utilisable en toute sécurité.
•L’appareil étant de CLASSE I, il doit être branché sur une prise SECTEUR disposant
d’une mise à la terre.
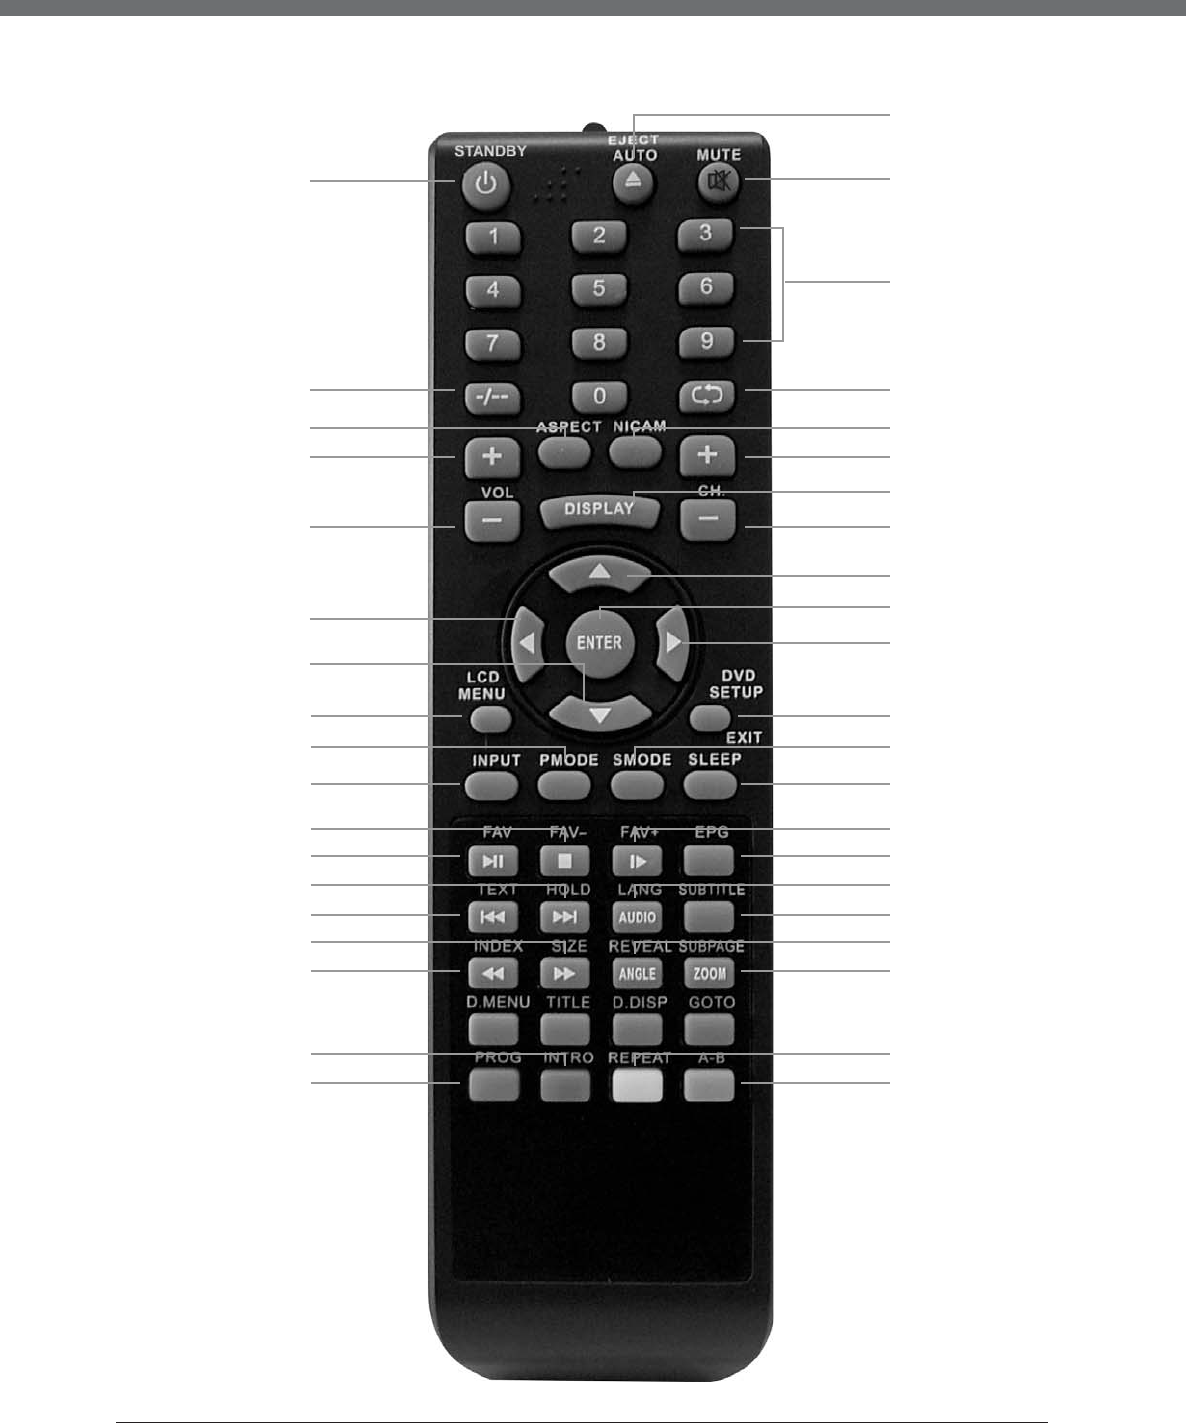
TÉLÉCOMMANDE
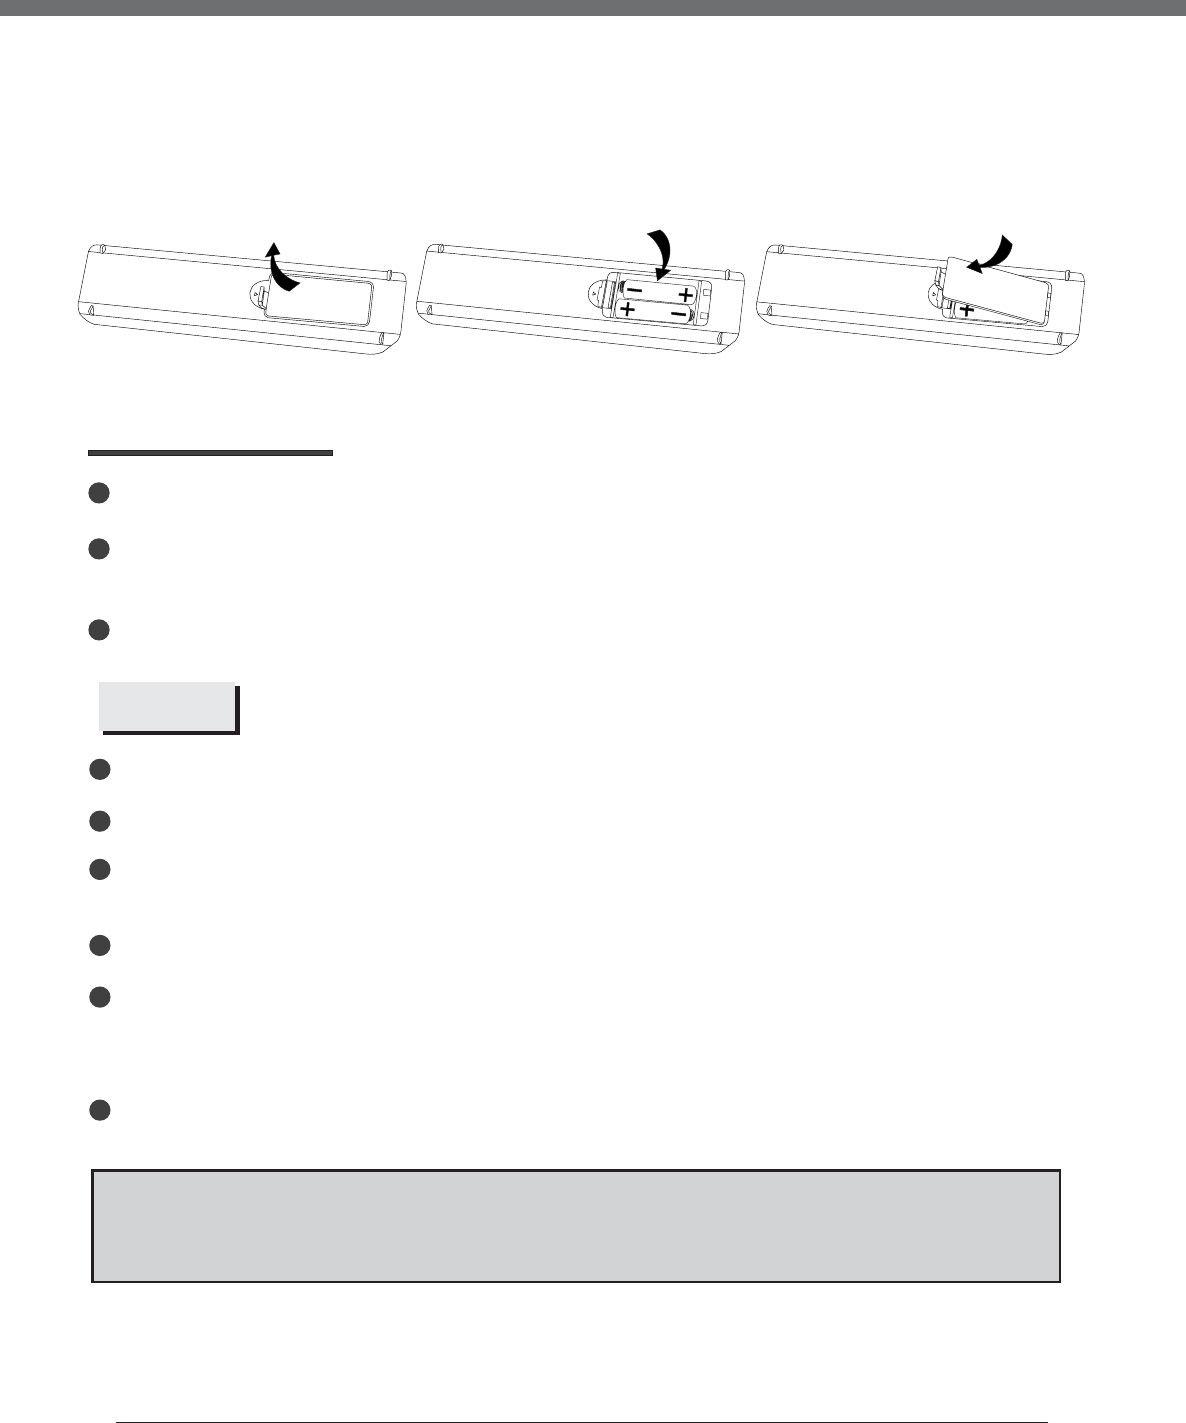
INSTALLATION DES PILES
Retirez le couvercle des piles. Insérez deux piles SUM-4 (AAA) en faisant correspondre les polarités
+/- des piles avec celles inscrites au fond du compartiment pour piles comme illustré :
AUTONOMIE DES PILES
•Normalement les piles peuvent durer un an.
•Changer les piles si la télécommande n’a plus d’effet lorsqu’elle est très proche du capteur de
la télé.
•
Utiliser des piles SUM-4 (AAA).
REMARQUES
•N’utilisez jamais des piles rechargeables.
•Ne tentez jamais de recharger, court-circuiter, démonter, chauffer ou jeter les piles dans du
feu.
•Faites attention de ne pas faire tomber la télécommande ou lui donner des coups, ceci peut
l’endommager.
•N’utilisez pas des piles anciennes avec des nouvelles.
•Si vous n’allez pas utiliser la télécommande pendant une longue période, retirez les piles
pour éviter toute fuite de liquide. Nettoyez éventuellement l’électrolyte avant de remplacer les
piles de la télécommande.
•Nettoyez immédiatement à l’eau de l’électrolyte qui rentre en contact avec la peau.
AVERTISSEMENT
:
Gardez les piles hors de la portée des enfants.
Contactezimmédiatement unmédecin si de
l’électrolyte e
st avalé par accident
.
8
DEMARRAGE
Une fois l’appareil est placé sur une table / accroché au mur convenablement, et que tous les
câbles, y compris l’alimentation, ont été branchés, tout ce qui vous reste à faire est :
• D’appuyer sur la touche [STANDBY] (veille) de la télécommande pour mettre en marche la
télé, le voyant devient vert. A présent vous allez profiter des différentes fonctionnalités de votre
télé.
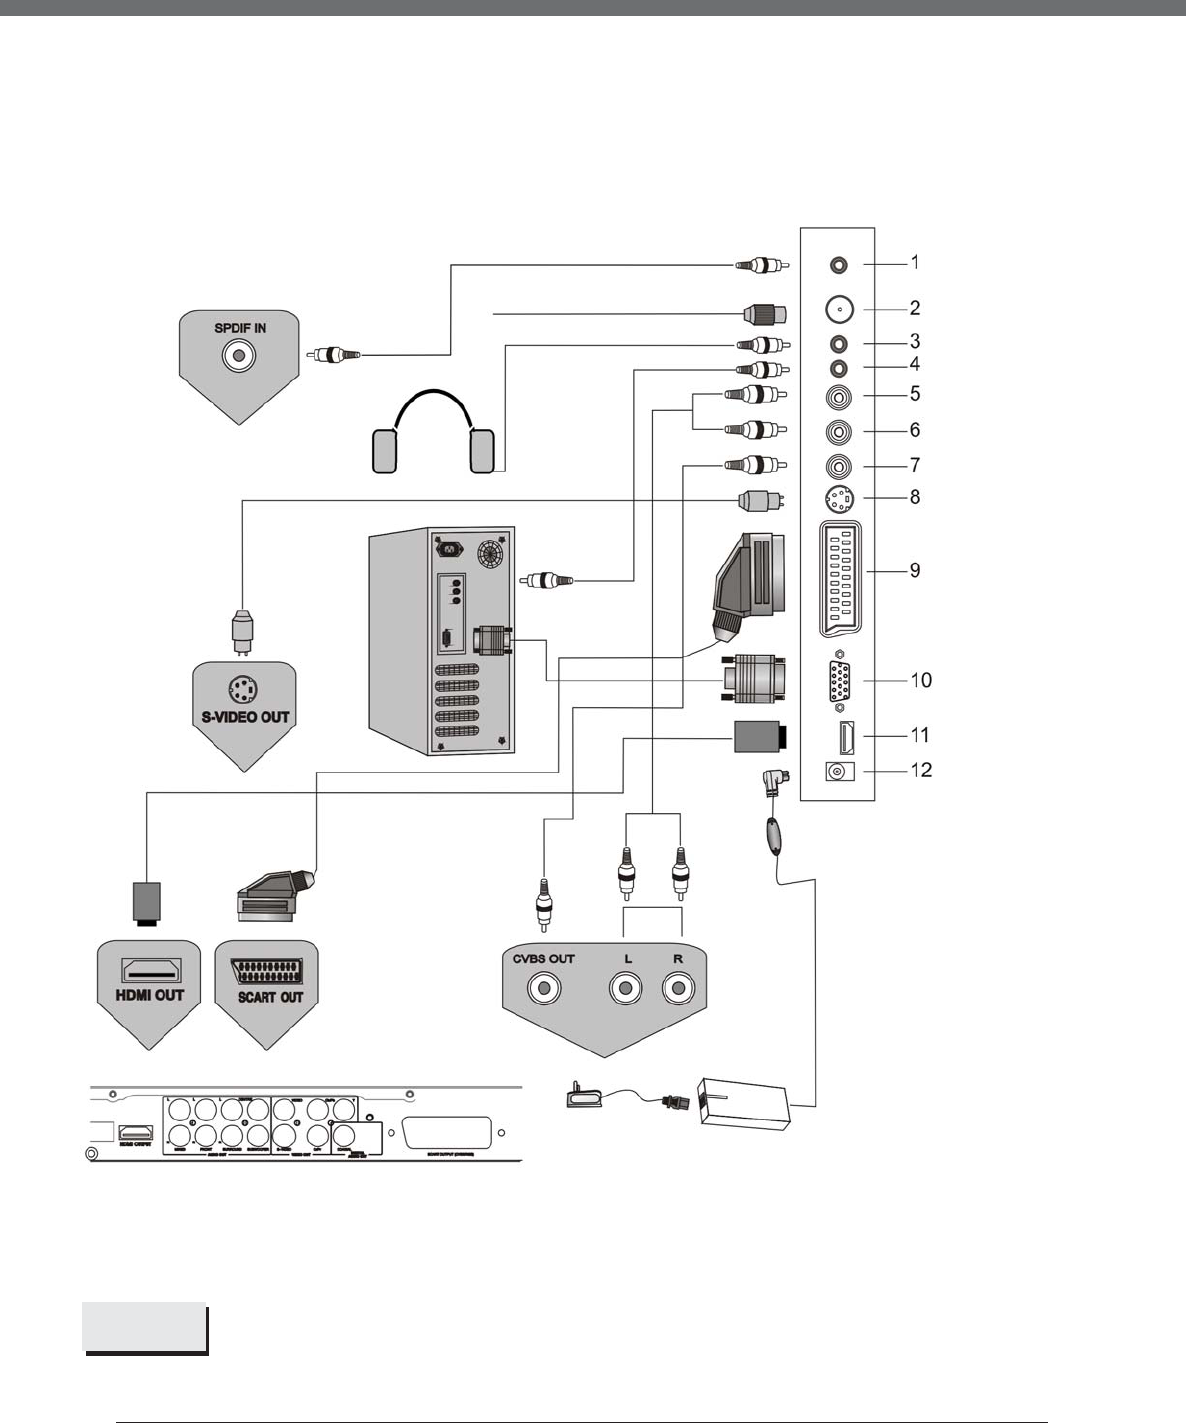
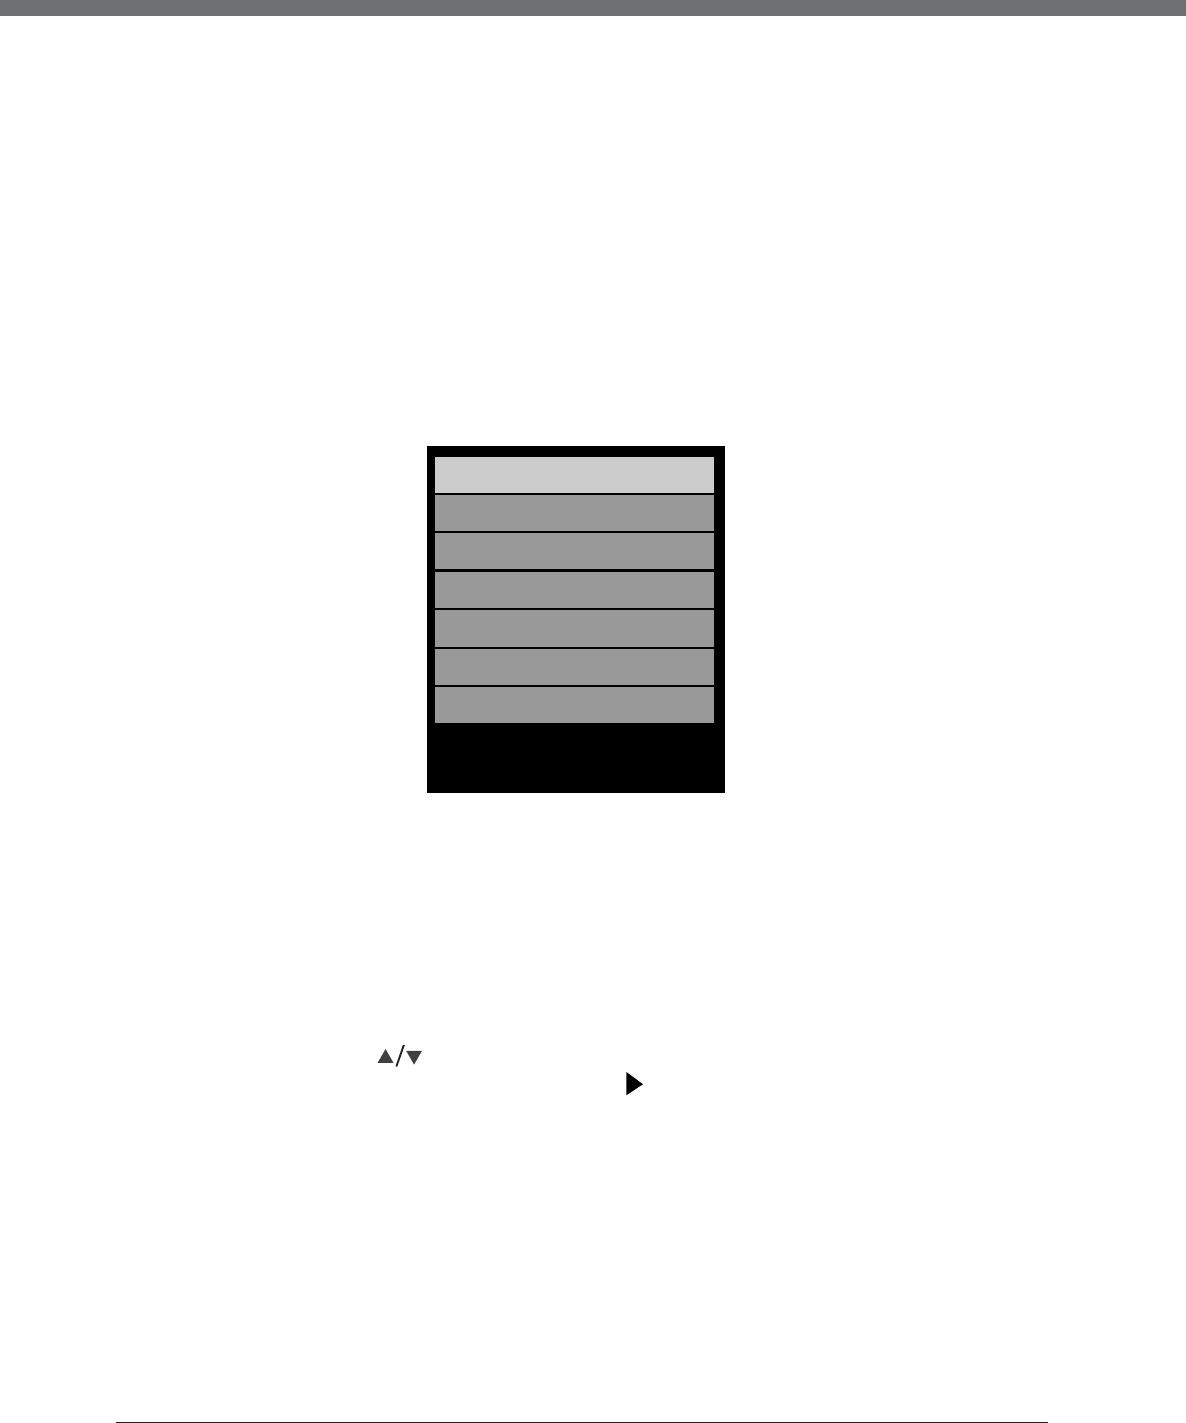
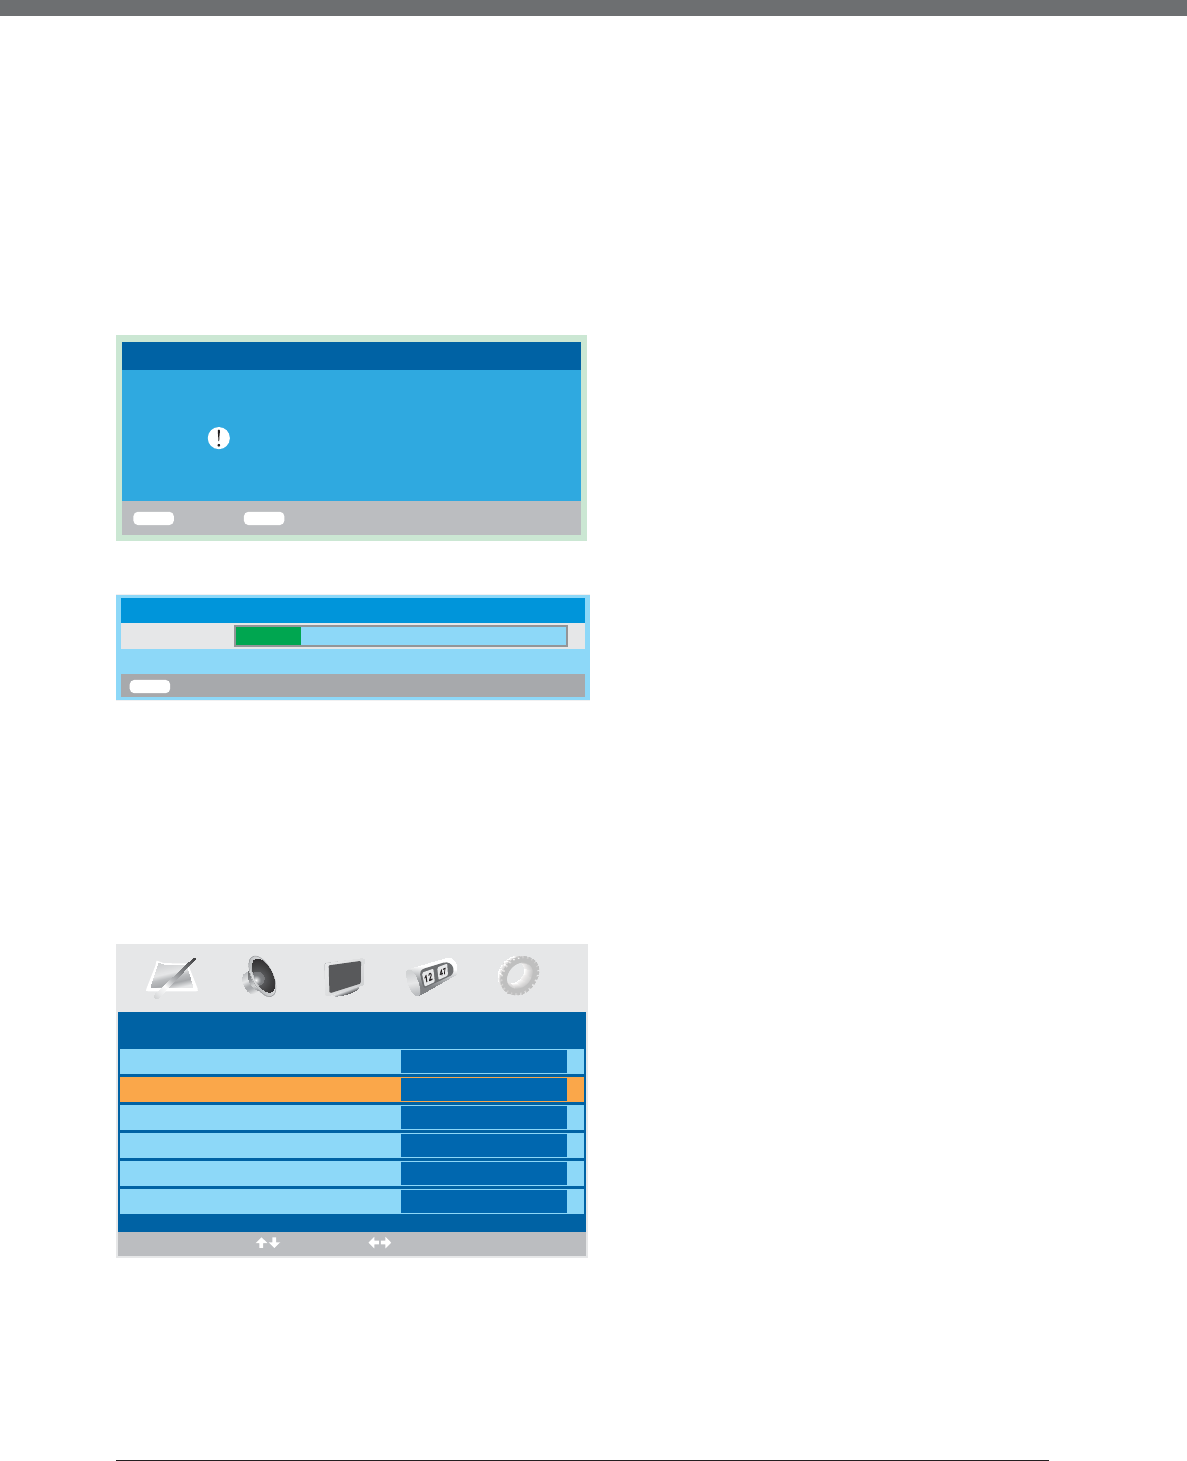
SÉLECTION DE LASOURCE
Vous pouvez sélectionner la source d’entrée à l’aide du menu source.
• Appuyez sur la touche INPUT ou TV/AV situé sur le côté droit de la télé LCD pour afficher le
menu suivant :
La source courante est surlignée.
• Utilisez les touches de la télécommande ou CH+/CH- situéssur le côté droit de la télé
LCD pour sélectionner la source souhaitée, appuyez sur la touche , VOL+ ou ENTER pour
confirmer votre choix.
9
TV
SCART
CVBS
S-VIDEO
VGA
HDMI
DVD
TV
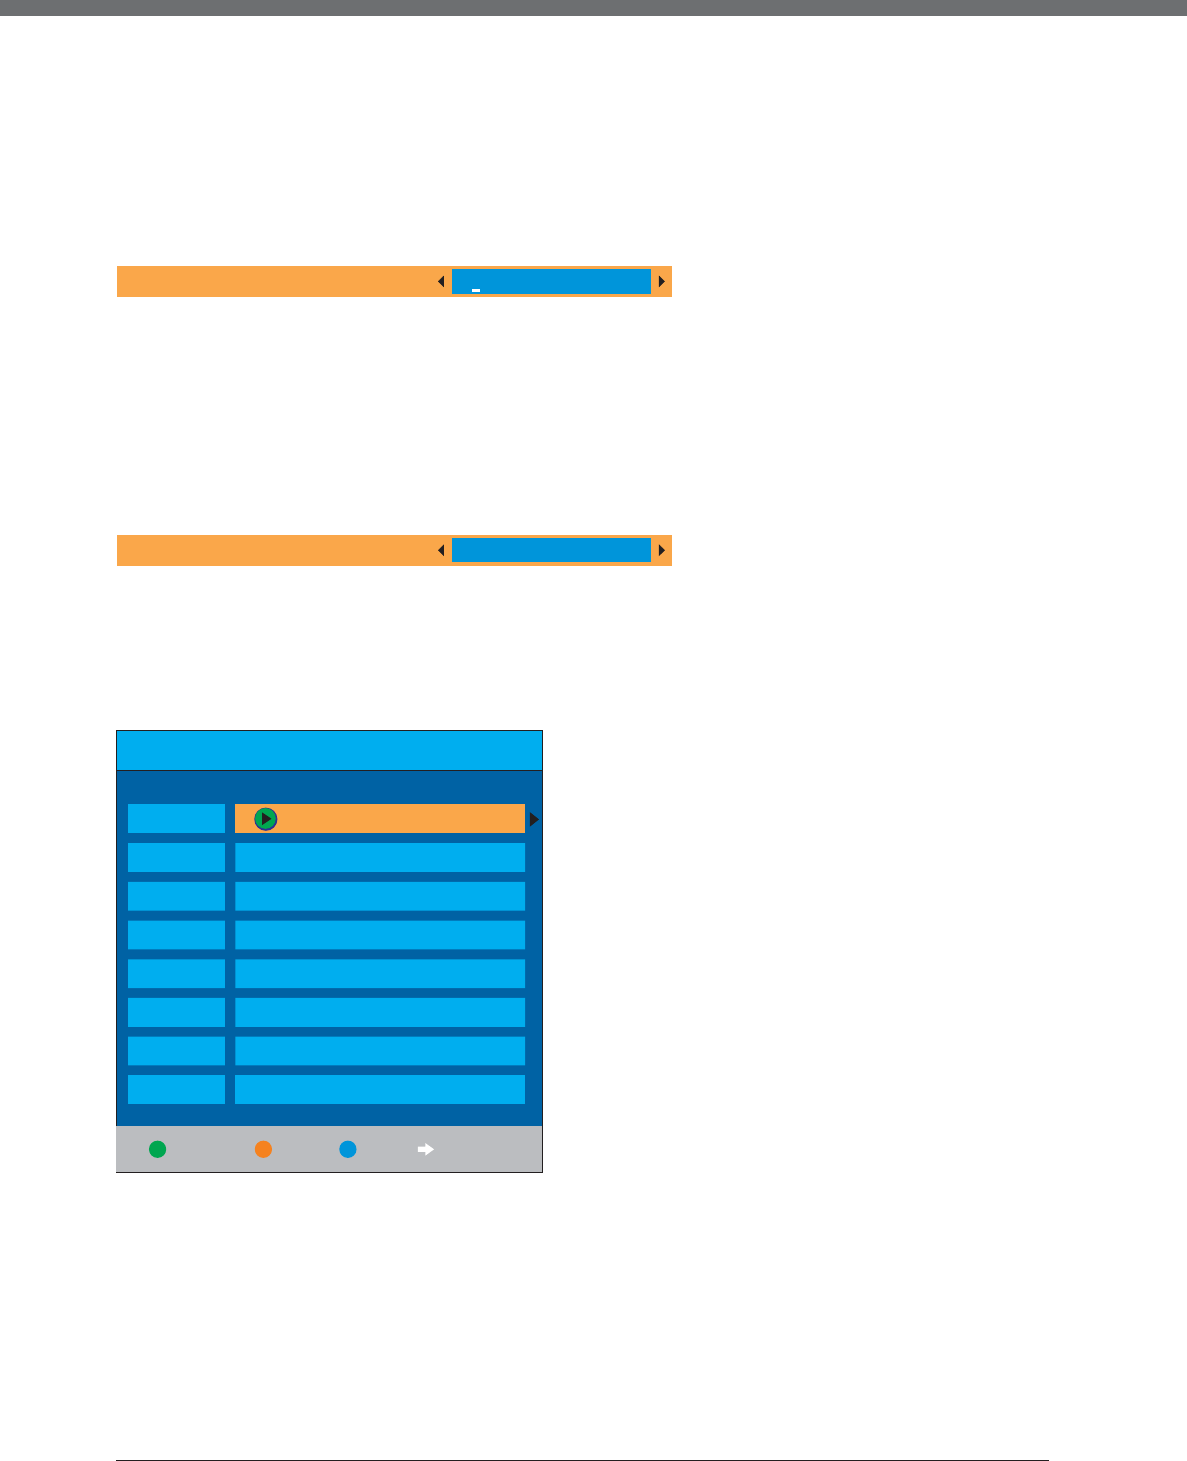
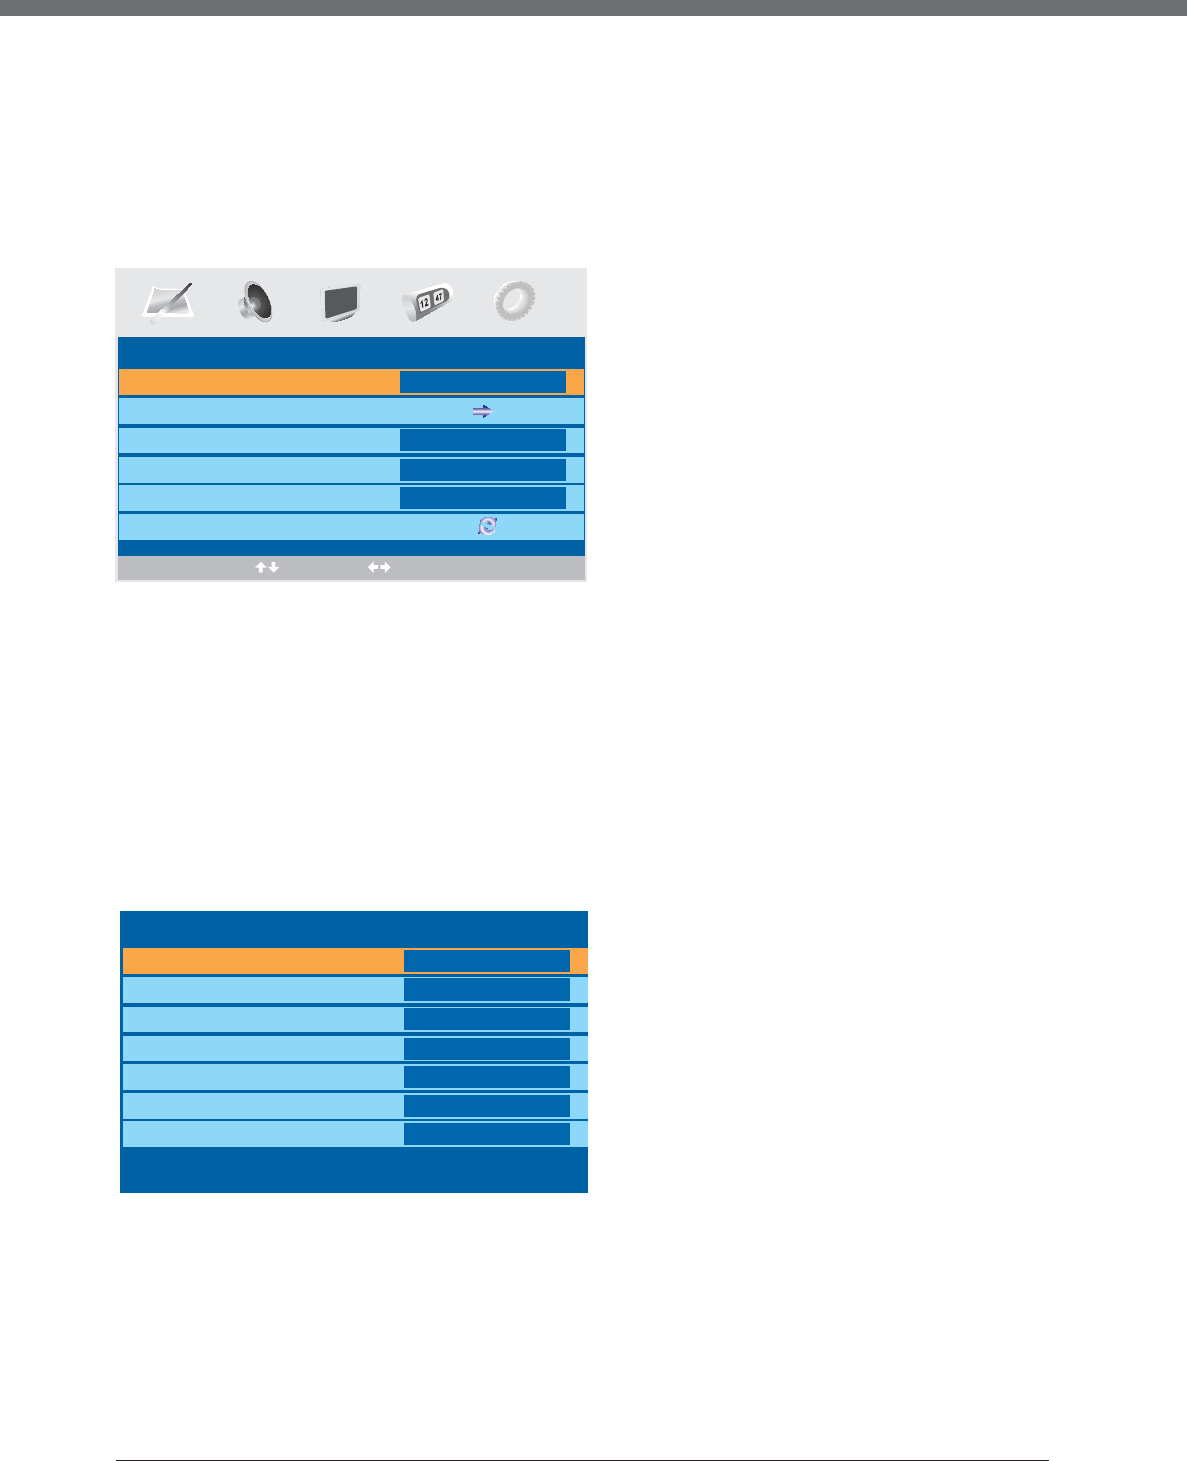
MANUEL DE L’OSD
Source initia
le
Utilisez les touches Ż / Ź pour sélectionner la source par défaut parmi TV, Péritel, CVBS, S-VIDEO, VGA, HDMI
ou DVD.
Programme initial
Utilisez les touches Ż / Ź pour sélectionner la source par défaut dans le mode Hôtel.
Volume max.
Utilisez les touches Ż / Ź pour sélectionner le volume maximum dans le mode Hôtel.
Réinitialiser lecadenas
Utilisez les touches Ż / Ź pour réinitialiser l’horloge dans le mode Hôtel.
Installation Première Fois
Appuyez surla touche Źpour ouvrirlemenu Installation Première Fois, l’utilisation de ce menu est décrite à la
page 11.
Réinitialiser
RéinitialiserAppuyez sur la touche ENTER ou Źpourréinitialiser la téléauxparamètres d’usine.
21
FONCTION TELETEXTE
FONCTION TELETEXTE
La plus part des stations de diffusion télévisé fournissent des informations télétexte gratuitement
concernant la météo, les programmes télé, la bourse etc.
Vous pouvez juste entrer le numéro de la page télétexte en fonction du contenu.
MODESD’AFFICHAGE DU TELETEXTE
•Sélectionnez une chaîne qui contient du télétexte ;
•Appuyer sur la touche TEXT pour activer le mode télétexte ;
•Sélectionnez la page télétexte à l’aide des touches numériques ou des touches colorées ;
•Appuyer sur la touche TEXT pour activer le mode mixte, où le texte est affiché en même temps
que l'image ;
•Appuyer de nouveau sur la touche TEXT pour désactiver le mode télétexte.
SELECTION DES PAGES
•Vous pouvez entrer 3 chiffres, à l’aide des touches numériques, pour afficher la page souhaitée.
Si le nombre entré est non valide, vous devez le corriger.
•Vous pouvez parcourir les pages vers l’avant ou l’arrière à l’aide des touches .
Verrouillage
z
Appuyez sur la touche HOLD pour figer une page télétexte. Appuyez de nouveau sur cette
touche pour libérer la page.
INDEX
z
Appuyez sur la touche [INDEX] pour afficher la page Sommaire.
z
Vous pouvez accéder à une page donnée en entrant son numéro.
ZOOM DANS LE TELETEXTE
•Vous pouvez agrandir la page affichée en faisant un zoom avant.
•Appuyez sur la touche Taille pour faire un zoom avant sur la moitié supérieure de la page.
•Appuyez sur la touche Taille pour faire un zoom avant sur la moitié inférieure de la page.
•Appuyez de nouveau sur cette touche pour retourner au mode d’affichage original.
MODE D’AFFICHAGE
•Appuyez sur la touche REVELER pour afficher le texte masqué.
•Appuyez de nouveau sur cette touche pour annuler.
TOUCHES COLOREES (ROUGE, VERTE, JAUNE, BLEUE)
•Sélectionne la page de télétexte correspondante à la couleur des touches.
22
DVD
UTILISATION DU DVD
Utilisation debase
1. Allumer et éteindre le DVD
-
Allumez la télé LCD puis appuyez sur la touche INPUT de la télécommande. Utilisez les touches ź / Ÿ pour sélectionner le mode DVD et
confirmez avec la touche ENTER.
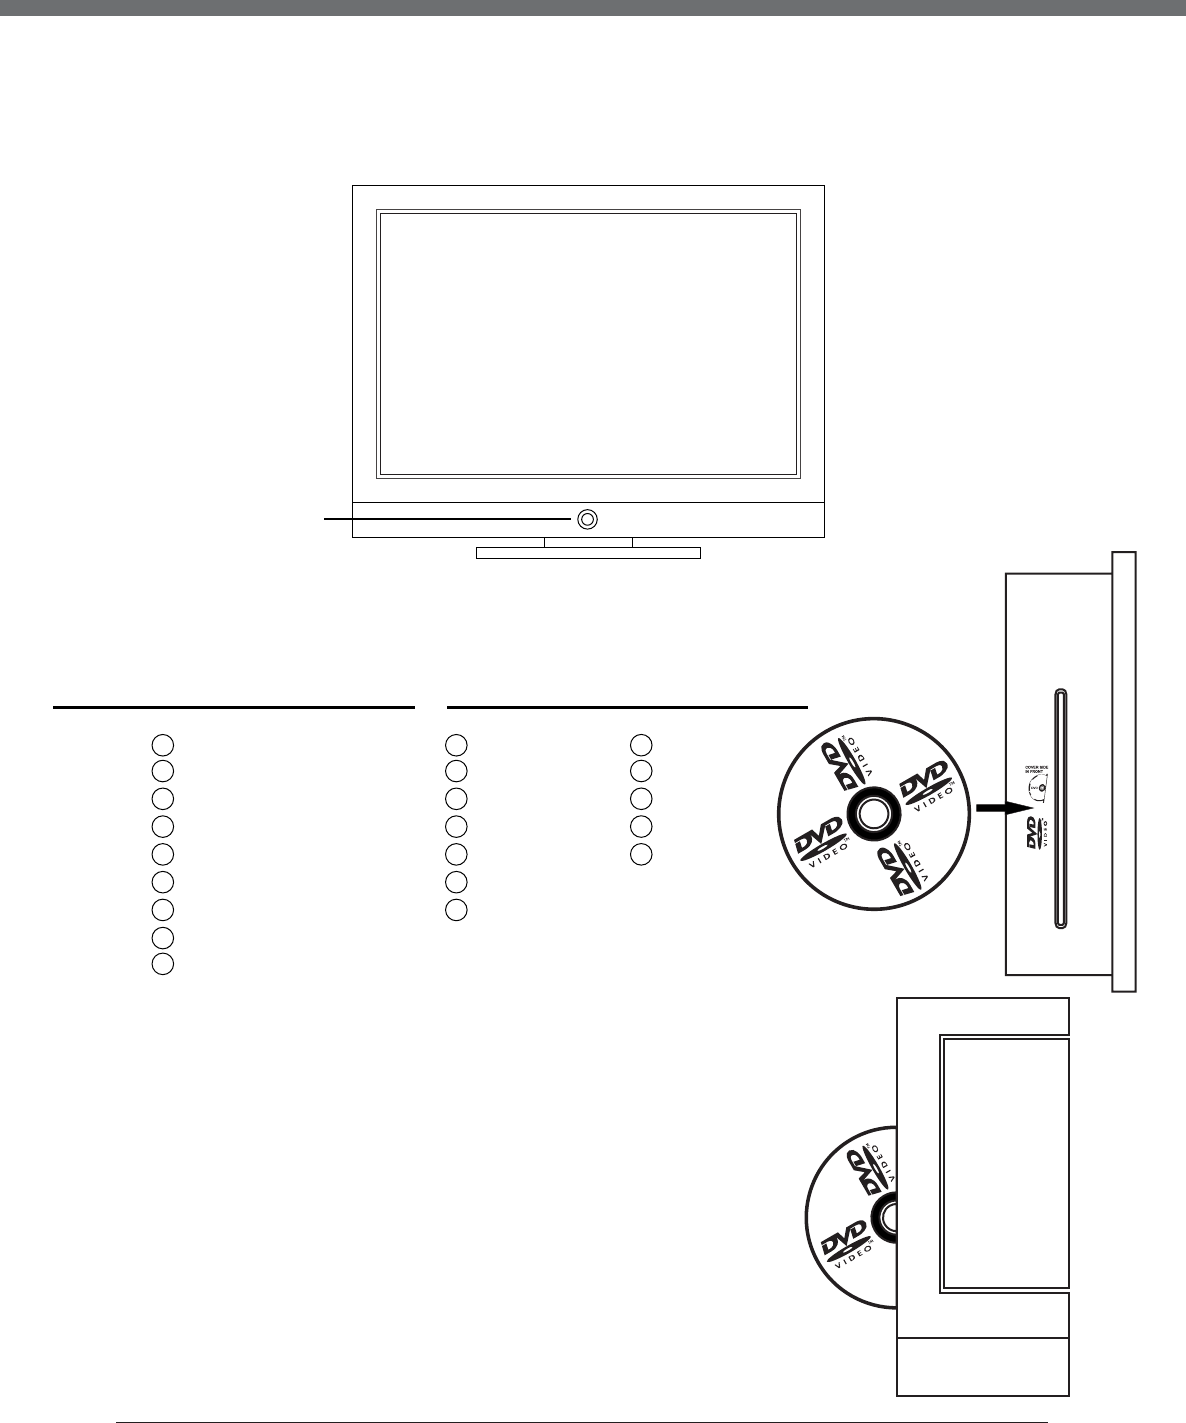
2. Insérez un disque dans le DVD
-
Insérez le disque dans la fente pour disque (la face imprimée doit être orientée vers la face de l’appareil), le lecteur chargera automatiquement le
disque. Les indications suivantes vont s'afficher à l'écran : “FERMER” puis “ LIRE”. Une fois le chargement du contenu est terminé, l'unité passe
automatiquement en mode lecture. Si un disque est déjà dans l'unité, il sera lu automatiquement.
REMARQUE :- Avec certains disques on est obligé d'appuyer sur ou d'utiliser une fonction du menu du disque, pour pouvoir les lire.
- En insérant le disque assurez-vousque la face imprimée doit être orientée versvous. Vous risquez d'endommager le mécanisme
du DVD si vous insérez le disque de façon incorrecte.
3. Lecture du DVD
- En fonction du contenu du disque, un menu sera affiché. Lors de la lecture, vous pouvez utiliser la touche pour basculer entre Lecture et Pause. Ce
produit prend en charge les Menus Titres, la lecture Séquentielle et Programmée.
4. Menu Lecture (pour les disques DVD/ super VCD et VCD 2.0)
- Appuyez sur la touche D.MENU
•Pour les disques DVD, c'est le Menu DVD (Menu Principal) qui est affiché.
•Pour les disques VCD et VCD2.0, c'est le Menu du Super VCD, VCD2.0 qui est affiché (PBC : [OFF]) (Appuyer sur la touche MENU pour afficher l'état
de PBC).
•La lecture des disques VCD et VCD2.0 se fait par défaut avec PBC ON.
- Pour les disques DVD, utilisez les touches de navigation pour la sélection et la Lecture, pour les disques VCD et VCD2.0, utilisez les touches
numériques pour la lecture de vos éléments préférés directement.
REMARQUE : PBC doit être OFF.
- Appuyer sur ENTER ou pour commencer avec l'élément surligné.
- Retour au Menu Principal en cours de lecture
•Pour les disques DVD, appuyer sur MENU pour afficher le Menu Disque.
•Pour les disques VCD et VCD2.0, lorsque PBC est ON, appuyer sur MENU pour afficher le Menu Disque.
- STOP
•Appuyer une fois sur
pour arrêter. Appuyer sur pour continuer à partir du point d'arrêt.
•Appuyer deux fois sur
pour arrêter. Appuyer sur pour commencer à partir du début.
Pour éjecter le disque en toute sécurité, appuyer sur
, ainsi vous protègerez le disque. Lorsque le disque est éjecté, tenez le fermement par le bord
et retirez le en ayant soin de ne pas le rayer.
•Pour protéger le chargeur et le disque, évitez de laisser un disque dans le plateau du lecteur DVD pour une longue période, surtout lorsque le lecteur
n'est pas utilisé.
5. Lecture des Titres (pour les disques DVD seulement)
- Appuyer sur TITRE, l'indication "TITRE" sera s'affichée à l'écran.
- Utilisez les touches de navigation ou les touches numériques pour sélectionner votre titre favori.
- La lecture commence au premier chapitre du titre sélectionné.
6. Lecture programmée (pour les disques DVD/ Super VCD/ VCD/ CD/ CD-G/HD-CD et MP3/ JPEG)
- Pour les disques Super VCD et VCD, si PBC est “ON”, appuyer sur pour ouvrir le menu disque. Appuyer sur MENU pour mettre PBC à OFF.
Appuyer sur pour commencer la lecture séquentielle. Pour les autres cas, appuyer sur à l'arrêt, pour commencer la lecture séquentielle.
7. Lecture programmée (pour les disques DVD/ Super VCD/ VCD/ CD/ CD-G/HD-CD et MP3/ JPEG)
- Appuyez sur la touche PROG.
- En utilisant la lecture programmée, vous pouvez programmer la lecture de 16 pistes maximum.
- Les menus écran pour la lecture programmée sont comme suit:
24
Utilisation du DVD
Disques DVD/MP3/JPEGDisques Super VCD/ VCD/ CD /CD-G/ HD-CD
- Si PBC est ON, l'utilisation de la lecture programmée met PBC à OFF automatiquement.
- Utilisez les touches numériques pour entrer le numéro de titre et chapitre et appuyez sur
pour commencer, ou allez sur <LECTURE> au moyen des
touches de navigation et appuyez sur ENTER pour commencer.
- En cours de lecture programmée, vous pouvez appuyer sur la touche PROGRAM pour afficher la liste programmée et la modifier. Pour effacer le
programme, allez sur <EFFACER> et appuyez sur ENTER. Ou appuyer sur la touche pour arrêter le programme. Si vous appuyez de nouveau sur
, le disque sera lu séquentiellement.
- En cours de lecture programmée, "PRG PLAY" et les numéros du titre et du chapitre seront affichés à l'écran.
Formats DVD pris en charge
Ce produit prend en charge les formats de disque DVD suivants :
REMARQUE : Prend en charge également DVD-R, CD-R, CD-RW.
25
Guide sur les fonctions DVD
1. Lecture (pour les disques DVD/ Super VCD/ VCD/ CD/ CD-G/HD-CD et MP3/ JPEG)
- Pour les disques DVD, appuyez sur
à partir du menu principal ou du menu titre, en mode lecture, vous pouvez également lire directement un titre
de votre choix en utilisant la touche TITRE.
- Pour les disques Super VCD et VCD, vous pouvez lire les pistes de votre choix en utilisant les touches numériques.
(REMARQUE : Pour changer de piste enmode lecture programmée ou lorsquePCB est sur ON, vous nepouvez qu'utiliserles toucheset).
- Pour les disques CD, CD-G et HD-CD, vous pouvez lire les pistes de votre choix en utilisant les touches numériques.
- Pour les disques MP3 / JPEG, vous pouvez lire les pistes de votre choix en utilisant les touches numériques et le menu des contenus.
- Si le numéro de la piste n'est pas valide, rien ne se passe.
REMARQUE : Utilisez les touches numériques pour les pistes de 1 à 10 ; au delà de 10 appuyez sur - / -- en premier. (Ex. Piste 15, appuyez sur
- / -- puis sur 5)
2. Précédent/Suivant (pour les disques DVD/ Super VCD/ VCD/ CD/ CD-G/HD-CD et MP3/ JPEG)
- Pendant la lecture;
• Appuyez sur
pour lire le dernier Titre / Chapitre / piste.
•Appuyez sur pour lire le prochain Titre / Chapitre / piste.
- Pour les disques VCD et VCD, en PBC à OFF;
•Si la piste courante est la première, appuyez sur pour arrêter la lecture.
•Si la piste courante est la dernière, appuyez sur pour arrêter la lecture.
- Pour les disques DVD, les fonctions ci-dessus peuvent changer en fonction des différentes structures des disques DVD.
3. Avance /Retour rapide (pour les disques DVD/ Super VCD/ VCD/ CD/ CD-G/HD-CD et MP3/ JPEG)
- Pendant la lecture, vous pouvez utiliser ces fonctions.
- Il y quatre vitesses pour l'avance rapide. Appuyez sur pour changer de vitesse selon cet ordre : (vitesse x 2 / vitesse x 4 / vitesse x 8 / vitesse x 20
/ vitesse normale).
•Si vous appuyez sur en retour rapide, vous continuez en vitesse normale.
•Le son est audible en avance et retour rapide pour les disques CD, HD-CD et MP3.
•Pour les disques DVD, si vous effectuez un retour rapide dans un titre ou chapitre, il commencera à partir du début.
•Pour les disques Super VCD et VCD, avec PBC ON, si vous effectuez un retour rapide dans une piste, il commencera à partir du début.
REMARQUE : Il n'y pas de son durant une Avance ou un Retour rapide
4. Ralenti (pour les disques DVD/ Super VCD/ VCD)
- Pendant la lecture, vous pouvez utiliser la fonction de ralenti.
•Il y a 6 vitesses pour cette fonction de ralenti. Appuyez sur pour changer de vitesse selon cet ordre : (SF1/2, SF1/3, SF1/4, SF1/5, SF1/6, SF1/7,
vitesse Normale).
•Si vous appuyez sur en mode ralenti, vous continuez à la vitesse normale.
Remarque : Il n'y pas de son durant le ralenti.
5. Pause (pour les disques DVD/ Super VCD/ VCD/ CD/ CD-G/HD-CD et MP3/ JPEG)
- Pour les disques CD, CD-G, HD-CD et MP3/JPEG, appuyez sur
pour faire une pause; appuyez sur pour reprendre.
- Pour les disques DVD, Super VCD, VCD, appuyez sur
pour faire une pause; appuyez sur pour une lecture image par image; appuyez sur pour
reprendre.
6. Répéter (pour les disques DVD/ Super VCD/ VCD/ CD/ CD-G/HD-CD et MP3/ JPEG)
- Appuyez sur REPETER une fois pour afficher le mode actuel de répétition.
•pour les disques Super VCD, VCD, CD, CD-G, HD-CD, en mode lecture séquentielle, vous pouvez utilisez la fonction Répéter.
•Il y 2 modes de répétition, appuyez sur REPETER pour basculer entre les différents modes. (DESA/ REPETER 1 / TOUT REPETER).
•Pour les disques DVD, vous pouvez régler le mode de répétition de la lecture. Il y 2 modes de répétition, appuyez sur REPETER pour basculer entre
les différents modes.(DESA / CHAPITRE /TITRE / TOUTREPETER).
•Pour les disques MP3 / JPEG, en mode lecture, vous pouvez utilisez la fonction Répéter. Il y 3 modes de répétition, appuyez sur REPETER pour
basculer entre les différents modes. (DESA / REPETER 1 / REP. REPERTOIRE / TOUT REPETER)
7. Afficher (pour les disques DVD/ Super VCD/ VCD/ CD/ CD-G/HD-CD et MP3/ JPEG)
- Appuyez sur DISPLAY pour activer un menu déroulant relatif au Titre, Chapitre, heure courants et d'autres informations
UTILISATION DUDVD
26
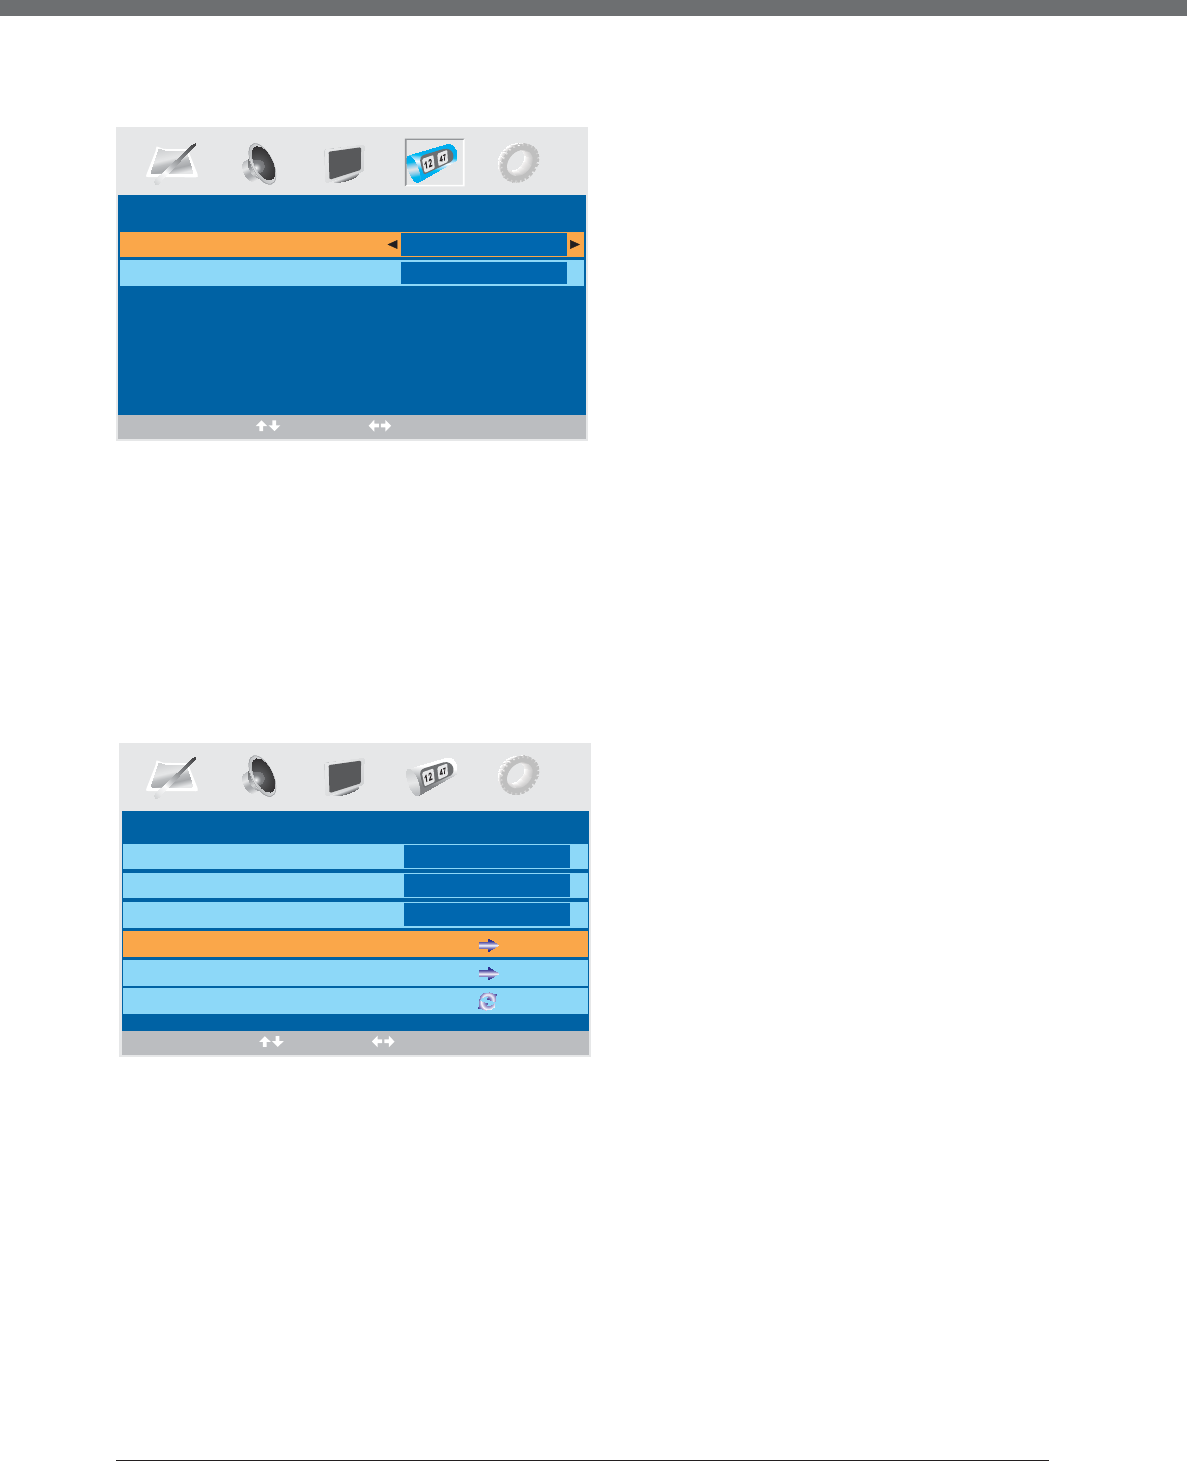
Sprachen-Einstellung
Mit
DVD SETUP
rufen Sie das Einstellungsmenü auf.
- OSD Sprache
Mit den Navigationstasten wählen Sie OSD SPRACHE, mit ENTER
bestätigen Sie. Ihnen stehen 7 Sprachen zur Verfügung, die Sie mit Ÿ und
ź durchlaufen. Mit ENTER bestätigen Sie.
HINWEIS: Steht die gewählte Sprache auf derDVD nicht zur
Verfügung, so wird automatisch zur Standardsprache der
Disc umgeschaltet. Standardeinstellung ist ENGLISCH.
-
Audio -
sprache
Mit den Navigationstasten wählen Sie
AUDIO - SPRACHE
,mitENTER bestätigen Sie. Ihnen stehen 7 Sprachen zur Verfügung, die Sie mit Ÿundź
durchlaufen. Mit ENTER bestätigen Sie.
HINWEIS: Steht die gewählte Sprache auf der DVD nicht zur Verfügung,
so wird automatisch zur Standardsprache der Disc umgeschaltet.
Standardeinstellung ist ENGLISCH.
- Untertitelsprache
Mit den Navigationstasten wählen Sie
UNTERTITEL SPRACHE
,mitENTER bestätigen Sie. Ihnen stehen 7 Sprachen zur Verfügung, die Sie mit Ÿund
ź durchlaufen. Mit ENTER bestätigen Sie.
HINWEIS: Steht die gewählte Sprache auf der DVD nichtzur Verfügung, so wird automatisch zur Standardspracheder Disc umgeschaltet.
Standardeinstellung ist ENGLISCH.
SPRACHE EINST.
AUDIO
- SPRACHE
UNTERTIT. SPR.
MEN
üSPRACHE
EINST. VERL.
OSD SPRACHE
DEUTSCH
SPRACHE EINST.
UNTERTIT. SPR.
MEN
üSPRACHE
EINST. VERL.
AUDIO - SPRACHE
OSD
SPRACHE
DEUTSCH
SPRACHE EINST.
MEN
üSPRACHE
EINST. VERL.
UNTERTIT. SPR.
AUDIO - SPRACHE
OSD SPRACHE
DEUTSCH
32
DVD-BETRIEB
Menüsprache
- Mit den Navigationstasten wählen Sie
MENÜSPRACHE
,mitENTER
bestätigen Sie. Ihnen stehen 7 Sprachen zur Verfügung, die Sie mit Ÿ und
ź durchlaufen. Mit ENTER bestätigen Sie.
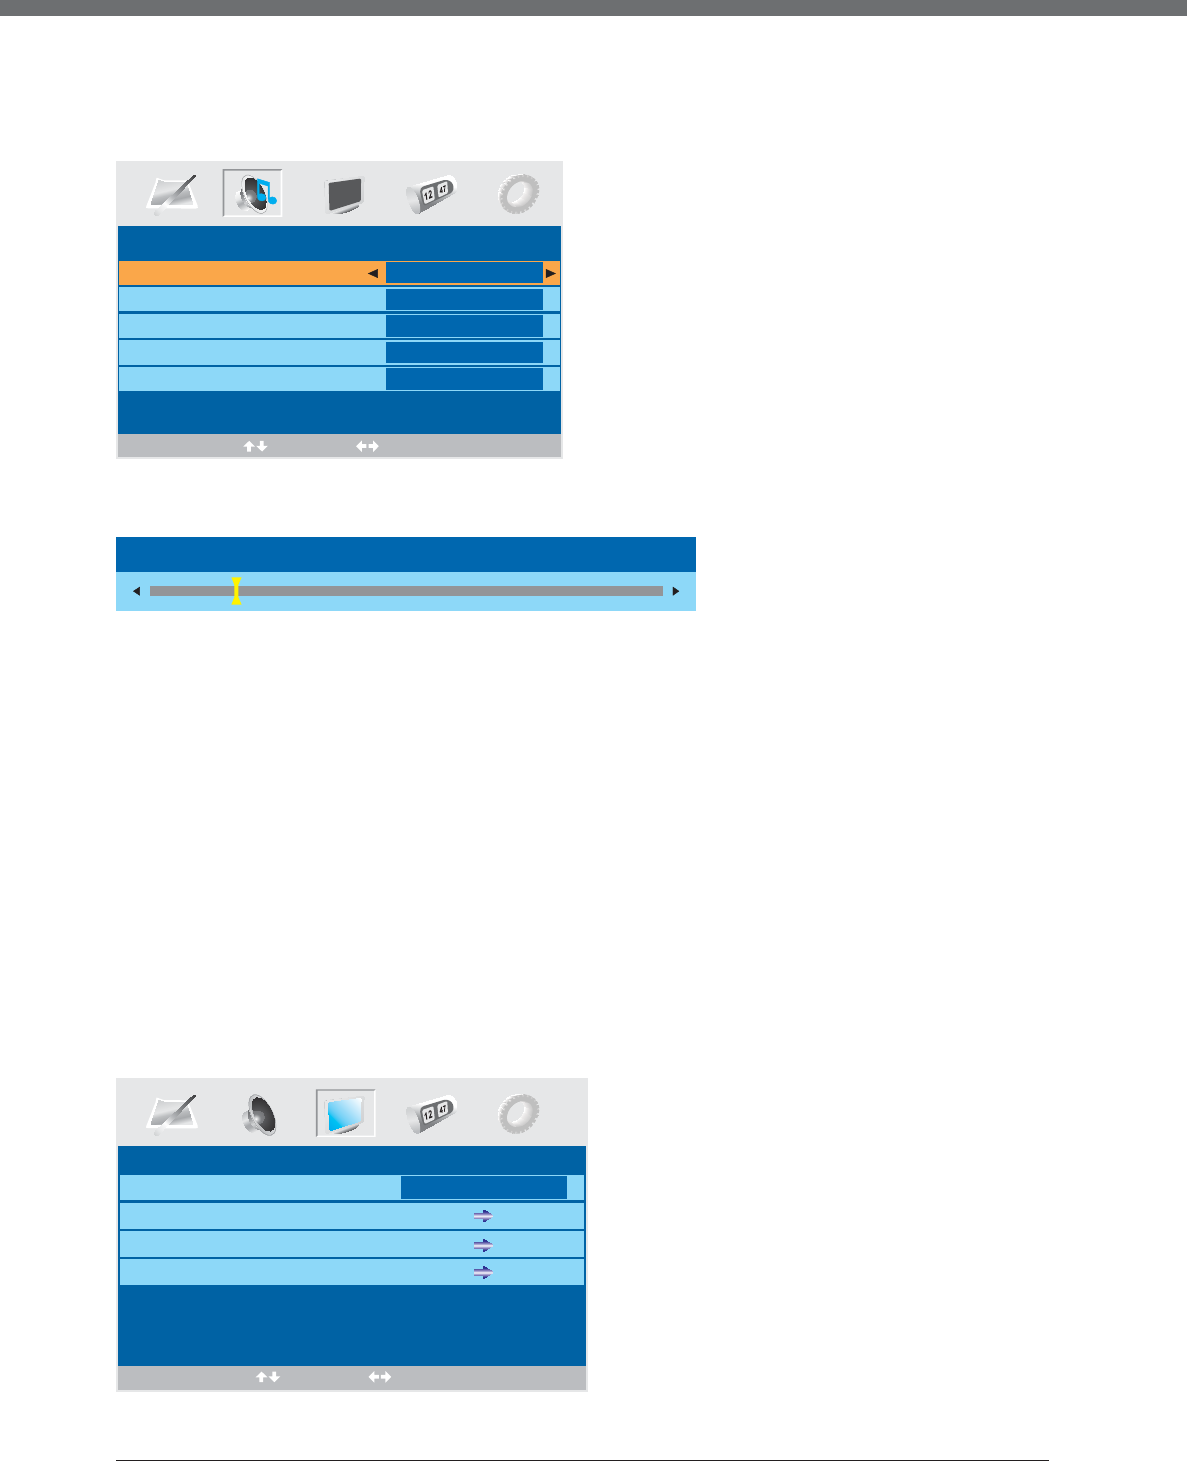
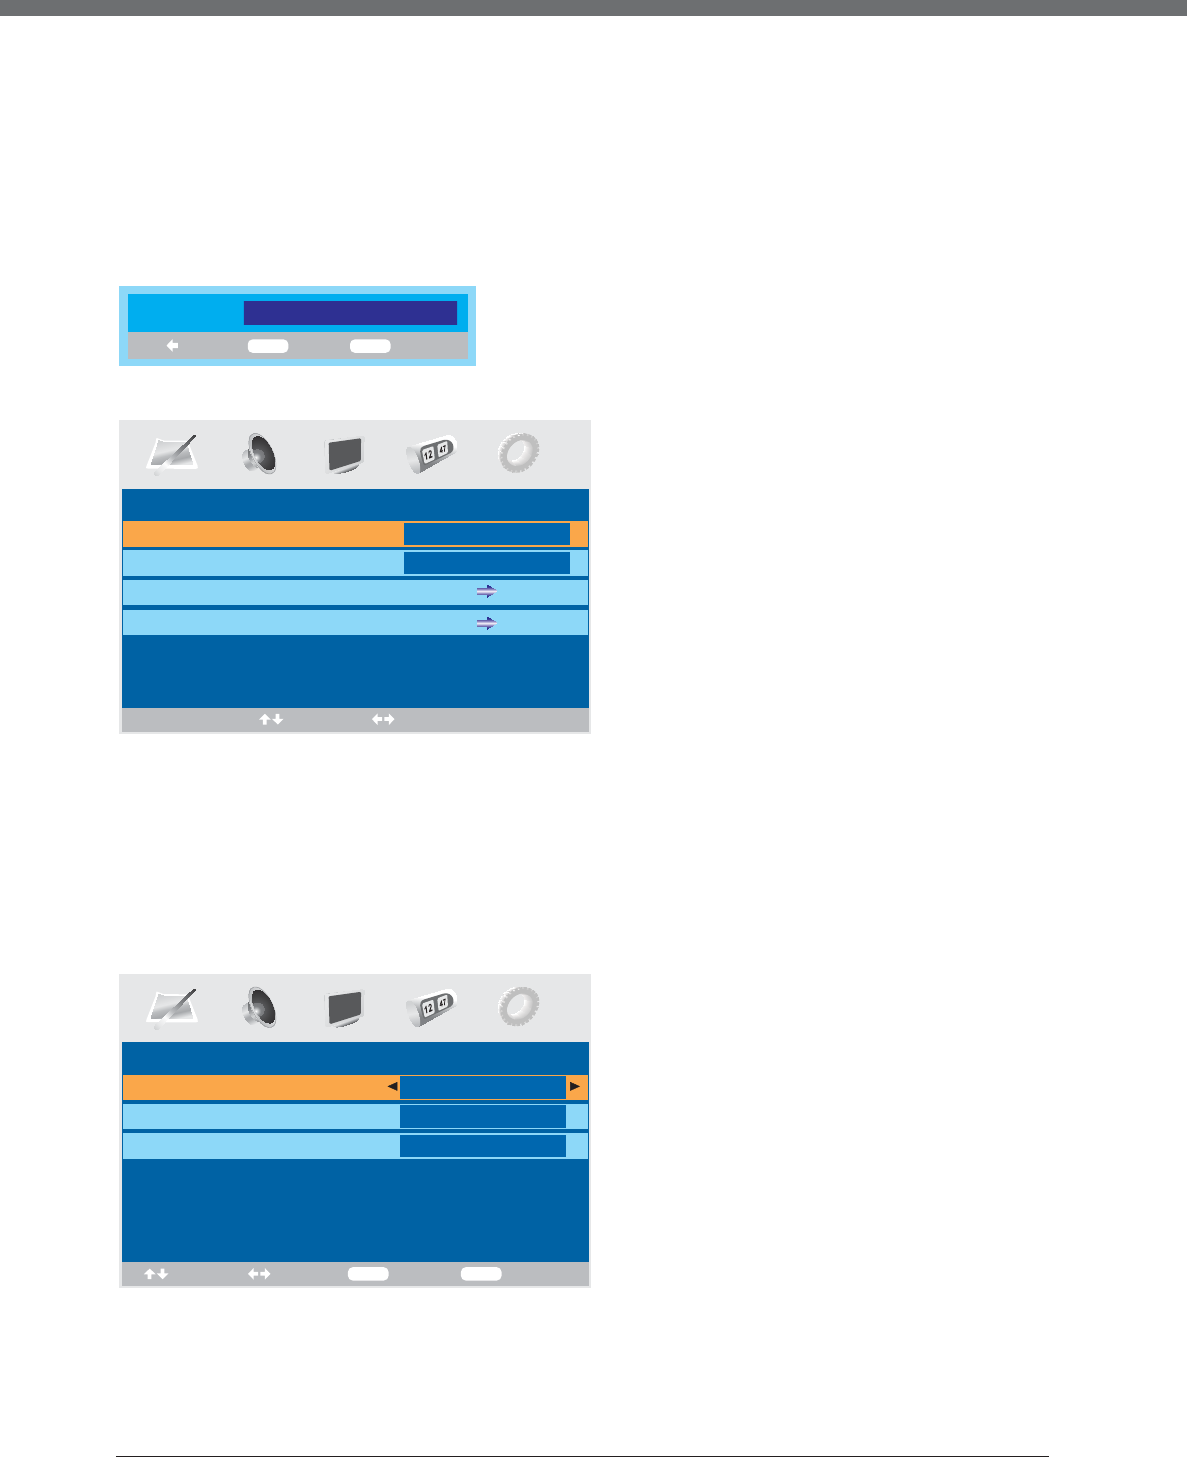
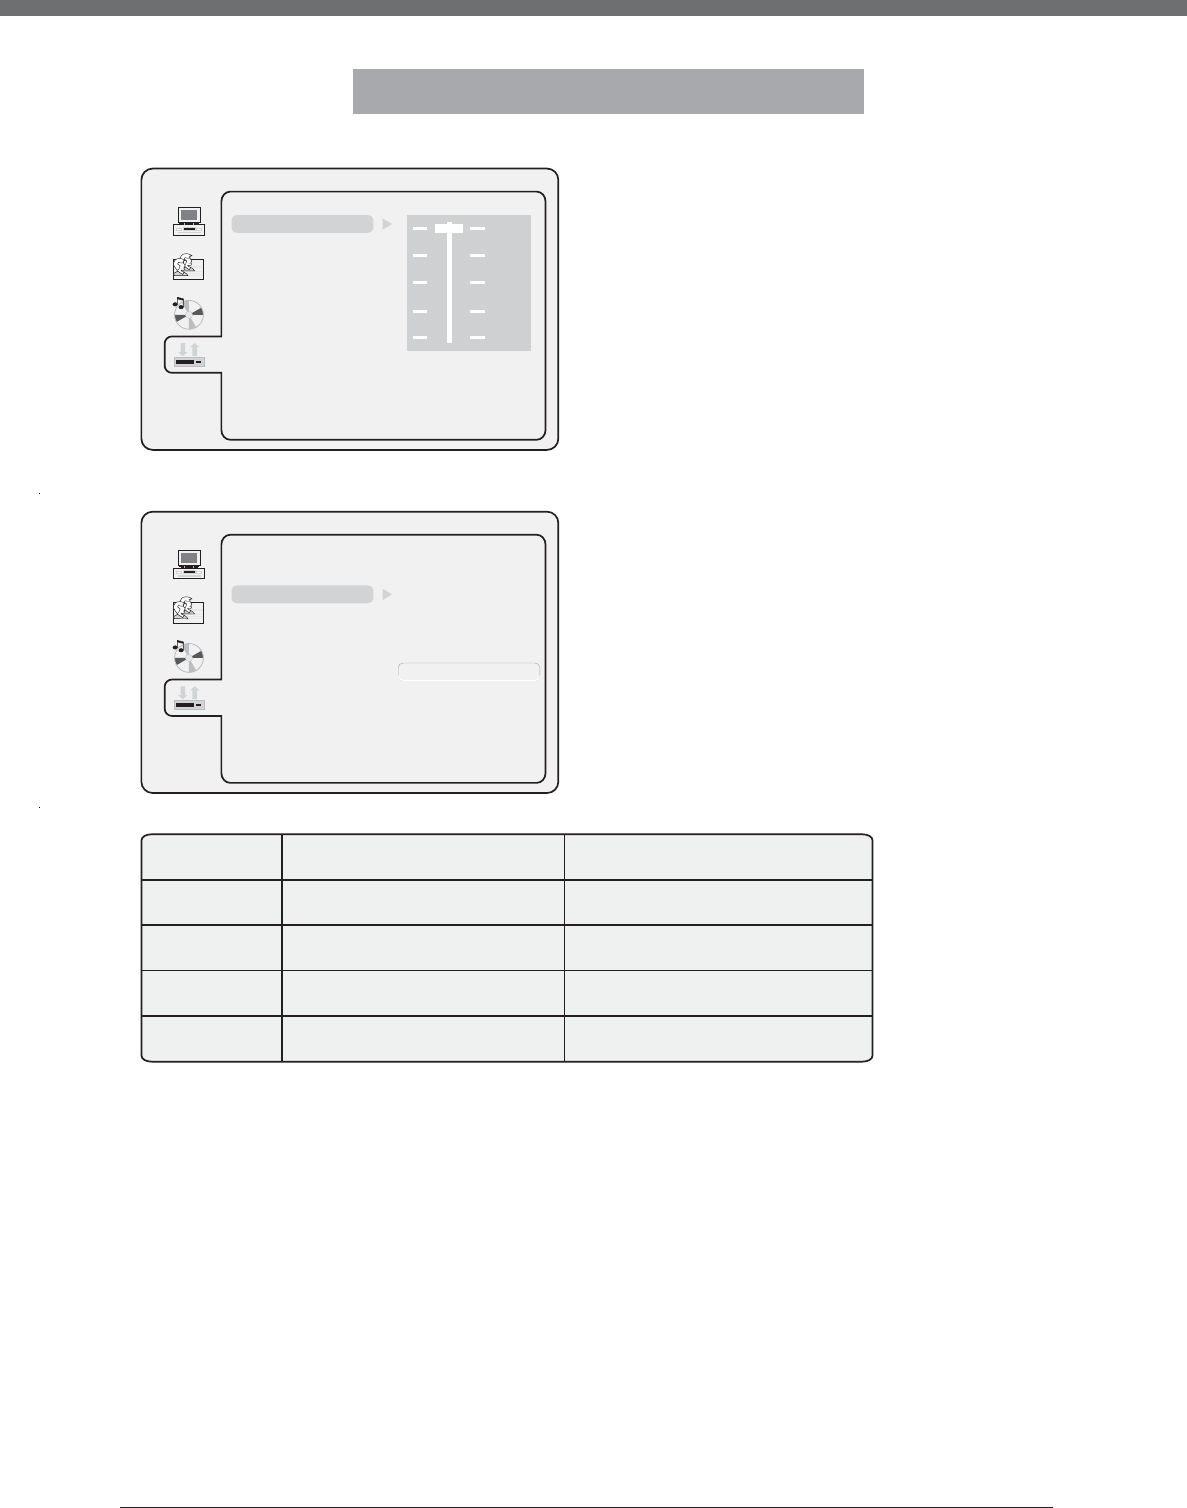
Audio-Einstellungen
Audio
Verl.
- Mit den Navigationstasten wählen Sie AUDIO
VERL.
,mitENTER
bestätigen Sie.
- Ihnen stehen 3 Modi zur Verfügung, mit den Navigationstasten wählen
Sie, mit ENTER bestätigen Sie (SPDIF /RAW / SPDIF AUS / SPDIF /
PCM).
- SPDIF / AUS: Der Koaxialausgang ist deaktiviert.
- SPDIF / RAW: Bei Anschluss eines Verstärkers/Receivers mit Dolby, MPEG wird das Original-Audio übertragen. Ihr Receiver muss mit einem
entsprechenden Decoder ausgestattet sein.
- SPDIF / PCM: Bei Anschluss eines 2-Kanal Verstärkers Wiedergabe der Dolby, MPEG Inhalte in Stereo.
Klang
-MitŸund źstellen Sie den Ton ein.
SPRACHE EINST.
EINST. VERL.
MENüSPRACHE
UNTERTIT. SPR.
AUDIO - SPRACHE
OSD SPRACHE
DEUTSCH
AUDIO - EINST.
EINST. VERL.
KLANG
AUDIO VERL.
SPDIF
/AUS
SPDIF/RAW
SPDIF
/PCM
AUDIO - EINST
EINST. VERL.
KLANG
AUDIO VERL.
b
+4
+2
+0
-2
-4
#
33
DVD-BETRIEB
Dolby Digital Einstellungen
Dynamik
- Einstellung der Kompressionsrate für Soundeffekte. Bei Auswahl von
VOLL ist das Spitzensignal gering, bei Auswahl von AUS ist das Signal
hoch.
- Umschalten zwischen vier Ausgangsmodi, STEREO, MONO L, MONO R,
MIX MONO. Siehe nachstehende Tabelle.
FULL
OFF
68
/
48/
28/
DIGITAL - EINST
EINST. VERL.
DUAL MONO
DYNAMIK
Dual Mono
DIGITAL - EINST.
EINST. VERL.
MIX MONO
MONO R
MONO L
STEREO
DYNAMIK
DUAL MONO
MODUSLINKER LAUTSPRECHERRECHTER LAUTSPRECHER
STEREOSTEREO-LSTEREO-R
L-MONOL-MONOL-MONO
R-MONOR-MONOR-MONO
MIX-MONOL-MONO+R-MONOL-MONO+R-MONO
34
DVD-BETRIEB
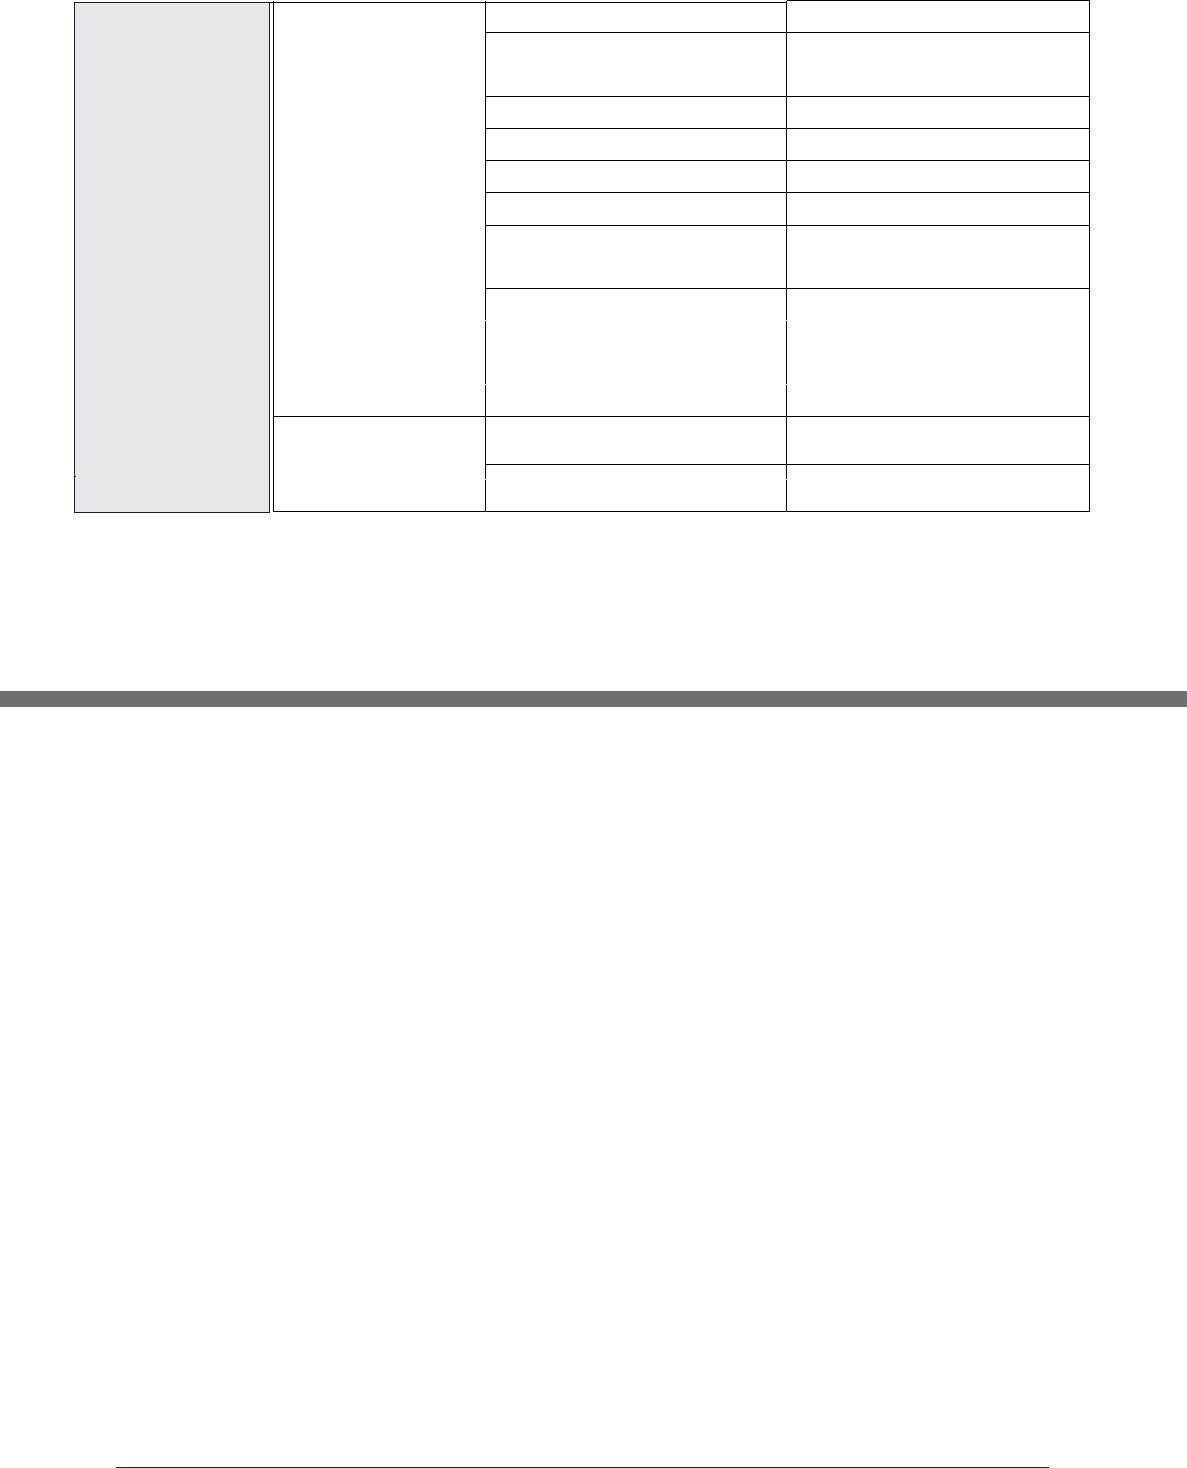
STÖRUNGSERKENNUNG
Bevor Sie sich mit einem Problem an den Kundendienst wenden, versuchen Sie bitte
zunächst eine Problemlösung anhand nachstehender Liste:
DISPLAY
ProblemMögliche Ursache und Lösungsvorschlag
•Überprüfen Sie, ob der Netzstecker in der Steckdose ist und
überprüfen Sie, ob das Gerät eingeschaltet ist.
Kein Bild, Status LED
leuchtet nicht.
•Überprüfen Sie, ob die Signalkabel der Quellengeräte
korrekt angeschlossen sind.
•Überprüfen Sie, ob das Quellengerät eingeschaltet ist.
•Überprüfen Sie, ob das Eingangssignal des Quellengeräts
den Spezifikationen des Fernsehers entspricht.
•Überprüfen Sie, ob die Einstellungen im PC-Menü mit den
Video-Ausgangseinstellungen des PC übereinstimmen.
•Stellen Sie neu ein.
Flimmerndes Bild.
•Hor Abtastfrequenz: 30kHz - 75kHz
•Ver Abtastfrequenz: 50 Hz - 75Hz
SOUND UND TV
ProblemMögliche Ursache und Lösungsvorschlag
Der Fernseher läßt sich
nicht einschalten.
•Überprüfen Sie, ob das Netzkabel richtig am Netzteil und
der Steckdose angeschlossen ist.
•Überprüfen Sie, ob die Audiokabel korrekt angeschlossen
sind.
•Überprüfen Sie die Lautstärke.
Kein Ton.
•Vergewissern Sie sich, dass die Ohrhörer nicht
angeschlossen sind.
•Überprüfen Sie die Lautstärke.
Lautstärke zu gering.
•Stellen Sie die Lautstärke ein.
Bild ist verschneit.
•Überprüfen Sie, ob die Antenne abgebrochen oder
beschädigt ist.
Die Fernbedienung
funktioniert nicht.
•Überprüfen Sie, ob die Batterien erschöpft sind.
•Überprüfen Sie, ob die Batterien richtigen Kontakt haben.
•Überzeugen Sie sich davon, dass sich keine Hindernisse
zwischen Fernbedienung und Sensor befinden.
•Überzeugen Sie sich davon, dass keine starken
Lichtquellen auf das Sensorfenster der Fernbedienung
Libble takes abuse of its services very seriously. We're committed to dealing with such abuse according to the laws in your country of residence. When you submit a report, we'll investigate it and take the appropriate action. We'll get back to you only if we require additional details or have more information to share.
Product:
Forumrules
To achieve meaningful questions, we apply the following rules:
First, read the manual;
Check if your question has been asked previously;
Try to ask your question as clearly as possible;
Did you already try to solve the problem? Please mention this;
Is your problem solved by a visitor then let him/her know in this forum;
To give a response to a question or answer, do not use this form but click on the button 'reply to this question';
Your question will be posted here and emailed to our subscribers. Therefore, avoid filling in personal details.
Register
Register getting emails for Salora LCD2222TNDVX at:
new questions and answers
new manuals
You will receive an email to register for one or both of the options.
Get your user manual by e-mail
Enter your email address to receive the manual of Salora LCD2222TNDVX in the language / languages: English, German, Dutch, French as an attachment in your email.
The manual is 3,57 mb in size.
You will receive the manual in your email within minutes. If you have not received an email, then probably have entered the wrong email address or your mailbox is too full. In addition, it may be that your ISP may have a maximum size for emails to receive.
The manual is sent by email. Check your email
If you have not received an email with the manual within fifteen minutes, it may be that you have a entered a wrong email address or that your ISP has set a maximum size to receive email that is smaller than the size of the manual.
The email address you have provided is not correct.
Please check the email address and correct it.
Your question is posted on this page
Would you like to receive an email when new answers and questions are posted? Please enter your email address.