489625
40
Zoom out
Zoom in
Previous page
1/60
Next page
48379 / 48095 / 48097 / 51097
Digital Music Player
Owner’s Manual
© 2008 Sakar International, Inc. All rights reserved.
Windows and the Windows logo are registered trademarks of Microsoft Corporation.
All other trademarks are the property of their respective companies.
2
Table of Contents
Key Features ····························································································································· 4
What your digital music player includes ···················································································· 5
Computer System Requirements······························································································· 5
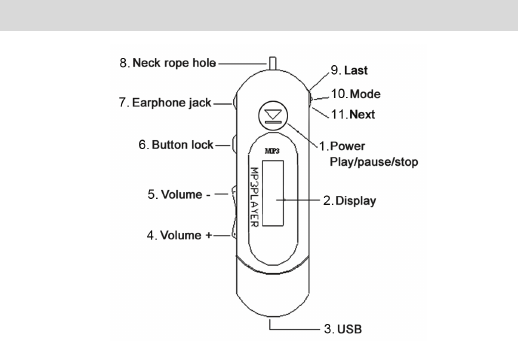
A quick look at your digital music player ···················································································· 6
Starting your digital music player······························································································· 7
The Button Functions················································································································· 7
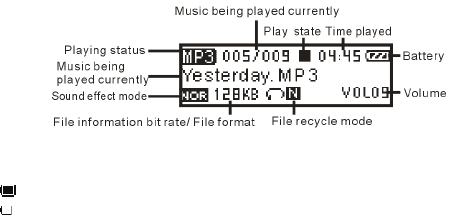
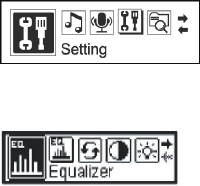
The Basic Functions ·················································································································· 9
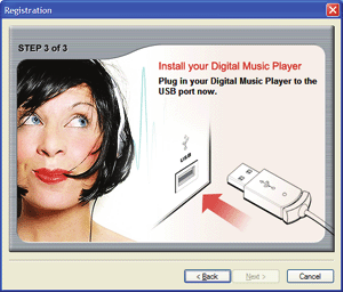
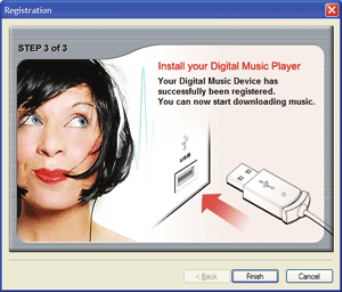
Connecting your player to your computer················································································ 21
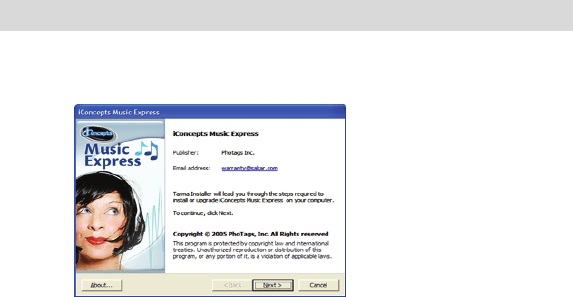
Music Express Software installation ························································································ 22
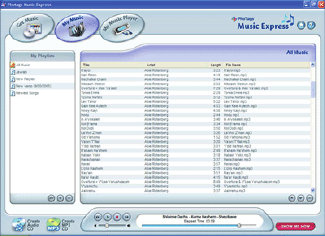
Using “Music Express” software ······························································································ 35
My Music Player Mode ············································································································ 47
Installation Guide of “Win98Driver” for Digital Music Player···················································· 51
Technical Specifications··········································································································· 58
Technical Support ···················································································································· 60
Warning···································································································································· 60
3
Introduction
Thank you for purchasing the 48379 48095 / 48097 / 51097 digital music player, voice
recorder and USB memory device. This new generation digital portable device supports
multiple music formats including MP3, WMA and WAV. Music Express software allows
you to upload and download music to and from your digital music player, create audio and
MP3 CDs, organize your songs in playlists, rip music from audio or MP3 CDs and much
more. Please read this manual carefully before using your new player.
We reserve the right to make changes to this manual without prior notice. If your player
does not function exactly as documented in the manual, please visit our website for the
latest product information.
NOTE: Certain features in “Music Express” are not supported by the Windows 2000 and
Vista operating systems. Please refer to the Help files in the “Music Express” application
for more details
.
4
Key Features
Streamlined design.
Supports multiple audio formats: MP3, WMA and WAV.
USB disk with no driver required.
Record/Replay- record external audio sources through the microphone and save
them as audio files in WAV format.
6-timbre equalizer- natural, rock, pop, classic, jazz, and bass.
Multiple play modes - normal, repeat one, repeat all, random repeat, Dir normal, Dir
all repeat, Dir random repeat.
Scheduled power off (2 minutes, 10 minutes, 30 minutes or Disable)
Animated menu.
5
What your digital music player includes
MP3 Player
Earphone
CD ROM
User Manual
USB Cable
Computer System Requirements
MS Windows 98/2000/XP/Vista (NOTE: Music Express is not supported on Win98)
6
A quick look at your digital music player
7
Starting your digital music player
Press and hold down the Play button for three seconds to turn on the player.
To switch off the player, press and hold down the Play button for three seconds.
The Button Functions
Play: Power on/play/pause/stop/power off
Mode: Access menus and sub menus
VOL+: Increase volume/ fast increase button
VOL-: Decrease volume/ fast decrease button
Next: Next item/ fast forward.
Last: Previous item/ fast rewind.
USB: USB connector
Earphone jack: Standard earphone jack
Pressing the Buttons:
The buttons have different functions depending on how long you hold them down.
Press and release: Press the button, and the operation will take effect immediately.
Press and hold: Press a button and hold for 1 to 2 seconds till the operation takes effect.
Hold: The operation keeps recurring while the button is depressed e.g. Fast forward, Fast
rewind.
8
The LCD Screen
Battery power level:
- fully charged battery (1.5V)
- low battery charge - replace battery.
Lock function:
Use the lock button to remain within one selected function and avoid accidentally
selecting other functions.
9
The Basic Functions
The Main Menu
To enter the main menu from another menu, press and hold down the mode button until
you see the main menu.
To enter a mode:
1. Select a mode using the last or next button.
2. Press the mode button to confirm your selection. Play Music Mode
10
1. From the main menu, select the Play Music mode using the last or next button.
2. Press the mode button to confirm your selection.
3. Press the Play button to play music.
4. While playing, press the Play button to pause playing.
5. To resume playing press the Play button again.
6. To stop playing, press and hold the Play button.
7. Press the Last button to select the previous song, or the Next button to select the
next one.
The Lyric Function
You can program your player to display the lyrics of a song while playing.
1. Prepare the song lyrics with ‘LRC” file or extention in a notepad file on your computer.
2. Save the lyrics file, with the same name as the song title, as an "LRC" file. For example, if
the song title is "Yesterday", then lyrics file must be named "Yesterday.lrc"
3. Upload the LRC file with the edited lyrics and the relevant song to the player.
4. Press and hold down the Mode button in the Play Music mode, and the lyrics of the song
will appear on the LCD screen. Press and release the Mode button again to exit.
11
The Play Music mode submenu: Replay
To enter the submenu:
1. From the main menu, select the Play Music mode using the last or next button.
2. Press the Mode button to confirm your selection.
3. Press the Play button to play music. (The player must be playing in order to enter the
submenu.)
4. Press the Mode button to enter the submenu.
To set your player to continuously replay a specific section of a file:
1. Press the mode button to confirm your selection.
2. An “A” icon will appear on the screen– to specify a start point push the Mode button.
3. To specify an end point push the Mode button again, and a “B” icon will appear on the
screen.
4. The player will continuously play the specified loop until it has been played the number of
times specified and then it will exit this mode. (To adjust the number of times it replays, see the
Repeat times section of this manual).
5. Press the Last button to reset point A again.
12
Voice Mode
The Voice mode enables you to record files on your MP3 player.
1. From the main menu, select Voice mode using the last or next button.
2. Press the mode button to confirm your selection.
3. Press the mode button to start recording.
4. Press the play button to pause recording, press again to resume recording.
5. Press and hold the mode button to stop recording and save the file.
To listen to recordings, press the next or last button to select the recording you want to
play, and the Play button to start playing. Press the Play button again to pause, resume,
or stop playing a recording.
13
Setting Mode
Equalizer
To access the 6-timbre equalizer: Normal, pop, rock, classical, jazz, and bass:
1. Select the Equalizer submenu as described above.
2. Press the mode button to confirm your selection.
3. Using the next or last button select: Normal, pop, rock, classical, jazz, or bass.
4. Press the mode button to confirm your selection.
14
Repeat
The Repeat mode allows you to define the number of times a recording or song should be
repeated.
To choose one of the multiple playing modes:
1. Select the Repeat submenu as described above.
2. Press the mode button to confirm your selection.
3. Using the next or last button select Normal, Repeat one, Repeat all, Random
repeat, Dir Normal, Dir all repeat or Dir random repeat.
4. Press the mode button to confirm your selection.
15
Normal
After playing the songs in the current folder, the player will continue
to play those in the next folder and will continue to play all the songs
in all the folders. When all the songs have been played, it stops
playing.
Repeat one
Play an individual song repeatedly.
Repeat all
Play all songs in all folders repeatedly.
Random repeat
Play all the songs in all folders in random order
Dir normal
Play all the songs in the current folder. When all the songs in the
current folder have been played, it stops playing.
Dir all repeat
Play all the songs in the current folder repeatedly.
Dir random repeat
Play all the songs in the current folder in random order.
16
Contrast
Select the Contrast submenu as described above. Use the next or last button to define
the contrast levels on the LCD screen. Confirm your selection by pressing the Mode
button.
Backlight
Select the Backlight submenu as described above. Use the next or last button to define
the settings for the Backlight on the LCD screen, ranging from Always off to 5 seconds, 10
seconds, and Always on. Confirm your selection by pressing the Mode button.
17
Power Set
Select the Power Set submenu as described above. You can set the amount of time it
takes for the player to automatically turn off when the player is idle. Use the next or last
button to set your choice: 2 minutes, 10 minutes, 30 minutes or Disable. Confirm your
selection by pressing the Mode button.
Record Set
Select the Record Set submenu as described above. Use the next or last button to
choose between 32 Kbps, 44 Kbps, 64 Kbps, and 88 Kbps. Confirm your selection by
pressing the Mode button.
18
Language
Select the Language submenu as described above. Use the next or last button to choose
the language default on your LCD screen: English, French, Chinese(Trad),
Chinese(Simp), German, Spanish, Italian, Portuguese or Poland.Confirm your selection
by pressing the Mode button.
Exit
Press the Mode button on the Exit option to leave the Setting submenu.
Info Mode
19
This mode displays information regarding the amount of space used and available on
your MP3 player. Select the menu by pressing the Mode button. The screen will show for
a number of seconds and then go back to the previous menu screen.
Folder Mode
This mode displays all the Voice recordings saved on your MP3 player. Select the menu
by pressing the Mode button. The screen will show for a number of seconds and then go
back to the previous menu screen.
Files can be deleted from the player from this mode:
1. Enter the Folder mode from the Main Menu.
2. Identifying the file you want, press the Mode button to select Play Now or Delete.
3. Press the Mode button again to delete a file.
20
Exit
Press the Mode button on the Exit option to leave the main menu.
USB Mode
Enter the USB mode by connecting the MP3 player to your PC. The player supports
Windows 98 (driver required), and operating systems above Windows 2000 (no driver
required), Mac OS 10.3 and above, and Linux Redhat 8.0 and above.
The Music Express software however does not support Win98.
The driver for the disk can be installed from the MP3 Player Utilities & Driver folder
located on the CD-Rom packaged with the player.
21
Connecting your player to your computer
USB disk:
You can use your player as a USB removable disk. Plug it into the USB port.
The player may display the following modes after connecting to the PC:
1 Standby mode
2 Downloading mode
3 Uploading mode
4 Formatting mode
22
Your player may be powered using the USB connection which allows it to play even when there
is no battery. In Standby mode, press the Mode button, to enter the main menu.
Music Express Software installation
1. Insert the Software CD that came with your Digital Music Players into the CD-ROM
drive. Make sure that your Digital Music Player is NOT connected to the computer.
2. On the “Music Express" screen, click the “Next” button.
23
3. Please review the license terms and click the “Agree” button to continue.
24
4. Let the “Music Express” installer create the folder where the program will be installed
to, and then click “Install”.
25
5. Click “Finish” to let the “Music Express” installer finish the installation program and
launch the application. (To launch “Music Express” next time, double click on the
program icon on your desktop.)
6. Congratulations!! You have successfully installed the “Music Express” software.
26
Digital Music Player Registration
Make sure that your Digital Music Player is NOT connected to the computer.
Note: The first time you open “Music Express” the wizard will open automatically requesting
device installation.
1. On the “Digital music player installation wizard" screen, click the “Next” button.
27
2. Select your Digital Music Player model from the drop down list and click the “Next” button.
28
3. Insert a name for the Digital Music Player device and click the “Next” button.
29
4. Plug your Digital Music Player to the USB port.
30
5. Once the computer recognizes that you plugged your device, an “Install now” button will
show, press it.
31
6. When the installation is done, a message will come up saying that the device has been
successfully registered. You are now ready to use Music Express and all its features!
32
The next time you plug in your Digital Music Player device, it will automatically open “Music
Express” and display its contents in “My music player” mode. (For more information please refer
to the help file in the software.)
Device Auto-Detect
The Device Auto-Detect detects your Digital Music Player as soon as you plug it into the USB
port. The "Music Express" software opens in "My music player" mode, displaying the contents
of your Digital Music Player and allowing for upload of new songs. (Only Content that was
uploaded through "Music Express").
The "Music Express" Auto-Detect icon
appears in the notification area on system startup.
33
To disable the Auto-Detect on startup, right click on the Auto-Detect icon in the notification area and
press "Preferences" or press the "Preferences" button in "Music Express" main window and
uncheck the check box.
34
To reset the Auto-Detect to launch at system start up do one of the following:
Right click on the Auto-Detect icon in the notification area, press "Preferences" and check the
check box.
Click the "Preferences" button on the "Music Express" main window, choose the Auto-Detect tab
and check the check box.
Press the "iConcepts Music Express" from the programs menu and choose "Launch Auto Detect".
35
Using “Music Express” software
Get Music Mode
Click the “Get Music” button on the “Main Menu" window or in any other mode to rip an audio
or MP3 CD, to find music on your computer or to copy music from any removable drive.
36
Rip an Audio. This feature requires Windows XP.
Rip music from a music CD, copy it to your computer and add it to your music library.
1. Click the “Rip CD” button in the “Get music” mode.
2. Click the “Load CD” button to load the CD from the CD drive.
Note: The default name of the CD can be changed.
3. Mark the songs you want to rip (to choose all of the songs on the CD press the “Select
all” button)
4. Press the “Browse” button to choose the folder you want to copy the songs to.
5. Choose a playlist to save the ripped songs in:
a. Create a new playlist.
b. Choose from an existing playlist.
c. Don’t add songs to any playlist.
6. Press the “Rip CD” button to start the ripping process.
37
Find music on your computer
Scan your computer for music files and add them to your music library.
1. Click the “Find music” button in the “Get music” mode.
2. Select a search type:
a. Quick search- Search in “My music” folder. This is recommended.
b. Full search- Search all hard drives on this computer.
c. Custom search- Search a selected folder.
3. Add songs to a playlist:
a. Create new playlist.
b. Choose from an existing playlist.
c. Don’t add songs to any playlist.
4. Click the “Begin search” button.
5. When the search is finished, the songs added will be listed in the text box.
38
Copy music from removable drive
Copy music files from any removable drive connected to your computer and add them to your
music library.
1. Make sure the removable drive is connected to your computer.
2. Click the “Copy music from removable driver” button in the “Get music” mode.
3. Select the removable drive from the drives list.
4. Choose a playlist to add the songs to:
a. Create a new playlist.
b. Choose from an existing playlist.
c. Don’t add songs to any playlist.
5. Click the “Begin search” button.
6. When the search is finished, the songs added will be listed in the text box.
39
My Music Mode
Listen, view and organize all of your music files in playlists using the My Music Mode.
Playlist
Click the “All music” playlist in the “My playlists” window to view all of the songs on your
computer in the “View playlists” window on the right.
40
Create a new Playlist
1. Click the
Create button to create a new playlist
2. A dialogue box will appear; Insert a playlist name and press OK.
3. The new playlist will now be listed in the “My playlists” window.
Add music files to a Playlist
1. Select the music file/files you wish to add from the “All music” playlist or another existing
playlist.
2. Click on the
“Add music to playlist” button and choose the playlist you want the
song to be in or drag the selected music file/files onto the playlist in the “My playlists” window
you want the song to be in.
(In order to select more than one song press the CTRL button and select the songs you wish
to add to the playlist.)
40


Need help? Post your question in this forum.

Forumrules


Report abuse

Libble takes abuse of its services very seriously. We're committed to dealing with such abuse according to the laws in your country of residence. When you submit a report, we'll investigate it and take the appropriate action. We'll get back to you only if we require additional details or have more information to share.

Product:

For example, Anti-Semitic content, racist content, or material that could result in a violent physical act.

For example, a credit card number, a personal identification number, or an unlisted home address. Note that email addresses and full names are not considered private information.

Forumrules

To achieve meaningful questions, we apply the following rules:

Register

Register getting emails for Sakar 48379 at:


You will receive an email to register for one or both of the options.


Get your user manual by e-mail

Enter your email address to receive the manual of Sakar 48379 in the language / languages: English as an attachment in your email.

The manual is 1,95 mb in size.


You will receive the manual in your email within minutes. If you have not received an email, then probably have entered the wrong email address or your mailbox is too full. In addition, it may be that your ISP may have a maximum size for emails to receive.

The manual is sent by email. Check your email

If you have not received an email with the manual within fifteen minutes, it may be that you have a entered a wrong email address or that your ISP has set a maximum size to receive email that is smaller than the size of the manual.

The email address you have provided is not correct.

Please check the email address and correct it.

Your question is posted on this page

Would you like to receive an email when new answers and questions are posted? Please enter your email address.


Info