485238
33
Zoom out
Zoom in
Previous page
1/40
Next page
1
CONTENTS
1. SAFETY............................................................................................................................................................ 3
2. INTRODUCTION............................................................................................................................................ 3
3. FEATURES....................................................................................................................................................... 4
4. REMOTE CONTROL..................................................................................................................................... 5
5. FRONT PANEL ............................................................................................................................................... 6
6. REAR PANEL.................................................................................................................................................. 7
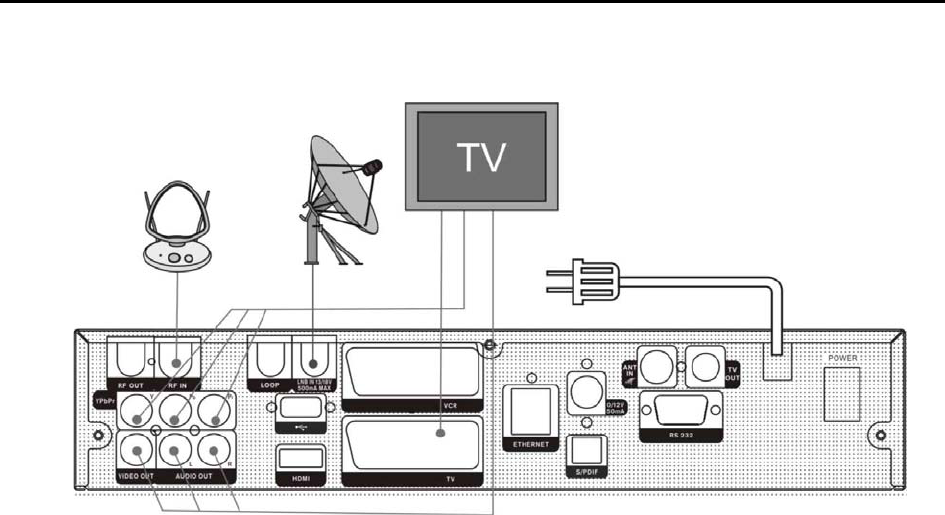
7. CONNECTING YOUR SYSTEM .................................................................................................................. 8
8. BASIC OPERATIONS .................................................................................................................................. 10
8.1 TURN ON STB................................................................................................................................................ 10
8.2 POWER........................................................................................................................................................... 10
8.3 CHANNEL UP/CHANNEL DOWN..................................................................................................................... 10
8.4 VOLUME UP/VOLUME DOWN-....................................................................................................................... 10
8.5 NUMBER........................................................................................................................................................ 10
8.6 MUTE ............................................................................................................................................................ 10
8.7 PAUSE............................................................................................................................................................ 10
8.8 RECALL ......................................................................................................................................................... 10
8.9 FAVORITE ...................................................................................................................................................... 10
8.10 AUDIO........................................................................................................................................................ 11
8.11 INFORMATION ............................................................................................................................................ 11
8.12 EPG........................................................................................................................................................... 11
8.13 TV/RADIO................................................................................................................................................ 12
8.14 CHANNEL LIST........................................................................................................................................... 12
8.15 SLEEP......................................................................................................................................................... 13
8.16 PAGE UP/PAGE DOWN ............................................................................................................................... 13
8.17 TEXT ........................................................................................................................................................ 13
8.18 SUBTITLE ................................................................................................................................................... 13
8.19 FIND........................................................................................................................................................... 13
8.20 ZOOM......................................................................................................................................................... 13
8.21 TV/RCV.................................................................................................................................................... 14
8.22 MENU......................................................................................................................................................... 14
8.23 VIDEO FORMAT.......................................................................................................................................... 14
8.24 EXIT........................................................................................................................................................... 14
9. SERVICE........................................................................................................................................................ 14
9.1 ORGANIZING SERVICE ................................................................................................................................... 14
i. Group............................................................................................................................................................ 14
ii. Options...................................................................................................................................................... 15
iii. Move.......................................................................................................................................................... 15
iv. Lock........................................................................................................................................................... 15
v. Delete............................................................................................................................................................ 15
vi. Skip and rename........................................................................................................................................ 16
vii. Find........................................................................................................................................................... 16
9.2 ORGANIZING FAVOURITES............................................................................................................................. 16
10. INSTALLATION ........................................................................................................................................... 17
10.1 SATELLITE INSTALLATION ......................................................................................................................... 17
10.2 FASTSCAN SATELLITE ............................................................................................................................... 19
10.3 AUTO INSTALLATION ................................................................................................................................. 19
10.4 SATELLITE GUIDE ...................................................................................................................................... 19
10.5 TERRESTRIAL INSTALLATION (OPTIONAL)................................................................................................. 20
11. PREFERENCE............................................................................................................................................... 21
11.1 LANGUAGE ................................................................................................................................................ 21
11.2 PARENTAL CONTROL ................................................................................................................................. 21
2
11.3 TIME SETTING............................................................................................................................................ 22
11.4 TIMER ........................................................................................................................................................ 22
11.5 A/V CONTROL ........................................................................................................................................... 23
11.6 MISCELLANEOUS SETTINGS ....................................................................................................................... 24
11.7 OSD SETTING ............................................................................................................................................ 24
12. SYSTEM ......................................................................................................................................................... 25
12.1 INFORMATION ............................................................................................................................................ 25
12.2 DEFAULT SETTING ..................................................................................................................................... 26
12.3 SOFTWARE UPGRADE................................................................................................................................. 27
12.4 UPGRADE BY USB..................................................................................................................................... 28
12.5 BACKUP TO USB........................................................................................................................................ 28
13. GAME ............................................................................................................................................................. 28
13.1 TETRIS ....................................................................................................................................................... 28
13.2 SNAKE........................................................................................................................................................ 28
13.3 OTHELLO ................................................................................................................................................... 29
14. CONDITIONAL ACCESS ............................................................................................................................ 29
14.1 CA SETTING............................................................................................................................................... 29
14.2 COMMON INTERFACE................................................................................................................................. 30
15. USB.................................................................................................................................................................. 30
15.1 FILE LIST ................................................................................................................................................... 30
15.2 RECORD MANAGER.................................................................................................................................... 33
15.3 STORAGE INFORMATION ............................................................................................................................ 33
15.4 PVR SETTING ............................................................................................................................................ 34
15.5 USB SPEED TEST ....................................................................................................................................... 34
16. INTERNET(OPTIONAL)............................................................................................................................. 35
16.1 NETWORK LOCAL SETTING........................................................................................................................ 35
16.2 HTTP UPGRADE.......................................................................................................................................... 35
16.3 FTP UPGRADE ........................................................................................................................................... 35
16.4 FTP............................................................................................................................................................ 35
17. NEW FEATURES.......................................................................................................................................... 37
17.1 TIME SHIFT ................................................................................................................................................ 37
17.2 RECORD ..................................................................................................................................................... 37
18. TROUBLE SHOOTING................................................................................................................................ 38
19. SPECIFICATIONS........................................................................................................................................ 39
3
1. SAFETY
This HD Receiver has been manufactured to satisfy the international safety standards.
Please read the following safety precautions carefully.
MAINS SUPPLY: 100 - 250V AC 50/60Hz
OVERLOADING: Do not overload wall outlet, extension cord or adapter as this may result in fire or
electric shock.
LIQUIDS: Keep liquids away from the HD Receiver. The apparatus shall not be exposed to dripping
or splashing and that no objects filled with liquids, such as vases, shall be placed on the apparatus.
CLEANING: Disconnect the HD Receiver from the wall outlet before cleaning .Use a light damp cloth
(no solvents) to dust the HD Receiver.
VENTILATION: The slots on top of the HD Receiver must be left uncovered to allow proper airflow to
the unit. Do not stand the HD Receiver on soft furnishings or carpets. Do not expose the HD Receiver
to direct sunlight or do not place it near a heater. Do not stack electronic equipments on top of the HD
Receiver.
ATTACHMENTS: Do not use any attachments that are not recommended as these may cause
hazard or damage the HD Receiver.
CONNECTION TO THE SATELLITE DISH LNB: Disconnect the HD Receiver from the mains before
connecting or disconnecting the cable from the satellite dish.
FAILURE TO DO SO CAN DAMAGE THE LNB.
CONNECTION TO THE TV: Disconnect the HD Receiver from the mains before connecting or
disconnecting the cable from the satellite dish.
FAILURE TO DO SO CAN DAMAGE THE TV.
EARTHING: The LNB cable MUST BE EARTHED to the system earth for the satellite dish.
LOCATION: Place the HD Receiver indoor in order not to expose to lightening, rain or sunlight.
2. INTRODUCTION
Thank you for purchasing the HD Receiver.
This HD Receiver is fully compliant with the international DVB standard and thus transmits digital
images, sounds, information guides and teletext directly to your TV through the satellite broadcasting.
Now you can comfortably see and receive digitally transmitted music, news, movie and sports satellite
broadcasts in your office or at your home. You can enjoy interesting games embedded in HD
Receiver.
In service search section, both the automatic service search method and the manual search mode
are provided. Also it supports DiSEqC 1.0, 1.2 and USALS, enabling you to move your antenna in
order to focus preferred satellite. You can save up to 8000 TV and Radio services and work around
with the favorite, Lock, Delete, Move and Sort functions.
The menu is very modern and supports multiple languages. All functions can be carried out using the
remote control and some of the functions can also be carried out using the front panel. The HD
Receiver is easy to use and adaptable for future advances. Please be aware that new software may
change the functions of the HD Receiver.
4
If you have any difficulties concerning the operation of your HD Receiver, please refer to the relevant
section of this manual, including the ‘Troubleshooting’. This Manual will provide you with useful
information on using the HD Receiver.
3. FEATURES
z MPEG-Fully DVB-S2 / T+S2 Combo (H.264) HD compliant
z 8000 channels (TV and Radio) programmable
z Multilingual menu text support
z Channel switching time less than 1 second
z Channel list editing
z Favorite channel list editing
z True-color On-Screen Display (OSD)
z Full Picture In Graphic (PIG) function
z Electronic Program Guide (EPG) for on screen channel information
z Subtitle supported
z Teletext supported by VBI insertion and software emulation
z Parental lock facility by channel and program event
z Program and Channel information transfer from receiver to receiver
z Exciting games embedded
z S/PDIF for digital audio or Dolby digital bitstream output
z DiSEqC 1.0, 1.1, 1.2 and USALS
z HDMI HD Video/Audio Output
z Software update via LAN port
z LAN 10/100 Mbps Ethernet
z USB 2.0 Host
z VFD Display for service information(optional)
z RTC (Real-Time-Clock)
z Time Shift
z Video Recording
z Recording one channel and Time Shifting another channel (optional)
5
4. Remote Control
You can power on/off the receiver, operate on screen menu, and
use a variety of hot key function.
POWER
To switch your receiver on from standby or standby to on.
MUTE
Used to enable or disable the audio
NUMERIC KEYS
Used to select channels or enter programming parameters
TV / RADIO
Receiver switches between TV and Radio mode.
(ZOOM)
Press
key select zoom times, from X1 to X16.
(RECALL)
Return to the previous menu or status.
AUDIO
Audio channels setup, to select audio mode; Left, Right , Stereo, Mono.
TV/SAT
Receiver switches between TV and receive mode.
INFO
To display channel status or various program information of current service.
EPG
Display the Programs guide on screen when available.
MENU
Displays the Main Menu on the screen, or return to the previous menu or
status.
EXIT
Cancel the user selection and return to the viewing mode from a menu.
OK
To select menu option, or to updated on entry.
<,> KEY
To adjust volume level, or to move cursor left or right in the menu.
^,v KEY
To change channels, or to move cursor up or down in the menu.
PAGE+/PAGE-
To move up the cursor to the next or previous page
in the menu or channel list.
REC
To start the recording.
TXT(YELLOW KEY)
Shows teletext or subtitle information of the current channel supports.
OPTION(GREEN KEY)
Shows NVOD information of the current channel supports.
(FIND)
Use to prompt find channels sort by character.
TIMER
Press timer key you can setup up the Standby time.
V.FORMAT
Press V.FORMAT button to switch the display mode among "By source", "By
native TV ", "480i", "480P”,”576i”,”576p",”720P” and "1080i".
FAV(FAVORITE)
To set receiver to the favorite server mode,
display the favorite channel.
SAT
Display the satellite list at normal picture.
FOLDER
Press this button to enter the Record Manager menu directly.
TMS(Time Shift)
Press this button to display Time Shift info bar.
Play
To play the MP3, JPEG, or Record files.
Stop
To stop the Time Shift, recording, or MP3/JPEG player.
PAUSE
Used to select the freeze function.
6
Press once to freeze the screen picture.
FB
To start Fast Backward function.
FF
To start Fast Forward function.
SB
To start Slow Backward function.
SF
To start Slow Forward function
USB
To remove the USB Hard Disk safely.
/ PREV/NEXT
Switch to preview or next file in play mode
5. Front panel
POWER KEY: To switch the receiver power on/stand by
MENU KEYTo enter into the main menu.
<,> KEY: To adjust volume level, or to move cursor left or right in the menu.
^, v KEY : To change channels, or to move cursor up or down in the menu
OK KEY: To see TV/Radio channel list, or to confirm in the menu.
Remote Sensor: Detects infrared signal from remote control unit
Display: Indicates operating status of receiver
POWER Indicator: while the receiver is power on and at standby mode.
Signal Indicator: When receiving signal is strong, the signal indicator is lighted.
Card Slot: Two slots CA Interface for Conax, Insert the smart card chip side up!
Common Interface: Tow socket for Conditional Access Modules CAM.
Display: (VFD type) Indicates operating status of receiver.(Optional)
VFD Display:
1. HDD spent space and available space indicator
2. Indicate which DVB standard of the receiver (DVB-S, DVB-T, DVB-C)
3. Indicate the recording from which Tuner. (optional)
4. Indicate which operation status such as PLAY, PAUSE
5. Will high light when MUTE the receiver
6. Indicate the play mode (Loop or not)
7. Will high light when decode the Dolby Digital audio
8. Will high light when the Smart card insert to the card reader
9. Will high light when the Module insert to the CI slot
10. Will high light when the USB Harddisk connected to the receiver
7
11. Indicate the PIP function
12. Indicate the MP3 player, will high light when play MP3
13. Will high light when decode the Dolby Digital audio
14. Indicate now is watching TV program
15. Indicate now is watching Radio program
16. Will high light when the warning information is displayed on screen
17. Indicate the TimeShift function Enable or not, will high light when TimeShift function is Enabled
18. Indicate the signal status, will high light when the signal is ok
19. Indicate the reading or writing to the Hard disk,
20. Indicate Standby or not
21. Will blinking when use the RCU to operating the receiver
22. Display the time
23. Indicate the time is AM or PM
24. Display the Program name or Menu name
6. Rear Panel
A
B
Please refer to the diagram above for all possible connections of your receiver
Do not connect the unit to the mains socket until all other connections have been made and checked.
Your configuration can vary depending on model
RF OUT: This enables the connection of another receiver. (Optional)
RF IN : This port is to connect the coaxial cable from terrestrial antenna. (Optional)
POWER ON/OFF SWITCH: To switch ON/OFF the receiver power supply.
LOOP: This enables the connection of another receiver. (Optional)
LNB IN 13/18V 500mA MAX: This port is to connect the coaxial cable from LNB of your Dish.
TV SCART: This is used to connect your TV through SCART cable.
VCR SCART: Audio and Video input/output socket for the Video cassette recorder or suchlike.
VIDEO OUT/CVBS : This RCA connector is used to connect any external video.
0/12V 50mA:This is used to Connect 12V to an external 0V/12V switch.
AUDIO R/L : These RCA connectors are used to connect any external audio amp or system.
8
S/PDIF: Digital Audio interface, connect to AV amplifier S/PDIF input terminal.
HDMI: Audio and Video output socket for TV set with HDMI Input Jack only.
USB: USB 2.0 Host, connect to USB hard disk, or flash disk
RS 232C SERIAL PORT: This is used to connect your receiver to a computer through a serial cable.
Ethernet: Network port, you can get a new software updates from this port.
YPbPr: Component video output socket for the television set. (Optional)
7. Connecting Your System
There are four ways to connect the receiver to your existing TV system. We recommend using one of
the following cases for the best result:
1. If you have a high definition television set, you should use a HDMI cable for best result, Plug one
end of the cable into the HDMI socket on the receiver, and the other end into the matching socket on
your television. In this case, you do not have to make audio connections because the HDMI connector
can output stereo audio or Dolby digital audio.
2. Connect one end of SCART cable to the TV (SCART) jack on the back of the receiver and the other
end to a SCART jack on your TV.
3. Connect one end of RCA cable to the RCA jack on the back of the receiver and the other end to a
RCA jack on your TV.
4. You will need to obtain a component video Cable (RCA cable) to use the component video
connector, Plug one end of the Cables into the Y(Green), P
b(Blue) and Pr(Red) Sockets on the digital
receiver, and the other end into the matching sockets on your television.
A:
9
B:
Finally connect the coaxial cable from the LNB to the LNB IN jack on the receiver.
With External Audio / Hi-Fi System
To connect any external Audio Hi-Fi system, the receiver has been provided with two RCA connectors
at the back of the receiver marked with Audio L and R.
Connect an RCA stereo cable from the AUDIO L, R jacks on the back of the receiver to the LINE,
AUX, SPARE OR EXTRA input jacks on your Hi-Fi System.
7.1 TV with Motorized System (DiSEqC 1.2)
Connect one end of your coaxial cable to the LNB IN connector on the receiver and the other end to
the REC or Receiver connector on the DiSEqC 1.2 motor.
Connect the coaxial cable from the LNB to the LNB connector on the DiSEqC 1.2 motor.
All our receivers are designed to be DiSEqC 1.0 and DiSEqC 1.2 compatible.
This allows multiple antennas to be connected to the receiver at the same time.
If you have two or more fixed antennas or LNBs, then we recommend you use a DiSEqC 1.0
switch.
Connect the coaxial cable from the first LNB to the LNB 1 or LNB A input connector of the DiSEqC
switch.
Do the same for any other LNBs that you have.
Connect one end of a coaxial cable to the RF output connector of the DiSEqC switch,
connect the other end to the LNB IN socket on the receiver.
To the digital receiver, you can connect either a single satellite antenna directly or LNB of
multi-feed equipment.
33
z Yellow Key:
Delete selected image if press Yellow Key.
z Blue Key:
Press Blue Key, will delete all image files in play
list, but system will remind you “ Are you sure? ”
before practical operation, if you select Yes, all
file will be deleted and Play list window will be
closed.
Blue key:
All the Image files in current directory are added
into Image play list by Blue key, and screen
display “Add to Play List”, display will disappear
after one second.
15.1.4 Software
If has software in current directory, you can press
[Green] key to upgrade.
15.1.5 All
You can preview all files in this menu.
15.2 Record Manager
In this menu you can see the record files, and
you can edit it:
1 To Lock the file, please press "Green"
Button.
2 To Delete the file, please press "Blue"
Button.
3 To Rename the file, please press "Red"
Button.
4 To play the file with small window, please
press "
" Button.
5 To play the file with full screen, please
press "OK" Button.
15.3 Storage Information
Press "OK" button to enter the HDD Information
menu like the below picture, in this menu you
can see the details information about the HDD.
33


Need help? Post your question in this forum.

Forumrules


Report abuse

Libble takes abuse of its services very seriously. We're committed to dealing with such abuse according to the laws in your country of residence. When you submit a report, we'll investigate it and take the appropriate action. We'll get back to you only if we require additional details or have more information to share.

Product:

For example, Anti-Semitic content, racist content, or material that could result in a violent physical act.

For example, a credit card number, a personal identification number, or an unlisted home address. Note that email addresses and full names are not considered private information.

Forumrules

To achieve meaningful questions, we apply the following rules:

Register

Register getting emails for SAB Titan at:


You will receive an email to register for one or both of the options.


Get your user manual by e-mail

Enter your email address to receive the manual of SAB Titan in the language / languages: English as an attachment in your email.

The manual is 2,26 mb in size.


You will receive the manual in your email within minutes. If you have not received an email, then probably have entered the wrong email address or your mailbox is too full. In addition, it may be that your ISP may have a maximum size for emails to receive.

Others manual(s) of SAB Titan

SAB Titan User Manual - German - 44 pages

SAB Titan User Manual - Dutch - 44 pages


The manual is sent by email. Check your email

If you have not received an email with the manual within fifteen minutes, it may be that you have a entered a wrong email address or that your ISP has set a maximum size to receive email that is smaller than the size of the manual.

The email address you have provided is not correct.

Please check the email address and correct it.

Your question is posted on this page

Would you like to receive an email when new answers and questions are posted? Please enter your email address.


Info