36880
50
Zoom out
Zoom in
Previous page
1/51
Next page
EN-1
FCC STATEMENT
This device complies with Part 15 of the FCC Rules. Operation is subject to the
following two conditions:
(1) This device may not cause harmful interference, and
(2) This device must accept any interference received, including interference that may
cause undesired operation.
Note:
This equipment has been tested and found to comply with the limits for Class B digital devices,
pursuant to Part 15 of the FCC rules. These limits are designed to provide reasonable protection
against harmful interference in a residential installation.This equipment generates uses and can
radiate radio frequency energy and, if not installed and used in accordance with the instructions,
may cause harmful interference to radio communications. However, there is no guarantee that
interference will not occur in a particular installation. If this equipment does cause harmful
interference to radio or television reception, which can be determined by turning the equipment off
and on, the user is encouraged to try to correct the interference by one or more of the following
measures:
Reorient or relocate the receiving antenna.
Increase the separation between the equipment and receiver.
Connect the equipment into an outlet on a circuit different from that to which the receiver is
connected.
Consult the dealer or an experienced radio/TV technician for help.
Use of shielded cable is required to comply with Class B limits in Subpart B of Part 15
of the FCC rules.
Do not make any changes or modifications to the equipment unless otherwise
specified in the manual. If such changes or modifications should be made, you could
be required to stop operation of the equipment.
Notice
If static electricity or electromagnetism causes data transfer to discontinue midway
(fail), restart the application or disconnect and connect the communication cable
(USB, etc.) again.
EN-2
READ THIS FIRST
Trademark Information
Microsoft
®
and Windows
®
are U.S. registered trademarks of Microsoft Corporation.
Pentium
®
is a registered trademark of Intel Corporation.
Macintosh is a trademark of Apple Computer, Inc.
SD™ is a trademark.
Other names and products may be trademarks or registered trademarks of their
respective owners.
Product Information
Product design and specifications are subject to change without notice. This
includes primary product specifications, software, software drivers, and user’s
manual. This User Manual is a general reference guide for the product.
The product and accessories that come with your camera may be different from
those described in this manual. This is due to the fact that different retailers often
specify slightly different product inclusions and accessories to suit their market
requirements, customer demographics, and geographical preferences. Products
very often vary between retailers especially with accessories such as batteries,
chargers, AC adapters, memory cards, cables, pouches, and language support.
Occasionally a retailer will specify a unique product color, appearance, and
internal memory capacity. Contact your dealer for precise product definition and
included accessories.
The illustrations in this manual are for the purpose of explanation and may differ
from the actual design of your camera.
The manufacturer assumes no liability for any errors or discrepancies in this user
manual.
EN-3
SAFETY INSTRUCTIONS
Read and understand all Warnings and Cautions before using this product.
Warnings
If foreign objects or water have entered the camera, turn the power off
and remove the battery.
Continued use might cause fire or electric shock. Consult the store of
purchase.
If the camera has fallen or its case has been damaged, turn the power
off and remove the battery.
Continued use might cause fire or electric shock. Consult the store of
purchase.
Do not disassemble, change or repair the camera.
This might cause fire or electric shock. For repair or internal inspection, ask
the store of purchase.
Use the supplied AC adapter only with the indicated power supply
voltage.
Use with any other power supply voltage might cause fire or electric shock.
Do not use the camera in areas near water.
This might cause fire or electric shock. Take special care during rain, snow,
on the beach, or near the shore.
Do not place the camera on inclined or unstable surfaces.
This might cause the camera to fall or tilt over, causing damage.
Keep the battery out of the reach of children.
Swallowing the battery might cause poisoning. If the battery is accidentally
swallowed, immediately consult a physician.
Do not use the camera while you are walking, driving or riding a
motorcycle.
This might cause you to fall over or result in traffic accident.
EN-4
Cautions
Insert the battery paying careful attention to the polarity (+ or –) of the
terminals.
Inserting the battery with its polarities inverted might cause fire and injury, or
damage to the surrounding areas due to the battery rupturing or leaking.
Do not fire the flash close to anyone’s eyes.
This might cause damage to the person’s eyesight.
Do not subject the LCD monitor to impact.
This might damage the glass on the screen or cause the internal fluid to
leak. If the internal fluid enters your eyes or comes into contact with your
body or clothes, rinse with fresh water. If the internal fluid has entered your
eyes, consult a physician to receive treatment.
A camera is a precision instrument. Do not drop it, strike it or use
excessive force when handling the camera.
This might cause damage to the camera.
Do not use the camera in humid, steamy, smoky, or dusty places.
This might cause fire or electric shock.
Do not remove the battery immediately after long period of continuous
use.
The battery becomes hot during use. Touching a hot battery might cause
burns.
Do not wrap the camera or place it in cloth or blankets.
This might cause heat to build up and deform the case, resulting in fire. Use
the camera in a well-ventilated place.
Do not leave the camera in places where the temperature may rise
significantly, such as inside a car.
This might adversely affect the case or the parts inside, resulting in fire.
Before you move the camera, disconnect cords and cables.
Failure to do this might damage cords and cables, resulting in fire and
electric shock.
EN-5
Notes on Battery Usage
When you use the battery, carefully read and strictly observe the Safety Instructions
and the notes described below:
Use only the specified battery (3.7V).
Avoid extremely cold environments as low temperatures can shorten the battery life and
reduce camera performance.
When you are using a new rechargeable battery or a rechargeable battery that has not
been used for an extended period of time (the battery that passed the expiry date is an
exception), it may affect the number of images that can be captured. Therefore, to
maximize its performance and lifetime, we recommend that you fully charge the battery
and discharge it for at least one complete cycle before use.
The battery may feel warm after a long period of continuous use of the camera or the
flash. This is normal and not a malfunction.
The camera may feel warm after a long period of continuous use. This is normal and not
a malfunction.
If the battery is not to be used for a long period of time, remove it from the camera to
prevent leakage or corrosion.
If the battery is not to be used for a long period of time, store it after no battery power is
left. If the battery is stored for a long time in a fully charged state, its performance may be
impaired.
Always keep the battery terminals clean.
There is a risk of explosion if the battery is replaced by an incorrect type.
Dispose of used batteries according to the recycle instructions.
We recommend charging the battery for 8 hours before the camera’s first use.
CONTENTS
EN-6
INTRODUCTION ................................................................. 8
Overview .....................................................................................................................8
Package Contents .......................................................................................................8
GETTING TO KNOW YOUR CAMERA .............................. 9
Front View ...................................................................................................................9
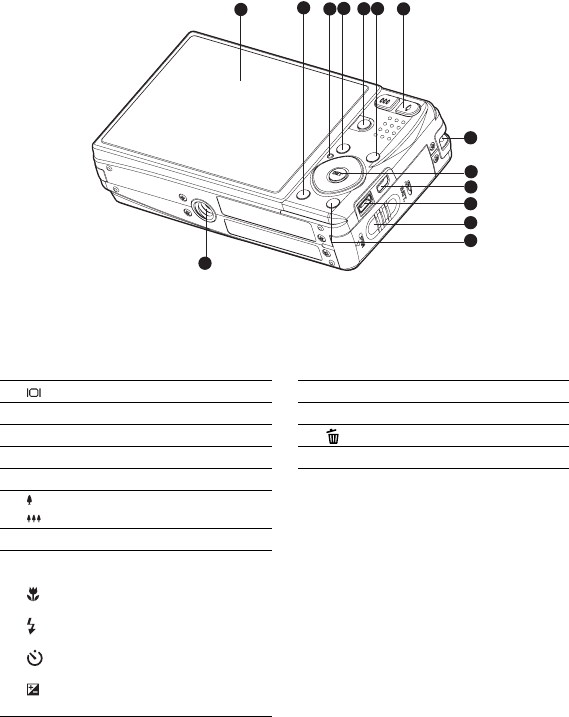
Rear View ..................................................................................................................10
Hot-Keys ....................................................................................................................11
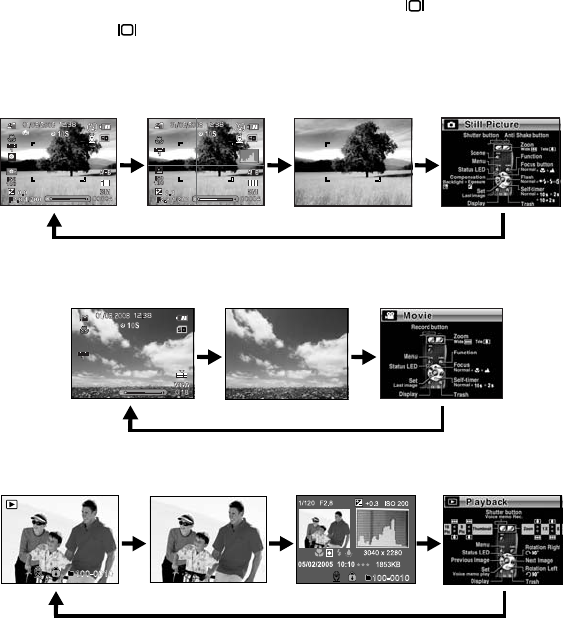
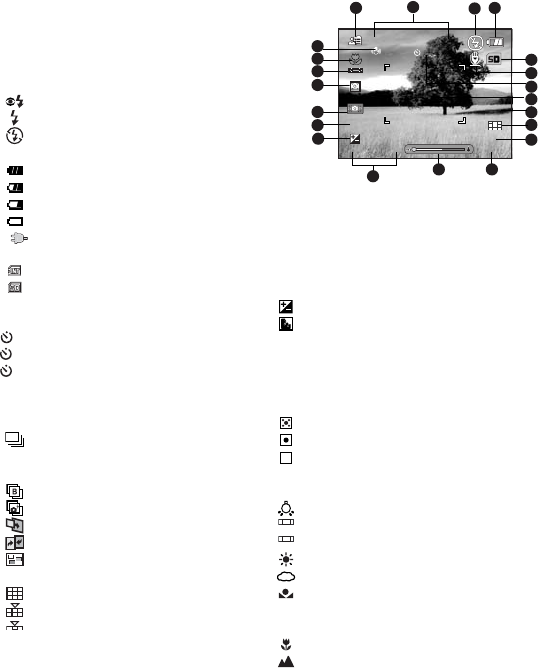
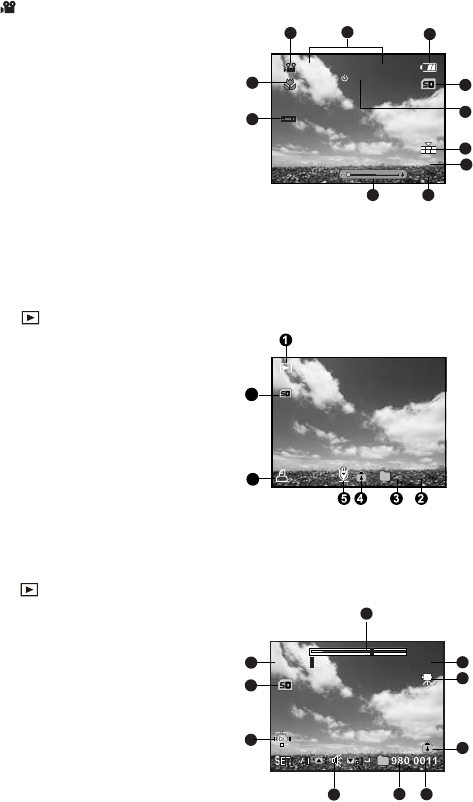
LCD Monitor Display .................................................................................................13
GETTING STARTED ......................................................... 15
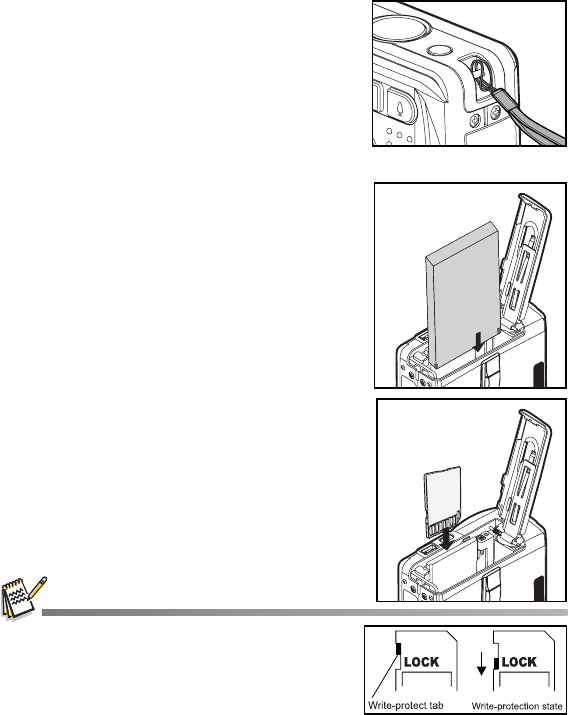
Preparation ................................................................................................................15
Charging the Battery .................................................................................................16
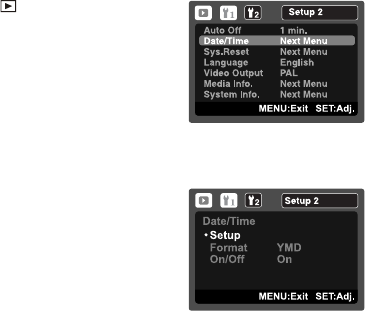
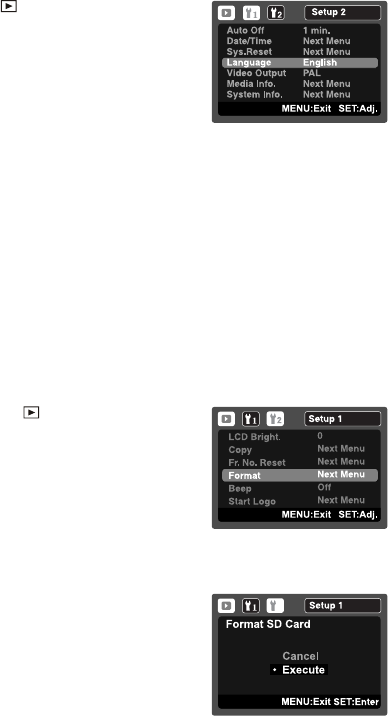
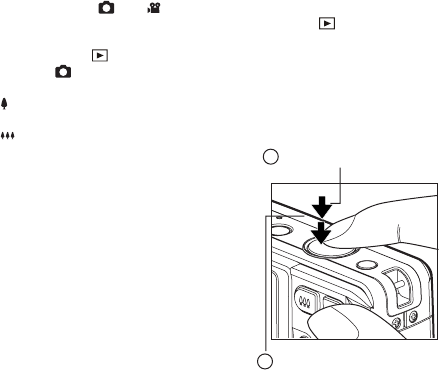
Initial Settings ...........................................................................................................17
CAPTURE MODE .............................................................. 19
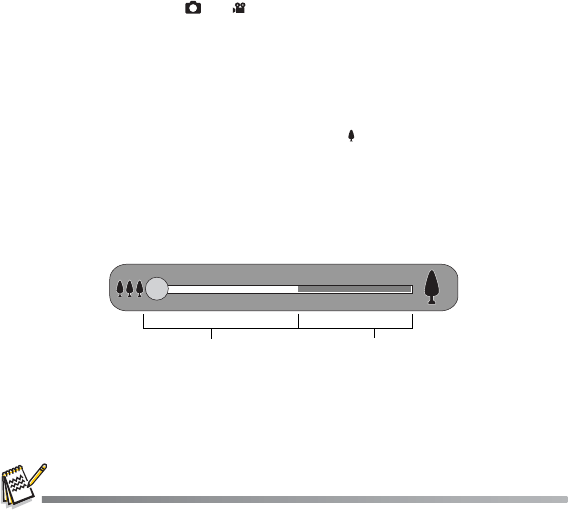
Capturing Images ......................................................................................................19
Zoom Function ..........................................................................................................20
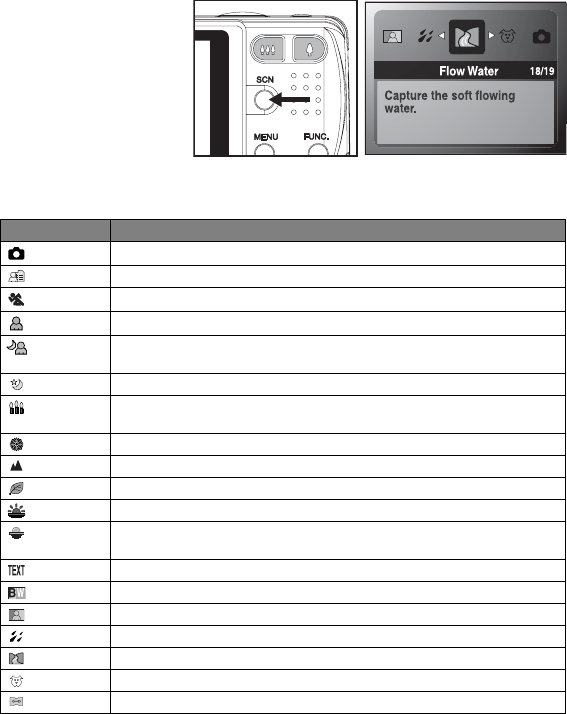
Setting the Scene Mode ............................................................................................21
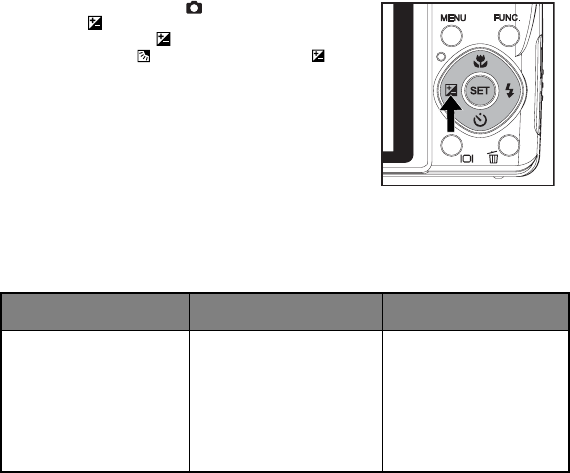
Exposure Compensation/Backlight Correction ..........................................................22
Recording a Subject onto an Existing Background Image ........................................23
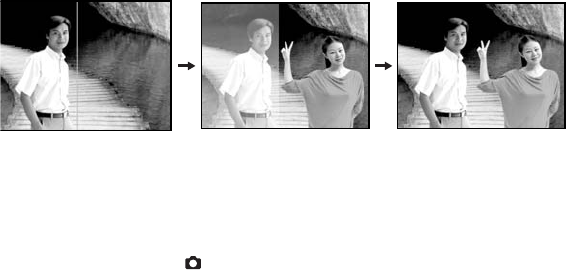
Combining Shots of Two People into a Single Image ...............................................24
Recording Shots into Multiple Image Layout .............................................................25
Recording Voice Memos ...........................................................................................25
VIDEO MODE .................................................................... 26
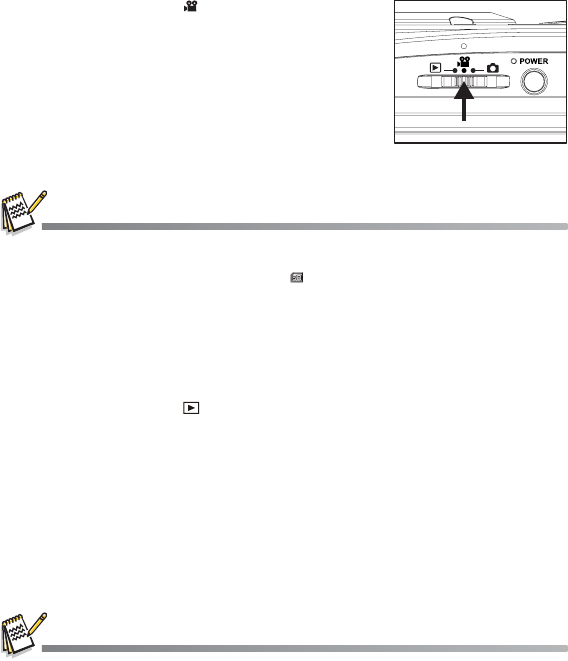
Recording Video Clips ...............................................................................................26
Playing Back Video Clips ..........................................................................................26
PLAYBACK MODE ........................................................... 27
Playing Back Still Images ..........................................................................................27
Thumbnail Display .....................................................................................................28
Attaching Voice Memos .............................................................................................29
Slideshow Display .....................................................................................................29
Protecting Images .....................................................................................................30
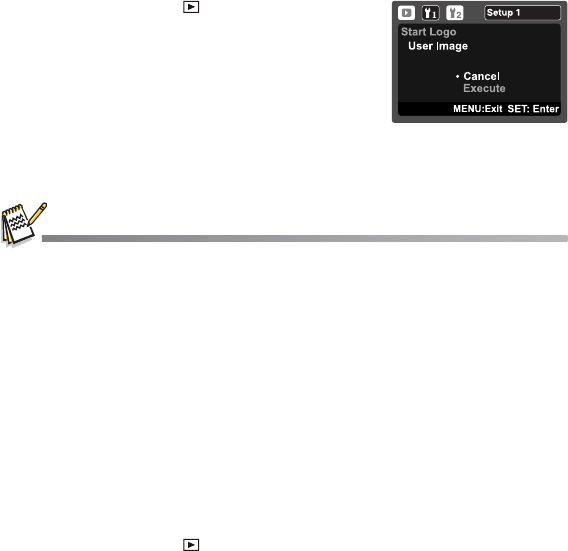
Changing Camera Start Logo Image .........................................................................31
Playing Back Still Images/Video Clips on a TV .........................................................31
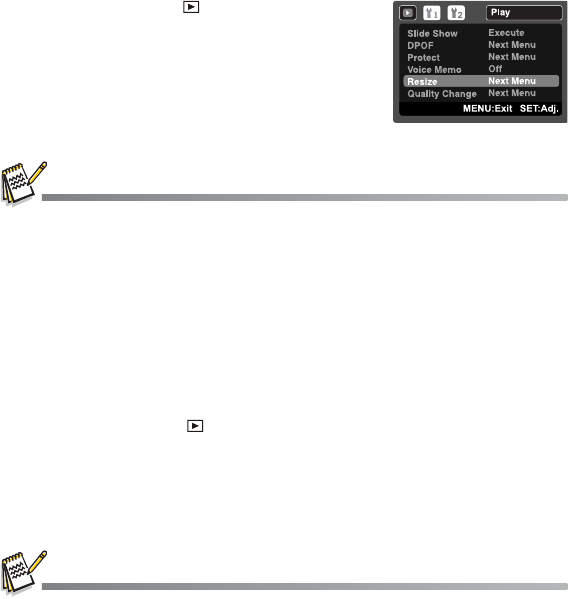
Resizing an Image .....................................................................................................32
Compressing an Image .............................................................................................32
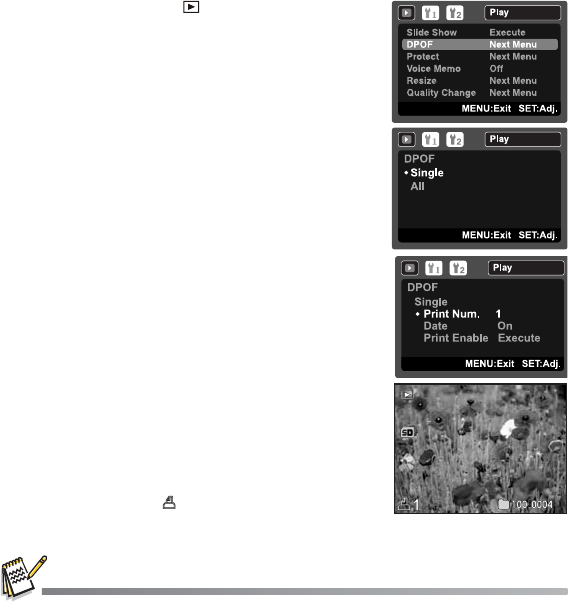
DPOF Settings ..........................................................................................................33
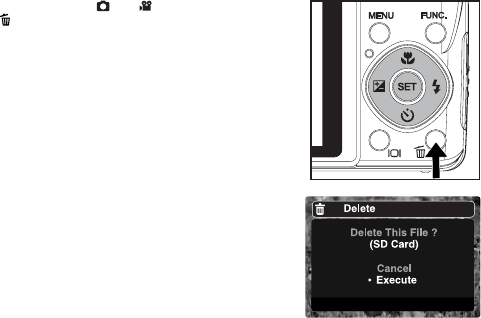
Erasing Images .........................................................................................................34
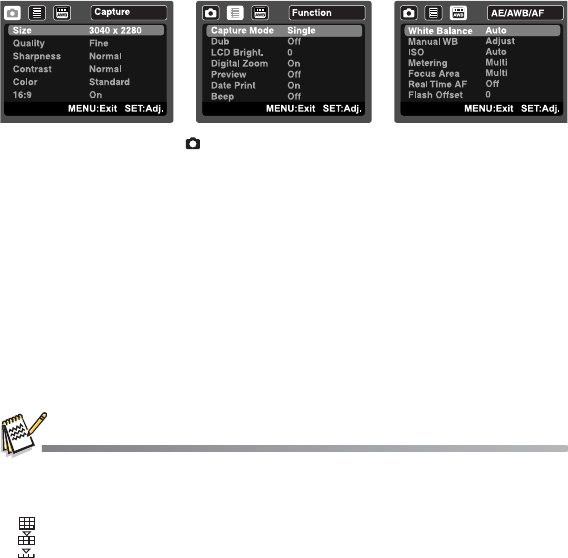
MENU OPTIONS ............................................................... 36
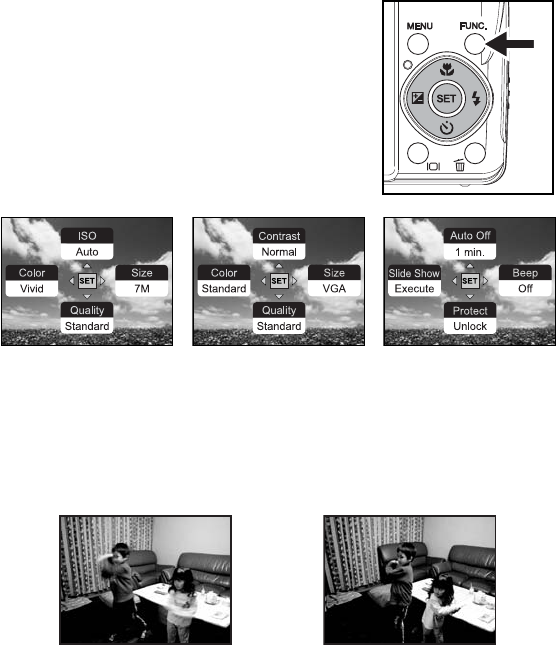
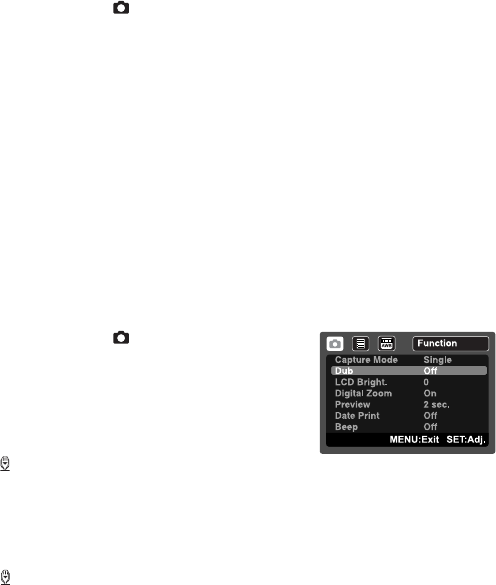
Capture Menu ............................................................................................................36
Video Menu ...............................................................................................................39
EN-7
Playback Menu ..........................................................................................................40
Setup Menu ...............................................................................................................41
TRANSFERRING FILES TO YOUR COMPUTER ............ 43
Downloading Your Files ............................................................................................43
EDITING SOFTWARE INSTALLATION ........................... 44
SPECIFICATIONS ............................................................. 45
APPENDIX ......................................................................... 46
Possible Number of Shots .........................................................................................46
Flash Setting .............................................................................................................47
Troubleshooting .........................................................................................................48
Connecting to a PictBridge Compliant Printer ...........................................................49
EN-8
INTRODUCTION
Overview
Congratulations on your purchase of the new digital camera.
Capturing high-quality digital images is fast and easy with this state-of-the-art smart
camera. Equipped with a 7.0-megapixel CCD, this camera is capable of capturing
images with a resolution of up to 3040 x 2280 pixels.
Package Contents
Carefully unpack your camera and ensure that you have the following items:
Common Product Components:
Digital Camera
User’s manual
Software CD-ROM
USB cable
AV cable
Camera strap
Camera pouch
AC power adapter
Rechargeable lithium-ion battery
Common (Optional) Accessories:
SD/SDHC memory card
Battery charger
Accessories and components may vary by retailer.
EN-9
GETTING TO KNOW YOUR CAMERA
Front View
1. Anti shake button
2. Shutter button
3. Power button
4. Microphone
5. Mode switch
Capture mode
Video mode
Playback mode
6. Speaker
7. Flash
8. Self-timer LED (AF auxiliary LED)
9. Lens
9
1
2
3
5
6
4
7
8
EN-10
Rear View
1
2
5
6
7
8
9
11
12
13
14
4
3
10
1. LCD monitor
2. Display button
3. Status LED
4. MENU Menu button
5. SCN Scene button
6. FUNC. Function button
7. Zoom in button
Zoom out button
8. Strap holder
9. SET / Direction button
S button
Focus button
X button
Flash button
T button
Self-timer button
W button
Backlight
/
Exposure compensation button
SET Set button
10. USB or AV OUT terminal
11. DC IN 5V terminal
12. Battery / Memory card cover
13. Delete button
14. Tripod socket
EN-11
Hot-Keys
Function button
There are four functions that have been assigned to the Direction button. These functions
can then be set directly by pressing the Direction button without displaying the menu.
1. Press FUNC. button.
2. Toggle the respective button to change the
setting.
3. Press the FUNC. button again to return to
preview mode.
Anti shake button
The anti-shake function works according to the luminance of the target object. This func-
tion uses special image data processing for getting high sensitivity of CCD. High sensitiv-
ity can use higher shutter speed compared with normal mode, so it reduces influence of
hand shaking. Press the anti-shake button before pressing the shutter button.
Video Mode Playback ModeCapture Mode
Anti shake is set to off
Anti shake is set to on
EN-12
Display button
You can switch the image display information by pressing the button.
Each press of the button switches the information display state in the following
order:
Capture mode:
Video mode:
Playback mode:
EN-13
LCD Monitor Display
Capture Mode
1. Mode indication
2. Date and time
3. Flash mode
[Blank] Auto Flash
[ ] Red-eye Reduction
[ ] Forced Flash
[ ] Flash Off
4. Battery condition
[ ] Full battery power
[ ] Medium battery power
[ ] Low battery power
[ ] No battery power
* [ ] AC adapter icon (if used)
5. Storage media
[ ] Internal memory (no card)
[ ] SD/SDHC memory card
6. Voice memo
7. Self-timer icon
[ 10s] 10 sec.
[
2s
]
2 sec.
[ 10+2s] 10+2 sec.
8. Main focus area
9. Capture mode icon
[Blank] Single
[ ] Continuous
[ AEB ] Auto Exposure
Bracketing
[] Burst
[ ] Series + flash
[ ] Pre-Shot
[ ] Couple Shot
[ ] Album Shot
10. Image quality
[] Fine
[ ] Standard
[ ] Economy
11. Image size resolution
[7M] 3040 x 2280
[5M] 2560 x 1920
[3M] 2048 x 1536
[
1.3M] 1280 x 960
[
0.3M] 640 x 480
* [
Wide
5
M
] 3040 x 1712/ [
Wide
3
.7
M
]
2560 x 1440 is only available when [16:9]
is set to [On].
12. Available number of shots
13. Zoom status
14. Shutter speed / Aperture
15.
[]
Exposure compensation
[]
Backlight correction
16. ISO
17. Slow shutter warning
* Poor lighting conditions.
Images will be vulnerable to vibration.
18. Metering
[] Multi
[] Spot
[ ] Average
19. White Balance
[Blank] Auto
[ ] Incandescent
[ ] Fluorescent 1
[ ] Fluorescent 2
[ ] Daylight
[ ] Cloudy
[ ] Manual
20. Focus setting
[Blank] Auto Focus
[] Macro
[ ] Infinity
21. Anti Shake
1
2
00004
10S
1
2
3
4
5
7
8
9
10
11
1213
16
6
12:38
01/08/2008
AEB
3M
20
15
21
14
17
18
19
0.0
1
IS0
100
F2.8 1/200
EN-14
Video mode []
1. Mode icon
2. Date and time
3. Battery condition
4. Storage media
5. Self-timer icon
6. Video quality
7. Video resolution
8. Available recording time/Elapsed time
9. Zoom status
10. White balance icon
11. Focus setting
Playback mode [] - Still image playback
1. Mode icon
2. File number
3. Folder number
4. Protect icon
5. Voice memo
6. DPOF icon
7. Storage media
Playback mode
[]
- Video playback
1. Video status bar
2. Elapsed time
3. Mode icon
4. Protect icon
5. File number
6. Folder number
7. Sound off icon (When the
c
button is pressed
during video playback)
8. Play mode
9. Storage media
10. Total recorded time
1
2
3
4
5
6
7
89
11
10
6
6
7
100-0023
1
3
5
4
6
Total
Play
0:06
1
2
7
8
10
9
0:10
EN-15
GETTING STARTED
Preparation
1. Attach the camera strap.
2. Open the battery/memory card cover.
3. Insert the supplied battery with correct orientation
as shown.
4. Insert an SD/SDHC memory card (Optional).
The camera has
32MB internal memory (26MB
available for image storage)
, but you can load
an SD/SDHC memory card to expand the
camera’s memory capacity.
Be sure to format the memory card with this
camera before its initial usage.
5. Close the battery/memory card cover and make
sure it is locked securely.
To prevent valuable data from being accidentally erased from
an
SD/SDHC memory card
, you can slide the write protect
tab (on the side of the
SD/SDHC
memory card) to “LOCK”.
To save, edit, or erase data on an SD/SDHC memory
card, you must unlock the card.
To prevent damaging of an SD/SDHC memory card, be
sure to turn off the power when inserting or removing the
SD/SDHC memory card. If inserting or removing the SD/
SDHC memory card with the power on, the camera will automatically turn off.
EN-16
Charging the Battery
The AC power adapter may charge the battery or operate the camera as power
supply. Make sure that the power of the camera is off and then insert the battery
before starting.
1. Insert one end of the AC power adapter into the DC IN
5V terminal of the camera.
2. Insert the other end of the AC power adapter into a
wall outlet.
The status LED flashes green when charging is
started and lights green when charging is
completed. The LED lights red when a charging
error has occurred.
It is recommended that you fully discharge the
battery before recharging.
Charging time varies according to the ambient
temperature and the status of battery.
This camera must be used with the specified battery and AC power adapter for battery
charging. Damage caused by the use of an incorrect adapter is not covered under the warranty.
The battery may feel warm after it has been charged or immediately after being used. This is
normal and not a malfunction.
When using the camera in cold areas, keep the camera and battery warm by holding them
inside your outer clothes.
EN-17
Initial Settings
Setting the Date and Time
The date/time needs to be set if and when:
Camera is turned on for the first time.
Camera is turned on after leaving the camera without the battery for an extended period
of time.
When the date and time information is not displayed on the LCD monitor, follow these
steps to set the correct date and time.
1. Slide the mode switch to [ ], and press the
MENU button.
2. Select [Setup 2] with the f button.
3. Select [Date/Time] with the c / d buttons, and
press the SET button.
4. Select [Setup] with
c
/
d
buttons, and press the
SET
button.
Select the item’s field with the e / f buttons
and adjust the value for the date and time with
the c / d buttons.
The date and time is displayed as the format
you set.
The time is displayed in 24-hour format.
After confirming all settings are correct, press
the
SET
button.
The setting will be stored and the screen will
return to the [Setup 2] menu.
5. Select [Format] with c / d buttons, and press the
SET button.
Select the date display format you want with
c / d buttons.
6. Select [On/Off] with c / d buttons, and press the SET button.
If your choice is [Off], there is no date/time information displayed on the LCD monitor.
7. To exit from the [Setup 2] menu, press the MENU button.
EN-18
Choosing the Language
Specify in which language menus and messages are to be displayed on the LCD monitor.
1. Slide the mode switch to [ ], and press the
MENU
button.
2. Select [Setup 2] menu with the f button.
3. Select [Language] with the
c
/
d
buttons and press
the
SET
button.
The Language setting screen will be displayed.
4. Select the displayed language with the
c
/
d
buttons
and press the
SET
button.
The setting will be stored.
Formatting the Memory Card or Internal Memory
This utility formats the internal memory (or memory card) and erases all stored images
and data.
1. Slide the mode switch to
[]
, and press the
MENU button.
2. Select [Setup 1] menu with f button.
3. Select [Format] with the
c
/
d
buttons, then press
the
SET
button.
4. Select [Execute] with the
c
/
d
buttons, and press
the
SET
button.
To cancel formatting, select [Cancel] and press
the
SET
button.
2
EN-19
CAPTURE MODE
Capturing Images
Your camera is equipped with a 3.0" full color LTPS-TFT LCD monitor to help you
compose images, playback recorded images/video clips or adjust menu settings.
1. Press the POWER button to turn the power on.
The status LED lights green and the camera is initiated.
When the power is turned on, the camera will start in the mode that was last set.
If the power is turned on in [ ] or [ ] mode, the lens will extend forward and it is
ready for shooting. In both modes, if the mode switch is set to
[]
, the lens barrel
will retract into the camera body after 30 seconds.
If the power is turned on in
[]
mode, the lens will remain closed.
2. Slide the mode switch to [ ].
3. Compose your image in the LCD monitor.
Pressing the button zooms in on the subject, and enlarges the subject on the LCD
monitor.
Pressing the button provides a wider angle image.
4. Press the shutter button.
Pressing the shutter button down halfway
automatically focuses and adjusts the exposure,
and pressing the shutter button down fully
captures the images.
The focus area frame turns blue when the
camera is in focus and the exposure is
calculated.
When the focus or exposure is not suitable,
the frame of the focus area turns yellow.
If the photographic preview is set to [2 sec.] /
[4 sec.], the captured image will be displayed
while the image is being recorded onto the
SD/SDHC memory card.
2
Press down fully
1
Press down halfway
EN-20
Zoom Function
Using a combination of 4 times optical zoom and 4.8 times digital zoom permits zoom
photography at up to 19.2 times magnification. While the digital zoom can be a useful
feature, the more an image is enlarged (zoomed), the more pixelated (grainier) the
image will appear.
1. Slide the mode switch to [ ] or [ ].
2. To enable the digital zoom:
a. Press the MENU button.
b. Select [Function] with the f butt
on.
c. Select [Digital Zoom] with the c / d buttons, and press the SET button.
d. Select [On] with the c / d buttons again, and press the SET button. The zoom bar
becomes blue. If selecting digital zoom off, zoom bar becomes red.
e. Press the MENU button to exit from the menu screen.
f. To activate the digital zoom, press and hold the button completely until the image
on the LCD monitor expands. With the “extended zoom” function, the zoom will stop
moving in the place where the image quality deterioration starts.
3. Press the shutter button to capture a “zoomed” image.
With the “extended zoom” cuts out a necessary size from the image of which it takes a picture
by the maximum size for getting clear image quality. This function will only works if the digital
zoom is activated. Color of the zoom bar is green at the "
extended zoom" area.
The zoom setting is automatically cancelled by either turning the camera off or the activation of
the Auto Off function.
Digital zoom 1X to 4.8X
Optical zoom 1X to 4X
EN-21
Setting the Scene Mode
By simply selecting one of the following 19 modes, you can capture the image with the
most appropriate settings.
1. Press the SCN button.
2. Select the desired scene mode with the e/f buttons, and press the SET button.
3. Compose the image and press the shutter button.
The table below will help you choose the appropriate scene mode:
Scene mode Description
Auto
Capture images without having to set special functions or manual adjustments.
User Setting
Manually set the camera’s parameters and these settings will be memorized.
Sport Capture fast-moving subjects.
Portrait
Capture an image that makes a person stand out against a blurred background.
Night Portrait
Capture people with an evening or night scene background. Keep your
camera still!
Night Capture dark scenes such as night views. Keep your camera still!
Candlelight Capture images of candlelit scene, without spoiling the ambience. Keep
your camera still!
Fireworks
Capture fireworks clearly with optimal exposure. Using a tripod is recommended.
Landscape Capture landscape images with bright color.
Natural Green
Capture the green scenery background such as forest.
Sunrise
Capture images of sunrise scene. This mode helps keep the deep hues in the scene.
Sunset Capture images of a beautiful sunset shot that vividly captures beautiful
red colors.
Tex t
Capture an image that contains black and white subjects like printed documents.
Black & White
Capture a black & white image.
Sepia Capture a sepia image.
Splash Water
Capture images of splashing water.
Flow Water Capture the soft flowing water.
Pets Capture images of your pets. Shoot from the eye level of your pets.
Panorama Create a 360
o
panoramic images.
EN-22
Exposure Compensation/Backlight Correction
Images can be captured with the overall scene intentionally made brighter or darker.
These settings are used when a suitable brightness (exposure) cannot otherwise be
obtained in circumstances where the difference in brightness between the subject and
the background (the contrast) is large, or when the subject that you wish to capture is
very small within the scene. Exposure can be set in 1/3 EV units.
1. Slide the mode switch to [ ].
2. Press the button.
Each press of the button displays the setting
in the order of [ ] Backlight Correction and [ ]
Exposure Compensation.
3. Set the exposure value with the e/f buttons.
Press the f button to increase the value.
Press the e button to decrease the value.
The setting range of the exposure compensation
is as follows:-2.0, -1.7, -1.3, -1.0, -0.7, -0.3, 0,
+0.3, +0.7, +1.0, +1.3, +1.7, +2.0.
Press the SET button to confirm the setting.
The larger the value, the brighter the image.
The smaller the value, the darker the image.
The set value is displayed on the screen.
Effective Subjects and Set Values
+(positive) compensation -(negative) compensation
Backlight correction
(+1.3 EV, fixed)
* Printed matter with black
text on whitish paper.
* Backlighting.
* Bright scenes or strong
reflected light such as ski
slopes.
* When the sky accounts for
a large area on the screen.
* People illuminated by a
spotlight, in particular,
against dark background.
* Printed matter with white
text on blackish paper.
* Weak reflecting bodies such
as evergreen trees or
darkish leaves
* When the background is
bright and the subject is
dark.
* When subjects (people)
have a light source such
as the sun to their backs.
EN-23
Recording a Subject onto an Existing Background Image
Pre-Shot helps you get the background you want, even if you need to ask someone
else to record the image for you. Basically, Pre-Shot is a two-step process.
Higher resolution and higher quality images provide finer detail but cause the images’
file size to be larger.
To change image resolution or image quality, perform these steps below:
Step 1: You compose the background you want and press the shutter button, which causes
a semi-transparent image of the background to remain on the monitor screen.
Step 2: Ask someone else to record a shot of you against your original background, telling
him/her to compose the image by using the semi-transparent monitor screen image
as a guide. Camera stores the image produced by step 2 only.
Step 3: Depending on how the image is actually composed in step 2, its background may not
be exactly the same as the one you composed in step 1.
1. Slide the mode switch to [ ].
a. Press the MENU button.
b. Select [Function] with the f button.
c. Select [Capture Mode] with the c / d buttons, and press the SET button.
d. Select [Pre-Shot] with the c / d buttons, and press the SET button.
e. Press the MENU button to exit from the menu screen.
2. Compose the background you want on the monitor screen, and then press the shutter
button to temporarily record it as a reference image.
This operation causes a semi-transparent image of the background to appear on the
monitor screen, but the displayed image is not actually saved in camera memory.
3. Now you can stand in front of the background and ask someone else to snap your
picture, using the semi-transparent background on the monitor screen as a composition
guide.
4. After composing the final image (using the semi-transparent background as a guide), the
person with camera should press the shutter button to record.
Note that the semi-transparent background image you temporarily record in step 2 is for
composition purposes only. The final image contains only what is in front of camera
when the shutter button is pressed in step 4.
F
reeze the background on
t
he monitor screen.
Only the second image
is recorded.
Record the image, using
the background on the
monitor screen as a guide.
EN-24
Combining Shots of Two People into a Single Image
This mode lets you record images of two people and combine them into a single
image. This makes it possible for you to include yourself in group images, even when
there is no one else around to record the image for you.
1. Slide the mode switch to [ ].
a. Press the MENU button.
b. Select [Function] with the f button.
c. Select [Capture Mode] with the c / d buttons, and press the SET button.
d. Select [Couple Shot] with the c / d buttons, and press the SET button.
e. Press the MENU button to exit from the menu screen.
2. Align the focus frame on the screen with the subject you want on the left side of the
image.
3. Press the shutter button to record the left side of the image.
4. Next compose the subject you want in the right side of the image, taking care to align the
actual background with the semi-transparent image of the background of the first image,
which is shown on the screen.
5. When everything is aligned correctly, record the right side of the image.
First Image
Second Image
Combined Images
T
his is the part of the
image
t
hat does not
include the
p
erson who is recording the
f
irst image.
Making sure that the
background of the image
is
aligned correctly, record
the
image of the person who
recorded the first image.
EN-25
Recording Shots into Multiple Image Layout
The Album Shot mode enables you to easily record images and combine three shots
into a single image.
1. Slide the mode switch to [ ].
a. Press the MENU button.
b. Select [Function] with the f button.
c. Select [Capture Mode] with the c / d buttons, and press the SET button.
d. Select [Album Shot] with the c / d buttons, and press the SET button.
e. Press the MENU button to exit from the menu screen.
2. Press the shutter button to capture the first image.
3. Press the shutter button again to capture the second and third images.
Pressing the SET button during step 2 or 3 will delete the last captured image.
This shot can only be recorded if there are 3 shots recorded in each of the available
frames.
Recording Voice Memos
A voice memo can be recorded once for 30 seconds at still image mode immediately
following a still image capture.
1. Slide the mode switch to [ ].
2. Press the MENU button, and select the [Function]
menu with the f button.
3. Select [Dub] with the c / d buttons, and press
the SET button.
4. Select [On] with the c / d buttons, and press the
SET button.
5. Press the MENU button to exit from the menu.
An [ ] icon is displayed on the screen.
6. Compose the image, press the shutter button
down halfway, then press it down fully.
[VOICE RECORDING] is displayed on the screen immediately, and the voice memo
recording starts.
7. Press the shutter button one more time during recording, or wait for 30 seconds
[VOICE RECORD END] will be displayed and the recording will end.
An [ ] icon is displayed with images that have been recorded with a voice memo.
EN-26
VIDEO MODE
Recording Video Clips
This mode allows you to record video clips at a resolution of 320 x 240 / 640 x 480 pix-
els.
1. Slide the mode switch to [ ].
2. Compose the image.
3. Press the shutter button.
The recording of the video clip will start.
Pressing the shutter button one more time
will end the recording of the video clip.
The recording time depends on the storage
size and the subject of the image to be
recorded.
The zoom function cannot be used during
video recording.
When recording a video clip, the flash cannot be used.
If the write speed of your SD/SDHC memory card is not fast enough for recording video clips in
the currently selected quality, a warning icon [ ] will appear, and then the video recording will
stop. In this case, select a video quality lower than the current one.
Playing Back Video Clips
You can play back recorded video clips on the camera. You can also play back sound if
recorded with the video.
1. Slide the mode switch to [ ].
The last image appears on the screen.
2. Select the desired video clip with the e / f buttons.
3. Press the SET button.
A press of the f / e buttons during playback allows fast forward play / fast reverse
play.
To stop video playback, press the d button.
This stops playback and returns to the start of the video clip.
To pause video playback, press the SET button.
This pauses video playback.
To cancel pause, press the SET button again.
By pressing the shutter button with a movie in pause mode, you can capture a still
image from the video.
Video clips cannot be displayed rotated or enlarged.
EN-27
PLAYBACK MODE
Playing Back Still Images
You can play back the still images on the LCD monitor.
1. Slide the mode switch to [ ].
The last image appears on the screen.
2. The images can be displayed in forward or reverse
sequence with the e / f buttons.
To view the previous image, press the e button.
To view the next image, press the f button.
Pressing the
c
/
d
buttons during image
playback
will result in a 90-degree rotated display.
The
d
button rotates the image counterclockwise
and displays it, whereas the
c
button rotates the
image clockwise and displays it. A press of the
button opposite to the direction in which the image
was rotated will return the image to the normal
display
.
Pressing the button enlarges the image.
To return to normal magnification, press the
button.
An [ ] icon is displayed with the video data. Video clips cannot be rotated.
An
[] icon is displayed with images which have an audio memo recorded.
Press the SET button to playback the voice memo data.
103-0006
EN-28
Thumbnail Display
This function allows you to view 9 or 16 thumbnail images on the LCD monitor at the
same time, which can let you quickly search for the image that you want.
1. Slide the mode switch to [ ].
The last image appears on the screen.
2. Press the button.
The images are displayed in the thumbnail
display. If you want to view 16 thumbnail
images, press the button again.
Images that have been selected with the e /
f / c / d buttons will be indicated by a green
frame.
When there are ten or more images, scroll the
screen with the c / d buttons.
3. Press the e / f / c / d buttons to select the image to be displayed at regular size.
4. Press the SET button.
The selected image is displayed at its regular size.
Page Jump Function
1. Slide the mode switch to [ ].
2. Press the button to enter thumbnail display.
3. Press the button to enter page jump function
and the image is indicated by a red frame.
4. For page selection, follow the steps below:
Pressing the
c
button jumps to the first image.
Pressing the
d
button jumps to the last image.
Pressing the e button jumps to the previous
thumbnail page.
Pressing the
f
button jumps to the next
thumbnail page.
5. Press the button to resume normal thumbnail
display.
To select the image to be displayed at regular size, follow the steps 3-4 in the above
section.
Only in the 9-thumbnail mode, an [], [ ], [ ], [ ] icon may be displayed in a thumbnail.
EN-29
Attaching Voice Memos
A maximum of 30 seconds of audio can be recorded as a memo for captured still
images. The voice memo can be recorded only once.
1. Slide the mode switch to [ ].
The last image appears on the screen.
2. Select the image to which you want to attach the
voice memo with the e / f buttons.
3. Press the MENU button.
4. Select [Voice Memo] with the c / d buttons, and
press the SET button.
5. Select [On] with the c / d buttons, and press the
SET button.
6. Press the MENU button to exit from the menu.
7. Press the shutter button.
[VOICE RECORDING] is displayed on the screen and recording starts.
8. To stop recording a voice memo as it is being recorded, press the shutter button again.
[VOICE RECORD END] will be displayed and the recording will end. An [ ] icon is
displayed with images that have been recorded with a voice memo.
Playing back voice memo
A press of the
SET
button displays [VOICE PLAYBACK] and plays back the voice memo.
Voice memo is only available for still images.
If a voice memo has already been recorded (either by dub recording or attaching voice memo
afterwards), the voice memo can not be replaced or recorded again.
Slideshow Display
The slideshow function enables you to playback your still images automatically in
order one image at a time.
1. Slide the mode switch to [ ].
2. Press the MENU button.
3. Select [Slide Show] and press the SET button.
The slideshow starts.
4. To stop the slide show during playback, press the
SET button.
The image is displayed on screen when you
press the SET button.
The Auto Off function does not operate during slide show.
All still images in the folder are automatically played back.
EN-30
Protecting Images
Set the data to read-only to prevent images from being erased by mistake.
1. Slide the mode switch to [ ].
2. Select the image that you want to protect with the
e / f buttons.
3. Press the MENU button.
4. Select [Protect] with the c / d buttons, and press
the SET button.
5. Select [Single] or [All] with the c / d buttons, and
press the SET button.
6. Select [Set] with the c / d buttons, and press the
SET button.
Protection is applied to the image and the
camera returns to the playback mode.
The protect icon
[] is displayed with protected
images.
When [All] has been selected,
[] is displayed
with all the images.
Canceling the Protection
To cancel protection for only one image, display the
image on which you want to remove the image
protection.
1. Select [Protect] with the c / d buttons from the
playback menu, and press the SET button.
2. Select [Single] or [All] with the c / d buttons, and
press the SET button.
3. Select [Cancel Protect] with the c / d buttons, and press the SET button.
The removal of image protection is executed and the camera returns to the playback mode.
Protecting multiple images simultaneously
1. Select [Protect] with the c / d buttons from the playback menu, and press the SET
button.
2. Select [Select] with the c / d buttons, and press the SET button.
The images are displayed in the thumbnail display.
3. Select the image you want to protect with the e / f / c / d buttons, and press the
button.
The protect icon
[] is displayed with protected images. Selecting a protected image
and pressing the button again will cancel the protection. This procedure is
repeated to select multiple images.
4. Press the SET button.
Protection and cancellation of the protectionare are executed and the camera returns
to playback mode.
Formatting an SD/SDHC memory card overrides protection, and erases all images regardless
of their protected status.
EN-31
Changing Camera Start Logo Image
You can specify the start logo image for camera. You can select the new start logo
image from among the captured still images.
1. Slide the mode switch to [ ].
2. Select the image that you want to be a new start
up screen with the e / f buttons.
3. Press the MENU button.
4. Select [Setup 1] with the f button.
5. Select [Start Logo] with the c / d buttons, and
press the SET button.
6. Select [User Image] with the c / d buttons, and
press the SET button.
7. Select [Execute] with the c / d buttons, and
press the SET button.
User selected image is saved in the special area of the internal memory. In case of formatting
the internal memory, the user selected start logo image will not be lost.
“NO IMAGE” message is displayed when “User Image” is selected and no images are stored in
the SD/SDHC memory card or internal memory.
If the image recorded voice memo is selected to be the start logo image, the voice memo can
only be played back in the playback mode.
The capacity for saving user image is only one. The previous start logo image will not be
recovered if you select another one as a new start logo image.
Playing Back Still Images/Video Clips on a TV
You can also play back your images on a TV screen. Before connecting to any video
devices, make sure to select NTSC/PAL to match the broadcast standard of the video
equipment you are going to connect to the camera.
1. Slide the mode switch to [ ].
2. Connect one end of the AV cable to the AV OUT terminal of the camera.
3. Connect the other end to the AV input of the TV set.
4. Turn on the TV and the camera.
5. Play back the still images/video clips.
The method of operation is the same as playing back still images and video clips on
the camera.
EN-32
Resizing an Image
Resizes a previously saved image.
Resizing replaces the original image with the changed image. Only resizing to a
smaller
size is available.
The following images cannot be resized:
Image size (640 x 480)
Image captured with another camera
Protected images
Video clips
Images cannot be resized when the SD/SDHC memory card is write protected
1. Slide the mode switch to [ ].
2. Select the image that you want to resize with the
e / f buttons.
3. Press the MENU button.
4. Select [Resize] with the c / d buttons, and press
the SET button.
5. Select the image size that you want to change
with the c / d buttons, and press the SET button.
To quit resizing, press the MENU button.
When resizing ends, the screen returns to playback mode.
It is not possible to resize into a different aspect ratio (i.e. [
1.3
M
] cannot be resized to [
Wide
3.7
M
]).
Compressing an Image
Changes the quality (compression) of a recorded image.
Compresses images down to half of their size or more, overwrites an old size image with a
newly
compressed image. Only quality changing to the lower quality level is available.
The following images cannot be resized:
(Economy) quality images
Images captured with another camera
Protected images
Video clips
Images cannot be changed quality when the SD/SDHC memory card is write-protected
1. Slide the mode switch to [ ].
2. Select the image that you want to change its quality.
3. Press the MENU button.
4. Select [Quality Change] with the c / d buttons, and press the SET button.
5. Select the compression that you want to change with the c / d buttons, and press the
SET button.
To quit compression, press the MENU button.
When compression ends, the screen returns to playback mode.
It is possible to reduce the size of an image. It is not possible to increase the size of an image,
or to restore size after it has been decreased.
EN-33
DPOF Settings
DPOF is the abbreviation for Digital Print Order Format, which allows you to embed
printing information on your memory card. You can select the images to be printed and
how many prints to make with the DPOF menu in the camera and insert the memory
card to the card compatible printer. When the printer starts printing, it will read the
embedded information on the memory card and print the specified images.
1. Slide the mode switch to [ ].
2. Select the image that you want to set DPOF with
the e / f buttons.
3. Press the MENU button.
4. Select [DPOF] with the c / d buttons, and press
the SET button.
The DPOF setting screen is displayed.
5. Select [Single] or [All] with the c / d buttons, and
press the SET button.
[Single]: Sets DPOF for each individual image.
[All]: Sets DPOF for all images at once.
6. Select [Print Num] with the c / d buttons, and
press the SET button.
This displays the number of prints setting screen.
7. Set the number of prints with the c / d buttons,
and press the SET button.
You can set up to 9 prints for each image.
8. Select [Date Print] with the c / d buttons, and
press the SET button.
The date setting screen appears.
9. Select date to [On] or [Off] with the c / d buttons,
and press the SET button.
[On]: The date of the image will also be printed.
[Off]: The date of the image will not be printed.
10. Select [Print Enable] with the c / d buttons, and
press the SET button.
11. Select [Execute] with the c / d buttons, and
press the SET button.
This creates a file containing the DPOF
information, and when the operation is finished,
the screen returns to the playback mode.
The DPOF icon [] is displayed on each
image that has set up DPOF settings.
The date that is printed on the image is the date set on the camera. To print the correct date on
the image, set the date on the camera before you capture the image. Refer to section in this
manual titled “Setting the Date and Time” for further details.
EN-34
Erasing Images
Erasing in Photography Mode (Quick Delete Function)
The quick delete function enables you to delete the last-captured image during cap-
ture.
1. Slide the mode switch to [ ] or [ ].
2. Press the button.
The last image and quick delete menu appear
on the screen.
3. Select [Execute] with the c / d buttons.
4. Press the SET button to confirm the deletion.
To not delete, select [Cancel], and press the
SET button.
SET : Enter
EN-35
Erasing in Playback Mode
Erasing single image / Erasing all images
1. Slide the mode switch to [ ].
The last image will be displayed on the screen.
2. Select the image you want to erase with the
e
/
f
buttons.
3. Press the button.
The deletion menu will be displayed.
4. Select [Single] or [All] with the c / d buttons, and
press the SET button.
[Single]: Erases the selected image or the last
image.
[All]: Erases all of the images except for the
protected images.
[Select]: Erases a number of selected images.
5. To delete single file with voice memo, select
[Delete Voice Memo] or [Delete Single File] with
the c / d buttons, and press the SET button.
[Delete Voice Memo]: Erases only the
recorded voice memo on the selected image.
[Delete Single File]: Erases the selected image.
6. Select [Execute] with the c / d buttons, and press the SET button.
To not erase, select [Cancel], and press the SET button.
Erasing selected images
This erases a number of selected images.
1. Slide the mode switch to [ ].
2. Press the button.
The deletion menu will be displayed.
3. Select [Select] with the c / d buttons, and press
the SET button.
The images are displayed in the thumbnail
display.
4. Select the image you want to erase with the e /
f / c / d buttons, and press the button.
The [ ] icon will be displayed. One more
press of the button will cancel the operation.
Repeat this procedure and select all the
images that you want to erase.
5. Press the SET button.
Deleting an image will not affect sequential image numbering. For example, if you delete image
number 240, the next captured image will be numbered 241 even though 240 no longer exists.
In other words, an image-number is retired when an image is deleted and will not be reused or
reassigned to another subsequently captured image.
SET : Enter
MENU:Exit SET:Enter
Delete Voice Memo
Delete Single File
100-0011
EN-36
MENU OPTIONS
Capture Menu
This menu is for the basic settings to be used when capturing still images.
1. Slide the mode switch to [ ].
2. Press the
MENU
button, and select the [Capture]/ [Function]/ [AE/AWB/AF] menu with the
e
/
f
button.
([AE/AWB/AF] menu is only available on [User Setting] and [Panorama] modes.)
3. Select the desired option item with the c / d buttons, and press the SET button to enter
its respective menu.
4. Select the desired setting with the c / d buttons, and press the SET button.
5. To exit from the menu, press the MENU button.
Size
This sets the size of the image that will be captured.
* [7M] 3040 x 2280
* [5M] 2560 x 1920
* [3M]
2048 x 1536
* [1.
3M] 1280 x 960
* [0.
3M] 640 x 480
* [Wide
5M] 3040 x 1712
* [Wide 3.
7M] 2560 x 1440
[Wide 5M] and [Wide 3.7M] are only available when [16:9] is set to [On].
Quality
This sets the quality (compression) at which the image is captured.
* [ ]Fine
* [ ]Standard
* [ ]Economy
Sharpness
This sets the sharpness of the image that will be captured.
* Hard / Normal / Soft
Contrast
This sets the difference between the bright and dark portions of the images that will be captured.
* Hard / Normal / Soft
Color
This sets the color of the image that will be captured.
* Standard / Vivid / Sepia / Monochrome / Red / Green / Blue / Yellow / Purple / Orange / Pink / Cyan
EN-50
3. If you select [Single] in the previous step, the
figure shown on the right hand side will appear.
Select the image that you want to print with
the e / f buttons.
Select the [Print Num.] (up to 99) with the
c / d
buttons.
After selecting the desired image and printing
number, press the SET button to confirm.
4. Select [Exit] with the c / d buttons, and press the
SET button.
5. Select [Print] with the c / d buttons, and press
the SET button to start printing.
6. The printing starts and the figure shown on the
right hand side appears.
The [Complete] will be displayed temporarily,
reminding you that the printing procedure is
finished.
If a print error is detected, the [Print Error] will
be displayed.
The image printing may be failed if the power to the camera is cut off.
We recommend that you use the AC power adapter when connecting the camera to the printer.
50


Need help? Post your question in this forum.

Forumrules


Report abuse

Libble takes abuse of its services very seriously. We're committed to dealing with such abuse according to the laws in your country of residence. When you submit a report, we'll investigate it and take the appropriate action. We'll get back to you only if we require additional details or have more information to share.

Product:

For example, Anti-Semitic content, racist content, or material that could result in a violent physical act.

For example, a credit card number, a personal identification number, or an unlisted home address. Note that email addresses and full names are not considered private information.

Forumrules

To achieve meaningful questions, we apply the following rules:

Register

Register getting emails for Rollei RCP7430XW at:


You will receive an email to register for one or both of the options.


Get your user manual by e-mail

Enter your email address to receive the manual of Rollei RCP7430XW in the language / languages: English as an attachment in your email.

The manual is 1,73 mb in size.


You will receive the manual in your email within minutes. If you have not received an email, then probably have entered the wrong email address or your mailbox is too full. In addition, it may be that your ISP may have a maximum size for emails to receive.

Others manual(s) of Rollei RCP7430XW

Rollei RCP7430XW User Manual - German - 51 pages


The manual is sent by email. Check your email

If you have not received an email with the manual within fifteen minutes, it may be that you have a entered a wrong email address or that your ISP has set a maximum size to receive email that is smaller than the size of the manual.

The email address you have provided is not correct.

Please check the email address and correct it.

Your question is posted on this page

Would you like to receive an email when new answers and questions are posted? Please enter your email address.


Info