574329
35
Zoom out
Zoom in
Previous page
1/44
Next page
EN-1
FCC STATEMENT
This device complies with Part 15 of the FCC Rules. Operation is subject to the
following two conditions:
(1) This device may not cause harmful interference, and
(2) This device must accept any interference received, including interference that may
cause undesired operation.
Note:
This equipment has been tested and found to comply with the limits for Class B digital
devices, pursuant to Part 15 of the FCC rules. These limits are designed to provide
reasonable protection against harmful interference in a residential installation.This
equipment generates uses and can radiate radio frequency energy and, if not installed
and used in accordance with the instructions, may cause harmful interference to radio
communications. However, there is no guarantee that interference will not occur in a
particular installation. If this equipment does cause harmful interference to radio or
television reception, which can be determined by turning the equipment off and on, the
user is encouraged to try to correct the interference by one or more of the following
measures:
Reorient or relocate the receiving antenna.
Increase the separation between the equipment and receiver.
Connect the equipment into an outlet on a circuit different from that to which the
receiver is connected.
Consult the dealer or an experienced radio/TV technician for help.
Use of shielded cable is required to comply with Class B limits in Subpart B of Part 15 of
the FCC rules.
Do not make any changes or modifications to the equipment unless otherwise specified
in the manual. If such changes or modifications should be made, you could be required
to stop operation of the equipment.
Notice
If static electricity or electromagnetism causes data transfer to discontinue midway (fail),
restart the application or disconnect and connect the communication cable (USB, etc.)
again.
Downloaded from www.Manualslib.com manuals search engine
EN-2
READ THIS FIRST
Trademark Information
Microsoft
®
and Windows
®
are U.S. registered trademarks of Microsoft Corporation.
Pentium
®
is a registered trademark of Intel Corporation.
Macintosh is a trademark of Apple Inc.
SD™ is a trademark.
Other names and products may be trademarks or registered trademarks of their
respective owners.
Product Information
Product design and specifications are subject to change without notice. This
includes primary product specifications, software, software drivers, and user’s
manual. This User Manual is a general reference guide for the product.
The product and accessories that come with your camera may be different from
those described in this manual. This is due to the fact that different retailers often
specify slightly different product inclusions and accessories to suit their market
requirements, customer demographics, and geographical preferences. Products
very often vary between retailers especially with accessories such as batteries,
chargers, AC adapters, memory cards, cables, pouches, and language support.
Occasionally a retailer will specify a unique product color, appearance, and internal
memory capacity. Contact your dealer for precise product definition and included
accessories.
The illustrations in this manual are for the purpose of explanation and may differ
from the actual design of your camera.
The manufacturer assumes no liability for any errors or discrepancies in this user
manual.
Downloaded from www.Manualslib.com manuals search engine
EN-3
SAFETY INSTRUCTIONS
Read and understand all Warnings and Cautions before using this product.
Warnings
If foreign objects or water have entered the camera, turn the power off
and remove the battery.
Continued use might cause fire or electric shock. Consult the store of
purchase.
If the camera has fallen or its case has been damaged, turn the power
off and remove the battery.
Continued use might cause fire or electric shock. Consult the store of
purchase.
Do not disassemble, change or repair the camera.
This might cause fire or electric shock. For repair or internal inspection, ask
the store of purchase.
Use the supplied AC adapter only with the indicated power supply
voltage.
Use with any other power supply voltage might cause fire or electric shock.
Do not use the camera in areas near water.
This might cause fire or electric shock. Take special care during rain, snow,
on the beach, or near the shore.
Do not place the camera on inclined or unstable surfaces.
This might cause the camera to fall or tilt over, causing damage.
Keep the battery out of the reach of children.
Swallowing the battery might cause poisoning. If the battery is accidentally
swallowed, immediately consult a physician.
Do not use the camera while you are walking, driving or riding a
motorcycle.
This might cause you to fall over or result in traffic accident.
Downloaded from www.Manualslib.com manuals search engine
EN-4
Cautions
Insert the battery paying careful attention to the polarity (+ or –) of the
terminals.
Inserting the battery with its polarities inverted might cause fire and injury, or
damage to the surrounding areas due to the battery rupturing or leaking.
Do not fire the flash close to anyone’s eyes.
This might cause damage to the person’s eyesight.
Do not subject the LCD monitor to impact.
This might damage the glass on the screen or cause the internal fluid to leak.
If the internal fluid enters your eyes or comes into contact with your body or
clothes, rinse with fresh water. If the internal fluid has entered your eyes,
consult a physician to receive treatment.
A camera is a precision instrument. Do not drop it, strike it or use
excessive force when handling the camera.
This might cause damage to the camera.
Do not use the camera in humid, steamy, smoky, or dusty places.
This might cause fire or electric shock.
Do not remove the battery immediately after long period of continuous
use.
The battery becomes hot during use. Touching a hot battery might cause
burns.
Do not wrap the camera or place it in cloth or blankets.
This might cause heat to build up and deform the case, resulting in fire. Use
the camera in a well-ventilated place.
Do not leave the camera in places where the temperature may rise
significantly, such as inside a car.
This might adversely affect the case or the parts inside, resulting in fire.
Before you move the camera, disconnect cords and cables.
Failure to do this might damage cords and cables, resulting in fire and electric
shock.
During the course of a thunderstorm, please do not operate the camera
or use its AC adaptor.
Downloaded from www.Manualslib.com manuals search engine
EN-5
Notes on Battery Usage
When you use the battery, carefully read and strictly observe the Safety Instructions
and the notes described below:
Use only the specified battery (3.7V).
Avoid extremely cold environments as low temperatures can shorten the battery life
and reduce camera performance.
When you are using a new rechargeable battery or a rechargeable battery that has
not been used for an extended period of time (the battery that passed the expiry
date is an exception), it may affect the number of images that can be captured.
Therefore, to maximize its performance and lifetime, we recommend that you fully
charge the battery and discharge it for at least one complete cycle before use.
The battery may feel warm after a long period of continuous use of the camera or the
flash. This is normal and not a malfunction.
The camera may feel warm after a long period of continuous use. This is normal and
not a malfunction.
If the battery is not to be used for a long period of time, remove it from the camera to
prevent leakage or corrosion and store it after no battery power is left. Stored for a
long time in a fully charged condition, its performance may be impaired.
Always keep the battery terminals clean.
There is a risk of explosion if the battery is replaced by an incorrect type.
Dispose of used battery according to the recycle instructions.
Charge the rechargeable battery fully before using for the first time.
To prevent short-circuiting or fire, keep the battery away from other metal objects
when carrying or storing.
Downloaded from www.Manualslib.com manuals search engine
CONTENTS
EN-6
7 INTRODUCTION
7Overview
7 Package Contents
8 GETTING TO KNOW YOUR
CAMERA
8 Front View
9 Rear View
10 LCD Monitor Display
12 GETTING STARTED
12 Preparation
13 Charging the Battery
14 Initial Settings
16 CAPTURE MODE
16 Capturing Images
17 Recording a Subject onto an Existing
Background Image
18 Combining Shots of Two People into
a Single Image
19 Setting the Panorama Mode
20 Recording Shots using Face
Detection Technology
21 Recording Voice Memos
22 VIDEO MODE
22 Recording Video Clips
22 Playing Back Video Clips
23 PLAYBACK MODE
23 Playing Back Still Images
24 Thumbnail Display
24 Removing Red-eye
25 Attaching Voice Memos
25 Changing the Camera Start Logo
Image
26 Protecting Images
27 DPOF Settings
28 Erasing Images
30 MENU OPTIONS
30 Capture Menu
33 Video Menu
34 Playback Menu
35 Setup Menu
36 TRANSFERRING FILES TO
YOUR COMPUTER
36 Downloading Your Files
37 USING THE CAMERA AS A PC
CAMERA
38 EDITING SOFTWARE
INSTALLATION
39 SPECIFICATIONS
40 APPENDIX
40 Possible Number of Shots
41 Troubleshooting
42 Connecting to a PictBridge Compliant
Printer
Downloaded from www.Manualslib.com manuals search engine
EN-7
INTRODUCTION
Overview
Congratulations on your purchase of the new digital camera.
Capturing high-quality digital images is fast and easy with this state-of-the-art smart
camera. Equipped with a 8.0-megapixel CCD, this camera is capable of capturing
images with a resolution of up to 3264 x 2448 pixels.
Package Contents
Carefully unpack your camera and ensure that you have the following items:
Common Product Components:
Digital Camera
User’s manual
Software CD-ROM
USB cable
AV cable
Camera strap
AC power adapter
Rechargeable lithium-ion battery
Common (Optional) Accessories:
SD/SDHC memory card
Accessories and components may vary by retailer.
Downloaded from www.Manualslib.com manuals search engine
EN-8
GETTING TO KNOW YOUR CAMERA
Front View
1. Shutter button
2. ON/OFF button
3. Self-timer LED
4. Mode switch
Capture mode
Video mode
Playback mode
5. Speaker
6. Lens
7. Microphone
8. Flash
1
2
4
3
5
8 7
6
Downloaded from www.Manualslib.com manuals search engine
EN-9
Rear View
1
2
4
3
5
6
7
8
9
101112
1. LCD monitor
2. Delete button
3. DISP Display button
4. MENU Menu button
5. Zoom in button
Zoom out button
6. Strap holder
7. DC IN 5V terminal
8. USB or AV OUT terminal
9. Battery / Memory card cover
10.SET / Direction button
S button
Focus button
X button
Flash button
T button
Self-timer button
W button
Backlight/Exposure
compensation button
SET Set button
11. Status LED
12. Tripod socket
Downloaded from www.Manualslib.com manuals search engine
EN-10
LCD Monitor Display
Capture mode
1. Zoom status
2. Voice memo
3. Battery condition
[ ] Full battery power
[ ] Medium battery power
[ ] Low battery power
[ ] No battery power
* [ ] AC adapter icon (if used)
4. Flash mode
[ Blank] Auto Flash
[ ] Red-eye Reduction
[ ] Pre-flash
[ ] Forced Flash
[ ] Flash Off
5. [ ] Histogram
6. Main focus area (When the shutter
button is pressed halfway)
7. Capture mode icon
[Blank] Single
[ ] Continuous
[AEB] Auto Exposure Bracketing
[] Burst
[ ] Series + flash
[ ] Pre-Shot
[ ] Coupling Shot
8. Image size resolution
[ ] 3264 x 2448
[ ] 2816 x 2112
[ ] 2272 x 1704
[ ] 1600 x 1200
[ ] 640 x 480
9. Available number of shots
10. Image quality
[ ] Fine
[ ] Standard
[ ] Economy
11. Date and time
12. Self-timer icon
[ 10S] 10 sec.
[ 2S ] 2 sec.
[ 10+2 ]10+2 sec.
13. Slow shutter warning
14. [ ] Exposure compensation
[ ] Backlight correction
(Adjust exposure value with the
c
/
d
buttons)
15. Metering
[ ] Center
[ ] Spot
[]Multi
16. White balance
[Blank] Auto
[ ] Incandescent
[ ] Fluorescent 1
[ ] Fluorescent 2
[ ] Daylight
[ ] Cloudy
[ ] Manual
17. Focus setting
[Blank] Auto focus
[ ] Face detection
[] Macro
[ ] Infinity
18. Scene mode
[ ] Program AE
[ ] Panorama
[ ] Portrait Man
[ ] Portrait Lady
[ ] Landscape
[ ] Sports
[ ] Night Portrait
[ ] Night Scene
[ ] Candlelight
[]Fireworks
[] Text
[ ] Sunset
[]Sunrise
[ ] Splash Water
[ ] Flow Water
[]Snow
[]Beach
[]Pets
[ ] Anti Shake
[ ] User Setting
01/01/2008 08:03
01/01/2008 08:03
1
2
P
Downloaded from www.Manualslib.com manuals search engine
EN-11
Video mode []
1. Mode icon
2. Zoom status
3. Battery condition
4. Video resolution
5.
Available recording time/Elapsed time
6. Video quality
7. Recording indicator
8. Self-timer icon
9. Focus setting
Playback mode [] - Still image playback
1. Mode icon
2. File number
3. Folder number
4. Protect icon
5. Voice memo
6. DPOF icon
Playback mode
[]
- Video playback
1. Video status bar
2. Elapsed time
3. File number
4. Folder number
5. Protect icon
6. Mode icon
7. Play mode
8. Sound off icon (When the
c
button is pressed
during video playback)
9. Total recorded time
00:07:30
10S
6
100-0011
35 46
Total
Play
00:00:10 00:00:
06
1
2
9
78
Downloaded from www.Manualslib.com manuals search engine
EN-12
GETTING STARTED
Preparation
1. Attach the camera strap.
2. Open the battery/memory card cover.
3. Insert the supplied battery with correct orientation as
shown.
4. Insert an SD/SDHC memory card (Optional).
The camera has
32MB internal memory (29MB
available for image storage)
, but you can load an
SD/SDHC memory card to expand the camera’s
memory capacity.
Be sure to format the memory card with this
camera before its initial usage.
5. Close the battery/memory card cover and make sure it
is locked securely.
To prevent valuable data from being accidentally erased from
an
SD/SDHC memory card
, you can slide the write protect tab
(on the side of the
SD/SDHC
memory card) to “LOCK”.
To save, edit, or erase data on an SD/SDHC memory card,
you must unlock the card.
To prevent damaging of an SD/SDHC memory card, be sure
to turn off the power when inserting or removing the SD/
SDHC memory card. If inserting or removing the SD/SDHC
memory card with the power on, the camera will automatically turn off.
Downloaded from www.Manualslib.com manuals search engine
EN-13
Charging the Battery
The AC power adapter may charge the battery or operate as the camera's power
supply. Make sure that the camera is turned off and the battery is inserted before
starting.
1. Insert one end of the AC power adapter
into the DC IN 5V terminal of the camera.
2. Insert the other end of the AC power
adapter into a wall outlet.
The status LED lights red when
charging has started and the LED turns
off when charging is completed. The
LED lights green when a charging error
has occurred or no battery is inserted
inside the camera.
It is recommended that you fully discharge the battery before recharging.
Charging time varies according to the ambient temperature and the status of
battery.
This camera must use with the specified battery and AC power adapter for battery charging.
Damage caused by using of an incorrect adapter is not covered under the warranty.
The battery may feel warm after it has been charged or immediately after being used. This is
normal and not a malfunction.
When using the camera in cold areas, keep the camera and battery warm by holding them inside
your outer clothes.
Downloaded from www.Manualslib.com manuals search engine
EN-14
Initial Settings
Setting the Date and Time
The date/time needs to be set if and when:
The camera is turned on for the first time.
The camera is turned on after leaving the camera without the battery for an
extended period of time.
When the date and time information is not displayed on the LCD monitor, follow these
steps to set the correct date and time.
1. Slide the mode switch to [ ] or [ ], and press
the MENU button.
2. Select [Setup] with the f button.
3. Select [Date/Time] with the c / d buttons, and
press the SET button.
Select the item’s field with the e / f buttons
and adjust the value for the date and time
with the c / d buttons.
The time is displayed in 24-hour format.
After confirming all settings are correct, press
the
SET
button.
4. To exit from the [Setup] menu, press the MENU
button.
SET:Adj.
SET:Enter
Downloaded from www.Manualslib.com manuals search engine
EN-15
Choosing the Language
Specify in which language menus and messages are to be displayed on the LCD monitor.
1. Slide the mode switch
to [ ], [ ] or [ ]
, and
press the
MENU
button.
2. Select [Setup] menu with the f button.
3. Select [Language] with the
c
/
d
buttons and press
the
SET
button.
4. Select the displayed language with the
c
/
d
buttons and press the
SET
button.
The setting will be stored.
Formatting the Memory Card or Internal Memory
This utility formats the internal memory (or memory card) and erases all stored images
and data.
1. Slide the mode switch to [ ], and press the
MENU button.
2. Select [Setup] menu with f button.
3. Select [Format] with the
c
/
d
buttons, then
press the
SET
button.
4. Select [Execute] with the
c
/
d
buttons, and
press the
SET
button.
To cancel formatting, select [Cancel] and
press the
SET
button.
Capture
SET:Adj.MENU:Exit
Play
SET:Adj.
MENU:Exit
Format
SET:Enter
Downloaded from www.Manualslib.com manuals search engine
EN-16
CAPTURE MODE
Capturing Images
Your camera is equipped with a 2.7" full color TFT LCD monitor to help you compose
images, playback recorded images/video clips or adjust menu settings.
1. Press the ON/OFF button to turn the power on.
The status LED lights green and the camera is initiated.
When the power is turned on, the camera will start in the mode that was last set.
If the power is turned on in [ ] or [ ] mode, the lens will extend forward and it
is ready for shooting. In both modes, if the mode switch is set to [ ], the lens
barrel will retract into the camera body after 30 seconds.
If the power is turned on in [ ] mode, the lens will remain closed.
2. Slide the mode switch to [ ].
3. Compose your image in the LCD monitor.
Pressing the button zooms in on the subject, and enlarges the subject on the
LCD monitor.
Pressing the button provides a wider angle image.
4. Press the shutter button.
Pressing the shutter button down halfway
automatically focuses and adjusts the
exposure, and pressing the shutter button
down fully captures the images.
The focus area frame turns green when the
camera is in focus and the exposure is
calculated.
When the focus or exposure is not suitable,
the frame of the focus area turns red.
If the photographic preview is set to [On],
the captured image will be displayed while the image is being recorded onto the
SD/SDHC memory card.
a
b
Downloaded from www.Manualslib.com manuals search engine
EN-17
Recording a Subject onto an Existing Background
Image
Pre-Shot helps you get the background you want, even if you need to ask someone else
to record the image for you. Basically, Pre-Shot is a two-step process.
1. You compose the background you want and press the shutter button, which causes
a semi-transparent image of the background to remain on the screen.
2. Ask someone else to record a shot of you against your original background, telling
him/her to compose the image by using the semi-transparent screen image as a
guide.
The camera stores the image produced by step 2 only.
The screen must be ligned up exactly to the on screen background in order to
capture the same image.
1. Slide the mode switch to [ ].
a. Press the MENU button.
b. Select [Function] with the f button.
c. Select [Capture Mode] with the c / d button, and press the SET button.
d. Select [Pre-Shot] with the c / d button, and press the SET button.
e. Press the MENU button to exit from the menu screen.
2. Compose the background you want on the screen, and then press the shutter button
to temporarily record it as a reference image.
This operation causes a semi-transparent image of the background to appear on
the screen, but the displayed image is not actually saved in camera memory.
3. Now you can stand in front of the background and ask someone else to take your
picture, using the semi-transparent background on the screen as a composition
guide.
4. After composing the final image (using the semi-transparent background as a
guide), the person with the camera should press the shutter button to record.
Note that the semi-transparent background image temporarily recorded in step 2
is for composition purposes only. The final image contains only what is in front of
the camera when the shutter button is pressed in step 4.
Freeze the background on
the screen.
Only the second image is
recorded.
Record the image, using the
background on the screen
as a guide.
Downloaded from www.Manualslib.com manuals search engine
EN-18
Combining Shots of Two People into a Single Image
This mode lets you record images of two people and combine them into a single image.
This makes it possible for you to include yourself in group images, even when there is
no one else around to record the image for you.
1. Slide the mode switch to [ ].
a. Press the MENU button.
b. Select [Function] with the f button.
c. Select [Capture Mode] with the c / d button, and press the SET button.
d. Select [Coupling Shot] with the c / d button, and press the SET button.
e. Press the MENU button to exit from the menu screen.
2. Align the focus frame on the screen with the subject you want on the left side of the
image.
3. Press the shutter button to record the left side of the image.
4. Next compose the subject you want in the right side of the image, taking care to
align the background with the semi-transparent image of the background of the first
image, which is shown on the screen.
5. When everything is aligned correctly, record the right side of the image.
First Image
Second Image
Combined Images
This is the part of the
image that does not
include the person who is
recording the first image.
Making sure that the
background of the image is
aligned correctly, record the
image of the person who
recorded the first image.
Downloaded from www.Manualslib.com manuals search engine
EN-19
Setting the Panorama Mode
This mode is designed to make it easier to take a series of shots then stitch them
together with software to make a single image. You can capture a photographic subject
that won’t fit into a single frame, such as a landscape, and stitch it together later with a
program such as Cool 360 or Photoshop application.
1. Slide the mode switch to [].
2. Press the MENU button.
3. Select [Scene Mode] with the c / d buttons, and press the SET button.
4. Select [Panorama] with the c / d buttons, and press the SET button.
5. Press the MENU button.
6. Select the photographic direction with the e / f buttons.
7. Shoot the first image.
The next image appears beside the previous image.
8. Orient the camera so that the second frame overlaps a small portion of the
photographic subject of the first image and press the shutter button to capture the
next image.
9. Follow the same steps to capture subsequent images in the sequence.
10. Finish the sequence by pressing the MENU button or switch to another mode after
the last image has been recorded.
Downloaded from www.Manualslib.com manuals search engine
EN-20
Recording Shots using Face Detection Technology
Face Detection Technology can identify and focus on the human faces in the image.
This advanced function simultaneously detects up to 5 human faces regardless of their
position in the scene.
1. Slide the mode switch to [ ].
2. Toggle the button until [ ] icon appears on the LCD monitor.
The white frame is identified as the “top priority” face (main focus frame), and
gray ones around the other faces.
3. Press the shutter button halfway down to lock the focus.
The main focus frame simultaneously turns green.
If the “top priority” face is out of focus, the main focus frame turns red.
4. Press the shutter button down fully to capture your image.
Subjects that are not suitable with this function:
a. A person is wearing glasses, sunglasses, or face is covered with hat or hair.
b. A person turned sideways.
Face detection function is on
White frame Green frame Red frame
Focus lock Out of focus
Downloaded from www.Manualslib.com manuals search engine
EN-21
Recording Voice Memos
A voice memo can be recorded once for 30 seconds in the still image mode immediately
following a still image capture.
1. Slide the mode switch to [ ].
2. Press the MENU button, and select the
[Function] menu with the f button.
3. Select [Voice Memo] with the c / d buttons,
and press the SET button.
4. Select [On] with the c / d buttons, and press
the SET button.
5. Press the MENU button to exit from the menu.
An [ ] icon is displayed on the screen.
6. Compose the image, press the shutter button down halfway, then press it down fully.
[VOICE RECORDING] is displayed on the screen immediately, and the voice
memo recording starts.
7. Press the shutter button one more time during recording, or wait for 30 seconds
[VOICE RECORD END] will be displayed and the recording will end.
An [ ] icon is displayed with images that have been recorded with a voice
memo.
Capture
Downloaded from www.Manualslib.com manuals search engine
EN-22
VIDEO MODE
Recording Video Clips
This mode allows you to record video clips at a resolution of 320 x 240 / 640 x 480 pixels.
1. Slide the mode switch to [ ].
2. Compose the image.
3. Press the shutter button.
The recording of the video clip will start.
Pressing the shutter button one more time will end
the recording of the video clip.
The recording time depends on the storage size
and the subject of the image to be recorded.
Zoom function can be used during video
recording. If [Video Zoom] is set to [On], you can
use optical zoom and enable or disable digital zoom function during recording. If [Video
Zoom] is set to [Off], optical and digital zoom function cannot be used during recording.
If you use the zoom function while recording a video clip, the noise will be recorded.
This acoustic noise can be excluded during the video recording by setting [Audio] to
[Off] in the [Function] menu.
When recording a video clip, the flash and "10+2 sec." self-timer function cannot be used.
If the write speed of your SD/SDHC memory card is not fast enough for recording video clips in
the currently selected quality, a warning icon [ ] will appear, and the video recording will stop. In
this case, select a video quality lower than the current one.
Playing Back Video Clips
You can play back recorded video clips on the camera. You can also play back sound if
recorded with the video.
1. Slide the mode switch to [ ].
The last image appears on the screen.
2. Select the desired video clip with the e / f buttons.
3. Press the SET button.
A press of the
f
/
e
buttons during playback allows fast forward play / fast reverse play.
To stop video playback, press the d button.
This stops playback and returns to the start of the video clip.
To pause video playback, press the SET button.
This pauses video playback.
To cancel pause, press the SET button again.
Video clips cannot be displayed rotated or enlarged.
Windows Media player or QuickTime Player is recommended to play back the video clip on your computer.
QuickTime Player is a free media player available at www.apple.com; and compatible with Mac
and Windows computers.
For more information about the operation of the media player, refer to its respective help documentation.
Downloaded from www.Manualslib.com manuals search engine
EN-23
PLAYBACK MODE
Playing Back Still Images
You can play back the still images on the LCD monitor.
1. Slide the mode switch to [ ].
The last image appears on the screen.
2. The images can be displayed in forward or
reverse sequence with the e / f buttons.
To view the previous image, press the e
button.
To view the next image, press the f button.
Pressing the
c
/
d
buttons during image
playback
will result in a 90-degree rotated display.
The
c
button rotates the image counterclockwise
and displays it, whereas the
d
button rotates the
image clockwise and displays it. A press of the
button opposite to the direction in which the image
was rotated will return the image to the normal
display
.
Pressing the button enlarges the image.
To return to normal magnification, press the
button.
An [ ] icon is displayed with the video data. Video clips cannot be rotated.
An [] icon is displayed with images which have an audio memo recorded.
Press the SET button to playback the voice memo data.
Downloaded from www.Manualslib.com manuals search engine
EN-24
Thumbnail Display
This function allows you to view 9 thumbnail images on the LCD monitor at the same
time, which can let you quickly search for the image that you want.
1. Slide the mode switch to [ ].
The last image appears on the screen.
2. Press the button.
The images are displayed in the thumbnail display.
Images that have been selected with the
e
/
f
/
c
/
d
buttons will be indicated by a yellow frame.
When there are ten or more images, scroll the
screen with the c / d buttons.
3. Press the e / f / c / d buttons to select the image
to be displayed at regular size.
4. Press the SET button.
The selected image is displayed at its regular size.
An [], [ ], [ ], [ ] icon may be displayed in a thumbnail.
Removing Red-eye
You can use this function to remove the red-eye effect after an image is taken.
1. Slide the mode switch to [ ].
2. Select the image that you want to edit with the
e
/
f
buttons.
3. Press the MENU button.
4. Select [Fix Red Eyes] with the c / d buttons, and
press the SET button.
5. Select [Execute] with the c / d buttons, and press
the SET button.
6. View the changes on the corrected image.
7. To save your corrected image, select [Confirm] with
the c / d buttons, and press the SET button.
When this process ends, this replaces the original
image with the corrected image.
1
100-0001
Play
SET:Adj.
MENU:Exit
File Overwrite?
SET:Enter
Confirm
Cancel
Downloaded from www.Manualslib.com manuals search engine
EN-25
Attaching Voice Memos
A maximum of 30 seconds of audio can be recorded as a memo for captured still
images. The voice memo can be recorded only once.
1. Slide the mode switch to [ ].
The last image appears on the screen.
2. Select the image to which you want to attach the voice memo with the e / f
buttons.
3. Press the shutter button.
[VOICE RECORDING] is displayed on the screen and recording starts.
4. To stop recording a voice memo as it is being recorded, press the shutter button
again.
[VOICE RECORD END] will be displayed and the recording will end. An [ ] icon
is displayed with images that have been recorded with a voice memo.
Playing back voice memo
A press of the
SET
button displays [VOICE PLAYBACK] and plays back the voice memo.
Voice memo is only available for still images.
Changing the Camera Start Logo Image
You can specify the start logo image for your camera. You can select the new start logo
image among the captured still images.
1. Slide the mode switch to [ ].
2. Select the image that you want to be a new start
up screen with the e / f buttons.
3. Press the MENU button.
The playback menu is displayed.
4. Select [Setup] with the f button.
5. Select [Start Logo] with the c / d buttons, and
press the SET button.
6. Select [User Image] with the c / d buttons, and
press the SET button.
7. Select [Execute] with the c / d buttons, and press the SET button.
This new start logo image will be activated on the next time you turn on the camera.
Play
Downloaded from www.Manualslib.com manuals search engine
EN-26
Protecting Images
Set the data to read-only to prevent images from being erased by mistake.
1. Slide the mode switch to [ ].
2. Select the image that you want to protect with the
e
/
f
buttons.
3. Press the MENU button.
4. Select [Protect] with the c / d buttons, and press the
SET button.
5. Select [Single] or [All] with the c / d buttons, and press
the SET button.
6. Select [Set] with the c / d buttons, and press the SET
button.
Protection is applied to the image and the camera
returns to the playback mode.
The protect icon
[]
is displayed with protected images.
When [All] has been selected, [] is displayed
with all the images.
Canceling the Protection
To cancel protection for only one image, display the image on which
you want to remove the image protection.
1. Select [Protect] with the c / d buttons from the playback
menu, and press the SET button.
2. Select [Single] or [All] with the c / d buttons, and press
the SET button.
3. Select [Cancel Protect] with the c / d buttons, and press
the SET button.
The removal of image protection is executed and the camera
returns to the playback mode.
Protecting multiple images simultaneously
1. Select [Protect] with the
c
/
d
buttons from the playback menu, and press the
SET
button.
2. Select [Select] with the c / d buttons, and press the SET button.
The images are displayed in the thumbnail display.
3. Select the image you want to protect with the
e
/
f
/
c
/
d
buttons, and press the
DISP
button.
The protect icon [] is displayed with protected images. Selecting a protected image
and pressing the
DISP
button again will cancel the protection. This procedure is
repeated to select multiple images.
4. Press the SET button.
Protection and cancellation of the protectionare are executed and the camera returns
to playback mode.
Formatting an SD/SDHC memory card overrides protection, and erases all images regardless of
their protected status.
Play
SET:Adj.
MENU:Exit
Play
SET:Enter
MENU:Exit
Play
SET:Enter
MENU:Exit
Downloaded from www.Manualslib.com manuals search engine
EN-27
DPOF Settings
DPOF is the abbreviation for Digital Print Order Format, which allows you to embed
printing information on your memory card. You can select the images to be printed and
how many prints to make with the DPOF menu in the camera and insert the memory
card to the card compatible printer. When the printer starts printing, it will read the
embedded information on the memory card and print the specified images.
1. Slide the mode switch to [ ].
2. Select the image that you want to set DPOF with the
e / f buttons.
3. Press the MENU button.
4. Select [DPOF] with the c / d buttons, and press the
SET button.
The DPOF setting screen is displayed.
5. Select [Single] or [All] with the c / d buttons, and
press the SET button.
[Single]: Sets DPOF for each individual image.
[All]: Sets DPOF for all images at once.
6. Select [Print Num] with the c / d buttons, and press
the SET button.
This displays the number of prints setting screen.
7. Set the number of prints with the c / d buttons, and
press the SET button.
You can set up to 9 prints for each image.
8. Select [Date Print] with the c / d buttons, and press
the SET button.
The date setting screen appears.
9. Select date to [On] or [Off] with the c / d buttons, and
press the SET button.
[On]: The date of the image will also be printed.
[Off]: The date of the image will not be printed.
10.Select [Print Enable] with the c / d buttons, and press
the SET button.
11. Select [Execute] with the c / d buttons, and press the
SET button.
This creates a file containing the DPOF information,
and when the operation is finished, the screen returns to the playback mode.
The DPOF icon [] is displayed on each image that has set up DPOF settings.
The date that is printed on the image is the date set on the camera. To print the correct date on
the image, set the date on the camera before you capture the image. Refer to section in this
manual titled “Setting the Date and Time” for further details.
Play
SET:Enter
MENU:Exit
Play
SET:Enter
MENU:Exit
100-0008
1
Play
SET:Adj.
MENU:Exit
Downloaded from www.Manualslib.com manuals search engine
EN-28
Erasing Images
Erasing in Photography Mode (Quick Delete Function)
The quick delete function enables you to delete the last-captured image during capture.
1. Slide the mode switch to [ ] or [ ].
2. Press the button.
The last image and quick delete menu
appear on the screen.
3. Select [Execute] with the c / d buttons.
4. Press the SET button to confirm the deletion.
To not delete, select [Cancel], and press the
SET button.
Erasing in Playback Mode
Erasing single image / Erasing all images
1. Slide the mode switch to [ ].
The last image will be displayed on the
screen.
2. Select the image you want to erase with the
e
/
f
buttons.
3. Press the button.
The deletion menu will be displayed.
4. Select [Single] or [All] with the c / d buttons,
and press the SET button.
[Single]: Erases the selected image or the
last image.
[All]: Erases all of the images except for the
protected images.
[Select]: Erases a number of selected
images.
5. Select [Execute] with the c / d buttons, and
press the SET button.
To not erase, select [Cancel], and press the SET button.
Delete
SET:Enter
MENU:Exit
Delete
MENU:Exit
SET:Enter
Downloaded from www.Manualslib.com manuals search engine
EN-29
Erasing selected images
This erases a number of selected images.
1. Slide the mode switch to [ ].
2. Press the button.
The deletion menu will be displayed.
3. Select [Select] with the c / d buttons, and
press the SET button.
The images are displayed in the thumbnail
display.
4. Select the image you want to erase with the e /
f / c / d buttons, and press the button.
The [ ] icon will be displayed. One more
press of the button will cancel the
operation. Repeat this procedure and select
all the images that you want to erase.
5. Press the SET button.
Deleting an image will not affect sequential image numbering. For example, if you delete image
number 240, the next captured image will be numbered 241 even though 240 no longer exists. In
other words, an image-number is retired when an image is deleted and will not be reused or
reassigned to another subsequently captured image.
Delete
SET:Enter
MENU:Exit
100-0002
Downloaded from www.Manualslib.com manuals search engine
EN-30
MENU OPTIONS
Capture Menu
This menu is for the basic settings to be used when capturing still images.
1. Slide the mode switch to [ ].
2.
Press the MENU button, and select the [Capture] / [Function] / [Setup] menu with the
e / f button
s
.
3. Select the desired option item with the c / d buttons, and press the SET button to
enter its respective menu.
4. Select the desired setting with the c / d buttons, and press the SET button.
5. To exit from the menu, press the MENU button.
Scene Mode
Select from 20 different scene modes in accordance with the shooting conditions.
* Program AE / Panorama / Portrait Man / Portrait Lady / Landscape / Sports / Night Portrait /
Night Scene / Candlelight / Fireworks / Text / Sunset / Sunrise / Splash Water / Flow Water /
Snow / Beach / Pets / Anti Shake / User Setting
Size
This sets the size of the image that will be captured.
* [ ] 3264 x 2448
* [ ] 2816 x 2112
* [ ] 2272 x 1704
* [ ] 1600 x 1200
* [ ] 640 x 480
Quality
This sets the quality (compression) at which the image is captured.
* [ ] Fine
* [ ] Standard
* [ ] Economy
Sharpness
This sets the sharpness of the image that will be captured.
* Hard / Normal / Soft
Saturation
This sets the saturation of the image that will be captured.
* High / Normal / Low
Downloaded from www.Manualslib.com manuals search engine
EN-31
Color
This sets the color of the image that will be photographed.
* Standard / Vivid / Sepia / Monochrome / Red / Green / Blue / Yellow / Purple
White Balance
This sets the white balance for a variety of lighting conditions and permits images to be
captured that approach the conditions that are seen by the human eye.
* [ Blank ] Auto
* [ ] Incandescent
* [ ] Fluorescent 1
* [ ] Fluorescent 2
* [ ] Daylight
* [ ] Cloudy
* [ ] Manual
Manual WB
This manually sets the white balance and stores it. Use of this is convenient when the white
balance does not offer a good match.
Before selecting [Execute] and before taking your image, place a white paper in the scene and
set the white balance manually.
* Cancel / Execute
ISO
This sets the sensitivity for capturing images. When the sensitivity is raised (and the ISO figure
is increased), photography will become possible even in dark locations, but the more pixelated
(grainier) the image will appear.
* Auto / 64 / 100 / 200 / 400 / 800 / 1600
Metering
This sets the metering method for calculating the exposure.
* [ ] Center: Averages the light metered from the entire frame, but gives greater weight
to the subject matter at the center.
* [ ] Spot: A very small portion of the center of the screen is measured to calculate the
correct exposure.
* [ ] Multi: The entire area of the screen is measured, and the exposure is calculated.
Capture Mode
This sets the recording method at the time of capturing images.
* [Blank] Single: Captures one image at a time.
* [ ] Continuous: Permits continuous capture of up to 3 images.
* [AEB] AEB: Permits 3 consecutive images in the order of standard exposure,
underexposure and overexposure compensation.
* [ ] Burst: Permits continuous photography while keeping the shutter button pressed
down. As long as you hold the shutter button pressed, pictures are captured until
the memory capacity is exhausted.
* [ ] Series + flash: The “Series + flash” capture mode lets you shoot a sequence of 3
pictures with flash.
* [ ]
Pre-Shot: Pre-shot helps you get the background you want, even if you need to ask
someone else to record the image for you. Basically, Pre-shot is a two-step process.
* [ ]
Coupling Shot:This mode lets you record images of two people and combine them
into a single image. This makes it possible for you to include yourself in group
images, even when there is no one else around to record the image for you.
1
2
Downloaded from www.Manualslib.com manuals search engine
EN-32
In [Continuous], [AEB], [Burst], [Series + flash], [Pre-Shot] and [Coupling Shot] capture mode, the
voice memo is automatically fixed at [Off].
Quick Shutter
In case of pressing S2 (the shutter button down fully) fast at “Quick shutter on” mode, camera
takes image without focus. However, if you set “Quick shutter off”, the auto focus function
works even if you press S2 fast.
* On / Off
Voice Memo
Refer to section in this manual titled "Recording Voice Memos" for further details.
* On / Off
When [Voice Memo] is set to [On], the [Preview] is also fixed at [On].
LCD Bright.
Select a brightness level for the LCD monitor.
The LCD becomes brighter with the c button and darker with the d button. The adjustment
range is from -5 to +5.
Digital Zoom
This sets whether or not to use digital zoom at the time of photography.
* On / Off
Preview
This sets whether or not to display the captured image on the screen immediately after the
image is captured.
* On / Off
Date Print
The date of recording can be printed directly on the still images. This function must be
activated before the image is captured.
* On / Off
Downloaded from www.Manualslib.com manuals search engine
EN-33
Video Menu
This menu is for the basic settings to be used when recording video clips.
1. Slide the mode switch to [ ].
2. Press the
MENU
button, and select the [Capture]/ [Function]/ [Setup] menu with the
e
/
f
buttons.
3. Select the desired option item with the c / d buttons, and press the SET button to
enter its respective menu.
4. Select the desired setting with the c / d buttons, and press the SET button.
5. To exit from the menu, press the MENU button.
Size
This sets the size of the video clip that will be captured.
* [ ] 640 x 480
* [ ] 320 x 240
Quality
This sets the quality (compression) at which the video clip is captured.
* [ ] Fine
* [ ] Standard
Color
This sets the color of the video clip that will be captured.
* Standard / Vivid / Sepia / Monochrome / Red / Green / Blue / Yellow / Purple
Audio
This sets whether or not to record audio at the time of video recording.
* On / Off
LCD Bright.
Refer to section in this manual titled “LCD Bright.” in Capture Menu for further details.
Video Zoom
This sets whether or not to activate zoom function at the time of video recording.
* On / Off
Digital Zoom
Refer to section in this manual titled “Digital Zoom” in Capture Menu for further details.
Downloaded from www.Manualslib.com manuals search engine
EN-34
Playback Menu
In the [ ] mode, choose which settings are to be used for playback.
1. Slide the mode switch to [ ].
2. Press the MENU button.
3. Select the desired option item with the c / d buttons, and press the SET button to
enter its respective menu.
4. Select the desired setting with the c / d buttons, and press the SET button.
5. To exit from the menu, press the MENU button.
Fix Red Eyes
Refer to section in this manual titled “Removing Red-eye” for further details.
Slide Show
This function enables you to playback your still images automatically in order one image at
a time.
* 3 sec. / 5 sec. / 10 sec.
DPOF
Refer to section in this manual titled “DPOF Settings” for further details.
Protect
Refer to section in this manual titled “Protecting Images” for further details.
LCD Bright.
Refer to section in this manual titled “LCD Bright.” in Capture Menu for further details.
Resize
Resizes a previously saved image. Resizing replaces the original image with the changed
image. It is only possible to resize to a smaller size.
Quality
Changes the quality (compression) of a recorded image. Compresses images down to half
of their size or less, overwrites old size images with newly compressed images. It is only
possible to reduce the image quality/size, never to increase it.
Copy to Card
Allows you to copy your files from the camera’s internal memory to an SD/SDHC memory card. Of
course, you can only do this if you have a memory card installed and some files in internal memory.
* Cancel / Execute
Play
SET:Adj.
MENU:Exit
Copy to Card Next Menu
Play
SET:Adj.
MENU:Exit
Downloaded from www.Manualslib.com manuals search engine
EN-35
Setup Menu
Set your camera’s operating environment.
1. Slide the mode switch to [ ], [ ] or [ ].
2. Press the MENU button, and select the [Setup] menu with the f button.
3. Select the desired option item with the c / d buttons, and press the SET button to enter its
respective menu.
4. Select the desired setting with the c / d buttons, and press the SET button.
5. To exit from the menu, press the MENU button.
Beep
This sets whether or not to mute the camera sound each time you press the camera's
buttons.
* On / Off
Fr. No. Reset
This creates a new folder. The captured images are recorded to the newly created folder from
number 0001.
* Cancel / Execute
Auto Off
If no operation is performed for a specific period of time, the power to the camera is
automatically turned off. This feature is useful for reducing battery usage.
* 1 Min. /
3 Min. / 5 Min. / 10 Min. / Off
Date/Time
Refer to section in this manual titled “Setting the Date and Time” for further details.
Sys. Reset
This returns all basic settings to the camera’s default settings. The time setting will not be reset.
* Cancel / Execute
Language
Refer to section in this manual titled “Choosing the Language” for further details.
Format
Refer to section in this manual titled “Formatting the Memory Card or Internal Memory” for further details.
Media Info.
This displays the free capacity of the internal memory or the memory card.
System Info.
This displays the firmware version of the camera.
Video Output
This sets your camera to match the system of the equipment that you are going to connect to the camera.
* PAL/NTSC
Start Logo
Refer to section in this manual titled “Changing the Camera Start Logo Image” for further details.
Capture
SET:Adj.
MENU:Exit
Downloaded from www.Manualslib.com manuals search engine
EN-36
TRANSFERRING FILES TO YOUR
COMPUTER
System Requirement
Downloading Your Files
1. Connect one end of the USB cable to an available
USB port on your computer.
2. Connect the other end of the USB cable to the
USB terminal on the camera.
3. Turn on your camera.
4. Select [PC] using the c / d buttons and press
the SET button.
5. From the Windows desktop, double click on “My
Computer”.
6. Look for a new “removable disk” icon.
This “removable disk” is actually the memory (or memory card) in your camera.
Typically, the camera will be assigned drive letter “e” or higher.
7. Double click on the removable disk and locate the DCIM folder.
8. Double click on the DCIM folder to open it to find more folders.
Your recorded images and video clips will be inside these folders.
9. Copy & Paste or Drag-N-Drop image and video files to a folder on your computer.
Mac users: Double-click the “untitled” or “unlabeled” disk drive icon on your desktop.
iPhoto may automatically launch.
Windows Macintosh
Pentium III 600 MHz or higher
Windows 2000/XP/Vista
128MB RAM
128MB hard disk space
CD-ROM drive
Available USB port
PowerPC G3/G4/G5
OS 9.0 or later
128MB RAM
128MB hard disk space
CD-ROM drive
Available USB port
Downloaded from www.Manualslib.com manuals search engine
EN-37
USING THE CAMERA AS A PC CAMERA
Your camera can act as a PC camera, which allows you to videoconference with busi-
ness associates, or have a real-time conversation with friends or family. To use the cam-
era for videoconferencing, your computer system must include the items as below:
Microphone
Sound card
Speakers or headphones
Network or Internet connection
1. After installing the PC camera driver (included on the CD-ROM) in your Windows
operating system, restart your computer.
2. Connect one end of the USB cable to the USB terminal of the camera.
3. Connect the other end of the USB cable to an available USB port on your computer.
4. Turn on your camera.
5. Select [PC Camera] with the c / d buttons and press the SET button.
6. Position the camera steadily on top of your computer monitor or use a tripod.
7. Launch the videoconferencing application software.
Simply follow the instructions in the application software to start your camera.
This function is not supported by Mac.
You are recommended to use MediaOne Gallery SE (included on the CD-ROM) or Windows
Netmeeting (Windows Meeting Space on Windows Vista) as a videoconferencing application
software.
The video resolution for videoconferencing applications is generally 320 x 240.
For more information about the operation of videoconference application software, refer to its
respective help documentation.
Downloaded from www.Manualslib.com manuals search engine
EN-38
EDITING SOFTWARE INSTALLATION
There are 2 types of software that are included on the CD-ROM:
MediaOne Gallery SE - makes it the easiest way to manage and share your digital life
with family & friends. The intuitive thumbnail library automatically organizes, updates
and sorts files for the most natural way to browse your multimedia collection.
COOL 360 SE - combines ease-of-use, power and flexibility to allow even novice digital
imaging enthusiasts to move beyond traditional photos into immersive imaging. Its
intuitive interface and easy-to-use wizard deliver great-looking panoramas while
advanced warping, blending and alignment tools ensure excellent results.
To install software:
1. Insert the CD-ROM that came with the camera into your CD-ROM drive.
The welcome screen appears.
2. Click the respective software name.
Follow the on-screen instructions to complete the installation.
For more information about the operation of the software, refer to its respective help documentation.
For Windows 2000/XP/Vista users, please make sure to install and use the software in
“Administrator” mode.
The software is not supported by Mac.
COOL 360 SE is not supported by Windows Vista.
Downloaded from www.Manualslib.com manuals search engine
EN-39
SPECIFICATIONS
* Design and specifications are subject to change without notice.
Item Description
Image sensor 1/2.5” CCD sensor (8.0 megapixels)
Image resolution
<Still image>
3264 x 2448, 2816 x 2112, 2272 x 1704, 1600 x 1200, 640 x 480
<Video clip>
640 x 480, 320 x 240
LCD monitor 2.7” full color TFT LCD (230K pixels)
Recording media
32MB internal memory (29MB available for image storage)
Supports SD/SDHC memory card (up to 4GB) (optional)
File format JPEG, DCF 1.1, EXIF 2.2, DPOF, AVI
Lens
4x optical zoom lens
Aperture range: 2.7(W) - 5.4(T)
Focal length:4.6mm - 18.4mm (equivalent to 28mm - 112mm on a
35mm camera)
Focus Range
Standard
0.5m to infinity
Macro
Wide: 0.05m to infinity
Tele: 0.35m to infinity
Shutter speed 1 - 1/1500 sec.
Digital zoom
5x (Capture mode)
4x (Playback mode)
Flash effective
range
0.5m - 3.0m (Wide)
0.5m - 2.1m (Tele)
Ter m i n a ls
DC IN 5V
AV OUT
USB 2.0 compliant
Power supply
Rechargeable Lithium-ion battery (3.7V)
AC power adapter (5V/2A)
Dimensions
Approx.
94 x 55 x 24
mm (without protruding parts)
Weight Approx. 132g (without battery and memory card)
Downloaded from www.Manualslib.com manuals search engine
EN-40
APPENDIX
Possible Number of Shots
Possible number of shots (still image)
The table shows the approximate shots that you can capture at each setting based on
the capacity of the internal memory and the SD/SDHC memory card.
Possible recording time / sec (video clip)
* We recommend a memory card of at least 10MB/Sec write speed to prevent auto stop or
unexpected results. If you experience an error using a slower SD/SDHC memory card, you
can set your camera’s video recording to QVGA (320 x 240) and standard quality.
Size Quality
Internal
Memory
SD/SDHC memory card capacity
128MB 256MB 512MB
1GB 2GB
4GB
SDHC
3264 x 2448
Fine
10 45 91 183 368 738 1478
Standard
13 58 118 238 477 955 1913
Economy
16 71 143 289 579 1160 2323
2816 x 2112
Fine
14 63 127 255 512 1025 2053
Standard
18 79 159 320 642 1285 2573
Economy
19 83 167 336 674 1349 2701
2272 x 1704
Fine
24 103 209 420 842 1686 3374
Standard
27 116 233 469 939 1881 3765
Economy
32 137 276 554 1111 2225 4454
1600 x 1200
Fine
49 209 415 833 1669 3342 6688
Standard
59 246 495 993 1990 3984 7974
Economy
67 279 561 1126 2255 4515 9037
640 x 480
Fine
152 628 1263 2535 5076 10160 20335
Standard
184 762 1531 3072 6153 12316 24649
Economy
229 945 1900 3812 7634 15279 30579
Size Quality
Internal
Memory
SD/SDHC memory card capacity
128MB 256MB 512MB
1GB 2GB
4GB
SDHC
640 x 480
Fine
00:00:12 00:00:53 00:01:47 00:03:35 00:07:12 00:14:25 00:28:51
Standard
00:00:14 00:01:00 00:02:02 00:04:05 00:08:11 00:16:24 00:32:50
320 x 240
Fine
00:00:39 00:02:42 00:05:27 00:10:57 00:21:56 00:43:54 01:27:52
Standard
00:00:45 00:03:09 00:06:20 00:12:42 00:25:26 00:50:55 01:41:55
Downloaded from www.Manualslib.com manuals search engine
EN-41
Troubleshooting
Refer to the symptoms and solutions listed below before sending the camera for repairs.
If the problem persists, contact your local reseller or service center.
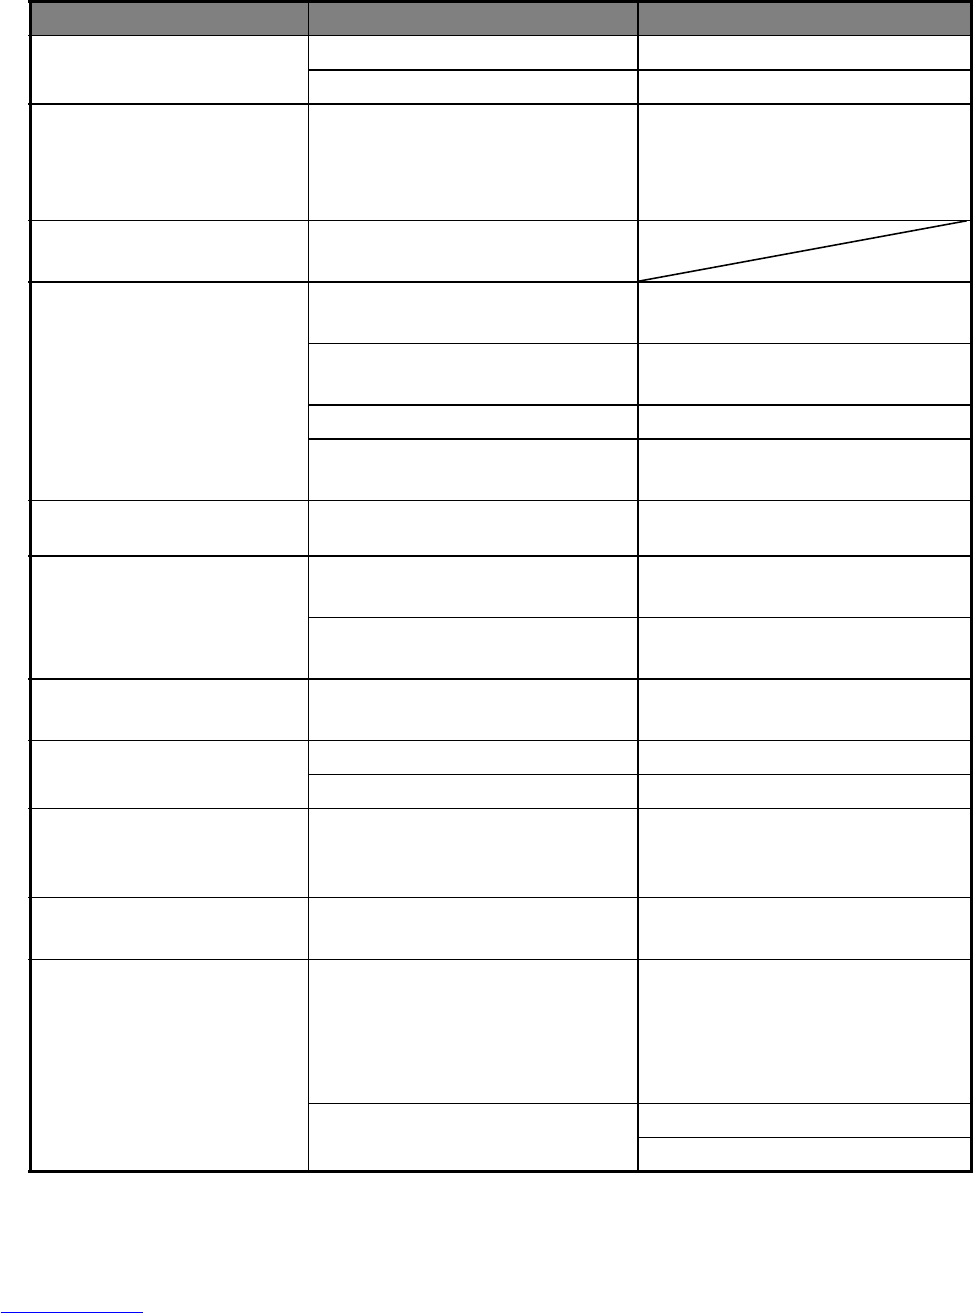
Symptom Cause Solutions / Corrective Actions
The power does not come
on.
The battery is not inserted. Insert the battery correctly.
The battery is exhausted. Recharge the battery.
The battery runs out quickly. The battery is not fully charged.
The battery is not used for an
extended period of time after
being charged.
Fully charge the battery and
discharge it for at least one complete
cycle before use to maximize its
performance and lifetime.
The battery or camera feels
warm.
Long period of continuous use of
the camera or the flash.
Even if I press the shutter
button, the camera does not
take a picture.
The shutter button is not pressed all
the way down.
Press the shutter button all the
way down.
The memory card does not have
any free capacity.
Insert a new memory card, or
delete unwanted files.
The flash is charging.
Wait until the status LED is off.
The memory card is
write-protected.
Remove the write-protection.
Images do not appear on the
LCD monitor.
LCD monitor is dark. Adjust the brightness of the
LCD monitor in the menu.
Although it is set to auto
focus, it does not focus.
The lens is dirty. Wipe clean with a soft, dry cloth or
lens paper.
The distance to the subject is
smaller than the effective range.
Get your subject within the effective
focus range.
The contents on the memory
card cannot be played back.
You played back a memory card that
was not formatted by this
camera
.
Insert a memory card that was
formatted on this camera.
Files cannot be deleted. The file is protected. Cancel protection.
The memory card is write-protected.
Remove the write-protection.
Even when the camera’s
buttons are pressed, it does
not operate.
The battery is running low. Recharge the battery.
The date and time are
wrong.
The correct date and time is not set.
Set the correct date and time.
Cannot download images. The free space on the hard disk in
your computer may be insufficient.
Check whether the hard disk has
space for running Windows, and
if the drive for loading image files
has a capacity at least that of the
memory card inserted in the camera.
No power supply. Use an AC power adapter.
Recharge the battery.
Downloaded from www.Manualslib.com manuals search engine
EN-42
Connecting to a PictBridge Compliant Printer
Read this section if the model you purchased is included with the PictBridge
functions.
If a printer that supports PictBridge is available, images can be printed by connecting the
digital still camera directly to the PictBridge-compatible printer without using a computer.
Connecting the camera to the printer
1. Connect one end of the USB cable to your
camera.
2. Connect the other end of the USB cable to the
USB port on the printer.
3. Turn on your camera.
4. The [USB] screen is displayed. Select [Printer]
with the
c / d
buttons, and press the
SET
button.
Printing images
When the camera is properly connected to a PictBridge compliant printer, the PictBridge
menu is displayed on the monitor.
1. Select the item you want to configure with the
c / d buttons, and press the SET button.
[Images]:Select whether you want to print
specific image or all images. You may also
select printing number for specific image.
[Date Print]:According to the printer type,
select whether you want to print the image
with date imprint or not.
[Paper Size]:Select the desired paper size
according to the printer type.
[Layout]:Select the desired printing layout according to the printer type.
[Print]:After all settings are configured, select this item to start printing.
2. If you select [Images] in the previous step, the
figure shown on the right hand side will appear.
Select [Select], [All] or [DPOF] with the c / d
buttons, and press the SET button.
[Select]:Select to print one specific image.
[All]:Select to print all images.
[DPOF]:Select to print images with DPOF
settings.
[Exit]:Exit from Images option.
PictBridge
SET:Enter
SET:Enter
Images
Downloaded from www.Manualslib.com manuals search engine
EN-43
3. If you select [Select] in the previous step, the
figure shown on the right hand side will appear.
Select the image that you want to print with
the e / f buttons.
Select the [Print Num] (up to 99) with the
c /
d
buttons.
After selecting the desired image and
printing number, press the SET button to
confirm.
4. Select [Exit] with the c / d buttons, and press
the SET button.
5. Select [Print] with the c / d buttons, and press
the SET button to start printing.
6. The printing starts and the figure shown on the
right hand side appears.
[COMPLETE] will be displayed temporarily,
reminding you that the printing procedure is
finished.
If an error is detected during the connection
(i.e. the printer hardware problem) between
camera and printer, [PRINT ERROR] will be
displayed.
If an error is detected during the communication (i.e. wrong setting on the
camera) between camera and printer, [ERROR] will be displayed.
The image printing may fail if the power to the camera is cut off.
We recommend that you use the AC power adapter when connecting the camera to the printer.
Select
SET:Enter105-0003
SET:Enter
Images
SET:Enter
PRINTING
PictBridge
Downloaded from www.Manualslib.com manuals search engine
EN-44
A. Information on Disposal for Users (private households)
1.In the European Union
Attention: If you want to dispose of this equipment, please do not use
the ordinary dust bin!
Used electrical and electronic equipment must be treated separately
and in accordance with legislation that requires proper treatment,
recovery and recycling of used electrical and electronic equipment.
Following the implementation by member states, private households
within the EU states may return their used electrical and electronic
equipment to designated collection facilities free of charge*. In some
countries* your local dealer may also take back your old product free of
charge if you purchase a similar new one.
*) Please contact your local authority for further details.
If your used electrical or electronic equipment has batteries or accumu-
lators, please dispose of these separately beforehand according to
local requirements.
By disposing of this product correctly you will help ensure that the
waste undergoes the necessary treatment, recovery and recycling and
thus prevent potential negative effects on the environment and human
health which could otherwise arise due to inappropriate waste han-
dling.
2. In other Countries outside the EU
If you wish to discard this product, please contact your local authorities
and ask for the correct method of disposal.
For Switzerland: Used electrical or electronic equipment can be
returned free of charge to the dealer, even if you donít purchase a new
product. Further collection facilities are listed on the homepage of
www.swico.ch or www.sens.ch.
B. Information on Disposal for Business Users
1. In the European Union
If the product is used for business purposes and you want to discard it:
Please contact your local dealer who will inform you about the
take-back of the product. You might be charged for the costs arising
from take-back and recycling. Small products (and small amounts)
might be taken back by your local collection facilities.
For Spain: Please contact the established collection system or your
local authority for take-back of your used products.
2. In other Countries outside the EU
If you wish to discard of this product, please contact your localau-
thorities and ask for the correct method of disposal.
Attention: Your prod-
uct is marked with this
symbol. It means that
used electrical and
electronic products
should not be mixed
with general house-
hold waste. There is a
separate collection
system for these prod-
ucts.
Downloaded from www.Manualslib.com manuals search engine
35


Need help? Post your question in this forum.

Forumrules


Report abuse

Libble takes abuse of its services very seriously. We're committed to dealing with such abuse according to the laws in your country of residence. When you submit a report, we'll investigate it and take the appropriate action. We'll get back to you only if we require additional details or have more information to share.

Product:

For example, Anti-Semitic content, racist content, or material that could result in a violent physical act.

For example, a credit card number, a personal identification number, or an unlisted home address. Note that email addresses and full names are not considered private information.

Forumrules

To achieve meaningful questions, we apply the following rules:

Register

Register getting emails for Rollei RCP-8427XW at:


You will receive an email to register for one or both of the options.


Get your user manual by e-mail

Enter your email address to receive the manual of Rollei RCP-8427XW in the language / languages: English as an attachment in your email.

The manual is 2,52 mb in size.


You will receive the manual in your email within minutes. If you have not received an email, then probably have entered the wrong email address or your mailbox is too full. In addition, it may be that your ISP may have a maximum size for emails to receive.

The manual is sent by email. Check your email

If you have not received an email with the manual within fifteen minutes, it may be that you have a entered a wrong email address or that your ISP has set a maximum size to receive email that is smaller than the size of the manual.

The email address you have provided is not correct.

Please check the email address and correct it.

Your question is posted on this page

Would you like to receive an email when new answers and questions are posted? Please enter your email address.


Info