7
INSTALA
CIÓN
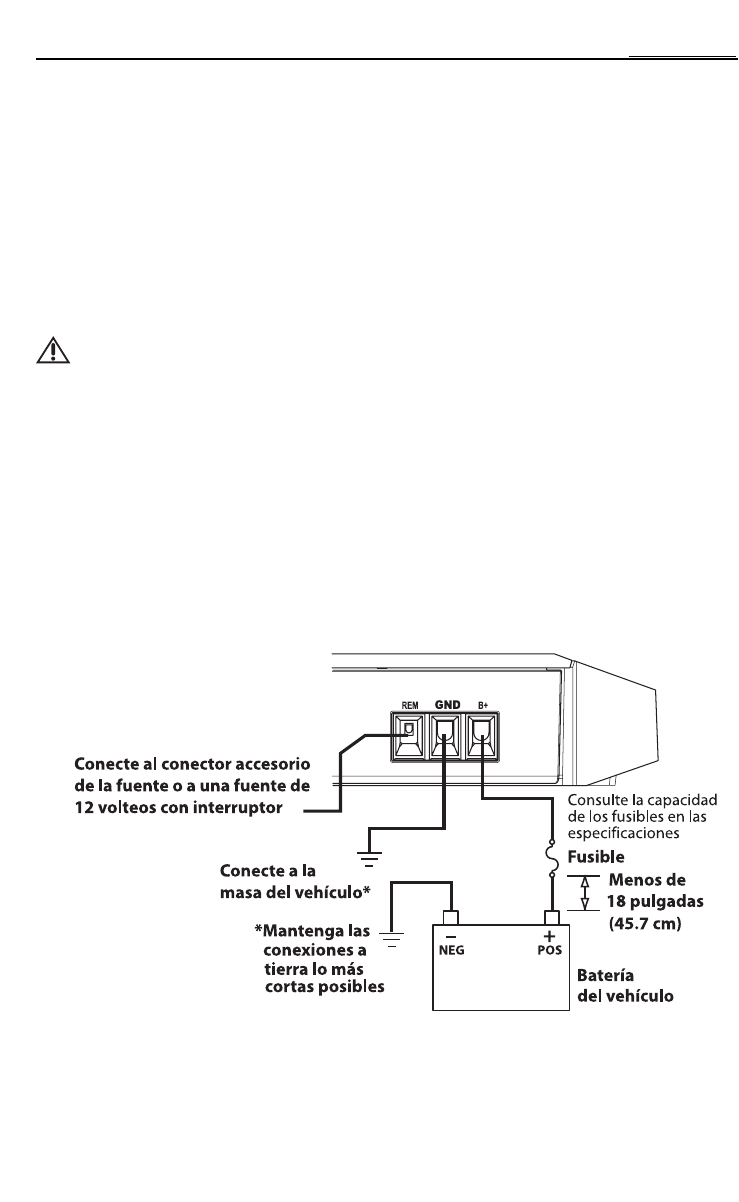
6. Prepare el cable de encendido REM para fijarlo al amplificador pelando 5/8 pulg. (1,6 cm) de aislamiento del extremo del
cable. Inserte el cable pelado en el terminal REM y apriete el tornillo de fijación para fijar el cable en su sitio. Conecte el
otro extremo del cable REM a una fuente de alimentación conmutada de 12 voltios.El voltaje conmutado normalmente
se toma del cable de encendido del amplificador remoto. Si la unidad de fuente no tiene esta salida disponible, la solución
recomendada es cablear un interruptor mecánico en línea con una fuente de 12 voltios para activar el amplificador.
7. Monte el amplificador seguramente al vehículo o al soporte del amplificador.Tenga cuidado de no montar el amplificador
sobre paneles de cartón o plástico porque los tornillos pueden salirse del panel debido a la vibración o las frenadas
repentinas del vehículo.
8. Conecte desde la señal de origen enchufando los cables RCA en los conectores de entrada en el amplificador.
NOTA:Todas las entradas “ACTIVAS” tienen que tener conectados los conectores RCA. Interruptor en la
posición 2CH,“ACTIVE” - Sólo entradas del canal delantero. Interruptor en la posición 4CH,
“ACTIVE” - Todas las entradas del canal delantero y trasero.Al conectar a las entradas de 4
canales, asegúrese de tender ambos cables RCA delantero y trasero muy juntos.
PRECAUCIÓN: Asegúrese siempre de que la alimentación esté apagada o desconectada en el
amplificador antes de conectar los cables RCA. No hacerlo podría causar lesiones,
daños al amplificador o a los componentes conectados.
9. Conecte los altavoces. Pele 1/2 pulgada (1,3 cm) de los cables de los altavoces, insértelos en los terminales de los
altavoces y ajuste el tornillo de fijación en su lugar.Asegúrese de mantener la polaridad correcta en los altavoces.NO
conecte ninguno de los conductores de los altavoces a tierra, ya que esto puede resultar en un funcionamiento inestable.
10. Realice un control final del cableado terminado del sistema para asegurarse de que todas las conexiones son precisas.
Verifique que no haya cables pelados ni conexiones sueltas en ninguna de las conexiones de poder y a tierra que podrían
causar problemas. Instale el fusible cerca de la conexión de la batería.
NOTA: Para establecer la polaridad de señal correcta siga los diagramas.
Conexión de
corriente